Heehee. Some projects make me feel like a child again (or, in this case, like a character in a Brontë novel)! I cannot tell you how excited Jenny and I are about bringing you this pattern. Charlotte’s Dream has been just that: A dream!
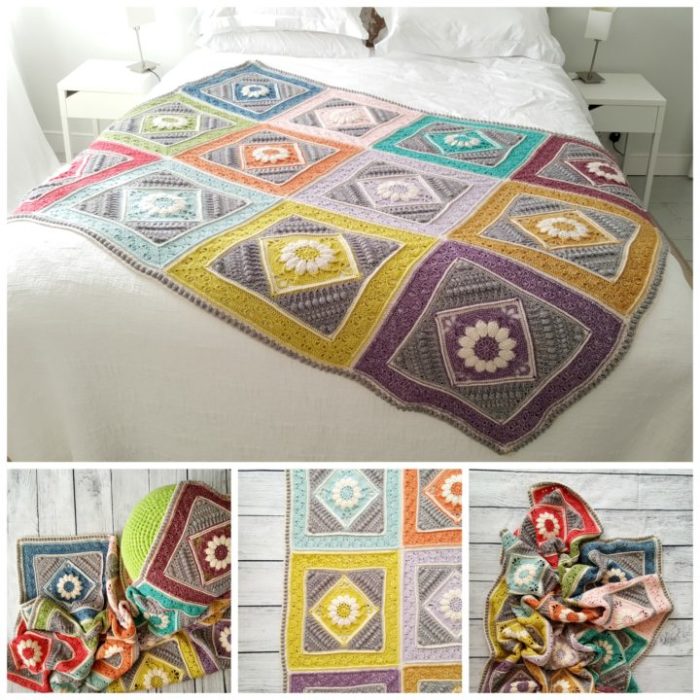
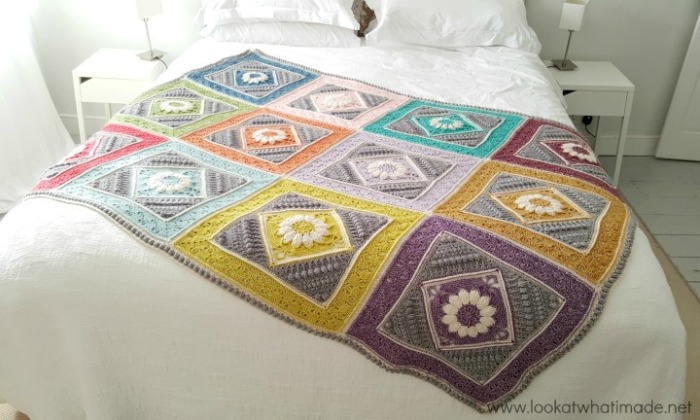
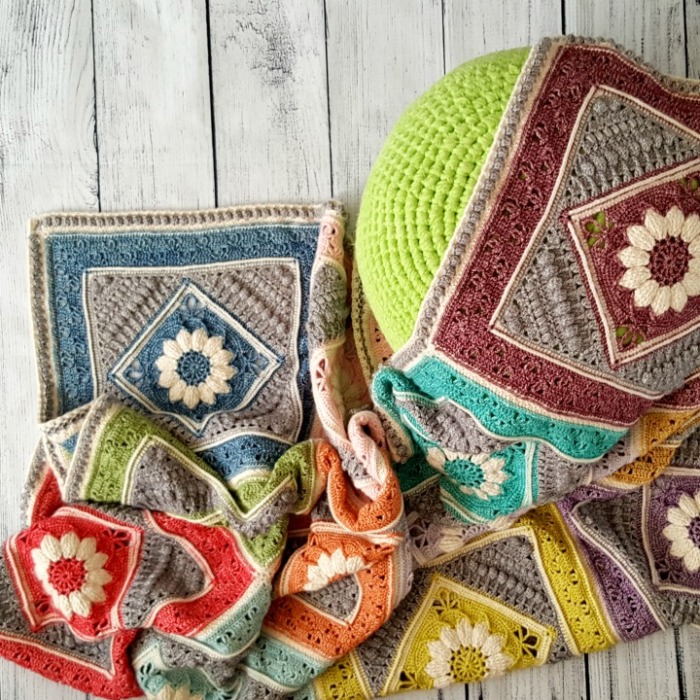
This blanket was made by my dear friend Jenny and consists of 12 Charlotte squares in 12 different colours. It is bordered with a simple popcorn edge. From the very first square, this blanket sparked my imagination. I keep imagining myself sitting on it under a huge tree, reading a really good book while the dappled sunlight dances over the pages.
Jenny and I have spent many happy hours choosing colours, chatting about a name, and oohing and aahing over the individual squares. I hope this project brings you as much joy as it has brought us.
The Charlotte Square was specifically designed for 67 Blankets for Mandela Day. I would like to thank my friend John Kelly for allowing me to use a smaller version of the flower he designed for his Mandala in Bloom pattern.
Charlotte’s Dream Pattern
© Dedri Uys and Jenny Lowman 2016. All Rights Reserved.
Resources
- Add this pattern to your Ravelry Queue
- Video Tutorials: You can find video tutorials for the squares (only) HERE on It’s All in a Nutshell.
- Hashtag: Please use #charlottesdream so that we can see your work.
If you prefer a formatted ad-free US PDF version of this pattern (with charts by the talented Masako Kawahara), you can buy it in my Ravelry Store HERE or in my Etsy Shop HERE.
Translations
- Dutch Translation by Dianne Baan
- French Translation
- German Translation by Ivonne Zimmer
- Hebrew Translation
- Korean Translation
- Swedish Translation
Materials
- 3.5 mm crochet hook (US 4/E, UK 9)
- Scheepjes Stonewashed (Sport weight/#2)
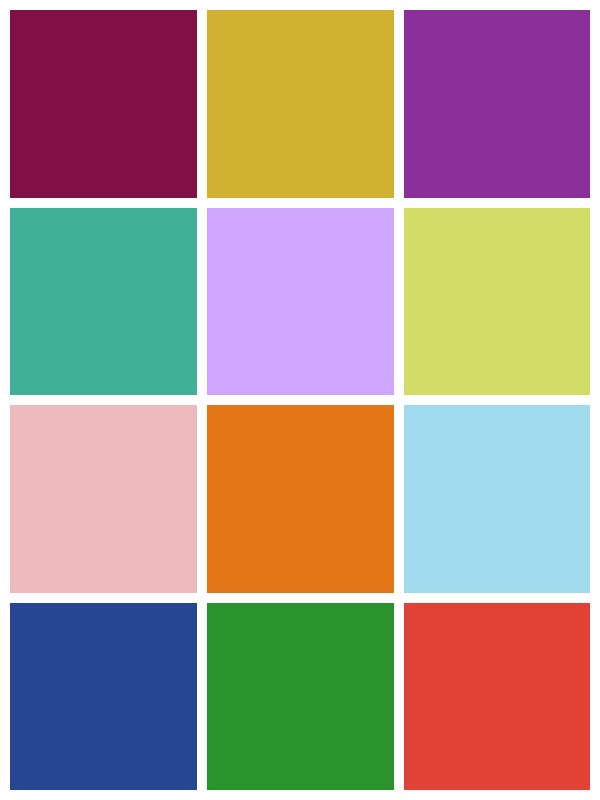
- Contrasting Colours (CC)/ Colour A* – 2 skeins (220 meters) each of Rose Quartz (820), Yellow Jasper (809), Lilac Quartz (818), Garnet (810), Deep Amethyst (811), Lemon Quartz (812), Carnelian (823), Amazonite (813), Canada Jade (806), Blue Apatite (805), Coral (816), and Green Agate (815)
- Main Colour 1 (MC1)/ Colour B* – 12 skeins (1500 meters) of Moon Stone (801)
- Main Colour 2 (MC2)/ Colour C* – 12 skeins (1450 meters) of Smokey Quartz (802)
* The square was originally designed using the colour references Colour A, Colour B, and Colour C. When following the photo tutorials for the individual squares, you will replace Colour A with CC, Colour B with MC1, and Colour C with MC2 as listed above.
Yarn packs for this project are available from Wool Warehouse (offers international shipping and includes printed version of the pattern) and Deramores. You can also buy Stonewashed from Scheepjes (NL).
Abbreviations
US Terminology {US/UK Conversion HERE}
- Ch – Chain
- BP – Back post (insert your hook from back to front around the post of the indicated stitch and complete the stitch as normal)
- CC – Contrasting colour
- Dc – Double crochet
- FP – Front post (insert your hook from front to back around the post of the indicated stitch and complete the stitch as normal)
- Hdc – Half-double crochet
- MC – Main colour
- Sc – Single crochet
- Sl st – Slip stitch
- St/st’s – Stitch/stitches
The rest of the Abbreviations and Special Stitches will be found in the individual parts for the Squares (see Charlotte Squares below).
Punctuation
* An asterisk indicates pattern repeats. You will need to repeat all the instructions between asterisks the number of times specified. This is a hard-core repeat and will consist of multiple instructions.
Parentheses () indicate repeats. You will need to repeat the instructions between parentheses the number of times specified. This is a lower level repeat. Parentheses are also used to indicate a group of stitches to be worked into the same stitch/space.
Gauge
At the end of Round 18, your square should measure 20 cm (8”). Each finished square should measure 42 cm (16.5”).
Size
172 cm (68”) x 130 cm (51”)
Notes
The central flower of this square is textured and raised slightly above the surface. When you have only made the flower, it will look like it bulges too much (because of all those front post stitches) but, as the square progresses, this will become less noticeable. With use, the flower will relax down even further, but it will always remain slightly raised above the surface of the square.
If you find that your flower bulges a lot and the rest of your square refuses to become ‘square’ by Round 18, you are making your chains too tight, and you will need to either relax your tension when making your chains or use a bigger hook for chains only.
Instructions
Charlotte Squares
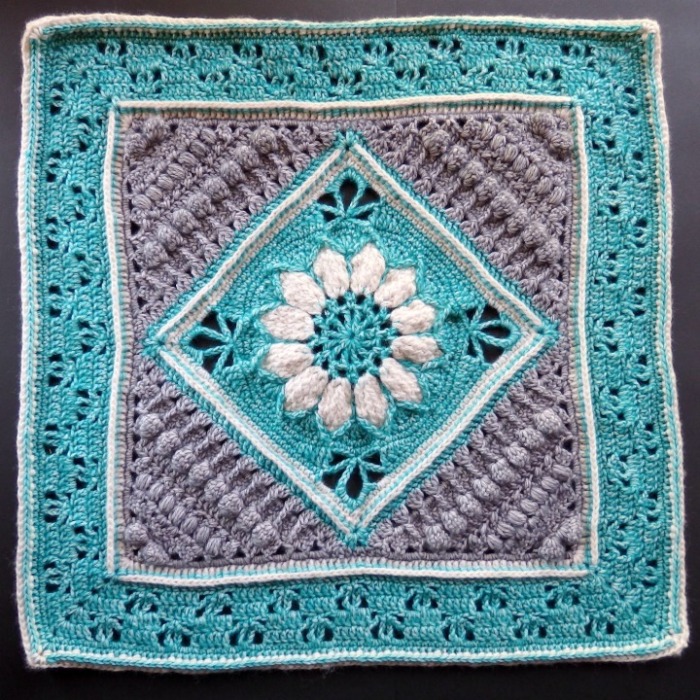
You will need to make 12 squares, using a different Contrasting Colour (CC) for each square. Below you will find the links to the 3-part Charlotte Square (published at the start of the year), as well as the two additional rounds that will need to be added to each square before joining. Remember to reference the colours and hook size (above) when making your squares.
- Rounds 1 – 18: Charlotte Square Part 1 – 20 cm (8″) at the end of Part 1 (gauge check)
- Rows 19 – 28: Charlotte Square Part 2
- Rounds 29 – 36: Charlotte Square Part 3 – don’t fasten off at the end of Round 36!
- Rounds 37 and 38: Extra Rounds Below
- Teil 1
- Teil 2
Round 37 (CC)
Sl st into the next ch-2 corner space. Ch 2 (counts as hdc). (Hdc, ch 2, 2 hdc) into the same ch-2 corner space. This is your first corner made.
*Skip the first (hidden) stitch. Hdc in each of the remaining 85 st’s across. (2 hdc, ch 2, 2 hdc) in the next ch-2 corner space.* Repeat from * to * 3 more times, omitting the last corner on the last repeat. Join to the top of the beginning ch-2 with a sl st. Fasten off and work away your ends.
Stitch Count: 356 hdc’s and 4 ch-2 corner spaces {89 hdc’s per side}
Round 38 (MC1)
Join your yarn by making a standing single crochet in any ch-2 corner space. (Ch 2, sc) in the same ch-2 space. This is your first corner made.
*BPhdc around each st. (Sc, ch 2, sc) in the next ch-2 corner space.* Repeat from * to * 3 more times, omitting the last corner on the last repeat. Join to the first sc with a sl st. Fasten off and work away your ends.
Stitch Count: 8 sc’s, 356 BPhdc’s, and 4 ch-2 corner spaces {2 sc’s and 89 BPhdc’s per side}
Deciding on Your Layout
When you have made all 12 squares, you will need to join them to each other. I am going to show you how we chose to do our layout, but you are free to move the colours around. If you do decide to move the colours, try not to put too many light or dark colours next to each other as this will make the blanket appear a bit lopsided.
Joining the Charlotte Squares
The squares are joined using a (Sc, ch 1, skip 1) join. It yields a flat seam on the front of your work that will look like little stitches. On the back of your work, the seam will be raised (but not as much as if you had made a sc in each stitch). This seam is reasonably elastic, provided that you don’t make your chains too tight.
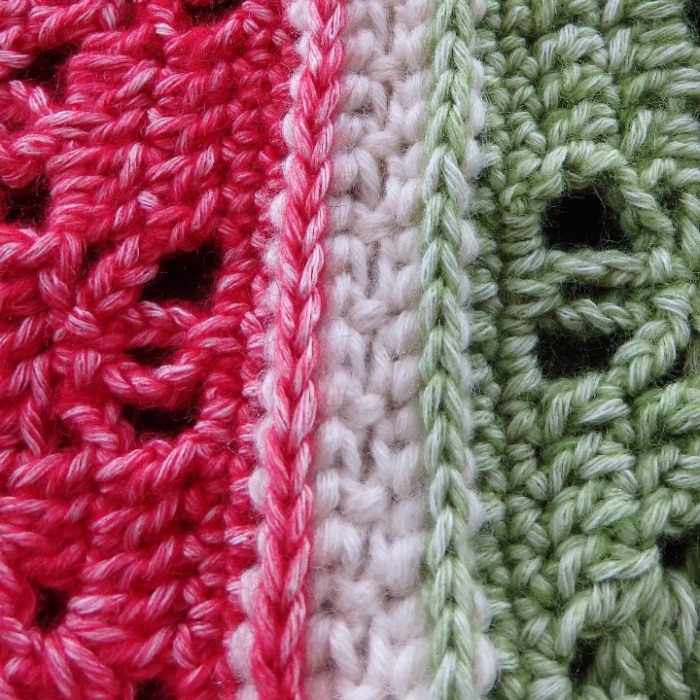
The squares are joined in a grid. You will be making all the horizontal joins first, followed by the vertical joins. Unless otherwise specified, you should be inserting your hook into both loops of both layers for each indicated stitch. To make it easier for you to understand, I have numbered the squares from 1 to 12, starting in the top left-hand corner and ending in the bottom right-hand corner.
Place Square 9 on top of Square 12 with right sides together. With a slip knot (MC1) already on your hook, start joining the two squares by making a standing single crochet in the ch-2 corner space. (Ch 1, skip the next st, and sc in the next st) until you have one stitch left before the next corner space. Ch 1, skip the last st, and sc in the ch-2 corner space. Ch 1 before joining the next 2 squares.
Place Square 8 on top of Square 11 with right sides together. *Make a sc in the ch-2 corner space, again remembering to work though both layers. (Ch 1, skip the next st, and sc in the next st) until you have one stitch left before the next corner space. Ch 1, skip the last st, and sc in the ch-2 corner space. Ch 1.*
Without fastening off, place Square 7 on top of Square 10 with right sides together and repeat from * to *. Fasten off and work away your ends.
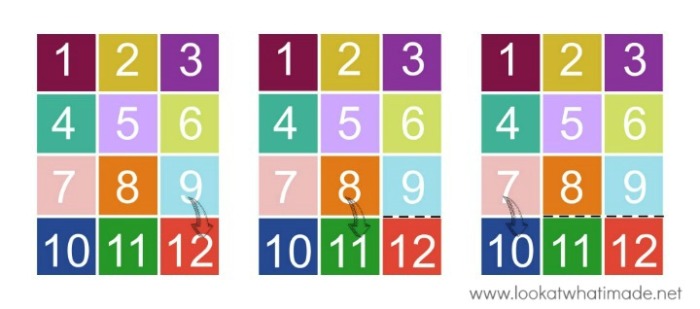
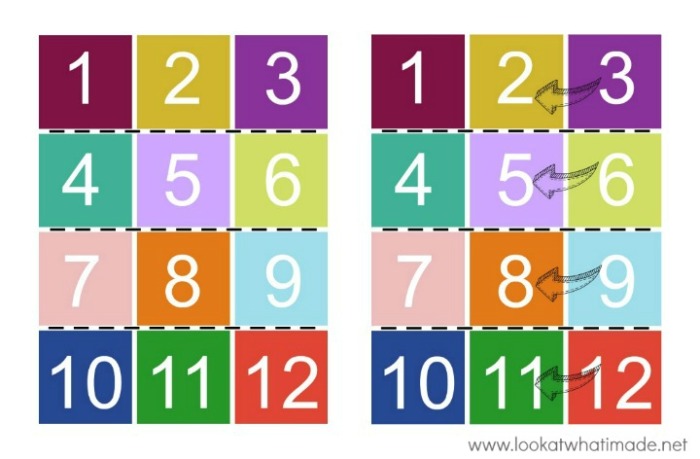
You have now completed your first horizontal strip. Repeat the whole process, laying Square 6 on Square 9, Square 5 on Square 8, and Square 4 on Square 7. Then repeat it again with the last 3 squares.
Now turn your blanket 90 degrees so that you can start joining the squares vertically. Fold the row containing squares 3, 6, 9, and 12 onto the row containing squares 2, 5, 8, and 11.
Just like when you were joining the squares horizontally, repeat the instructions between asterisks (*) above for each square, remembering to chain 1 between squares. Fasten off when you have joined all four squares and then repeat the process to join squares 2, 5, 8, and 11 to squares 1, 4, 7, and 10.
Adding the Border
When you have joined all your squares to each other, you are ready to add your border. The Popcorns in this border are created over 2 rounds. In Round 2, you will make a series of 5-dc groups. In Round 3, you will turn these 5-dc groups into Popcorns by using front post stitches.
Border Round 1 (MC1)
When adding the first round of the border, the ch-2 corners of each square (along the edges of the blanket) will count as a stitch and should be worked into. Only the four ch-2 spaces in the corners of the blanket will be referred to as a ch-2 space.
Join your yarn by making a standing double crochet in the ch-2 corner space at the start of any long side. (Dc, ch 2, 2 dc) in the same ch-2 space. This is your first corner made.
*Hdc in each st, remembering that the ch-2 spaces along the edge count as stitches and should be worked into. (2 dc, ch 2, 2 dc) in the next ch-2 corner space.* Repeat from * to * 3 more times, omitting the last corner on the last repeat. Join to the first dc with a sl st. Fasten off and work away your ends.
Stitch Counts:
- Long Sides: 370 hdc’s and 4 dc’s
- Short Sides: 277 hdc’s and 4 dc’s
Border Round 2 (MC2)
Join your yarn by making a standing double crochet in the ch-2 corner space at the start of any long side. (Dc, ch 2, 2 dc) in the same ch-2 space. This is your first corner made.
*(Ch 2, skip the next 2 st’s, and make 5 dc’s in the next st) until you have 2 st’s left. Ch 2 and skip the last 2 st’s. (2 dc, ch 2, 2 dc) in the next ch-2 corner space.* Repeat from * to * 3 more times, omitting the last corner on the last repeat. Join to the first dc with a sl st. Fasten off and work away your ends.
Stitch Counts:
- Long Sides: 124 5-dc groups and 125 ch-2 spaces (not including corner spaces)
- Short Sides: 93 5-dc groups and 94 ch-2 spaces (not including corner spaces)
Border Round 3 (MC1)
To make a FPhdc around a 5-dc group, yarn over and insert your hook from front to back into the ch-2 space before the 5-dc group. Insert your hook from back to front into the next ch-2 space so that the 5 dc’s lie on top of your hook. Complete your hdc as normal, making sure that your working yarn is above the 5 dc’s, not in front of them. This will pull the 5 dc’s together and form a neat Popcorn. If you want more help, have a look at my tutorial for the Really Lazy Popcorn.
Join your yarn by making a standing half-double crochet in the ch-2 corner space at the start of any long side. (Hdc, ch 2, 2 hdc) in the same ch-2 space. This is your first corner made.
*Hdc in the first 2 st’s and make 2 hdc’s in the first ch-2 space. (Make a FPhdc around the next 5-dc group, make 2 hdc’s in the next ch-2 space) until you have worked into every ch-2 space. Hdc in the last 2 st’s. (2 hdc, ch 2, 2 hdc) in the corner ch-2 space.* Repeat from * to * 3 more times, omitting the last corner on the last repeat. Join to the first hdc with a sl st. Fasten off and work away your ends.
Stitch Counts:
- Long Sides: 382 hdc’s
- Short Sides: 289 hdc’s
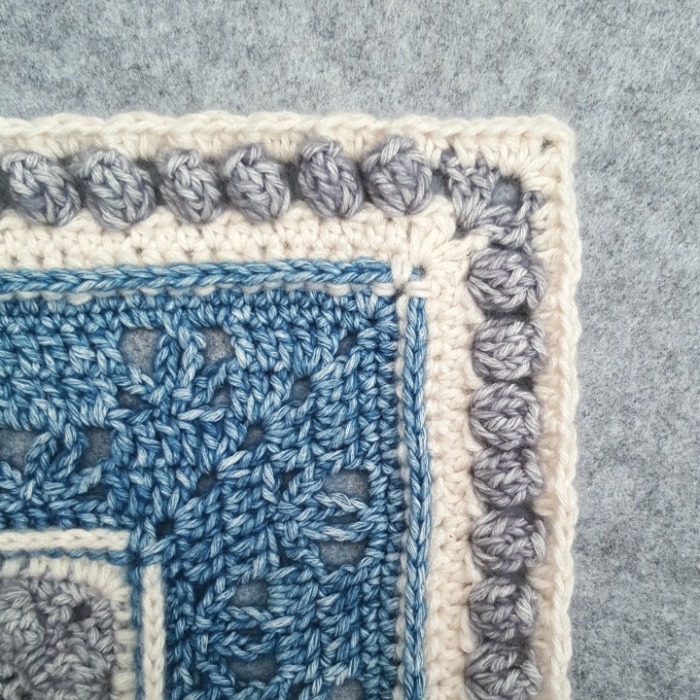
And that is Charlotte’s Dream all done :)
Thank you for choosing to make this blanket. If you would like to share photos of your finished project, please use hashtag #charlottesdreamcrochetblanket so that Jenny and I can see it!
Want to see more of our Charlotte’s Dream journey?

This blog post contains affiliate links. I only link to products I personally use or would use. All opinions are my own.


Jana says
Hi Dedri and Jenny,
I am on my 3rd square for my daughter’s 30 BD blanket and I don’t think I’ll finish it but I will show it to her a her gift. Her bd is on Jan 11 and these squares take time. Darn life keeps getting in the way!!
If I had nothing to do all day but Charlottes I might make it in time. I am making mine in Cityscape, Cloundscape (? Don’t have the colors in front of me) and the purple, instead of Riverscape. I think it’s fantasyscape.
I am still in love with this yarn. I hope I can finish in time, but since I don’t even know when I will see her, and was going to mail it, I don’t know.
Well, better late than never right!!
Thank you for such a lovely, lovely pattern. I am so in love with the way it looks. My squares are sort of loose as they move out from the flower but I guess that’s okay.
Thank you for sharing this with us. I really appreciate ALL of your lovely patterns. They are as beautiful as you are!!
Namaste,
Jana
ps I will post it when I am done. Oh and does this yarn block well? My first one really needs blocking.
Jana
Jenny says
Hi Jana!
We look forward to seeing the finished article and are sure your daughter will love it!
I am not familiar with the names of the yarn you are using? Is it the Scheepjes Stone Wash? If so, it will block beautifully. I lightly steam blocked all my squares before joining.
Jenny :)
Eleanor says
As a child, my mother taught me the basic stitches, because I wanted to know what she was doing. That was over forty years ago and I haven’t done any crochet since. Now I have fallen in love with Charlotte, so much so that I printed the pattern, bought the yarn (no alterations, your colours are superb), and started the first flower. I have never crocheted something so beautiful, and though I know it’s not perfect I am very happy with it and want to thank you for this beautiful pattern and my new hobby.
Dedri Uys says
Hi Eleanor. What a lovely comment. I am so pleased that you have picked crochet up again. It is such a rewarding hobby and how special that you can think of your mom now as you do it :)
I look forward to seeing your progress!
Dedri
Lo Cooper says
Hi I made my first to try and see if I could do it in stylecraft and it was beautiful but the border didn’t hold up so I am eagerly awaiting my pack from your link. Love it. very well explained and written. Thanks again, I just love your work xx
Dedri Uys says
How are you managing with your eyesight and the layered flower? And the sides? I know you said you found it tricky to do that first round after the triangles.
Lindsey says
Hi there! This pattern is simply beautiful, and sophisticated. I plan to make some blankets but first I’ve decided to use the blocks to make a poncho, I have been scouring Pinterest to find a granny square that spoke to me for this particular project and I found it in this one! Thank you for such a beautiful design and everything it took to get it to the public.
Dedri Uys says
You’re very welcome, Lindsey. We are so pleased that you like it. Good luck with your poncho!
Marilyn Alvey says
I would like to thank you so much for such a beautiful pattern. I usually do doilies as I have made so many blankets and have not seen any patterns to inspire me. This is an exception! ?Can’t wait to get it started.
Dedri Uys says
Thank you for that lovely compliment, Marilyn :)
Amelia says
I don’t really like working with sport weight yarn and would prefer to make the blanket in worsted weight. Do you think the pattern would still work out okay if I played around with the hook size? I absolutely love the pattern!
Dedri Uys says
Hi Amelia. It will work out fine in worsted weight, but you would need less squares as it comes out quite a bit bigger. I never used to like using sports weight, but I have been converted :)
Betty Byers says
I love this blanket so much & really wanting to make it in Bendigo Woollen Mills DK Cotton over our Aussie Summer :) Do you think it will still work if I use the same colour, or maybe 2 -3 for the contrast & for the remainder, mains A & B as per pattern?
Was thinking of making a larger version & BWM do not have enough colours I love?
Thanks so much for this gorgeous pattern :)
Betty
Jenny says
Betty, I think this would look just as fabulous in one colour or several. I suggest you make one in the colour/s you want and then see what you think.
Jenny
Betty Byers says
Thanks Jenny :) I went ahead & ordered, decided on 3 different shades of blue, with parchment & fawn as the main colours. I will post a photo when I have completed a few :)
Dedri Uys says
That sounds delicious, Betty!
JoM says
Hi Betty,
How are you going with the Bendigo Woollen Mills DK Cotton? Is it light enough for Australia. I’d love to give this a serious try (or give the pattern to my sister in Canberra and give her something to do). I just adore this pattern. Jenny is very talented. This is my first look at this site. Just WOW……
rotguelden says
Vielen herzlichen Dank für die Anleitung dieser wunderschönen Decke. Liebe Grüße aus Graz, Austria.
Andrea Denby says
Another winner I’m sure!
Beautiful and sophisticated.
Mmmmm what colours shall I use….simple charcoal, silver grey and cream…pure British wool?
Thank you for more stunningly, gorgeous inspiration.
Dedri Uys says
Ooh, that sounds divine!
Ginger says
This is absolutely gorgeous. I can’t wait to give it a go and although I am currently working on two blankets I am already looking at colours and yarn for this. Thanks so much.
Dedri Uys says
We are both so pleased that you like it. I always find that having a new project to look forward to is the best incentive to finish a current one (or two).
Ginger says
Laughs that is so true.
Guida says
Just wanted to say a big thank you for this lovely pattern.
sandre says
c’est magnifique dommage qu’il ne soit pas traduit en français car la traduction google est très mauvaise. Sinon un diagramme du motif aurait été plus facile a traduire.j’adore cette couverture.
Dedri Uys says
Hi Sandre. It is very tricky to chart the flower, which is why I haven’t supplied a chart. We are working on the translations.
Loretta Newnam says
It’s just beautiful!
Dedri Uys says
Thank you :)
Shirla Ghadaki says
So, so pretty! Love the patterns and colors.
Dedri Uys says
Thank you :)
Carol Derbis says
I already loved Charlotte! But done in the varied colors is just beautiful!
I may have to order that yarn in colors – though in original blues/greys, it was subtle and lovely – the colors just make it come alive! Gorgeous!
Dedri Uys says
Carol, this blanket has a completely different personality to the one I did/am doing. I am totally in love with it!
Roy says
Oktober is die mooiste mooiste maand
Dedri Uys says
Dit was altyd my gunsteling maand in Suid-Afrika. As die wind so waai in die kaap is dit darem lekker om in die bed te le met ‘n boek :)
Glenys says
Dedri and Jenny
Just want to say what a beautiful design …am going to attempt to make it. Can I use an alternative yarn as unfortunately looking at the pack its above my price range, also are the instructions u.s. or u.k. as I know they describe things differently.
Thanks so much
P.s. Love the blog
Dedri Uys says
Hi Glenys. You can use any yarn you like, and the instructions are in US terms.
Diana Hudson says
It’s simply stunning! Thank you so much for the pattern, Dedri!
Jenny says
Glad you like it Diana :)
Jenny
Sherri says
Beautiful! I want to make this but I wanted to try Scheepje’s Sunkissed. it is 170 m though..did you have quite a bit of stonewashed left of each? Thanks for your help!
Jenny says
I didn’t have too much left over, Sherri.
Jenny :)
Dedri Uys says
Hi Sherri. Sunkissed is thinner than Stonewashed, so you will use less yarn. You might also want to go down to a 3.25 hook.
Sue Couanis says
Hi Dedri & Jenny
The blanket is gorgeous – can’t wait to begin! Just a question on hook size – it states 5mm, is that correct?
Thank you for your beautiful creation!
Jenny says
The pattern has since been adjusted. It is a 3.5mm hook that I used, Sue :)
Jenny