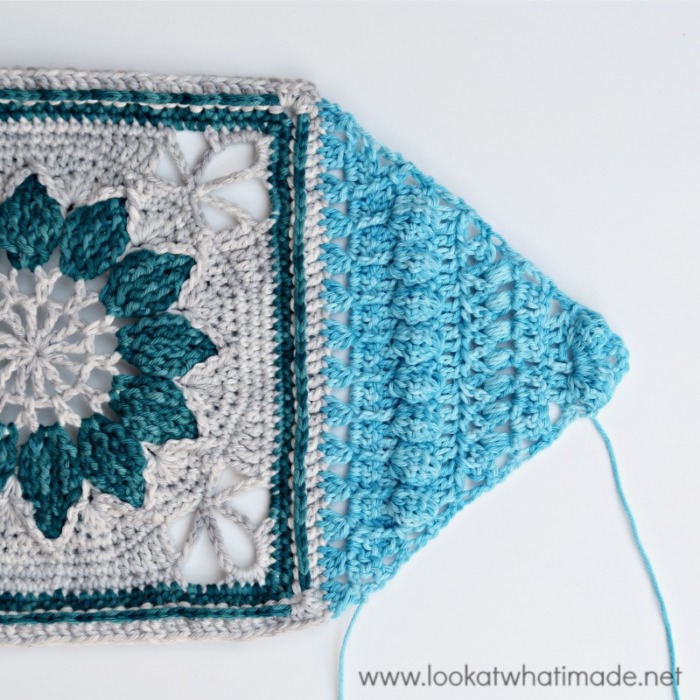
Welcome to Part 2 of Charlotte. In this part, we will be adding 4 triangles to the small central square to create a larger square.
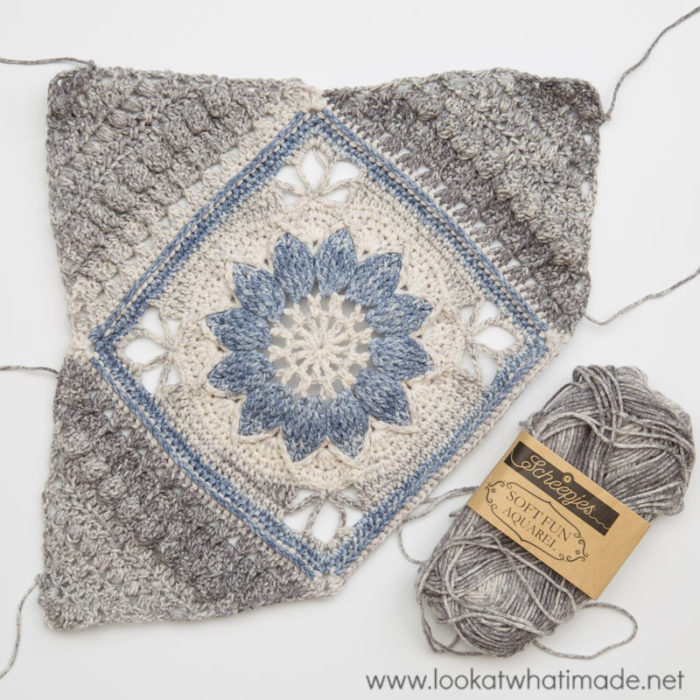
For the photo tutorial below, I have used Scheepjes Sunkissed in shades 04, 06, and 16. Please note that the photos are only to show you how to make the rows and do not reflect the colours I have used in the written pattern.
Update 2021: This post has been updated as part of the Charlotte’s Universe CAL 2021.
Charlotte Large Crochet Square Part 2: Triangles
Resources
- You can find links to the right and left-handed video tutorials (US) for Part 2 HERE on It’s All in a Nutshell.
- If you need help with any of the special stitches or techniques used in this pattern, please see Special Stitches and Techniques.
Original Translations
Updated Translations With Charts
- German Translation by Sabi Bulla and Silke Schippa-Witte
- Hebrew Translation by Michal Ben-Hur, Iris Fait, Tami Sultan Nudelman, Tali Shchori, and Sarit Grinberg
Abbreviations
US Terminology (US/UK Conversion HERE)
- Beg – Beginning
- Ch – Chain
- Dc – Double crochet
- FP – Front post (insert your hook from front to back around the post of the indicated stitch and complete the stitch as normal)
- RS – Right side
- Tr – Treble crochet
- Sl st – Slip stitch
- Sp/sps – Space/spaces
- St/sts – Stitch/stitches
- WS – Wrong side
- () and * – Repeat instructions between parentheses and/or asterisks the number of times specified
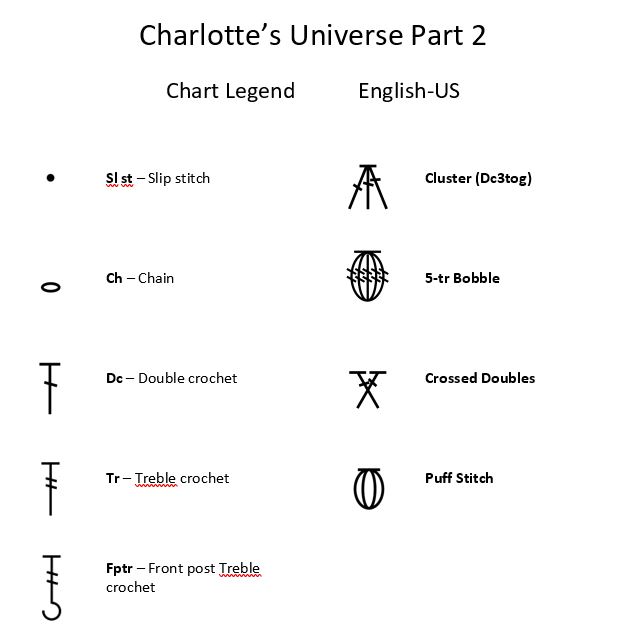
Special Stitches
- 3-dc Cluster (Cluster) – Yarn over and insert your hook into the indicated stitch. Yarn over and pull up a loop. Yarn over and pull through 2 loops. (Yarn over and insert your hook into the next stitch. Yarn over and pull up a loop. Yarn over and pull through 2 loops) twice. Yarn over and pull through all 4 loops on your hook.
- 5-tr Bobble – Yarn over twice and insert your hook into the indicated stitch. Yarn over and pull up a loop. (Yarn over and pull through 2 loops) twice. *Yarn over twice and insert your hook into the same stitch. Yarn over and pull up a loop. (Yarn over and pull through 2 loops) twice.* Repeat from * to * 3 more times. You should now have 6 loops on your hook. Yarn over and pull through all 6 loops.
- Puff Stitch – Yarn over and insert your hook into the specified stitch/space. Yarn over again and pull up a long loop. (Yarn over and insert your hook into the same stitch/space. Yarn over again and pull up a long loop)3 more Yarn over and pull through all 9 loops on your hook. Ch 1 to close the Puff Stitch.
- Crossed Doubles – Skip the next st and make a dc in the next st. Working over the last dc made, make a dc in the skipped stitch.
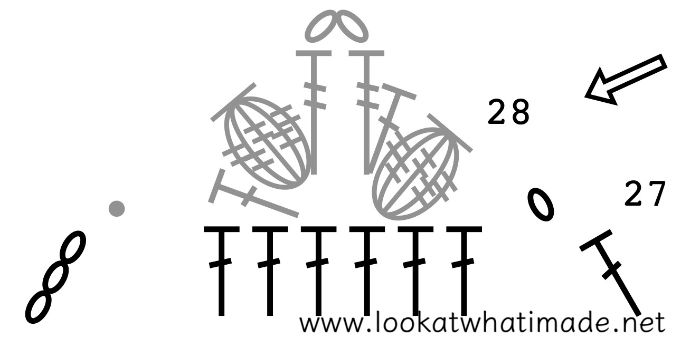
Charts
Credit: Masako Kawahara from Crochet_Hmmm
Please follow the charts in a counter-clockwise direction, regardless of whether you are right or left-handed.
Instructions
© Dedri Uys 2016. All Rights Reserved.
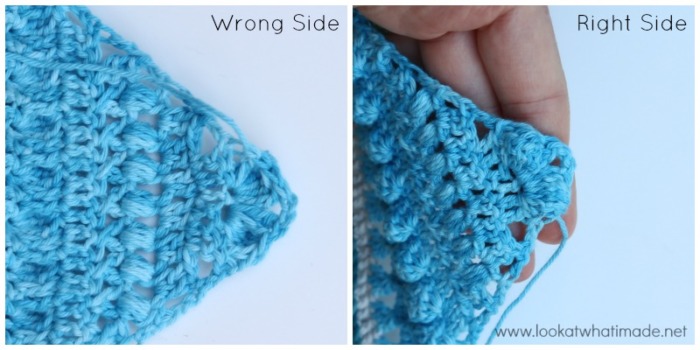
The triangles are created one at a time using a single colour and working back and forth. You will turn at the end of every row.
When looking at your stitches, the top of each stitch will be AFTER the post of the stitch, not before it, because the back of the previous row will always be facing you. The only exception is when you make Row 19, where the top of each stitch will be BEFORE the post of the stitch, as the right side of Round 18 is facing you.
All 4 Triangles are made with Colour C.
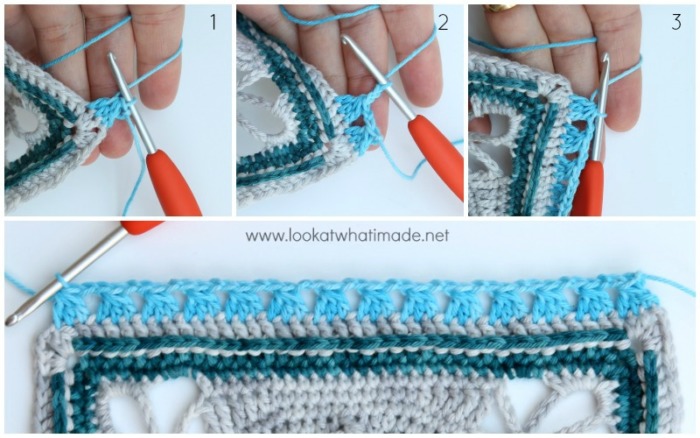
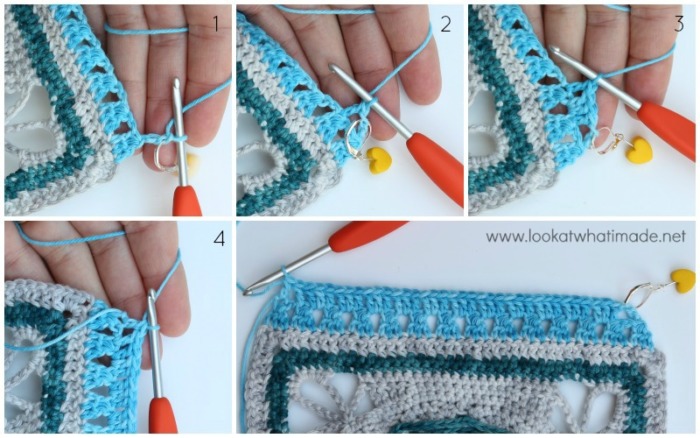
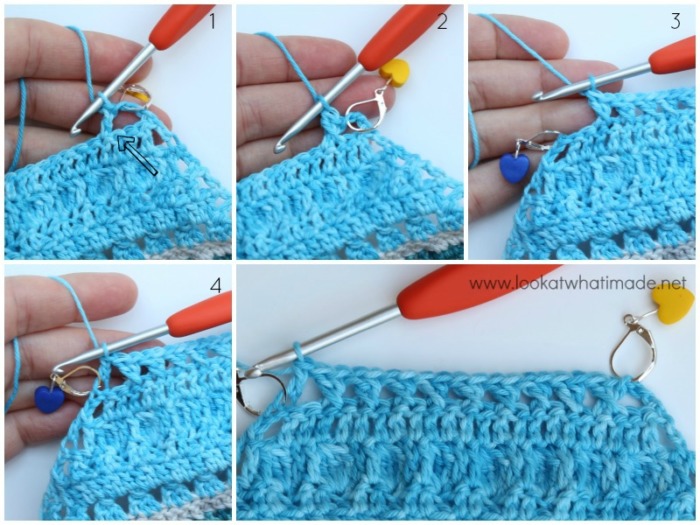
Row 19
With RS facing, join your yarn by making a Standing 3-dc Cluster in the first 3 sts of any side {Photo 1}. (Ch 2, make a 3-dc Cluster over the next 3 sts {Photo 2}) 13 times {Photo 3}. TURN.
Stitch Count: 14 Clusters and 13 ch-2 sps
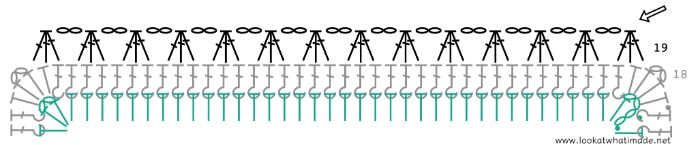
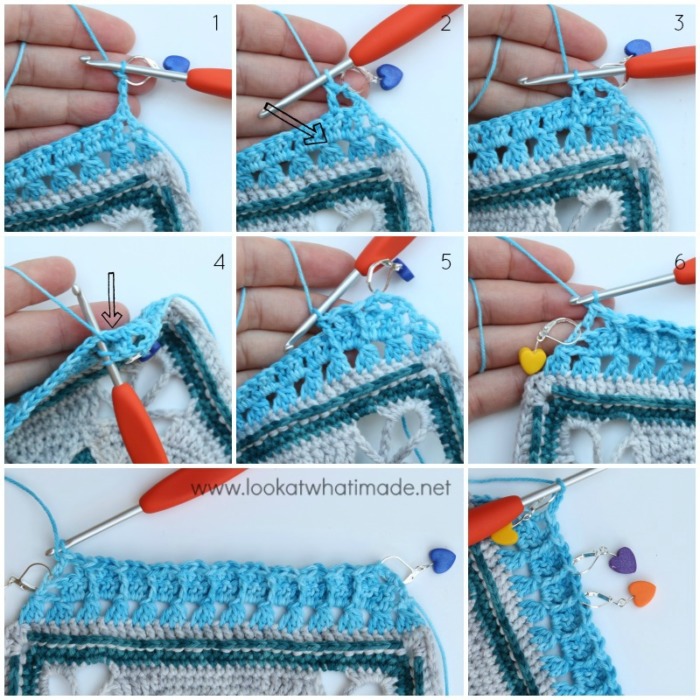
Row 20
With WS facing, ch 3 (counts as your first dc, here and throughout). Skip the first ch-2 sp. Dc in the next Cluster {Photo 2}. (Make 2 dc in the next ch-2 sp, dc in the next Cluster {Photo 3}) 11 times. Skip the last ch-2 sp. Dc in the last Cluster {Photo 4}. TURN.
Stitch Count: 36 dc

Row 21
If you are having trouble identifying which loops belong to which stitch, mark all the FPtr sts (except the first and last one) so that you can identify them in the next row.
With RS facing, ch 3. Skip the next 2 sts. Dc in the next st {Photo 2}. FPtr around the third Cluster from Row 19 {indicated with an arrow in Photo 2 and illustrated in Photo 3}. (Skip the next st of Row 20 {indicated with an arrow in Photo 4} and dc in the next 2 sts. FPtr around the next Cluster from Row 19 {Photo 5}) 9 times. There should now be 2 Clusters left. Skip the next st and dc in the next st. Skip the next 2 sts. Dc in the top of the beg ch-3 {Photo 6}. TURN.
Stitch Count: 22 dc and 10 FPtr

Row 22
The Bobbles won’t look like much when you make them, but as soon as you make the first dc after the Bobble, it will pop out towards the back of your work (which will be the front of your square).
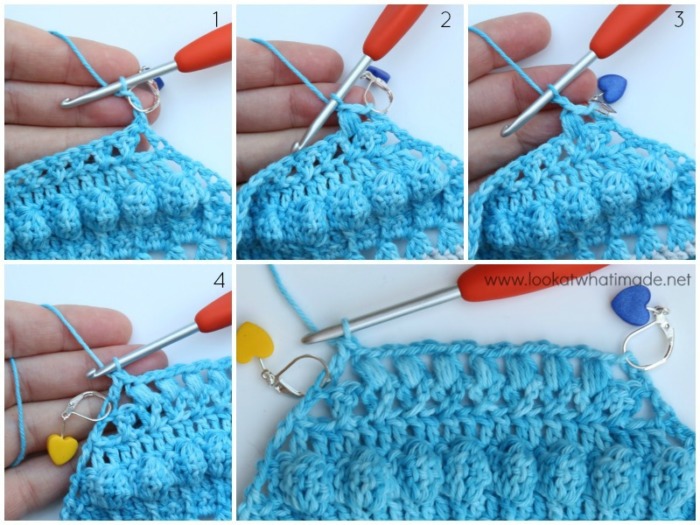
With WS facing, ch 3. Skip the next 2 sts. Dc in the next 2 sts {Photo 2}. (Make a 5-tr Bobble in the next st, which will be the FPtr {Photo 3}. Dc in the next 2 sts) 8 times {Photo 4}. Skip the next 2 sts. Dc in the top of the beg ch-3 {Photo 5}. TURN.
Stitch Count: 28 sts {8 5-tr Bobbles and 20 dc}
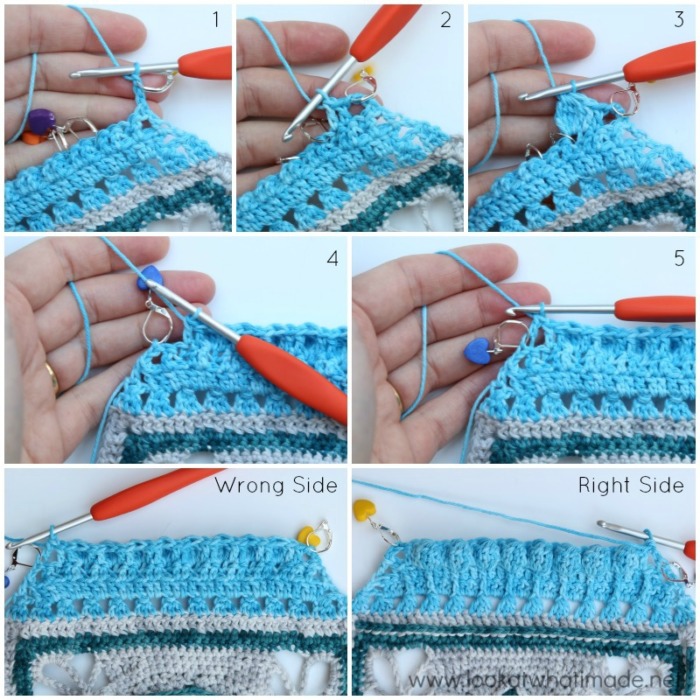

Row 23
With RS facing, ch 3. Skip the next 2 sts. Dc in the next 22 sts, the first and last of which will be a 5-tr Bobble {Photos 1 and 2}. Skip the next 2 sts. Dc in the top of the beg ch-3 {Photo 3}. TURN.
Stitch Count: 24 dc
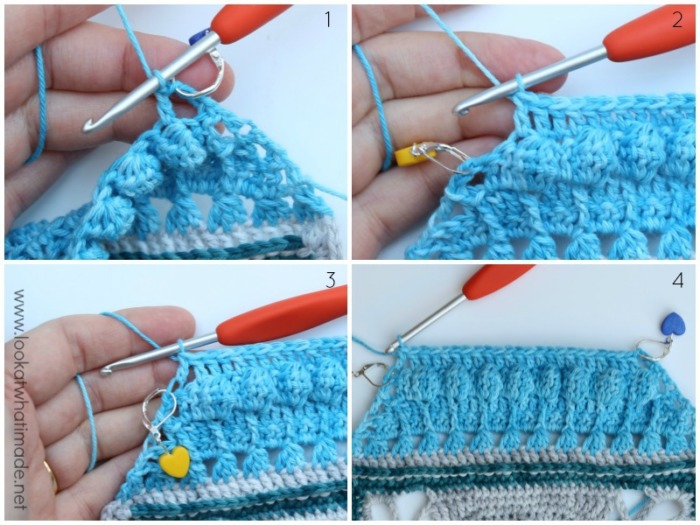

Row 24
With WS facing, ch 3. Skip the next 3 sts. Dc in the next st {Photo 1}. Dc in the last skipped st, working OVER the previous dc {indicated with an arrow in Photo 1 and illustrated in Photo 2}. This is your first Crossed Double made.
(Skip 1, dc in the next st, dc in the skipped st, working OVER the previous dc) 8 times {Photo 3}. Skip the next 2 sts. Dc in the top of the beg ch-3 {Photo 4}. TURN.
Stitch Count: 20 sts {2 dc and 9 Crossed Doubles}

Row 25
Please remember that the Puff Stitch is closed with a chain stitch. The ch-1 directly after the Puff Stitch is an extra chain stitch.
With RS facing, ch 3. Skip the first Crossed Double. (Make a Puff Stitch between the 2 dc of the next Crossed Double, ch 1 {Photo 2 and 3}) 6 times. There should now be 2 Crossed Doubles left. Make a Puff Stitch between the 2 dc of the next Crossed Double. Skip the last Crossed Double. Dc in the top of the beg ch-3 {Photo 4}. TURN.
Stitch Count: 7 Puff Stitches, 2 dc and 6 ch-1 sps

Row 26
With WS facing, ch 3. Make 2 dc in each of the 6 ch-1 sps. Dc in the top of the beg ch-3. TURN.
Stitch Count: 14 dc


Row 27
With RS facing, ch 3. Skip the next 3 sts. Dc in the next 6 sts. Skip the next 3 sts. Dc in the top of the beg ch-3. Ch 1 and turn.
Stitch Count: 8 dc

Row 28
You will notice that the instructions between parentheses are not mirror images of each other. This is intentional and makes for a neater finish.
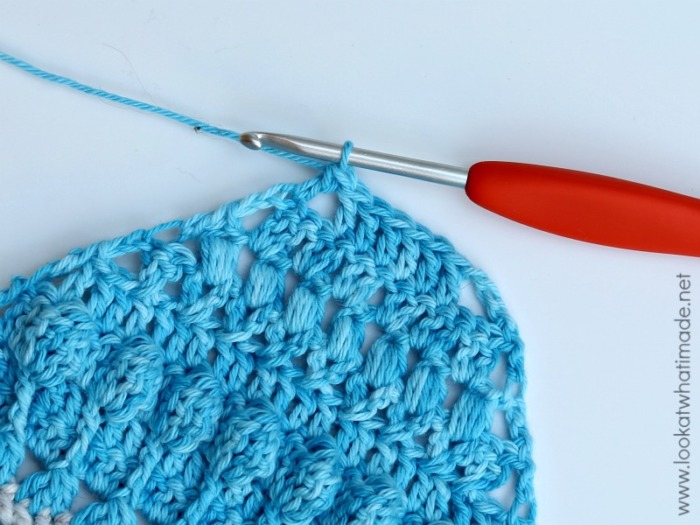
With WS facing, skip the next 2 sts. (5-tr Bobble, dc, tr) in the next st. Ch 2. (Tr, 5-tr Bobble, dc) in the next st. Skip the last 2 sts. Sl st in the top of the beg ch-3. Fasten off and work away your ends. The ch-2 sp will become your new corner.
Stitch Count: 2 dc, 2 tr, 2 Tr Bobbles, and 1 ch-2 sp.
You have now completed one triangle. You will need to repeat this for each side of the Part-1 square so that you end up with a square once again.

This blog post contains affiliate links. I only link to products I personally use or would use. All opinions are my own.


Mely says
I’m having so much fun with this project! When I started crocheting a couple years ago I always thought this type of thing would be the last thing I’d do, it seemed so complicated. Fast forward and I finished the first part of this square within a day. Your pattern is so clear and beautiful thank you for sharing
Jenny Lowman says
We are so happy that you are enjoying Charlotte! Are you making a Charlotte’s Dream or a Universe with her? :)
Kase says
Hello!
I’ve been working on part two for a while now, but I can’t seem to get it right. I count the stitches of each row and always end up with the correct number. However, when I work on the row after, the stitches don’t line up the way they do in the pattern. I was wondering if you had any tips or an idea as to why this keeps happening?
Thank you for your time and this lovely pattern :)
Jenny Lowman says
Maybe you are starting the next rows in a different place to Dedri. Have you looked at Esther’s wonderful videos? They may help you check placement of those starting stitches for each row.
Eva says
Wow, you are amazing! Thank you so so much for all this lovely crochet material. I feel so inspired.
Dedri Uys says
Thank you Eva x
shirley says
Hi;
I have just finished my first large square and it’s gorgeous. I want to thank you so much for the pattern and the awesome video tutorials. I’m not sure if I’d been able to complete it without the instructions.
I am making a blanket out of mine and I was wondering…. how do I join the squares together? Thanks
Jenny says
Hi!
Have a look at the Charlotte’s Dream pattern here in the blog. That will show you how I joined the squares.
Best wishes
Jenny :)
Sarah Pearson says
Excellent pattern, using such a vast array of stitches, but more importantly, the instructions are so clear and the pictures make it so easy to follow also. Thank you
Dedri Uys says
Thank you, Sarah :)
Silvia Gutierrez says
Hola Dedri, he empezado hacer la Charlotte, me gustaria saber si hay videos. Un beso.
Dedri Uys says
Not yet, but soon x
Lo Cooper says
Hi, I have commented before I have a tip which may be of use to people who are in some degree of visual impairment to help with row 20 and 21. As I work by using markers and “finger tip feel” to locate the stitches I was having a mild problem with row 20 putting my stitches in the right place so i exchanged “DC in next Cluster” with “FPTR around the Cluster”. Then I did the two DC in the gap. This actually worked out well because when I did row 21 my FPTR is directly in line with the FPTR i did in the previous row! and it kept my stitch count accurate and all in line.
I will post you pictures as soon as I can (I have to wait for my husband to take them or you will just get a blur! lol) but my friend who is also working the pattern will full vision held mine against hers and said it was perfect (well as perfect as possible) but she is very honest with me so that I don’t make a catastrophic mistake.
Please feel free to delete this is you want, I won’t be at all offended. Kindest regards Lorraine Cooper
Dedri Uys says
That’s a great tip, Lo :) Thank you for sharing it :)
Sylvia says
Très très beau, j’espère tellement une traduction en français
.
Jarede says
Row 22….I love it. Triples with a double hug really makes the bobbles pop.
Marilyn Vazquez says
Unas aplicaciones preciosas,,me parecen un poco complicadas,de todos modos voy al intentar,mi hija quiere una manta sofa
Carmelita says
Comme toujours, MERVEILLEUX!!!!
Merci. Mais, à quand une traduction française?
Bises.
Dedri Uys says
Hi Carmelita. I will be talking about the translators regarding translations soon. Thank you!
HollyB says
I was curious about part two… I was so in love with the colors of Sophie so I am making a brightly colored Charlotte as well so my question is do the triangles HAVE to be in one color or can we change the colors each row like the Sophie was? I only ask so maybe you can guide me so it doesn’t look just too silly for part 3 since I don’t know whats coming haha.
Dedri Uys says
Hi Holly. You can see what the completed square is going to look like HERE. You can use as many or as few colours as you wish.
Marthie Muller says
Dankie Dedri,dis n pragtige blok!
Sherry says
I like to receive your blog on email.
Jenny says
Fill in the section for the newsletter, Sherry. Then you can receive regular updates :)
Sylvie says
Bonjour,
C’est très beau comme d’habitude !
Avez la traduction en français ?
Bonne journée
Sylvie
Jenny says
Sylvia, I believe translations are being worked on. I am sure Dedri will confirm soon :)