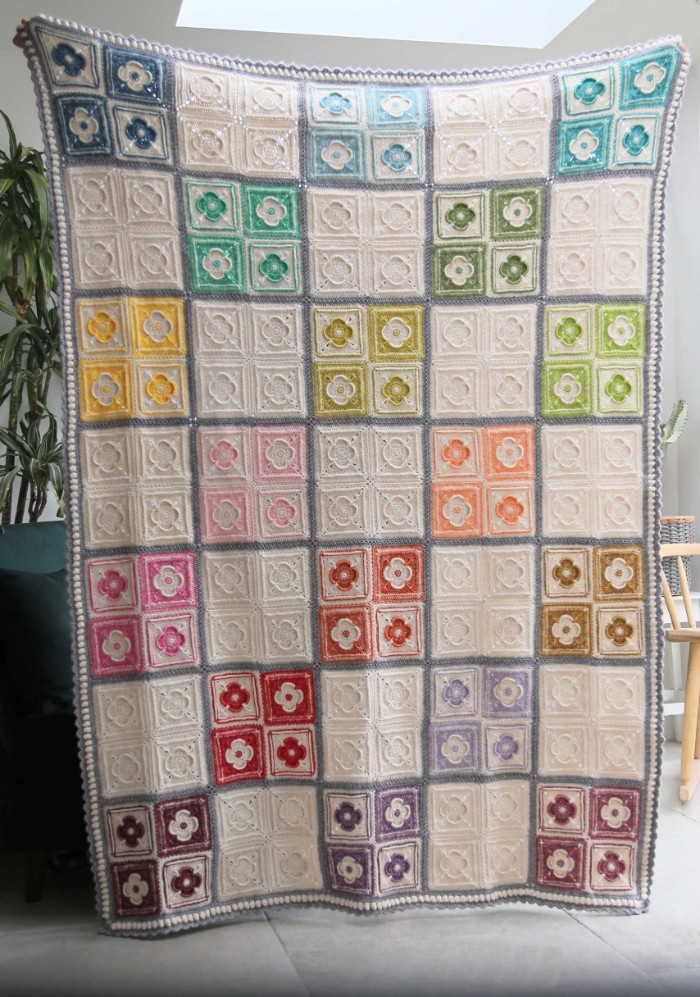
Sue’s Dream was created by my friend Jenny Lowman. Just like with Charlotte’s Dream and Sophie’s Dream, she decided to take my very humble Sue Square on a journey of colour and layout, and we are so in love with how it turned out.
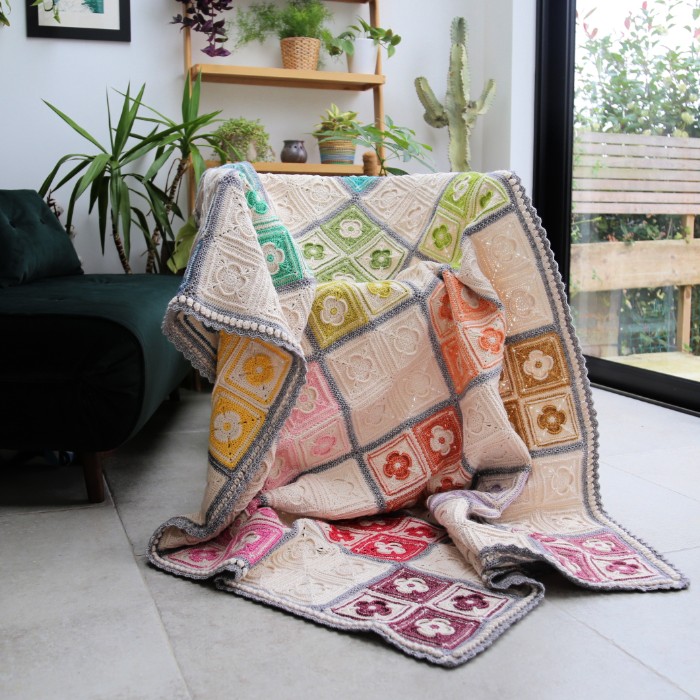
The square was originally designed as a nod to my friend Sue-Anne, whom I met in February 2019 on my Crafty Adventures Cruise. Sue shared her ‘Look At What I Made’ journey with me as we strolled along the deck of the ship, reminding me quite viscerally about why I share my patterns and why I share/write them in the way that I do; to uplift and empower, to bring joy when life is already good, to facilitate distraction, should it be needed, and to provide solace, should THAT be needed.
Jenny and I hope that you will thoroughly enjoy making this blanket!
Sue’s Dream Blanket Pattern
© Dedri Uys and Jenny Lowman 2021. All Rights Reserved.
Resources
- Add this Pattern to Your Ravelry Queue
- Hashtag: #suesdreamblanket
If you prefer a formatted ad-free US PDF version of this pattern (both Photo Tutorial and Written-only), you can buy it HERE in my Ravelry Store.
Materials
- 3.5mm crochet hook – for squares only
- 4mm crochet hook – for joining only
- Scheepjes Stonewashed (78% cotton/22% acrylic), 50g/130m/142yds
- Main Colour 1 (MC1) – Moonstone (801) x 28 balls
- Main Colour 2 (MC2) – Smokey Quartz (802) x 8 balls
- Contrasting Colours (CC) – 1 ball each*
- CC A – Blue Apatite (805)
- CC B – Amazonite (813)
- CC C – Green Agate (815)
- CC D – Fosterite (826)
- CC E – Canada Jade (806)
- CC F – Beryl (833)
- CC G – Lemon Quartz (812)
- CC H – Peridot (827)
- CC I – Rose Quartz (820)
- CC J – Morganite (834)
- CC K – Tourmaline (836)
- CC L – Coral (816)
- CC M – Yellow Jasper (809)
- CC N – Carnelian (823)
- CC O – Lilac Quartz (818)
- CC P – Garnet (810)
- CC Q – Deep Amethyst (811)
- CC R – Corundum Ruby (808)
* It is worth mentioning here that only half a ball of each Contrasting Colour is used in the blanket (24g), so if you like the pattern but your wallet won’t quite stretch to buying 18 balls of Contrasting Colour, you can pick your favourite 9 and use each of them twice (provided you work to gauge). OR, and this is FUN, you can share your Contrasting Colours with a friend/family member.
Size
130cm x 175cm (51“ x 69”)
Gauge
- Each finished Sue Square should measure 11cm (4.3“) and weigh 12g*
- Each finished Foursquare should measure 24cm (9.5“) and weigh 54g
* We suggest making a single colour square as a gauge test.
Abbreviations
US Terminology
- Beg – Beginning
- BLO – Back Loop Only
- BP – Back post
- Ch – Chain
- Dc – Double crochet
- FLO – Front Loop Only
- FP – Front post
- Hdc – Half-double crochet
- Rem – Remaining/remains
- Rep – Repeat
- Sc – Single crochet
- Sk – Skip
- Sl st – Slip stitch
- Sp/sps – Space/spaces
- St/sts – Stitch/stitches
- Tr – Treble crochet
Punctuation
* and () indicate pattern repeats. You will need to repeat all the instructions between asterisks/brackets the number of times specified.
Square Brackets [] are used to indicate a group of stitches to be worked into the same stitch/space.
Special Stitches
Back Post Stitches – Identify the post of the stitch you want to work around. Insert your hook from the back to the front and then from the front to the back around the post of the stitch so that the post lies behind your hook. Complete your stitch as normal.
Front Post Stitches – See the note at the start of Border Round 3.
Standing Stitches – Standing stitches are used to start the round when using a new colour (or starting in a different place from where you finished the previous round). They are exactly the same as regular stitches, except that they are made ‘in air’, without being attached to a previous stitch. With a slip knot already on your hook, and holding the knot in place with your index finger, make your stitch as normal.
Omitting – At the end of some rounds, you will see an instruction telling you to omit the last corner/stitch(es) of the last repeat. This means that your last repeat should stop before the indicated corner/stitch(es), because you will already have made that corner/stitch(es) before the repeat started.
Dc2tog – Yarn over, insert your hook into the indicated st/sp, yarn over and pull up a loop. Yarn over and pull through two loops. Yarn over, insert your hook into the next st/sp, yarn over and pull up a loop. Yarn over and pull through two loops. Yarn over and pull through all three loops on your hook.
Sc2tog – Insert your hook into the indicated st/sp, yarn over and pull up a loop. Insert your hook into the next st/sp, yarn over and pull up a loop. Yarn over and pull through all three loops on your hook.
Notes
This blanket is created by making 140 simple squares in 3 different colourways:
- MC Square x 68 squares
- CC Square 1 x 36 squares (2 in each Contrasting Colour)
- CC Square 2 x 36 squares (2 in each Contrasting Colour)
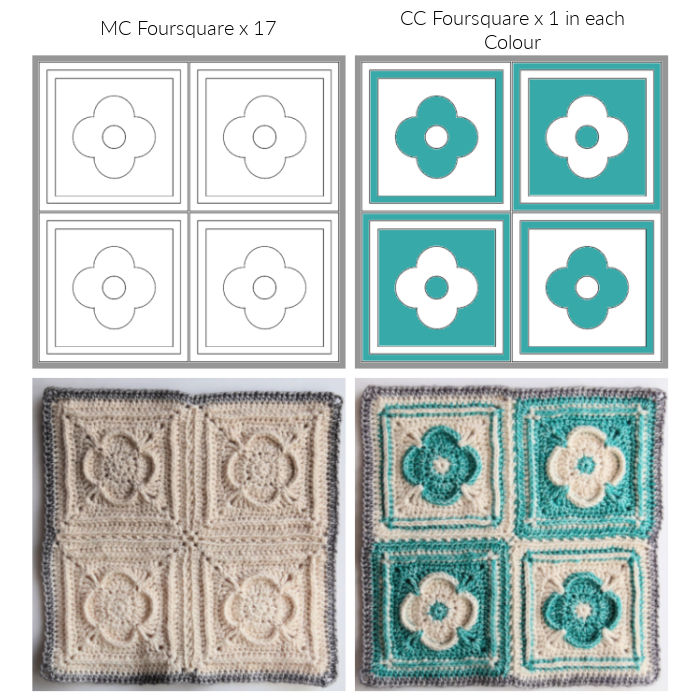
These squares are then joined together in sets of four to create what I call Foursquares:
- MC Foursquares x 17
- CC Foursquares x 18 (one in each Contrasting Colour)
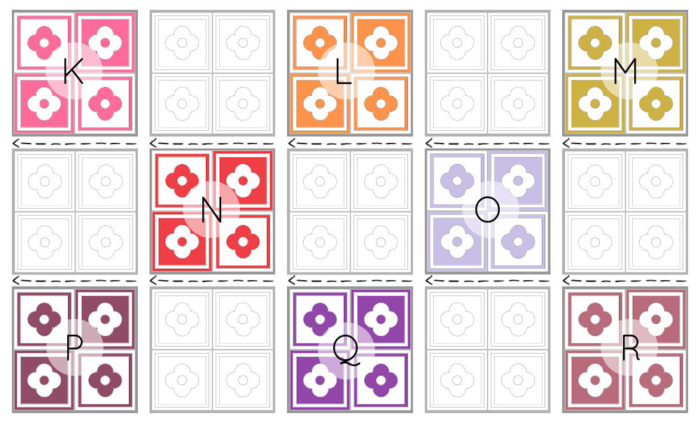
These Foursquares are then joined to each other in a chequerboard pattern before adding the border.
Instructions
MC Squares
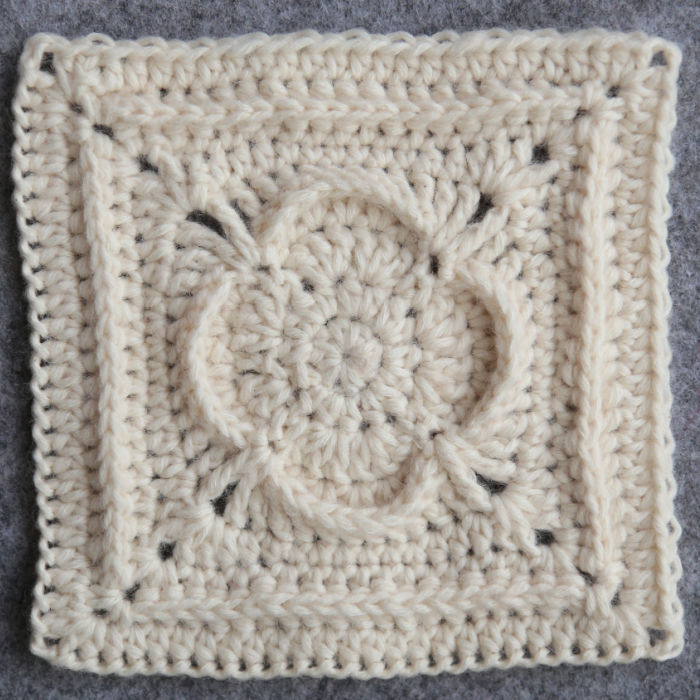
You will need to make 68 of these squares, using a 3.5mm hook.
Round 1: With MC1 and working into a magic ring, ch 1 (doesn’t count as a st throughout), make 8 hdc. Join to the first hdc with a sl st. {8 hdc}
Round 2: Ch 1, make 2 hdc in each of the 8 sts around. Join to the first hdc with a sl st. {16 hdc}
Round 3: Ch 2 (doesn’t count as a st). Skip the st at the base of the ch-2. (3 dc in the next st, sl st in the next 2 sts, 3 dc in the next st) 3 times. Make 3 dc in the next st and sl st in the last 2 st. Make 3 dc in the same st as the sl st join. Join to the first dc with a sl st, ignoring the initial ch-2. {24 dc – not including the sl sts}
Round 4: Ch 3 (counts as dc). Dc in the same st. (2 dc in the next st) twice. Sl st in the next st, which will be the first sl st between Petals. Skip the next sl st. *Sl st in the first st of the next Petal, (2 dc in the next st) 5 times, sl st in the next sl st, skip the next sl st.* Rep from * to * twice. Sl st in the first st of the last petal. (2 dc in the next st) twice. Join to the top of the beg ch-3 with a sl st. Fasten off. {40 dc – not including sl sts}
Round 5: With MC1 and starting with a standing st: *[Tr, ch 1, tr] in the second sl st between Petals. BPdc in the next 2 sts, BPhdc in the next st, BPsc in the next 4 sts, BPhdc in the next st, BPdc in the next 2 sts.* Rep from * to * 3 more times. Join to the first tr with a sl st. {4 sc, 2 hdc, 4 dc, and 2 tr per side – not including ch-1 corner sps}
Round 6: Sl st in the next ch-1 corner sp. [Ch 3, dc, ch 2, 2 dc] in the same sp. This is your first corner made. *Hdc in the next 3 sts, sc in the next 6 sts, hdc in the next 3 sts. [2dc, ch 2, 2dc] in the next ch-1 corner sp.* Rep from * to * 3 more times, omitting the last corner on the last repeat. Join to the top of the beg ch-3 with a sl st. {6 sc, 6 hdc, and 4 dc per side – not including ch-2 corner sps}
Round 7: Sl st in the next st and in the ch-2 corner sp. Ch 2 (counts as hdc), [hdc, ch 2, 2 hdc] in the same ch-2 sp. This is your first corner made. *Skip the first (hidden) st. Hdc in the next 15 sts. [2 hdc, ch 2, 2 hdc] in the next ch-2 corner sp.* Rep from * to * 3 more times, omitting the last corner on the last repeat. Join to the top of the beg ch-2 with a sl st. {19 hdc per side – not including ch-2 corner sps}
Round 8: Sl st in the next st and in the ch-2 corner sp. [Ch 1, sc, ch 2, sc] in the same corner sp. This is your first corner made. *BPhdc in each of the 19 sts. [Sc, ch 2, sc] in the next ch-2 corner sp.* Rep from * to * 3 more times, omitting the last corner on the last repeat. Join to the top of the first sc with a sl st. {2 sc and 19 BPhdc per side – not including ch-2 corner sps}
Round 9: Sl st into the ch-2 corner sp. Ch 2(counts as hdc). [Hdc, ch 2, 2 hdc] in the ch-2 corner sp. This is your first corner made. *Hdc in each of the 21 sts. [2 hdc, ch 2, 2 hdc] in the next ch-2 corner sp.* Rep from * to * 3 more times, omitting the last corner on the last repeat. Join to the top of the first hdc with a sl st. Fasten off and work away your ends. {25 hdc per side, not including ch-2 corner sps}
CC Squares
In each of the 18 Contrasting Colours, make 2 x CC Square 1 and 2 x CC Square 2, using a 3.5mm hook and following the table below when changing colours.
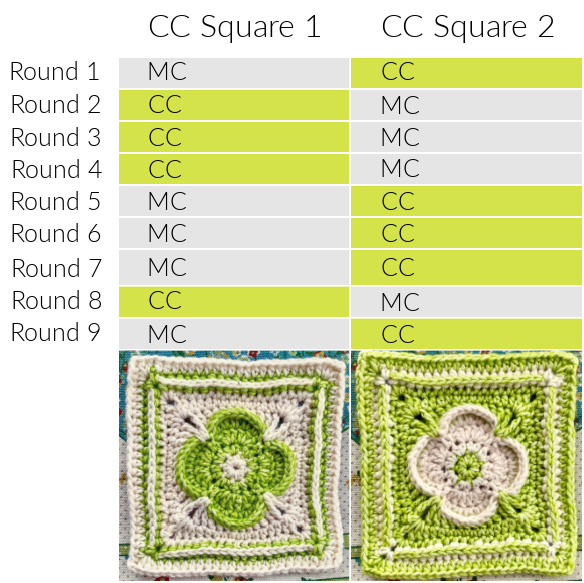
Round 1: Working into a magic ring, ch 1 (doesn’t count as a st throughout), make 8 hdc. Join to the first hdc with a sl st. Fasten off and change colour. {8 hdc}
Round 2: Join your yarn by making a standing hdc in any st. Hdc in the same st. Make 2 hdc in each of the rem 7 sts. Join to the first hdc with a sl st. {16 hdc}
Round 3: Ch 2 (doesn’t count as a st). Skip the st at the base of the ch-2. (3 dc in the next st, sl st in the next 2 sts, 3 dc in the next st) 3 times. Make 3 dc in the next st and sl st in the last 2 st. Make 3 dc in the same st as the sl st join. Join to the first dc with a sl st, ignoring the initial ch-2. {24 dc – not including the sl sts}
Round 4: Ch 3 (counts as dc throughout). Dc in the same st. (2 dc in the next st) twice. Sl st in the next st, which will be the first sl st between Petals. Skip the next sl st. *Sl st in the first st of the next Petal, (2 dc in the next st) 5 times, sl st in the next sl st, skip the next sl st.* Rep from * to * twice. Sl st in the first st of the last petal. (2 dc in the next st) twice. Join to the top of the beg ch-3 with a sl st. Fasten off and change colour. {40 dc – not including sl sts}
Round 5: Starting with a standing st: *[Tr, ch 1, tr] in the second sl st between Petals. BPdc in the next 2 sts, BPhdc in the next st, BPsc in the next 4 sts, BPhdc in the next st, BPdc in the next 2 sts.* Rep from * to * 3 more times. Join to the first tr with a sl st. {4 sc, 2 hdc, 4 dc, and 2 tr per side – not including ch-1 corner sps}
Round 6: Sl st in the next ch-1 corner sp. [Ch 3, dc, ch 2, 2 dc] in the same sp. This is your first corner made. *Hdc in the next 3 sts, sc in the next 6 sts, hdc in the next 3 sts. [2dc, ch 2, 2dc] in the next ch-1 corner sp.* Rep from * to * 3 more times, omitting the last corner on the last repeat. Join to the top of the beg ch-3 with a sl st. {6 sc, 6 hdc, and 4 dc per side – not including ch-2 corner sps}
Round 7: Sl st in the next st and in the ch-2 corner sp. Ch 2 (counts as hdc), [hdc, ch 2, 2 hdc] in the same ch-2 sp. This is your first corner made. *Skip the first (hidden) st. Hdc in the next 15 sts. [2 hdc, ch 2, 2 hdc] in the next ch-2 corner sp.* Rep from * to * 3 more times, omitting the last corner on the last repeat. Join to the top of the beg ch-2 with a sl st. Fasten off and change colour. {19 hdc per side – not including ch-2 corner sps}
Round 8: Join your yarn by making a standing sc in any corner sp. [Ch 2, sc] in the same corner sp. This is your first corner made. *BPhdc in each of the 19 sts. [Sc, ch 2, sc] in the next ch-2 corner sp.* Rep from * to * 3 more times, omitting the last corner on the last repeat. Join to the top of the first sc with a sl st. Fasten off and change colour. {2 sc and 19 BPhdc per side – not including ch-2 corner sps}
Round 9: Starting with a standing st: *[2hdc, ch 2, 2hdc] in the ch-2 corner sp. Hdc in each of the 21 sts.* Rep from * to * 3 more times. Join to the top of the first hdc with a sl st. Fasten off and work away your ends. {25 hdc per side, not including ch-2 corner sps}
Creating Each Foursquare
Once you have made all your squares, we will be joining them to each other in sets of four. This is a method I used for the Block a Week CAL 2014, and I love it! Don’t worry if the squares look a tiny bit wonky after joining. It will magically fix itself!
You will need to make:
- MC Foursquares x 17
- CC Foursquares x 18 (one in each Contrasting Colour)
Joining the Squares
Things to Note:
- When joining the squares, you will be working into the FLO of the square closest to you and the BLO of the square farthest away from you. To make things easier, I am going to call these the outside loops.
- When instructed to work into the ch-2 corner spaces, you will work into the outside loops of the second ch {Indicated with an Arrow in Photo 1 and illustrated in Photos 2 -4}, NOT into the ch-2 space itself. Working in this way will make the join less visible on the CC Squares.
- Use a 4mm hook for joining.
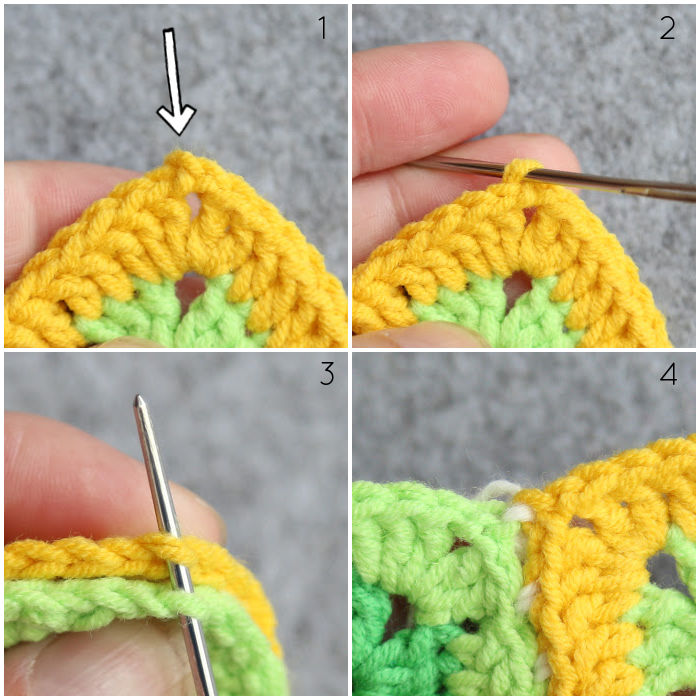
Place the four squares in a grid with the right sides facing you. Flip the two squares at the top over onto the two squares at the bottom so that the right sides of the squares are facing each other.
Joining the First Two Squares:
Working into the side farthest away from you and through both layers, join your MC1 yarn by making a standing sc in the ch-2 corner sp on the right (left, if you are left-handed) – as explained above.
(Ch 1, skip the next st, sc in the outside loops of the next st) 12 times. Ch 1, skip the last st, sc in the ch-2 corner sp.
Joining the Second Two Squares:
Ch 1, sc in the ch-2 corner sp of the next set of squares. (Ch 1, skip the next st, sc in the outside loops of the next st) 12 times. Ch 1, skip the last st, sc in the ch-2 corner sp. Fasten off.
You should now have 28 sc and 27 ch-1 sps along that joined edge.
Joining the Other Axis
Open your squares up and rotate them by 90 degrees. Fold them over onto each other just like before and repeat the process above to join the other axis.
Adding the Border Round
With a 3.5mm hook, join MC2 by making a standing dc in any ch-2 corner sp of the Foursquare you just created. [Ch 2, dc] in the same ch-2 sp. This is your first corner made.
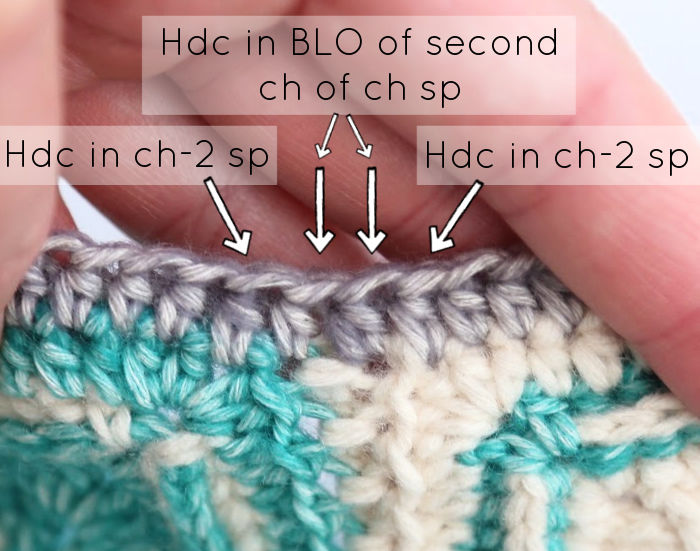
*Skip the first (hidden) st. Hdc in the next 24 sts. Hdc in the next ch-2 corner sp. Hdc in the BLO of the second ch of the ch-2 sp, which will already contain a joining stitch. Working into the next square, hdc in the BLO of the second ch of the next ch-2 sp. Hdc in the ch-2 sp. Skip the first (hidden) st. Hdc in the next 24 sts. [Dc, ch 2, dc] in the next ch-2 sp.*
Rep from * to * 3 more times, omitting the last corner on the last repeat. Join to the top of the first dc with a sl st. Fasten off and work away your ends. {52 hdc and 2 dc per side – not including ch-2 corner sps}
You have now completed one Foursquare. You will need to make 34 more before we can join them to each other.
Joining the Foursquares
Oh, my loves, the joining continues!
Things to Note:
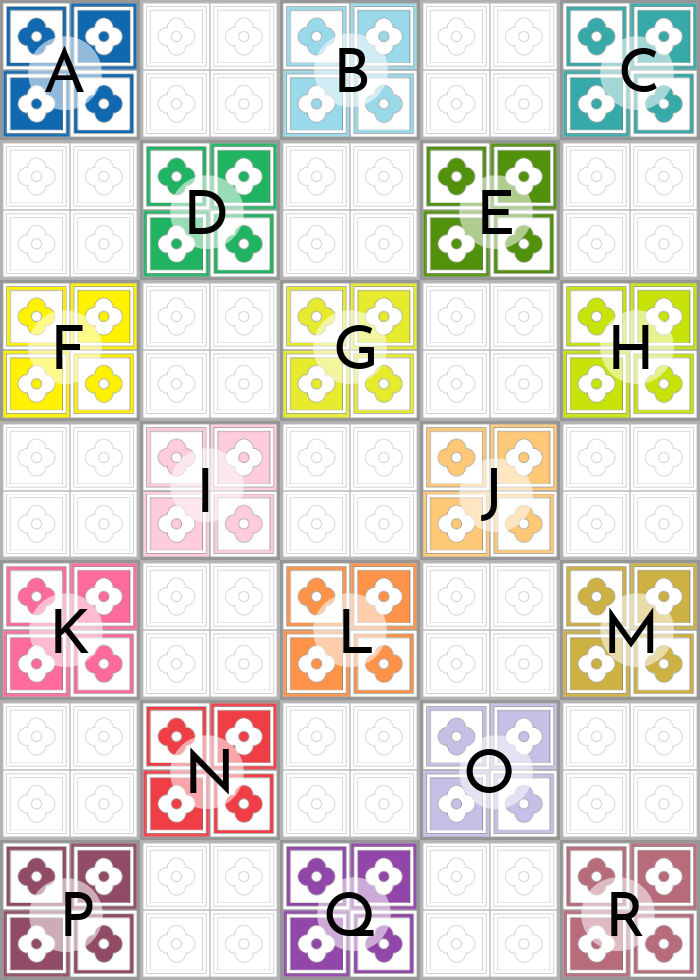
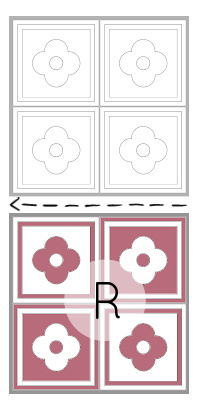
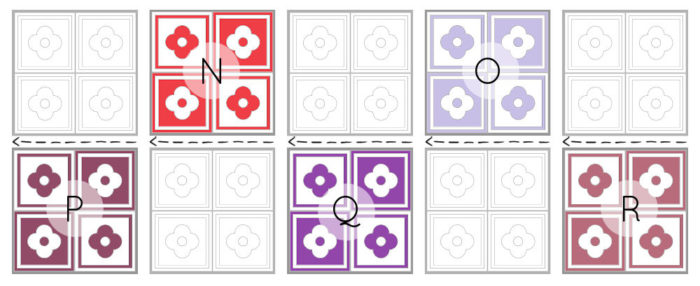
- You will be joining the Foursquares to each other in a 5 x 7 grid, working first in Rows (right to left/left to right if you are left-handed) and then in Columns (please see Layout below). Please make sure that all the CC Foursquares are turned so that they have a CC Square 1 Top Left.
- When joining, you will be working into BOTH loops and INTO the ch-2 spaces. This creates a sturdy, decorative join.
- Use a 4mm hook for joining.
Layout
Joining the First Two Rows
I suggest that you start joining in the bottom right-hand corner (bottom left, if you are left-handed). Doing it this way means that you will have the Right Side of the blanket facing you as it grows, making it easier to spot if you’ve accidentally rotated one of the CC Foursquares. You are, of course, welcome to use your own method if you prefer.
Before joining each set of squares, I find it easiest to lay the two squares I will be joining above each other with Right Sides facing (as before). This helps you to check that the CC Foursquares are not accidentally rotated. Once this has been checked, flip the square farthest away from you onto the one closest to you so that their right sides are facing each other. Proceed joining as instructed below.
Joining the First Two Squares:
Working into the side farthest away from you, join your MC2 yarn by making a standing sc in the ch-2 corner sp on the right (left, if you are left-handed). (Ch 1, skip the next st, sc in the next st) 27 times. Ch 1, sc in the ch-2 corner sp.
Stitch Count: 29 sc and 27 ch-1 sps.
Joining Subsequent Squares:
*Ch 1, sc in the ch-2 corner sp of the next set of squares. (Ch 1, skip the next st, sc in the next st) 27 times. Ch 1, sc in the ch-2 corner sp.*
Rep from * to * until you have joined every square in the bottom two rows. Fasten off.
Stitch Count Per Square: 29 sc and 27 ch-1 sps.
Joining Subsequent Rows
When you have joined these two rows, open up your work so that the Right Side of the blanket is facing you. Continue adding the squares of the next row as above.
Repeat this until you have joined all the rows.
Joining the Other Axis
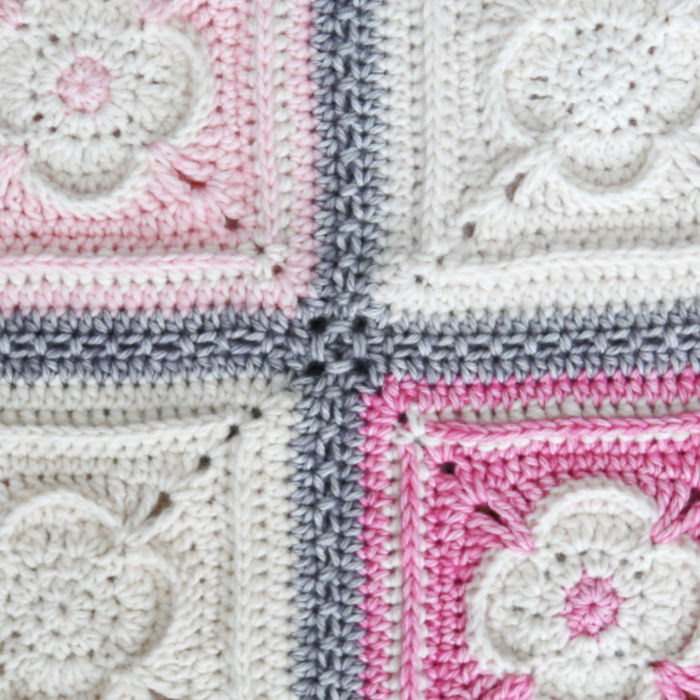
When you have joined all the rows, open your work up so that the Right Side of the blanket is facing you. Check that all your CC Squares look the same (i.e CC Square 1 Top Left). I really hope they do because you don’t want to have to frog at this point!!
Once you have checked that all your squares are in the right order and have the correct orientation, you can rotate the blanket by 90 degrees and join the columns in the same way you joined the rows above.
Adding the Border
Border Round 1
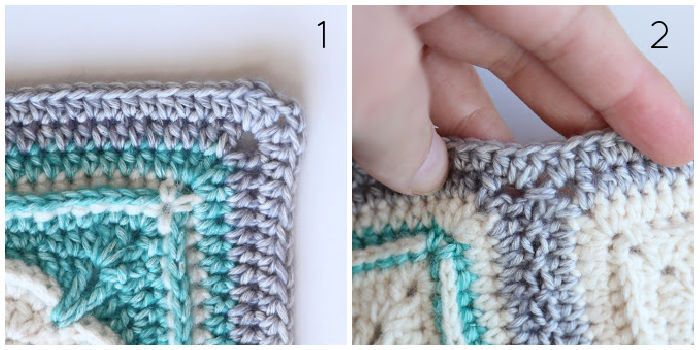
With a 3.5mm hook, join MC2 by making a standing dc in any ch-2 corner sp. [Dc, ch 2, 2 dc] in the same sp. This is your first corner made.
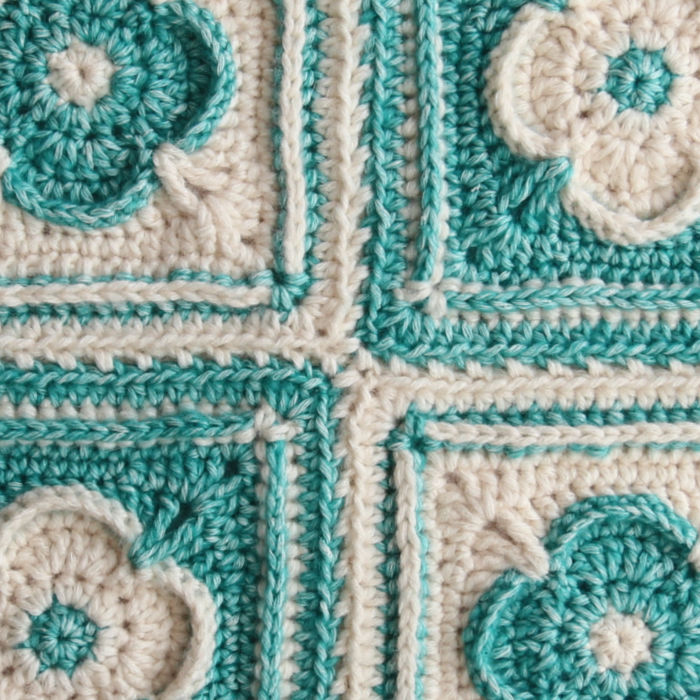
*Hdc in the next 54 sts. (Hdc in the next ch-2 sp. Dc2tog in the same ch-2 sp and the next ch-2 sp. Hdc in the same ch-2 sp as the last post of the dc {Photo 2}. Hdc in the next 54 sts) until you get to the next ch-2 corner sp. [2 dc, ch 2, 2 dc] in the ch-2 corner sp.* Rep from * to * 3 more times, omitting the last corner on the last repeat. Join to the top of the first dc with a sl st. Fasten off and work away your ends.
Stitch Counts:
- Per Long Side: 400 sts – 390 hdc, 4 dc, and 6 dc2tog, not including ch-2 corner sps
- Per Short Side: 286 sts – 278 hdc, 4 dc, and 4 dc2tog, not including ch-2 corner sps
Border Round 2
In this Round, you will be making Really Lazy Popcorns, which won’t look like Popcorns at all until the end of the next round.
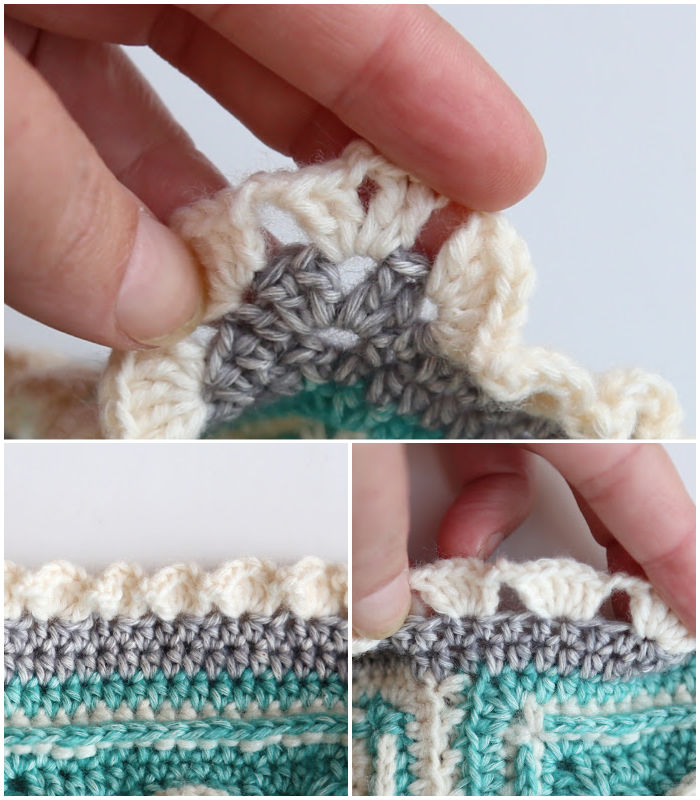
Join MC1 by making a standing dc in any ch-2 corner sp. [Dc, ch 2, 2 dc] in the same ch-2 sp. This is your first corner made.
*(Ch 2, skip the next 2 sts, and make 5 dc in the next st) until 1 st rem. Ch 2 and skip the last st. [2 dc, ch 2, 2 dc] in the next ch-2 corner sp.* Repeat from * to * 3 more times, omitting the last corner on the last repeat. Join to the first dc with a sl st. Fasten off and work away your ends.
Stitch Counts:
- Per Long Side: 4 dc, 133 5-dc groups, and 134 ch-2 sps, not including ch-2 corner sps
- Per Short Side: 4 dc, 95 5-dc groups, and 96 ch-2 sps, not including ch-2 corner sps
Border Round 3
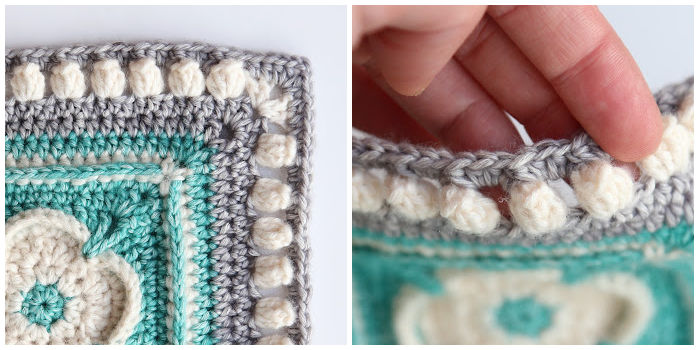
To make a FPhdc around a 5-dc group, yarn over and insert your hook from front to back into the ch-2 space before the 5-dc group. Insert your hook from back to front into the next ch-2 space so that the 5 dc sts lie on top of your hook. Complete your hdc as normal, making sure that your working yarn is above the 5 dc, not in front of them. This will pull the 5 dc together and form a neat Popcorn. If you want more help, have a look at my tutorial for the Really Lazy Popcorn.
Join MC2 by making a standing hdc in the ch-2 corner sp at the start of any Long Side. [Hdc, ch 2, 2 hdc] in the same ch-2 space. This is your first corner made.
*Hdc in the first 2 sts and make 2 hdc in the first ch-2 sp. (Make a FPhdc around the next 5-dc group, make 2 hdc in the next ch-2 sp) until you have worked into every ch-2 sp. Hdc in the last 2 sts. [2 hdc, ch 2, 2 hdc] in the ch-2 corner sp.* Repeat from * to * 3 more times, omitting the last corner on the last repeat. Join to the first hdc with a sl st.
Stitch Counts:
- Per Long Side: 403 sts – 270 hdc and 133 FPhdc, not including ch-2 corner sps
- Per Short Side: 289 sts – 194 hdc and 95 FPhdc, not including ch-2 corner sps
Border Round 4
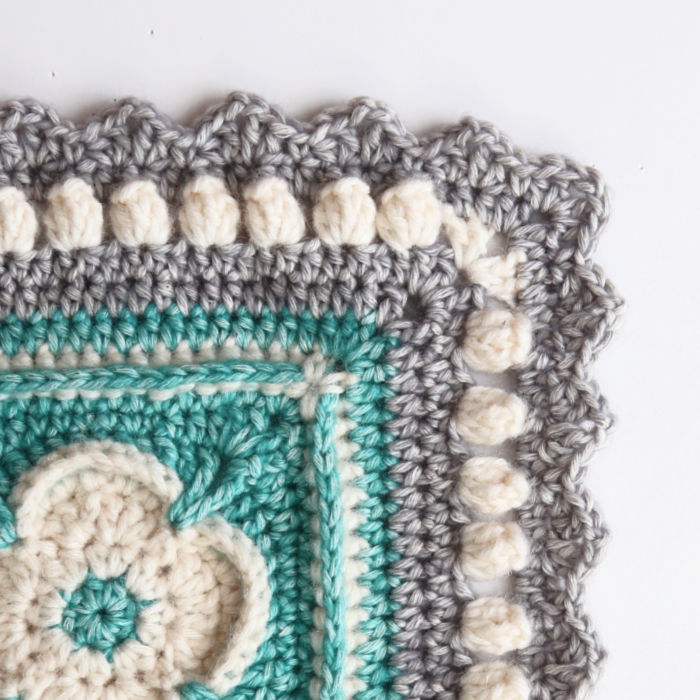
Sl st into the ch-2 corner sp. Ch 2 (counts as hdc). [Dc, ch 2, dc, hdc] in the same ch-2 corner sp. This is your first corner made.
*Long Side: Skip the first (hidden) st. Sc in the next st. (Skip the next st, [hdc, dc] in the next st. Ch 2, [dc, hdc] in the next st. Skip the next st, sc in the next st) until 1 st rem before the ch-2 corner sp. Skip the last st. [Hdc, dc, ch 2, dc, hdc] in the next ch-2 corner sp.
Short Side: Skip the first (hidden) st. Sc in the next st. (Skip the next st, [hdc, dc] in the next st. Ch 2, [dc, hdc] in the next st. Skip the next st, sc in the next st) until 7 st rem before the ch-2 corner sp. Skip the next st, [hdc, dc] in the next st. Ch 2, [dc, hdc] in the next st. Skip the next st, sc2tog over the next 2 sts, skip the last st. [Hdc, dc, ch 2, dc, hdc] in the next ch-2 corner sp.*
Rep from * to * once, omitting the last corner. Join to the top of the beg ch-2 with a sl st. Fasten off and work away your ends.
Stitch Counts:
- Per Long Side: 81 sc, 162 hdc, 162 dc, and 80 ch-2 sps, not including ch-2 corner sps
- Per Short Side: 58 sc, 116 hdc, 116 dc, and 57 ch-2 sps, not including ch-2 corner sps
Whoohoo!!! You’re all done :)
Jenny and I hope that this blanket has brought you as much joy in the making as it will in the using/gifting.
Thank you for joining us on another adventure.
Want to see more of our Sue’s Dream journey?

This blog post contains affiliate links. I only link to products I personally use or would use. All opinions are my own.


Gaby says
Bellissimo modello mi piacerebbe farla….chissà se prima o poi ci sarà un video per me sarebbe piu’ semplice farla…spero che questo accada presto nel frattempo compro il primo lotto di colori.Grazie ancora per vostro lavoro che condividete con noi mi fanno sognare e danno Pace.Ciao dall’Italia Gaby
Jenny Lowman says
Hi Gaby.
We are glad you like this pattern. We have no plans for a video tutorial at the moment. We hope you enjoy the pattern of you give it a go :)
Leroux says
Bonjour je n arrive pas a comprendre les rang 3/4…je ne tombe jamais juste avez vous des vidéo et des photos de pas a pas ?
Merci
Jenny Lowman says
Sorry, but the Sue square and Dream blanket do not have a video tutorial.
Tatsiana says
very cozy plaid!
Jenny Lowman says
Thank you Tatsiana. We both love the blanket as well :)
Sangeetha says
Thank you for this amazing pattern. It is so beautifully written with so much attention to detail! Have a lovely day, Gorgeous! :)
Jenny Lowman says
We are so happy you like it!