This is a quick tutorial for making the standing single crochet.
Although this tutorial is specifically for the standing SINGLE crochet, you can apply the general principle to any stitch. For an in-depth look at standing double crochet stitches, please see this tutorial by Tamara from Moogly.
The standing single crochet is used at the beginning of a new round when joining yarn. It can be used instead of the traditional (sl st, ch-1, sc) join and gives a neater finish.
I first came across the term “standing” stitch in Tamara’s tutorial, which covers the standing double crochet and is well worth a look! Even though the name “standing” stitch is fairly new to me, I have been using standing stitches in my patterns for ages. I just hadn’t realized they had a name.
So let’s dive in and see what the standing single crochet is all about.
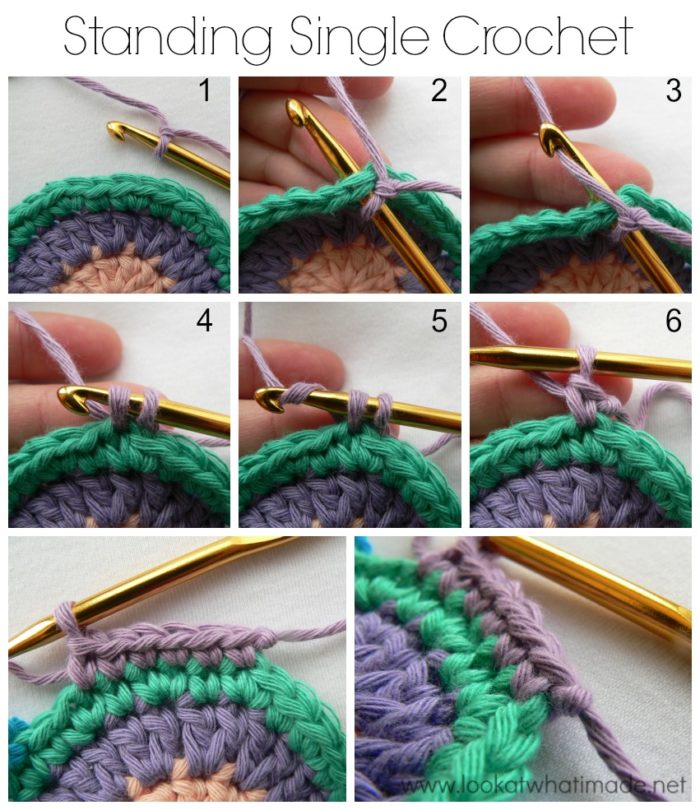
How to Make a Standing Single Crochet Stitch
- Start with a slip knot already on your hook.
- Insert your hook into whichever stitch you wish to start in.
- Yarn over…
- …and pull up a loop.
- Yarn over again…
- …and pull through both loops on your hook.
You see, it is really quite simple. It is just a normal single crochet stitch, but started in thin air.
Adding new yarn like this instead of in the traditional (sl st, ch 1, sc) way, you don’t end up with a visible slip stitch at the beginning of the round.
When you get to the end of your round, you will join to the first sc (the standing sc) with a sl st just as you would when starting with a (sl st, ch 1, sc).
Joining New Yarn With a Slip Stitch
This is the traditional way of joining a new colour at the beginning of a round.
I am including it here so that you can see the difference between the two methods. I think that you will understand/appreciate the awesomeness of the standing single crochet a little bit more if you have something to compare it to.
- Start with a slip knot already on your hook.
- Insert your hook into whichever stitch you wish to start in.
- Yarn over…
- …and pull through all the way. This is your slip stitch made.
- Chain 1…
- …and make a single crochet in the same stitch as your slip stitch join.
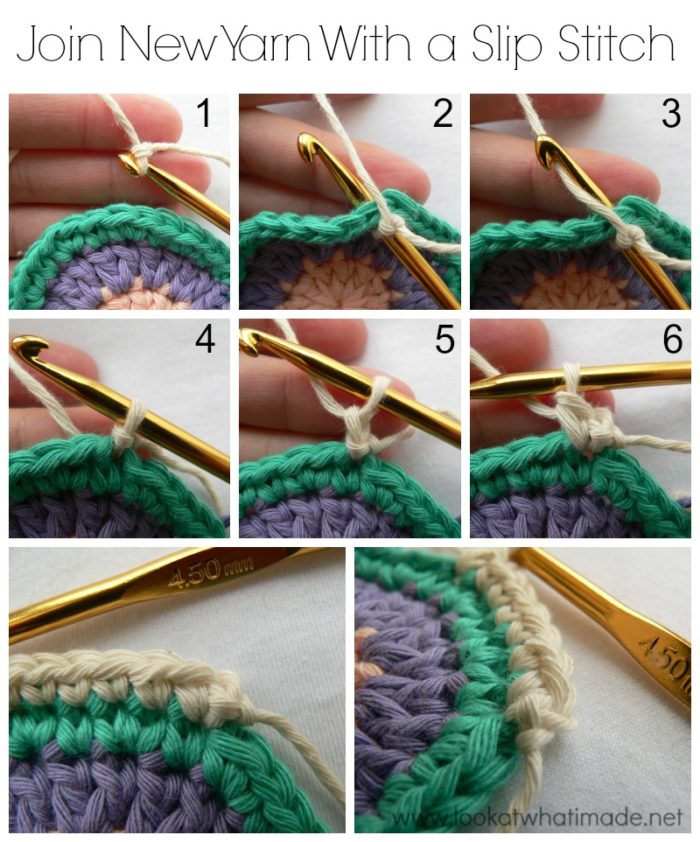
When using this method, you will end up with a (sl st, ch 1, sc) in the first stitch. When you get to the end of the round you will join with a sl st to the sc, skipping both the slip stitch and the ch-1 (and effectively rendering them moot).
Not only will the slip stitch be slightly visible, but it can also cause confusion if you do not know which loops belong to which stitch. A lot of stitch count problems occur when people join to the chain stitch instead of the first sc.
Just as an aside, if you want to brush up on your Anatomy of Crochet Stitches, have a look at this tutorial, which tells you which loops belong to which stitch (when working in the round) and how to avoid missing stitches after making a corner.
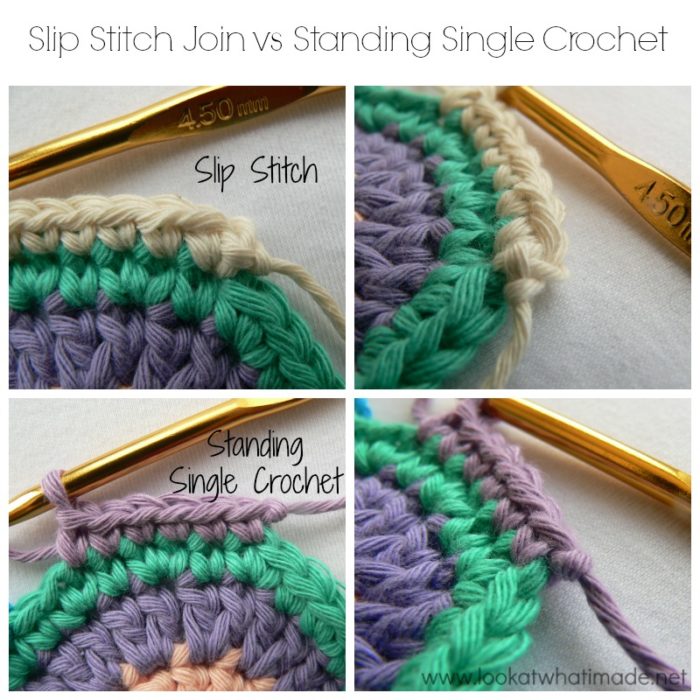
So let’s compare them side by side.
Slip Stitch Join vs Standing Single Crochet
I thought that a visual of the two methods side by side might be better than any hundred words I throw at you.
At the end of the round, you will join to the top of the first sc, regardless of which method you are using. If you are worried about substituting the standing single crochet for the traditional method in a particular pattern, skip to the end of the relevant round and read the joining instructions. Does the designer tell you to join to the first sc? If so, go ahead and substitute.
Again I will say that this is only applicable to rounds that start with a single crochet, because the initial ch st isn’t counted as a st. As soon as you start making hdc’s and dc’s, your initial chain stitches DO count, so you cannot just leave them out and start with the first dc. Instead you have to “replace” them with a standing hdc/dc so that you don’t mess up the stitch count.
Pros of Using Standing Single Crochet Stitches
- It’s neater
- It’s quicker
- It makes it easier to identify the first stitch of the round
Cons of Using Standing Single Crochet Stitches
{These aren’t really cons, more like “user error” issues, to quote my boss}
If you work quite loosely, your join might not be as neat as you would like it to be, because the standing single crochet starts in thin air. To remedy this, make sure that your tension is very tight when making the standing single crochet and then relax it to normal for the rest of the round.
Because the stitch starts in thin air, it is easy to join to the side of the stitch instead of to the top. To prevent this, make sure that you are working OVER the initial slip knot when joining at the end of your round. Otherwise, the knot will be visible and your join will be ugly and stretchy.
I hope you find this tutorial useful and would love to hear what you think, so if you have any questions/comments/suggestions, please do not hesitate to contact me.
And don’t forget to have a look at my other Free Patterns and Tutorials.

This blog post contains affiliate links. I only link to products I personally use or would use. All opinions are my own.

Shobhana Madhu says
Hi, May I ask which type of yarn have you used in this tutorial?
Jenny Lowman says
Hi Shobhana. I believe Dedri used Drops Paris cotton yarn.
Valerie says
I just made an article and wasn’t satisfied with the way it looked when I joined in the round. Then when contemplating making the Jacaranda CAL, I googled some stitches and found this article. Thanks so much, will get out my yarn and practice it in the morning. This is something I knew I wanted but didn’t know it existed. I will also study Tamara’s. Thank you very much.
Dedri Uys says
You are so very welcome :) Good luck!
Betty Lundy says
Thank you ever so much for this tutorial. This has bothered me to no end since I started crocheting. Your written and pictorial tutorials are excellent. Thank you for your time and dedication in providing the solution to this problem!!
Dedri Uys says
You’re welcome, Betty.
Laura Hickman says
This brilliant!!I’ve been crocheting for over 40 years and I can’t believe I’ve never caught on to this one. It looks so nice in the work. I’ve already pinned it to remind me. Thanks.
Dedri Uys says
You are very welcome :)
Diane Doyle says
Hi Dedri: Thank you so much for showing me the “standing single crochet”. This makes a lot more sense to me and less confusing. I’ve been crocheting since I was fourteen and starting with the slip stitch has always been a problem for me. It’s the little things that trip me up.
Thank you thank you thank you
Diane
Terri Shea says
I’m working on Firenze now, and I’ve been fighting with it, so I hope this will make it less confusing. But I have to wonder, doesn’t it cause a problem when the stitch isn’t raised to the right level? I thought that was the purpose of the chain, just as for a turning chain.
Thank you for taking the time to do these tutuorials. I had a difficult time with the K stitch. Most of them I know; I have a lot more troule with getting the right amount of stitches into the rounds. That was my problem on this one, I think.
I want to do Sophie’s Garden next, but I can’t decide if I want to make it huge, like one big blanket, or in Size 10 thread, for a wall. But, since I want to do the new CAL, I may have to wait on it!
Dedri Uys says
Terri, it does cause a slight problem when the stitch isn’t raised. The standing single crochet is automatically raised due to the fact that it is not attached to the previous round, but rather made in “thin air”, if that makes sense.
Rowena Kerr says
Love your tutorials…thanks.
Sakeenah says
The slip stitch always confuses me when it’s time to start the next round. I will be using this trick from now on. Thanks!
Mary says
I just started the block of the week but I would have never made the first block without your help. The K stitch almost did me in. Your photos and tutorials are fantastic. I know as long as your are writing about each block I can do it and now I see you are doing photo tutorials on each block too. I have been on your site so much in the last two days….wow, what a help. I am not new to crocheting but I have not crocheted in many years and really enjoy your site. Please keep on with your pictures and tutorials!!! Well, I have a lot of catching up to do with only one competed so off to work.
Dedri Uys says
Mary, thank you so much for your enthusiastic and encouraging post. I was starting to wonder if the tutorials were really necessary…but your comment has affirmed the fact that I am not doing them in vain. My driving force is trying to make crochet accessible to everyone. And I think we can all learn new things, no matter how experienced we are.
Are you going to post your finished squares to the flickr group/facebook group? If so, poke me so that I can look out for them! Good luck and just holler if you need anything cleared up.
The first 3 blocks don’t have photo tutorials, but all the other ones do. You will still need the actual patterns, though, as I don’t cover every round for every square.
Have a great evening, and thanx again for your kind words.
Dedri
fariba says
Dear Dedri , Thank you for your great explanation .This helped to me sooo much. :)
Dedri Uys says
I’m glad you found it useful, Fabrina :)
Wendy says
Thank you foryour tutorials with bow it is so helpful for learners and also your crocheting tutorials ie the standing single crochet
Dedri Uys says
Glad you like it, Wendy :)