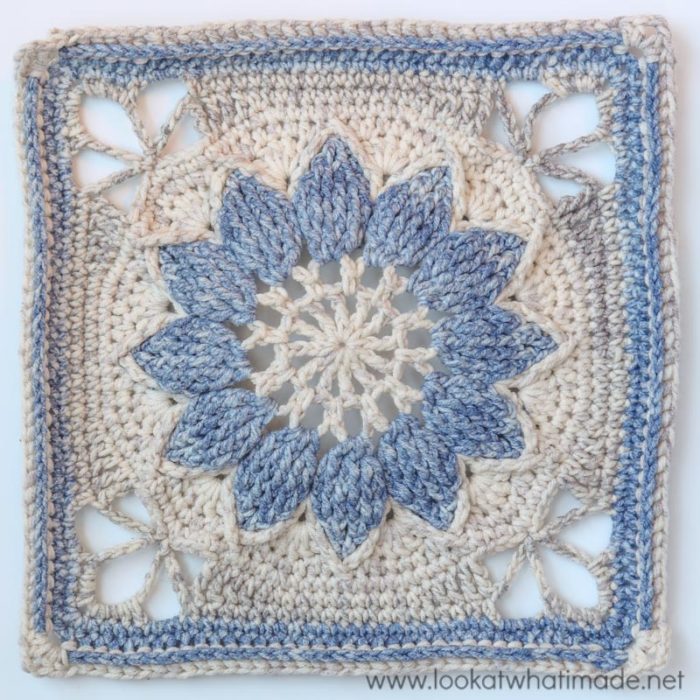
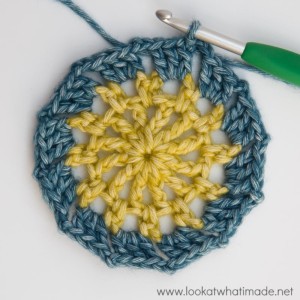
I know many of you have been eagerly awaiting the pattern for my new large crochet square, and I am very excited to bring you Part 1 of 3. In this part I will show you how to make the central square. Next week I will show you how to make the triangles used to extend the square. The week after I will show you how to make the border. You can see photos of the completed Charlotte Square HERE.
I have decided to call this crochet square Charlotte because I never did hear back from Counting Crows about using ‘Anna Begins’ as a name. I really, really wanted to use ‘Anna Begins’ (for so many reasons), but Charlotte was my second choice, and I think it suits the feel of this square.
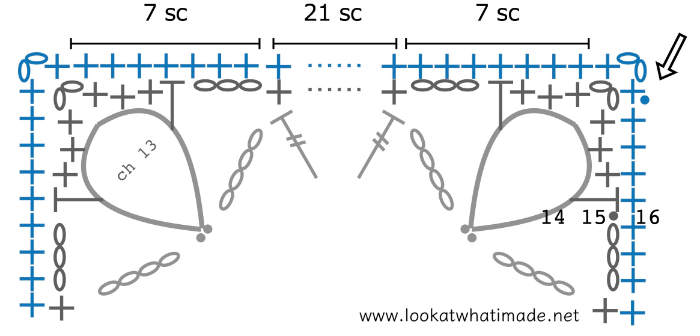
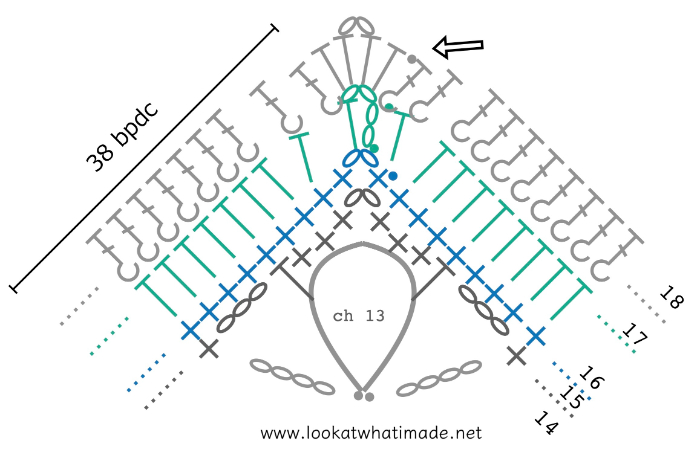
Update 2021: This post has been updated as part of the Charlotte’s Universe CAL 2021. Check out the fancy charts by Masako Kawahara!
Charlotte Large Crochet Square Part 1: Small Square
Resources
- You can find links to the right and left-handed video tutorials (US) for Part 1 HERE on It’s All in a Nutshell.
- If you need help with any of the special stitches or techniques used in this pattern, please see Special Stitches and Techniques.
Original Translations
Updated Translations With Charts
- German Translation by Sabi Bulla and Silke Schippa-Witte
- Hebrew Translation by Michal Ben-Hur, Iris Fait, Tami Sultan Nudelman, Tali Shchori, and Sarit Grinberg
Materials and Gauge
Please consult the relevant pattern:
Abbreviations
US Terminology (US/UK Conversion HERE)
- Ch – Chain
- BP – Back post (insert your hook from back to front around the post of the indicated stitch and complete the stitch as normal)
- Dc – Double crochet
- Dc2tog – Double crochet 2 together (see Special Stitches)
- FP – Front post (insert your hook from front to back around the post of the indicated stitch and complete the stitch as normal)
- Hdc – Half-double crochet
- Sc – Single crochet
- Tr – Treble crochet
- Sl st – Slip stitch
- Sp/sps – Space/spaces
- St/sts – Stitch/stitches
- () and * – Repeat instructions between parentheses and/or asterisks the number of times specified
Special Stitches
- Dc2tog – Yarn over and insert your hook into the indicated stitch. Yarn over and pull up a loop. Yarn over and pull through 2 loops. Yarn over and insert your hook into the next stitch. Yarn over and pull up a loop. Yarn over and pull through 2 loops. Yarn over and pull through all 3 loops on your hook.
- Standing Stitches – Standing stitches are exactly the same as regular stitches, except that they are made ‘in air’, without being attached to a previous stitch. Start with a slip knot already on your hook and complete the stitch as normal. Here are some tutorials for the standing double crochet and standing single crochet to get you started.
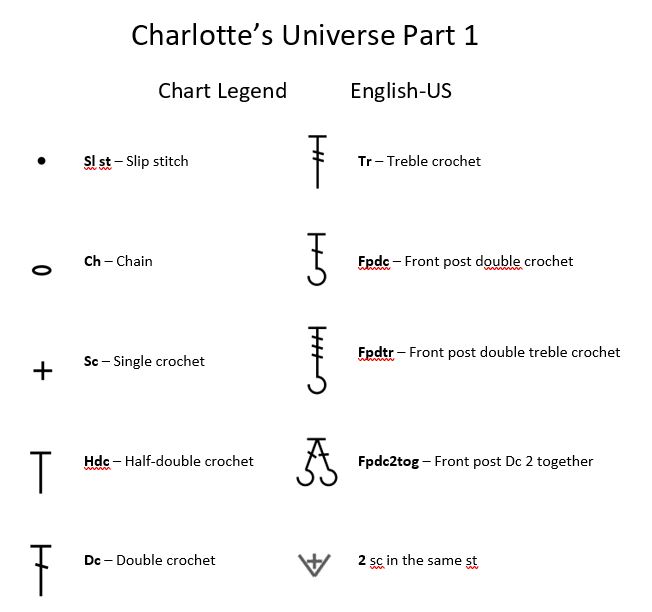
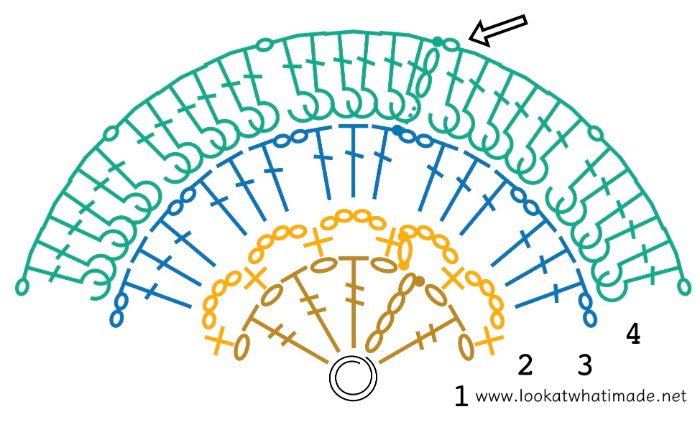
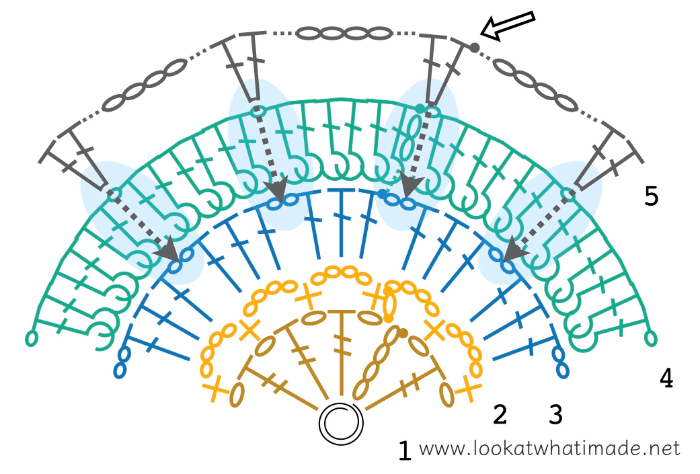
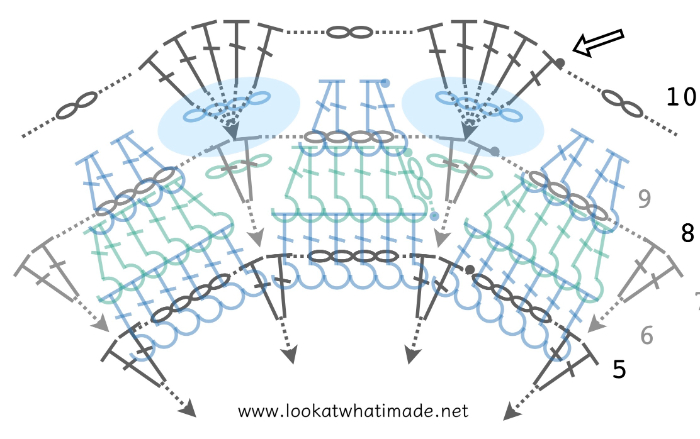
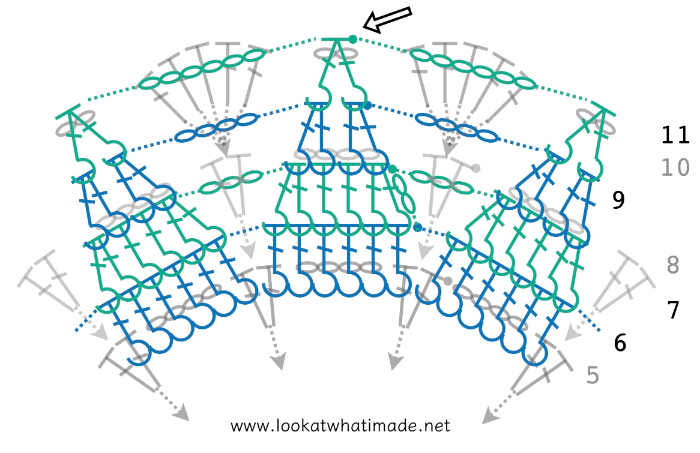
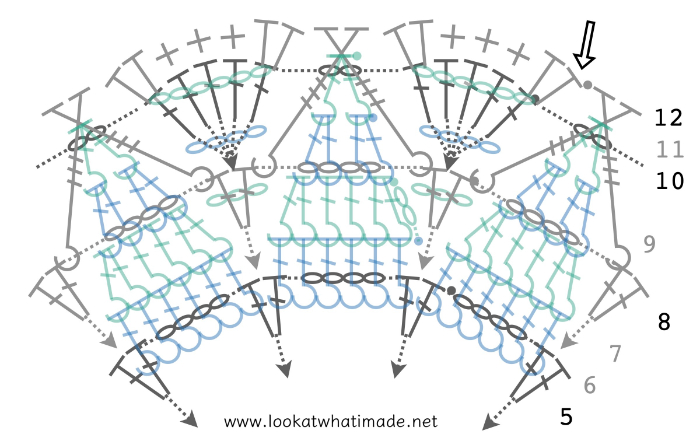
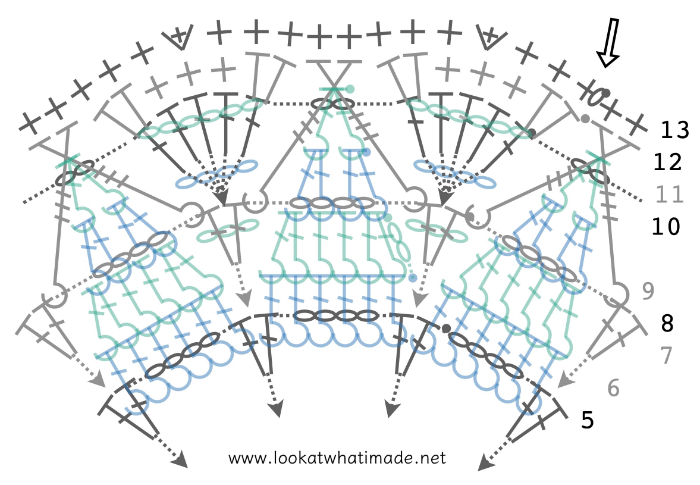
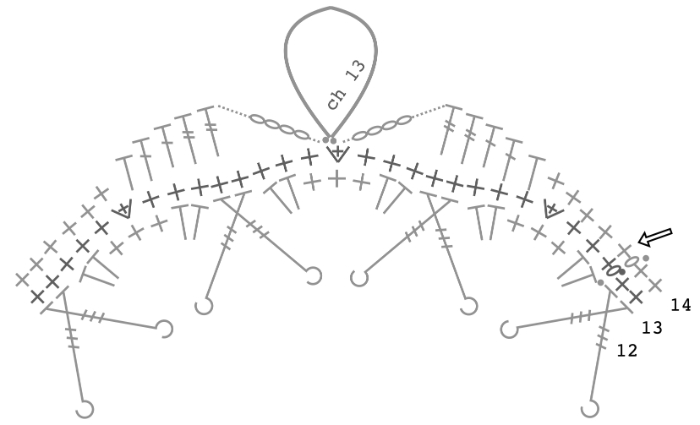
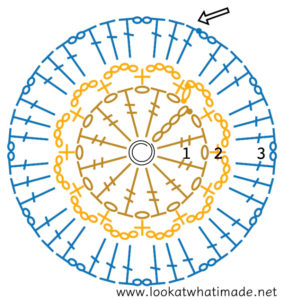
Charts
Credit: Masako Kawahara from Crochet_Hmmm
Please follow the charts in a counter-clockwise direction, regardless of whether you are right or left-handed.
Notes
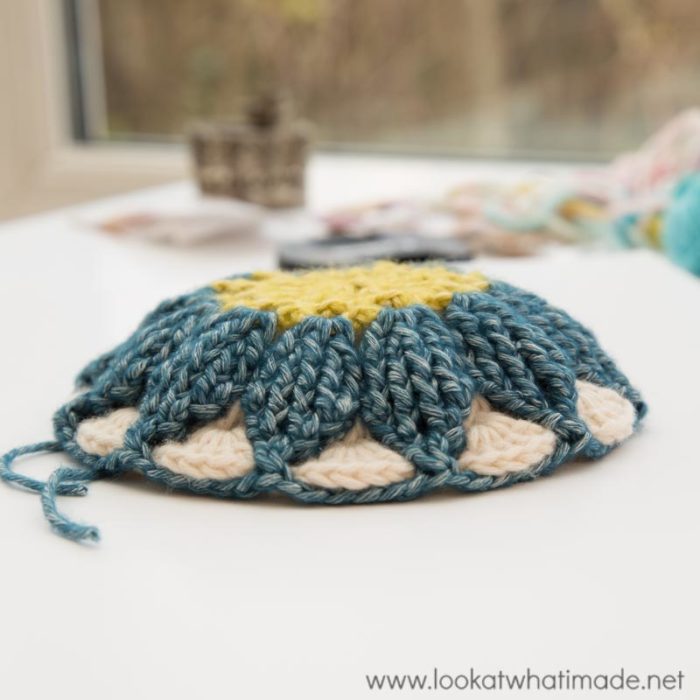
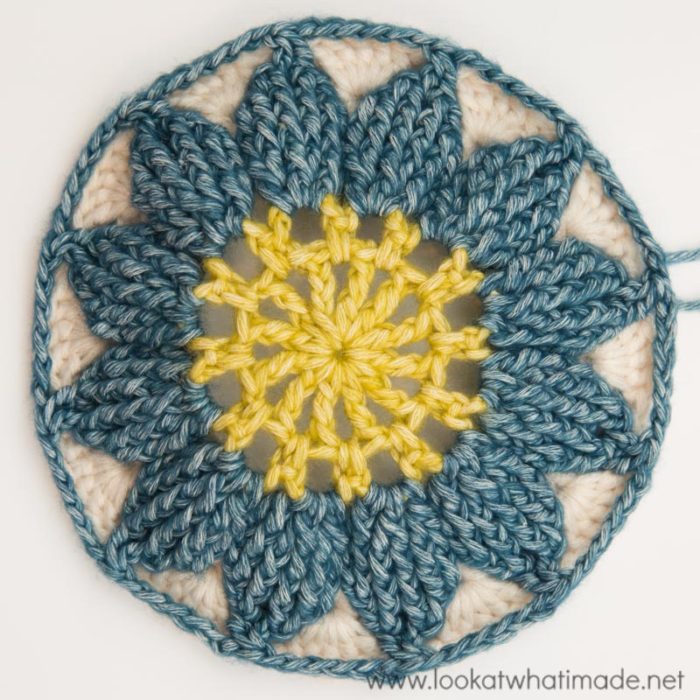
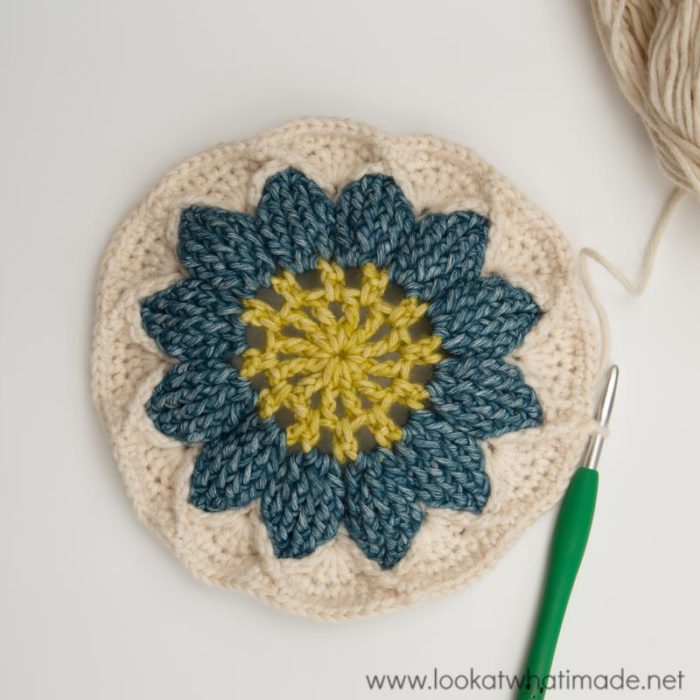
The central Flower of this square is textured and raised slightly above the surface. When you have only made the flower, it will look like it bulges a lot (because of all those front post stitches), but as the square progresses this will become less noticeable. With use, the flower will relax down even further, but it will always remain slightly raised above the surface of the square.
For the photos in this photo tutorial, I have used Scheepjes Stonewashed XL and a 5.5 mm crochet hook. This is one of my all-time favourite yarns, and my hands are itching to work up a cream, purple, and soft lime version!
If you find that your square refuses to become ‘square’ by Round 18 (the corners are pointy and the sides are ruffled/wavy), it is an indication that you are making your chains far tighter than the rest of your stitches, which pulls the square in and prevents it from having enough surface area for the number of stitches in the last round.
You can fix this by doing one of the following:
- Relax your tension when making the chains
- Use a bigger hook for the chain portions when making the Flower ONLY
- Add an extra chain to each chain space when making the Flower ONLY
This usually happens if you are a ‘yanker’ (please see THIS GOLDEN LOOP VIDEO).
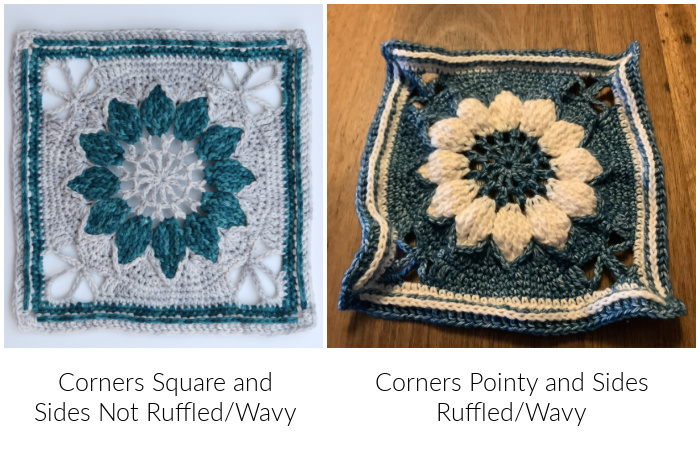
Example Square on the right courtesy of Diane Kelly
Instructions
© Dedri Uys 2016. All Rights Reserved.
Round 1 (Colour A)
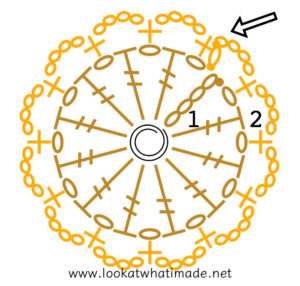
Into a magic ring: ch 5 (counts as tr + ch 1). (Tr, ch 1) 11 times. Join to the 4th ch of the beginning ch-5 with a sl st.
Stitch Count: 12 tr and 12 ch-1 sps
Round 2 (Colour A)
Sl st into the next ch-1 sp. (Ch 1, sc) into the same ch-1 sp. (Ch 4, sc in the next ch-1 sp) 11 times. Ch 4. Join to the top of the first sc with a sl st. Fasten off and work away your ends.
Stitch Count: 12 sc and 12 ch-4 sps
Round 3 (Colour B)
Join your yarn by making a standing dc in any ch-4 sp. Make 2 more dc in the same ch-4 sp. (Ch 2, make 3 dc in the next ch-4 sp) 11 times. Ch 2. Join to the top of the standing dc with a sl st.
Stitch Count: 36 dc and 12 ch-2 sps
Round 4 (Colour B)
Ch 2 (doesn’t count as a st). Make 2 FPdc around the post of the same (first) dc from Round 3. Make 2 FPdc around each of the next 2 dc. Ch 1. (Make 2 FPdc around each of the next 3 dc, ch 1) 11 times. Join to the top of the first FPdc with a sl st. Fasten off and work away your ends.
Stitch Count: 72 FPdc and 12 ch-1 sps
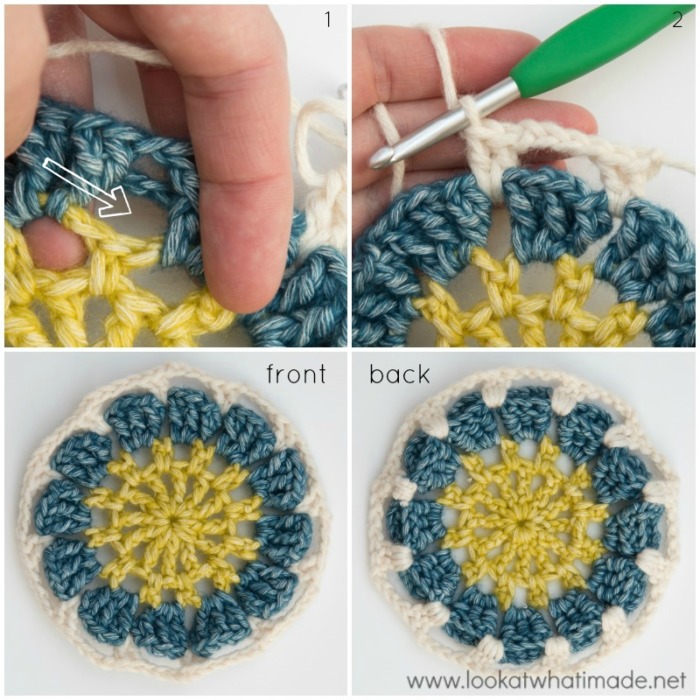
Round 5 (Colour A)
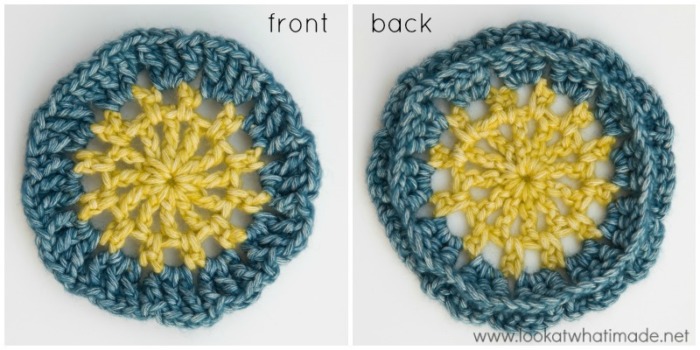
Join your yarn by making a standing dc into any ch-2 sp from Round 3, working OVER the ch-1 sp from Round 4. You will find the ch-2 sps between Petals {Photos 1 and 2}. Dc in the same ch-2 sp. (Ch 4. Make 2 dc in the next ch-2 sp from Round 3, working OVER the ch-1 sp from Round 4) 11 times. Ch 4. Join to the top of the standing dc with a sl st. Fasten off and work away your ends.
Stitch Count: 24 dc and 12 ch-4 sps
Round 6 (Colour B)
Work in front of the ch-4 sps from Round 5 when making this round. You will need to dig around a bit to locate the first FPdc of each 6-FPdc ‘group’.
Hint: Work in 12 lots of 6 stitches to make sure that you don’t accidentally skip any stitches. You should make 6 stitches into each Petal.
Join your yarn by making a standing FPdc around the first FPdc of any 6-FPdc group from Round 4. Make a FPdc around each of the remaining 71 sts. Join to the top of the first FPdc with a sl st.
Stitch Count: 72 FPdc
Your flower will be ruffled at this point. Don’t worry about it.
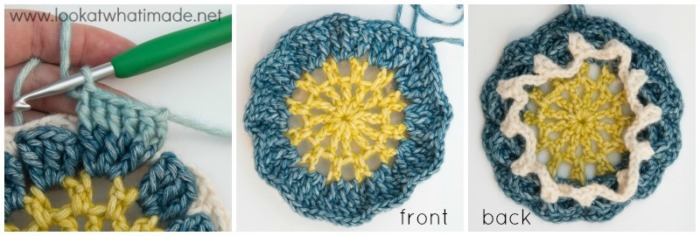
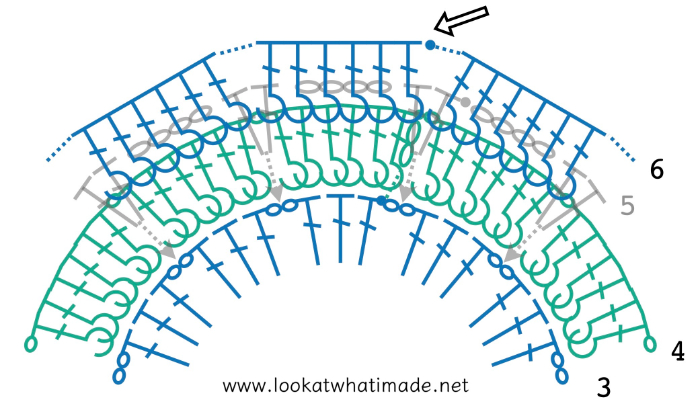
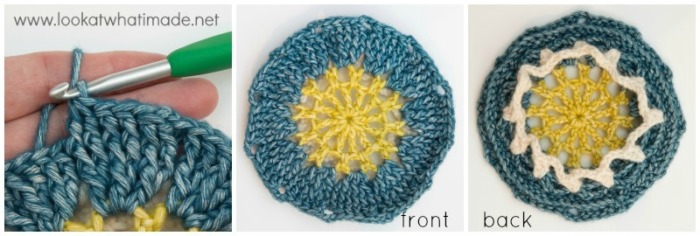
Round 7 (Colour B)
Ch 2 (doesn’t count as a st). (FPdc2tog, working into the first 2 FPdc of the Petal. FPdc in the next 2 sts. FPdc2tog, working into the last 2 FPdc of the Petal. Ch 3) 12 times. Join to the first FPdc2tog with a sl st. Fasten off and work away your ends.
Stitch Count: 48 FPdc and 12 ch-3 sps
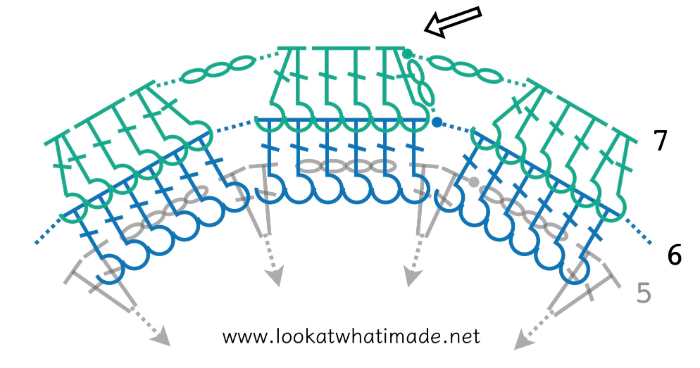
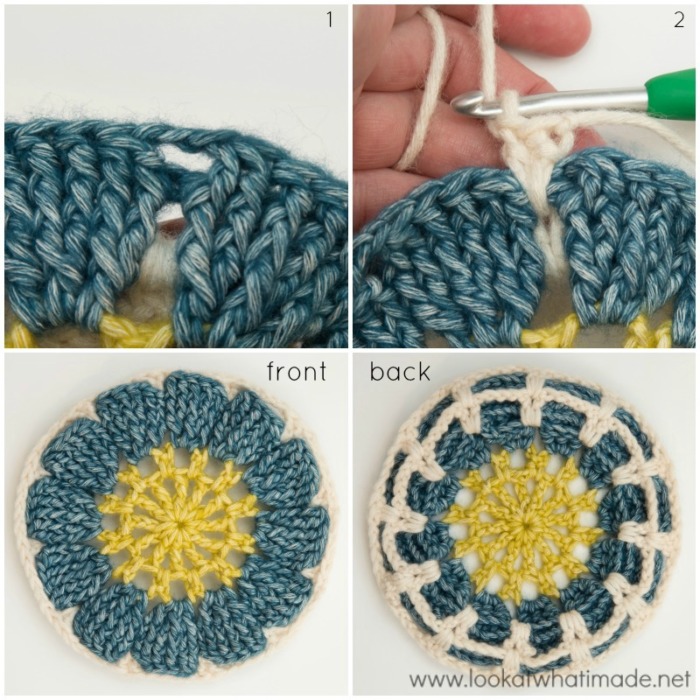
Round 8 (Colour A)
In this round, you will be working between the 2 dc that form each 2-dc group in Round 5. You will work OVER the ch-3 sp from Round 7 and the stitches of Round 6 (between Petals). You will need to apply quite a bit of tension to ensure your dc sts are ‘tight’.
Make a standing dc between any 2 dc from Round 5, remembering to work OVER Rounds 6 and 7. Make another dc between the same 2 dc. (Ch 4. Make 2 dc between the next 2 dc from Round 5, remembering to work OVER Rounds 6 and 7) 11 times. Ch 4. Join to the first dc with a sl st. Fasten off and work away your ends.
Stitch Count: 24 dc and 12 ch-4 sps
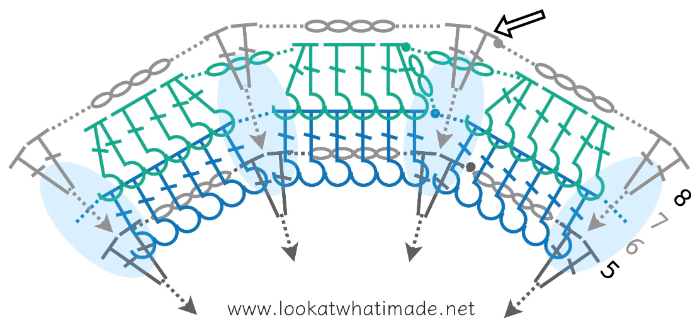
Round 9 (Colour B)
Join your yarn by making a standing FPdc2tog around the first 2 sts of any Petal from Round 7 (in other words, around the FPdc2tog and the first FPdc). FPdc2tog around the last 2 sts of the Petal. Ch 4. (FPdc2tog twice into the next Petal of Round 7. Ch 4) 11 times. Join to the first FPdc2tog with a sl st. Fasten off and work away your ends.
Stitch Count: 24 FPdc and 12 ch-4 sps
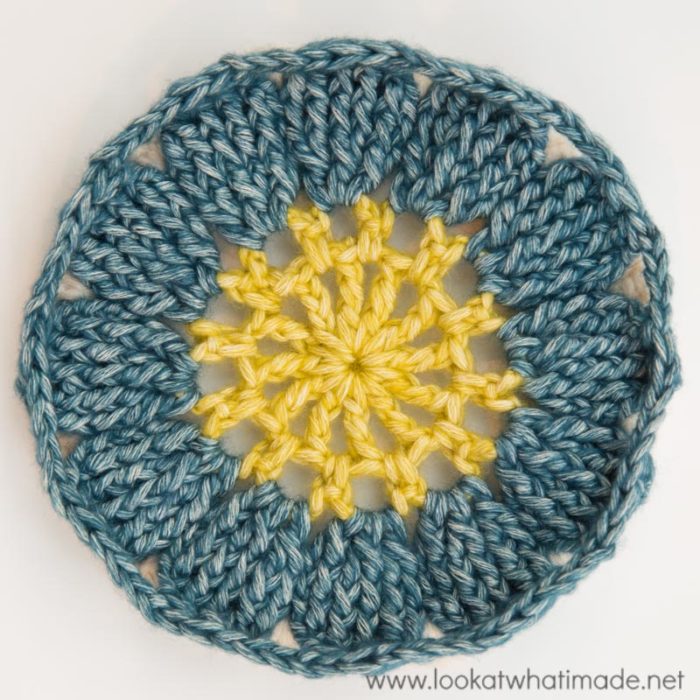
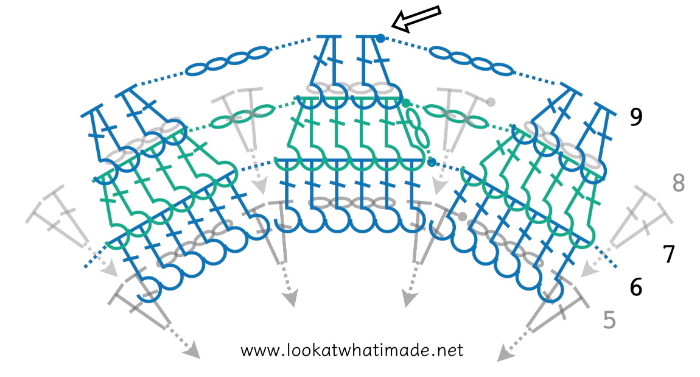
Round 10 (Colour A)
Join your yarn by making a standing dc between any 2 dc from Round 8, working OVER the ch-4 sp from Round 9. Make 4 dc in the same sp. (Ch 2 and make 5 dc between the next 2 dc from Round 8) 11 times. Ch 2. Join to the first dc with a sl st. Fasten off and work away your ends.
Stitch Count: 60 dc and 12 ch-2 sps
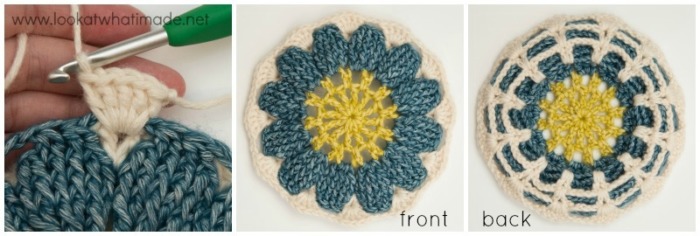
Round 11 (Colour B)
Join your yarn by making a FPdc2tog around the remaining 2 sts of any Petal from Round 9. (Ch 6 and FPdc2tog around the 2 sts of the next Petal from Round 9) 11 times. Ch 6. Join to the first FPdc2tog with a sl st. Fasten off and work away ends.
Stitch Count: 12 FPdc and 12 ch-6 sps
At the end of this round, your flower will bulge quite a lot. This will relax but it won’t completely go away. The final flower will be raised slightly above the surface of the square.
Round 12 (Colour A)
In this round, you will work IN FRONT OF the ch-6 sps from Round 11.
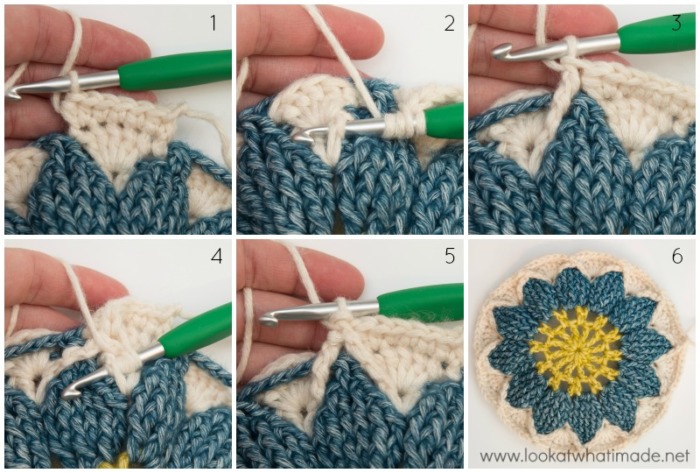
Join your yarn by making a standing hdc in the first dc of any 5-dc group from Round 10. Hdc in the same st. Sc in the next 3 sts. Make 2 hdc in the next st, which will be the last dc of the 5-dc group {Photo 1}. FPdtr in the dc from Round 8 to the left of the next Petal (to the right if you are left-handed) – Photos 2 and 3. FPdtr in the dc from Round 8 to the right of the same Petal (to the left if you are left-handed) – Photos 4 and 5. You are essentially doubling back, and you will need to fold/turn your work to make it easier to get into that stitch.
*Make 2 hdc in the first dc of the next 5-dc group from Round 10. Sc in the next 3 sts. Make 2 hdc in the next st. FPdtr in the dc from Round 8 to the left of the next Petal (to the right if you are left-handed). FPdtr in the dc from Round 8 to the right of the same Petal (to the left if you are left-handed).*
Repeat from * to * 10 more times. Join to the first hdc with a sl st.
Stitch Count: 108 sts {36 sc, 48 hdc, and 24 FPdtr}
Round 13 (Colour A)
Ch 1 and sc in the same st as the sl st join, which will be the hdc after 2 FPdtr. Sc in the next 2 sts. (Make 2 sc in the next st, which should be the central of the 3 sc from the previous round. Mark the second sc with a SM if you are going to have trouble finding it in the next round. Sc in the next 8 sts) 11 times. Make 2 sc in the next st. Sc in the last 5 sts. Join to the first sc with a sl st.
Stitch Count: 120 sc
Remember to check your gauge at the end of this round.
Round 14 (Colour A)
Ch 1 and sc in the same st as the sl st join. Sc in the next 4 sts. You should now have 5 sc, the last of which should fall in the second (marked) sc of the increase from the previous round.
*Hdc in the next st, dc in the next 2 sts, tr in the next 2 sts. Ch 4, skip the next 4 sts and sl st in the next st, which should be the second (marked) sc of the increase from the previous round. Ch 13 and sl st in the same st to form a loop. Ch 4 and skip the next 4 sts. Tr in the next 2 sts, dc in the next 2 sts, hdc in the next st. Sc in the next 11 sts. The first and last sc should fall in the second (marked) sc of the increase from the previous round.*
Repeat from * to * 3 more times, omitting the last 5 sc on the last repeat (because you’ve already made them at the start of this round). Join to the first sc with a sl st. Fasten off and work away your ends.
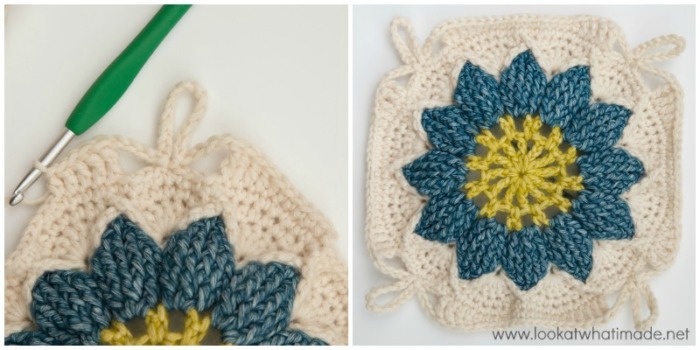
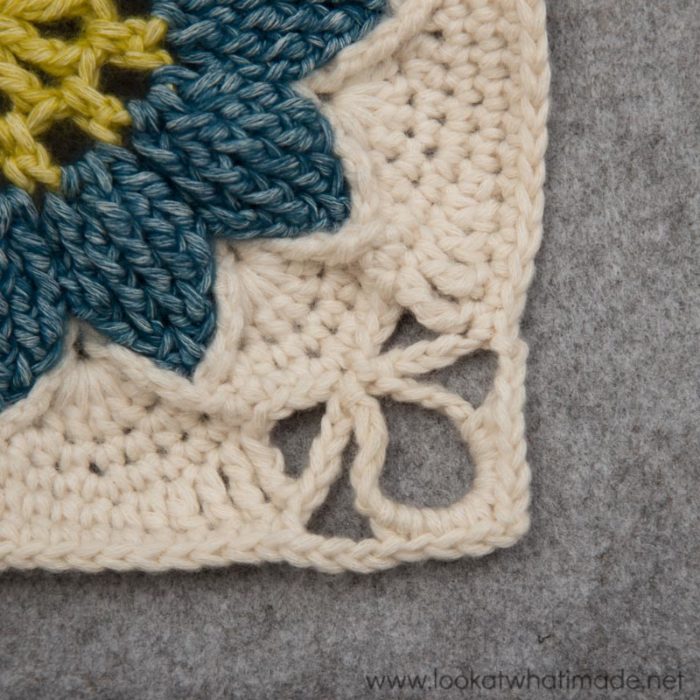
Have a look at your work before continuing. The flowers formed by the ch-4 and ch-13 loops are your corners. Each of them should fall between 2 Petals. If they don’t, you’ll need to check your stitches to see where you have gone wrong.
Stitch Count: 84 sts {44 sc, 8 hdc, 16 dc, 16 tr, 8 ch-4 sps, and 4 ch-13 sps}
Round 15 (Colour A)
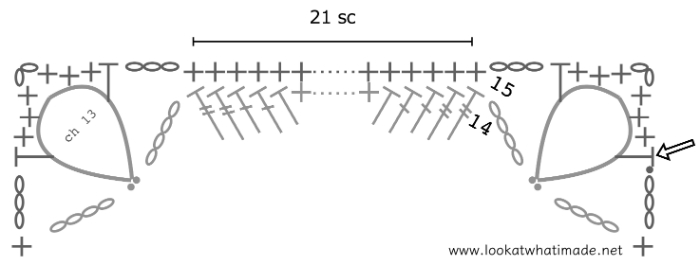
Join your yarn by making a standing hdc in any ch-13 sp around. Try to make this st close to the middle of the ch-13 sp. Into the same ch-13 sp: (3 sc, ch 2, 3 sc, hdc). This is your first corner made. Move these sts up so that they fall over the centre of the ch-13 sp. You can adjust them later if it looks a bit wonky now.
*Ch 3, skip the ch-4 sp, sc in each of the next 21 sts. Ch 3 and skip the next ch-4 sp. Into the next ch-13 sp: (hdc, 3 sc, ch 2, 3 sc, hdc).*
Repeat from * to * 3 more times, omitting the last corner on the last repeat. Join to the first hdc with a sl st. Fasten off and work away your ends.
Stitch Counts:
- Total: 116 sts {8 hdc, 108 sc, 8 ch-3 sps, and 4 ch-2 corner sps}
- Per Side: 29 sts {2 hdc, 27 sc, and 2 ch-3 sps}
Round 16 (Colour B)
Join your yarn by making a standing sc in any ch-2 corner sp. (Ch 2, sc) in the same sp. This is your first corner made.
*Sc in the next 4 sts. Make 3 sc in the next ch-3 sp. Sc in the next 21 sts. Make 3 sc in the next ch-3 sp. Sc in the last 4 sts. Don’t accidentally skip the hdc right after the ch-3 sp. (Sc, ch 2, sc) in the next ch-2 corner sp.*
Repeat from * to * 3 more times, omitting the last corner on the last repeat. Join to the first sc with a sl st.
Stitch Count: 148 sc and 4 ch-2 corner sps {37 sc per side}
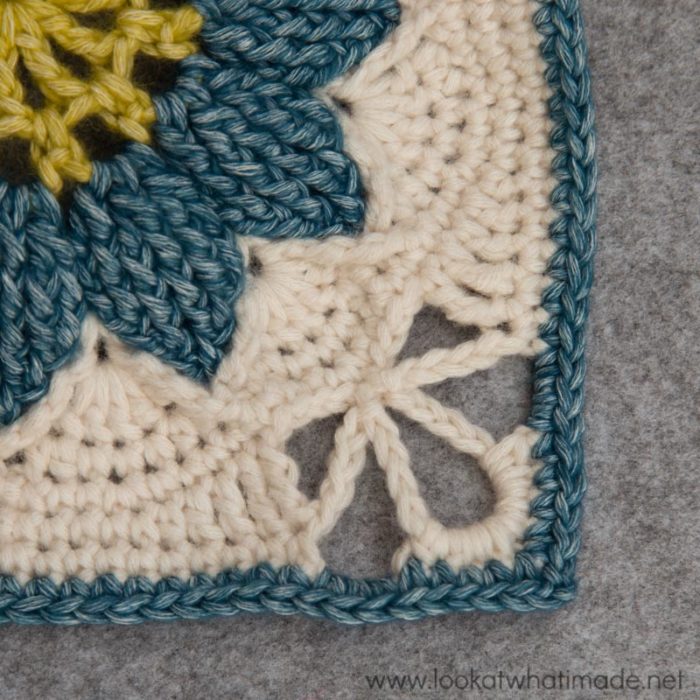
Round 17 (Colour B)
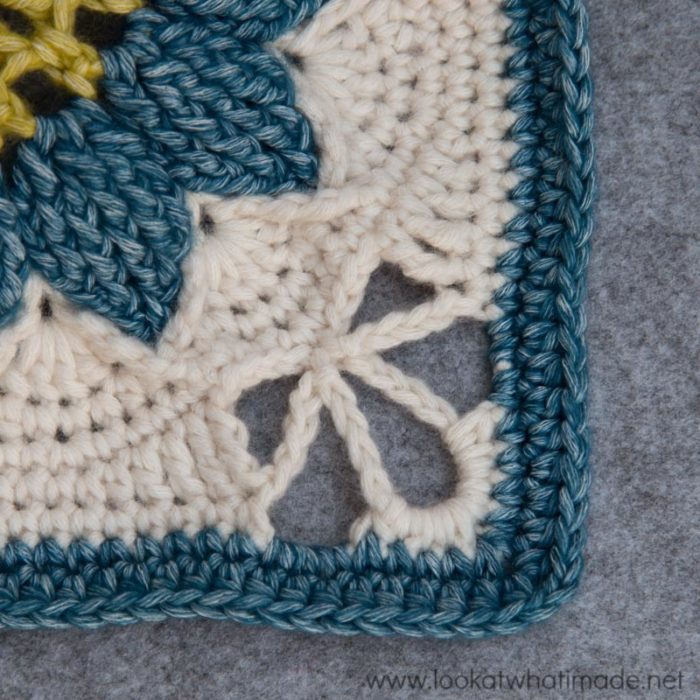
Sl st into the ch-2 corner sp. Ch 4 (counts as hdc and ch-2). Hdc in the same sp. This is your first corner made.
*Skip the first (hidden) st. Hdc in each of the remaining 36 sts. (Hdc, ch 2, hdc) in the next ch-2 corner sp.*
Repeat from * to * 3 more times, omitting the last corner on the last repeat. Join to the second ch of the initial ch-4 with a sl st. Fasten off and work away your ends.
Stitch Count: 152 hdc and 4 ch-2 corner sps {38 hdc per side}
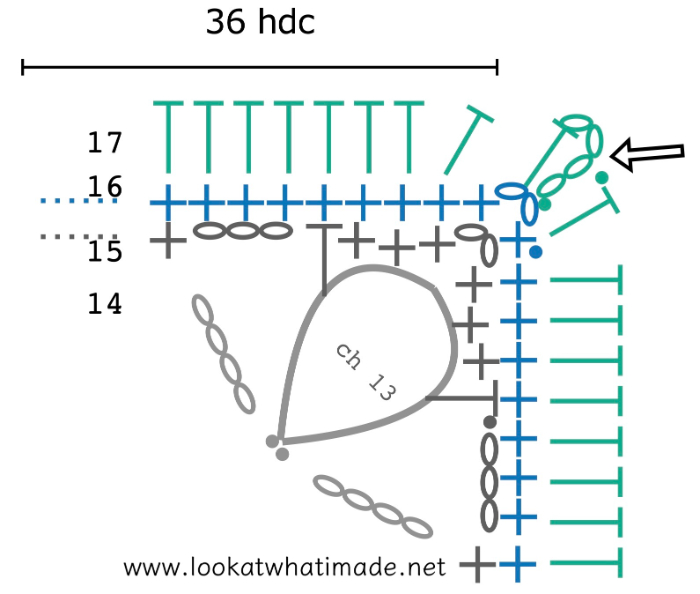
Round 18 (Colour A)
Join your yarn by making a standing hdc in any ch-2 corner sp. (Hdc, ch 2, 2 hdc) in the same sp. This is your first corner made.
*BPdc in each of the 38 sts across. (2 hdc, ch 2, 2 hdc) in the next ch-2 corner sp.*
Repeat from * to * 3 more times, omitting the last corner on the last repeat. Join to the first hdc with a sl st. Fasten off and work away your ends.
Stitch Counts:
- Total: 168 sts and 4 ch-2 corner sps {16 hdc and 152 BPdc}
- Per Side: 42 sts per side {4 hdc and 38 BPdc}
Remember to check your gauge at the end of this round.
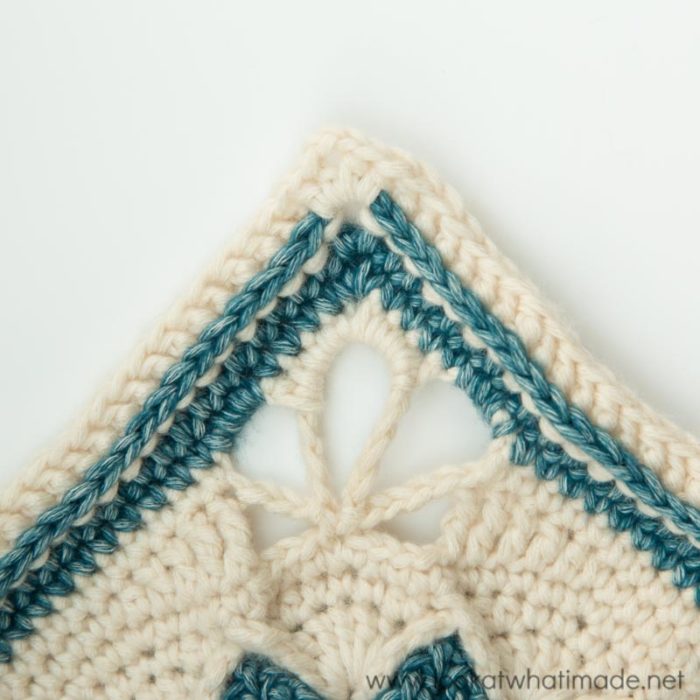
And there you have it. One central square made!

This blog post contains affiliate links. I only link to products I personally use or would use. All opinions are my own.


Margo says
I love this blanket. I would like to know how to make or find the pattern for the large baby blanket please.
Jenny says
Check the blog for the Sunshine Baby extension. Dedri hasn’t released Simply Charlotte yet, but she does give information about another lady’s beautiful extended version.
Jenny :)
Wendy says
What day of the week do you update? Love this pattern. Can’t wait to carry on.
Jenny says
All 3 parts of the Charlotte square are released, and have been for some considerable time now :)
Annette says
I’m just starting this square and noticed that there are 3 colours but only colour A and colour B is mentioned…I’m assuming that the center colour is the colour C
Jenny says
Hi! There are three colours in the whole square, but this section only uses two of them :)
Jenny
Sheila says
Hi Dedri,
I wonder if you have any plans to add to Charlotte? I have made parts 1,2 and 3 in worsted weight yarn so I have about a 25 inch square. I would love to make a queen bedspread. I made Sophie’s Universe into a bedspread and it came out great.
I love your patterns! They are so much fun to do! Keep up the great work!!
Jenny says
If you look closely, Dedri has recently had her growing version of Charlotte in some pics on her blog posts and Facebook/Instagram pics!
I am sure you won’t miss the excitement when Dedri is happy and finished with a grown Charlotte!
Keep your eyes peeled next year!
BW Jenny :)
Jeremy Schultz says
At the end of several rounds, the instructions detail to “Fasten off and work away your yarn ends”. But then when I pick up that colour again, I find myself starting in the same place I left off (or a place that I could reasonably slip-stitch to unobtrusively, or a place that I could chain up before doing the FPdcs.
Instead of cutting the yarn, and restarting the colour again, wouldn’t it be easier to just pull out a big loop while you work with the other colour, and then tighten the loop up again when it is time to work with that colour again?
Thank you for this great pattern. I really really love it so far! and it is just gorgeous.
Dedri Uys says
Hi Jeremy. That is a very valid point and you are certainly welcome to pull up a long loop instead of cutting your yarn. For this particular pattern, it was personal preference not to do so. I have, however, done so with my two-colour linen stitch squares, if anyone else reads your query and would like to know more about the technique.
Michelle says
HI Jeremy, I’ve just finished row 11 and was thinking exactly the same thing. Partly because I always leave the weaving till last so I’ve got a huge mess of strands. I will try this next time.
Michelle
Amanda says
Hi, I just wanted to comment on a few things. Firstly thank you so much for this pattern it is an absolute joy to make and has actually turned into a passion for me. I have only been crocheting for a few years and I love the different stitches and techniques used. Secondly I really wanted to comment on the video tutorial for part 1 from Its All In A Nut Shell…Wow she is a wonderful teacher and the video was a great tool when I got a little lost in rounds 9 & 10. Thank you to you all for helping me experience another way to open up my creative horizons.
Dedri Uys says
Hi Amanda. Thank you for your love, enthusiastic comment. I am so pleased that you have enjoyed Charlotte so much. Esther is indeed a wonderful teacher. May you continue thriving in this new-found passion x
Kristi Renee Richman says
Hi there! This is just so beautiful! I am stuck on row 14! I’ve torn this out 4 times now and cannot figure out what is going on? I get all the way to the eand each time and run out of stitches? Each time I go back 1-3 rows and this last time I started completely over from scratch and still ended up exactly the same? Do you have any ideas?
Dedri Uys says
Hi Kristi. I am sorry to hear that you are finding Row 14 tricky. Can you use the Contact Me tab to send me an email? We can then open a channel of conversation that will allow us to exchange photos and better trouble-shoot this.
Dedri
Kristi Renee Richman says
I got it! I’m on my 5th square now! You give amazing instructions! I just had to slow down and not let the grandkids distract me! Lol
Dedri Uys says
Yay! Well done :)
Lauri Salcido says
Absolutely love this pattern. I have made 2 blankets so far using this as the base.
Dedri Uys says
I’m so glad you like it, Lauri :)
Tanya says
How would I join my squares and do a border, if I stop after part one. My squares with 4 ply yarn are measuring 12.5 inches. I’m working on my 3rd square ( of part 1) I’m afraid if I go to part 2 they will get way TOO big
Dedri Uys says
Hi Tanya. I have just emailed you. Let me know if you don’t get it.
Berney says
Hi Dedri. I trust that you are well. Thank you for this pattern. It’s so pretty that I just had to do it. I’m an Amigurumi girl so it must be something really special to get me to do anything else.
I am stuck on Round 12 though. What is DTR in FPdtr? Double treble? How on earth is that done?
Thank you once again for this. I sit in my husband’s isolation ward and crochet while he battles his leukemia and I wanted quick projects because I want to make many different things to keep him interested and he enjoys watching me.
Dedri Uys says
Hi Berney. A double treble is yarn over 3 times. You might find this video useful. Crochet can be so soothing in difficult times. I hope your husband is restful and pain-free. I work with cancer in my ‘real’ job and it is a terrifying disease. My thoughts go with you.
Dina Harman says
Dedri, I absolutely loved making this. My recuperation project after surgery for Breast Cancer. The video tutorials were really helpful. You can see my finished blankey on Ravelry- Ozzysmum x
Dedri Uys says
Hi Dina. I am a radiotherapist and work with cancer daily. I am pleased that you turned your attention to something positive in this time and hope that it helped you deal with what must have been such a scary time. Your photos are lovely… every single one of them x
Alicia says
I’ve been crocheting obsessively for more than 5 years now? This pattern has challenged me and I absolutely love it! You are the best, thank you so very much. Can’t say enough how wonderful this is.
Dedri Uys says
Thank you, Alicia. Have you shared photos of your work?
Vanessa Rossouw says
So gorgeous. I will definitely try this.
Dedri Uys says
Thank you :)
Lucy says
I cannot wait to get started on this – tomorrow morning is the plan… I have searched for 2 months and this is the one I have chosen. Thank you for the beautiful creation and pattern that is not completely daunting….
Diann Hayes says
This is absolutely wonderful. Your instructions and illustrated pictures are so easy to follow. I thank you especially for including “left handed” instructions for folks like me. I have just finished Part 1 using yarns I had around the house. Tomorrow—Part 2 begins. What a beautiful afghan. It has so many different possibilities. Thank you for your creativity and for sharing all this. My mind is going abuzz with all the different colors and how they can be mixed/matched.
Dedri Uys says
Thank you, Diann. I am so glad that you are enjoying the pattern x
Pauline Holloway Swanepoel says
thanks Dedri, I cant wait to get started. thx for all the wonderful pics…
Dedri Uys says
You’re welcome :)
Karen Bidwell says
Hi. I’m new to the magic ring. How many chain stitches make the magic ring? Thanks
Dedri Uys says
There are plenty of youtube tutorials for the magic ring, but if you really don’t want to use it, you can use a ch-4 ring instead.
Louise says
Hello, is there a way of extending the Charlotte into a blanket with just one Charlotte?
Dedri Uys says
Hi Louise. You can have a look at the Around the Bases pattern. You might have to make a few rounds first to get to the correct stitch multiple.
Megan says
I appreciate how you write directions! With most patterns, I understand the terminology but doubt whether I’m doing it correctly. So, thank you for being detailed in your written directions and using pictures, it makes this a fun project instead of a stressful one!
Dedri Uys says
Thank you, Megan. I always aim to write my patterns (well, my later ones) in the same way I would talk someone through it. It’s not conventional, but it’s me. I am glad that it works for you :)
Lillie Walker says
I would love to download this pattern, but can’t seem to get it in a PDF form. Any suggestions?
Dedri Uys says
You can use the print-friendly button at the bottom of each post to save the pattern as a PDF.