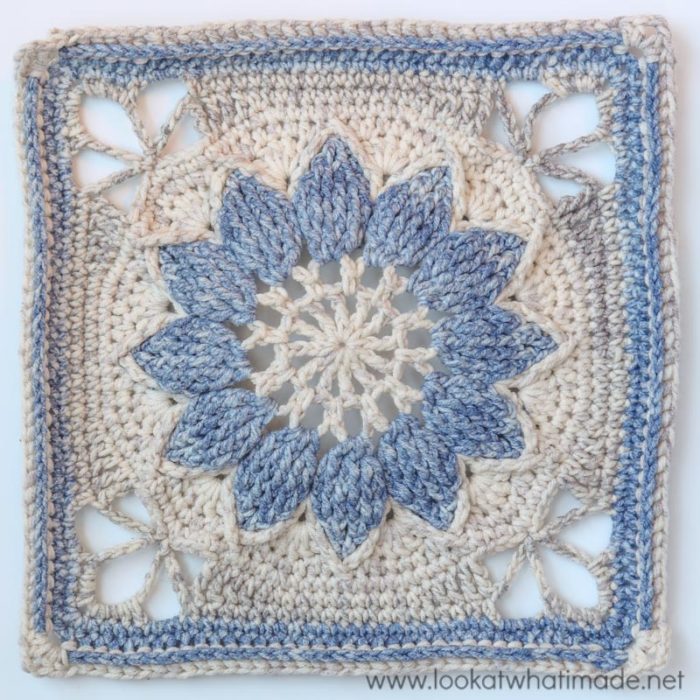
I know many of you have been eagerly awaiting the pattern for my new large crochet square, and I am very excited to bring you Part 1 of 3. In this part I will show you how to make the central square. Next week I will show you how to make the triangles used to extend the square. The week after I will show you how to make the border. You can see photos of the completed Charlotte Square HERE.
I have decided to call this crochet square Charlotte because I never did hear back from Counting Crows about using ‘Anna Begins’ as a name. I really, really wanted to use ‘Anna Begins’ (for so many reasons), but Charlotte was my second choice, and I think it suits the feel of this square.
Update 2021: This post has been updated as part of the Charlotte’s Universe CAL 2021. Check out the fancy charts by Masako Kawahara!
Charlotte Large Crochet Square Part 1: Small Square
Resources
- You can find links to the right and left-handed video tutorials (US) for Part 1 HERE on It’s All in a Nutshell.
- If you need help with any of the special stitches or techniques used in this pattern, please see Special Stitches and Techniques.
Original Translations
Updated Translations With Charts
- German Translation by Sabi Bulla and Silke Schippa-Witte
- Hebrew Translation by Michal Ben-Hur, Iris Fait, Tami Sultan Nudelman, Tali Shchori, and Sarit Grinberg
Materials and Gauge
Please consult the relevant pattern:
Abbreviations
US Terminology (US/UK Conversion HERE)
- Ch – Chain
- BP – Back post (insert your hook from back to front around the post of the indicated stitch and complete the stitch as normal)
- Dc – Double crochet
- Dc2tog – Double crochet 2 together (see Special Stitches)
- FP – Front post (insert your hook from front to back around the post of the indicated stitch and complete the stitch as normal)
- Hdc – Half-double crochet
- Sc – Single crochet
- Tr – Treble crochet
- Sl st – Slip stitch
- Sp/sps – Space/spaces
- St/sts – Stitch/stitches
- () and * – Repeat instructions between parentheses and/or asterisks the number of times specified
Special Stitches
- Dc2tog – Yarn over and insert your hook into the indicated stitch. Yarn over and pull up a loop. Yarn over and pull through 2 loops. Yarn over and insert your hook into the next stitch. Yarn over and pull up a loop. Yarn over and pull through 2 loops. Yarn over and pull through all 3 loops on your hook.
- Standing Stitches – Standing stitches are exactly the same as regular stitches, except that they are made ‘in air’, without being attached to a previous stitch. Start with a slip knot already on your hook and complete the stitch as normal. Here are some tutorials for the standing double crochet and standing single crochet to get you started.
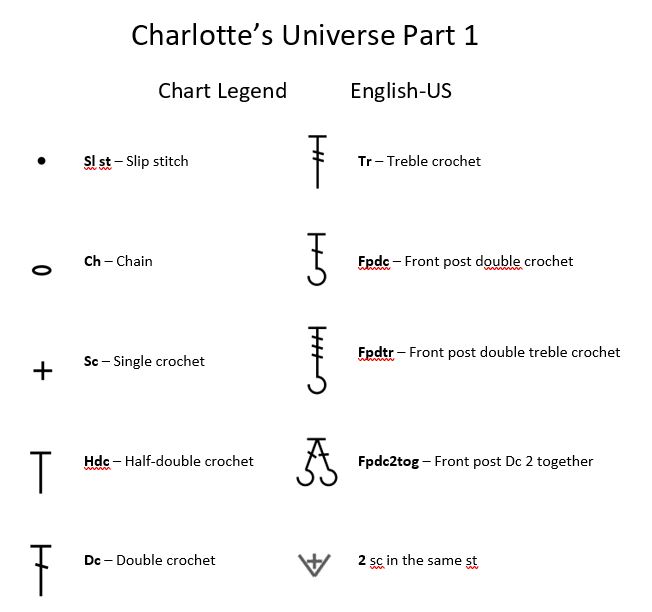
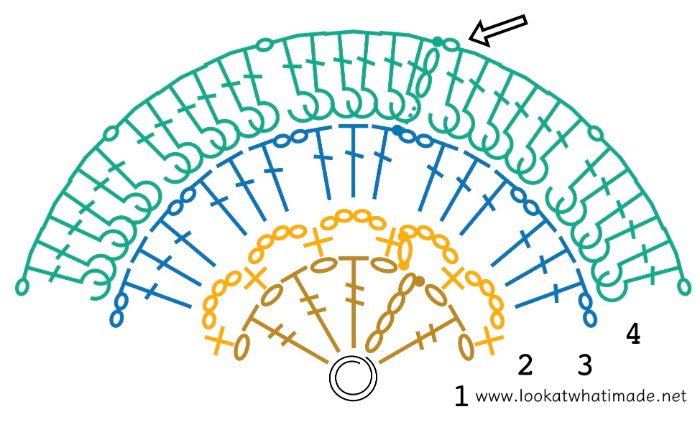
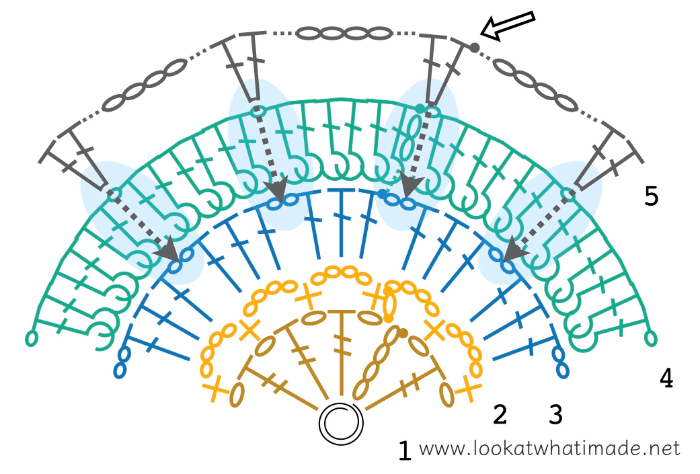
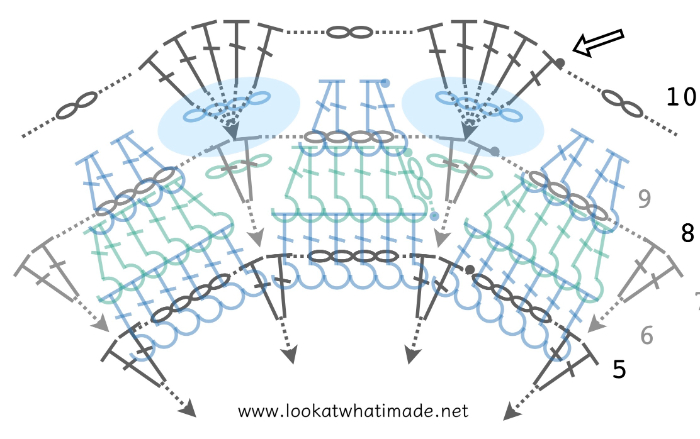
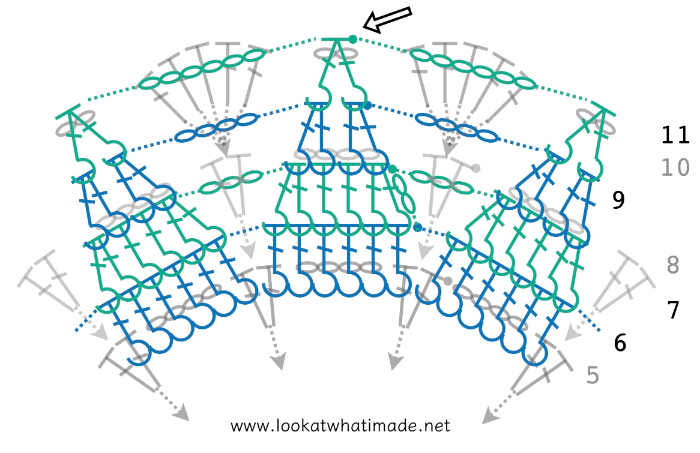
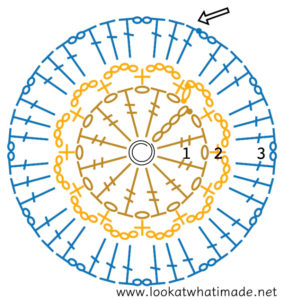
Charts
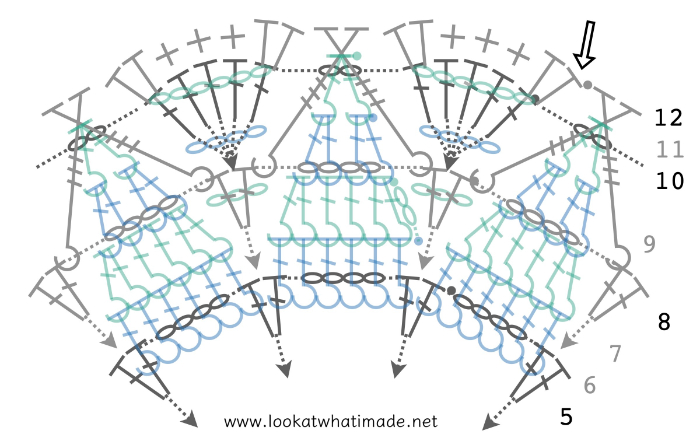
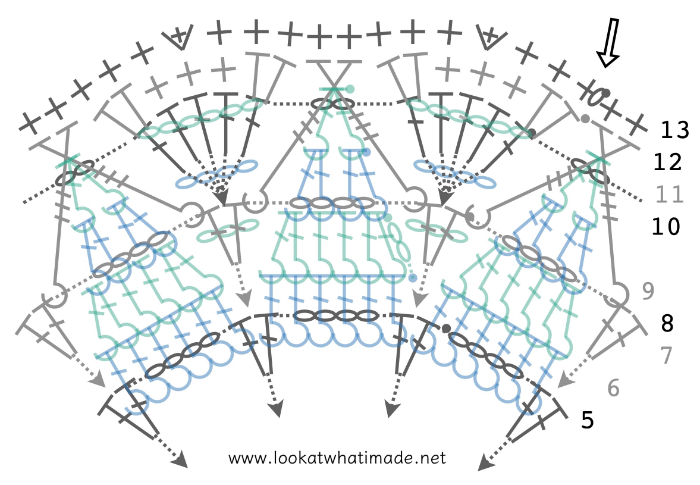
Credit: Masako Kawahara from Crochet_Hmmm
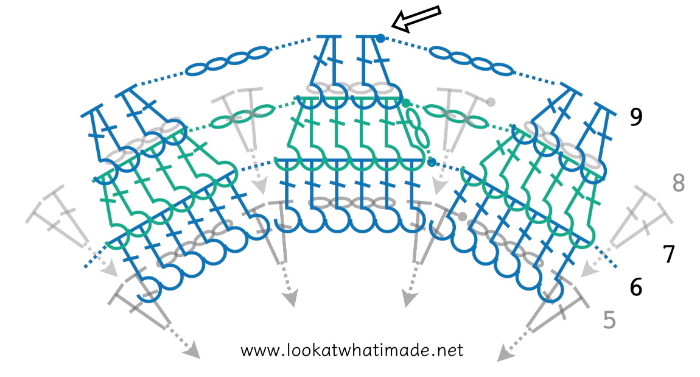
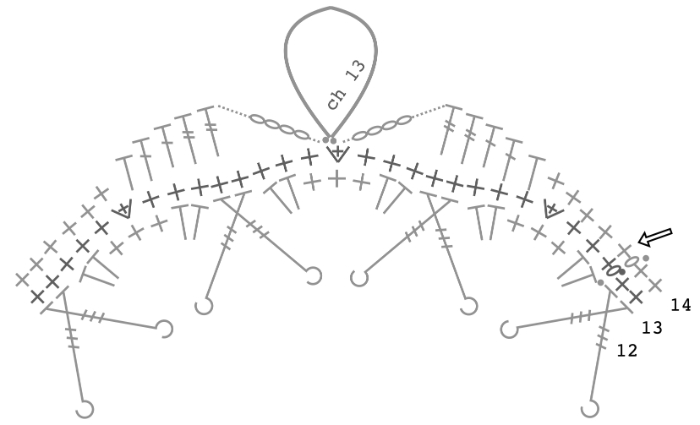
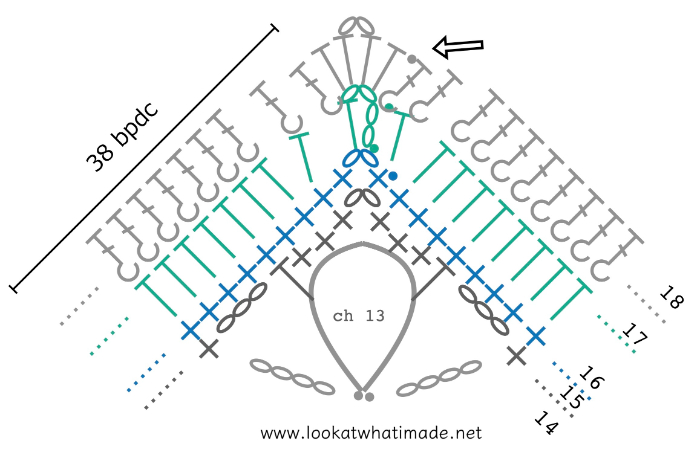
Please follow the charts in a counter-clockwise direction, regardless of whether you are right or left-handed.
Notes
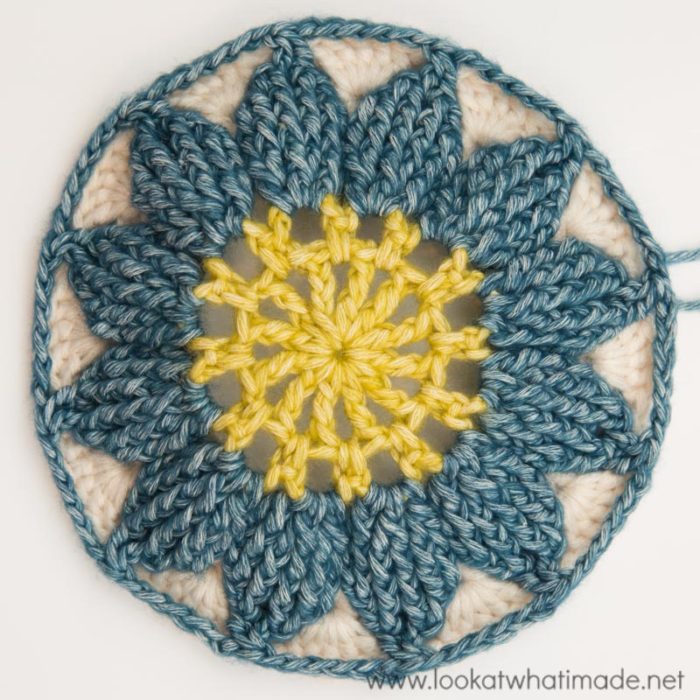
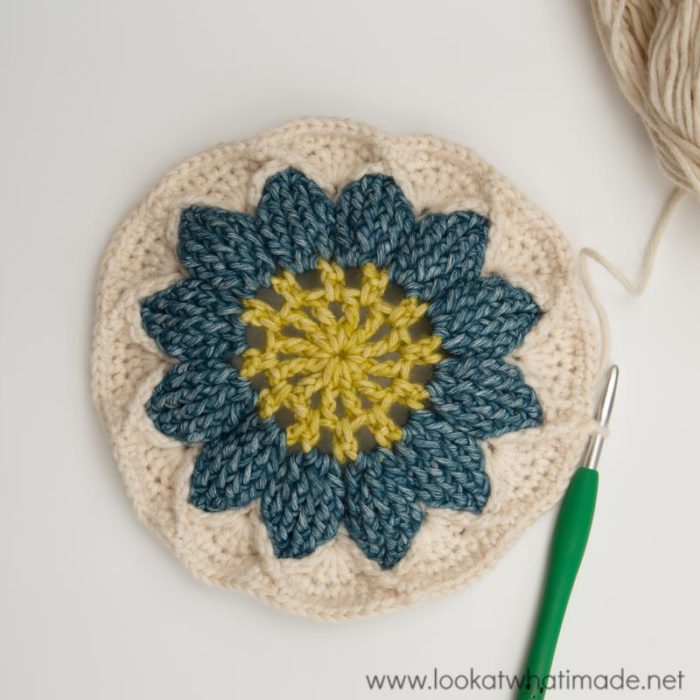
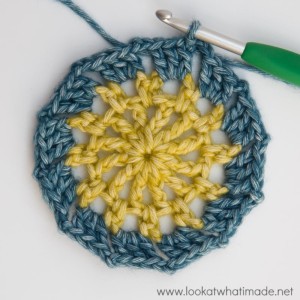
The central Flower of this square is textured and raised slightly above the surface. When you have only made the flower, it will look like it bulges a lot (because of all those front post stitches), but as the square progresses this will become less noticeable. With use, the flower will relax down even further, but it will always remain slightly raised above the surface of the square.
For the photos in this photo tutorial, I have used Scheepjes Stonewashed XL and a 5.5 mm crochet hook. This is one of my all-time favourite yarns, and my hands are itching to work up a cream, purple, and soft lime version!
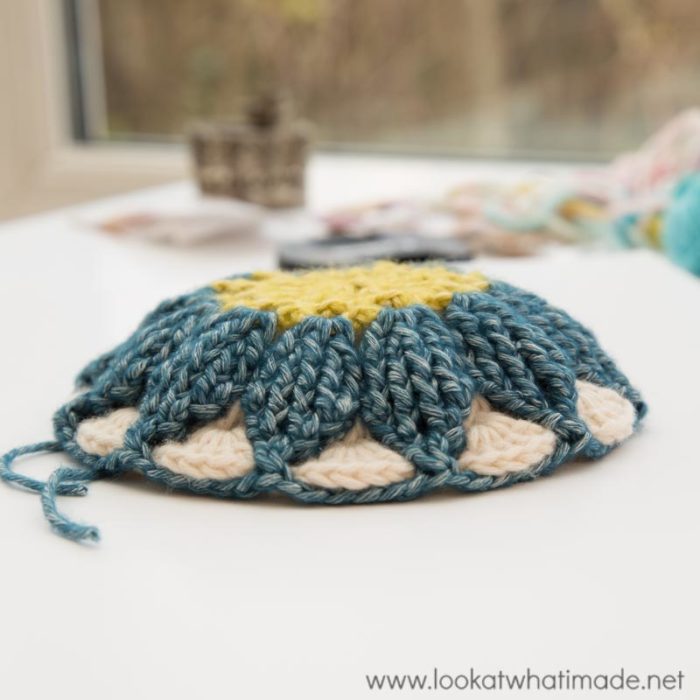
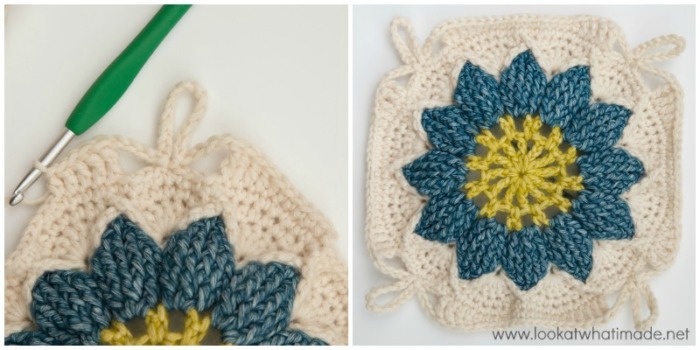
If you find that your square refuses to become ‘square’ by Round 18 (the corners are pointy and the sides are ruffled/wavy), it is an indication that you are making your chains far tighter than the rest of your stitches, which pulls the square in and prevents it from having enough surface area for the number of stitches in the last round.
You can fix this by doing one of the following:
- Relax your tension when making the chains
- Use a bigger hook for the chain portions when making the Flower ONLY
- Add an extra chain to each chain space when making the Flower ONLY
This usually happens if you are a ‘yanker’ (please see THIS GOLDEN LOOP VIDEO).
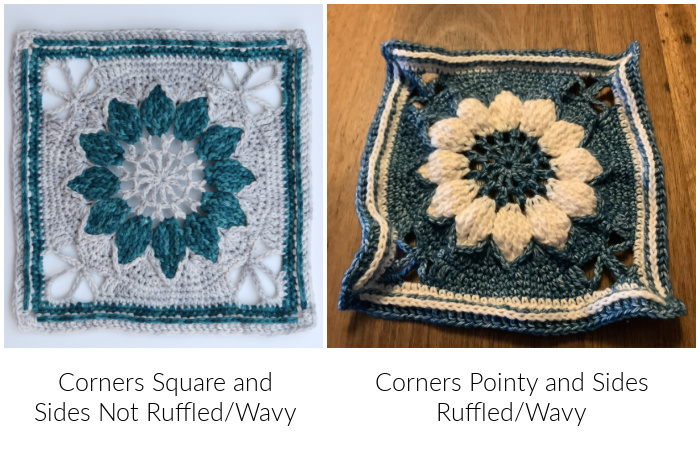
Example Square on the right courtesy of Diane Kelly
Instructions
© Dedri Uys 2016. All Rights Reserved.
Round 1 (Colour A)
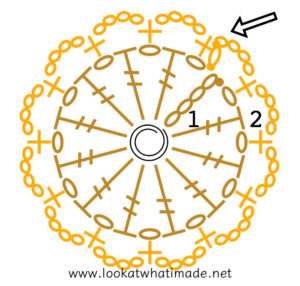
Into a magic ring: ch 5 (counts as tr + ch 1). (Tr, ch 1) 11 times. Join to the 4th ch of the beginning ch-5 with a sl st.
Stitch Count: 12 tr and 12 ch-1 sps
Round 2 (Colour A)
Sl st into the next ch-1 sp. (Ch 1, sc) into the same ch-1 sp. (Ch 4, sc in the next ch-1 sp) 11 times. Ch 4. Join to the top of the first sc with a sl st. Fasten off and work away your ends.
Stitch Count: 12 sc and 12 ch-4 sps
Round 3 (Colour B)
Join your yarn by making a standing dc in any ch-4 sp. Make 2 more dc in the same ch-4 sp. (Ch 2, make 3 dc in the next ch-4 sp) 11 times. Ch 2. Join to the top of the standing dc with a sl st.
Stitch Count: 36 dc and 12 ch-2 sps
Round 4 (Colour B)
Ch 2 (doesn’t count as a st). Make 2 FPdc around the post of the same (first) dc from Round 3. Make 2 FPdc around each of the next 2 dc. Ch 1. (Make 2 FPdc around each of the next 3 dc, ch 1) 11 times. Join to the top of the first FPdc with a sl st. Fasten off and work away your ends.
Stitch Count: 72 FPdc and 12 ch-1 sps
Round 5 (Colour A)
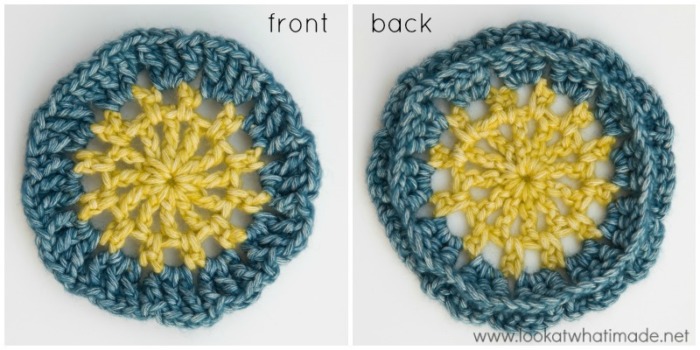
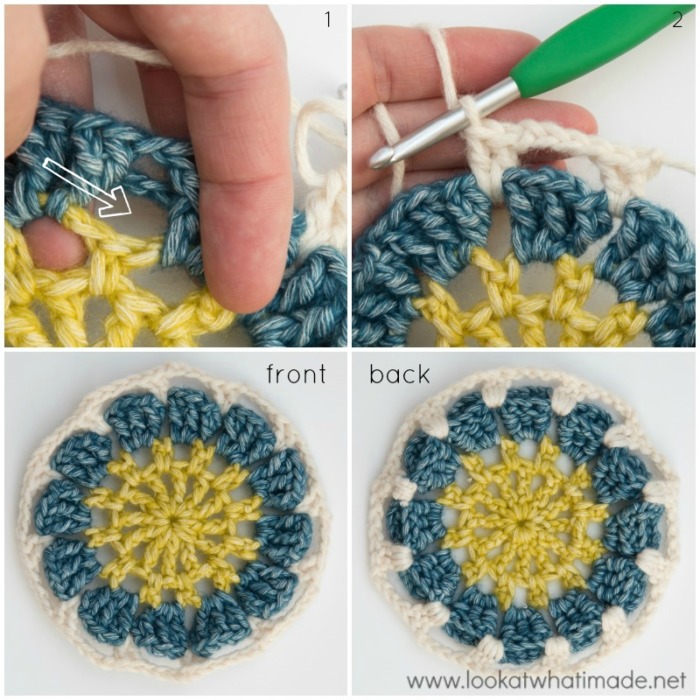
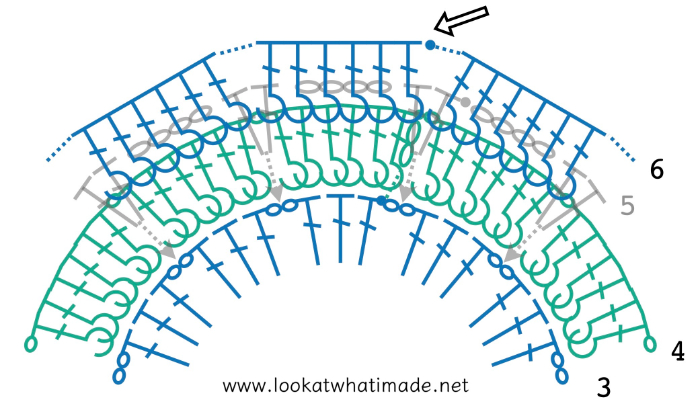
Join your yarn by making a standing dc into any ch-2 sp from Round 3, working OVER the ch-1 sp from Round 4. You will find the ch-2 sps between Petals {Photos 1 and 2}. Dc in the same ch-2 sp. (Ch 4. Make 2 dc in the next ch-2 sp from Round 3, working OVER the ch-1 sp from Round 4) 11 times. Ch 4. Join to the top of the standing dc with a sl st. Fasten off and work away your ends.
Stitch Count: 24 dc and 12 ch-4 sps
Round 6 (Colour B)
Work in front of the ch-4 sps from Round 5 when making this round. You will need to dig around a bit to locate the first FPdc of each 6-FPdc ‘group’.
Hint: Work in 12 lots of 6 stitches to make sure that you don’t accidentally skip any stitches. You should make 6 stitches into each Petal.
Join your yarn by making a standing FPdc around the first FPdc of any 6-FPdc group from Round 4. Make a FPdc around each of the remaining 71 sts. Join to the top of the first FPdc with a sl st.
Stitch Count: 72 FPdc
Your flower will be ruffled at this point. Don’t worry about it.
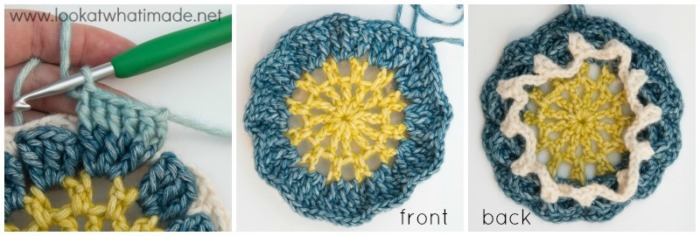
Round 7 (Colour B)
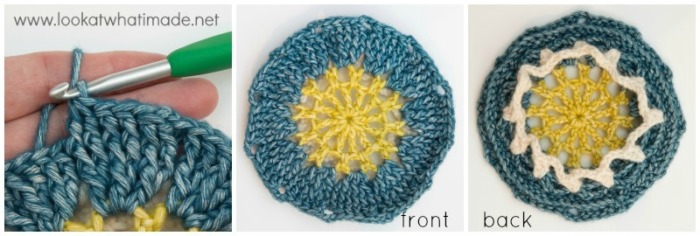
Ch 2 (doesn’t count as a st). (FPdc2tog, working into the first 2 FPdc of the Petal. FPdc in the next 2 sts. FPdc2tog, working into the last 2 FPdc of the Petal. Ch 3) 12 times. Join to the first FPdc2tog with a sl st. Fasten off and work away your ends.
Stitch Count: 48 FPdc and 12 ch-3 sps
Round 8 (Colour A)
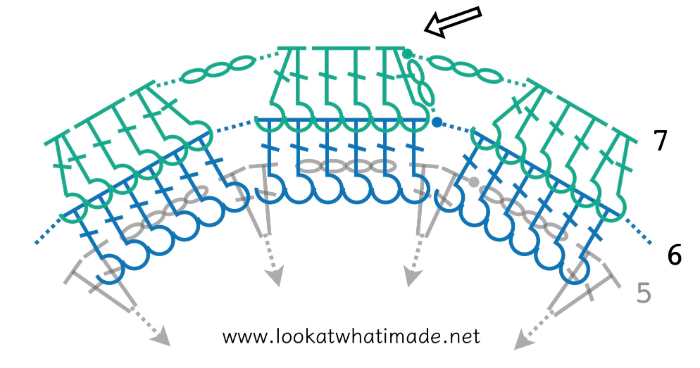
In this round, you will be working between the 2 dc that form each 2-dc group in Round 5. You will work OVER the ch-3 sp from Round 7 and the stitches of Round 6 (between Petals). You will need to apply quite a bit of tension to ensure your dc sts are ‘tight’.
Make a standing dc between any 2 dc from Round 5, remembering to work OVER Rounds 6 and 7. Make another dc between the same 2 dc. (Ch 4. Make 2 dc between the next 2 dc from Round 5, remembering to work OVER Rounds 6 and 7) 11 times. Ch 4. Join to the first dc with a sl st. Fasten off and work away your ends.
Stitch Count: 24 dc and 12 ch-4 sps
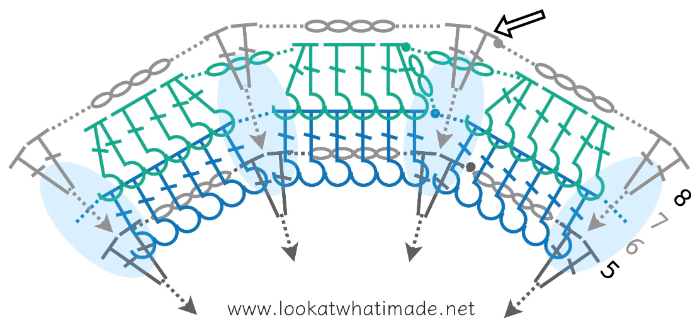
Round 9 (Colour B)
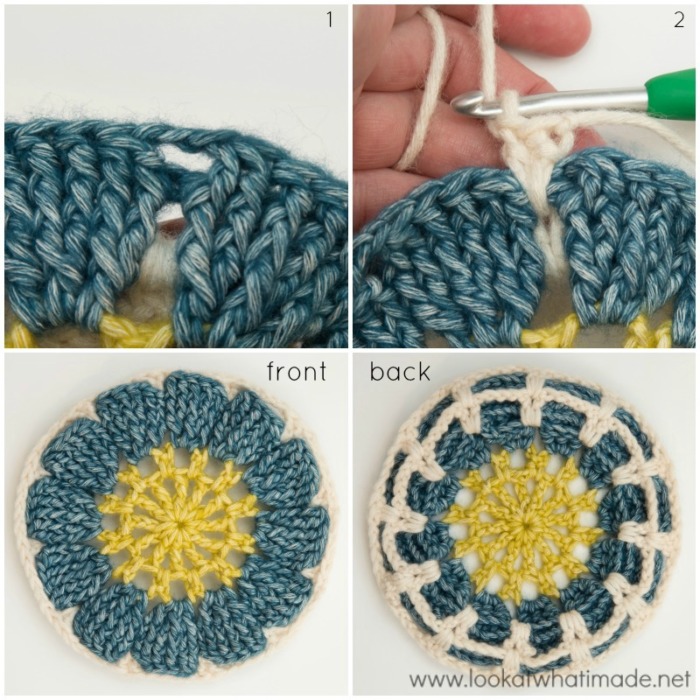
Join your yarn by making a standing FPdc2tog around the first 2 sts of any Petal from Round 7 (in other words, around the FPdc2tog and the first FPdc). FPdc2tog around the last 2 sts of the Petal. Ch 4. (FPdc2tog twice into the next Petal of Round 7. Ch 4) 11 times. Join to the first FPdc2tog with a sl st. Fasten off and work away your ends.
Stitch Count: 24 FPdc and 12 ch-4 sps
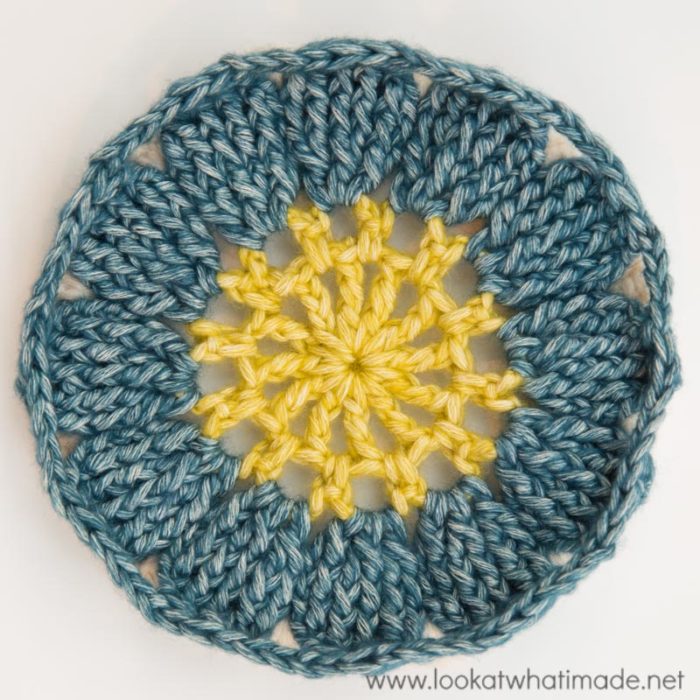
Round 10 (Colour A)
Join your yarn by making a standing dc between any 2 dc from Round 8, working OVER the ch-4 sp from Round 9. Make 4 dc in the same sp. (Ch 2 and make 5 dc between the next 2 dc from Round 8) 11 times. Ch 2. Join to the first dc with a sl st. Fasten off and work away your ends.
Stitch Count: 60 dc and 12 ch-2 sps
Round 11 (Colour B)
Join your yarn by making a FPdc2tog around the remaining 2 sts of any Petal from Round 9. (Ch 6 and FPdc2tog around the 2 sts of the next Petal from Round 9) 11 times. Ch 6. Join to the first FPdc2tog with a sl st. Fasten off and work away ends.
Stitch Count: 12 FPdc and 12 ch-6 sps
At the end of this round, your flower will bulge quite a lot. This will relax but it won’t completely go away. The final flower will be raised slightly above the surface of the square.
Round 12 (Colour A)
In this round, you will work IN FRONT OF the ch-6 sps from Round 11.
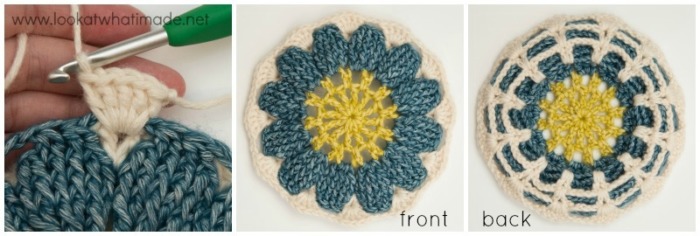
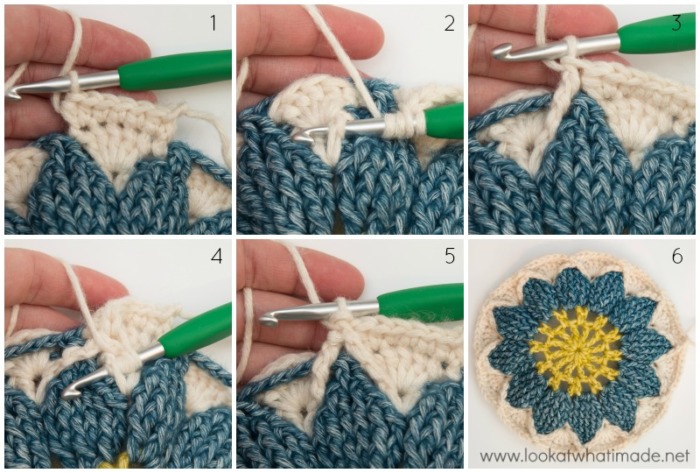
Join your yarn by making a standing hdc in the first dc of any 5-dc group from Round 10. Hdc in the same st. Sc in the next 3 sts. Make 2 hdc in the next st, which will be the last dc of the 5-dc group {Photo 1}. FPdtr in the dc from Round 8 to the left of the next Petal (to the right if you are left-handed) – Photos 2 and 3. FPdtr in the dc from Round 8 to the right of the same Petal (to the left if you are left-handed) – Photos 4 and 5. You are essentially doubling back, and you will need to fold/turn your work to make it easier to get into that stitch.
*Make 2 hdc in the first dc of the next 5-dc group from Round 10. Sc in the next 3 sts. Make 2 hdc in the next st. FPdtr in the dc from Round 8 to the left of the next Petal (to the right if you are left-handed). FPdtr in the dc from Round 8 to the right of the same Petal (to the left if you are left-handed).*
Repeat from * to * 10 more times. Join to the first hdc with a sl st.
Stitch Count: 108 sts {36 sc, 48 hdc, and 24 FPdtr}
Round 13 (Colour A)
Ch 1 and sc in the same st as the sl st join, which will be the hdc after 2 FPdtr. Sc in the next 2 sts. (Make 2 sc in the next st, which should be the central of the 3 sc from the previous round. Mark the second sc with a SM if you are going to have trouble finding it in the next round. Sc in the next 8 sts) 11 times. Make 2 sc in the next st. Sc in the last 5 sts. Join to the first sc with a sl st.
Stitch Count: 120 sc
Remember to check your gauge at the end of this round.
Round 14 (Colour A)
Ch 1 and sc in the same st as the sl st join. Sc in the next 4 sts. You should now have 5 sc, the last of which should fall in the second (marked) sc of the increase from the previous round.
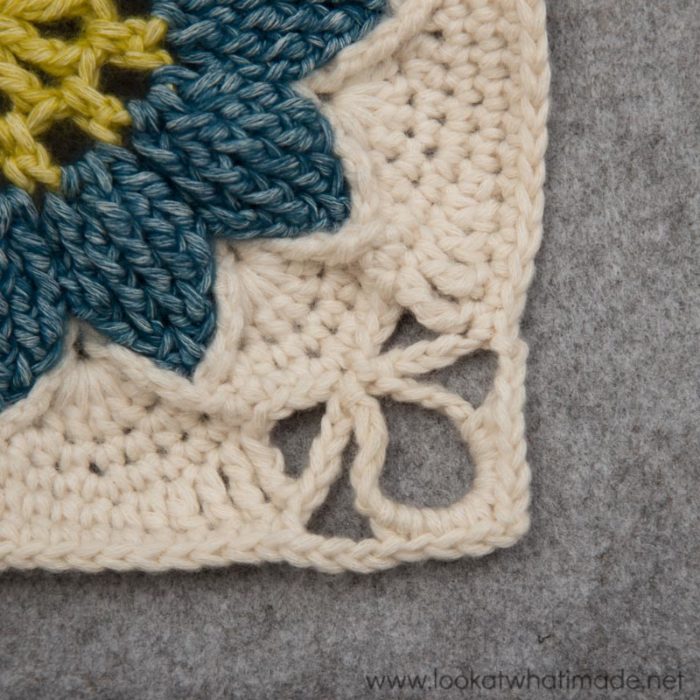
*Hdc in the next st, dc in the next 2 sts, tr in the next 2 sts. Ch 4, skip the next 4 sts and sl st in the next st, which should be the second (marked) sc of the increase from the previous round. Ch 13 and sl st in the same st to form a loop. Ch 4 and skip the next 4 sts. Tr in the next 2 sts, dc in the next 2 sts, hdc in the next st. Sc in the next 11 sts. The first and last sc should fall in the second (marked) sc of the increase from the previous round.*
Repeat from * to * 3 more times, omitting the last 5 sc on the last repeat (because you’ve already made them at the start of this round). Join to the first sc with a sl st. Fasten off and work away your ends.
Have a look at your work before continuing. The flowers formed by the ch-4 and ch-13 loops are your corners. Each of them should fall between 2 Petals. If they don’t, you’ll need to check your stitches to see where you have gone wrong.
Stitch Count: 84 sts {44 sc, 8 hdc, 16 dc, 16 tr, 8 ch-4 sps, and 4 ch-13 sps}
Round 15 (Colour A)
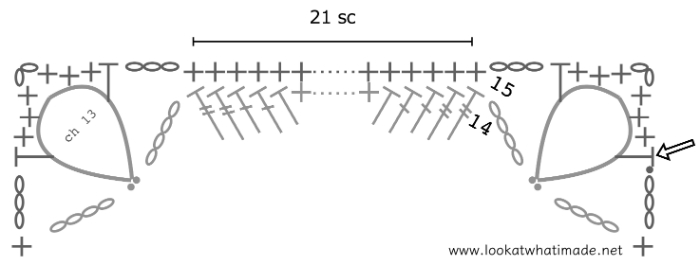
Join your yarn by making a standing hdc in any ch-13 sp around. Try to make this st close to the middle of the ch-13 sp. Into the same ch-13 sp: (3 sc, ch 2, 3 sc, hdc). This is your first corner made. Move these sts up so that they fall over the centre of the ch-13 sp. You can adjust them later if it looks a bit wonky now.
*Ch 3, skip the ch-4 sp, sc in each of the next 21 sts. Ch 3 and skip the next ch-4 sp. Into the next ch-13 sp: (hdc, 3 sc, ch 2, 3 sc, hdc).*
Repeat from * to * 3 more times, omitting the last corner on the last repeat. Join to the first hdc with a sl st. Fasten off and work away your ends.
Stitch Counts:
- Total: 116 sts {8 hdc, 108 sc, 8 ch-3 sps, and 4 ch-2 corner sps}
- Per Side: 29 sts {2 hdc, 27 sc, and 2 ch-3 sps}
Round 16 (Colour B)
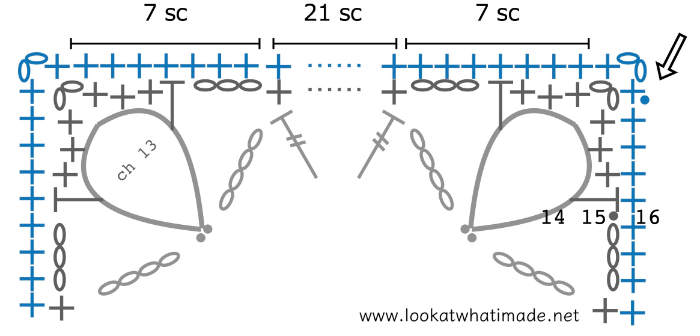
Join your yarn by making a standing sc in any ch-2 corner sp. (Ch 2, sc) in the same sp. This is your first corner made.
*Sc in the next 4 sts. Make 3 sc in the next ch-3 sp. Sc in the next 21 sts. Make 3 sc in the next ch-3 sp. Sc in the last 4 sts. Don’t accidentally skip the hdc right after the ch-3 sp. (Sc, ch 2, sc) in the next ch-2 corner sp.*
Repeat from * to * 3 more times, omitting the last corner on the last repeat. Join to the first sc with a sl st.
Stitch Count: 148 sc and 4 ch-2 corner sps {37 sc per side}
Round 17 (Colour B)
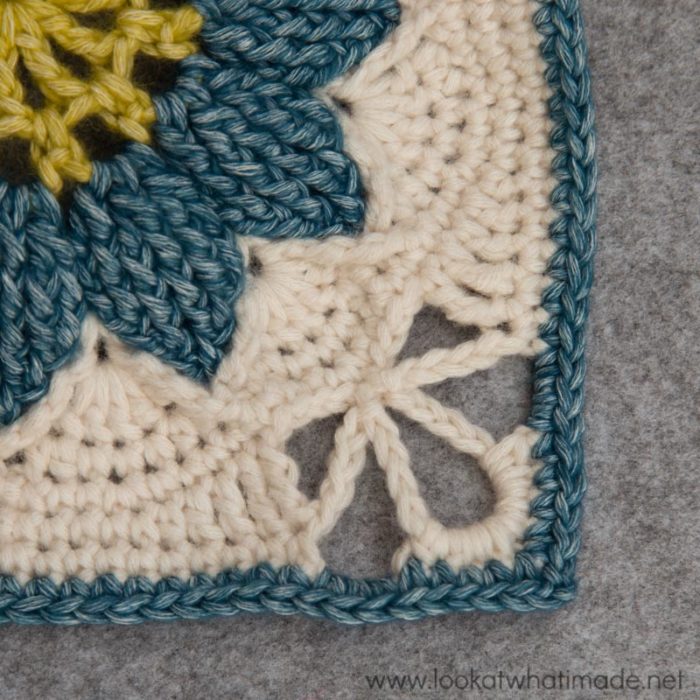
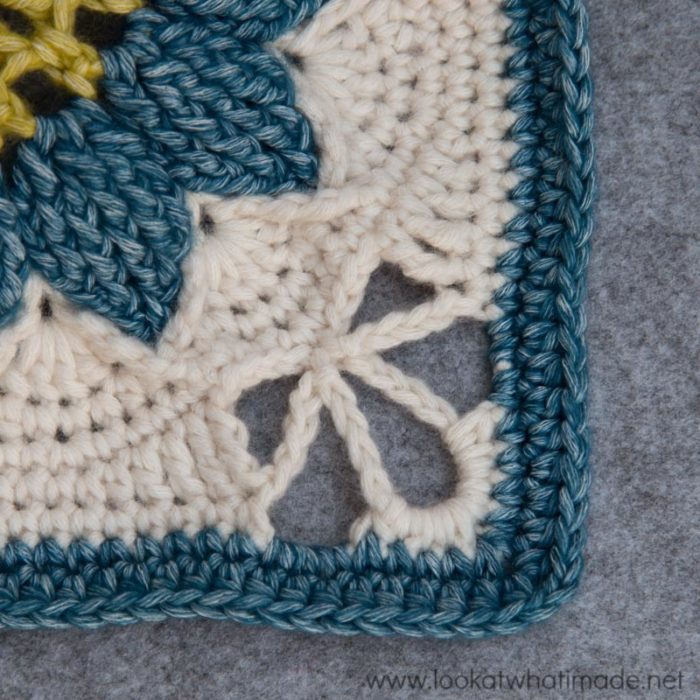
Sl st into the ch-2 corner sp. Ch 4 (counts as hdc and ch-2). Hdc in the same sp. This is your first corner made.
*Skip the first (hidden) st. Hdc in each of the remaining 36 sts. (Hdc, ch 2, hdc) in the next ch-2 corner sp.*
Repeat from * to * 3 more times, omitting the last corner on the last repeat. Join to the second ch of the initial ch-4 with a sl st. Fasten off and work away your ends.
Stitch Count: 152 hdc and 4 ch-2 corner sps {38 hdc per side}
Round 18 (Colour A)
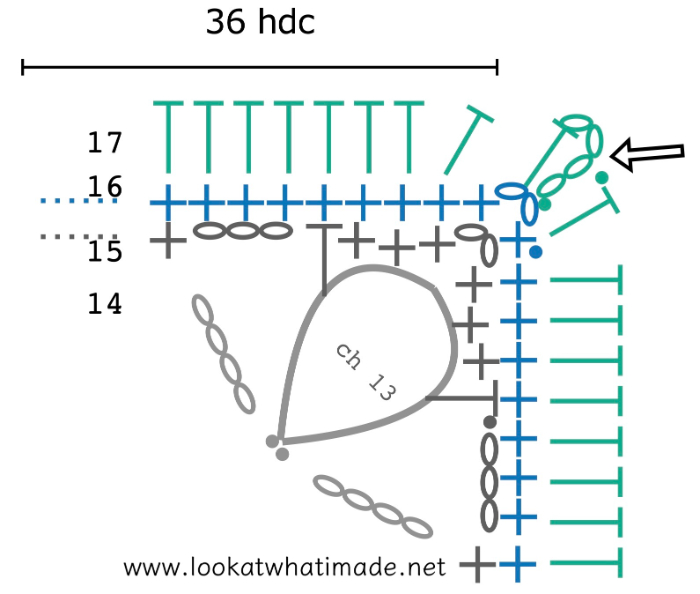
Join your yarn by making a standing hdc in any ch-2 corner sp. (Hdc, ch 2, 2 hdc) in the same sp. This is your first corner made.
*BPdc in each of the 38 sts across. (2 hdc, ch 2, 2 hdc) in the next ch-2 corner sp.*
Repeat from * to * 3 more times, omitting the last corner on the last repeat. Join to the first hdc with a sl st. Fasten off and work away your ends.
Stitch Counts:
- Total: 168 sts and 4 ch-2 corner sps {16 hdc and 152 BPdc}
- Per Side: 42 sts per side {4 hdc and 38 BPdc}
Remember to check your gauge at the end of this round.
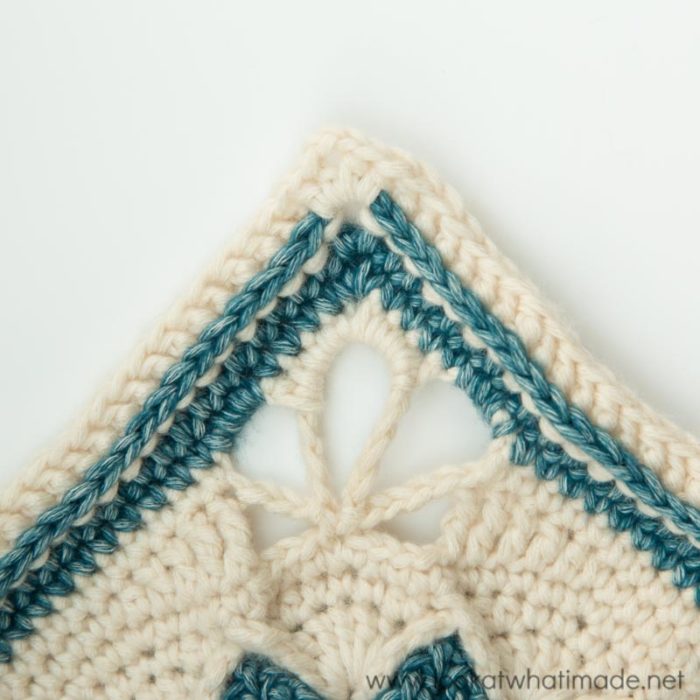
And there you have it. One central square made!

This blog post contains affiliate links. I only link to products I personally use or would use. All opinions are my own.


Cindy says
I am excited to try this new pattern. I see three different crochet hooks sizes in the different areas. I see 4, 6 and 6.5.
Can you clarify? Thanks
Dedri Uys says
Cindy, that depends on which yarn you are using and how large you want to make your square. If you are making the Aquarel one, you should use a 4 mm. If you are making Charlotte’s Dream, you should use the hook and yarn specified in Charlotte’s Dream.
Lo Cooper says
Bonjour, je parle assez bien le français, mais quand je dois traduire d’une langue à une autre, j’utilise Google et saisis la barre de recherche
«Traduire l’anglais vers le français».
Je l’ai utilisé pour traduire du roumain vers l’anglais en copiant et collant le motif dans la boîte de traduction, puis en copiant et en collant les traductions dans un document!
J’espère que ceci est d’une certaine utilité à n’importe qui qui a besoin d’aide.
Hello, I speak French,quite well however when I have to translate from one language to another, I use Google and input the search bar “Translating English into French”.I used it to translate from Romanian to English by copying and pasting the pattern into the translation box, then copying and pasting the translations into a document!
I hope this is of some use to anyone who needs help.
Françoise BECHEVET says
Bonjour Dedri,je suis francaise et l’anglais me parle très peu.
J’aimerai faire une couverture pour ma petite fille Juliette avec le modele de Charlotte
j’ai été emballée par la présentation.mais petit problème il n’y a pas de traduction
en francais.Comment faire?
JE te remercie d’avance si tu peux faire quelque chose pour moi.
Très amicalement
Françoise
Dedri Uys says
Hi, we are working on the translations.
Monica Snyman says
Hi Dedri
just want to say how much I enjoyed your Namaqwa block. Can’t wait to get my hands on extra wool to complete it into a bigger precious block. Started with Charlotte yesterday. Thank you so much for the superb notes, photo’s and instructions. I am on row 14 and enjoying the challenge. Hope the rest of your tour will exceed all expectations. I did enjoy the workshop so much on the 29th. Was worth every km travelled from bloem. I cannot believe that my crocheting skills have grown so much in 9 months. I am now #crocheting along.
Robin says
Loving this pattern! Would it be alright with you if I share this pattern for a crochet along for a local crafter’s group? I am doing mine in ww in colors peach, salmon and leaf green. I may have to keep this one for myself!
Dedri Uys says
Hi Robin, can you use the contact me tab at the top to send me an email, please?
Cheryl (aka HookintotheBeat) says
Well, you’ve only gone and done it again! What a superb pattern! How many of your patterns have I tried and loved now? Let’s see….
– Puzzle ball
– Sophie’s Garden
– Sophie’s Mandala
– Sophie’s Universe
– Both Jack and Lydia Squares around Sophie’s Universe
– Lydia Blanket
– and now Charlotte!!!
Your talents abound. Working on Part 3 now but with Patons DK in shades of purple, variegated and beige – aiming for a 3 x 3 afghan for a Xmas present!!!
Love you and your work so much!!! Must pick your brain sometime and learn how to design patterns other than graphgans.
Cheryl (aka Hookintothebeat)
Dedri Uys says
Hi again, Cheryl. You HAVE been busy. Maybe you can teach me how to design graphgans in exchange :)
shelly wright says
Wondering if any of your testers worked the entire Charlotte with worsted weight yarn? I am curious on what approximate sizes the finished projects happened to be?
Your work always amazes me!
Thanks in advance!
Dedri Uys says
Hi Shelly. I made one in WW and it was about 22″, but most people’s Charlottes come out even bigger.
Doris says
Such a beautiful flower! Congrats Dedri for another beautiful pattern !
But I have to admit … I modified the corners in Rd 14 & 15, because they look too loopy for my taste. And it turned out great!
For the corners I used 4 groups of TR3tog, each separated by ch3. So I have 4 cute leaves in each corner, making it looking “fuller” lol
Keep up the wonderful work you’re doing !
Dedri Uys says
I’m glad you found something that suited you. Your corners sound very similar the the corners for Sophie, which I tried to steer clear of for this pattern. Have you got a photo? I would love to see your square.
Julie Salter says
Hello, I started this wonderful pattern tonight but for the life of me I cannot work out Round 9. Is there some photos of this round that will help me. I cannot work out what I am suppose to be doing. Thanks for a great pattern and instructions but sorry I just don’t get round 9.
Dedri Uys says
Hi Julie. Have you managed to complete rounds 7 and 8? In round 7 you made a fpdc2tog over the first 2 st’s, then you made 2 fpdc’s, then you made another fpdc2tog. In round 9 you are doing the same thing, except that there are now only 4 st’s to work into, not 6, so you don’t make the central 2 fpdc’s. You just make 2 fpdc2tog into (the 4 stitches of) each petal, and then ch-4.
Does this help at all?
Dedri
Judy says
lol, I just did the same thing, did the fpdc 3 times across the stitches, not reading ir right to do 2 reg. ones in between the fpdc’s, lol, thanks for the help Dedri
Dedri Uys says
You’re welcome. I will have a look at the instructions again to try and simplify/highlight.
Lee-Ann says
Hi Dedri, thank you for Charlotte, she is gorgeous. I was super stuck on this same spot, thank goodness I came and checked the comments and wham there is the answer. See in in July/ August in SA . Thanks so much, now to frog and do round 9.
Dedri Uys says
I will have a look at the instructions again and see if I can make it more clear. You are the fifth person to contact me about that round, so something is obviously awry with my explanation :) I am excited to see you in July/August.
Katelyn says
I think the wrong photo was used for round 9. It appears to be the photo after round 8 instead. Referring to the picture is what threw me off on this round as well because my stitches didn’t look the same. However, in round 10 the stitches of round 9 matched mine. That is to say there are only 4 and not 6 as the picture depicts.
Jenny says
The pattern depicts the correct pictures for each round after the written round description, Katelyn, so the pictures just above the start of the written description for each round are from the round before. Read the description and refer to the photos below that section for the correct reference.
I hope that clears it up for you.
Jenny :)
Dedri Uys says
Hi Katelyn, I’ve had a look at the photo and it is def the right one. I think what you are seeing is the posts of the stitches from Round 8 which makes it look like there are 6 stitches, not 4. Can you have another look at the tops of the stitches in the Round 9 photo? There are only 6 ‘tops/loops’ for every petal (4 ch’s and 2 fpdc’s).
anita says
is it just me or are the colours wrong? the first 9 rows only use colours a and b but the pictures show 3 colours….. did I miss something???
this is my 2nd Dedri pattern but I have used bits of Sophie in lots of patterns… this is for my friends first baby…
Dedri Uys says
Anita, I am using a different yarn and a different colour combo in the photo tutorial. The photos are only there to show you what the rounds should look like, NOT which colours to use. The colours specified are for the completed square shown at the start of the post. I hope that helps,
Dedri
Christine Waugh says
Thank you so much, so in love with this square, going to make a wonderful throw for my living room, using this. Your work is always beautiful, well written, and so readable, is that a word? From one out of Africa living elsewhere to another. Baie Dankie.
Dedri Uys says
Dankie, Christine. I try my best to make the patterns ‘readable’, so thank you xx
Susan says
I am in love with this I can’t wait to finish so I can post a pic of it. I really hope that this grows into something as wonder for as Sophie is. I’m thinking that I might use this a the center for an around the bases or a virus blanket for now….Beautiful pattern!!!
Dedri Uys says
Thank you, Susan :) I look forward to seeing yours!
Annie says
I have just finished part one of this beautiful Charlotte square. I had my doubts that I’d be able to do it so had a play with left over baby yarn, and it’s come out beautiful and looks like the pictures too! This is the first time I’ve crocheted something other than with the basic sc, dc, trebles and chains. My new favorite is the bpdc – so easy and a lovely finishing touch to so many projects. Thank you for teaching me and for creating this beautiful design.
Jenny says
We are glad you are enjoying your journey with Charlotte :)
Jana says
Dedri, there is an error on the link in your e-mail for the lace and bobbles pattern.
This is what I get:
There is an error in your link code.
There is an error in your link code. Please get a new copy of the code from your account and replace the current code on your website.
Shareasale.com manages the relationships between advertisers and affiliates, which is why you were directed to our site. Since the link that you clicked contains an error, you were not redirected to the site.
Just wanted you to know. By the way I LOVE THIS SQUARE!!!
Dedri Uys says
Thank you, Jana. I will fix it in the next newsletter.
Minette says
I’m thinking, as I sit here crocheting, you could have called it Charlotte’s Web, Dedri – after the classic children’s book bye. B. White you liked so much.
I love the design. Well done.
Jeannette says
This is just so beautiful, took my breath away. Is there a way to print a pdf of the pattern instructions?
Jenny says
Jeanette, click on the print friendly button at the bottom by Dedri’s sign off. You can create a PDF from there :)
Anna Davies says
I have finished block one so far. It is lovely. Thanks Dedri for sharing this pattern. Link: https://www.facebook.com/groups/officialcccsocialgroup/1016306158443644/?comment_id=1016748345066092¬if_t=like
Margaret T says
Hi – I love this Charlotte Square. It has really made me want to try crochet again. I used to make Granny Squares as a child many moons ago. Do you think this pattern together with your tutorials will be Ok for a relative novice to try?
Jenny says
Yes Margaret. Dedri’s tutorials are ideal for learning stitches and pattern following technique :)
Diana says
Thanks so much for this pattern. I had just decided to step out and try some different and challenging projects when this showed up. I’m more of a knitter and not very good at crochet, but I have just finished part one of this pattern and getting ready to start another one while patiently waiting for part 2. Again, thanks so much for sharing your beautiful pattern. I am honestly in awe of you for being able to create something so beautiful.
Jenny says
Let us know how you get on Diana :)
Patty says
When will you be posting the next part?
Jenny says
Hope you’ve found it, Patty :)