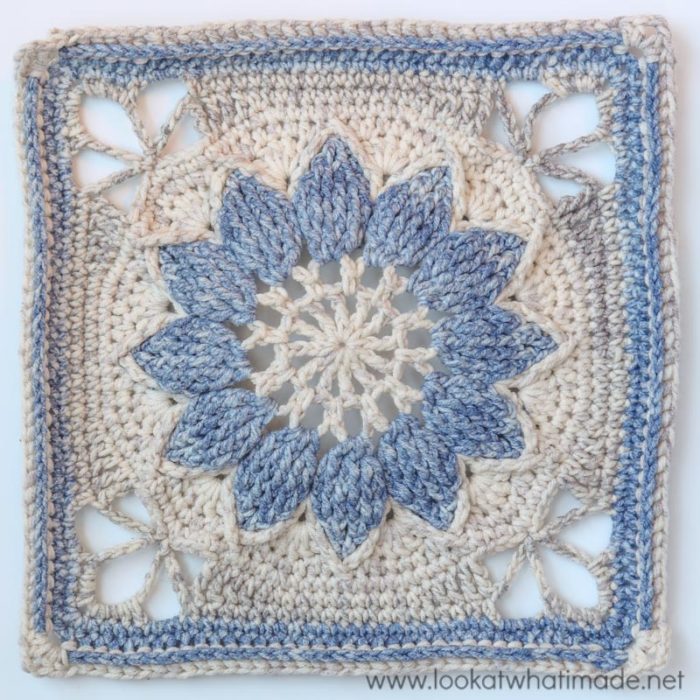
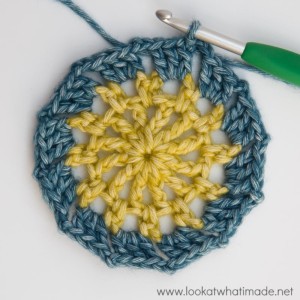
I know many of you have been eagerly awaiting the pattern for my new large crochet square, and I am very excited to bring you Part 1 of 3. In this part I will show you how to make the central square. Next week I will show you how to make the triangles used to extend the square. The week after I will show you how to make the border. You can see photos of the completed Charlotte Square HERE.
I have decided to call this crochet square Charlotte because I never did hear back from Counting Crows about using ‘Anna Begins’ as a name. I really, really wanted to use ‘Anna Begins’ (for so many reasons), but Charlotte was my second choice, and I think it suits the feel of this square.
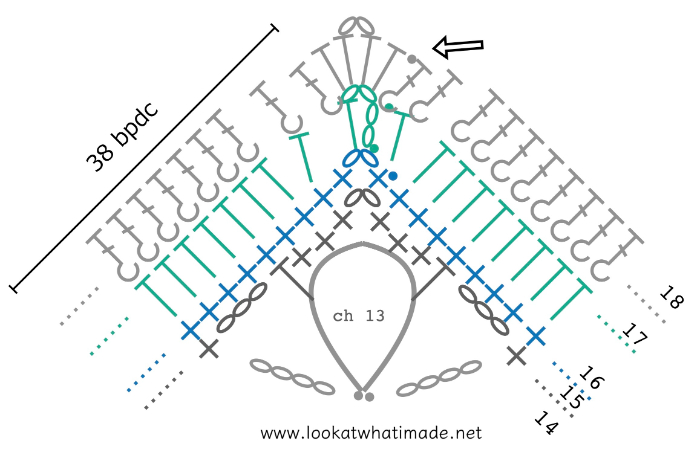
Update 2021: This post has been updated as part of the Charlotte’s Universe CAL 2021. Check out the fancy charts by Masako Kawahara!
Charlotte Large Crochet Square Part 1: Small Square
Resources
- You can find links to the right and left-handed video tutorials (US) for Part 1 HERE on It’s All in a Nutshell.
- If you need help with any of the special stitches or techniques used in this pattern, please see Special Stitches and Techniques.
Original Translations
Updated Translations With Charts
- German Translation by Sabi Bulla and Silke Schippa-Witte
- Hebrew Translation by Michal Ben-Hur, Iris Fait, Tami Sultan Nudelman, Tali Shchori, and Sarit Grinberg
Materials and Gauge
Please consult the relevant pattern:
Abbreviations
US Terminology (US/UK Conversion HERE)
- Ch – Chain
- BP – Back post (insert your hook from back to front around the post of the indicated stitch and complete the stitch as normal)
- Dc – Double crochet
- Dc2tog – Double crochet 2 together (see Special Stitches)
- FP – Front post (insert your hook from front to back around the post of the indicated stitch and complete the stitch as normal)
- Hdc – Half-double crochet
- Sc – Single crochet
- Tr – Treble crochet
- Sl st – Slip stitch
- Sp/sps – Space/spaces
- St/sts – Stitch/stitches
- () and * – Repeat instructions between parentheses and/or asterisks the number of times specified
Special Stitches
- Dc2tog – Yarn over and insert your hook into the indicated stitch. Yarn over and pull up a loop. Yarn over and pull through 2 loops. Yarn over and insert your hook into the next stitch. Yarn over and pull up a loop. Yarn over and pull through 2 loops. Yarn over and pull through all 3 loops on your hook.
- Standing Stitches – Standing stitches are exactly the same as regular stitches, except that they are made ‘in air’, without being attached to a previous stitch. Start with a slip knot already on your hook and complete the stitch as normal. Here are some tutorials for the standing double crochet and standing single crochet to get you started.
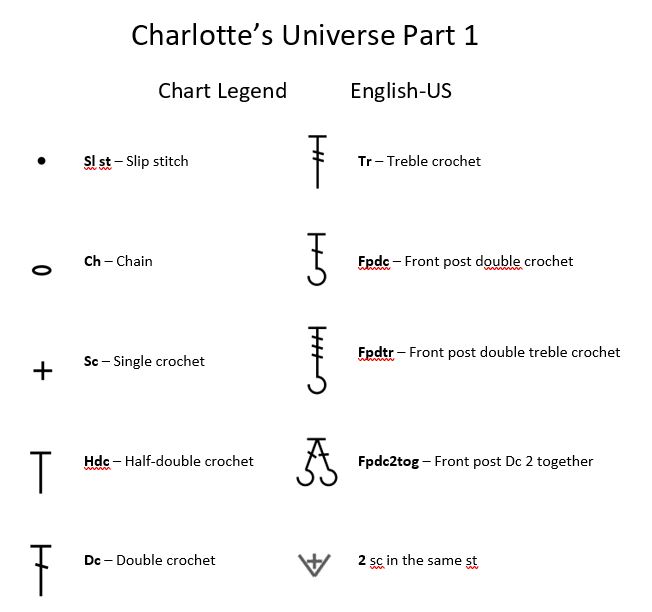
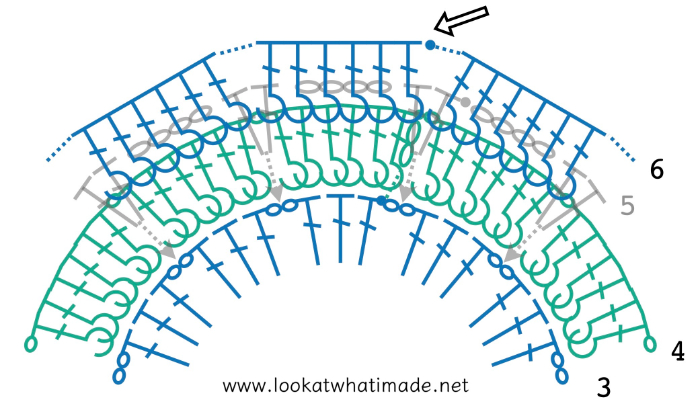
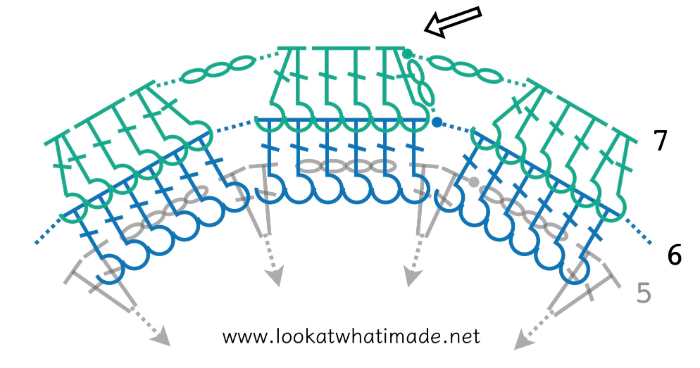
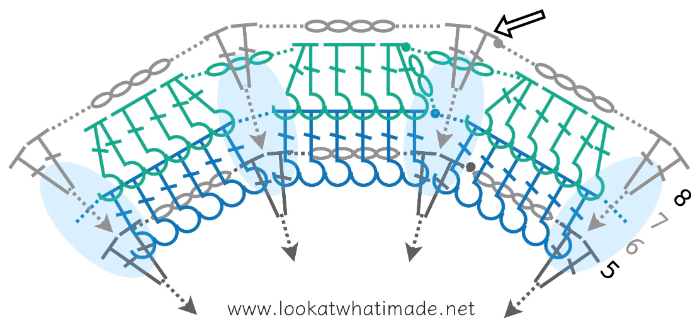
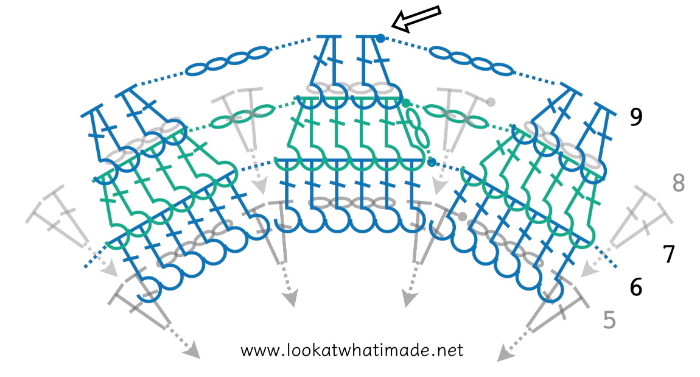
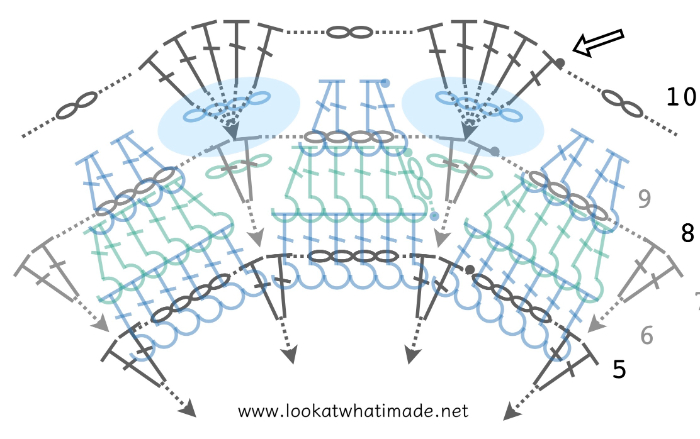
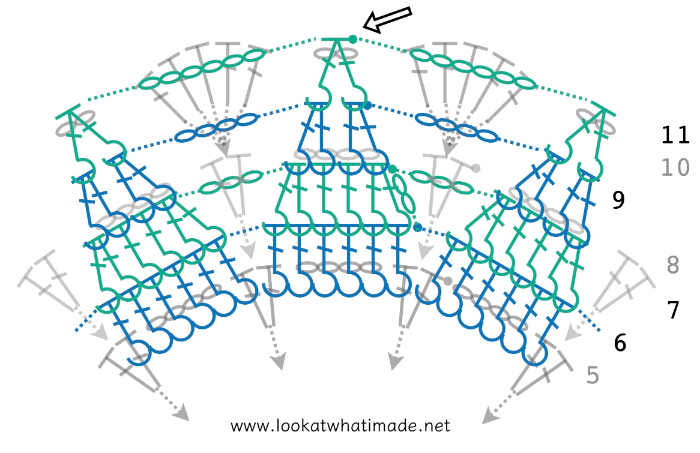
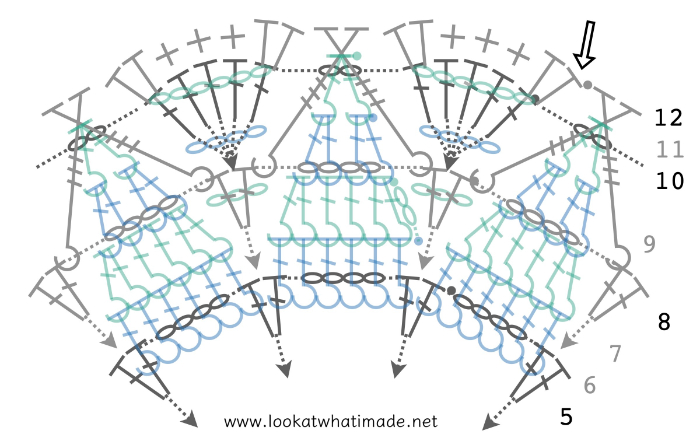
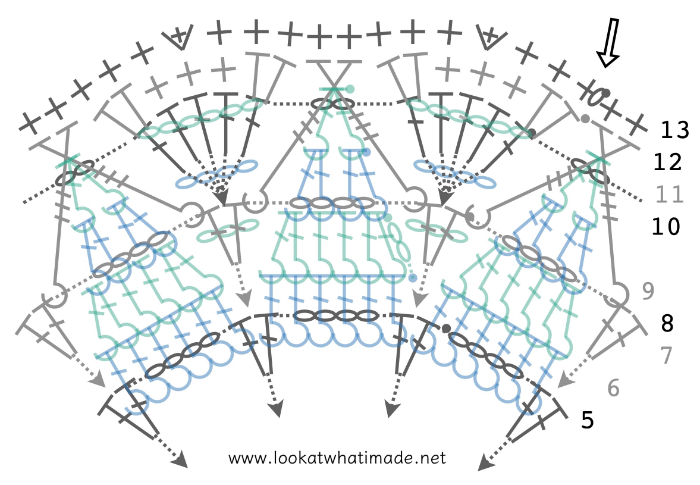
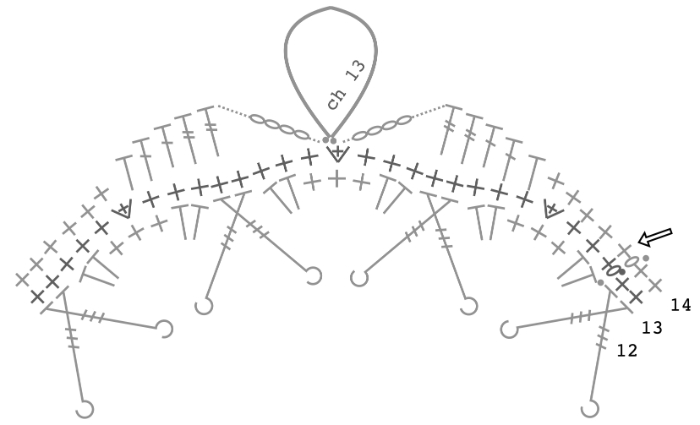
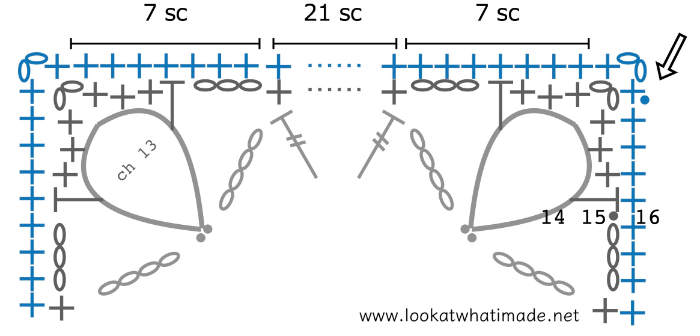
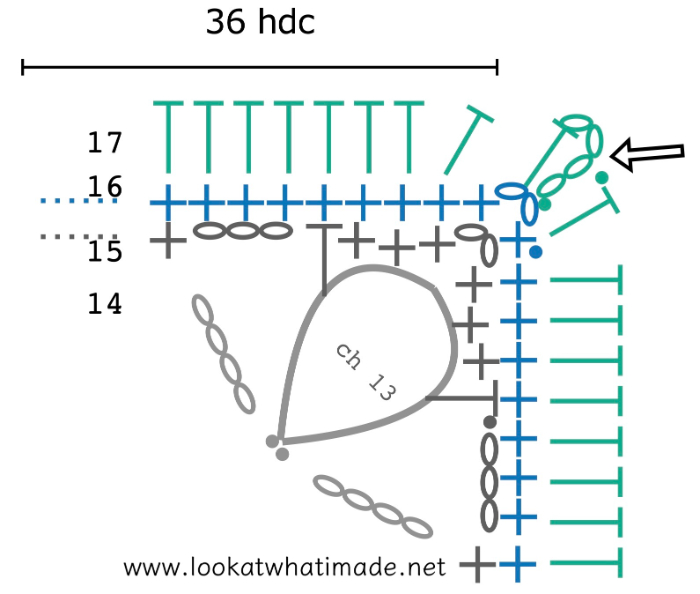
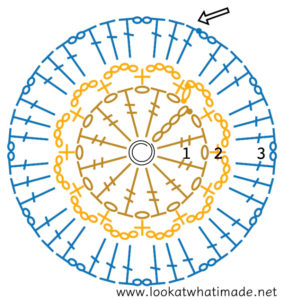
Charts
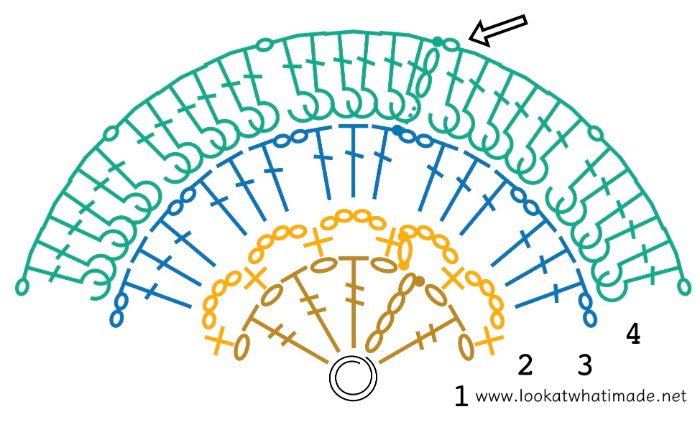
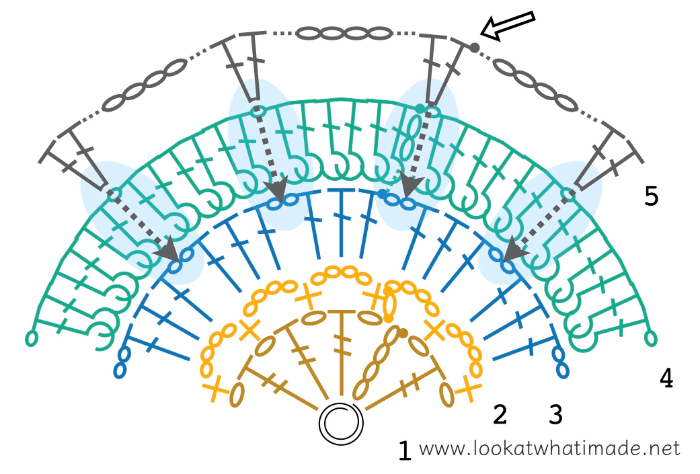
Credit: Masako Kawahara from Crochet_Hmmm
Please follow the charts in a counter-clockwise direction, regardless of whether you are right or left-handed.
Notes
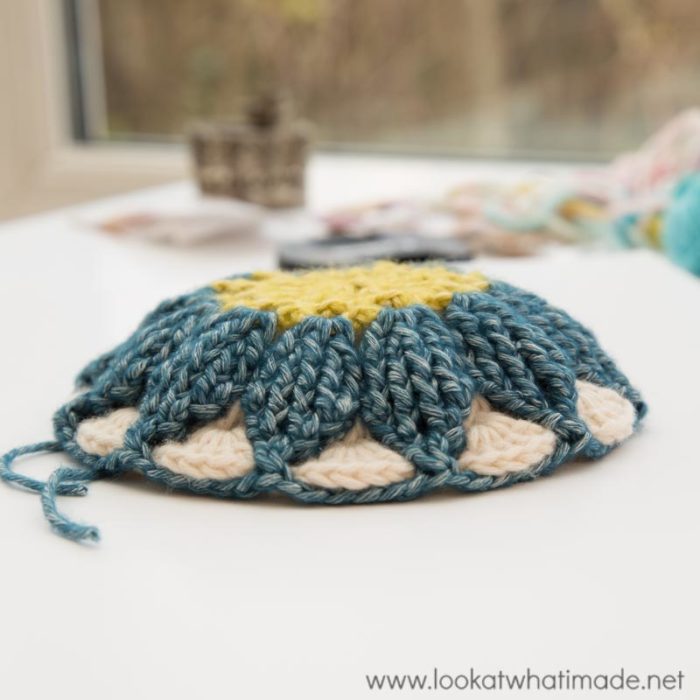
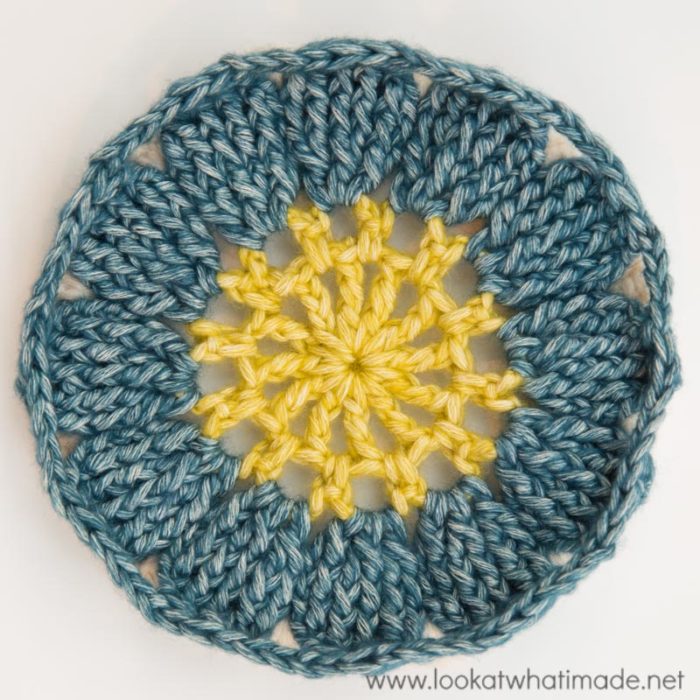
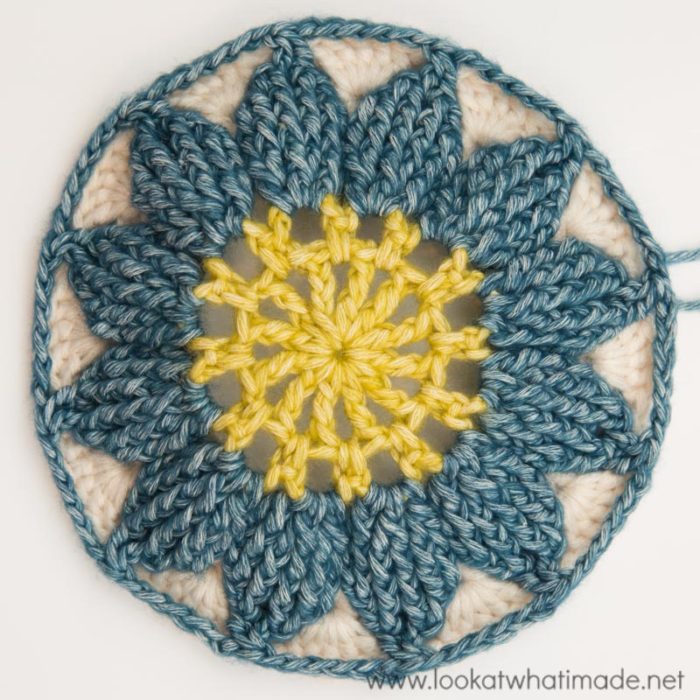
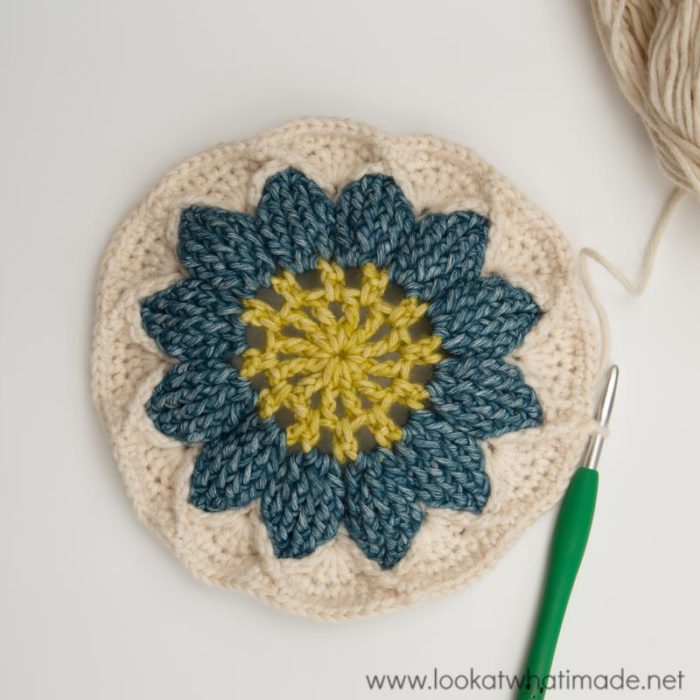
The central Flower of this square is textured and raised slightly above the surface. When you have only made the flower, it will look like it bulges a lot (because of all those front post stitches), but as the square progresses this will become less noticeable. With use, the flower will relax down even further, but it will always remain slightly raised above the surface of the square.
For the photos in this photo tutorial, I have used Scheepjes Stonewashed XL and a 5.5 mm crochet hook. This is one of my all-time favourite yarns, and my hands are itching to work up a cream, purple, and soft lime version!
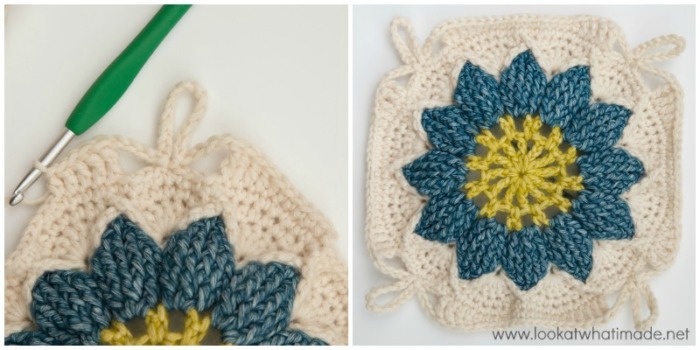
If you find that your square refuses to become ‘square’ by Round 18 (the corners are pointy and the sides are ruffled/wavy), it is an indication that you are making your chains far tighter than the rest of your stitches, which pulls the square in and prevents it from having enough surface area for the number of stitches in the last round.
You can fix this by doing one of the following:
- Relax your tension when making the chains
- Use a bigger hook for the chain portions when making the Flower ONLY
- Add an extra chain to each chain space when making the Flower ONLY
This usually happens if you are a ‘yanker’ (please see THIS GOLDEN LOOP VIDEO).
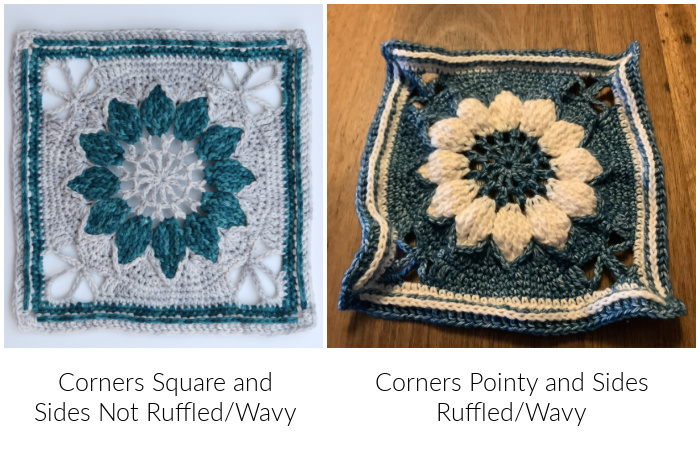
Example Square on the right courtesy of Diane Kelly
Instructions
© Dedri Uys 2016. All Rights Reserved.
Round 1 (Colour A)
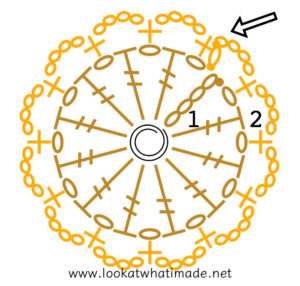
Into a magic ring: ch 5 (counts as tr + ch 1). (Tr, ch 1) 11 times. Join to the 4th ch of the beginning ch-5 with a sl st.
Stitch Count: 12 tr and 12 ch-1 sps
Round 2 (Colour A)
Sl st into the next ch-1 sp. (Ch 1, sc) into the same ch-1 sp. (Ch 4, sc in the next ch-1 sp) 11 times. Ch 4. Join to the top of the first sc with a sl st. Fasten off and work away your ends.
Stitch Count: 12 sc and 12 ch-4 sps
Round 3 (Colour B)
Join your yarn by making a standing dc in any ch-4 sp. Make 2 more dc in the same ch-4 sp. (Ch 2, make 3 dc in the next ch-4 sp) 11 times. Ch 2. Join to the top of the standing dc with a sl st.
Stitch Count: 36 dc and 12 ch-2 sps
Round 4 (Colour B)
Ch 2 (doesn’t count as a st). Make 2 FPdc around the post of the same (first) dc from Round 3. Make 2 FPdc around each of the next 2 dc. Ch 1. (Make 2 FPdc around each of the next 3 dc, ch 1) 11 times. Join to the top of the first FPdc with a sl st. Fasten off and work away your ends.
Stitch Count: 72 FPdc and 12 ch-1 sps
Round 5 (Colour A)
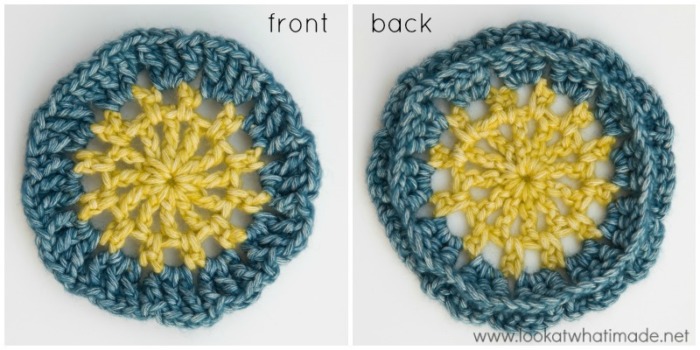
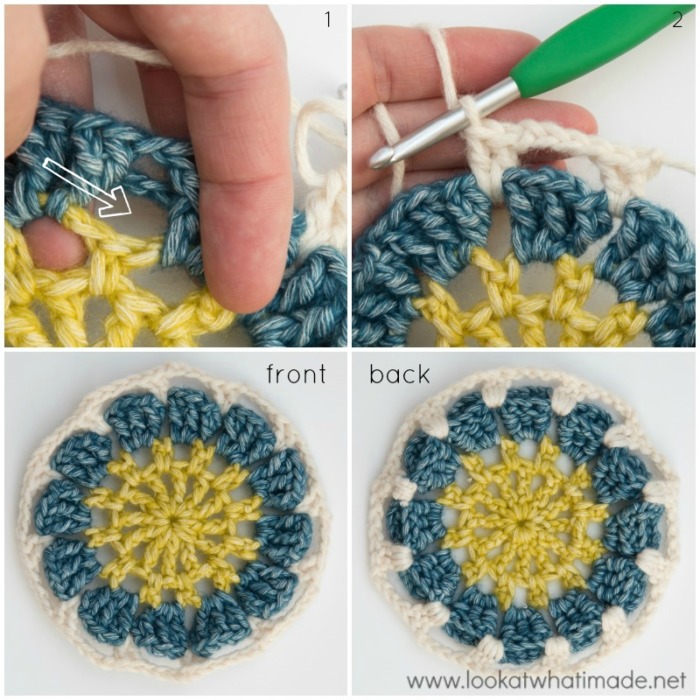
Join your yarn by making a standing dc into any ch-2 sp from Round 3, working OVER the ch-1 sp from Round 4. You will find the ch-2 sps between Petals {Photos 1 and 2}. Dc in the same ch-2 sp. (Ch 4. Make 2 dc in the next ch-2 sp from Round 3, working OVER the ch-1 sp from Round 4) 11 times. Ch 4. Join to the top of the standing dc with a sl st. Fasten off and work away your ends.
Stitch Count: 24 dc and 12 ch-4 sps
Round 6 (Colour B)
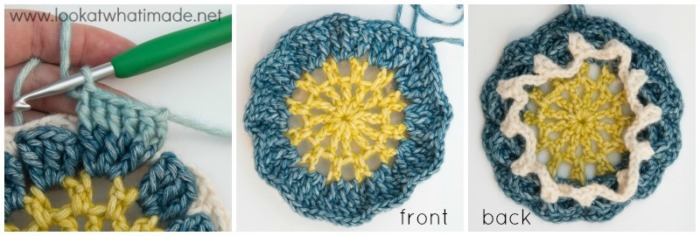
Work in front of the ch-4 sps from Round 5 when making this round. You will need to dig around a bit to locate the first FPdc of each 6-FPdc ‘group’.
Hint: Work in 12 lots of 6 stitches to make sure that you don’t accidentally skip any stitches. You should make 6 stitches into each Petal.
Join your yarn by making a standing FPdc around the first FPdc of any 6-FPdc group from Round 4. Make a FPdc around each of the remaining 71 sts. Join to the top of the first FPdc with a sl st.
Stitch Count: 72 FPdc
Your flower will be ruffled at this point. Don’t worry about it.
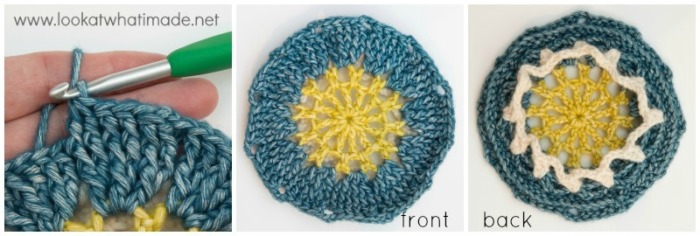
Round 7 (Colour B)
Ch 2 (doesn’t count as a st). (FPdc2tog, working into the first 2 FPdc of the Petal. FPdc in the next 2 sts. FPdc2tog, working into the last 2 FPdc of the Petal. Ch 3) 12 times. Join to the first FPdc2tog with a sl st. Fasten off and work away your ends.
Stitch Count: 48 FPdc and 12 ch-3 sps
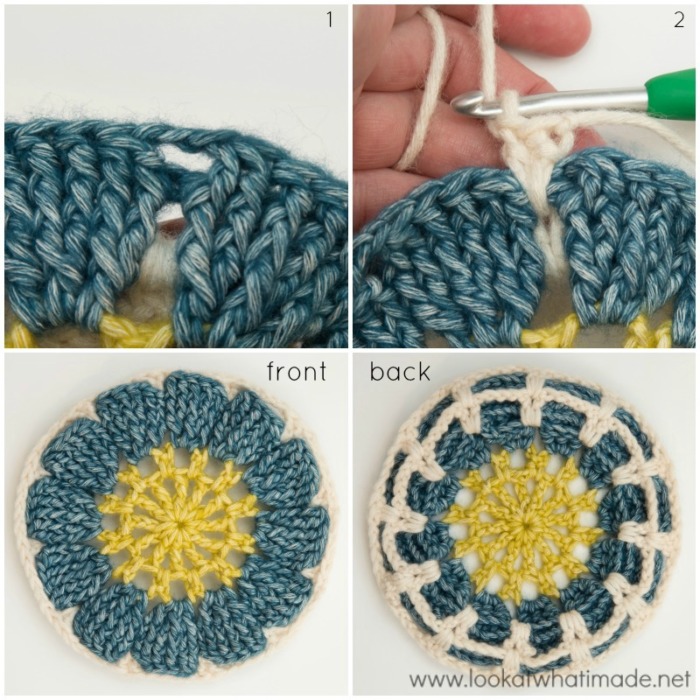
Round 8 (Colour A)
In this round, you will be working between the 2 dc that form each 2-dc group in Round 5. You will work OVER the ch-3 sp from Round 7 and the stitches of Round 6 (between Petals). You will need to apply quite a bit of tension to ensure your dc sts are ‘tight’.
Make a standing dc between any 2 dc from Round 5, remembering to work OVER Rounds 6 and 7. Make another dc between the same 2 dc. (Ch 4. Make 2 dc between the next 2 dc from Round 5, remembering to work OVER Rounds 6 and 7) 11 times. Ch 4. Join to the first dc with a sl st. Fasten off and work away your ends.
Stitch Count: 24 dc and 12 ch-4 sps
Round 9 (Colour B)
Join your yarn by making a standing FPdc2tog around the first 2 sts of any Petal from Round 7 (in other words, around the FPdc2tog and the first FPdc). FPdc2tog around the last 2 sts of the Petal. Ch 4. (FPdc2tog twice into the next Petal of Round 7. Ch 4) 11 times. Join to the first FPdc2tog with a sl st. Fasten off and work away your ends.
Stitch Count: 24 FPdc and 12 ch-4 sps
Round 10 (Colour A)
Join your yarn by making a standing dc between any 2 dc from Round 8, working OVER the ch-4 sp from Round 9. Make 4 dc in the same sp. (Ch 2 and make 5 dc between the next 2 dc from Round 8) 11 times. Ch 2. Join to the first dc with a sl st. Fasten off and work away your ends.
Stitch Count: 60 dc and 12 ch-2 sps
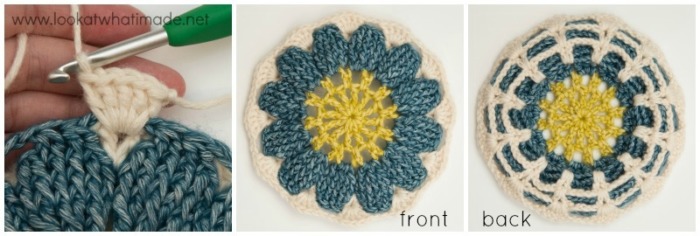
Round 11 (Colour B)
Join your yarn by making a FPdc2tog around the remaining 2 sts of any Petal from Round 9. (Ch 6 and FPdc2tog around the 2 sts of the next Petal from Round 9) 11 times. Ch 6. Join to the first FPdc2tog with a sl st. Fasten off and work away ends.
Stitch Count: 12 FPdc and 12 ch-6 sps
At the end of this round, your flower will bulge quite a lot. This will relax but it won’t completely go away. The final flower will be raised slightly above the surface of the square.
Round 12 (Colour A)
In this round, you will work IN FRONT OF the ch-6 sps from Round 11.
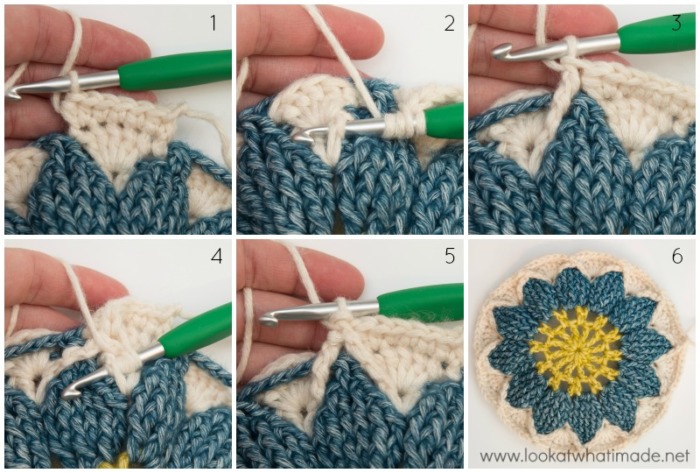
Join your yarn by making a standing hdc in the first dc of any 5-dc group from Round 10. Hdc in the same st. Sc in the next 3 sts. Make 2 hdc in the next st, which will be the last dc of the 5-dc group {Photo 1}. FPdtr in the dc from Round 8 to the left of the next Petal (to the right if you are left-handed) – Photos 2 and 3. FPdtr in the dc from Round 8 to the right of the same Petal (to the left if you are left-handed) – Photos 4 and 5. You are essentially doubling back, and you will need to fold/turn your work to make it easier to get into that stitch.
*Make 2 hdc in the first dc of the next 5-dc group from Round 10. Sc in the next 3 sts. Make 2 hdc in the next st. FPdtr in the dc from Round 8 to the left of the next Petal (to the right if you are left-handed). FPdtr in the dc from Round 8 to the right of the same Petal (to the left if you are left-handed).*
Repeat from * to * 10 more times. Join to the first hdc with a sl st.
Stitch Count: 108 sts {36 sc, 48 hdc, and 24 FPdtr}
Round 13 (Colour A)
Ch 1 and sc in the same st as the sl st join, which will be the hdc after 2 FPdtr. Sc in the next 2 sts. (Make 2 sc in the next st, which should be the central of the 3 sc from the previous round. Mark the second sc with a SM if you are going to have trouble finding it in the next round. Sc in the next 8 sts) 11 times. Make 2 sc in the next st. Sc in the last 5 sts. Join to the first sc with a sl st.
Stitch Count: 120 sc
Remember to check your gauge at the end of this round.
Round 14 (Colour A)
Ch 1 and sc in the same st as the sl st join. Sc in the next 4 sts. You should now have 5 sc, the last of which should fall in the second (marked) sc of the increase from the previous round.
*Hdc in the next st, dc in the next 2 sts, tr in the next 2 sts. Ch 4, skip the next 4 sts and sl st in the next st, which should be the second (marked) sc of the increase from the previous round. Ch 13 and sl st in the same st to form a loop. Ch 4 and skip the next 4 sts. Tr in the next 2 sts, dc in the next 2 sts, hdc in the next st. Sc in the next 11 sts. The first and last sc should fall in the second (marked) sc of the increase from the previous round.*
Repeat from * to * 3 more times, omitting the last 5 sc on the last repeat (because you’ve already made them at the start of this round). Join to the first sc with a sl st. Fasten off and work away your ends.
Have a look at your work before continuing. The flowers formed by the ch-4 and ch-13 loops are your corners. Each of them should fall between 2 Petals. If they don’t, you’ll need to check your stitches to see where you have gone wrong.
Stitch Count: 84 sts {44 sc, 8 hdc, 16 dc, 16 tr, 8 ch-4 sps, and 4 ch-13 sps}
Round 15 (Colour A)
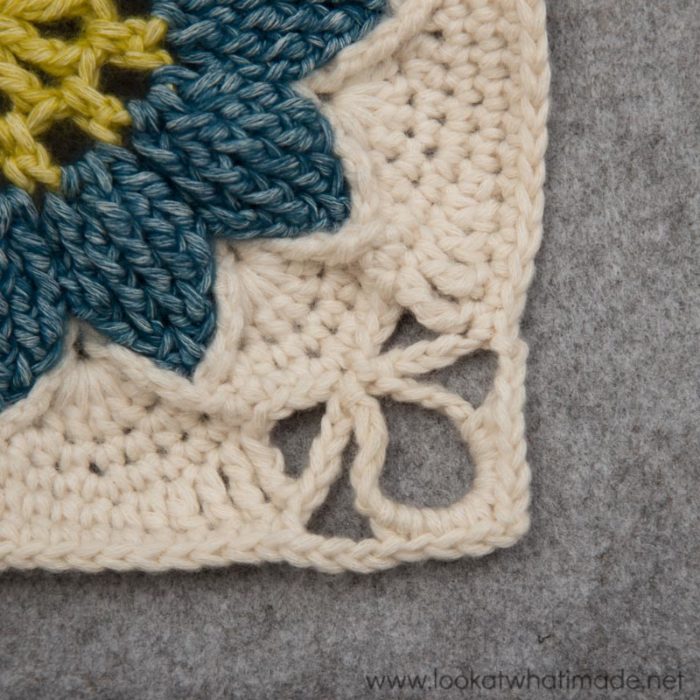
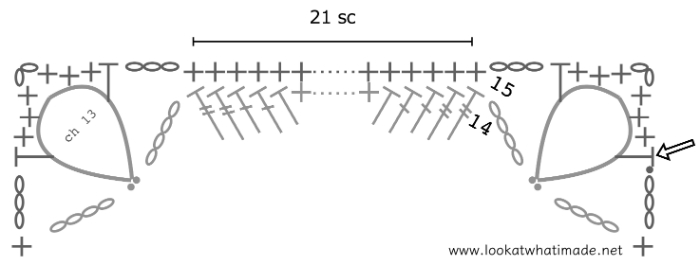
Join your yarn by making a standing hdc in any ch-13 sp around. Try to make this st close to the middle of the ch-13 sp. Into the same ch-13 sp: (3 sc, ch 2, 3 sc, hdc). This is your first corner made. Move these sts up so that they fall over the centre of the ch-13 sp. You can adjust them later if it looks a bit wonky now.
*Ch 3, skip the ch-4 sp, sc in each of the next 21 sts. Ch 3 and skip the next ch-4 sp. Into the next ch-13 sp: (hdc, 3 sc, ch 2, 3 sc, hdc).*
Repeat from * to * 3 more times, omitting the last corner on the last repeat. Join to the first hdc with a sl st. Fasten off and work away your ends.
Stitch Counts:
- Total: 116 sts {8 hdc, 108 sc, 8 ch-3 sps, and 4 ch-2 corner sps}
- Per Side: 29 sts {2 hdc, 27 sc, and 2 ch-3 sps}
Round 16 (Colour B)
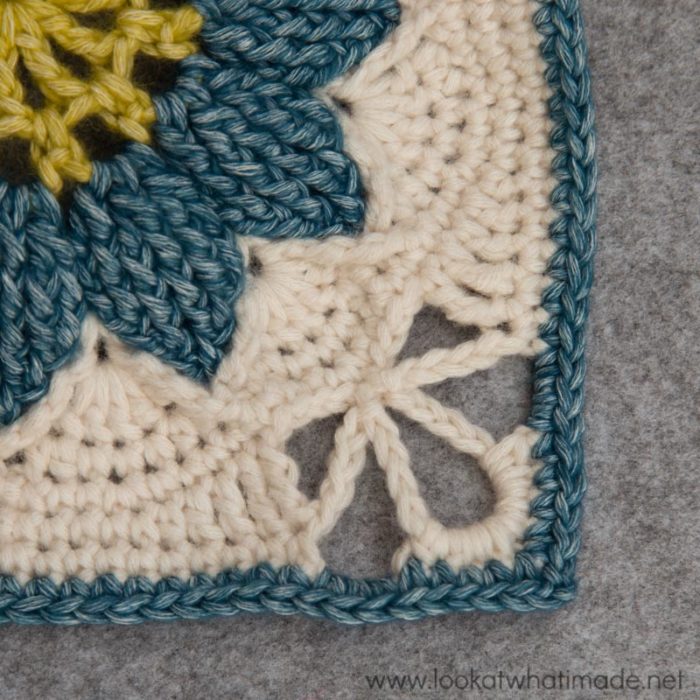
Join your yarn by making a standing sc in any ch-2 corner sp. (Ch 2, sc) in the same sp. This is your first corner made.
*Sc in the next 4 sts. Make 3 sc in the next ch-3 sp. Sc in the next 21 sts. Make 3 sc in the next ch-3 sp. Sc in the last 4 sts. Don’t accidentally skip the hdc right after the ch-3 sp. (Sc, ch 2, sc) in the next ch-2 corner sp.*
Repeat from * to * 3 more times, omitting the last corner on the last repeat. Join to the first sc with a sl st.
Stitch Count: 148 sc and 4 ch-2 corner sps {37 sc per side}
Round 17 (Colour B)
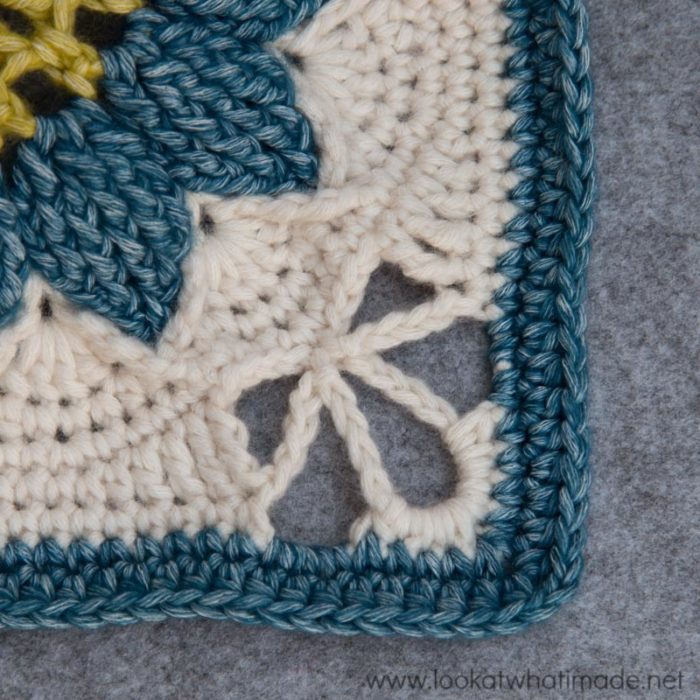
Sl st into the ch-2 corner sp. Ch 4 (counts as hdc and ch-2). Hdc in the same sp. This is your first corner made.
*Skip the first (hidden) st. Hdc in each of the remaining 36 sts. (Hdc, ch 2, hdc) in the next ch-2 corner sp.*
Repeat from * to * 3 more times, omitting the last corner on the last repeat. Join to the second ch of the initial ch-4 with a sl st. Fasten off and work away your ends.
Stitch Count: 152 hdc and 4 ch-2 corner sps {38 hdc per side}
Round 18 (Colour A)
Join your yarn by making a standing hdc in any ch-2 corner sp. (Hdc, ch 2, 2 hdc) in the same sp. This is your first corner made.
*BPdc in each of the 38 sts across. (2 hdc, ch 2, 2 hdc) in the next ch-2 corner sp.*
Repeat from * to * 3 more times, omitting the last corner on the last repeat. Join to the first hdc with a sl st. Fasten off and work away your ends.
Stitch Counts:
- Total: 168 sts and 4 ch-2 corner sps {16 hdc and 152 BPdc}
- Per Side: 42 sts per side {4 hdc and 38 BPdc}
Remember to check your gauge at the end of this round.
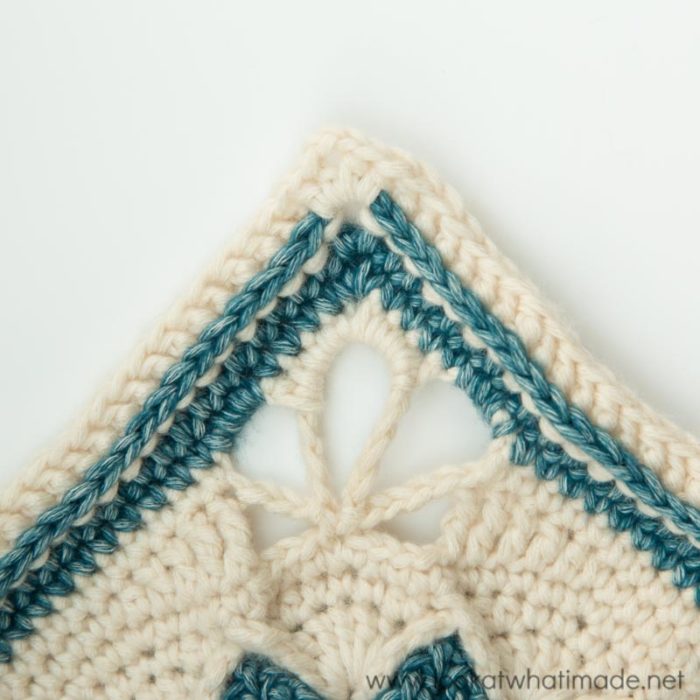
And there you have it. One central square made!

This blog post contains affiliate links. I only link to products I personally use or would use. All opinions are my own.


Suzette Huyzers says
Dedri my trouble with round 9 is i don’t know where to make the FPdc2tog. And are confused by the FPdc. Just don’t know . Trying to figure it out with the photo but still cant see.
Dedri Uys says
Hi Suzette.
If you have a look at the Petals from Round 8, each petal should have 6 legs, but only 4 tops of the stitches. The first and last stitches will be fpdc2tog’s, so will look like upside-down V’s. When you make the fpdc2tog in Round 9, you will make the first leg of the fpdc around the fpdc2tog of Round 8 (the upside down V). You will make the second leg of the fpdc2tog around the next fpdc. If you can wait until this weekend, I can send you a photo of how to insert the hook.
I hope you feel better soon,
Dedri
Dedri Uys says
Hi Chrystal. This square will stay at Part 3 for quite some time, but at least you’ll be ready if and when she decides to grow.
Suzette Huyzers says
Thankyou ! Having trouble understanding round 9. Help please. It might be a blond moment as i love your patterns and can usually follow it easily. Asseblief :-)
Dedri Uys says
Hi Suzette. If you tell me what you are having trouble with, I will help you :)
Cindy says
Dedri, I just love this pattern. I am, however, confused by the colors. In the tutorial you use three colors – yellow for the center, blue for the front of the petals and white for everything else. The written instructions only mention two colors – A and B. B is always blue, but A is both yellow and white. In addition, in your original picture it looks like the center and area between and around the petals are both your white color, the petals and final edge are blue, and if there is a third color (a multi gray?) used it looks like it is only the corners, round 14 and 15. Can you clarify that?
Dedri Uys says
Hi Cindy. The yarn used for the actual square (not the photo tutorial) is Aquarel. The aquarel is not only a dappled yarn with a hand-dyed feel, it is also ombre yarn, so the yarn that looks like white changes to a darker grey as the rounds progress, that is why the last round looks grey not white. The triangles that follow will be made in a darker grey that ranges from the light grey you see in the final round to a much darker grey. So on the photo of the finished Part 1 square, you are only looking at 2 colours, although it looks like you see 3.
For the photo tutorial I have used Scheepjes Stonewashed XL (there’s a note just below materials about that) and I am not following the same colourway for that one. The photos are to show you what the rounds should look like, not which colours to use, if that makes sense.
I am sorry that this has confused you,
Dedri x
Sue Carrinton says
Loving it! Made a second one as I could see it as a sunflower – vivid yellow one done now. Thank you.
Dedri Uys says
Two already? Well done!
Karen says
You are such a great artist designing those fantastic patterns.
Thank you so much for it.
Charlotte Huffman says
Thanks for naming your latest project after me!
Dedri Uys says
Haha, you are most welcome, Charlotte.
marie-ange says
magnifique j’adore ce bleu est divin Merci
lana says
really excited to make this. love the design.
Sherry says
Love this square…Can’t wait to try this one!!
Melissa says
How perfect to see this when I am trying to figure out what to make for my daughters for Christmas…a few of these squares should make a lovely start to a throw for my eldest, who just happens to be named Charlotte!
Dedri Uys says
What a happy coincidence :)
sonja says
Wonderful Square Kathryn
Just love this
thanks for sharing with us!
hugs sonja
manuela v. veldhoven says
it says 2hdc 2ch 2hdc in the corner
it shows 1 hdc 2ch 1hdc
Stitchcount of168 goes for the first option
I guess the photo doesn’t match the description
…
lovely regards, Manuela
Dedri Uys says
I accidentally posted a photo I had taken of an incorrect corner. Thank you for flagging that up. It is def (2 hdc, ch 2, 2 hdc). I will replace the photo after work.
Raedene Reardon says
I’ve been telling everyone about this gorgeous design and have been waiting with baited breath for the release of beautiful Charlotte after you shared her with us a couple of weeks ago. She is truly magnificent and I can’t wait to start her Your designs are incredible – you are truly an inspiration!
Oh these WIPs… But such joy in starting them all!!
Dedri Uys says
Thank you, Raedene!
Sharon Braxton says
In reading thru the pattern, I noticed that at the start Color A is yellow. But then on Round 10, when switching back to Color A, it is white. I understand that our colors will be our choosing, but I am confused as to the difference between the 2 Color A’s. I may be making too much of this but want to be clear that I didn’t miss something.
Dedri Uys says
Hi Sharon. There is a note below materials stating that I have used a different yarn for the photo tutorial. The photos do not necessarily reflect the colours for each round. They are only meant to show you how the round should look, not which colours to use. The original square (pictured at the start of the post) was made with Aquarel, using the colours stated in the written pattern.
I hope that makes sense,
Dedri
shoshana says
shalom
i love your Large Crochet Square/
it’s too hard for me to follow the written instraction.
is it possible to see it as a Technical drawing?
thanks
Dedri Uys says
Hi Shoshana. This pattern is (and will) only be available as a written pattern. What exactly are you having trouble with? Maybe someone can help?
Angie says
I just finished Sophie two weeks ago. It always saddens me a little when I finish a project that I have spent so much time with (like watching one of your children leave). Thank you for this lovely pattern! The fact that my daughter is named Charlottes I’ll make this a perfect project to start for her. Love all of my LWIM projects so much!
Dedri Uys says
I am always sad when a big project finishes too…well…if I liked doing it! I was very sad when Sophie finished, but I am still fielding questions and seeing photos of new ones daily, so I don’t think it will ever really end for me. I hope you enjoy Charlotte :)
Doris says
Hello Dedri!
I love your designs. The wool information is for the whole pattern or just for part one. I want to buy the yRn. Thanks!
Doris
Dedri Uys says
Hi Doris. Sorry about that. I have included a note now. The yarn is for the whole large square and will give you one square. You will need to multiply it if you want to make more than one square.
Doris says
Thanks!
Tarryn Fowler says
You have posted this on the very day I decided to get back into my crocheting….thank you so much and God Bless.
Dedri Uys says
That’s great :) Have fun with it!
Kathryn says
Thank you so much for sharing this, it is just beautiful & will fit perfectly in our new home. I saw your completed square on your blog a while back & just loved it so have been waiting for you to release the pattern, the fact that you’ve also included pictorial instructions is amazing, makes it possible for even beginner crocheters like me to attempt such a beautiful pattern, so thank you again
Dedri Uys says
Hi Kathryn, thank you for your comment. I hope you enjoy the pattern and please ask if you get stuck.