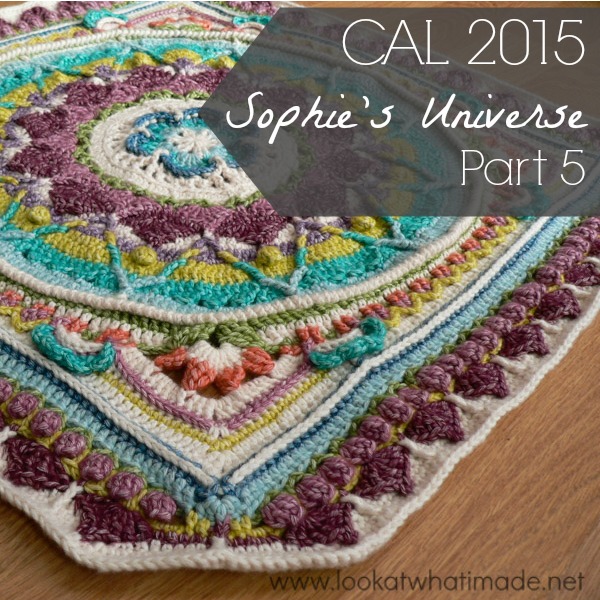
Sophie’s Universe Part 5
©Dedri Uys 2014. All Rights Reserved.
Good morning and welcome to the first completely mystery part of the CAL. We hope you have great fun this week!!
Resources
- Add this CAL to your Ravelry Queue
- Sophie’s Universe CAL 2015 Information
- Use the Print-friendly button at the bottom (right) of this post to print/save this tutorial. Don’t know how? Find out HERE.
- **Part 5 VIDEO TUTORIAL** by Esther Dijkstra from It’s All in a Nutshell
Translations
- Dutch Photo Tutorial by Dianne Baan
- German Translation by Maja Heidingsfelder
- Spanish Translation by Lynda Hernandez
- Finnish Translation by Sari Åström
- French Translation by Sandra Larvin
- Danish Translation by Tina Poulsen
- Russian Translation (with Video) by Natalie V. Alimpieva
- Swedish CAL Information by Emma Vingqvist, Agnetha Magnusson, Åza Karlsson, and Ulrika Larsson
- Arabic Video Tutorial by Banan Felimban
Materials
For the purposes of this tutorial I am using Scheepjeswol Cotton 8 (available from Deramores) and a 3.25 mm Clover Amour Crochet Hook (US D/3 UK 10).
In some of the photos I have used a different colour than the specified colour to make it easier for you to see where the stitches go.
Abbreviations
US Terminology Used (Basic US/UK comparison chart here)
- Ch – Chain
- Dc – Double crochet
- Fpdc – Front post double crochet
- Fpsc – Front post single crochet
- Hdc – Half-double crochet
- Sc – Single crochet
- Sl st – Slip stitch
- St/st’s – Stitch/stitches
- * – Repeat instructions between asterisks the number of times specified. This is a hardcore repeat and will consist of multiple instructions.
- () – Repeat instructions between parentheses the number of times specified. This is a lower level repeat.
Special Stitches
- Popcorn Stitch: Make 5 dc’s in the same stitch. Remove your hook from the last stitch. Insert your hook into the first dc of the 5 dc’s. Grab the last stitch with your hook and pull it through the first stitch. Ch 1. See this tutorial.
- Beginning Popcorn Stitch: Ch 3 (counts as first dc). Make 4 dc’s in the same stitch. Remove your hook from the last stitch. Insert your hook into the third ch of the beginning ch-3. Grab the last stitch with your hook and pull it through the first stitch. Ch 1. See this tutorial.
- V-Stitch: (Dc, ch 1, dc) in the same stitch.
- Picot: Ch 3, sl st in the third chain from the hook.
Instructions
Rounds 1 – 36
You can find the links for Rounds 1 – 36 HERE.
Round 37
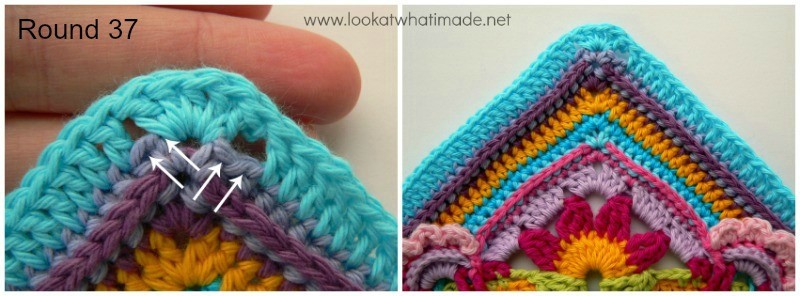
Join your new yarn by making a standing double crochet in any ch-2 corner space around. (Dc, hdc, 2 dc) in the same ch-2 corner space. This is your first corner made.
*Skip the first 2 st’s, remembering that first hidden stitch, and dc in the next 80 st’s. Skip the last 2 st’s. (2 dc, hdc, 2 dc) in the next ch-2 corner space.*
Repeat from * to * 3 more times, omitting the last corner on the last repeat. Join to the top of the standing double crochet with a sl st. Fasten off and work away your tails of yarn.
The first photo below shows the 2 skipped stitches on either side of the (2 dc, hdc, 2 dc) corner.
Stitch Counts:
- Total: 340 st’s {4 hdc’s and 336 dc’s}
- Per Side: 84 dc’s (not including corner hdc)
IMPORTANT NOTE
From this point onward, your “square” will have 8 facets (or sides). There will be 4 short sides and 4 long sides. As the rounds grow, the short sides will get longer and the long sides will get shorter. You’ll soon see what I mean.
Round 38 {Leaves}
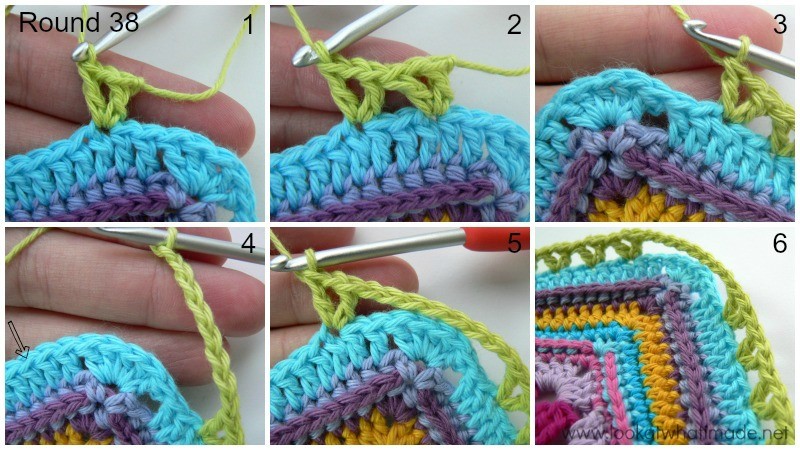
Join your yarn by making a standing double crochet in the fifth dc of any side. (Ch 1, dc) in the same stitch. This is your first V-stitch made – see Photo 1. (Skip the next 2 st’s and make a V-stitch in the next st – see Photo 2) 25 times. You should now have 26 V-stitches. There should be 4 dc’s left unworked before the corner hdc (Photo 3).
*Short Side: Ch 8 (Photo 4) and skip the next 9 st’s.
Long Side: Make a V-stitch in the fifth dc of the next side (indicated with an arrow in Photo 4 and illustrated in Photo 5). (Skip the next 2 st’s and make a V-stitch in the next st) 25 times.*
Repeat from * to * 3 times, omitting the last long side on the last repeat. Join to the top of the standing double crochet with a sl st.
Stitch Counts:
- Total: 104 V-st’s and 4 ch-8 spaces
- Per Short Side: 1 ch-8 space
- Per Long Side: 26 V-stitches
Round 39 {Tulips}
In this round, you will be forming the tulips. Your work will seem quite tight at the end of this round, but don’t worry about it too much. Keep your tension relaxed when making the ch-2 spaces and you will be just fine!
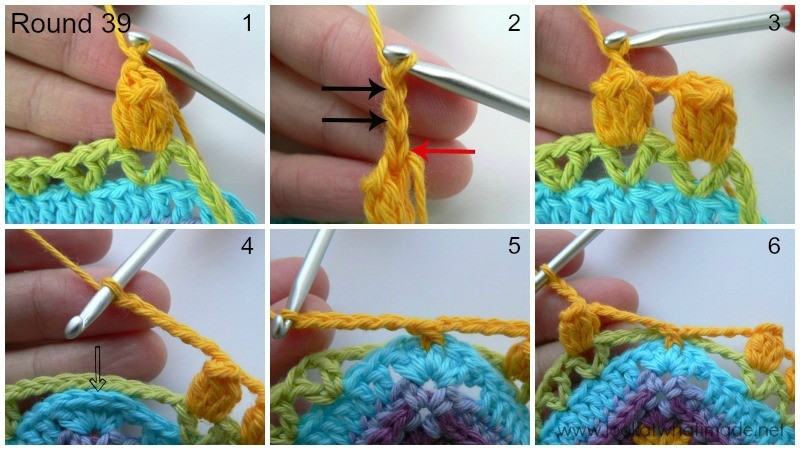
Before we get started, let’s talk about those popcorn stitches. Just like in Round 18 the popcorn stitches are closed with a ch st. This ch stitch is part of the popcorn stitch! When you are instructed to ch 2 after each popcorn stitch that ch-2 does not include the ch used to close the popcorn stitch (red arrow in Photo 2 below).
- If you are using the same colour, sl st into the next ch-1 space and make a beginning popcorn (see Special Stitches above).
- If you are using a new colour, join your yarn by making a standing double crochet in the ch-1 space of the first V-stitch on any side. Make 4 more dc’s in the same ch-1 space and complete a Popcorn Stitch (Photo 1).
(Ch 2 – see Photo 2, and make a Popcorn Stitch in the ch-1 space of the next V-stitch – see Photo 3) 25 times. You should now have 26 popcorns, one in each V-stitch from the previous round.
*Short Side: Ch 5 (Photo 4). Working in front of the ch-8 space from Round 38, make a fpsc around the corner hdc from Round 37. Ch 5 (Photo 5).
Long Side: Make a Popcorn Stitch in the ch-1 space of the first V-stitch on the next side (Photo 6). (Ch 2, make a Popcorn Stitch in the ch-1 space of the next V-stitch) 25 times.*
Repeat from * to * 3 more times, omitting the last long side on the last repeat. Join to the top of the first popcorn with a sl st.
Stitch Counts:
- Total: 108 st’s, 8 ch-5 spaces, and 100 ch-2 spaces {4 fpsc’s and 104 popcorns}
- Per Short Side: 1 fpsc and 2 ch-5 spaces
- Per Long Side: 26 popcorns and 25 ch-2 spaces
Round 40
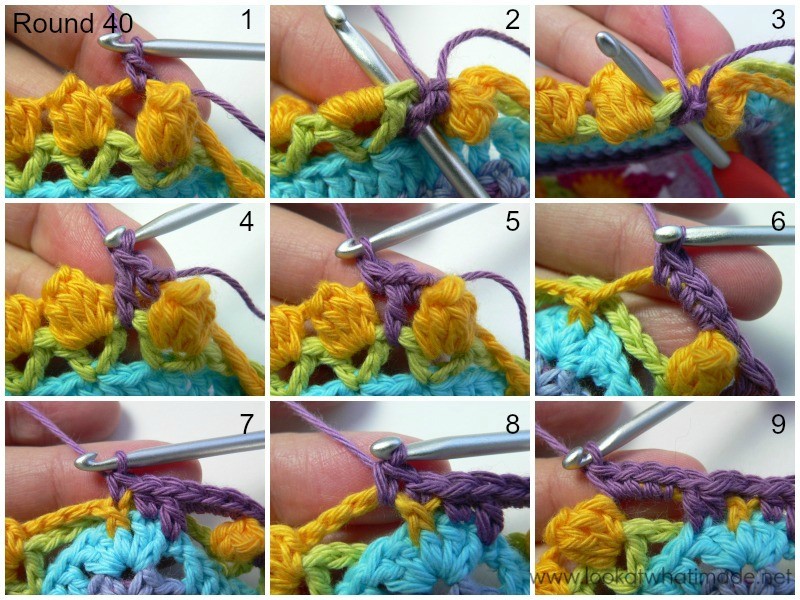
In this round, you will be working into the ch-2 spaces from Round 39 AND between the V-stitches from Round 38. When working between the V-stitches, work IN FRONT OF the relevant ch-2 space. I have found that it is easier if you fold the ch-2 down behind your work when making the stitches between the V-stitches from Round 38, otherwise it is just in the way.
- If you are using the same colour, sl st into the next ch-2 space. (Ch 1, sc) into the same space. Working in front of the ch-2 space, dc between the 2 V-stitches from Round 38 directly below the same ch-2 space. Sc in the same ch-2 space.
- If you are using a new colour, join your yarn by making a standing single crochet in the first ch-2 space of any long side (Photo 1). Working in front of the ch-2 space, dc between the 2 V-stitches from Round 38 directly below the same ch-2 space (Photos 2 -4). Sc in the same ch-2 space (Photo 5).
(Skip the next popcorn. Sc in the next ch-2 space. Working in front of the ch-2, dc between the 2 V-stitches from Round 38 directly below the same ch-2 space. Sc in the same ch-2 space) 24 times.
*Short Side: Make 4 sc’s into the first ch-5 space (Photo 6). Working in front of the ch-5 space, dc in the first corner dc from Round 37 and hdc in the next corner dc. Sc in the top of the fpsc from Round 39 (Photo 7). Sc in the next ch-5 space (Photo 8). Working in front of the ch-5 space, hdc in the next corner dc from Round 37 and dc in the last corner dc. Make 4 sc’s into the same (last) ch-5 space (Photo 9).
Long Side: (Skip the next popcorn. Sc in the next ch-2 space. Working in front of the ch-2, dc between the 2 V-stitches from Round 38 directly below the same ch-2 space. Sc in the same ch-2 space) 25 times.*
Repeat from * to * 3 more times, omitting the last long side on the last repeat. Join to the top of the first sc with a sl st. Fasten off and work away your tails of yarn.
Stitch Counts:
- Total: 356 st’s {240 sc’s, 8 hdc’s, and 108 dc’s}
- Per Short Side: 14 st’s {10 sc’s, 2 hdc’s, and 2 dc’s}
- Per Long Side: 75 st’s {50 sc’s and 25 dc’s}
Round 41 {Purple Petals}
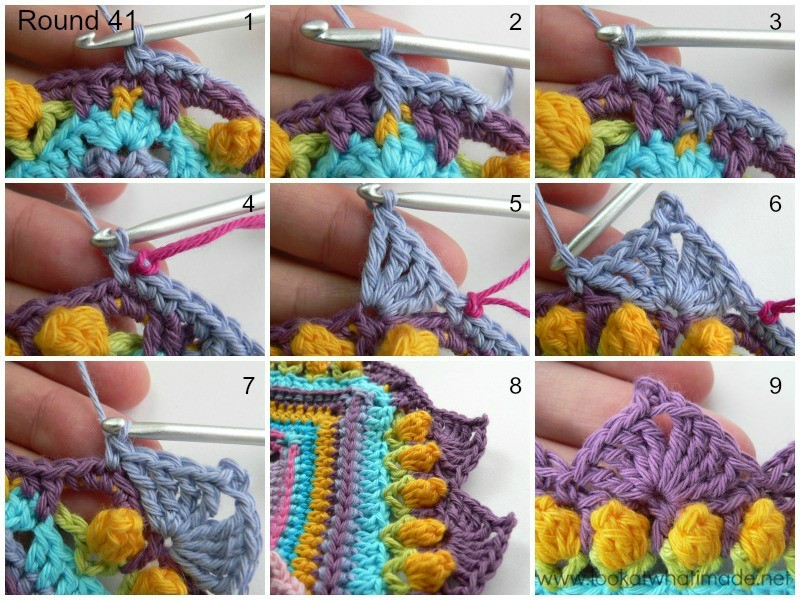
You will be making pretty Purple Petals in this round. The petals are similar to the ones used in Rounds 10 and 13.
UPDATE: Please read this round carefully. Not all the petals will fall in a dc between popcorns. ONLY Petals 1, 4, 7, and 10, as specified in the Hint below this round. If you struggle with this round, please have a look at the brilliant video tutorial that Esther Dijkstra has done.
Join your yarn by making a standing single crochet in the fourth sc made into the first ch-5 space of any short side. Sc in the next 3 st’s (Photo 1). The last sc should fall in the sc you made into the fpsc from Round 39. Fpdc around the fpsc from Round 39 (Photo 2). Sc in the next st of Round 40, directly behind the fpdc you just made. Sc in the next 3 st’s (Photo 3). The last sc should fall in the first sc after the dc. This is your first short side made.
*Long Side: Sc in the next st. Mark this stitch with a stitch marker to make it easier to count your stitches later on (Photo 4). (Skip the next 3 st’s. Make 4 tr’s in the next st – see Photo 5. Ch 3 and sl st into the third ch from your hook. This is your picot made. Make 4 tr’s in the same st. Skip the next 3 st’s and sc in the next st – see Photo 6) 10 times – see Hint below. The last sc should fall in the third sc made into the first ch-5 space of the short side (Photo 7). Mark this stitch with a stitch marker to help with counting later. You should now have 10 petals, each separated by one single crochet.
Short Side: Sc in the next 4 st’s. Fpdc around the fpsc from Round 39. Sc in the next st of Round 40, directly behind the fpdc you just made. Sc in the next 3 st’s.*
Repeat from * to * 3 more times, omitting the last short side on the last repeat. Join to the first sc with a sl st.
Fasten off and work away your tails of yarn. Once you have counted your stitches (see Stitch Counts below), you can remove the stitch markers again.
Hint
To help prevent copious amounts of frogging, I am going to give you a little tip. The first petal will fall in the dc between the first 2 popcorns. The fourth petal will fall in the dc between the ninth and tenth popcorns. The seventh petal will fall in the dc between the seventeenth and eighteenth popcorns. The tenth petal will fall in the dc between the last 2 popcorns.
You don’t necessarily have to count the popcorns, but you SHOULD check that petals 1, 4, 7, and 10 fall in a dc. If they don’t, you’ve made a booboo. Have a look at Photo 9 if you need visual help with this.
Stitch Counts:
- Total: 400 st’s and 40 picots {76 sc’s, 4 fpdc’s, 320 tr’s, and 40 picots}
- Per Short Side: 9 st’s {8 sc’s and 1 fpdc}
- Per Long Side (starting at the first marked stitch and ending at the last marked stitch): 10 petals and 11 sc’s {8 tr’s and 1 picot per petal}
Round 42
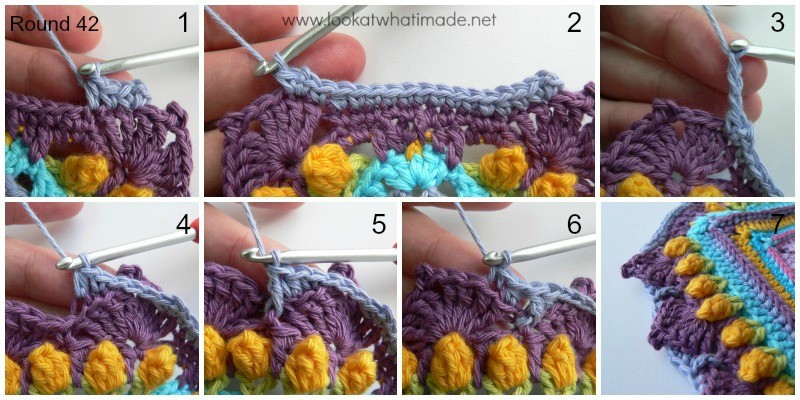
Keep your tension relaxed when making the ch-3 spaces. When working into the back loops only, your stitches might look very “stretchy”. Don’t worry about it! It will all magically work out. If you are going to have trouble identifying the ch-1 spaces at the start and end of every short side, consider using stitch markers to mark them.
Join your new yarn by making a standing single crochet in the seventh treble of the last petal on any long side. (Ch 1, sc) in the same stitch. Sc in the last tr of the petal and hdc in the next st (Photo 1). Sc in the next 9 st’s. The fifth sc will fall in the top of the fpdc from the previous round. Hdc in the next st. Sc in the first tr of the first petal. (Sc, ch 1, sc) in the next tr. This is your first short side made (Photo 2).
*Long Side (working into blo): (Ch 3 – see Photo 3. Skip the next 4 tr’s (and the picot) and sc in the blo of the seventh tr of the petal. Hdc in the blo of the last tr of the petal – see Photo 4. Fpdc around the sc between petals – see Photo 5. Hdc in the blo of the first tr of the next petal. Sc in the blo of the second tr of the petal – see Photo 6) 9 times. Ch 3. Skip the next 4 tr’s and the picot.
Short Side: (sc, ch 1, sc) through both loops of the seventh treble of the last petal. Sc in the last tr of the petal and hdc in the next st. Sc in the next 9 st’s. Hdc in the next st. Sc in the first tr of the first petal. (Sc, ch 1, sc) in the next tr.*
Repeat from * to * 3 more times, omitting the last short side on the last repeat. Join to the first sc with a sl st.
Don’t worry about flicking the ch-3’s to the back of your work. You can do that later.
Stitch Counts:
- Total: 248 st’s, 40 ch-3 spaces, and 8 ch-1 corners {132 sc’s, 80 hdc’s, and 36 fpdc’s}
- Per Short Side: 15 st’s {13 sc’s and 2 hdc’s}
- Per Long Side: 47 st’s and 10 ch-3 spaces {20 sc’s, 18 hdc’s, and 9 fpdc’s}
Having Trouble With the Stitch Counts?
When counting the sides (in this and subsequent rounds), you will count from the ch-1 corner space to the next ch-1 corner space. In Rounds that have a ch-2 corner space, you will count from ch-2 corner space to the next ch-2 corner space. Any exceptions will be highlighted. Have a look at the photo at the start of Part 6 if you need visual help.
Round 43
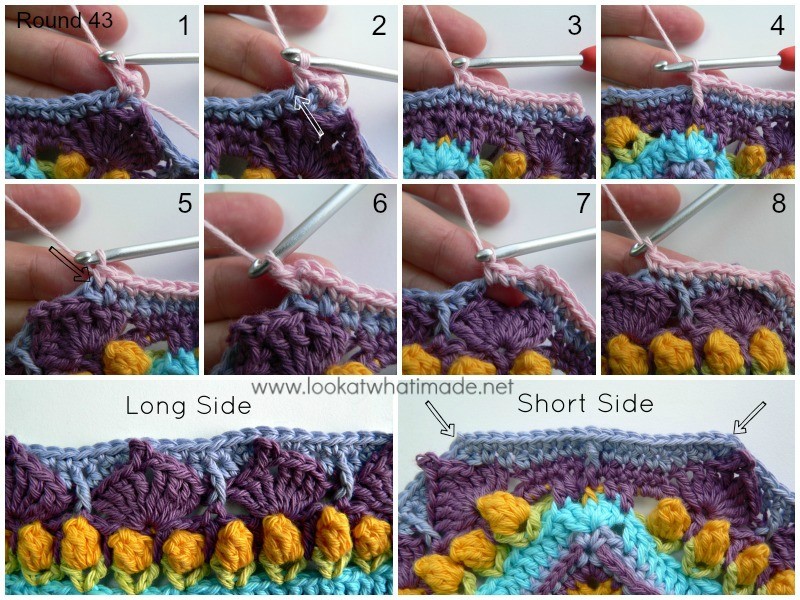
The ch-1 spaces are a bit tricky to get into. It is also quite easy to accidentally skip the first sc after the ch-1 space. You will have to skip some of these “hidden” sc’s on purpose, so make sure that you can identify them. See this tutorial if you need a recap of which loops belong to which stitch.
- If you are using the same colour, (ch 1, sc, ch 1, sc) in the same stitch as the sl st join. This is your first corner made.
- If you are using a new colour, join your yarn by making a standing single crochet in the last sc of any long side (in other words, the sc before the ch-1 space). (Ch 1, sc) in the same stitch (Photo 1). This is your first corner made.
Sc in the next ch-1 space (Photo 2). Skip the next (hidden) st and sc in the next 7 st’s (indicated with an arrow in Photo 2 and illustrated in Photo 3). The last sc should fall in the sc made into the fpdc from Round 41. Make a fpdc around the fpdc from Round 41 (Photo 4). Sc in the next 7 st’s of Round 42. Sc in the next ch-1 space (Photo 5). (Sc, ch 1, sc) in the next (hidden) st (indicated with an arrow in Photo 5 and illustrated in Photo 6). This is your first short side made.
*Long Side: Make 2 sc’s in the next ch-3 space (Photo 7). Sc in the next 5 st’s (Photo 8). (Make 3 sc’s in the next ch-3 space. Sc in the next 5 st’s) 8 times. Make 2 sc’s in the last ch-3 space.
Short Side: (sc, ch 1, sc) in the next st. Sc in the next ch-1 space. Skip the next (hidden) st and sc in the next 7 st’s. Make a fpdc around the fpdc from Round 41. Sc in the next 7 st’s. Sc in the next ch-1 space. (Sc, ch 1, sc) in the next (hidden) stitch.*
Repeat from * to * 3 more times, omitting the last short side on the last repeat. Join to the first sc with a sl st.
Stitch Counts:
- Total: 376 st’s and 8 ch-1 corner spaces {372 sc’s and 4 fpdc’s}
- Per Short Side: 19 st’s {18 sc’s and 1 fpdc}
- Per Long Side: 75 sc’s
Round 44
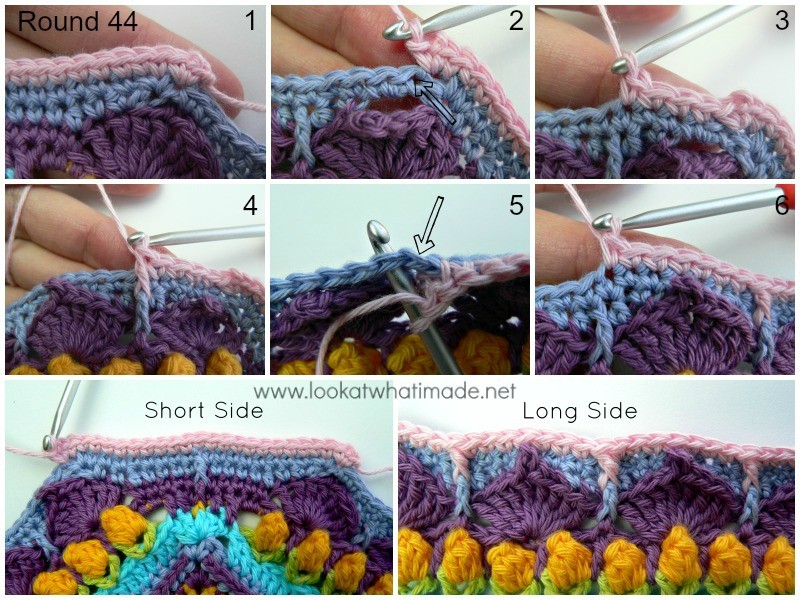
Each long side starts with 4 sc’s and ends with 3 sc’s. This slight asymmetry will be corrected in the next round, so do not worry about it.
- If you are using the same colour, (ch 1, sc, ch 1, sc) in the same stitch as the sl st join. This is your first corner made.
- If you are using a new colour, join your yarn by making a standing single crochet in the same stitch as the sl st join. (Ch 1, sc) in the same stitch. This is your first corner made.
Sc in the next ch-1 space. Sc in the next 19 st’s (Photo 1). Don’t accidentally skip the first (hidden) stitch. Sc in the next ch-1 space. (Sc, ch 1, sc) in the next (hidden) stitch (Photo 2). This is your first short side made.
*Long Side: Skip the next sc (indicated with an arrow in Photo 2). Sc in the next 4 st’s. The last sc should fall in the sc you made into the fpdc from Round 42 – see Photo 3. (Fpdc around the fpdc from Round 42 – see Photo 4. Skip the next st of Round 43 – see Photo 5 – and sc in the next 7 st’s. The last sc should fall in the sc you made into the fpdc from Round 42 – see Photo 6) 8 times. Fpdc around the fpdc from Round 42. Skip the next st of Round 43 and sc in the next 3 st’s.
Short side: (sc, ch 1, sc) in the next st. Sc in the next ch-1 space. Sc in the next 19 st’s. Don’t accidentally skip the first (hidden) stitch. Sc in the next ch-1 space. (Sc, ch 1, sc) in the next (hidden) stitch.*
Repeat from * to * 3 more times, omitting the last short side on the last repeat. Join to the top of the first sc with a sl st.
Stitch Counts:
- Total: 380 st’s and 8 ch-1 corner spaces {344 sc’s and 36 fpdc’s}
- Per Short Side: 23 sc’s
- Per Long Side: 74 st’s {65 sc’s and 9 fpdc’s}
Round 45
- If you are using the same colour, sl st into the ch-1 space. Ch 1 and make 2 sc’s in the same ch-1 space.
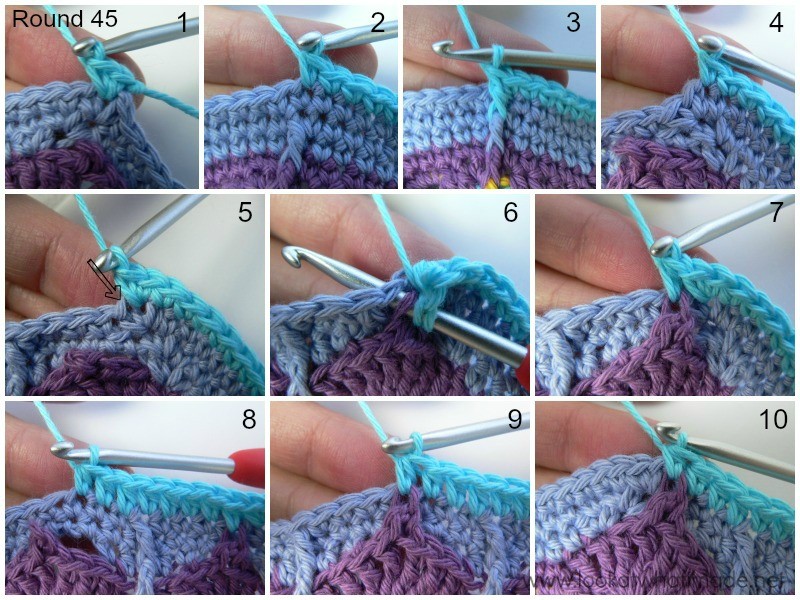
- If you are using a new colour, join your yarn by making a standing single crochet in the ch-1 space at the start of any short side. Sc in the same stitch (Photo 1).
Skip the first (hidden) stitch. Sc in the next 11 st’s. The last sc should fall in the sc made into the fpdc from Round 43 (Photo 2). Fpdc around the fpdc from Round 43 (Photo 3). Sc in the next 11 st’s (Photo 4). Make 2 sc’s in the next ch-1 space (Photo 5).
*Long Side: Skip the first (hidden) sc (indicated with an arrow in Photo 5). Catch the picot from Round 41 with the next hdc. To do this, yarn over, insert your hook into the second ch of the picot AND into the next st from Round 44, and complete an hdc through both layers – see Photos 6 and 7. (Hdc in the next 7 st’s. The fourth hdc should fall in the fpdc from the previous round – see Photo 8. Catch the picot with an hdc, as before – see Photo 9) 9 times. Photo 10 shows the last hdc of the long side made.
Short Side: Make 2 sc’s in the next ch-1 space. Skip the first (hidden) stitch. Sc in the next 11st’s. The last sc should fall in the sc made into the fpdc from Round 43. Fpdc around the fpdc from Round 43. Sc in the next 11 st’s. Make 2 sc’s in the next ch-1 space.*
Repeat from * to * 3 more times, omitting the last short side on the last repeat. Join to the top of the first sc with a sl st.
Stitch Counts:
- Total: 400 st’s {104 sc’s, 292 hdc’s, and 4 fpdc’s}
- Per Short Side: 27 st’s {26 sc’s and 1 fpdc} – this stitch count includes both sc’s of the 2-sc corner
- Per Long Side: 73 hdc’s
And that is quite enough for this week. This part was tested and proofread by Kimberly Slifer, Claire Martin, and Venetia Smith. Thank you very much, girls!!!

This blog post contains affiliate links. I only link to products I personally use or would use. All opinions are my own.


Sunette Steyn says
Can you please help me. I am finished with row 37. Part 4. I want to go on with part 5, row 38, but there are no photos avalible on part 5. Where am I doing something wrong. The photos helps allot
Dedri Uys says
Hi Sunette.
Can you just have another look? I can see all the photos on Firefox, Chrome, and Internet Explorer.
Therese says
I love this pattern, and the descriptions are great – BUT why oh why in the world whould you start round 40 in a place where it does not end so you can seemlessly continue on to round 41? It’s the same yarn/color and just starting round 40 a couple of stitches earlier and I could have started the first petal of row 41 right away – instead I have just finished row 40 and am now sitting here cursing over how the hell I’m gonna get to 41. Most if not all other rounds you have given the option of using the same yarn – why not in this one?!? It’s not like it would have been hard to start the row earlier (I get that if you do not switch color between 39 and 40 it’s not right – but you yourself is using the same color for 40 and 41 – why not instruct in fastening of at the round of row 39 (where you change color) instead of 40 (where you don’t)? This makes no sense! I’m now probably going to end up fastening of and then starting again with the same yarn – which is annoying as it leaves me with unnecissary yarntails and joins.
Please consider revising this for the future, or at least you know, warn a bitch so she can choose to start 40 earlier
Thanks
(P.s. I’m not angry, just a little peeved, if I sound angry it’s just my abrasively charming personality)
Love your work!
Dedri Uys says
Hi Therese. I understand that you are frustrated, but I have tried to limit the number of ‘fastening off’ episodes to a minimum for single-colour Sophies. The rounds all start at the start of a side to make it easier to write and follow the instructions. On the occasions that I do ask you to fasten off when using a single colour, it is because that was, after much consideration on my part, the best way to approach the next round.
This pattern was written specifically with adventurous beginners in mind, so with the changing shape (and the long and short sides), I wanted to avoid as much confusion as possible. You are obviously an advanced crocheter, so it might be worth checking the end of each next round for fastening off instructions to better help you figure out when to start a round earlier? I realize that this is not an ideal solution for you, but it’s the best one I can offer…
Dedri
ps. I had to lol at your ps :)
Elizabeth Ham says
Round 41. The short side stitches seem off. Even the photos are different. How many sc are on either side of the fpdc?
Dedri Uys says
Hi Elizabeth. I’m sorry to hear that you are having problems with this round and am happy to help you figure it out. The instructions and photos match up and are correct. On the short side, there are 4 sc, 1 FPdc, and 4 sc. How are your stitches differing from this? And do you have a photo so that I can better help you figure out what the confusion is? If you contact me using the ‘contact me’ tab at the top of the page, I can reply to you, which will enable you to send me a photo.
Dedri
Jenny says
Row 38, the chain 8. Will that forever just sit there loose or will we be working that
In another row? Thanks
Dedri Uys says
We won’t work into those. They don’t bother me on the final blanket, but if they bother you, feel free to either work over them (not as tidy) or sew them down later.
tina says
I love the colors of these blankets but I have decided to try it in black white and gray.. I think it is beautiful and look forward to doing a colorful one in the near future.. thanks for taking the time to share such an amazing pattern
Dedri Uys says
Tina, hi :) I have seen some amazing ones in black, white and grey. Have you had a look on Ravelry?
Theresa says
I am loving this. I wish I was able to purchase the same color palette, but instead I am using a bunch of leftovers I was gifted. I have a few issues with either my tension or stitch count , but I love it anyway. It’s quirky . I can’t wait to finish it. Was making it as a gift, but may keep it for myself. Thank you for sharing this amazing pattern.
Dedri Uys says
Theresa, when using leftover/scrap yarn, please make sure that they are all the same weight (I know I am stating the obvious, but I didn’t think about that when I made my one and only scrap blanket and it was wobbly and wavy and…well…bad). I have seen some amazing scrappy Sophies, so don’t for one moment regret not being able to purchase the suggested yarn. Just enjoy the journey :)
Dedri
Theresa Larson says
I have started over. I love the look of my first one, but I figured out that I didn’t pay as close attention as I should have, and my stitch count was way off. For the second attempt I pulled out my stitch markers. I am paying a lot closer attention. So far my second attempt is working out beautifully. Thank you.
Alex says
If you’ve struggled with the pattern I suggest you try the YouTube crochet along by its all in a nut shell! She talks you through each round step by step and it’s really helped me to keep on track with the pattern. Hope this helps. X https://youtu.be/g_o7ZGN5qwI
Isabella says
Hi Dedri
I have started the Sophie following the video I just love it I only began to crochet a few months ago so it’s all new to me I have not learned to read a pattern yet but hope to do this later. My only wish would be that we could buy the pattern so I could follow the video and learn to read the pattern at the same time I just want to thank you for taking the time and the effort to do this
Isabella
Dedri Uys says
Hi Isabella. You can save each part of the pattern as a pdf (or print it if you prefer), using the Print-Friendly button at the bottom of each post. We are working on a Sophie book and hope to have that available by the middle of the year.
Dedri
Laura says
Hi! Is there an error on the long side of row 41? At the beginning of the repeat, it says to do a sc, and then again at the end of the repeat, which would result in 2sc between each petal, which does not work out to 10 petals. Your picture seems to indicate that there should only be 1 sc between each petal. Thanks so much for your help! Loving this CAL!!!
Dedri Uys says
Hi Laura. Round 41 is correct. The first sc is part of the BIG repeat, but it is not part of the smaller repeat that forms each petal. This is the repeat: (Skip the next 3 st’s. Make 4 tr’s in the next st – see Photo 5. Ch 3 and sl st into the third ch from your hook. This is your picot made. Make 4 tr’s in the same st. Skip the next 3 st’s and sc in the next st – see Photo 6) 10 times.
You make the sc and then you repeat everything inside parentheses 10 times.
I hope that helps.
Dedri
theresa cunning says
i love this pattern so far but i am having issues in row 41 at the beginning it says sc in the fourth on the chain 5 and i do that then 3 sc in the next and i do the fpdc and sc without skipping a stitch and then 3 sc (so basically 4 sc, that is my understanding of the directions atlease)
but i keep ending up in the second stitch on the second ch 5 stitches.
i hope that makes sense.
Dedri Uys says
Hi Theresa. the last 4 sc’s you describe above should fall in a sc, a hdc, a dc, and the first sc made into the ch-5 space. If you keep ending up in the second sc, you have either skipped the sc, or you neglected to make it in the previous round. Have you taken a look at the videos and are you able to send a photo so that I can better assist you?
Theresa cunning says
I see my mistake. I didnr make the sc in the ch 5 before I did the hdc and dc.
Dedri Uys says
Phew. Glad you figured out what it was. That sc is sneaky!
Sol says
HÍ! I’m having trouble with the triple petals. My triples are so loose and i can’t seem to change that no matter what I do! The top loop is huge, escpecially in the first treble. Do you have any tips or tricks for good looking trebles? Yours look so gook!
Dedri Uys says
Hi Sol.
The great thing about this pattern is that all those loose first trebles will be hidden when you make subsequent rounds. But I do have a little trick and my friend Kimberly has done a tutorial for it. You can find it HERE.
aliyfia says
Hi Dedri, howr u? i find myself out of words to describe how im enjoying crocheting this blanket. simply put im totally in love with the sophie pattern. Though I don’t yet consider myself an expert at crocheting, iv been able to reach part 5 successfully thanx to your perfect explanations. :)
I have a small query the size of my sophie measures 30cm by 30cm just at the start of part 5 is that okay? iv been using acrylic yarn due to unavailability of cotton yarn in kenya.
Thankyou again for this lovely pattern :) :)
Dedri Uys says
Hi Aliyfia. Thank you for your lovely comment. Your measurements sound fine. Your blanket might just be slightly smaller than mine, but you can always add more rounds at the end if you feel you would like it bigger.
Dedri
Melissa Bird says
I’m LOVING this pattern.. I learnt to crochet in UK terms so it been a bit of a change to not fall back into UK terms.. I’ve only crochet granny squares using dc & sc, I just love learning all these new stitches,so exciting.. Can’t wait to finish so I can make more for gifts.. Thank you for sharing such a beautiful pattern. I love the tulips, my favourite flower..
Dedri Uys says
Hi Melissa. Once your brain gets used to the switch it’s not that hard, but be careful when you crochet when you’re tired as that is where you are most likely to accidentally fall back into UK terms. Have fun!
Carol D says
Well, Dedri (I almost called you Sophie!)
I’m still working on that massive California King afghan with Sophie…have made 2 large Sophie’s – stopped before the butterfly rows so the large ones will cover the top and center of the bed. For the ‘drop’ on both sides, I have four smaller (Sophie’s Garden) pieces and have puzzled over how I want to join and complete them. I laid all out on the bed yesterday and think I want to fill in on sides with going forward from Row 37, but NOT decreasing – so no ‘short sides’. I’d still like to do the popcorn stitches and am trying to figure out how to proceed. the pattern is sort of ‘stripes’ with the popcorns, without the short side flowers, etc. so the stripes and popcorn flowers as fillins. I also have a few squares which I had made before Sophie burst onto the scene which I may also work in. About now, I’m wishing we had a much smaller bed!
I can’t wait now til this is done. She looked so pretty spread out on the bed! I’ve received so many compliments from friends who’ve seen pictures of my Sophie! One friend wants me to make her a rug “exactly like that”! and still have to try to figure out how much yarn it would take to do the Sophie’s Garden square with heavier, sturdier yarn (which I’d have to treat with non-slip product of some kind. I have NO idea how to figure out how much yarn it would take in that bulkier weight yarn!
I have to thank you so much for this beautiful project! This is the absolute longest I’ve ever stuck with a project! (I have done a few smaller ones in between for a ‘break’) but am getting itchier to get this thing DONE!
Don’t know if I’ll ever do one for a bed this big again, though!
Blessings to you and your family. If I have a problem figuring out how to proceed on these sides, may I bother you to ask how to go forward? I think if I just make sure to keep stitch counts the same on TWO SIDES only, to fill in the rest of the sides that I’ll be okay.
Here’s hoping!
By the way, I don’t think I’ve ever seen one project catch on so far world-wide as Sophie has done! I’ve seen pictures of beautiful Sophie’s from literally just about every country in the world! the vast numbers that have been done in South Africa alone are staggering! you have turned out to be an OUTSTANDING Designer! Congratulations for that!
Wish me luck! If I finish this before I die – :>) – I’ll send photos…
Thanks again for your outstanding design, your unending patience, and your encouragement to all!
God bless!
Cathy McKenzie says
On round 42 it reads Per Short Side: 15 st’s {13 sc’s and 2 hdc’s} shouldn’t it read 15 sc’s or did I do something wrong ??????
Dedri Uys says
Cathy, just below the stitch counts for that round there is a note about stitch counts (in purple). It tells you that only 1 of sc of the corner (sc, ch 1, sc) belongs to the sort side. The other belongs to the long side as you are counting from ch-1 space to ch-1 space. So if you only count 1 of those corner sc’s on each side you will get 13 sc’s and 2 hdc’s. I hope that helps,
Dedri
Nancy says
I am so enjoying my journey with Sophie. I enjoy each and every stitch and round. I’ve been crocheting for over 40 years and have never been so excited. The pattern is very well written and the photos are excellent. Many thanks to Dedri and others involved for giving this old hooker a thrilling experience.
Dedri Uys says
Glad you are having fun, Nancy :)
Melissa says
I’m a little late to the game, just starting Round 41. I noticed that you make a sc after the petal and then, if you go back to the beginning, it says “make a sc”. This sounds like two sc’s in a row, but it’s only one, right?
Dedri Uys says
Melissa, hi.
The very first sc is not part of the repeat. This is the repeat: (Skip the next 3 st’s. Make 4 tr’s in the next st – see Photo 5. Ch 3 and sl st into the third ch from your hook. This is your picot made. Make 4 tr’s in the same st. Skip the next 3 st’s and sc in the next st – see Photo 6) 10 times
So there should only be one sc between petals.
I hope that helps. If you find yourself getting confused with the repeats, it is always handy to take a highlighter and highlight everything between parentheses.
Rebekah says
I did exactly this. Hehe!!
Celeste says
I am trying to print this but when I click the print friendly button I get a recipe! It works for the next set of instructions but not 5!
Jenny says
Celeste, try clearing your cookies and cache on your computer/tablet etc. as that may help. I never seem to get this problem with the Print Friendly button.
Stylememary says
Just finished Part 5, and I am finding such great comfort in working this project. Last week was so stressful for me, but each night, Sophie helped me calm down, get into a hooking rhythm, and focus on something beautiful and soothing. Thank you for this awesome CAL!
Jenny says
Sorry to hear you are going through stressful times at the moment Stylememary! Sophie is indeed a wonderful way to redress the emotional balances of life and obtain a good zen feeling again. 100% feel good, is Dedri’s Sophie :)
Liz says
What do we do with the 8 chain from round 38? TIA
Jenny says
It is captured/secured in round 39, as the photos show you in the tutorial :)
Liz says
I didnt see anything telling me to do that :(
Karen says
I didn’t see it either but I am not going to frog 6 rows. It’s not all that bad.
Mary Jane says
The pattern here reads: Working in front of the ch-8 space from Round 38, make a fpsc around the corner hdc from Round 37. Ch 5 (Photo 5). And from the photo 5 it is very difficult to tell that you captured the chain 8, might I suggest that you change the directions to include directions to capture it? I don’t have access to the video. I live in China so the only thing I can use is the pictures and written word (which are excellent and very helpful except right here :( )
Dedri Uys says
Thank you for your feedback, Mary Jane. The ch-8 is not captured. You work in front of it all the while, so it will be to the back of your. You are free to capture it should you wish.
Kathy Fuller says
Hello…I am currently working on part 5. In row 44, the stitch count says 75 stitches on the long side. I have done this row over and over and I cannot get it to come out right. Up to this point, my stitch count was perfect. Any ideas??
Kathy Fuller says
I found the answer down in the comments when you explained it to someone else. I am SO glad. It was kinda makin’ me crazy. LOL And, I LOVE this CAL. Your design is gorgeous. I have loved looking at all the pictures posted on Facebook. Thanks!