The Popcorn Stitch is an excellent way to add dimension to your crochet projects, and it is one of the easiest textured stitches to master. In this photo tutorial I will walk you through making Popcorn Stitches and working into them in subsequent rows/rounds.
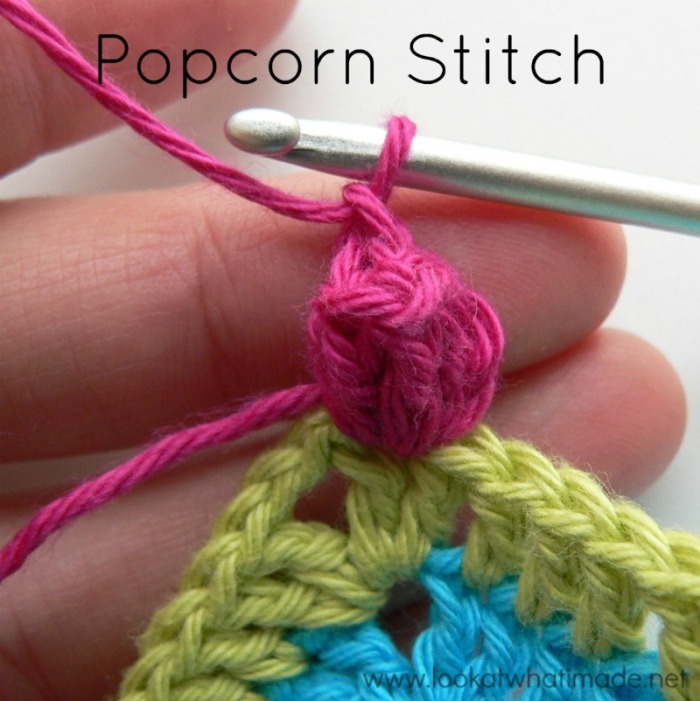
A Popcorn Stitch is basically 5 dc’s into the same stitch/space. The “Popcorn” is formed by pulling the top of the last dc through the top of the first dc. Popcorn Stitches can also be made with 3, 4, 6, or 7 stitches, depending on how skinny or ‘puffy’ you want them to be. They are not to be confused with Bobble Stitches, Cluster Stitches, or Puff Stitches. Each of these stitches have very specific characteristics (see More Tutorials at the end of this post).
The instructions for the Popcorn Stitch remain the same, regardless of whether you are working in rounds or in rows. It is useful to know that Popcorn Stitches “pop” to the front of your work. When working in the round, this is not a problem, because the front of the work is usually always facing you. When working in rows however, you will need to make your popcorn stitches ONLY on those rows where the front of your work is facing you (in other words, every alternate row).
Index
- How to Crochet the Popcorn Stitch
- Things to Note
- Hint
- Working Into Popcorn Stitches
- More Tutorials
- Related Free Patterns
How to Crochet the Popcorn Stitch
Popcorn stitches at the beginning of a row/round are made slightly differently from those in the middle of a row/round. I have therefore broken the instructions up into “Making the First Popcorn Stitch” and “Making Subsequent Popcorn Stitches“.
Making the First Popcorn Stitch
Used when starting a row/round with a Popcorn Stitch.
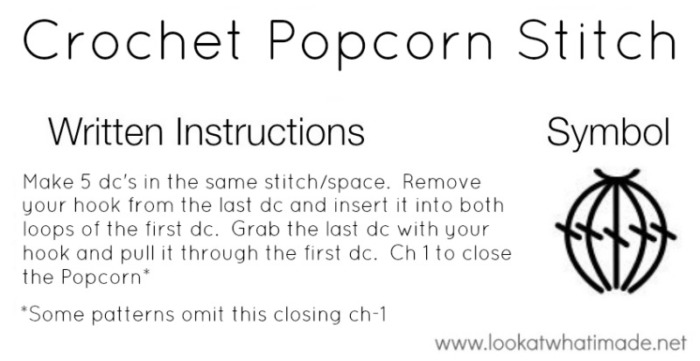
Ch 3 (this counts as your first dc) – see Photo 1. Make 4 dc’s in the same st {Photo 2}. Remove your hook from the last stitch and insert it into the top of the beginning ch-3 {Photo 3}. Insert your hook into the last stitch {Photo 4}. Pull the last stitch through the top of the ch-3 {Photo 5}. Ch 1 to close the Popcorn* {Photo 6}.
*See Things to Note below.

Making Subsequent Popcorn Stitches
Used when making a Popcorn Stitch in the middle of a row/round.
Make 5 dc’s in the indicated stitch/space {Photo 1}. Remove your hook from the last dc and insert it into the first dc of the 5-dc group. Insert your hook into the last dc {Photo 2} and pull it through the first dc. Ch 1 to close the Popcorn* {Photo 3}.
*See Things to Note below.

Things To Note
*Some patterns will omit the ch-1 that closes the Popcorn. It’s a matter of personal preference. I feel that the Popcorns ‘pop’ more when they are closed with a ch-1. Whatever your feelings are about it, it is important that you check the instructions at the start of a pattern to see how the designer wants you to make the stitches.
- Popcorn stitches will usually be separated by one or two chain stitches. The first ch st will “close” the popcorn and is almost always part of the instructions. The second ch st is only used when making popcorn stitches right next to each other. They act as “spacers” so that the popcorn stitches don’t crowd each other.
- When making popcorn stitches right next to each other in a row, you will usually skip a stitch between popcorn stitches to give them room to breathe.
- When making popcorn stitches right next to each other in the round, you don’t generally skip a stitch between popcorn stitches, as they will fan away from each other.
Hint
When you make your Popcorn Stitches, they will partially hide the top of the next stitch to be worked into. Scooch the stitches of the Popcorn up to make sure that you don’t accidentally skip the next stitch. If you are meant to skip the next stitch, this will help prevent you from skipping 2 st’s.

Working Into Popcorn Stitches
This is what the Popcorn Stitch will look like from the front, side, and back. This little flower is formed by the first 2 rounds of Julee Reeves’ Winter Rose Square. You can find the pattern HERE on Julee’s site.

Popcorn Stitch from the front, side, and back.
There are 2 ways to work into your Popcorns:
These methods assume that you have closed your Popcorns with a ch-1.
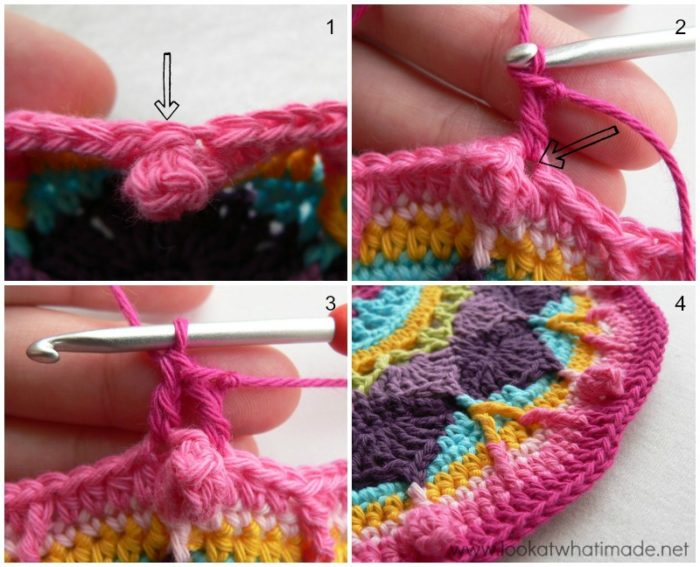
- Method 1: Work into the ch-1 that closed the Popcorn {Photo 1}. This is the most common method, but I find that the Popcorns have a tendency to lean slightly to the right when this method is used (left if you are left-handed).
- Method 2: Work into the first of the 5 dc’s that form the Popcorn. You will find the loops for this stitch immediately to the right and slightly behind the Popcorn (to the left if you are left-handed) – see the arrow in Photo 2. When you work into the first dc of the 5-dc Popcorn like this {Photo 2}, you will skip the ch st on top of each Popcorn (the one indicated with an arrow in Photo 1). Photo 3 below shows the first dc after the Popcorn completed. Note the skipped ch st at the top of the Popcorn. Photo 4 shows one of the popcorns from the side. Notice how much it ‘pops’ with this method.
Popcorns in Part 3 of Sophie’s Universe
How do you make your Popcorn Stitches and do you have any tips and tricks for making them easier?
More Tutorials
- If you prefer video instructions, Tamara from Moogly has got an excellent video tutorial for the popcorn stitch.
- Demystifying Cluster Stitches is a brilliant, comparative post about Puff Stitches, Bobble Stitches and Pineapple Stitches (by Stephanie from A Bag Full Of Crochet).
Related Free Patterns
- Cable and Bobble Stitch Blanket (Lienke’s Lovie)
- Popcorn Stitch Flower by Britanny from b.hooked
- Granny Bobble Blanket by Karen from Colour In a Simple Life (uses 4-dc popcorns)
I hope that you have found this tutorial useful!

This blog post contains affiliate links. I only link to products I personally use or would use. All opinions are my own.


Lesley says
Hi! I love your blog! I was wondering if I could add a popcorn stitch or bobble stitch to a finished project?
I have made a donut pillow which I would like to add sprinkles to. I have already finished the project but I thought adding these would be perfect.
Jenny Lowman says
Not to send you way from Dedri’s blog at all, but on the Outstanding Crochet blog, there is a video titled ‘Add crochet bobbles to anything’. Worth a look as I think it is exactly what you are looking for ;)
Elizabeth Clarkson says
Now I am really confused. I knew how to make the popcorn stitch but I got on Google to see how to turn at the end of a row with popcorn. then something that had been nagging at me for a while was do you make a whole row of nothing but popcorns and if they’re that puffy aren’t they a little overcrowded like doesn’t have popcorn need a little more room?
First thing I find is a tutorial on another site that tells you you have to alternate popcorns with single crochets across one row and then the next row in line will be all singles like the first rose singles and the second row is singles alternating with popcorns and that repeats itself for the length of your blanket or whatever….AAAAUGH!
I’M SO CONFUSED!
R U saying NO row of just singles but rather every row is popcorn’s separated by chains???
Dedri Uys says
HI Elizabeth,
It can be quite frustrating marrying all the different tutorials. You are correct: Popcorns do need room to breathe. And you are also correct that they do need a row of something in between them, not least because they pop to the front of your work when you are making them, and if you work in Rows, they will pop front/back/front/back as you turn each row. You want them to pop only to the front, so you will only make them on the Right Side rows, not the Wrong Side rows.
There are many ways to incorporate them into a pattern, so if you would like me to help you with your specific pattern, can you send me a link here so that I can check it out and better assist you?
Dedri
Sally says
I’m struggling with Row 3 of this pattern. Row 2 was easy but I’m not sure which 2 back loops of popcorn Stitch to work into….
Row 2: Ch 4 (counts as dc, ch 1), skip sc and ch-1 space, *popcorn in next sc, ch 1, skip next ch-1 space, dc in next sc**, ch-1, skip next ch-1 space; repeat from * across, ending at **; turn – 7 popcorns; 8 dc, 14 ch-1 spaces.
Row 3: Ch 1, sc in first dc, *ch 1, skip next ch-1 space, sc in back 2 loops of next popcorn, ch 1, skip next ch-1 space, sc in next dc; repeat from * across, working last sc in 3rd chain of beg ch-4; turn – 14 ch-1 spaces; 15 sc.
Dedri Uys says
Hi Sally. I think this is what it means: If you look at a Popcorn from the top, the top forms a circle, with the loops of the last st you pulled through the first st falling to the back of the circle, and the 5 dc that make the popcorn falling to the front. Some people poke their hook straight down into that circle/hole (instead of into the first st of the Popcorn) and work around that pulled through stitch. I don’t really know how to explain it other than just poke your hook straight down into the top of the Popcorn and then make your stitch?
Noreen Lee says
Looking at a pattern that calls for Popcorn stitch, Puff stitch, and Puff Cluster but has no written directions on how to do these stitches only diagrams. for the entire pattern.. How do I do them? Also it said I could use either popcorn or puff stitch throughout or follow stern… Any thoughts… I have crocheted numerous patterns and consider myself an advanced beginner or intermediate… I just haven’t done anything with just diagrams… have always used written pattern instructions… and can’t remember doing any puff stitches in years… how would I proceed if It says puff cluster (into indicated stitch 5DC Puff, CH2, 5DC, Ch2, 5 DC for the puff cluster. It looks like I would do in one stitch 5DC – close with aCH2 then another 5 DC close with CH 2, and a final 5 DC in that one stitch? IS that right? (Note pattern I am considering trying is from Crochet Wench. and is called Magnificent Marge… )
Dedri Uys says
Hi Noreen.
I just had a look at the pattern and I LOVE the story behind it and how it looks. So pretty!
For the Puff clusters, You are making (Puff, ch 2, Puff, ch 2, Puff) into each indicated st/sp. Puffs are when you load ALLL the yarn-overs before pulling through. You can see my tutorial HERE. Please note that my Puff tutorial only has 4 dc, not 5, but in my opinion, 4 looks just as good as 5 with less hassle.
LimnerC says
Hello! You just taught me how to make popcorn stitches in one easy lesson. Thank you. You KISSED it. (Kept it simple sister.)
Jenny says
Have you seen Dedri’s Lazy Popcorns? They are even better!
Jenny :)
Mariette says
I love your work which is truly inspiring. Looking forward to receive your newsletter.
ZebunNesa says
I totally agree with LitlBits comments. It’s dedicated crafters like you who keep up and further our passion for crochet. Thanks so much!
Dedri Uys says
You are most welcome. Thank you for your kind comment.
Petra says
Hi Dedri,
I absolutely second what LitlBits said. Your tutorials are superb and inspiring. I love every one of them and I think the CAL is a great encouragement to keep on crocheting and learning and improving.
You are indeed very appreciated. Thank you
Dedri Uys says
Thank you, Petra ;)
LitlBits says
Thank you so much for this tutorial…you and others who publish these tutorials have been so incredibly helpful to those of us who are working to improve our skills and get beyond the ‘beginner’ level. I’m now able to tackle patterns that are labeled ‘intermediate’ and even one that was labeled ‘advanced’ – because of the help from fine folks like yourself. This must take you hours of work to produce these tutorials…
Just wanted to let you know you are so very appreciated!
Blessings to you!
Dedri Uys says
Thank you for your lovely, heartfelt comment. It does take me hours. But every hour is worth it ten times over when I get comments like this. It thrills me no end that you are learning and progressing. I am so pleased for you :)
Stephanie says
Thanks for the ping back :)
Dedri Uys says
Just a pleasure, Stepanie. Your tutorial is so clear!