Good Morning!
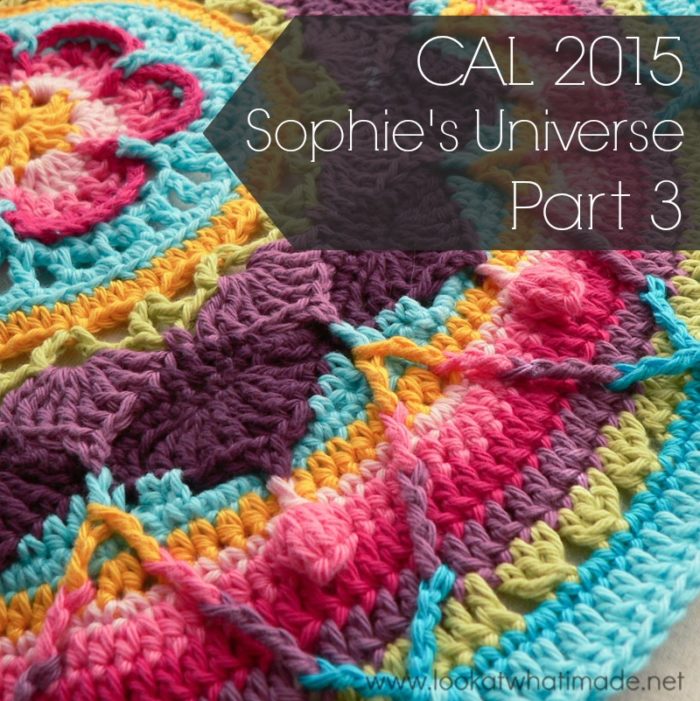
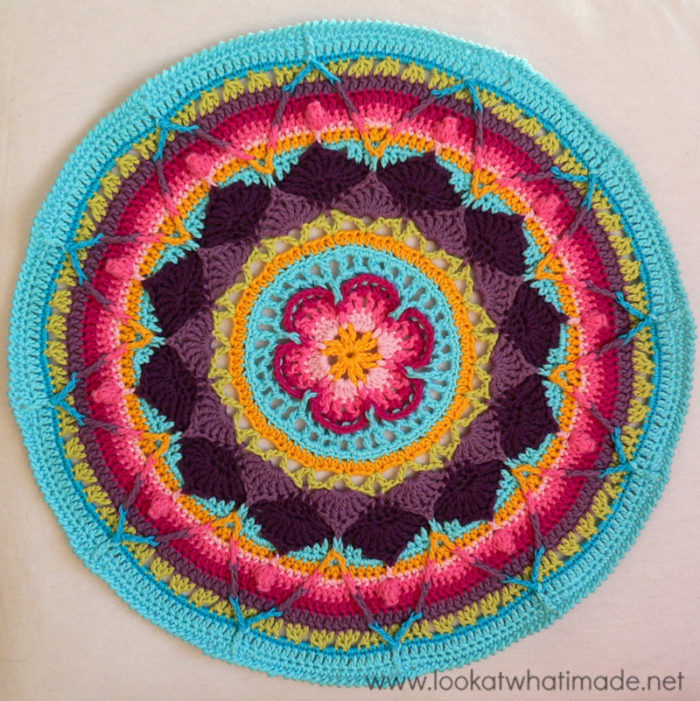
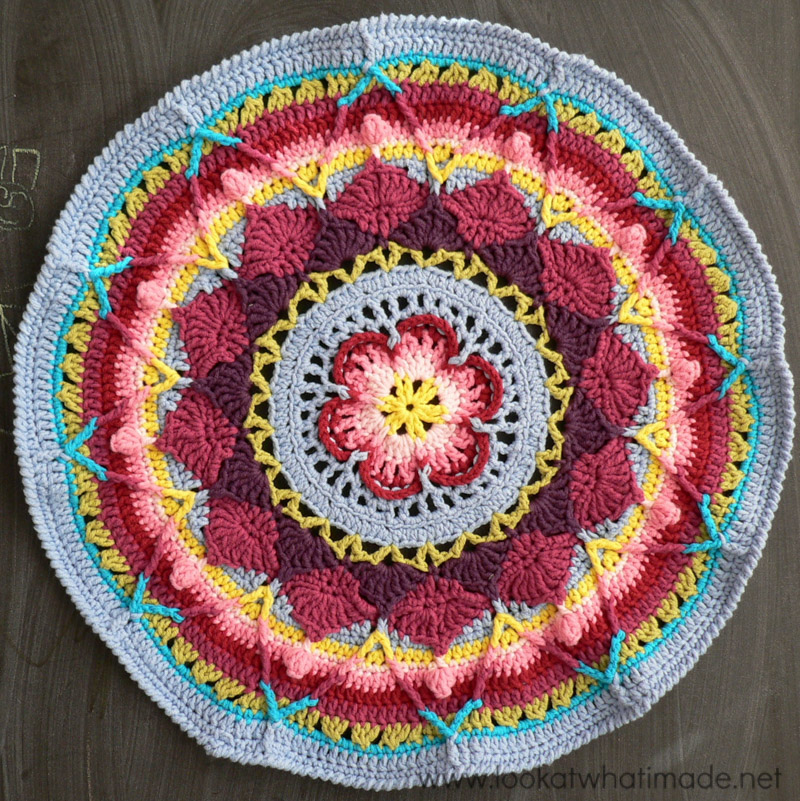
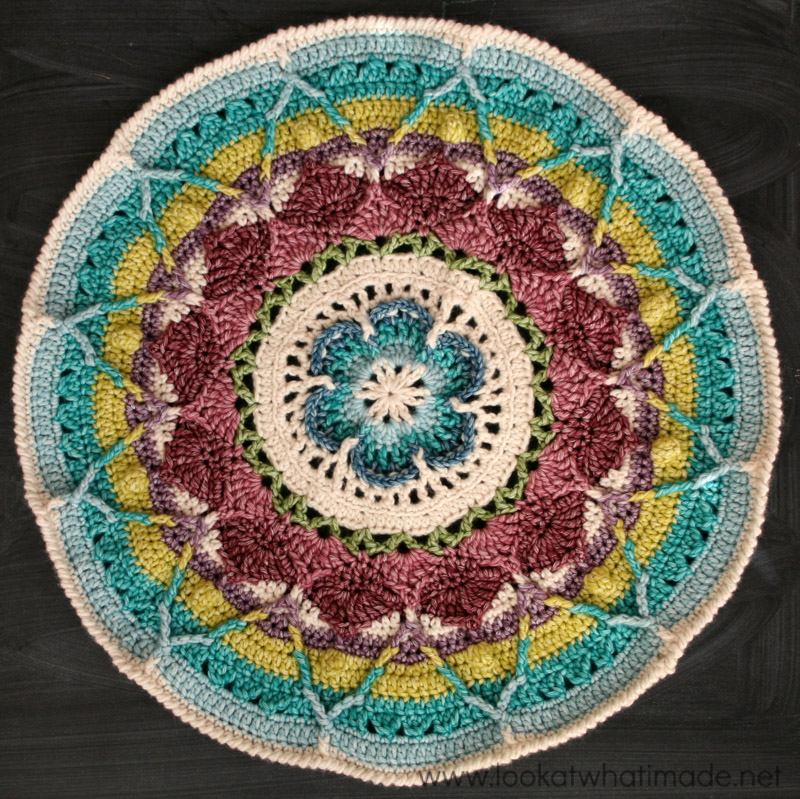
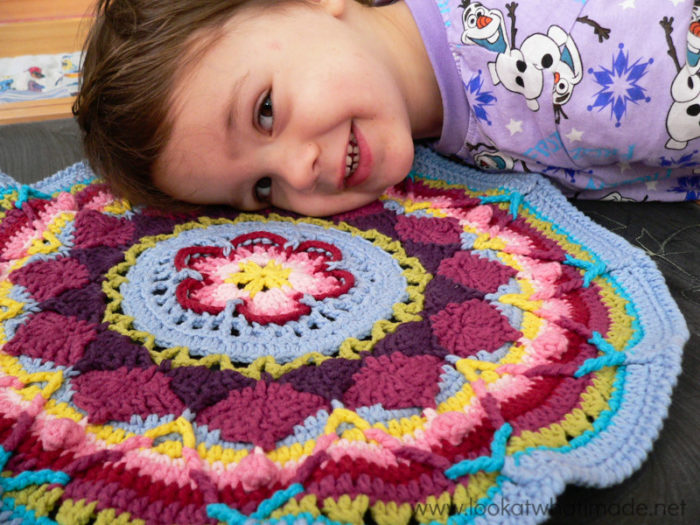
I hope you are all excited and ready for Part 3 of Sophie’s Universe. At the end of part 3, you will have a beautifully bright Mandala. This Mandala has its own Ravelry Page, so feel free to add your projects there as well.
Sophie’s Universe Part 3 {Photo Tutorial}
©Dedri Uys 2014. All Rights Reserved.
Special design credit to Chris Simon for allowing me to use a modified version of her Lace Petals flower.
Resources
- Add this CAL to your Ravelry Queue
- Sophie’s Universe CAL 2015 Information
- Use the Print-friendly button at the bottom (right) of this post to print/save this tutorial. Don’t know how? Find out HERE.
- **Part 3 VIDEO TUTORIAL** by Esther Dijkstra from It’s All in a Nutshell
Translations
- Dutch Photo Tutorial by Dianne Baan
- German Translation by Gabriele Rogers
- Spanish Translation by Lynda Hernandez
- Danish Translation by Tina Poulsen
- Finnish Translation by Sari Åström
- French Translation by Sandra Larvin (with Video Tutorials by Géraldine Cymer)
- Russian Translation (with Video) by Natalie V. Alimpieva
- Swedish CAL Information by Emma Vingqvist, Agnetha Magnusson, Åza Karlsson, and Ulrika Larsson
- Arabic Video Tutorial by Banan Felimban
Materials
See the Information Post.
| Colours for Part 3 | |||
 |
 |
 |
|
| Cotton 8 | Softfun | Stonewashed XL | |
| Round 16 | Canary | Canary | Deep Amethyst |
| Round 17 | Light Pink | Light Rose | Deep Amethyst |
| Round 18 | Pink | Rose | Lemon Quartz |
| Round 19 | Fuchsia | Bordeaux | Lemon Quartz |
| Round 20 | Moors | Cyclamen | Green Agate |
| Round 21 | Light Green | Olive | Green Agate |
| Round 22 | Turquoise | Dark Turquoise | Amazonite |
| Round 23 | Light Turquoise | Light Blue | Amazonite |
| Round 24 | Light Turquoise | Light Blue | Moonstone |
| Round 25 | Light Turquoise | Light Blue | Moonstone |
Size
| Large | Medium | Small | |
| Sophie’s Universe (End of Part 3) | 50 cm (just under 20 “) | 40 cm (just under 16″) | 30 cm (just under 12″) |
Abbreviations
US Terminology used (US/UK comparison chart here)
- Ch – Chain
- Dc – Double crochet
- Fpdc – Front post double crochet
- Fpdtr – Front post double treble
- Fptr – Front post treble crochet
- Hdc – Half-double crochet
- Sc – Single crochet
- Sl st – Slip stitch
- St/st’s – Stitch/stitches
- * – Repeat instructions between asterisks the number of times specified. This is a hardcore repeat and will consist of multiple instructions.
- () – Repeat instructions between parentheses the number of times specified. This is a lower level repeat.
Special Stitches
- Cluster : Dc3tog – see this tutorial.
- Crab stitch: This stitch is also known as the reverse single crochet. See this tutorial.
- Popcorn stitch: Make 5 dc’s in the same stitch. Remove your hook from the last stitch. Insert your hook into the first dc of the 5 dc’s. Grab the last stitch with your hook and pull it through the first stitch. Ch 1. See this tutorial.
- Standing Stitches: Standing sc’s, hdc’s, and dc’s are stitches used to start the round without the need for the traditional beginning chain. Links to tutorials are supplied in each relevant round.
Invisible Join
If you would like to use the invisible join instead of the sl st join at the end of each round, you can find a step-by-step photo tutorial here. If you DO decide to use it, make very sure that you understand which stitch to join to and which stitch to start your new round in, otherwise, your mandala is going to come out all wonky!
Instructions
Rounds 1 – 15
You can find the links for Rounds 1 – 15 HERE.
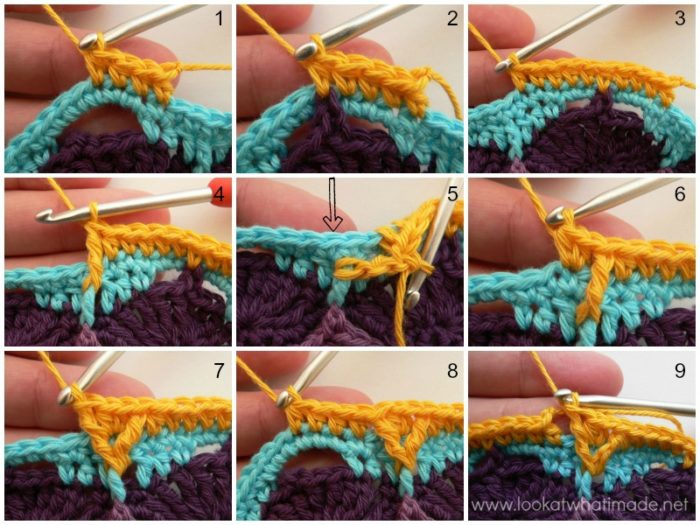
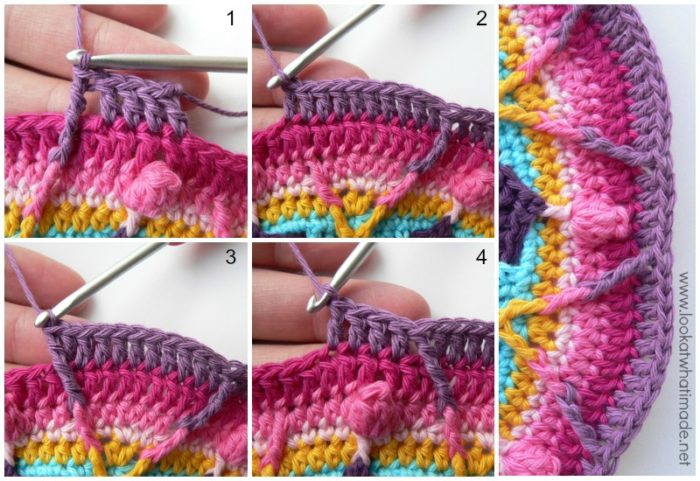
Round 16
Hint: The hdc’s worked into the picots should fall in the 4th sc made into the ch-6 space.
- If you are going to use the same colour, sl st into the next st and then ch 2 (this counts as your first hdc). Hdc in the next 3 st’s.
- If you are going to use a different colour, start with a standing half-double crochet in the st after the sl st join. Hdc in the next 3 st’s {Photo 1}.
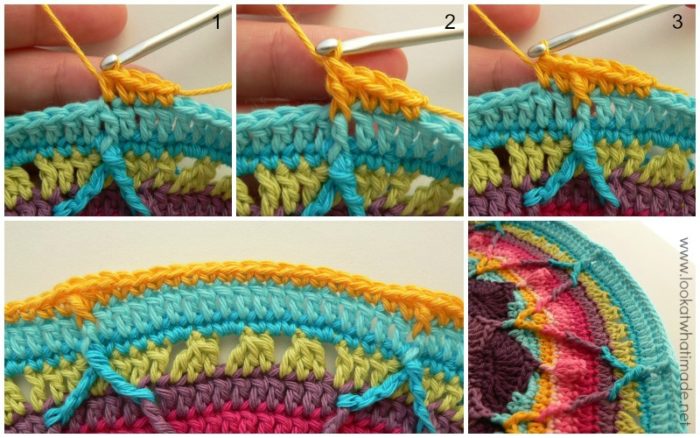
*Catch the picot by making a hdc through the picot from Round 13 and into the next st of Round 15 (so through both layers as before) – see Photo 2. Hdc in the next 5 st’s {Photo 3} and make a fptr around the post of the fpdc from Round 14 {Photo 4}. Skip the next st of Round 15 and Make 2 hdc’s in the next st {indicated with an arrow in Photo 5 and illustrated in Photo 6}. Fptr around the same fpdc from Round 14 {Photo 7}. Skip the next st of Round 15 and hdc in the next 4 st’s {Photo 8}.* Repeat from * to * 11 more times, omitting the last 4 hdc’s on the last repeat {Photo 9}. Join to the top of the beginning ch-2 (or standing hdc) with a sl st.
Stitch Count: 168 st’s {144 hdc’s and 24 fptr’s}
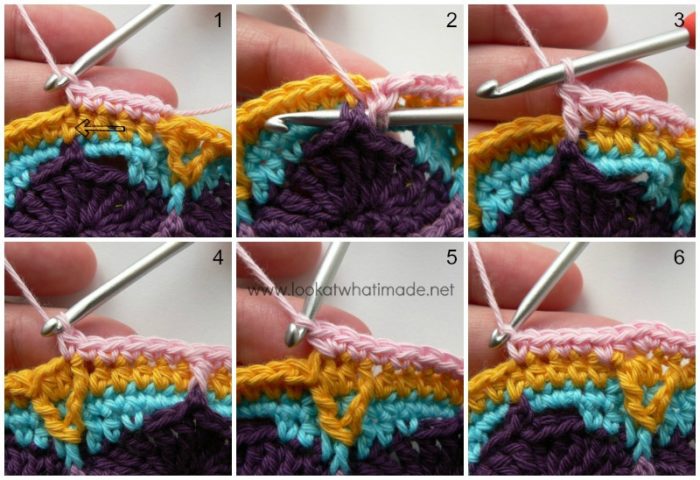
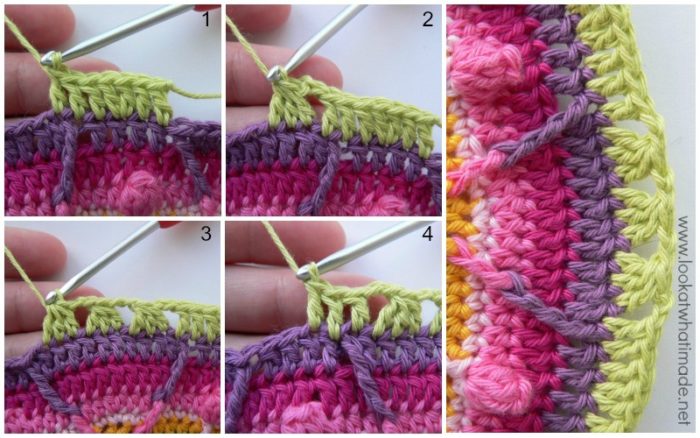
Round 17
- If you are going to use the same colour, ch 1 and sc in the same st. Sc in the next 4 st’s {Photo 1}.
- If you are going to use a different colour, start with a standing single crochet in the same st as the sl st join. Sc in the next 4 st’s.
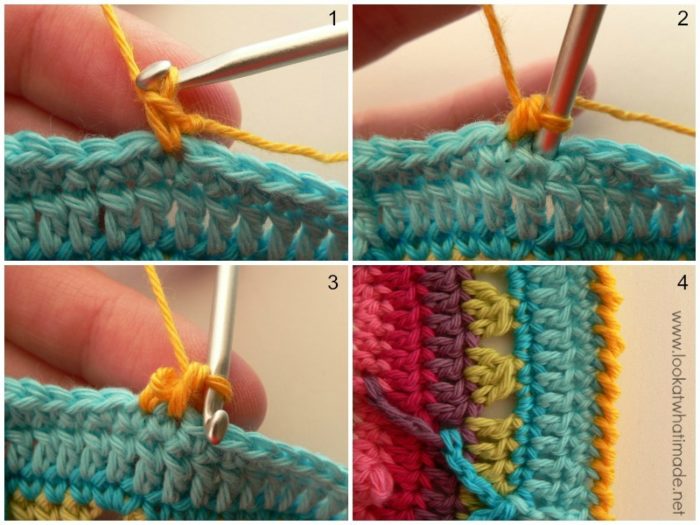
*Fpdc around the picot from Round 13 {indicated with an arrow in Photo 1 and illustrated in Photos 2 and 3}. Skip the next st from Round 16 and sc in the next 6 st’s {Photo 4}. Make 2 sc’s in the next st {Photo 5}. Sc in the next 6 st’s {Photo 6}.* Repeat from * to * 11 more times, omitting the last 5 sc’s on the last repeat. Join to the top of the first sc with a sl st.
Stitch Count: 180 st’s {168 sc’s and 12 fpdc’s}
Note
In the next 3 rounds, Sophie has a tendency to buckle. This will correct itself in Rounds 21 and 22, so don’t worry about it. If your stitch count is spot on, you’ll be fine.
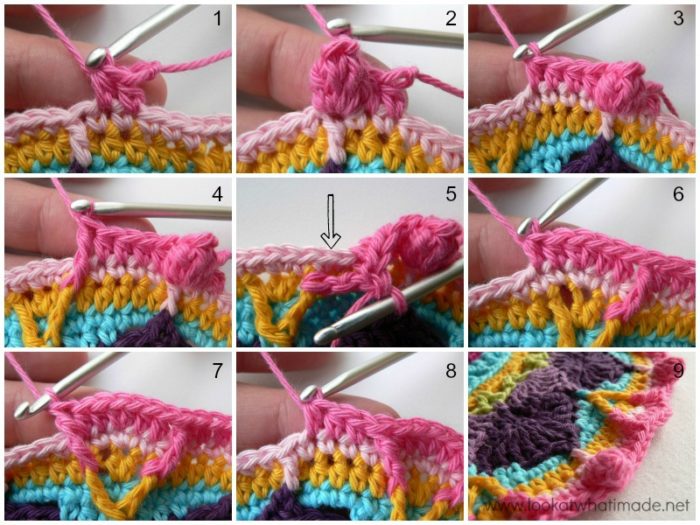
Round 18
Update: A few of you seem to be struggling with this round. I have now linked to a better tutorial (by Tamara from Moogly) to make it easier for you to understand how the popcorn should be made. Remember that the 5-dc popcorn stitch is closed with a ch st.
- If you are going to use the same colour, sl st into the next 3 st’s so that you end up in the second sc before the fpdc. Ch 2 (this counts as your first hdc). Hdc in the next st.
- If you are going to use a different colour, start with a standing half-double crochet in the second sc before any fpdc from the previous round. Hdc in the next st {Photo 1}.
*Make a popcorn stitch in the next st, which will be the fpdc {Photo 2}. Hdc in the next 4 st’s {Photo 3}. Fptr around the fptr from Round 16 {Photo 5}. Skip the next st of Round 17 {indicated with an arrow in Photo 5}. Hdc in the next 2 st’s. Make 2 hdc’s in the next st. Hdc in the next 2 st’s {Photo 6}. Fptr around the fptr from Round 16 {Photo 7}. Skip the next st of Round 17. Hdc in the next 3 st’s {Photo 8}.* Repeat from * to * 11 more times, omitting the last 2 hdc’s on the last repeat. Join to the top of the beginning ch-2 (or the standing hdc) with a sl st.
Stitch Count: 192 st’s {156 hdc’s, 12 popcorns and 24 fptr’s}
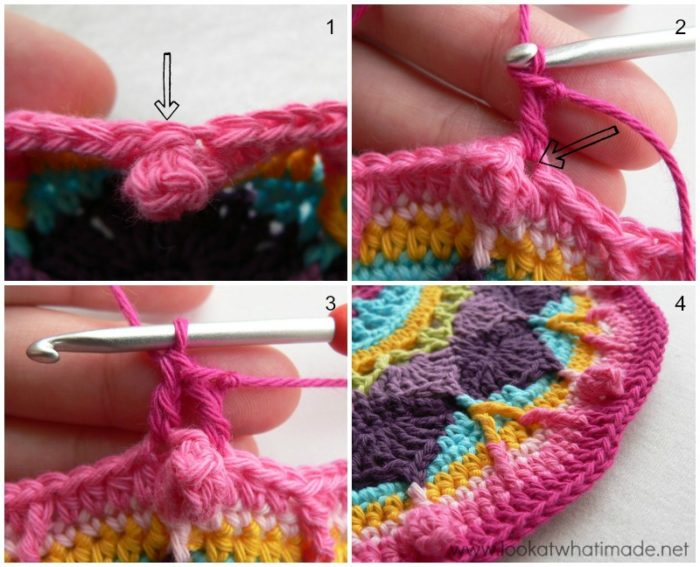
Round 19
Identifying which “loops” to work into for the popcorn stitch: for the purposes of this pattern, the “top” of the popcorn stitch will be the first dc of the 5-dc’s used to create the popcorn. You will find the loops for this stitch immediately to the right and slightly behind the popcorn (to the left if you are left-handed) – see the arrow in Photo 2. When you work into the first dc of the 5-dc popcorn like this (Photo 2), you will skip the ch st on top of each popcorn (indicated with an arrow in Photo 1).
- If you are going to use the same colour, sl st to the popcorn stitch. Ch 3 (this counts as your first dc).
- If you are going to use a different colour, start with a standing double crochet in any popcorn stitch around {Photo 2}.
Dc in the next 15 st’s. *Dc in the next stitch, which should be the Popcorn Stitch. Dc in the next 15 st’s.* Repeat from * to * 10 more times. Join to the top of the beginning ch-3 (or the standing dc) with a sl st.
Photo 3 below shows the first dc after the Popcorn completed. Note the skipped ch st at the top of the Popcorn.
Stitch Count: 192 dc’s
Round 20
- If you are going to use the same colour, ch 3 (this counts as your first dc). Dc in the next 3 st’s.
- If you are going to use a different colour, start with a standing double crochet in the same st as the sl st join. Dc in the next 3 st’s.
*Fpdtr around the fptr from Round 18 {Photo 1}. Skip the next st of Round 19 and dc in the next 10 st’s {Photo 2}. Fpdtr around the fptr from Round 18 {Photo 3}. Skip the next st of Round 19 and dc in the next 4 st’s {Photo 4}. The first dc should fall in the dc in the top of the popcorn stitch.* Repeat from * to * 11 more times, omitting the last 4 dc’s on the last repeat. Join to the top of the beginning ch-3 (or the standing double crochet) with a sl st.
Stitch Count: 192 st’s {168 dc’s and 24 fpdtr’s}
Round 21
- If you are going to use the same colour, ch 3 (this counts as your first dc). Dc in the next st.
- If you are going to use a different colour, start with a standing double crochet in the same st as the sl st join. Dc in the next st.
*Make 2 dc’s in the next st. Dc in the next 3 st’s. The last dc should fall in the dc after the fpdtr from the previous round {Photo 1}. (Ch 2 and make a cluster) three times {Photos 2 and 3}. Ch 2 and dc in the next 3 st’s {Photo 4}.* Repeat from * to * 11 more times, omitting the last 2 dc’s on the last repeat. Join to the top of the beginning ch-3 (or the standing double crochet) with a sl st.
Stitch Count: 132 st’s and 48 ch-2 spaces {96 dc’s and 36 clusters }
Round 22
At this point, the “petals” formed by your front post stitches are almost complete. In this round, you will be forming the points of the petals.
Do not worry if your mandala starts to curl in this round, it will straighten out in the next round.
- If you are going to use the same colour, ch 1 and sc in the same st. Sc in the next 2 st’s.
- If you are going to use a different colour, start with a standing single crochet in the same st as the sl st join. Sc in the next 2 st’s.
*Fpdtr around the fpdtr from Round 20 to the left of the popcorn stitch (right, if you are left-handed) – see Photo 1. Fpdtr around the fpdtr from Round 20 to the right of the popcorn stitch (left, if you are left-handed) – see Photo 2. Skip the next st of Round 21. Sc in the next 3 st’s {Photo 3}. (Make 2 sc’s in the next ch-2 space, sc in the top of the next cluster) three times. Make 2 sc’s in the last ch-2 space {Photo 4}. Sc in the next 4 st’s {Photo 5}.* Repeat from * to * 11 more times, omitting the last 3 sc’s on the last repeat. Join to the first sc with a sl st.
Stitch Count: 240 st’s {216 sc’s and 24 fpdtr’s}
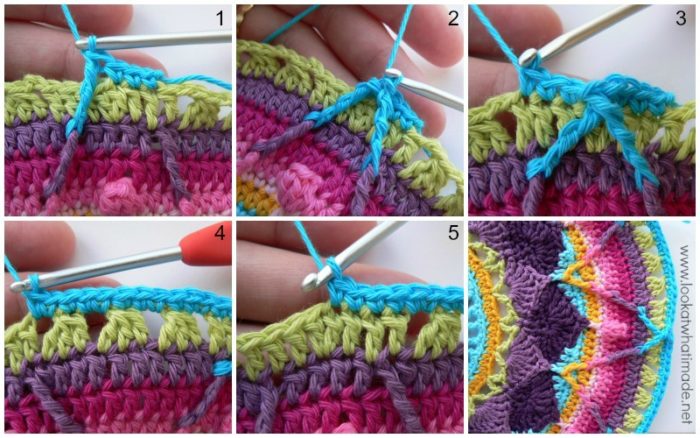
Round 23
Note: When working around the fpdtr’s from the previous round, you will make one fpdc around both posts (together) and skip the tops of these 2 st’s. The arrows in Photo 4 indicate the tops of the fpdtr’s that will be skipped.
- If you are going to use the same colour, ch 3 (this counts as your first dc). Dc in the next 2 st’s.
- If you are going to use a different colour, start with a standing double crochet in the same st as the sl st join. Dc in the next 2 st’s {Photo 1}.
*Make a fpdc around the posts of both fpdtr’s from Round 22 {Photos 2 and 3}. See Note above if you need help with this. Dc in the next 18 sc’s {Photo 5}. Don’t accidentally skip the first sc after the fptr’s.* Repeat from * to * 11 more times, omitting the last 3 dc’s on the last repeat. Join to the top of the beginning ch-3 (or the standing double crochet) with a sl st.
Stitch Count: 228 st’s {216 dc’s and 12 fpdc’s}
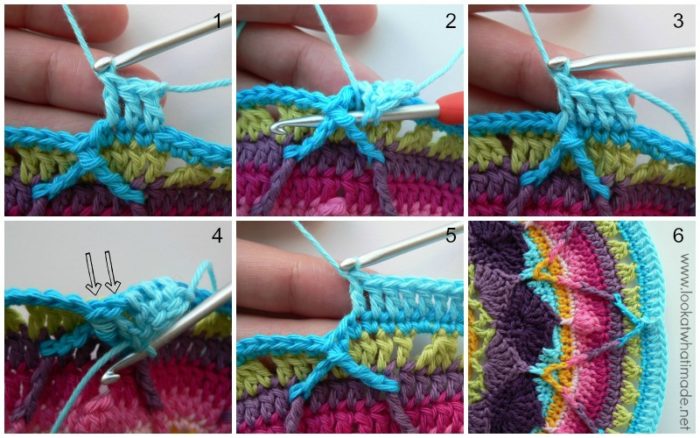
Round 24
In this round, you will be making increases by working into the loops (tops) of the fpdc’s AND around the posts.
- If you are going to use the same colour, ch 1 and sc in the same st. Sc in the next st.
- If you are going to use a different colour, start with a standing single crochet in the same st as the sl st join. Sc in the next st.
*Hdc in the next 2 st’s. The last hdc should fall in the top of the fpdc from the previous round {Photo 1}. Fpdc around the post of the fpdc from the previous round {Photo 2}. Hdc in the next 2 st’s {Photo 3}. Sc in the next 15 st’s.* Repeat from * to * 11 more times, omitting the last 2 sc’s on the last repeat. Join to the first sc with a sl st. Fasten off and work away your tails of yarn.
Stitch Count: 240 st’s {180 sc’s, 48 hdc’s, and 12 fpdc’s}
Please Note: I have used Canary in the photos below to better illustrate the stitches, but I have used light turquoise in my final blanket.
Round 25 (Optional)
This round is optional. The crab stitch tends to make a lot of people “crabby”, but I quite like making it. Don’t worry if your mandala starts wobbling slightly when you make the crab stitch round. Once you’ve blocked it, it will be right as rain.
Start in any stitch around with a standing single crochet (Photo 1). Make a crab stitch in each st around (Photos 2 and 3).
If you are not familiar with the crab stitch, see this video tutorial. When you get to the end of the round, make a crab stitch in the same stitch as the standing single crochet. No need to join with a sl st. In fact, I’ll give you an apple if you manage to do it! Just fasten off and work away your tails of yarn.
Stitch Count: 240 crab stitches
See the “wobble” I was talking about? It looks a little bit worse in the photo than it actually was.

This is nothing to be alarmed about. It is caused by the fact that the crab stitch takes up more space and is denser than normal single crochet. Because of this, it stretches the last round slightly. Once your mandala is blocked it should be perfect!
If you are going to continue with the CAL there is no need to block at this point. We will square this mandala up next week and that will get rid of the “wobble”.
And now that we’ve gotten all the formalities out of the way I have a little mister who would like to say hello. Of the 3 blankets I am making, the Softfun seems to be his favourite.

This blog post contains affiliate links. I only link to products I personally use or would use. All opinions are my own.


Mary says
Hi, just wanted to let you know the crab stitch tutorial link you have in the article is no longer available. Here’s a link to the youtube video: https://www.youtube.com/watch?v=K7XOkueIkNM
Jenny Lowman says
Thank you for that link!
Erika says
Everything is going great… except for round 18 – my stitches are not lining up – the end “sk next st of round 17, hdc in the next 3 sts. Repeat.” Except we did 6 scs to the fpdc around the picot in r17. So 3 sts to the fpdc is too short. Especially since we did 4 hdcs on the other side after the popcorn st? Should the 3 hdcs be 4?
Dedri Uys says
Hi Erika, I can see your confusion. The pattern is correct, but I suspect something is going hinky with those Front Post stitches and skipped stitches. Have you had a look at Esther’s brilliant video for this part? It will show you exactly where each st should fall. I hope you find that helpful!
Natasha Rose says
Perhaps instead add a crab stitch, you could do a twisted single crochet instead?
Venus says
You are great dearSophie … thanks for ur tutorial …
Jenny Lowman says
So glad you love Sophie as we do!
Venus says
I have been stuck in round16 … i have recorrected myself with a total obssession several times but still there is something wrong . … i do everything right on the instruction but it dose not work … please help me… 4hdc . 1hdc through both layers of previous rounds . 5hdc . Fptr . Skip a st . Fptr . (Both fptrs around the same dc ). skip a st . 4 hdc…
Jenny Lowman says
Hi Venus. Have you checked your stitch count for the previous rounds? This is the only thing I can think may be out of sync with your issues. Maybe check out Esther’s videos via her blog ‘It’s all in a nutshell’ to check your work visually.
J
Natalie says
“A Apple a day makes Eve okay!” Fun row!!! Excited to keep going! Your directions are easy to follow.
Jenny Lowman says
We are happy you are enjoying the Sophie, Natalie! :)
Rose says
I want my apple!
No in all seriousness, the crab stitch was really fun and this is a really coherent, easy-to-follow pattern.
Jenny Lowman says
Sending you a virtual apple, Rose :)
Jacqueline Truong says
I actually really liked doing the crab stitch. This is a fun project, thank you!
Jenny Lowman says
Hi Jacqueline. You are a star! Well done :)
Amber says
I am having a hard time on the end of row 20. It says omitting 4 stitches..I do have 4 left at the end of the row. Dose it mean to skip them?
Jenny Lowman says
You omit the last 4 stitches because you have already made them at the start of the round, Amber :)
Joanne says
I would like to thank you for writing instructions for lefties on that one round. No one hardly does. Much appreciated. All of your explanations are fabulous. Thank you again
Jenny Lowman says
Aren’t Dedri’s pattern writing talents wonderful? We are glad that it helped you? :)
Calista says
I love your pattern and I’m enjoying it so much. It makes me so happy to see the pattern come to life.
I just jeep having an issue with round 19. I 100% have the correct stitch count in round 18. I counted 100 times.
It says to skip the chain of the popcorn and dc in the next 15 stitches. But if you skip the popcorn chain there’s only 14 stitches, 15 total if you count the “dc I the next stitch” between the popcorns.
If you dc in the next stitch, then dc in the next 15 shouldn’t there be 16 total? The next round seems to work out anyways.. maybe I haven’t been skipping one stitch after the fptc but it’s hard to tell.
It doesn’t really matter cuz it always comes out right in the end when I’m finished.
Thank you so much for your amazing work and sharing it with everyone. I am in love.
Calista Switzer says
Oh never mind !!! I wasn’t taught to chain 1 after popcorn stitches. That’s why I’m confused never mind !!!! Thabks anyways
Jenny Lowman says
This is just how Dedri created this particular pattern, Calista. Glad you worked it out though :)
Jenny Lowman says
We see you worked it out in the end :)
Rhianna Price says
I’m working on what I hope will be my first fully completed Sophie the whole pattern thru! I’ve made a few of just the mandala( parts 1-3), and several lap size. I have to admit I’ve crocheted for 28+ years and up until a couple years ago upon braving this beautiful pattern I had always avoided the crab stitch at all costs. The video is very clear, I’ve found myself using it for several blanket edgings for a clean finish I now love it. Thank you so much for sharing your amazing talent with us!
Jenny Lowman says
Is Charlotte’s Universe up next? ;)
Miss Chivus says
I never could figure out the crab stitch until I saw this video tutorial. I love the sort of fluted edge it makes. Not to mention this pattern is gorgeous. Thanks for sharing!
Jenny Lowman says
Crab stitch is a love it or hate it stitch, that’s for sure Miss Chivus! :)
Jenny Lowman says
Hi Raylene,
Do share pics with us on the Facebook page for the blog! We’d love to see your hooped version.
BW
Jenny :)
Sherin says
Instruction are well written. Very clear. I made one so far, and it’s very beautiful. At first i was scared, but instructions are prerry easy.Thankyou.
Phillipa Godfrey says
Hi Dedri
In Row 19 the pattern says to DC 15 stitchesDc in the next 15 st’s.
*Dc in the next stitch, which should be the Popcorn Stitch. Dc in the next 15 st’s.* Repeat from * to * 10 more times. Join to the top of the beginning ch-3 (or the standing dc) with a sl st.
In your Youtube tutorial you say DC 16 stitches.
Which is the correct amount of stitches
Kind regards
Phillipa
Jenny says
The you tube video was made by Esther, Phillipa. Go by the written pattern instructions. Dc in the next 15 stitches that are between the popcorn stitches.
BW
Jenny :)
Lisa says
My top is already big enough for the Sophie stool after Round 20. Do I just move straight on to the sides now? I must crochet very loosely.
Jenny says
If it fits, then the choice is up to you, Lisa. Carrying on will result in the top being too big. The only other option is to frog it all and increase tension/go down a hook size or two.
Good luck!
BW Dedri and Jenny :)
Kieli Mowrer says
I’m confused on row 16… The pattern calls for 5hdc, then the two front post stitches with the 2hdc in between, then 4hdc on the other side of all that. Shouldn’t it be 5hdc on each side, so it’s symmetrical? Plus there’s 5 stitches on each side of the picots from the previous round, so doing 5/4 not only leaves it lopsided, but means I have to skip a stitch on one side to even make it work… I’ve done and redone this row about ten times now and I’m to the point where I’m not sure if I’m actually doing something wrong, or if it’s just a typo in the pattern? And if I am doing something wrong… any ideas about what it could be? My stitch counts were correct as of the end of row 15, so I’m completely at a loss
Dedri Uys says
Hi Kieli,
I am sorry to hear that you are finding this round troublesome. The instructions are definitely correct, and I am sure that we can figure out what is going on :) Firstly, have you had a look at the video for this round? Esther takes it step by step and it is by far the easiest way to check that how I explain the instructions and how you interpret them marry up. Also, have you got a clear photo of your first repeat completed, showing a section of the previous round as well? If you could send that to me using the Contact tab at the top of this website, I can have a look and see what’s going on.
Looking forward to hearing from you,
Dedri
Arbel says
I’m stuck! I’m going from round 18 to 19 and I counted 192 stitches but in round 19 you skip a stick so I have 180 dc not 192. Did I count wrong?
Dedri Uys says
Hi Arbel.
I am sorry to hear you are stuck. You should not be skipping stitches in Round 19. The only stitch you do not work into is the chain on top of the popcorn (because you work into the first dc of the popcorn instead). I suspect that you are accidentally skipping the first stitch after the Popcorn? Each repeat should have 16 sts. The first st of these 16 should fall in the Popcorn. If you take it 16 stitches at a time, and check every time that the first st of the 16 falls in a Popcorn, you will end up with 192 sts.
Will you let me know if that helps?
Dedri