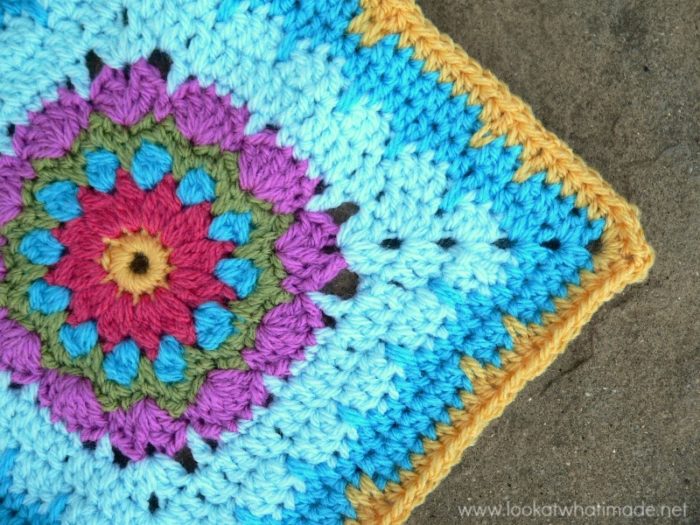
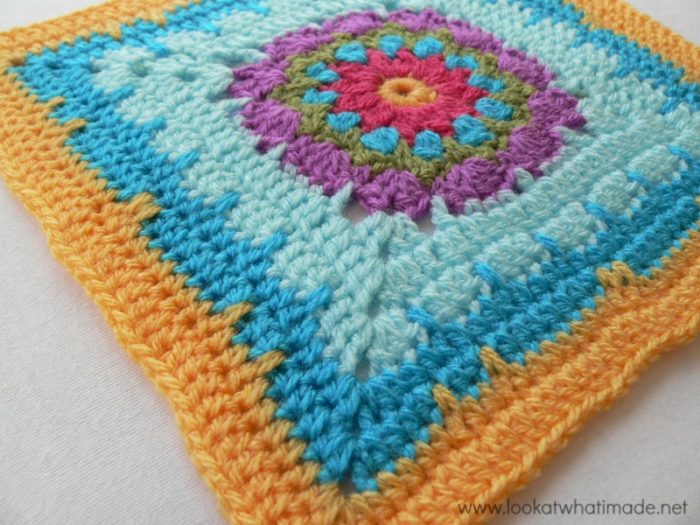
Block 25 of the Block a Week CAL (hosted by Kimberly Slifer) is Melissa Green’s Addie Square. The central flower is dainty and reminds me a bit of a cathedral window. In this square you will be using spiked extended stitches. After Week 23’s See How They Run, you should all be familiar with spiked stitches. This Addie square is a perfect way to not only reinforce that knowledge, but also expand on it by using a “new” stitch in a spiked way. Hmmm does that make sense? Maybe after a cup of coffee…
I hope you have as much fun with this square as I did.
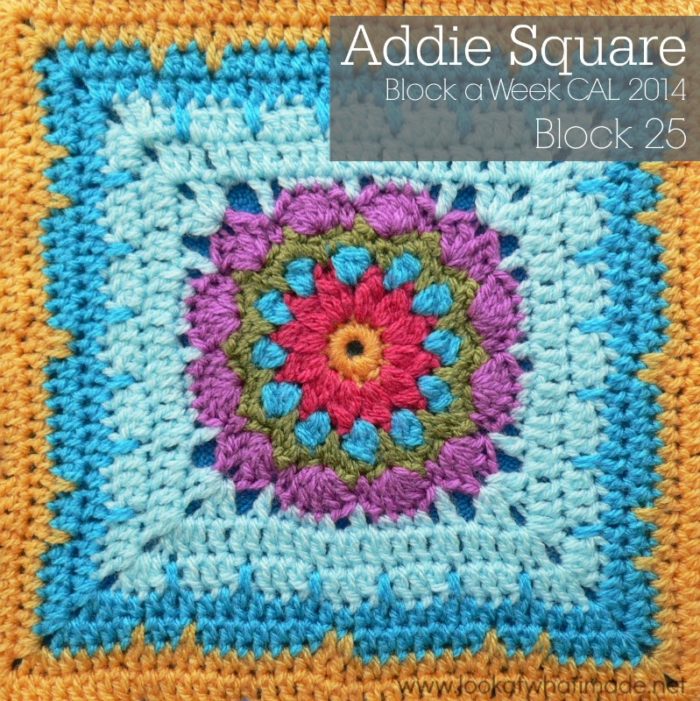
Addie Crochet Square
{Pattern © 2014 Melissa Green. Photo tutorial done with kind permission}
Pattern
Available as a Free Ravelry Download.
Suggested Materials
- 5.5 mm Clover Amour Crochet Hook (US I/9 UK 5)
- Worsted weight yarn
Size
- Using the hook and yarn specified, your square should be a nice even 12″ when you are done.
- Using a 4 mm crochet hook (US G/6 UK 8) and double knit yarn, as I have done, your finished square will be about 8″ big.
My Yarn and Colour Choices
I am using the Stylecraft Special DK.
- Saffron (Rounds 1, 11, and 12)
- Pomegranate (Round 2)
- Turquoise (Rounds 3, 9, and 10)
- Meadow (Round 4)
- Magenta (Round 5)
- Sherbet (Rounds 6, 7, and 8)
Notes
- The initial ch st’s in each round are counted as a stitch, except for the initial ch st in Round 6, which doesn’t count as a stitch.
- US Crochet Terminology used. (See this comparative chart if you need help transcribing from US to UK)
- Affiliate Link: The yarn used in most of the tutorial photos is Patons 100% cotton dk
. I bought it ages ago and have just never gotten around to using it. And now that I have (used it, I mean), I am smitten. The yarn is slightly shiny, but it doesn’t split at all and the colours are really vibrant and great. At first glance it looks like it is too thin to be double knit (light worsted weight), but it works up exactly like you expect a dk to.
Special Stitches
- Cluster stitches – see this Bobble Stitch tutorial (same stitch, different name)
- Esc – extended single crochet (see written pattern or relevant round below)
- Edc – extended double crochet (see written pattern or relevant round below)
Corrections
Round 12: Stitch count is 168 dc’s, not 164.
Addie Square Photo Tutorial
This photo-walkthrough is NOT the actual pattern and should not be used instead of the pattern, but rather in conjunction with it.
Thank you very much to Melissa Green for giving us permission to do this photo-tutorial for her Addie Square. And a special thank you to Kimberly Slifer for letting me do these tutorials and for obtaining the necessary permission.
Round 1
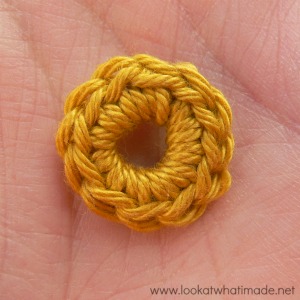 You can start this round with a magic ring instead of the initial ch-5 ring.
Magic Ring Instructions for Round 1
Into a magic ring: ch 1 (this does not count as a st). Sc x 12 into the ring and pull the ring tight. Join to the top of the first sc with a sl st.
If you feel like practising the invisible join I talked about last week, feel free to use it instead of the sl st join. Make sure that you understand which stitch to join to if you do use it!
If you are not familiar with working into a magic ring, this video tutorial from Moogly is clear and easy to follow.
Please remember, when working into a magic ring you HAVE to work away your initial tail very well. If you just cut it, your whole square might unravel!
Stitch count: 12 sc’s
Round 2
- If you are using the same colour, continue in the same st as the sl st join.
- If you are using a new colour, join your yarn by making a sl st in any sc around.
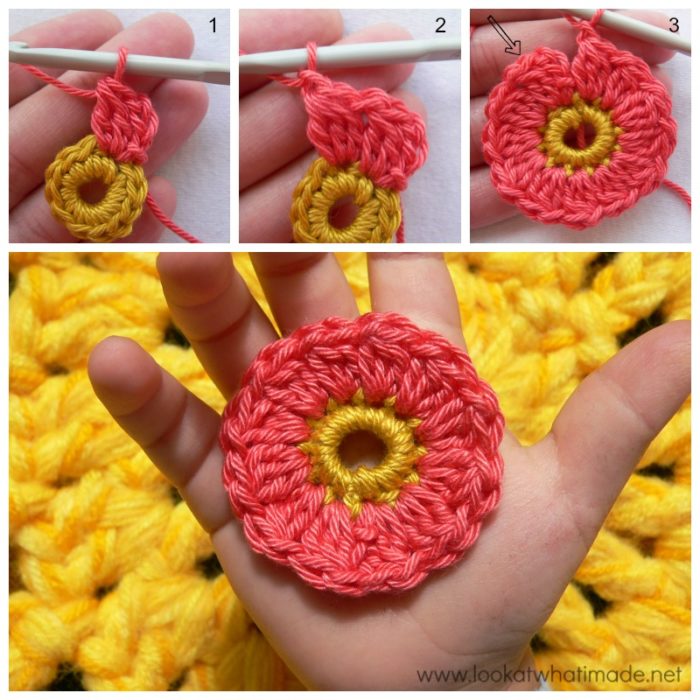
Make a beginning cluster (see First Bobble in this Bobble Stitch tutorial) and then ch 1 (Photo 1). (Make a cluster – see Subsequent Bobble Stitch in this tutorial – and ch 1) in each of the remaining 11 st’s around (Photos 2 and 3). Join to the top of the beginning cluster with a sl st.
Stitch count: 12 clusters and 12 ch-1 spaces
Round 3
- If you are using the same colour, sl st into the next ch-1 space.
- If you are using a new colour, join with a sl st in any ch-1 space around.
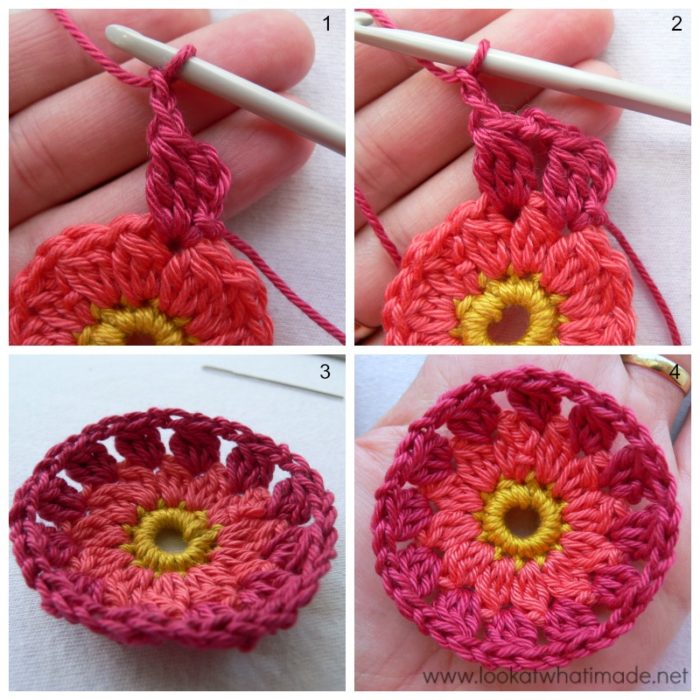
Make a beginning cluster as before and ch 2 (Photo 1). (Make a cluster, ch 2) in each of the remaining 11 ch-1 spaces around (Photo 2). Join to the top of the first cluster with a sl st.
At this point your “flower” will probably curl into a bowl a little bit (Photo 3), but that will correct itself in the next round.
Stitch count: 12 clusters and 12 ch-2 spaces
Round 4
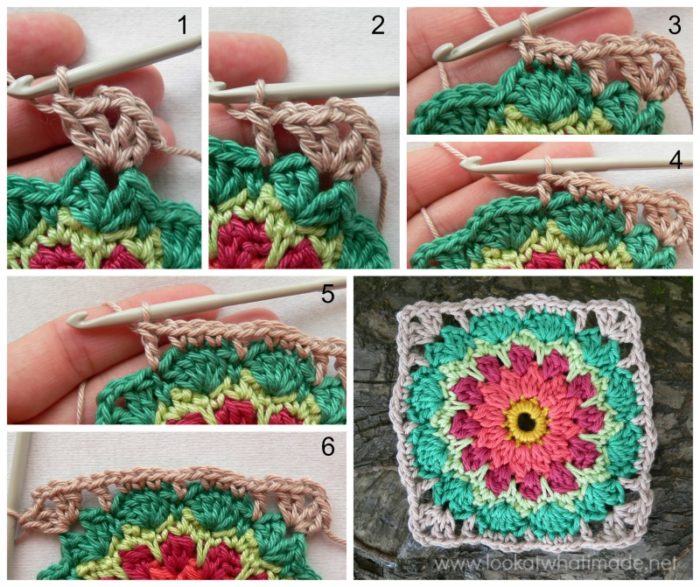
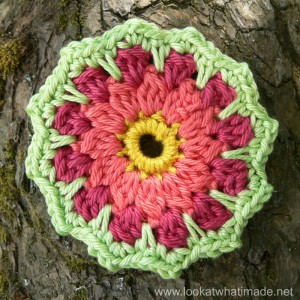 In this round you will be working into AND over the ch-2 spaces in the previous round, and into the top of the cluster stitches in Round 2. You will be using extended sc’s, so have a little look at the how-to below before continuing.
How to Crochet: Esc
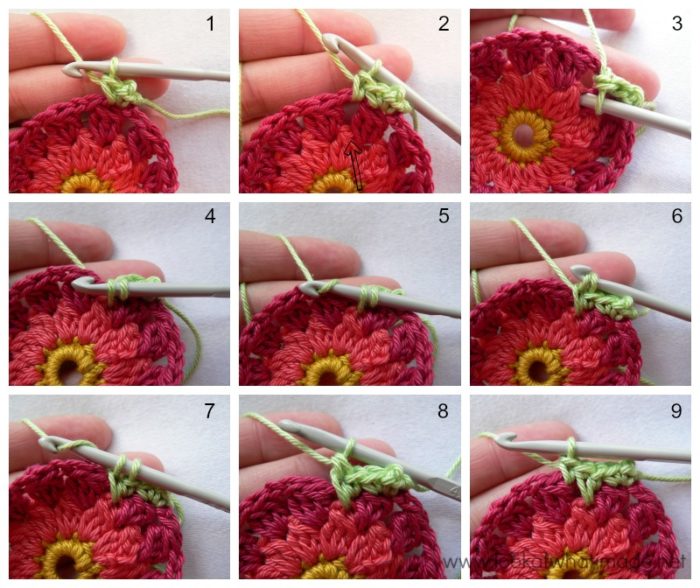
Insert your hook into the top of the cluster in Round 2, directly below the next ch-2 space (Photo 3). Yarn over and pull up a loop (Photo 4). You should now have 2 loops on your hook. Yarn over (Photo 5) and pull through one loop, effectively making a chain stitch (Photo 6). You should still have 2 loops on your hook. Yarn over again (Photo 7), and pull through both loops on your hook (Photo 8).
Right, let’s get started!
- If you are using the same colour, (ch 1, sc, ch 1, sc) in the same st as the sl st join.
- If you are using a new colour, join with a standing single crochet in the top of any cluster around. (Ch 1, sc) in the same st (Photo 1).
*Sc in the next ch-2 space (Photo 2). Esc (see instructions above) in the top of the cluster in Round 2, directly below the ch-2 space (indicated with an arrow in Photo 2). Photo 8 shows the first esc completed. Sc in the same ch-2 space of Round 3 (Photo 9). (Sc, ch 1, sc) in the top of the next cluster in Round 3* x 12. Omit the last (sc, ch 1, sc) on the last repeat. Join to the first sc with a sl st
Stitch count: 12 ch-1 spaces, 12 esc’s, and 48 sc’s.
Round 5
- If you are using the same colour, sl st your way to the next esc. (Ch 3, dc, ch 2, 2 dc) in the same esc.
- If you are using a new colour, join with a standing double crochet in the top of any esc around. (Dc, ch 2, 2 dc) in the same esc (Photo 1).
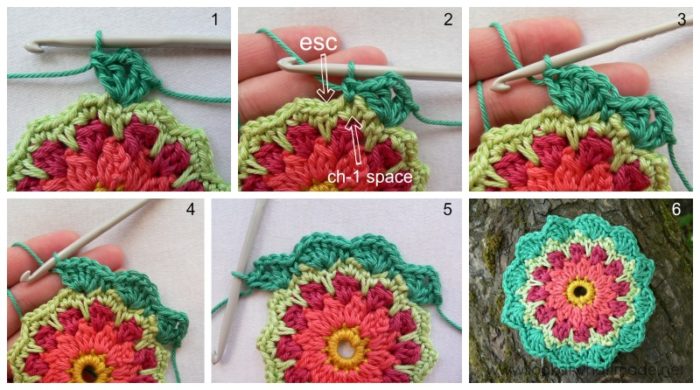
*(Sc in the next ch-1 space, 5 dc in the next esc) twice (Photos 2 – 4). Sc in the next ch-1 space. (2 dc, ch 2, 2 dc) in the next esc (corner made) – see Photo 5* x 4. Omit the last corner on the last repeat. Join to the top of the beginning ch-3 (or the standing double crochet) with a sl st.
Stitch count:
- Per Side: 17 st’s {14 dc’s and 3 sc’s}
- Total: 68 st’s and 4 ch-2 corner spaces {56 dc’s and 12 sc’s}
Round 6
- If you are using the same colour, sl st your way to the next ch-2 corner space. (Ch 3, dc, ch 2, 2 dc) in the corner space. This counts as your first corner.
- If you are using a new colour, join with a standing double crochet in any ch-2 corner space. (Dc, ch 2, 2 dc) in the same space. This counts as your first corner (Photo 1).
*Ch 1, dc in the next sc (Photo 2). Ch 1, skip the next dc and sc in each of the next 3 dc’s (Photo 3). Ch 1, skip the last dc of the 5-dc group and hdc in the next sc (Photo 4). Ch 1, skip the next dc and sc in each of the next 3 dc’s. Ch 1, dc in the next sc (Photo 5). Ch 1, skip the last 2 dc’s before the corner and work (2 dc, ch 2, 2 dc) in the ch-2 corner space (Photo 6)* x 4. Omit the last corner on the last repeat. Join to the top of the beginning ch-3 (or the top of the standing double crochet) with a sl st.
Stitch counts:
- Per Side: 13 st’s and 6 ch-1 spaces per side {6 dc’s, 1 hdc, and 6 sc’s}
- Total: 52 st’s, 24 ch-1 spaces, and 4 ch-2 spaces {24 dc’s, 4 hdc’s, and 24 sc’s}
Round 7
As written.
Don’t forget to watch out for…and I can hear Carolyn saying it along with me…that first hidden stitch after the corners. See this tutorial if you are new to the CAL and haven’t already heard me bang on about Corners and the Elusive Hidden Stitch!
The only other thing to look out for is the fact that the 10th dc of each side will fall in the top of the central hdc. Because this hdc follows a ch st, it will be a bit hard to see where you need to insert your hook. It’s a bit hard to photograph things you can’t see, but Photo 1 is making a valiant attempt to do just that. If you fold the top edge of your work back a bit to expose the underside of the chain, you’ll see where to insert your hook.
Photo 2 shows the stitch made correctly. You should have a little “bar” under the stitch (arrow in Photo 2). If you really cannot insert your hook between the 2 top loops and this “bar”, don’t sweat it. No-one will know (except you)!
Stitch counts: 92 dc’s and 4 ch-2 corner spaces {23 dc’s per side, 19 dc’s between corners}
Round 8
As written.
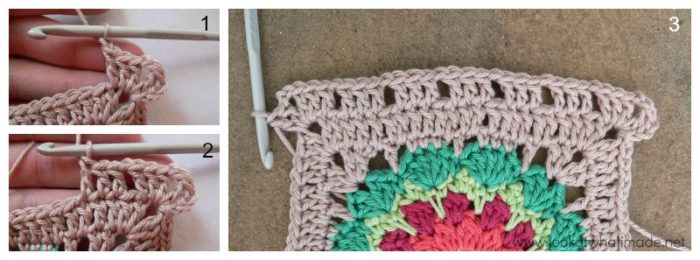
At the end of this round you want 7 3-dc groups on each side, each separated by a skipped stitch and a ch-1 (Photo 3).
Remember not to skip that first stitch after the corner, the top loops of which will be slightly hidden by the corner stitches (Photo 1).
Stitch counts: 84 dc’s, 24 ch-1 spaces, and 4 ch-2 corner spaces {21 dc’s and 6 ch-1 spaces per side}
Round 9
In this Round you will work into the dc’s from Round 8 and the skipped dc’s from Round 7.
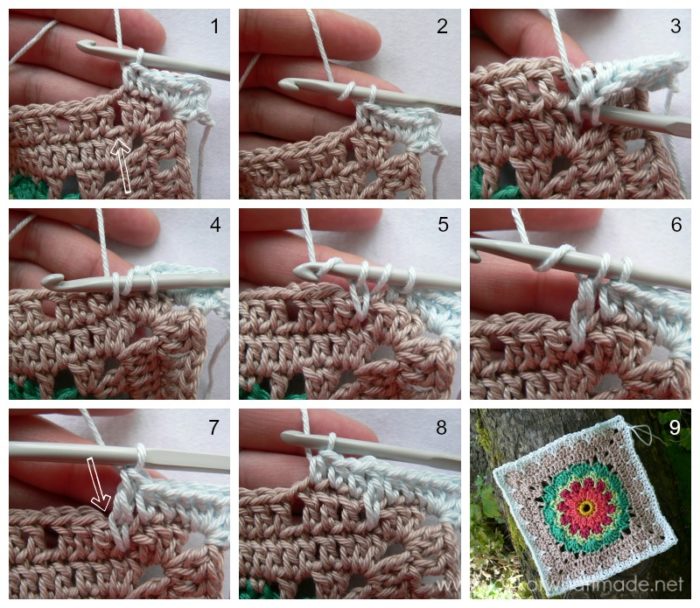
How to Crochet: Edc
To make the edc, yarn over (Photo 2) and insert your hook into the skipped dc from Round 7 (Photo 3). Yarn over and pull up a loop (3 loops on hook) – see Photo 4. Yarn over and pull through 1 loop (still 3 loops on hook). Yarn over (Photo 5) and pull through 2 (2 loops on hook). Yarn over (Photo 6) and pull through the last 2 loops (Photo 7).
Let’s get started!
- If you are using the same colour, sl st your way to the next ch-2 corner space. (Ch 2, hdc, ch 2, 2 hdc) in the corner space. This counts as your first corner.
- If you are using a new colour, join with a standing hdc in any ch-2 corner space. (Hdc, ch 2, 2 hdc) in the same space. This counts as your first corner.
*(Hdc in the next 3 dc’s – see Photo 1, edc in the skipped dc of Round 7 – see Photo 7) 6 times. The edc will partially hide the loops of the next st to be worked into (indicated with an arrow in Photo 7). Hdc in the last 3 dc’s before the corner space* x 4. Omit the last corner on the last repeat. Join to the top of the beginning ch-2 (or to the top of the standing hdc) with a sl st.
Stitch count: 100 dc’s, 24 edc’s, and 4 ch-2 corner spaces {31 st’s per side: 25 dc’s and 6 edc’s per side}
Round 10
As written.
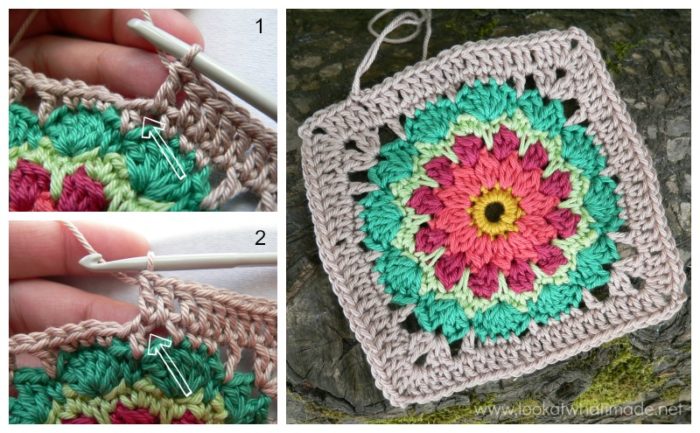
Look out for the fact that you skip the very first st after the corner. The top of this stitch will be hidden anyway, but just make sure you don’t accidentally skip 2 st’s.
The 2 hdc’s of the first 2-hdc grouping should fall on either side of the post of the edc (indicated with 2 arrows in Photo 1). The ch-2 space should fall between the 2 central edc’s (indicated with one arrow in Photo 1). The 2 hdc’s of the last 2-hdc grouping should fall on either side of the post of the edc (indicated with 2 arrows in Photo 2).
Stitch count: 112 hdc’s, 16 ch-1 spaces, 4 ch-2 spaces, and 4 ch-2 corner spaces. {28 hdc’s, 4 ch-1 spaces, and 1 ch-2 space per side}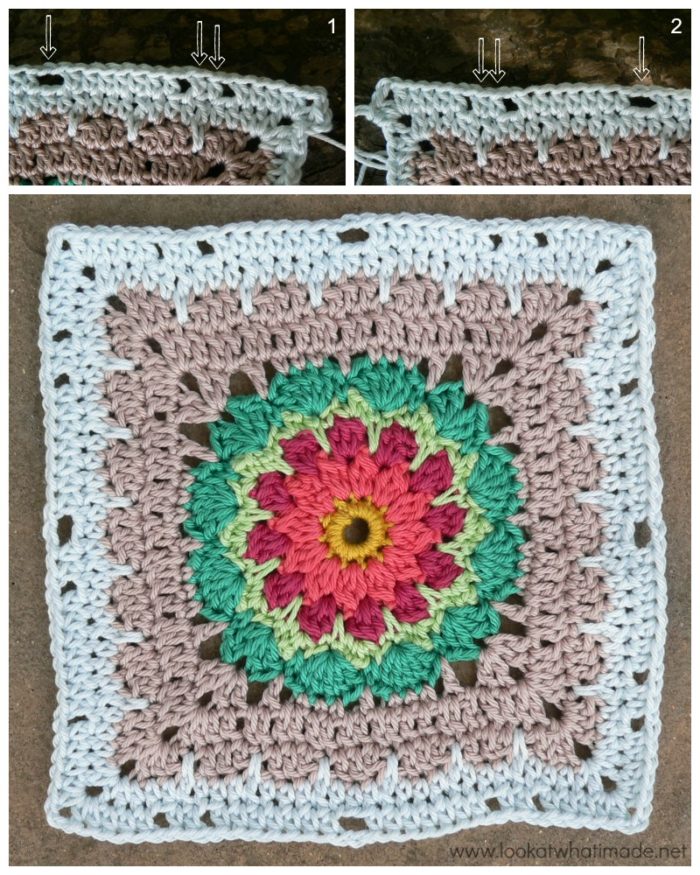
This is my Addie square (in Stylecraft) up to the end of Round 10. It was a little bit wobbly at this point (whereas the Patons square was perfectly fine at this point), but blocking sorted that right out.
Round 11
As written. Remember that the top of the first stitch after the corner will be hidden.
Stitch count: 128 hdc’s, 24 edc’s, and 4 ch-2 corner spaces. {32 hdc’s, and 6 edc’s per side}
Round 12
As written.
Stitch count: 168 dc’s and 4 ch-2 corner spaces {42 dc’s per side, 38 dc’s between corners}
Remember to subscribe to my Weekly Newsletter if you would like to be kept in the loop. You can also like my Facebook page or follow me on Bloglovin, Google+, Pinterest, Twitter, or Instagram.
More Blogs Following the CAL
- San from Loopsan – using Stylecraft in sophisticated Parchment, Denim, Mocha and Meadow
- Lou Mander from Tea, Crochet and Me – using Stylecraft in White, Mocha and Raspberry
- Wendy from Little Wendy Crochet (Dutch photo tutorials)
Happy Hooking!




Heidi Herr says
Hello Dedri,
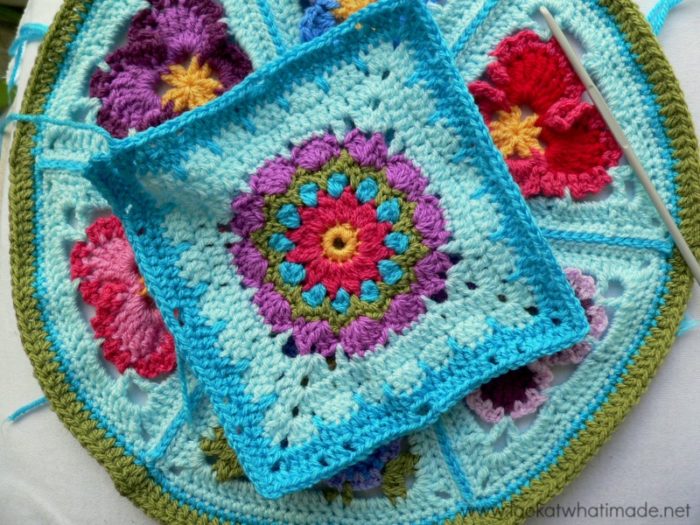
I love all of your colors and patterns! What is the round pansy pattern behind Addie up to round 10 photo? It is so pretty!
Dedri Uys says
Hi Heidi. It’s my pansy pizza, the pattern for which I have yet to perfect! I keep meaning to make work of it.
Daisy says
What does “as written” mean? Written where? I can’t get the pattern to download either. Help!
Dedri Uys says
Hi Daisy. At the top of the page there is a heading that says Pattern. Below that you will see a sentence that says Available as a Free Ravelry Download where the words ‘Free Ravelry Download’ are a link. If you click on those words it will take you to where you can get the free pattern. The tutorial is only a guide to help you with the pattern should you get stuck, not the complete pattern. As written means as the designer instructs in the pattern.
mary morris says
I have been unable to get the pattern to download. help
mary
Andrea says
Really lovely!
Dedri Uys says
Thank you :)
Carolyn King says
I tried to leave a comment earlier, but I do not believe it took. :) You are amazing, Dedri, and I have posted your website on my facebook page. You are absolutely right,,,I ALWAYS can hear you saying, “Don’t forget that elusive hidden stitch after the corner.” Thank you so much for that! I do believe it is finally ingrained into my head. I am learning so much from you. Now,,, this is for sure the block where I will attempt the magic ring! And I am so thankful for the closeup photos!!!
Dedri Uys says
Carolyn! What a surprise :) Thank you for your kind words. I hope you DO try the magic ring. It’s not nearly as scary as you think it will be x
Carrie says
Interesting pattern. Like the combo of lacy and spikes :)