Today we will be squaring up the large mandala (created by Parts 1 – 3 of the Universe) to create Sophie’s Garden. Up to this point the playing field has not been exactly level, because those who have heard of/made Sophie’s Garden before soon recognised it and knew roughly what to expect from the CAL up to this point. After today, however, the CAL will indeed be a mystery to everyone!
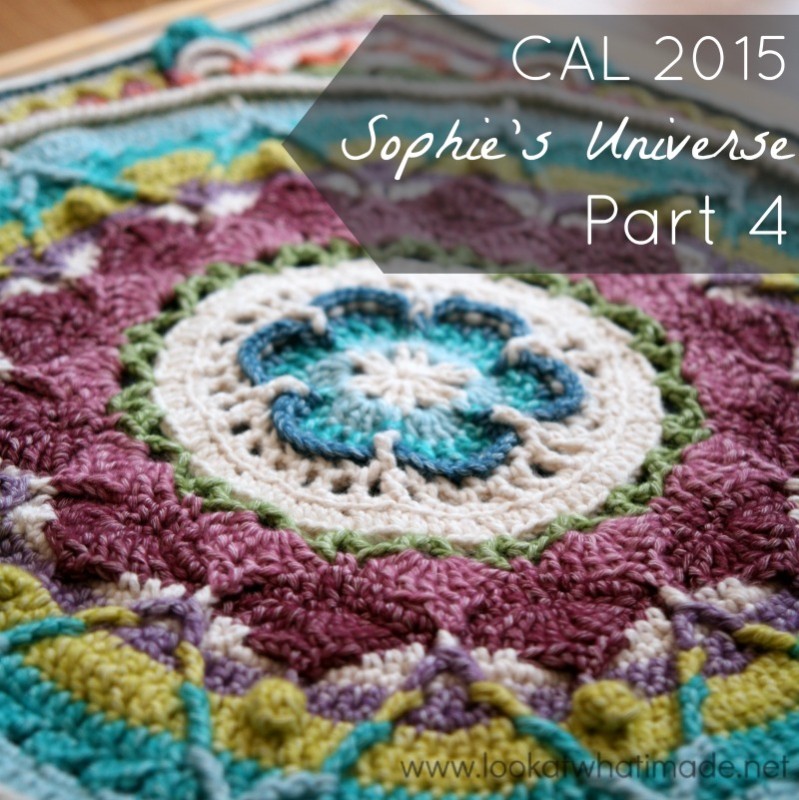
It is important to note that today will be the last time you will comfortably be able to stop until we get to Week 12 again. I can’t say more without giving the game away…
Sophie’s Universe CAL Part 4 {Sophie’s Garden}
©Dedri Uys 2014. All Rights Reserved.
Special design credit to Chris Simon for the use of a modified version of her Lace Petals flower.
Resources
- Add this CAL to your Ravelry Queue
- Sophie’s Universe CAL 2015 Information
- Use the Print-friendly button at the bottom (right) of this post to print/save this tutorial. Don’t know how? Find out HERE.
- **Part 4 VIDEO TUTORIAL** by Esther Dijkstra from It’s All in a Nutshell
Translations
- Dutch Photo Tutorial by Dianne Baan
- German Translation by Gabriele Rogers
- Spanish Translation by Lynda Hernandez
- Finnish Translation by Sari Åström
- French Translation by Sandra Larvin (with Video Tutorials by Géraldine Cymer)
- Danish Translation by Tina Poulsen
- Russian Translation (with Video) by Natalie V. Alimpieva
- Swedish CAL Information by Emma Vingqvist, Agnetha Magnusson, Åza Karlsson, and Ulrika Larsson
- Arabic Video Tutorial by Banan Felimban
Materials
See the Information Post.
Size
| Large | Medium | Small | |
| Sophie’s Universe Part 4 | 56 – 58 cm (22″ – 23″) | 46 – 48 cm (18″ – 19″) | 35.5 cm (14″) |
Abbreviations
US Terminology used (US/UK comparison chart here)
- Bpsc – Back post single crochet
- Bphdc – Back post half-double crochet (Squaring Up)
- Bpdc – Back post double crochet (Squaring Up)
- Bptr – Back post treble crochet (Squaring Up)
- Dc – Double crochet
- Fpdc – Front post double crochet
- Fphdc – Front post half-double crochet (Squaring Up)
- Fpsc – Front post single crochet
- Fptr – Front post treble crochet
- Hdc – Half-double crochet
- Sc – Single crochet
- Sl st – Slip stitch
- St/st’s – Stitch/stitches
- Tr – Treble crochet
- * – Repeat instructions between asterisks the number of times specified. This is a hardcore repeat and will consist of multiple instructions.
- () – Repeat instructions between parentheses the number of times specified. This is a lower level repeat.
Special Stitches
- Tr Cluster: Tr3tog – see this tutorial. Please note that we will be working around the front posts of the stitches, not into the tops of the stitches as in this tutorial.
- Standing Stitches – Standing sc’s, hdc’s, and dc’s are stitches used to start the round without the need for the traditional beginning chain. Links to tutorials are supplied in each relevant round.
Instructions
Rounds 1 – 25
You can find the links for Rounds 1 – 25 HERE.
Remember to check the Helpful Tips before starting Part 4. You will need to change to the recommended hook size at the start of this part if you started with a smaller hook (as suggested).
Round 26
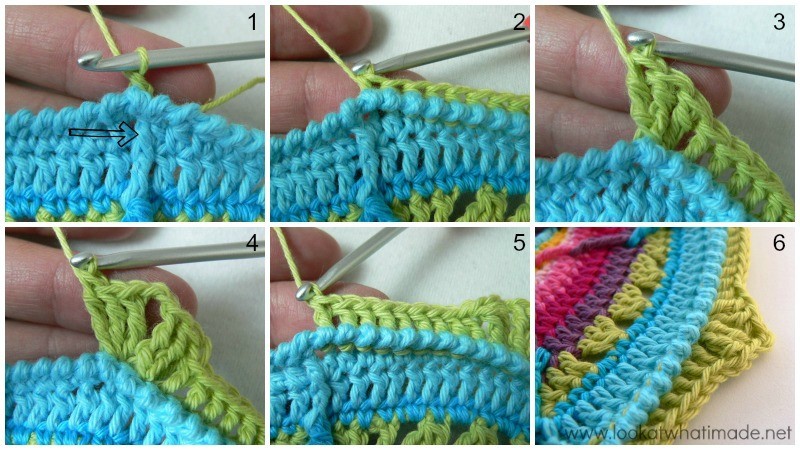
In this round, you will be working around the back posts of the stitches from Round 24. Make very sure that you don’t accidentally skip a stitch or work around 2 posts at the same time. To help you with that I have included references to when you should end up at the next fpdc from Round 24.
Making the bptr’s for the corners might be a bit tricky, but I am sure you can manage!
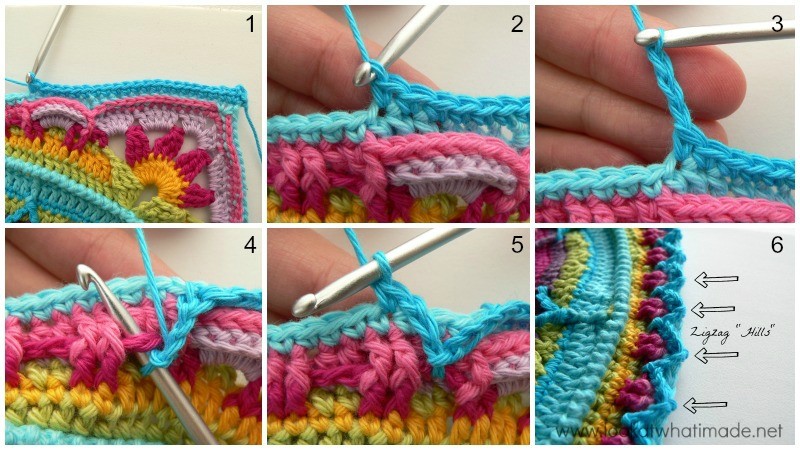
Join your yarn by making a standing single crochet around the back post of any fpdc from Round 24 {Photo 1}. Bpsc in the next 9 st’s.
*Bphdc in the next 10 st’s. The last bphdc should fall in the st before the fpdc from Round 24 {Photo 2}. Bpdc in the next 9 st’s. (Make 3 bptr’s in the next st, ch 2 and make 3 bptr’s in the next st.) This will form your corner {Photos 3 and 4}. Bpdc in the next 9 st’s. The last bpdc should fall in the stitch before the fpdc from Round 24 {Photo 5}. Bphdc in the next 10 st’s. Bpsc in the next 20 st’s.* Repeat from * to * 3 more times. Omit the last 10 bpsc’s on the last repeat. Join to the first sc with a sl st.
Stitch Counts:
- Total: 256 st’s and 4 ch-2 corner spaces {80 bpsc’s, 80 bphdc’s, 72 bpdc’s, and 24 bptr’s}
- Per Side: 64 st’s {20 bpsc’s, 20 bphdc’s, 18 bpdc’s, and 6 bptr’s}
Round 27
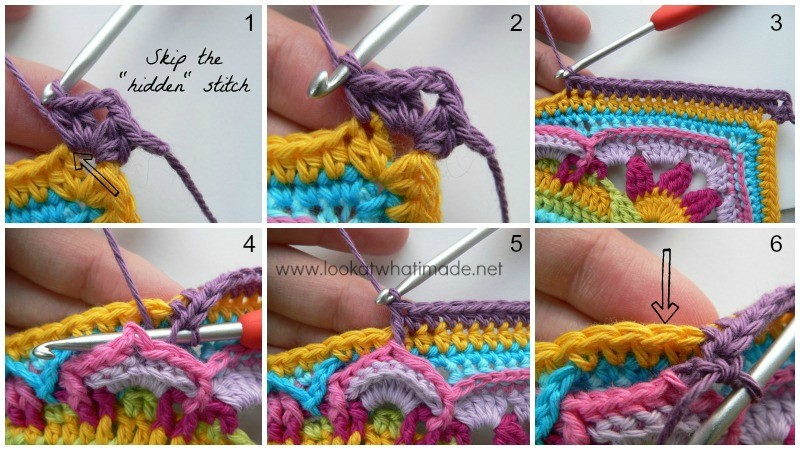
- If you are going to use the same colour, ch 1 and sc in the same st. Sc in the next 13 st’s.
- If you are going to use a different colour, start with a standing single crochet in the same st as the sl st join {Photo 1}. Sc in the next 13 st’s.
*Hdc in the next 3 st’s and dc in the next 12 st’s. The last dc should fall in the last bpdc before the 3 bptr’s that form the corner {Photo 2}. Skip the 3 bptr’s. Into the ch-2 corner space: (6 dc, ch 3 and sl st into the third ch from the hook to form a picot, 6 dc). It will be a tight fit getting all 12 dc’s into the corner space. Squish them up good {Photos 3 – 5}. Skip the 3 bptr’s. Dc in the next 12 st’s {indicated with an arrow in Photo 5 and illustrated in Photo 6}, hdc in the next 3 st’s, and sc in the next 28 st’s.* Repeat from * to * 3 more times. Omit the last 14 sc’s on the last repeat. Join to the first sc with a sl st. Fasten off and work away your tails of yarn.
Stitch Count:
- Total: 280 st’s and 4 corner picots {112 sc’s, 24 hdc’s, and 144 dc’s}
- Per Side: 70 st’s {28 sc’s, 6 hdc’s, and 36 dc’s per side}
Round 28
When you make the corners in this round, they will seem too tight for the round. Do not worry about it.
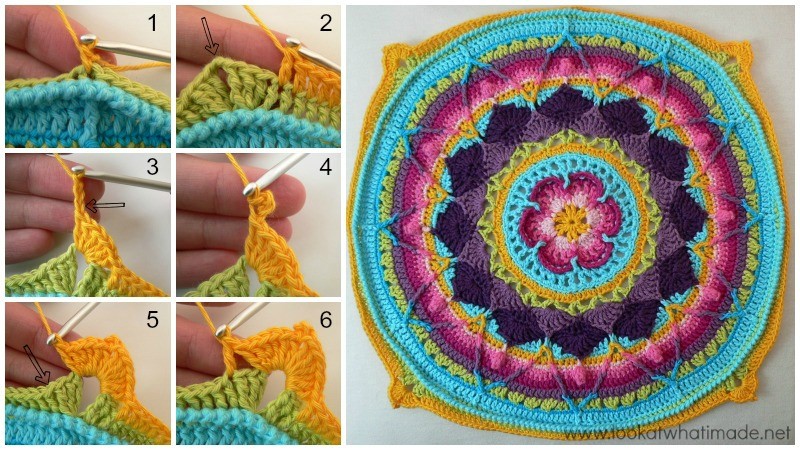
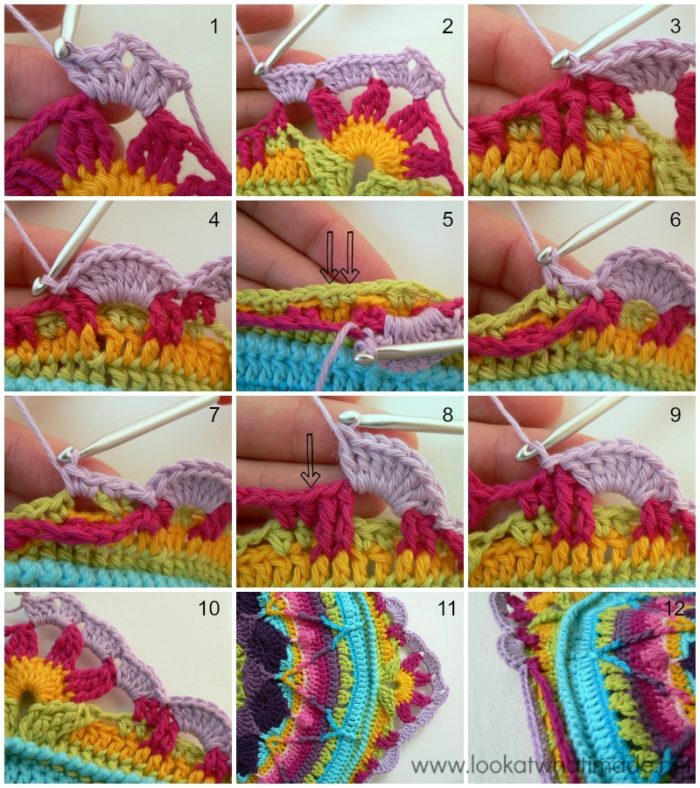
Join your yarn by making a standing single crochet in any ch-3 picot around {Photo 1}.
*Ch 4. Make a tr cluster, working around the front posts of the 3 bptr’s in Round 26 {Photos 3 and 4}. Ch 2 {Photo 5}. Skip the first 4 dc’s after the bptr’s. Hdc in the next 2 st’s {indicated with an arrow in Photo 6 and illustrated in Photo 7}. Ch 2, skip the next 2 st’s and hdc in the next 2 st’s. (Ch 2, skip the next 2 st’s and sc in the next 2 st’s) 9 times. (Ch 2, skip the next 2 st’s and hdc in the next 2 st’s) twice. There should now be 4 dc’s left before the bptr’s from Round 26 {Photo 8}. Ch 2. Make a tr cluster by working around the front posts of the 3 bptr’s in Round 26 {Photo 9}. Ch 4. Sc in the picot {Photo 10}.*
Repeat from * to * 3 more times, omitting the last sc on the last repeat. Join to the top of the first sc with a sl st. Fasten off and work away your tails of yarn.
Once you have completed the round, push the (ch-4, sc, ch-4) bits in each corner to the back of your work, never to be seen or used again {Photos 11 and 12}!
Stitch Counts:
- Total: 116 st’s, 8 ch-4 spaces, and 56 ch-2 spaces {8 tr clusters, 32 hdc’s, and 76 sc’s – including corner sc’s}
- Per Side: 29 st’s, 2 ch-4 spaces, and 14 ch-2 spaces {2 tr clusters, 8 hdc’s, and 19 sc’s – including corner sc }
Round 29
Except for 16 stitches, you will be working only into the stitches of Round 27 in this round. When working into the st’s from Round 27 below the ch-2 spaces, work in front of the ch-2 spaces, not over them!
You will notice that there is a fpdc in the instructions below that has been underlined, bolded, and made red. Why? Because a lot of people have gotten back to me to say that they missed the fact that those stitches should be fpdc’s, not fptr’s. Will the sky fall if I accidentally make them all fptr’s? Nope. Your square will just bulge the teeniest bit on each side.
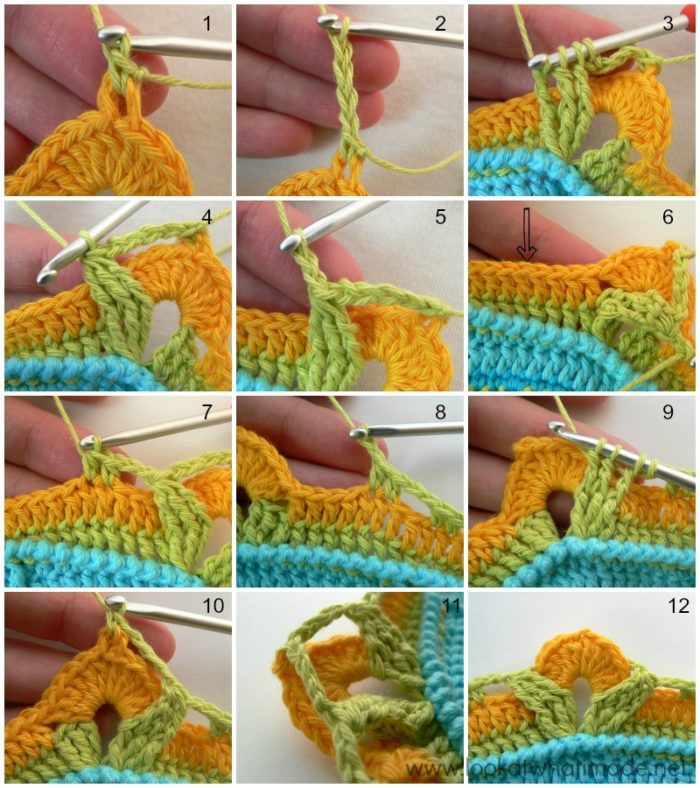
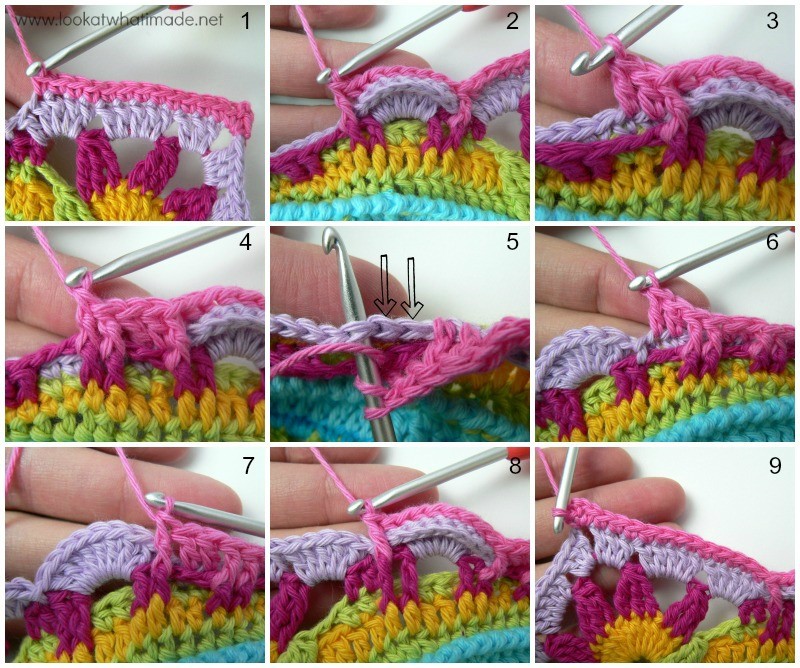
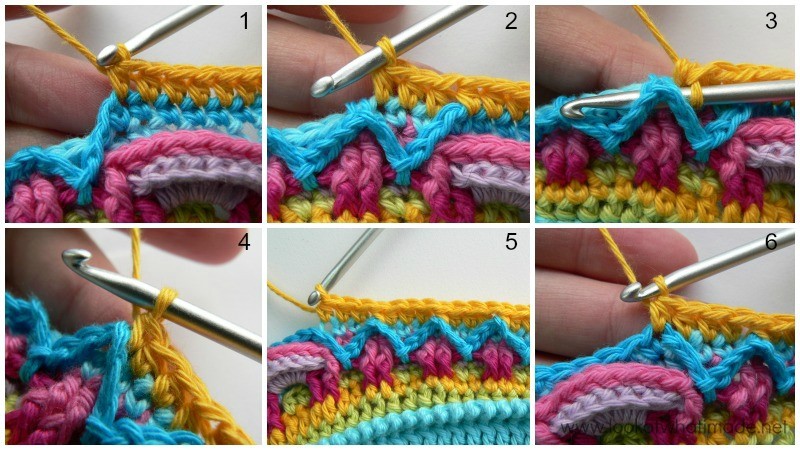
Join your yarn by making a standing half-double crochet in the second hdc from Round 28 on any side {Photo 1}.
*Fptr in the 2 st’s from Round 27 directly below the next ch-2 space {Photo 2}. Remember to work in front of the ch-2 space, not over it {Photo 5}. (Ch 2 and fpdc in the 2 st’s from Round 27 directly below the next ch-2 space {Photos 3 and 4}) 10 times. Ch 2 and fptr around the 2 st’s from Round 27 directly below the next ch-2 space. Hdc in the next 2 hdc’s from Round 28 {Photo 6}.
You will now be working into the half-circle formed by the (6 dc, picot, 6 dc) from Round 27, and in front of the ch-4 spaces from Round 28. You will have to push the “leaves” out of the way to find the first and last st’s of the half-circle {Photo 7}. Ch 2 and make a tr cluster in the first 3 dc’s of the half-circle {Photos 7 and 8}. (Ch 4 and make a tr cluster in the next 3 dc’s of the half-circle) three times {Photos 9 and 10}. Ch 2 and hdc in the next 2 hdc’s from Round 28 {Photo 11}.*
Repeat from * to * 3 more times, omitting the last hdc on the last repeat. Join to the top of the first hdc with a sl st.
Stitch Counts:
- Total: 128 st’s, 12 ch-4 spaces, and 52 ch-2 spaces {16 tr clusters, 16 hdc’s, 16 fptr’s, and 80 fpdc’s}
- Per Side: 32 st’s, 3 ch-4 spaces, and 13 ch-2 spaces {4 tr clusters, 4 hdc’s, 4 fptr’s, and 20 fpdc’s}
Round 30
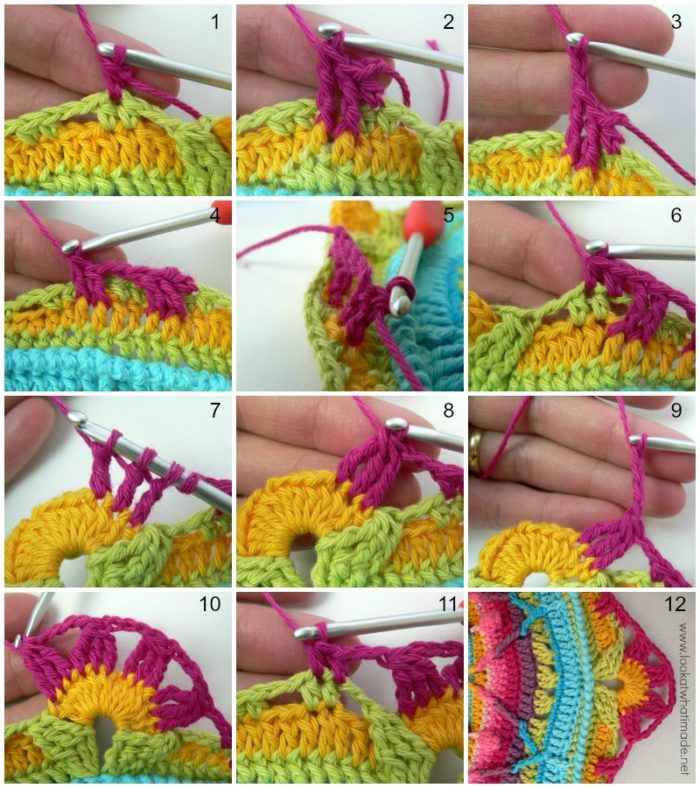
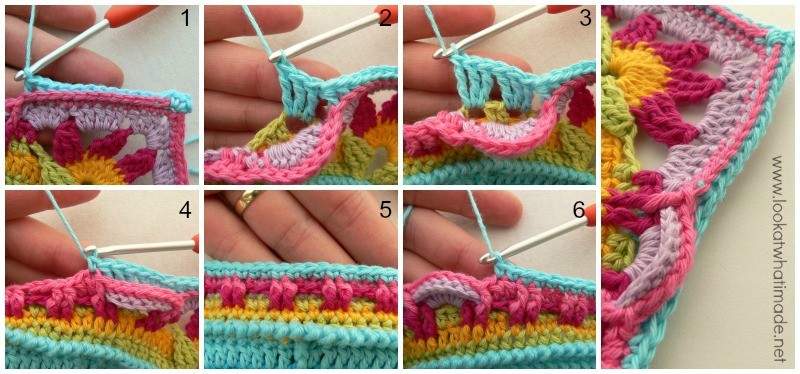
Join your yarn by making a standing double crochet in the central ch-4 space of any corner around. (2 dc, ch 2, 3 dc) in the same ch-4 space. This is your first corner made {Photo 1}.
*Make 5 dc’s in the next ch-4 space. Make 5 dc’s in the next ch-2 space {Photo 2}. Skip the next 2 hdc’s and sl st in the next fptr {Photo 3}. Make 8 dc’s in the next ch-2 space. Skip the next fpdc and sl st into the next fpdc {Photo 4}. Now you will be working into the st’s and ch-2 spaces of Round 28, which you will find behind the st’s of Round 29. (Sc in the next 2 sc’s of Round 28 {indicated with arrows in Photo 5 and illustrated in Photo 6}, make 2 sc’s in the next ch-2 space of Round 28 {Photo 7}) 8 times. Sc in the next 2 st’s of Round 28. You should now have made 34 sc’s in total.
Working into Round 29 again: sl st in the next fpdc. Skip the next fpdc and make 8 dc’s in the next ch-2 space {Photo 8}. Skip the next 2 fptr’s and sl st in the next hdc {indicated with an arrow in Photo 8 and illustrated in Photo 9}. Skip the next hdc and make 5 dc’s in the next ch-2 space. Make 5 dc’s in the next ch-4 space. (3 dc, ch 2, 3 dc) in the central corner ch-4 space {Photo 10}.*
Repeat from * to * 3 more times, omitting the last corner on the last repeat. Join to the top of the standing double crochet with a sl st.
Stitch Counts:
- Total: 304 st’s and 4 ch-2 spaces {168 dc’s and 136 sc’s}
- Per Side: 76 st’s {42 dc’s and 34 sc’s}
Round 31
This round is very involved!
- If you are using the same colour, sl st into the next 2 dc’s and into the corner ch-2 space. (Ch 1, sc, ch 2, sc) into the same ch-2 space.
- If you are using a new colour, start with a standing single crochet in any ch-2 corner space. (Ch 2, sc) in the same ch-2 space.
*Sc in the next 12 dc’s {Photo 1}. Skip the next dc and make a fpdc around the first fptr of Round 29. Make a bpsc in each of the 8 dc’s of the half-circle from Round 30. Skip the next fpdc from Round 29 and fpdc around the next fpdc from Round 29, which will be the fpdc that contains the sl st from Round 30 {Photo 2}. Dc in the next 2 sc’s of Round 30, behind the next ch-2 space of Round 29 {Photo 3}. Fpdc around the next 2 fpdc’s of Round 29 {Photo 4} and skip the next 2 st’s of Round 30, which will be the 2 sc’s made into the ch-2 space of Round 28, directly behind the front post stitches {indicated with arrows in Photo 5}.
Hdc in the next 2 st’s of Round 30. Fphdc around the next 2 fpdc’s of Round 29 and skip the next 2 sc’s of Round 30.
(Sc in the next 2 st’s of Round 30. Fpsc around the next 2 fpdc’s of Round 29 and skip the next 2 sc’s of Round 30) 4 times. Sc in the next 2 st’s of Round 30.
Fphdc around the next 2 fpdc’s of Round 29 and skip the next 2 sc’s from Round 30. Hdc in the next 2 st’s of Round 30. Fpdc around the next 2 fpdc’s of Round 29 and skip the next 2 st’s of Round 30. Dc in the next 2 st’s of Round 30 {Photo 6}.
Fpdc around the next fpdc from Round 29 {Photo 7}. Bpsc in each of the 8 dc’s of the half-circle from Round 30. Skip the next fptr from Round 29 and fpdc around the next fptr {Photo 8}. Skip the next dc from Round 30 and sc in the next 12 dc’s. (Sc, ch 2, sc) in the ch-2 corner space {Photo 9}.* Repeat from * to * 3 more times, omitting the last corner on the last repeat. Join to the first sc with a sl st.
Stitch Counts:
- Total: 320 st’s and 4 ch-2 spaces
- Per Side: 80 st’s {8 fpsc’s, 36 sc’s, 16 bpsc’s, 4 fphdc’s, 4 hdc’s, 8 fpdc’s, and 4 dc’s}
Isn’t that pretty?
Round 32
- If you are using the same colour, sl st into the ch-2 space. (Ch 1, sc, ch 2, sc) in the same ch-2 space.
- If you are using a new colour, join your yarn by making a standing single crochet in any ch-2 corner around. (Ch 2, sc) in the same corner space.
*Bpsc in the next 12 st’s. Bphdc in the next st {Photo 1}. Make 3 tr’s in the first ch-2 space from Round 28 (behind the “petal”) – see Photo 2. Make 3 tr’s in the next ch-2 space from Round 28 {Photo 3}. Skip the 8 bpsc’s of the petal and the next fpdc. Sc in each of the next 34 st’s {Photos 4 and 5}. The last sc should fall in the stitch before the fpdc from Round 31 {Photo 6}.
(Make 3 tr’s in the next ch-2 space from Round 28) twice – as before. Skip the 8 bpsc’s of the petal and the next fpdc of Round 31. Bphdc in the next st. Bpsc in the next 12 st’s. (Sc, ch 2, sc) in the corner ch-2 space.*
Repeat from * to * 3 more times, omitting the last corner on the last repeat. Join to the first sc with a sl st.
Stitch Counts:
- Total: 296 st’s and 4 ch-2 spaces
- Per Side: 74 st’s {24 bpsc’s, 36 sc’s, 2 bphdc’s, and 12 tr’s}
Round 33
In this round you will be making little zigzag “hills” using surface crochet. This round is very slightly asymmetrical. There are 20 sc’s before the zigzags, and only 19 sc’s after them (including the last st of the last “hill”, but not including the corner sc’s).
- If you are using the same colour, sl st into the ch-2 space. (Ch 1, sc, ch 2, sc) in the same ch-2 space.
- If you are using a new colour, join your yarn by making a standing single crochet in any ch-2 corner around. (Ch 2, sc) in the same corner space.
*Sc in the next 20 st’s {Photos 1 and 2}. The last sc will fall in the last tr worked into the ch-2 spaces behind the petal. If it doesn’t, check that you haven’t accidentally skipped the first (hidden) st after the corner. (Ch 3 and sl st into the next ch-2 space from Round 29. This ch-2 space will be in front of your work and between front post groups {Photos 3 and 4}. Ch 3, skip the next 3 st’s from Round 32 and sc in the next st from Round 32 {Photo 5}) 9 times. The last sc should fall in the second tr worked into the ch-2 spaces behind the petal.
Sc in the next 18 st’s. You will now have 19 sc’s (including the last st of the last “hill”). (Sc, ch 2, sc) in the corner ch-2 space.* Repeat from * to * 3 more times, omitting the last corner on the last repeat. Join to the first sc with a sl st.
Stitch Counts:
- Total: 196 sc’s, 32 zigzag “hills”, and 4 ch-2 corners
- Per Side: 49 sc’s per side and 8 zigzag “hills”
Round 34
- If you are using the same colour, sl st into the ch-2 space. (Ch 2, hdc, ch 2, 2 hdc) in the same ch-2 space.
- If you are using a new colour, join your yarn by making a standing half-double crochet in any ch-2 corner around. (Hdc, ch 2, 2 hdc) in the same corner space.
*Skip the first (hidden) stitch and hdc in the next 20 st’s {Photo 1}. (Hdc in the next 3 st’s from Round 32 {Photo 2}, make a bpsc around the next sc from Round 33 {Photos 3 and 4}, which will be at the top of the zigzag “hill”) 8 times. Hdc in the next 3 st’s of Round 32. Hdc in the next 20 st’s of Round 33, making sure not to accidentally skip the first st after the last ch-3 {Photo 6}.
(2 hdc, ch 2, 2 hdc) in the next ch-2 corner space.* Repeat from * to * 3 more times, omitting the last corner on the last repeat. Join to the top of the beginning ch-2 (or the standing half-double crochet) with a sl st.
Stitch Count: 284 hdc’s, 32 sc’s, and 4 ch-2 corner spaces {79 st’s per side}
Round 35
Join your yarn by making a standing half-double crochet in any ch-2 corner space around. (Hdc, ch 2, 2 hdc) in the same corner space {Photo 1}.
*Skip the first hdc, which will be hidden anyway {Photo 1} and hdc in the next 18 st’s {Photos 2 and 3}. Bpdc around the fourth bpsc of the “petal” formed by Rounds 30 and 31 {Photos 4 and 5}. Skip the next st of Round 34 {indicated with an arrow in Photo 6} and hdc in the next 40 st’s. Bpdc around the fourth bpsc of the “petal” formed by Rounds 30 and 31. Skip the next st of Round 34 and hdc in the next 18 st’s. (2 hdc, ch 2, 2 hdc) in the next ch-2 corner space.*
Repeat from * to * 3 more times, omitting the last corner on the last repeat. Join to the top of the first hdc with a sl st.
Stitch Count: 328 st’s and 4 ch-2 corner spaces {82 st’s per side}
Round 36
- If you are using the same colour, sl st into the next hdc and into the ch-2 space. (Ch 1, sc, ch 2, sc) in the same ch-2 space.
- If you are using a new colour, join your yarn by making a standing single crochet in any ch-2 corner around. (Ch 2, sc) in the same corner space.
*Bphdc in each of the 82 st’s across. (Sc, ch 2, sc) in the next ch-2 corner space.* Repeat from * to * 3 more times, omitting the last corner on the last repeat. Join to the first sc with a sl st.
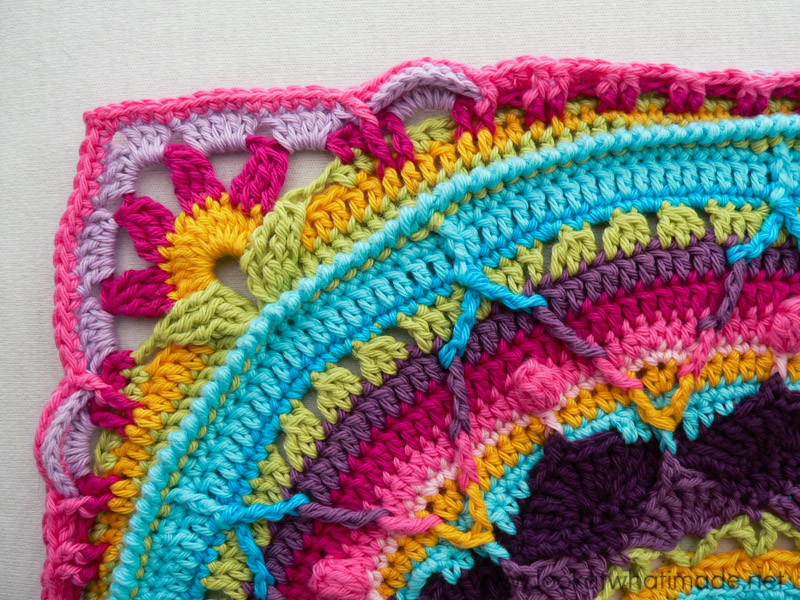
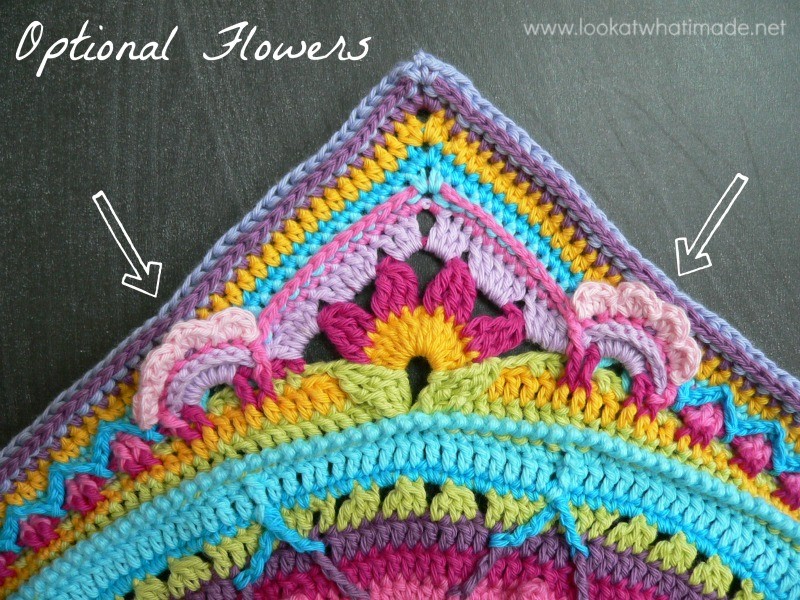
Bind off and work away your tails of yarn. If you need visual help, see the photo for the Optional Flowers below.
Stitch Count: 336 st’s and 4 ch-2 corner spaces {84 st’s per side}
Optional Flowers
These flowers will be made into the bpsc’s of the 8-dc “petals” formed by Rounds 30 and 31. If you think this makes the corners look too busy, feel free to leave them out. You can make all the flowers in the same colour, or each one in a different colour. It is totally up to you.
And if you feel like making totally different flowers, that’s also fine!
Join your yarn to the first bpsc (Round 31) of any 8-dc “petal” from Round 30 with a sl st. (Make 4 hdc’s in the next st, sl st in the next st) 4 times. The last sl st should fall in the top of the fpdc after the petal. Bind off and work away your tails of yarn.
Repeat for each of the 8 “petals” from Rounds 30 and 31.
Phew! I think I deserve a glass of wine (and so do you)!
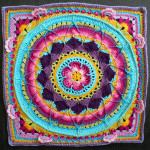
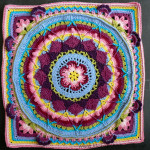
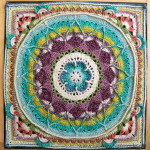
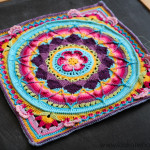
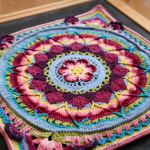
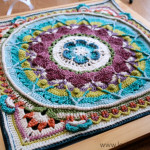
Here are all 3 “Gardens”, unblocked but still pretty :)
Credit
This pattern was originally tested up to this point by the following people:
Kimberly Slifer, Claire Martin, Beth Spaulding, and Venetia Smith.
Thank you for testing and proofing this pattern for me!

This blog post contains affiliate links. I only link to products I personally use or would use. All opinions are my own.


Cindy Dillon says
Using this pattern to make a temperature afghan for my youngest (it’s finally her turn). Making one Sophie per month starting with her birthday day in the center and using the daily high temps to dictate the color for the row. [Some days get two rows when the first row is a foundation for the next.] Each square will be finished though row 36 using a charcoal gray for the border and any rows left after the month ends to get them to the same size as one another. I’ve made it through to day 24 (row 28 in the pattern for each one) and now my thoughts have turned toward joining these 24 inch squares together. Originally, I was going to use a flat braid, but I like how you bordered your Charlotte. That one might be a bit too wide, though. Any ideas?
Dedri Uys says
That sounds gorgeous. I saw a temperature Sophie on Facebook a week or two ago and it blew me away. I would use the (sc, ch 1, skip 1) join Jenny and I used for Charlotte’s Dream HERE.
bobbie Butz says
This is my first sophie, and Im documenting the progress on facebook.My friends love watching it grow as much as I do. I love making this blanket because of the variety of stitches- Anytime I try to make something with the same stitch pattern I usually get bored and abandon ship. Im already looking forward to doing this in different color schemes.
Dedri Uys says
Hi Bobbie. I’m so pleased that you are enjoying the journey :)
Lianne says
Phew 26 was a pain for me. In all honesty I would have given up many many rows ago if it weren’t for your hints on where certain stitches should fall. They’ve been a lifesaver and I’m so glad I stuck with it. I’m having so much fun doing this. Thank you so much!!!
Dedri Uys says
Lol. Once you get past the first 4 parts, the rest won’t seem nearly as daunting. It’s a bit of a baptism by fire at the start x
Martha L Williams says
I decided to use up some of my “stash” before buying more yarn this year. So I am challenging myself to doing the Sophie. Using all blues, greens, turquoise, aquas and white. Proud to say I have overcome my fear of post doubles and trebles. ( I have avoided patterns in the past that use them). Just completed Row 30 and I am so pleased! Thank you for this wonderful, challenging pattern! 70 years old, been crocheting for 4 years.
Dedri Uys says
Hi Martha. I used to hate making post stitches, but I love the way they look so much that I just had to force myself to use them. By the end of Sophie, I was whizzing through them like nobody’s business.
Have a wonderful day,
Dedri
Miriam says
Thank you so much, Dedri, for that fabulous and gorgeous pattern. I’m now halfway on the first side in round 36, and although I don’t drink I need that glass of wine NOW, lol! All kidding aside, I’m a newbie at crochet, and this is my second ever project! Loving every second of it. Even my husband marvels at what’s coming out of my hands. :) Your written tutorials are incredibly helpful, although from time to time I have to fall back to Esther’s wonderful video tutorials… :)
I am curious: why did you call it Sophie’s Universe? It is a beautiful name for this artwork… I wonder who Sophie is, and what is the story behind the name. :)
Warm (literally!) greetings from Mexico!
Dedri Uys says
Miriam! Yay to you for taking on this project as a newbie and I am so pleased that you feel a (huge) sense of achievement and pride from it. This project is named after a friend of mine’s granddaughter (Sophie). It started as a mandala (Sophie’s Mandala), which grew into a square (Sophie’s Garden), which grew into THIS. I wish there was more of a story (and if I went into detail, it would probably be more poetic), but this is all she wrote :)
Melinda says
Thank you for a well written pattern. In part 3 row 25 is optional. Row 26 is written referencing row 24. Should we crochet row 26 into row 24 even if we crocheted row 25? Thanks. Melinda
Dedri Uys says
Hi Melinda. Row 26 goes into Row 24 regardless.
Donna Heist says
MAY 28, 2017 9 AM
I First saw Sophie’s Garden at our summer fair in 2016, [it won best of show] it was so beautiful I snapped a picture of it. if met the lady who made it this March and she gave me your web site. I printed of the pattern but the typing was so small I needed a magnifying glass to read it. I found where I could order the book, it is such a beautiful book. I am 79 years old and been knitting [my first love] since I was eighteen. I have not been this excited about a project for many years, I am now on row 33 using a sports weight yarn and a G hook I hope its not too small. . It for my oldest grandson and his family and his favorite colors are orange, gray, green, and I ‘m using lots of white to set it off. I live in Montana USA
Dedri Uys says
Hi Donna. I am so pleased that you are this excited about Sophie. When you went to print the instructions, did you just print what was on the screen, or did you use the print-friendly button? The print-friendly button allows you to remove unwanted text blocks and photos, and to save to pdf or print. I hope you enjoy the rest of your Sophie journey and that your grandson loves what sounds like a wonderful colourway.
Sheridan says
Thanks for this beautiful blanket pattern. I have become obsessed. I’m up to row 31 and just wanted to clarify that the sc stitches into row 30 are directly behind the fpsc into row 29 or am I reading the pattern wrong.
“(Sc in the next 2 st’s of Round 30. Fpsc around the next 2 fpdc’s of Round 29 and skip the next 2 sc’s of Round 30) 4 times. Sc in the next 2 st’s of Round 30.”
Thanks in advance for any help.
Sheridan says
Hi I have worked it out. Just took a bit of perseverance. I was counting the skip 2 stitches on row 29 not 30. Thanks
Dedri Uys says
Ah, I’m glad you figured it out :)
Melanie Rosenberg says
I am only 15 years old, but I am enjoying Sophie so much! I was sick for three days last week, so I just watched friends on half my screen and read the pattern on the other half. I’m already up to round 34! If I can, I’m planning on making the whole thing. I am using a 6 mm hook, which may be a bit large. But I’m happy with the result, and if it’s a bit big I suppose it will be ok. Thank you so much for Sophie!
Dedri Uys says
How wonderful, Melanie. You are one of my youngest Sophie-makers. Second-youngest, if I am not mistaken. A 6 mm hook should be fine, as long as your tension isn’t too loose. And if it is enormous, all the better :) I’m a big Friends fan too (and so is my husband). Have fun!
Annika says
Now it’s just 3rd ;-). I was 12/13 when I made two of them last summer…
Dedri Uys says
No way! You were 12 when you made a Sophie? Well done!
Belle F says
Thank you for such a challenging and inspired project. I’m using the large color scheme on my Sophie and am running into a bit of trouble with working away the tails for rows 27-29. I’m just starting 30. What method would you recommend? The trouble I’m having is hiding the last row’s color and keeping the sharp contrast between the rows.
Dedri Uys says
Hi Belle. You can wait until you have completed Round 31 and then work your tails away. The green from Round 28 can be worked away into the back of the Yellow stitches below it. The ends from Round 28 can be threaded through the bottom of Round 29 so that it is to the back of your work, and then worked away at the back.
gloria says
Thank you soooooo much!
I have a naval themed house so I will be making this in both ‘natural’ and dyed indigo cooking twine in various shades… then I will fishnet out from the corners and have a beautiful cushion for my retreat.
I can’t wait to start it, though it may have to wait several months as the house is still being built!!
I’ll share a photo when it’s done.
Thanks again!
Dedri Uys says
Oh Gloria, how fun! A new house!! I look forward to seeing some pictures. Thank you :)
Diane Hampshire says
Hi, I’m on row 31 and I’m loving crocheting this lovely pattern. I bought the wool from the local charity shop ..( thrift shop) in my home town in Scotland, it had obviously been knit up once and pulled back and then rolled into odd balls, and luckily the job lot was of colours that blended together, hues of blues, green,gold,pink, and purple. The out come is lovely muted colours.Can’t wait to finish it.
Dedri Uys says
How lucky for you! Have you shared a photo somewhere?
Ann W. says
I have just finished Sophies Garden using Stylecraft Special DK on 3mm and 3.4mm hooks I like a nice close weave. It is going to be the focus of a bed size Afghan. I have had the best time placing the colours and watching it grow and yes even a bit of frogging.
Thankyou so much Dedri for this beautiful design, this is my first Sophie but definitely won’t be the last.
Jenny says
Hi Ann! I made one of my Sophies in stylecraft special DK with a 4mm hook and that is dense (I work quite tightly), so I can imagine yours is very robust :)
Good luck with future Sophies!
Jenny :)
Laura K. says
I’m loving this project, and learning so much! If this blanket turns out well, it’ll go to an artist friend who’s known for making huge, ephemeral mandalas on beaches. His beautiful work vanishes with the changing tide, but if I make my work sturdy enough it’ll last a bit longer. Thanks so much for sharing this design with us!
Dedri Uys says
What a wonderful, thoughtful gift to give your friend. I hope you share yours when it is done :)
Eugenia says
Thank you for your wonderful pattern! I completed row 26 tonight and if it were not for work tomorrow, I would crochet through the night! Thank you !!
Dedri Uys says
Hi Eugenia. I am so glad you like it that much!
Amanda Hart says
Thank you, thank you, thank you – this is just wonderful – I am enjoying making this so, so much!! Amanda
Cindy Hall says
Dedri I have to say this is the prettiest Afghan I have ever crocheted in 40 yrs. I started 3 of them for my granddaughter & neice & me 3 weeks ago. I am on part 4 row 30… I live in the United States in Georgia…You are so talented you should have a book out on all these projects that you make. Breath taking beautiful. I’m a yr late starting because I just now saw it on pinterest…thank you for keeping the free pattern. Cindy Hall
Dedri Uys says
Hi Cindy. Thank you so much for your lovely comment :) I hope you enjoy your Sophie journey and please keep me updated :)
Silvia Ricciuti says
This is so beautiful but addictive, can’t stop to go on and on, and on (slowly unluckily). By the way, I’m using a very thin thread that was left decades ago by my grandmother and I think the result will be just a pillow, but I’m sure it’s gonna be a very nice one. Your works are great, I hope I’ll be able to start the 2016 cal as well. THANKS!
Silvia
Dedri Uys says
Silvia, I would love to see your pillow when it’s done :)
Annaliesa Meeks says
I have spent months,off and on,looking at and trying to figure out what was going on with Sophie’s Garden and not knowing the word “mandala”. All I knew was that I wanted to make the blanket. My yarn has been ordered and I am spending the afternoon printing out the instructions and making notes on them. I have even sent my husband out by himself to do the shopping. I cannot begin to describe how excited I am to be doing this project and how happy I am to find Sophie. Thank you, Annaliesa
Dedri Uys says
Hi Annaliesa. I didn’t know the word ‘mandala’ 2 years ago, so you are not alone. I hope you have a lot of fun with this project and if you get stuck, please know that you can ask me anything, any time.
Dedri
clarissa says
I loved doing this project! Its addicting!! I am very happy with the outcome of the 36 rounds but I want to continue! Thank you! I would like to share a photo.
Dedri Uys says
Hi Clarissa. I’m pleased to hear that. You can find the rest of the pattern here.