Today we will be squaring up the large mandala (created by Parts 1 – 3 of the Universe) to create Sophie’s Garden. Up to this point the playing field has not been exactly level, because those who have heard of/made Sophie’s Garden before soon recognised it and knew roughly what to expect from the CAL up to this point. After today, however, the CAL will indeed be a mystery to everyone!

It is important to note that today will be the last time you will comfortably be able to stop until we get to Week 12 again. I can’t say more without giving the game away…
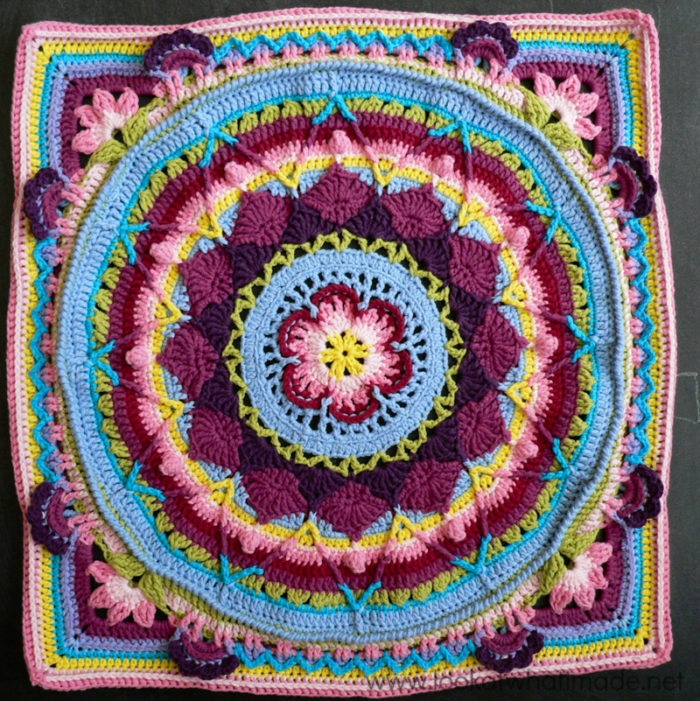
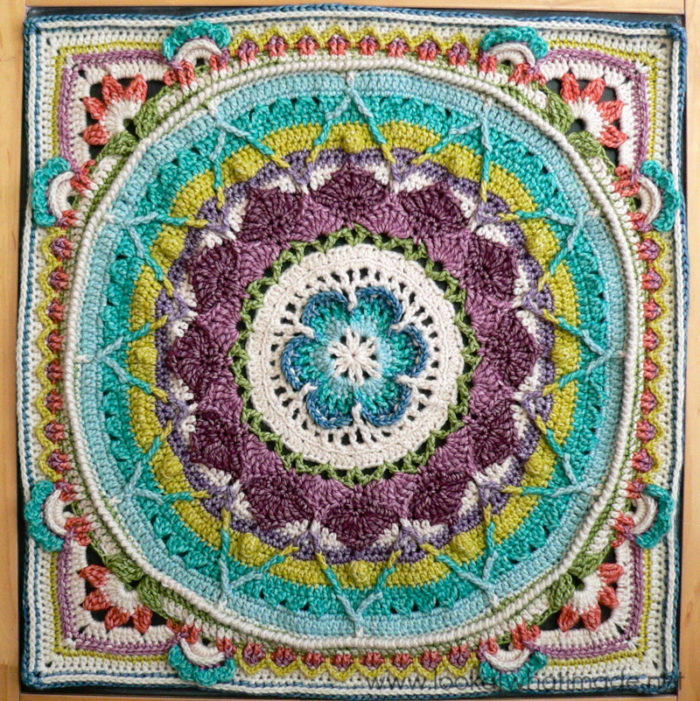
Sophie’s Universe CAL Part 4 {Sophie’s Garden}
©Dedri Uys 2014. All Rights Reserved.
Special design credit to Chris Simon for the use of a modified version of her Lace Petals flower.
Resources
- Add this CAL to your Ravelry Queue
- Sophie’s Universe CAL 2015 Information
- Use the Print-friendly button at the bottom (right) of this post to print/save this tutorial. Don’t know how? Find out HERE.
- **Part 4 VIDEO TUTORIAL** by Esther Dijkstra from It’s All in a Nutshell
Translations
- Dutch Photo Tutorial by Dianne Baan
- German Translation by Gabriele Rogers
- Spanish Translation by Lynda Hernandez
- Finnish Translation by Sari Åström
- French Translation by Sandra Larvin (with Video Tutorials by Géraldine Cymer)
- Danish Translation by Tina Poulsen
- Russian Translation (with Video) by Natalie V. Alimpieva
- Swedish CAL Information by Emma Vingqvist, Agnetha Magnusson, Åza Karlsson, and Ulrika Larsson
- Arabic Video Tutorial by Banan Felimban
Materials
See the Information Post.
Colours for Part 4 |
|||
| Click on the images to enlarge them. | 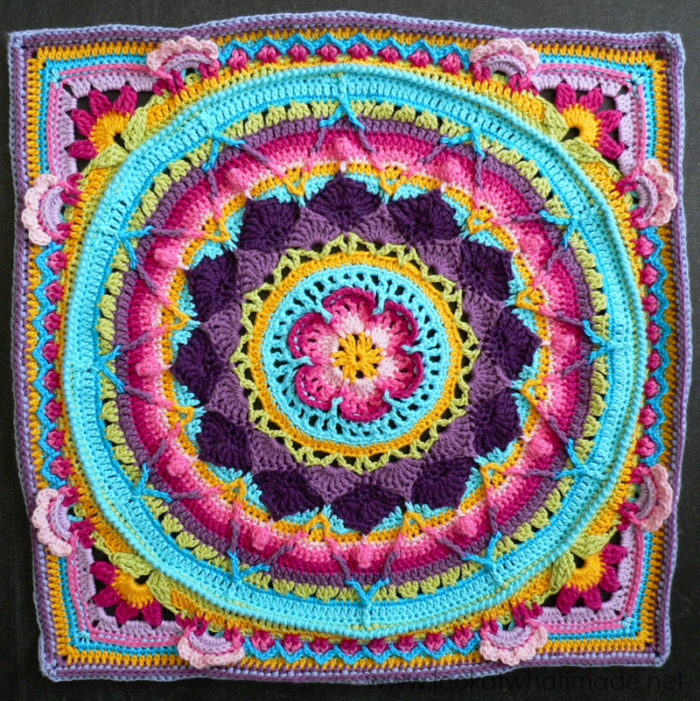 |
 |
 |
| Cotton 8 | Softfun | Stonewashed XL | |
| Round 26 | Light Green | Olive | Canada Jade |
| Round 27 | Canary | Light Rose | Moonstone |
| Round 28 | Light Green | Olive | Canada Jade |
| Round 29 | Fuchsia | Rose | Coral |
| Round 30 | Violet | Cyclamen | Moonstone |
| Round 31 | Pink | Violet | Corundum Ruby |
| Round 32 | Light Turquoise | Light Blue | Moonstone |
| Round 33 | Turquoise | Dark Turquoise | Lemon Quartz |
| Round 34 | Canary | Canary | Moonstone |
| Round 35 | Moors | Light Rose | Moonstone |
| Round 36 | Light Purple | Rose | Blue Apatite |
| Optional Flowers | Light Pink | Heath | Green Agate |
Size
| Large | Medium | Small | |
| Sophie’s Universe Part 4 | 56 – 58 cm (22″ – 23″) | 46 – 48 cm (18″ – 19″) | 35.5 cm (14″) |
Abbreviations
US Terminology used (US/UK comparison chart here)
- Bpsc – Back post single crochet
- Bphdc – Back post half-double crochet (Squaring Up)
- Bpdc – Back post double crochet (Squaring Up)
- Bptr – Back post treble crochet (Squaring Up)
- Dc – Double crochet
- Fpdc – Front post double crochet
- Fphdc – Front post half-double crochet (Squaring Up)
- Fpsc – Front post single crochet
- Fptr – Front post treble crochet
- Hdc – Half-double crochet
- Sc – Single crochet
- Sl st – Slip stitch
- St/st’s – Stitch/stitches
- Tr – Treble crochet
- * – Repeat instructions between asterisks the number of times specified. This is a hardcore repeat and will consist of multiple instructions.
- () – Repeat instructions between parentheses the number of times specified. This is a lower level repeat.
Special Stitches
- Tr Cluster: Tr3tog – see this tutorial. Please note that we will be working around the front posts of the stitches, not into the tops of the stitches as in this tutorial.
- Standing Stitches – Standing sc’s, hdc’s, and dc’s are stitches used to start the round without the need for the traditional beginning chain. Links to tutorials are supplied in each relevant round.
Instructions
Rounds 1 – 25
You can find the links for Rounds 1 – 25 HERE.
Remember to check the Helpful Tips before starting Part 4. You will need to change to the recommended hook size at the start of this part if you started with a smaller hook (as suggested).
Round 26
In this round, you will be working around the back posts of the stitches from Round 24. Make very sure that you don’t accidentally skip a stitch or work around 2 posts at the same time. To help you with that I have included references to when you should end up at the next fpdc from Round 24.
Making the bptr’s for the corners might be a bit tricky, but I am sure you can manage!
Join your yarn by making a standing single crochet around the back post of any fpdc from Round 24 {Photo 1}. Bpsc in the next 9 st’s.
*Bphdc in the next 10 st’s. The last bphdc should fall in the st before the fpdc from Round 24 {Photo 2}. Bpdc in the next 9 st’s. (Make 3 bptr’s in the next st, ch 2 and make 3 bptr’s in the next st.) This will form your corner {Photos 3 and 4}. Bpdc in the next 9 st’s. The last bpdc should fall in the stitch before the fpdc from Round 24 {Photo 5}. Bphdc in the next 10 st’s. Bpsc in the next 20 st’s.* Repeat from * to * 3 more times. Omit the last 10 bpsc’s on the last repeat. Join to the first sc with a sl st.
Stitch Counts:
- Total: 256 st’s and 4 ch-2 corner spaces {80 bpsc’s, 80 bphdc’s, 72 bpdc’s, and 24 bptr’s}
- Per Side: 64 st’s {20 bpsc’s, 20 bphdc’s, 18 bpdc’s, and 6 bptr’s}
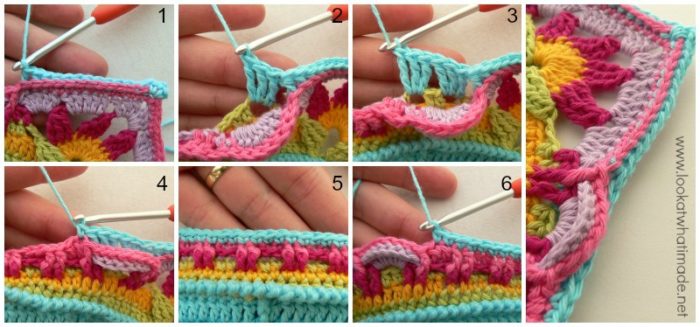
Round 27
- If you are going to use the same colour, ch 1 and sc in the same st. Sc in the next 13 st’s.
- If you are going to use a different colour, start with a standing single crochet in the same st as the sl st join {Photo 1}. Sc in the next 13 st’s.
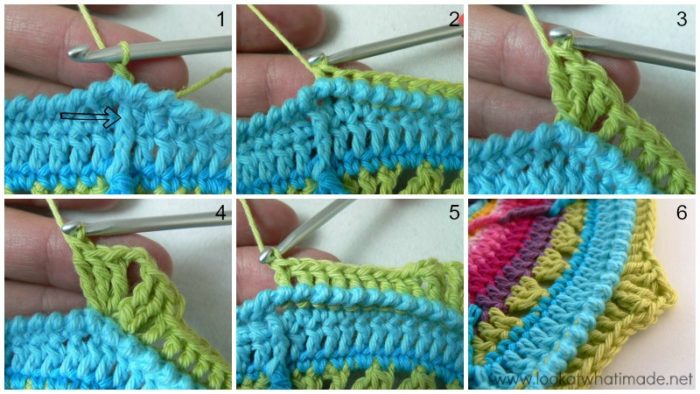
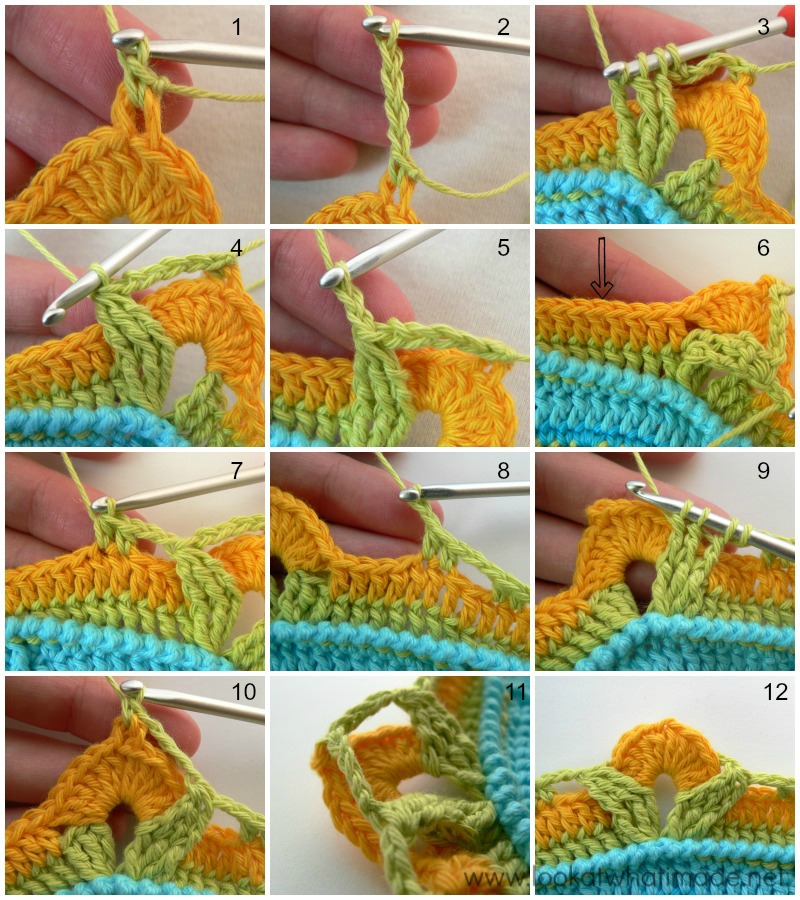
*Hdc in the next 3 st’s and dc in the next 12 st’s. The last dc should fall in the last bpdc before the 3 bptr’s that form the corner {Photo 2}. Skip the 3 bptr’s. Into the ch-2 corner space: (6 dc, ch 3 and sl st into the third ch from the hook to form a picot, 6 dc). It will be a tight fit getting all 12 dc’s into the corner space. Squish them up good {Photos 3 – 5}. Skip the 3 bptr’s. Dc in the next 12 st’s {indicated with an arrow in Photo 5 and illustrated in Photo 6}, hdc in the next 3 st’s, and sc in the next 28 st’s.* Repeat from * to * 3 more times. Omit the last 14 sc’s on the last repeat. Join to the first sc with a sl st. Fasten off and work away your tails of yarn.
Stitch Count:
- Total: 280 st’s and 4 corner picots {112 sc’s, 24 hdc’s, and 144 dc’s}
- Per Side: 70 st’s {28 sc’s, 6 hdc’s, and 36 dc’s per side}

Round 28
When you make the corners in this round, they will seem too tight for the round. Do not worry about it.
Join your yarn by making a standing single crochet in any ch-3 picot around {Photo 1}.
*Ch 4. Make a tr cluster, working around the front posts of the 3 bptr’s in Round 26 {Photos 3 and 4}. Ch 2 {Photo 5}. Skip the first 4 dc’s after the bptr’s. Hdc in the next 2 st’s {indicated with an arrow in Photo 6 and illustrated in Photo 7}. Ch 2, skip the next 2 st’s and hdc in the next 2 st’s. (Ch 2, skip the next 2 st’s and sc in the next 2 st’s) 9 times. (Ch 2, skip the next 2 st’s and hdc in the next 2 st’s) twice. There should now be 4 dc’s left before the bptr’s from Round 26 {Photo 8}. Ch 2. Make a tr cluster by working around the front posts of the 3 bptr’s in Round 26 {Photo 9}. Ch 4. Sc in the picot {Photo 10}.*
Repeat from * to * 3 more times, omitting the last sc on the last repeat. Join to the top of the first sc with a sl st. Fasten off and work away your tails of yarn.
Once you have completed the round, push the (ch-4, sc, ch-4) bits in each corner to the back of your work, never to be seen or used again {Photos 11 and 12}!
Stitch Counts:
- Total: 116 st’s, 8 ch-4 spaces, and 56 ch-2 spaces {8 tr clusters, 32 hdc’s, and 76 sc’s – including corner sc’s}
- Per Side: 29 st’s, 2 ch-4 spaces, and 14 ch-2 spaces {2 tr clusters, 8 hdc’s, and 19 sc’s – including corner sc }
Round 29
Except for 16 stitches, you will be working only into the stitches of Round 27 in this round. When working into the st’s from Round 27 below the ch-2 spaces, work in front of the ch-2 spaces, not over them!
You will notice that there is a fpdc in the instructions below that has been underlined, bolded, and made red. Why? Because a lot of people have gotten back to me to say that they missed the fact that those stitches should be fpdc’s, not fptr’s. Will the sky fall if I accidentally make them all fptr’s? Nope. Your square will just bulge the teeniest bit on each side.
Join your yarn by making a standing half-double crochet in the second hdc from Round 28 on any side {Photo 1}.
*Fptr in the 2 st’s from Round 27 directly below the next ch-2 space {Photo 2}. Remember to work in front of the ch-2 space, not over it {Photo 5}. (Ch 2 and fpdc in the 2 st’s from Round 27 directly below the next ch-2 space {Photos 3 and 4}) 10 times. Ch 2 and fptr around the 2 st’s from Round 27 directly below the next ch-2 space. Hdc in the next 2 hdc’s from Round 28 {Photo 6}.
You will now be working into the half-circle formed by the (6 dc, picot, 6 dc) from Round 27, and in front of the ch-4 spaces from Round 28. You will have to push the “leaves” out of the way to find the first and last st’s of the half-circle {Photo 7}. Ch 2 and make a tr cluster in the first 3 dc’s of the half-circle {Photos 7 and 8}. (Ch 4 and make a tr cluster in the next 3 dc’s of the half-circle) three times {Photos 9 and 10}. Ch 2 and hdc in the next 2 hdc’s from Round 28 {Photo 11}.*
Repeat from * to * 3 more times, omitting the last hdc on the last repeat. Join to the top of the first hdc with a sl st.
Stitch Counts:
- Total: 128 st’s, 12 ch-4 spaces, and 52 ch-2 spaces {16 tr clusters, 16 hdc’s, 16 fptr’s, and 80 fpdc’s}
- Per Side: 32 st’s, 3 ch-4 spaces, and 13 ch-2 spaces {4 tr clusters, 4 hdc’s, 4 fptr’s, and 20 fpdc’s}

Round 30
Join your yarn by making a standing double crochet in the central ch-4 space of any corner around. (2 dc, ch 2, 3 dc) in the same ch-4 space. This is your first corner made {Photo 1}.
*Make 5 dc’s in the next ch-4 space. Make 5 dc’s in the next ch-2 space {Photo 2}. Skip the next 2 hdc’s and sl st in the next fptr {Photo 3}. Make 8 dc’s in the next ch-2 space. Skip the next fpdc and sl st into the next fpdc {Photo 4}. Now you will be working into the st’s and ch-2 spaces of Round 28, which you will find behind the st’s of Round 29. (Sc in the next 2 sc’s of Round 28 {indicated with arrows in Photo 5 and illustrated in Photo 6}, make 2 sc’s in the next ch-2 space of Round 28 {Photo 7}) 8 times. Sc in the next 2 st’s of Round 28. You should now have made 34 sc’s in total.
Working into Round 29 again: sl st in the next fpdc. Skip the next fpdc and make 8 dc’s in the next ch-2 space {Photo 8}. Skip the next 2 fptr’s and sl st in the next hdc {indicated with an arrow in Photo 8 and illustrated in Photo 9}. Skip the next hdc and make 5 dc’s in the next ch-2 space. Make 5 dc’s in the next ch-4 space. (3 dc, ch 2, 3 dc) in the central corner ch-4 space {Photo 10}.*
Repeat from * to * 3 more times, omitting the last corner on the last repeat. Join to the top of the standing double crochet with a sl st.
Stitch Counts:
- Total: 304 st’s and 4 ch-2 spaces {168 dc’s and 136 sc’s}
- Per Side: 76 st’s {42 dc’s and 34 sc’s}
Round 31
This round is very involved!
- If you are using the same colour, sl st into the next 2 dc’s and into the corner ch-2 space. (Ch 1, sc, ch 2, sc) into the same ch-2 space.
- If you are using a new colour, start with a standing single crochet in any ch-2 corner space. (Ch 2, sc) in the same ch-2 space.
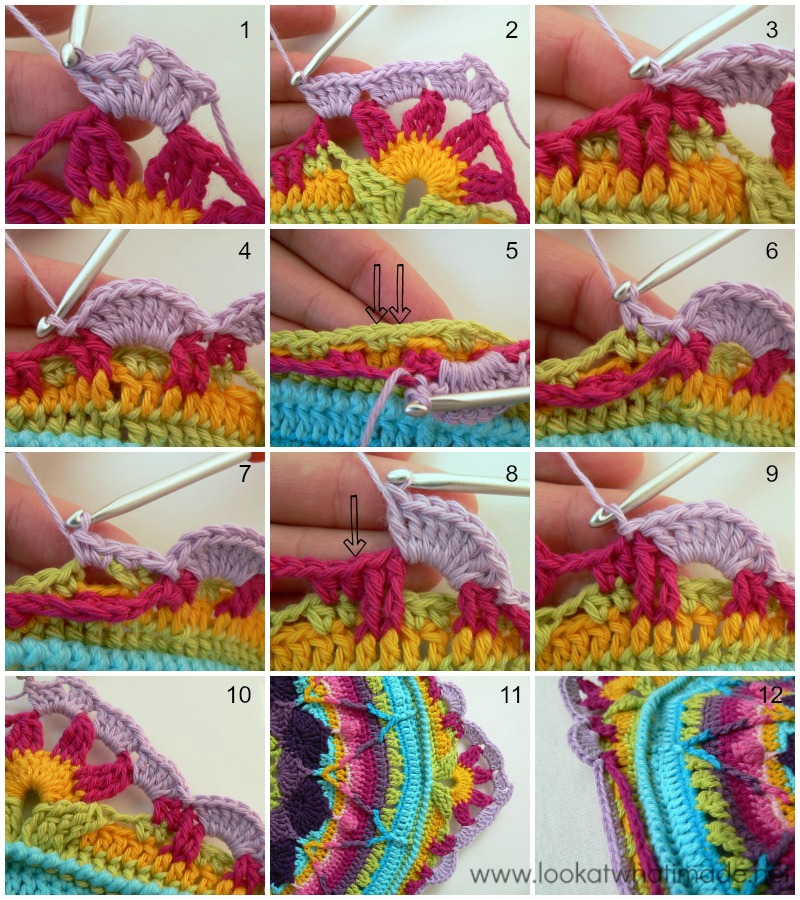
*Sc in the next 12 dc’s {Photo 1}. Skip the next dc and make a fpdc around the first fptr of Round 29. Make a bpsc in each of the 8 dc’s of the half-circle from Round 30. Skip the next fpdc from Round 29 and fpdc around the next fpdc from Round 29, which will be the fpdc that contains the sl st from Round 30 {Photo 2}. Dc in the next 2 sc’s of Round 30, behind the next ch-2 space of Round 29 {Photo 3}. Fpdc around the next 2 fpdc’s of Round 29 {Photo 4} and skip the next 2 st’s of Round 30, which will be the 2 sc’s made into the ch-2 space of Round 28, directly behind the front post stitches {indicated with arrows in Photo 5}.
Hdc in the next 2 st’s of Round 30. Fphdc around the next 2 fpdc’s of Round 29 and skip the next 2 sc’s of Round 30.
(Sc in the next 2 st’s of Round 30. Fpsc around the next 2 fpdc’s of Round 29 and skip the next 2 sc’s of Round 30) 4 times. Sc in the next 2 st’s of Round 30.
Fphdc around the next 2 fpdc’s of Round 29 and skip the next 2 sc’s from Round 30. Hdc in the next 2 st’s of Round 30. Fpdc around the next 2 fpdc’s of Round 29 and skip the next 2 st’s of Round 30. Dc in the next 2 st’s of Round 30 {Photo 6}.
Fpdc around the next fpdc from Round 29 {Photo 7}. Bpsc in each of the 8 dc’s of the half-circle from Round 30. Skip the next fptr from Round 29 and fpdc around the next fptr {Photo 8}. Skip the next dc from Round 30 and sc in the next 12 dc’s. (Sc, ch 2, sc) in the ch-2 corner space {Photo 9}.* Repeat from * to * 3 more times, omitting the last corner on the last repeat. Join to the first sc with a sl st.
Stitch Counts:
- Total: 320 st’s and 4 ch-2 spaces
- Per Side: 80 st’s {8 fpsc’s, 36 sc’s, 16 bpsc’s, 4 fphdc’s, 4 hdc’s, 8 fpdc’s, and 4 dc’s}
Isn’t that pretty?
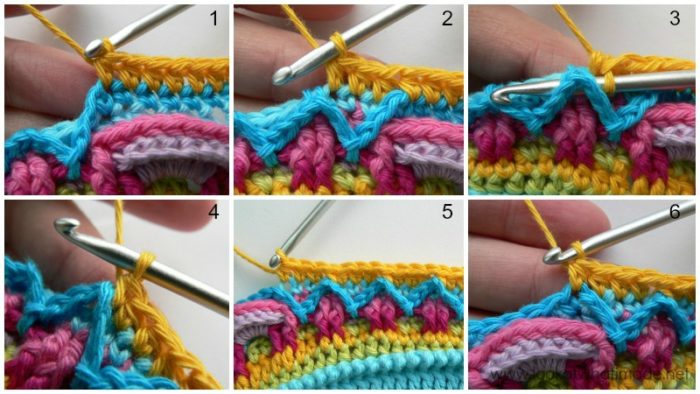
Round 32
- If you are using the same colour, sl st into the ch-2 space. (Ch 1, sc, ch 2, sc) in the same ch-2 space.
- If you are using a new colour, join your yarn by making a standing single crochet in any ch-2 corner around. (Ch 2, sc) in the same corner space.
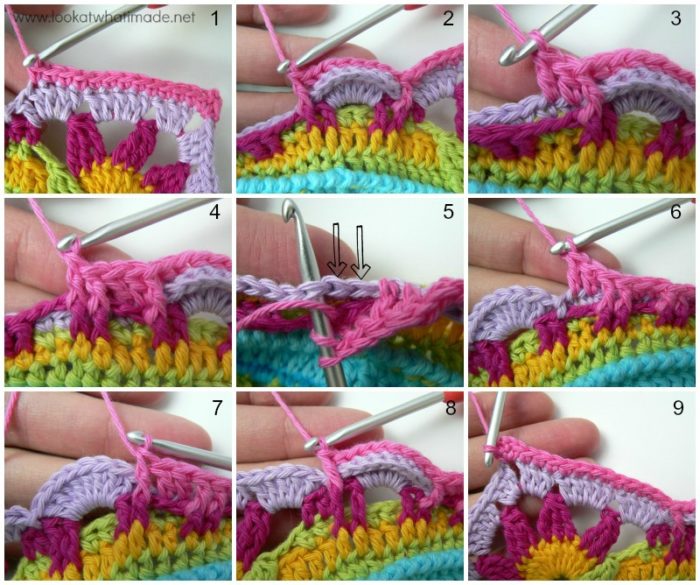
*Bpsc in the next 12 st’s. Bphdc in the next st {Photo 1}. Make 3 tr’s in the first ch-2 space from Round 28 (behind the “petal”) – see Photo 2. Make 3 tr’s in the next ch-2 space from Round 28 {Photo 3}. Skip the 8 bpsc’s of the petal and the next fpdc. Sc in each of the next 34 st’s {Photos 4 and 5}. The last sc should fall in the stitch before the fpdc from Round 31 {Photo 6}.
(Make 3 tr’s in the next ch-2 space from Round 28) twice – as before. Skip the 8 bpsc’s of the petal and the next fpdc of Round 31. Bphdc in the next st. Bpsc in the next 12 st’s. (Sc, ch 2, sc) in the corner ch-2 space.*
Repeat from * to * 3 more times, omitting the last corner on the last repeat. Join to the first sc with a sl st.
Stitch Counts:
- Total: 296 st’s and 4 ch-2 spaces
- Per Side: 74 st’s {24 bpsc’s, 36 sc’s, 2 bphdc’s, and 12 tr’s}
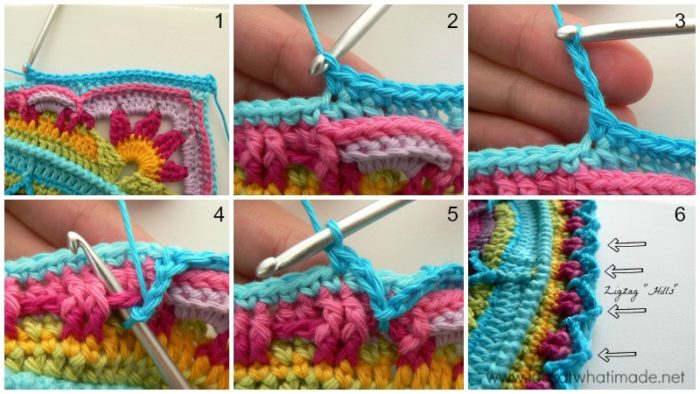
Round 33
In this round you will be making little zigzag “hills” using surface crochet. This round is very slightly asymmetrical. There are 20 sc’s before the zigzags, and only 19 sc’s after them (including the last st of the last “hill”, but not including the corner sc’s).
- If you are using the same colour, sl st into the ch-2 space. (Ch 1, sc, ch 2, sc) in the same ch-2 space.
- If you are using a new colour, join your yarn by making a standing single crochet in any ch-2 corner around. (Ch 2, sc) in the same corner space.
*Sc in the next 20 st’s {Photos 1 and 2}. The last sc will fall in the last tr worked into the ch-2 spaces behind the petal. If it doesn’t, check that you haven’t accidentally skipped the first (hidden) st after the corner. (Ch 3 and sl st into the next ch-2 space from Round 29. This ch-2 space will be in front of your work and between front post groups {Photos 3 and 4}. Ch 3, skip the next 3 st’s from Round 32 and sc in the next st from Round 32 {Photo 5}) 9 times. The last sc should fall in the second tr worked into the ch-2 spaces behind the petal.
Sc in the next 18 st’s. You will now have 19 sc’s (including the last st of the last “hill”). (Sc, ch 2, sc) in the corner ch-2 space.* Repeat from * to * 3 more times, omitting the last corner on the last repeat. Join to the first sc with a sl st.
Stitch Counts:
- Total: 196 sc’s, 32 zigzag “hills”, and 4 ch-2 corners
- Per Side: 49 sc’s per side and 8 zigzag “hills”
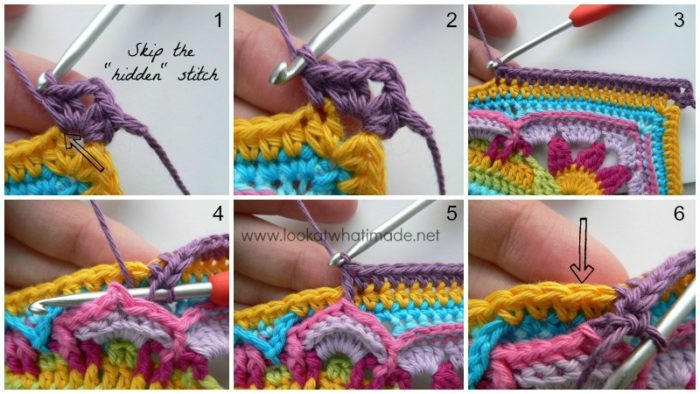
Round 34
- If you are using the same colour, sl st into the ch-2 space. (Ch 2, hdc, ch 2, 2 hdc) in the same ch-2 space.
- If you are using a new colour, join your yarn by making a standing half-double crochet in any ch-2 corner around. (Hdc, ch 2, 2 hdc) in the same corner space.
*Skip the first (hidden) stitch and hdc in the next 20 st’s {Photo 1}. (Hdc in the next 3 st’s from Round 32 {Photo 2}, make a bpsc around the next sc from Round 33 {Photos 3 and 4}, which will be at the top of the zigzag “hill”) 8 times. Hdc in the next 3 st’s of Round 32. Hdc in the next 20 st’s of Round 33, making sure not to accidentally skip the first st after the last ch-3 {Photo 6}.
(2 hdc, ch 2, 2 hdc) in the next ch-2 corner space.* Repeat from * to * 3 more times, omitting the last corner on the last repeat. Join to the top of the beginning ch-2 (or the standing half-double crochet) with a sl st.
Stitch Count: 284 hdc’s, 32 sc’s, and 4 ch-2 corner spaces {79 st’s per side}
Round 35
Join your yarn by making a standing half-double crochet in any ch-2 corner space around. (Hdc, ch 2, 2 hdc) in the same corner space {Photo 1}.
*Skip the first hdc, which will be hidden anyway {Photo 1} and hdc in the next 18 st’s {Photos 2 and 3}. Bpdc around the fourth bpsc of the “petal” formed by Rounds 30 and 31 {Photos 4 and 5}. Skip the next st of Round 34 {indicated with an arrow in Photo 6} and hdc in the next 40 st’s. Bpdc around the fourth bpsc of the “petal” formed by Rounds 30 and 31. Skip the next st of Round 34 and hdc in the next 18 st’s. (2 hdc, ch 2, 2 hdc) in the next ch-2 corner space.*
Repeat from * to * 3 more times, omitting the last corner on the last repeat. Join to the top of the first hdc with a sl st.
Stitch Count: 328 st’s and 4 ch-2 corner spaces {82 st’s per side}
Round 36
- If you are using the same colour, sl st into the next hdc and into the ch-2 space. (Ch 1, sc, ch 2, sc) in the same ch-2 space.
- If you are using a new colour, join your yarn by making a standing single crochet in any ch-2 corner around. (Ch 2, sc) in the same corner space.
*Bphdc in each of the 82 st’s across. (Sc, ch 2, sc) in the next ch-2 corner space.* Repeat from * to * 3 more times, omitting the last corner on the last repeat. Join to the first sc with a sl st.
Bind off and work away your tails of yarn. If you need visual help, see the photo for the Optional Flowers below.
Stitch Count: 336 st’s and 4 ch-2 corner spaces {84 st’s per side}
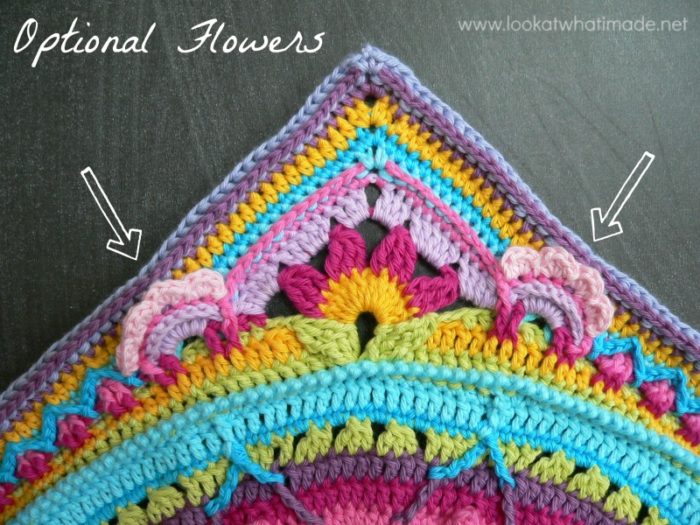
Optional Flowers
These flowers will be made into the bpsc’s of the 8-dc “petals” formed by Rounds 30 and 31. If you think this makes the corners look too busy, feel free to leave them out. You can make all the flowers in the same colour, or each one in a different colour. It is totally up to you.
And if you feel like making totally different flowers, that’s also fine!
Join your yarn to the first bpsc (Round 31) of any 8-dc “petal” from Round 30 with a sl st. (Make 4 hdc’s in the next st, sl st in the next st) 4 times. The last sl st should fall in the top of the fpdc after the petal. Bind off and work away your tails of yarn.
Repeat for each of the 8 “petals” from Rounds 30 and 31.
Phew! I think I deserve a glass of wine (and so do you)!
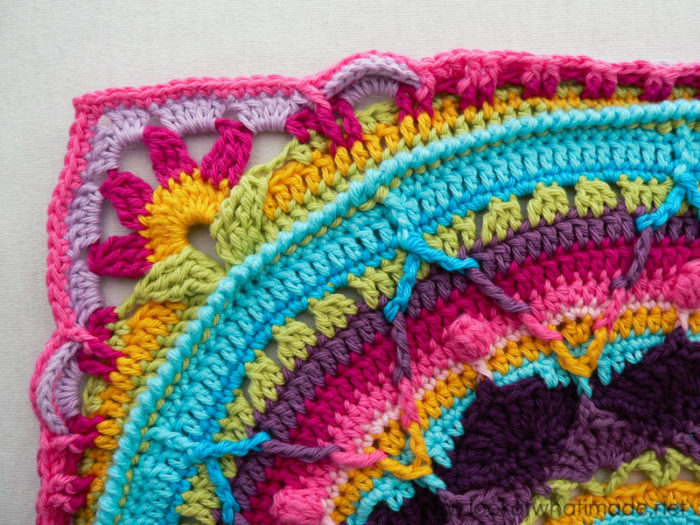
Here are all 3 “Gardens”, unblocked but still pretty :)


Credit
This pattern was originally tested up to this point by the following people:
Kimberly Slifer, Claire Martin, Beth Spaulding, and Venetia Smith.
Thank you for testing and proofing this pattern for me!

This blog post contains affiliate links. I only link to products I personally use or would use. All opinions are my own.


jessica says
I just found and started this last week. I love it. Im almost finished with part 4 and it’s the most beautiful thing I’ve ever crocheted. When I first looked at it, I thought, no way can I do that!! But, it’s so easy to follow and it’s super helpful that there are links for things that might be unfamiliar. My 14th old son has chosen my colors for me at the beginning of every round (they’re in no particular order) & it’s looking amazing. plus, it’s fun that it gives my son & I something else to chat about :) Im pretty sure I’m making him pick my colors from now on ;) Thanks for this!!
Teresa says
Thank you, I recently started teaching my daughter to crochet and she was refusing to learn written patterns, she said that she “just didn’t get it” she preferred to watch me, or videos of the patterns. I started us on Sophie as a mother daughter cal, but I couldn’t work on it for a few weeks. My daughter watched the videos and compared it to the written pattern that I had insisted she print. By the time I was able to continue working on it, she was far ahead of me and is reading the pattern! So, again, thank you, your pattern is well written and simply a joy to follow! Plus after flogging about 6 rounds, my daughter has now learned the importance of keeping accurate count and not “fudging it in”
Jenny says
How lovely to hear this story! I can’t seem to get my niece interested in crochet, wven after promising that she could crochet blankets for her pony! :)
Kandi says
I just started my Sophie Universe over the weekend and I must say this is the best written pattern ever! Thank you so much Dedri for written such awesome directions! I have been crocheting a little over a year and I’m making a Sophie! :) :):)
Jenny says
We are delighted you are enjoying Sophie! :)
Paulette says
I only recently heard about Sophie’s Universe and decided to give it a go. I’ve been crocheting for over 50 years, & I’ve made everything from hats & gloves to garments and blankets. I don’t think I have ever encountered a better written pattern. You have gone the extra mile with the instructional photos as well. I have completed Part 4, and it’s truly gorgeous. I am regretting that I did not purchase some special yarn, but I started it with what I had on hand, which is mostly economy acrylic, since I use a lot of it for my charity crochet items. Even so, it is just stunning! Thank you so much for creating this project and for hosting this CAL. You are truly an artist.
Jenny says
I couldn’t agree with you more, Paulette! So happy to hear Sophie is making you amile as well :)
Cheryl says
I love to crochet and I am always looking for interesting and unique patterns. Never have I seen anything to even come close to what i have seen on your site. I can only liken your work to true art. It is so beautiful that I had to stop and catch my breath when I first saw the work. You are truly an artist. I want to make this, but I know that if I do I will only be a plagarist. You have created such beauty. It is truly amazing. Thank you.
Jenny says
Cheryl, you simply must create your own Sophie! She is a thing of beauty, a masterpiece and a fabulous learning tool just waiting for you to help her evolve into something gorgeous :)
Dedri Uys says
Thank you, Cheryl. You are very kind :)
Mandi MS says
Hi Dedri. I just wanted to thank you for producing this. This is the first time I’ve ever attempted something like this, and I am loving it! Just got half way through section 4 (I started late as I didn’t think I could do this, and still have my doubts) but what amazing instructions for a beginner like me! Thank you for helping me gain so much learning and enjoyment. Feeling quite determined now to make it to the end however, fingers crossed! :) Mandi xx
Dedri Uys says
Good on you for giving it a go, Mandi. If you can get through the first 4 parts, you can get through the whole thing! Good luck :)
Elizabeth says
I just started this CAL and I have a huge problem… I just can’t stop working on it! This is AMAZING!! I love the tutorials! You make this so easy to do! When I saw that there was a round with the crab stitch, I thought for sure that I would make the optional and I am so glad I didn’t!!!
Dedri Uys says
Lol…as problems go that’s a fairly nice one :)
Lanita Findley says
I absolutely love this pattern. I had to completely frog my first try and start over, but my second attempt came out just about perfect. My son, who is an artist, says it is by far the coolest thing I have ever made! Thank you so much for sharing it, and for all of the helpful photos!
Gail Price says
on row 26…
You have 18 stitches between the FP if you add the start one that is 19…
Join your yarn by making a standing single crochet around the back post of any fpdc from Round 24 (Photo 1). Bpsc in the next 9 st’s.
*Bphdc in the next 10 st’s. The last bphdc should fall in the st before the fpdc from Round 24 (Photo 2
that is 1 +9 +10 stitches … one to many?
Gail Price says
just realised missed a stitch behind the fp. sorry
Dedri Uys says
Gail, is it working out now?
Kathy Dynge says
Hi ladies. While doing row 32 I was confused about where the instructions are for the first 3 trebles in the chain spaces. It does not say to do it in each chain space. ACK! I had to watch the video tutorial and saw where you are to make the trebles in each of the chain spaces.
Jenny says
Glad you worked it out with the aid of the video :)
Dedri Uys says
Hi Kathy,
Just have another read of the instructions:
*Bpsc in the next 12 st’s. Bphdc in the next st (Photo 1). Make 3 tr’s in the first ch-2 space from Round 28 (behind the “petal”) – see Photo 2. Make 3 tr’s in the next ch-2 space from Round 28 (Photo 3). Skip the 8 bpsc’s of the petal and the next fpdc. Sc in each of the next 34 st’s (Photos 4 and 5). The last sc should fall in the stitch before the fpdc from Round 31 (Photo 6).
There are def instructions for making 2 lots of 3 tr’s. It might help if you highlight that sentence for future reference so that you don’t accidentally miss it again.
Kathy Dynge says
Dedri, how right you are! Sometimes I read faster than I think. I totally skipped that part. Thanks for the reply and I am loving this pattern more than anything I have ever made.
Dedri Uys says
I am so pleased to hear that :)
Jenny says
Happy to hear you are enjoying Sophie with us :)
Mary says
Just finishing up Part 4, and I am loving this CAL dearly! I’m having a blast choosing the colors as I go; it helps so much to see your 3 different versions, Dedri. I even bought a Clover Amour hook after decades of using the cheapest hook I could find. What a worthwhile indulgence! Wish I’d splurged on myself sooner–I’m worth it!
Part 5, here I come…
Beth Bowles says
Hi Dedri or Jenny,
I think it would be helpful to link “tr cluster” in row 28 to a tutorial. Thanks for such a wonderful CAL!
Beth Bowles
Jenny says
Thank you for the suggestion Beth. All additions are down to Dedri’s discretion, and I am sure she will look in to it :)
Dedri Uys says
Hi Beth
There is a link to a tr cluster tutorial in the Abbreviations and Special Stitches at the start of Part 4. I did not include the link in the instructions for the round as there is a note in the abbreviations section that needs to be read before accessing the link.
Each part has the relevant abbreviations and special stitches at the start of the tutorial and they will tell you how to make each stitch.
LaTonia says
Never mind!! Some how I missed the “8times” every time I read the instructions! Lol I think I need to put down the hook and go to bed!
Catherine says
Hi Dedri – I was just wondering – is the corner in round 31 supposed to be sc, ch1, sc or sc, ch2, sc? It’s just that round 32 says to create the first stitch of the new corner in the ch2 of any corner.
I didn’t even notice this on my first time round – just catching up with the second blanket and noticed it.
Thank you so much for this CAL – I am loving it. I can’t wait to see how the rest of it goes!
Catherine x
Catherine says
Doh – I just realised I misread it … it is ch2, darn it!
maxine timms says
Thank you thank you thank you for this stunning design. The instructions are so well written and it is delightful in every way. I have completed part 4 in the softfun. should I block now before carrying on to part 5?
Dedri Uys says
maxine, I didn’t block, but you can if you want to.
Carol D says
I was able to easily block my first Sophie’s on my bed…I used a heavy towel – and did pin – and sprayed with clean water….it was well dry by late that afternoon.
I absolutely love Sophie’s and am nearly done with Part 4…though I started late. I was asked to test pattern for another designer this week, so will get back to Sophie’s part 4 and finish tonight…then – onward…this will be a treat for me, since Sophie’s finished after what is Part 4 here…I may have to add on to my first Sophie’s now! It looks so pretty – I may not be able to resist…..
Rae Casey says
I can’t thank you enough for the hard work you have put into the design of this cal. I never would have thought I could make something as beautiful as this. Deidre Uys you are a champion.
Dedri Uys says
Thank you, Rae :)
Carol D says
She IS a champion! I was a rank beginner when I started my first Sophie’s! And this pattern gives you the confidence to go forward!
Dedri is awesome! and so many of us owe her so much!
Jay Woodford says
I just want to say that I am enjoying this CAL. I LOVE how it is turning out…thank you so much for doing this! I am having problems with Row 26. When I do the bpsc I can’t see any stitches in front. They are all hidden behind Row 25. Is there something I’m missing? Thanks :)
Dedri Uys says
Jay, if you bend round 25 back, you should be able to see the little running stitches formed by the back post stitches. If you don’t, send me a photo and I will have a look for you. You can do this by using the “Contact Me” link at the top of the page.
Jay Woodford says
Dedri, I’m getting the running stitch but I can’t see the stitches at the top of Round 25. It’s like the SC’s are too small to see. I’ll keep going and see if it gets better. Thanks for your help :)
Chantelle says
I have a question regarding the pattern, specifically row 32… The instructions read that there should be 3 triple crochets going into the next chain 2 space from row 28, and then the next set of triples are repeated. The stitch count shows that there should be 12 triple crochets per side, but the instructions given are for 9 in total per round. I’m guessing that the stitch count is right, but figured I would ask, just in case. Thanks for your help :)
Dedri Uys says
Hi Chantelle. There are 2 ch-2 spaces behind each 8-dc petal (so 4 per side). You are making 3 trebles into each of these 4 ch-2 spaces per side, giving you 12 tr’s per side, 6 tr’s behind each 8-dc petal. Does that make sense? Have another look at the photo tutorial and see if you can spot the 6 tr’s behind the 8-dc petal.
Chantelle says
Oh, I figured it out :) I just wasn’t reading it in the pattern and worried that others who come across it may have trouble… though… I do see it in the written instructions now…so maybe my eyes and brain were playing tricks with me.
Thanks for your help!
Dedri Uys says
No worries, Chantelle. Sometimes we just need to step away for a while and come back. I know there are a lot of words, but i wanted to convey so much information!