Today we will be squaring up the large mandala (created by Parts 1 – 3 of the Universe) to create Sophie’s Garden. Up to this point the playing field has not been exactly level, because those who have heard of/made Sophie’s Garden before soon recognised it and knew roughly what to expect from the CAL up to this point. After today, however, the CAL will indeed be a mystery to everyone!

It is important to note that today will be the last time you will comfortably be able to stop until we get to Week 12 again. I can’t say more without giving the game away…
Sophie’s Universe CAL Part 4 {Sophie’s Garden}
©Dedri Uys 2014. All Rights Reserved.
Special design credit to Chris Simon for the use of a modified version of her Lace Petals flower.
Resources
- Add this CAL to your Ravelry Queue
- Sophie’s Universe CAL 2015 Information
- Use the Print-friendly button at the bottom (right) of this post to print/save this tutorial. Don’t know how? Find out HERE.
- **Part 4 VIDEO TUTORIAL** by Esther Dijkstra from It’s All in a Nutshell
Translations
- Dutch Photo Tutorial by Dianne Baan
- German Translation by Gabriele Rogers
- Spanish Translation by Lynda Hernandez
- Finnish Translation by Sari Åström
- French Translation by Sandra Larvin (with Video Tutorials by Géraldine Cymer)
- Danish Translation by Tina Poulsen
- Russian Translation (with Video) by Natalie V. Alimpieva
- Swedish CAL Information by Emma Vingqvist, Agnetha Magnusson, Åza Karlsson, and Ulrika Larsson
- Arabic Video Tutorial by Banan Felimban
Materials
See the Information Post.
Colours for Part 4 |
|||
| Click on the images to enlarge them. | 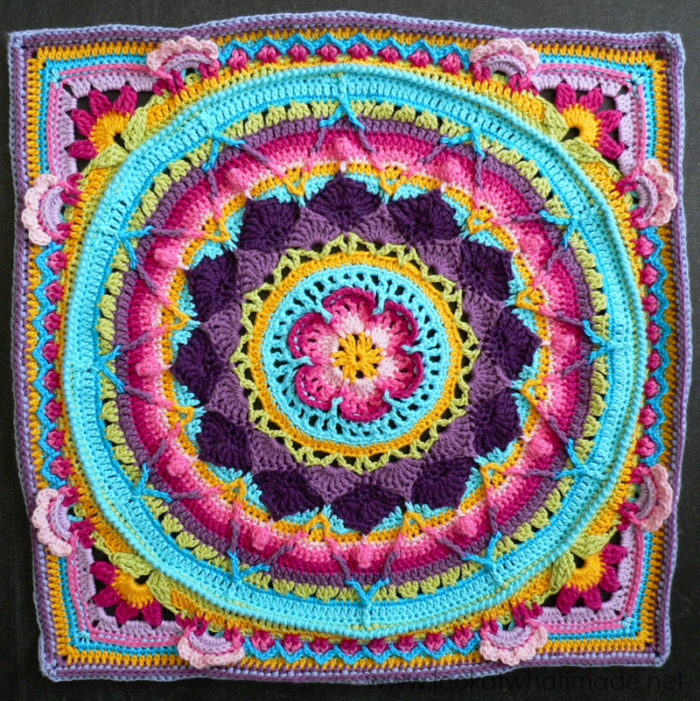 |
 |
 |
| Cotton 8 | Softfun | Stonewashed XL | |
| Round 26 | Light Green | Olive | Canada Jade |
| Round 27 | Canary | Light Rose | Moonstone |
| Round 28 | Light Green | Olive | Canada Jade |
| Round 29 | Fuchsia | Rose | Coral |
| Round 30 | Violet | Cyclamen | Moonstone |
| Round 31 | Pink | Violet | Corundum Ruby |
| Round 32 | Light Turquoise | Light Blue | Moonstone |
| Round 33 | Turquoise | Dark Turquoise | Lemon Quartz |
| Round 34 | Canary | Canary | Moonstone |
| Round 35 | Moors | Light Rose | Moonstone |
| Round 36 | Light Purple | Rose | Blue Apatite |
| Optional Flowers | Light Pink | Heath | Green Agate |
Size
| Large | Medium | Small | |
| Sophie’s Universe Part 4 | 56 – 58 cm (22″ – 23″) | 46 – 48 cm (18″ – 19″) | 35.5 cm (14″) |
Abbreviations
US Terminology used (US/UK comparison chart here)
- Bpsc – Back post single crochet
- Bphdc – Back post half-double crochet (Squaring Up)
- Bpdc – Back post double crochet (Squaring Up)
- Bptr – Back post treble crochet (Squaring Up)
- Dc – Double crochet
- Fpdc – Front post double crochet
- Fphdc – Front post half-double crochet (Squaring Up)
- Fpsc – Front post single crochet
- Fptr – Front post treble crochet
- Hdc – Half-double crochet
- Sc – Single crochet
- Sl st – Slip stitch
- St/st’s – Stitch/stitches
- Tr – Treble crochet
- * – Repeat instructions between asterisks the number of times specified. This is a hardcore repeat and will consist of multiple instructions.
- () – Repeat instructions between parentheses the number of times specified. This is a lower level repeat.
Special Stitches
- Tr Cluster: Tr3tog – see this tutorial. Please note that we will be working around the front posts of the stitches, not into the tops of the stitches as in this tutorial.
- Standing Stitches – Standing sc’s, hdc’s, and dc’s are stitches used to start the round without the need for the traditional beginning chain. Links to tutorials are supplied in each relevant round.
Instructions
Rounds 1 – 25
You can find the links for Rounds 1 – 25 HERE.
Remember to check the Helpful Tips before starting Part 4. You will need to change to the recommended hook size at the start of this part if you started with a smaller hook (as suggested).
Round 26
In this round, you will be working around the back posts of the stitches from Round 24. Make very sure that you don’t accidentally skip a stitch or work around 2 posts at the same time. To help you with that I have included references to when you should end up at the next fpdc from Round 24.
Making the bptr’s for the corners might be a bit tricky, but I am sure you can manage!
Join your yarn by making a standing single crochet around the back post of any fpdc from Round 24 {Photo 1}. Bpsc in the next 9 st’s.
*Bphdc in the next 10 st’s. The last bphdc should fall in the st before the fpdc from Round 24 {Photo 2}. Bpdc in the next 9 st’s. (Make 3 bptr’s in the next st, ch 2 and make 3 bptr’s in the next st.) This will form your corner {Photos 3 and 4}. Bpdc in the next 9 st’s. The last bpdc should fall in the stitch before the fpdc from Round 24 {Photo 5}. Bphdc in the next 10 st’s. Bpsc in the next 20 st’s.* Repeat from * to * 3 more times. Omit the last 10 bpsc’s on the last repeat. Join to the first sc with a sl st.
Stitch Counts:
- Total: 256 st’s and 4 ch-2 corner spaces {80 bpsc’s, 80 bphdc’s, 72 bpdc’s, and 24 bptr’s}
- Per Side: 64 st’s {20 bpsc’s, 20 bphdc’s, 18 bpdc’s, and 6 bptr’s}
Round 27
- If you are going to use the same colour, ch 1 and sc in the same st. Sc in the next 13 st’s.
- If you are going to use a different colour, start with a standing single crochet in the same st as the sl st join {Photo 1}. Sc in the next 13 st’s.
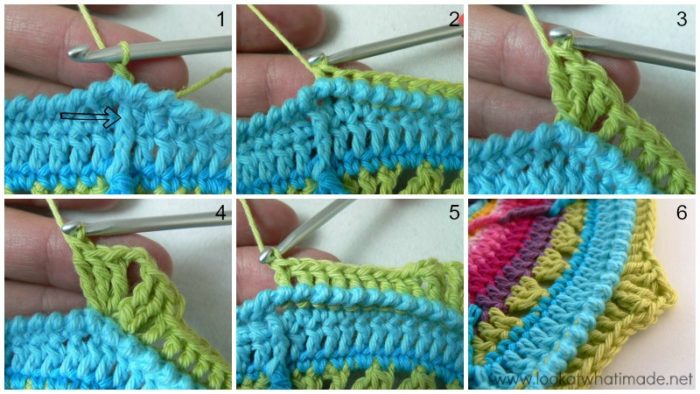
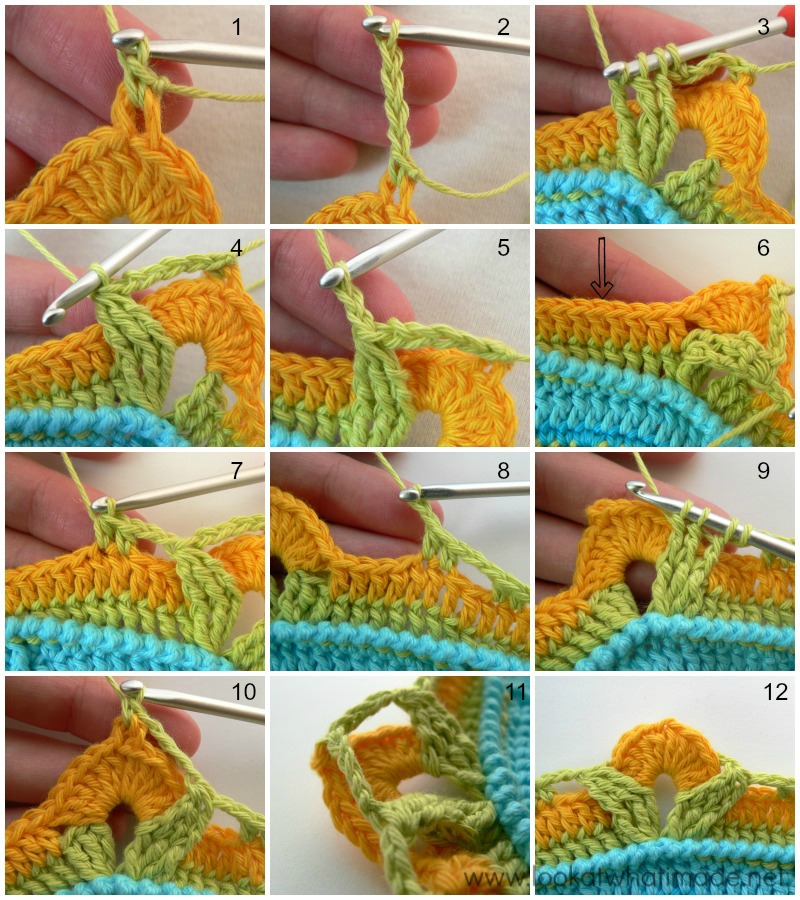
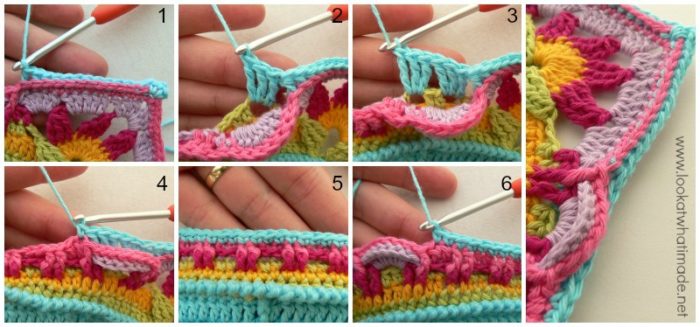
*Hdc in the next 3 st’s and dc in the next 12 st’s. The last dc should fall in the last bpdc before the 3 bptr’s that form the corner {Photo 2}. Skip the 3 bptr’s. Into the ch-2 corner space: (6 dc, ch 3 and sl st into the third ch from the hook to form a picot, 6 dc). It will be a tight fit getting all 12 dc’s into the corner space. Squish them up good {Photos 3 – 5}. Skip the 3 bptr’s. Dc in the next 12 st’s {indicated with an arrow in Photo 5 and illustrated in Photo 6}, hdc in the next 3 st’s, and sc in the next 28 st’s.* Repeat from * to * 3 more times. Omit the last 14 sc’s on the last repeat. Join to the first sc with a sl st. Fasten off and work away your tails of yarn.
Stitch Count:
- Total: 280 st’s and 4 corner picots {112 sc’s, 24 hdc’s, and 144 dc’s}
- Per Side: 70 st’s {28 sc’s, 6 hdc’s, and 36 dc’s per side}

Round 28
When you make the corners in this round, they will seem too tight for the round. Do not worry about it.
Join your yarn by making a standing single crochet in any ch-3 picot around {Photo 1}.
*Ch 4. Make a tr cluster, working around the front posts of the 3 bptr’s in Round 26 {Photos 3 and 4}. Ch 2 {Photo 5}. Skip the first 4 dc’s after the bptr’s. Hdc in the next 2 st’s {indicated with an arrow in Photo 6 and illustrated in Photo 7}. Ch 2, skip the next 2 st’s and hdc in the next 2 st’s. (Ch 2, skip the next 2 st’s and sc in the next 2 st’s) 9 times. (Ch 2, skip the next 2 st’s and hdc in the next 2 st’s) twice. There should now be 4 dc’s left before the bptr’s from Round 26 {Photo 8}. Ch 2. Make a tr cluster by working around the front posts of the 3 bptr’s in Round 26 {Photo 9}. Ch 4. Sc in the picot {Photo 10}.*
Repeat from * to * 3 more times, omitting the last sc on the last repeat. Join to the top of the first sc with a sl st. Fasten off and work away your tails of yarn.
Once you have completed the round, push the (ch-4, sc, ch-4) bits in each corner to the back of your work, never to be seen or used again {Photos 11 and 12}!
Stitch Counts:
- Total: 116 st’s, 8 ch-4 spaces, and 56 ch-2 spaces {8 tr clusters, 32 hdc’s, and 76 sc’s – including corner sc’s}
- Per Side: 29 st’s, 2 ch-4 spaces, and 14 ch-2 spaces {2 tr clusters, 8 hdc’s, and 19 sc’s – including corner sc }
Round 29
Except for 16 stitches, you will be working only into the stitches of Round 27 in this round. When working into the st’s from Round 27 below the ch-2 spaces, work in front of the ch-2 spaces, not over them!
You will notice that there is a fpdc in the instructions below that has been underlined, bolded, and made red. Why? Because a lot of people have gotten back to me to say that they missed the fact that those stitches should be fpdc’s, not fptr’s. Will the sky fall if I accidentally make them all fptr’s? Nope. Your square will just bulge the teeniest bit on each side.
Join your yarn by making a standing half-double crochet in the second hdc from Round 28 on any side {Photo 1}.
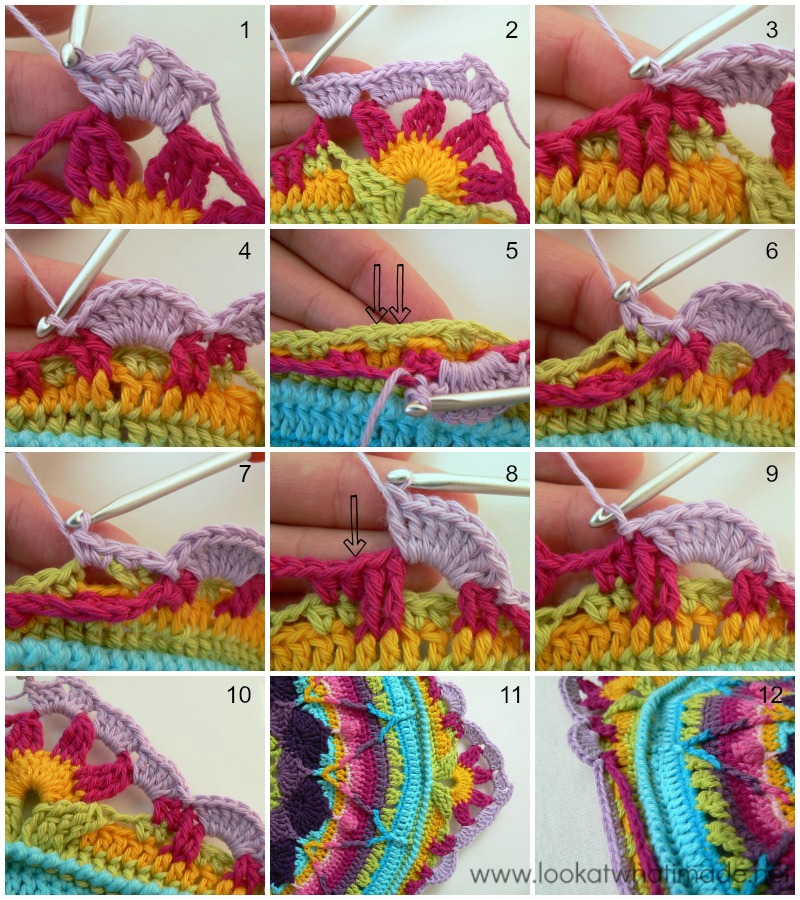
*Fptr in the 2 st’s from Round 27 directly below the next ch-2 space {Photo 2}. Remember to work in front of the ch-2 space, not over it {Photo 5}. (Ch 2 and fpdc in the 2 st’s from Round 27 directly below the next ch-2 space {Photos 3 and 4}) 10 times. Ch 2 and fptr around the 2 st’s from Round 27 directly below the next ch-2 space. Hdc in the next 2 hdc’s from Round 28 {Photo 6}.
You will now be working into the half-circle formed by the (6 dc, picot, 6 dc) from Round 27, and in front of the ch-4 spaces from Round 28. You will have to push the “leaves” out of the way to find the first and last st’s of the half-circle {Photo 7}. Ch 2 and make a tr cluster in the first 3 dc’s of the half-circle {Photos 7 and 8}. (Ch 4 and make a tr cluster in the next 3 dc’s of the half-circle) three times {Photos 9 and 10}. Ch 2 and hdc in the next 2 hdc’s from Round 28 {Photo 11}.*
Repeat from * to * 3 more times, omitting the last hdc on the last repeat. Join to the top of the first hdc with a sl st.
Stitch Counts:
- Total: 128 st’s, 12 ch-4 spaces, and 52 ch-2 spaces {16 tr clusters, 16 hdc’s, 16 fptr’s, and 80 fpdc’s}
- Per Side: 32 st’s, 3 ch-4 spaces, and 13 ch-2 spaces {4 tr clusters, 4 hdc’s, 4 fptr’s, and 20 fpdc’s}

Round 30
Join your yarn by making a standing double crochet in the central ch-4 space of any corner around. (2 dc, ch 2, 3 dc) in the same ch-4 space. This is your first corner made {Photo 1}.
*Make 5 dc’s in the next ch-4 space. Make 5 dc’s in the next ch-2 space {Photo 2}. Skip the next 2 hdc’s and sl st in the next fptr {Photo 3}. Make 8 dc’s in the next ch-2 space. Skip the next fpdc and sl st into the next fpdc {Photo 4}. Now you will be working into the st’s and ch-2 spaces of Round 28, which you will find behind the st’s of Round 29. (Sc in the next 2 sc’s of Round 28 {indicated with arrows in Photo 5 and illustrated in Photo 6}, make 2 sc’s in the next ch-2 space of Round 28 {Photo 7}) 8 times. Sc in the next 2 st’s of Round 28. You should now have made 34 sc’s in total.
Working into Round 29 again: sl st in the next fpdc. Skip the next fpdc and make 8 dc’s in the next ch-2 space {Photo 8}. Skip the next 2 fptr’s and sl st in the next hdc {indicated with an arrow in Photo 8 and illustrated in Photo 9}. Skip the next hdc and make 5 dc’s in the next ch-2 space. Make 5 dc’s in the next ch-4 space. (3 dc, ch 2, 3 dc) in the central corner ch-4 space {Photo 10}.*
Repeat from * to * 3 more times, omitting the last corner on the last repeat. Join to the top of the standing double crochet with a sl st.
Stitch Counts:
- Total: 304 st’s and 4 ch-2 spaces {168 dc’s and 136 sc’s}
- Per Side: 76 st’s {42 dc’s and 34 sc’s}
Round 31
This round is very involved!
- If you are using the same colour, sl st into the next 2 dc’s and into the corner ch-2 space. (Ch 1, sc, ch 2, sc) into the same ch-2 space.
- If you are using a new colour, start with a standing single crochet in any ch-2 corner space. (Ch 2, sc) in the same ch-2 space.
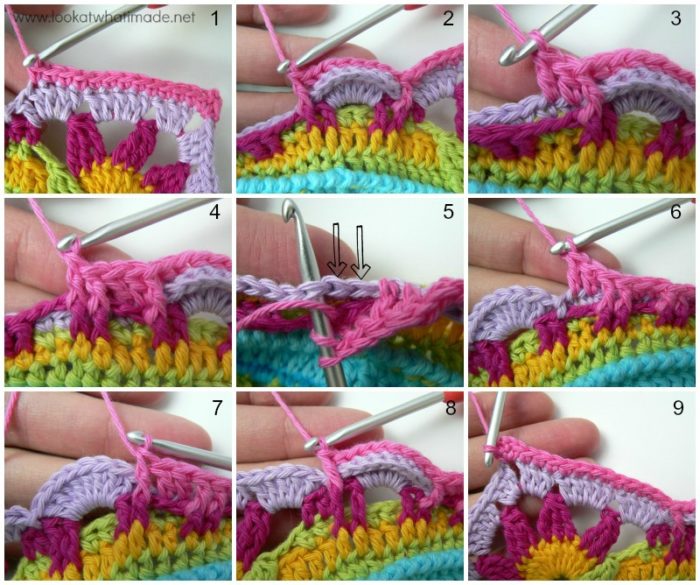
*Sc in the next 12 dc’s {Photo 1}. Skip the next dc and make a fpdc around the first fptr of Round 29. Make a bpsc in each of the 8 dc’s of the half-circle from Round 30. Skip the next fpdc from Round 29 and fpdc around the next fpdc from Round 29, which will be the fpdc that contains the sl st from Round 30 {Photo 2}. Dc in the next 2 sc’s of Round 30, behind the next ch-2 space of Round 29 {Photo 3}. Fpdc around the next 2 fpdc’s of Round 29 {Photo 4} and skip the next 2 st’s of Round 30, which will be the 2 sc’s made into the ch-2 space of Round 28, directly behind the front post stitches {indicated with arrows in Photo 5}.
Hdc in the next 2 st’s of Round 30. Fphdc around the next 2 fpdc’s of Round 29 and skip the next 2 sc’s of Round 30.
(Sc in the next 2 st’s of Round 30. Fpsc around the next 2 fpdc’s of Round 29 and skip the next 2 sc’s of Round 30) 4 times. Sc in the next 2 st’s of Round 30.
Fphdc around the next 2 fpdc’s of Round 29 and skip the next 2 sc’s from Round 30. Hdc in the next 2 st’s of Round 30. Fpdc around the next 2 fpdc’s of Round 29 and skip the next 2 st’s of Round 30. Dc in the next 2 st’s of Round 30 {Photo 6}.
Fpdc around the next fpdc from Round 29 {Photo 7}. Bpsc in each of the 8 dc’s of the half-circle from Round 30. Skip the next fptr from Round 29 and fpdc around the next fptr {Photo 8}. Skip the next dc from Round 30 and sc in the next 12 dc’s. (Sc, ch 2, sc) in the ch-2 corner space {Photo 9}.* Repeat from * to * 3 more times, omitting the last corner on the last repeat. Join to the first sc with a sl st.
Stitch Counts:
- Total: 320 st’s and 4 ch-2 spaces
- Per Side: 80 st’s {8 fpsc’s, 36 sc’s, 16 bpsc’s, 4 fphdc’s, 4 hdc’s, 8 fpdc’s, and 4 dc’s}
Isn’t that pretty?
Round 32
- If you are using the same colour, sl st into the ch-2 space. (Ch 1, sc, ch 2, sc) in the same ch-2 space.
- If you are using a new colour, join your yarn by making a standing single crochet in any ch-2 corner around. (Ch 2, sc) in the same corner space.
*Bpsc in the next 12 st’s. Bphdc in the next st {Photo 1}. Make 3 tr’s in the first ch-2 space from Round 28 (behind the “petal”) – see Photo 2. Make 3 tr’s in the next ch-2 space from Round 28 {Photo 3}. Skip the 8 bpsc’s of the petal and the next fpdc. Sc in each of the next 34 st’s {Photos 4 and 5}. The last sc should fall in the stitch before the fpdc from Round 31 {Photo 6}.
(Make 3 tr’s in the next ch-2 space from Round 28) twice – as before. Skip the 8 bpsc’s of the petal and the next fpdc of Round 31. Bphdc in the next st. Bpsc in the next 12 st’s. (Sc, ch 2, sc) in the corner ch-2 space.*
Repeat from * to * 3 more times, omitting the last corner on the last repeat. Join to the first sc with a sl st.
Stitch Counts:
- Total: 296 st’s and 4 ch-2 spaces
- Per Side: 74 st’s {24 bpsc’s, 36 sc’s, 2 bphdc’s, and 12 tr’s}
Round 33
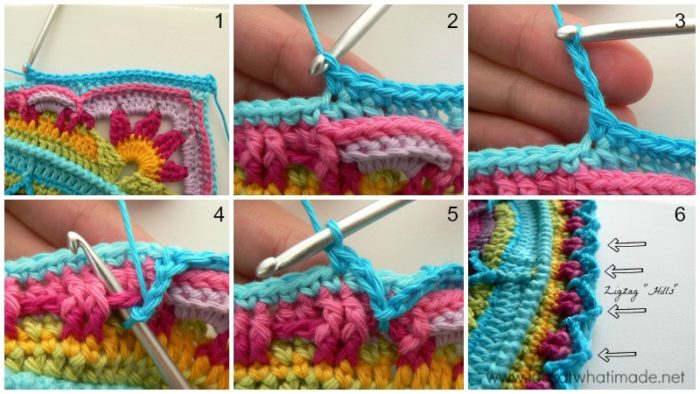
In this round you will be making little zigzag “hills” using surface crochet. This round is very slightly asymmetrical. There are 20 sc’s before the zigzags, and only 19 sc’s after them (including the last st of the last “hill”, but not including the corner sc’s).
- If you are using the same colour, sl st into the ch-2 space. (Ch 1, sc, ch 2, sc) in the same ch-2 space.
- If you are using a new colour, join your yarn by making a standing single crochet in any ch-2 corner around. (Ch 2, sc) in the same corner space.
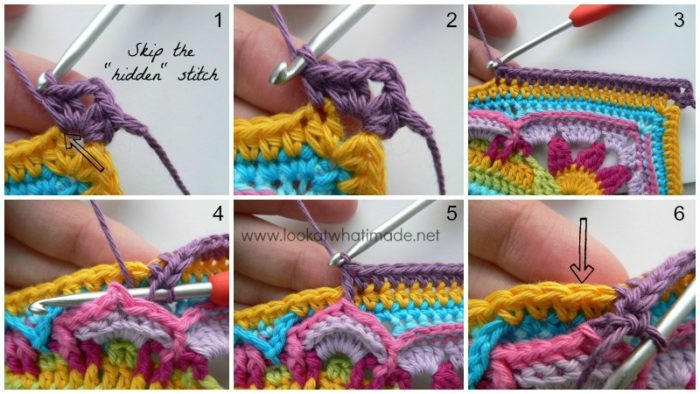
*Sc in the next 20 st’s {Photos 1 and 2}. The last sc will fall in the last tr worked into the ch-2 spaces behind the petal. If it doesn’t, check that you haven’t accidentally skipped the first (hidden) st after the corner. (Ch 3 and sl st into the next ch-2 space from Round 29. This ch-2 space will be in front of your work and between front post groups {Photos 3 and 4}. Ch 3, skip the next 3 st’s from Round 32 and sc in the next st from Round 32 {Photo 5}) 9 times. The last sc should fall in the second tr worked into the ch-2 spaces behind the petal.
Sc in the next 18 st’s. You will now have 19 sc’s (including the last st of the last “hill”). (Sc, ch 2, sc) in the corner ch-2 space.* Repeat from * to * 3 more times, omitting the last corner on the last repeat. Join to the first sc with a sl st.
Stitch Counts:
- Total: 196 sc’s, 32 zigzag “hills”, and 4 ch-2 corners
- Per Side: 49 sc’s per side and 8 zigzag “hills”
Round 34
- If you are using the same colour, sl st into the ch-2 space. (Ch 2, hdc, ch 2, 2 hdc) in the same ch-2 space.
- If you are using a new colour, join your yarn by making a standing half-double crochet in any ch-2 corner around. (Hdc, ch 2, 2 hdc) in the same corner space.
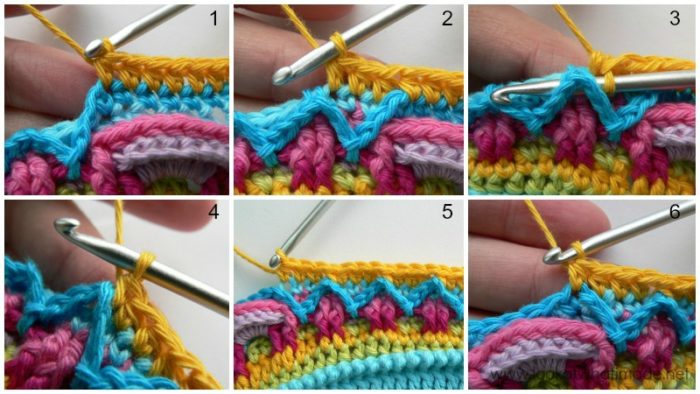
*Skip the first (hidden) stitch and hdc in the next 20 st’s {Photo 1}. (Hdc in the next 3 st’s from Round 32 {Photo 2}, make a bpsc around the next sc from Round 33 {Photos 3 and 4}, which will be at the top of the zigzag “hill”) 8 times. Hdc in the next 3 st’s of Round 32. Hdc in the next 20 st’s of Round 33, making sure not to accidentally skip the first st after the last ch-3 {Photo 6}.
(2 hdc, ch 2, 2 hdc) in the next ch-2 corner space.* Repeat from * to * 3 more times, omitting the last corner on the last repeat. Join to the top of the beginning ch-2 (or the standing half-double crochet) with a sl st.
Stitch Count: 284 hdc’s, 32 sc’s, and 4 ch-2 corner spaces {79 st’s per side}
Round 35
Join your yarn by making a standing half-double crochet in any ch-2 corner space around. (Hdc, ch 2, 2 hdc) in the same corner space {Photo 1}.
*Skip the first hdc, which will be hidden anyway {Photo 1} and hdc in the next 18 st’s {Photos 2 and 3}. Bpdc around the fourth bpsc of the “petal” formed by Rounds 30 and 31 {Photos 4 and 5}. Skip the next st of Round 34 {indicated with an arrow in Photo 6} and hdc in the next 40 st’s. Bpdc around the fourth bpsc of the “petal” formed by Rounds 30 and 31. Skip the next st of Round 34 and hdc in the next 18 st’s. (2 hdc, ch 2, 2 hdc) in the next ch-2 corner space.*
Repeat from * to * 3 more times, omitting the last corner on the last repeat. Join to the top of the first hdc with a sl st.
Stitch Count: 328 st’s and 4 ch-2 corner spaces {82 st’s per side}
Round 36
- If you are using the same colour, sl st into the next hdc and into the ch-2 space. (Ch 1, sc, ch 2, sc) in the same ch-2 space.
- If you are using a new colour, join your yarn by making a standing single crochet in any ch-2 corner around. (Ch 2, sc) in the same corner space.
*Bphdc in each of the 82 st’s across. (Sc, ch 2, sc) in the next ch-2 corner space.* Repeat from * to * 3 more times, omitting the last corner on the last repeat. Join to the first sc with a sl st.
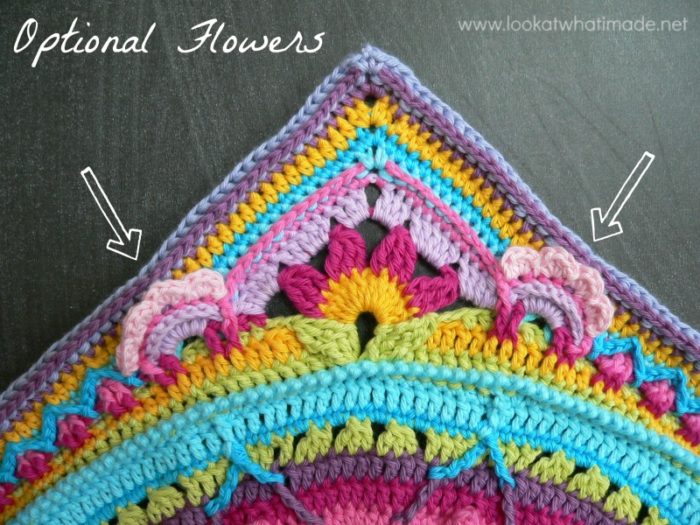
Bind off and work away your tails of yarn. If you need visual help, see the photo for the Optional Flowers below.
Stitch Count: 336 st’s and 4 ch-2 corner spaces {84 st’s per side}
Optional Flowers
These flowers will be made into the bpsc’s of the 8-dc “petals” formed by Rounds 30 and 31. If you think this makes the corners look too busy, feel free to leave them out. You can make all the flowers in the same colour, or each one in a different colour. It is totally up to you.
And if you feel like making totally different flowers, that’s also fine!
Join your yarn to the first bpsc (Round 31) of any 8-dc “petal” from Round 30 with a sl st. (Make 4 hdc’s in the next st, sl st in the next st) 4 times. The last sl st should fall in the top of the fpdc after the petal. Bind off and work away your tails of yarn.
Repeat for each of the 8 “petals” from Rounds 30 and 31.
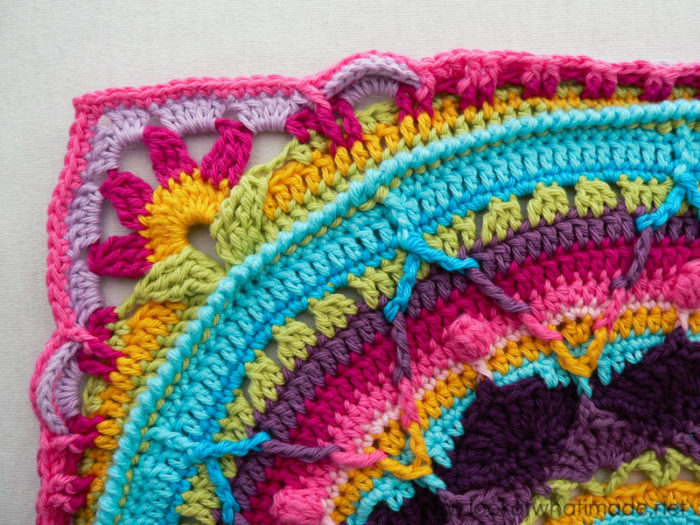
Phew! I think I deserve a glass of wine (and so do you)!
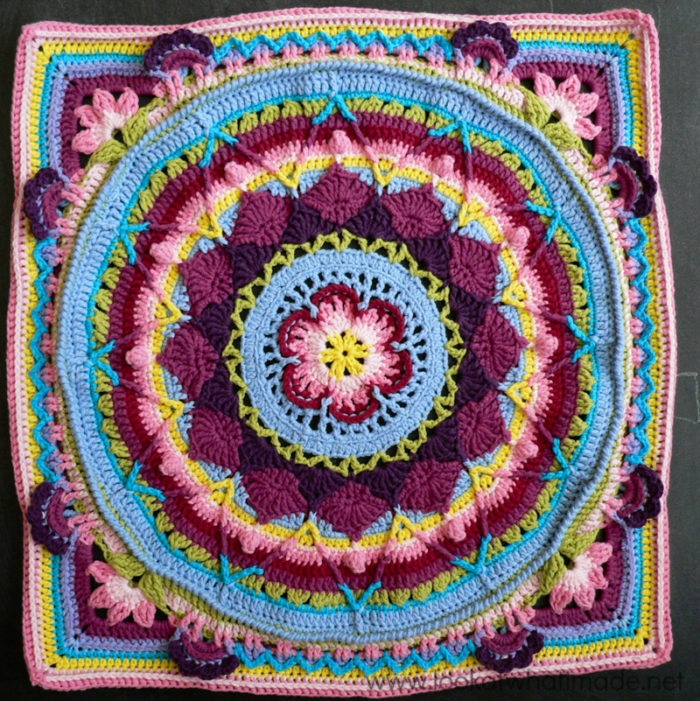
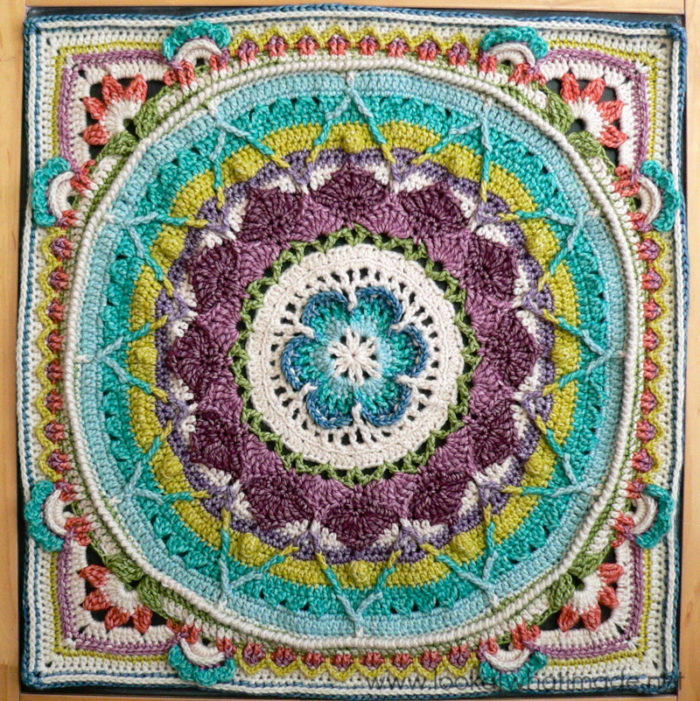
Here are all 3 “Gardens”, unblocked but still pretty :)


Credit
This pattern was originally tested up to this point by the following people:
Kimberly Slifer, Claire Martin, Beth Spaulding, and Venetia Smith.
Thank you for testing and proofing this pattern for me!

This blog post contains affiliate links. I only link to products I personally use or would use. All opinions are my own.


Gina says
This is so gorgeous!! I’m still working on part 3 but I can’t wait to get here… But seeing how gorgeous this is, I almost wish I hadn’t started this with just scrap yarn in fingering/DK weight, and instead had bought some new pretty colours and went with worsted for a full-sized blanket! But I guess I can always use the smaller one for a baby and it can be my practice one and I can always do another, right? Seriously, this round is amazing, the way those corners are formed? I have seen crocheted circles turn into squares before but never so elegantly. It’s absolutely beautiful, truly! And “optional” flowers, how can we resist?!?! :)
Jenny says
Hold on to your hat Gina, there’s so much more wonderment and beauty to come! ;)
Dedri Uys says
Thank you, Gina. I am so pleased that you are enjoying the project :)
Esther says
I am new to crochet and have been watching this CAL unfold. It is so beautiful that last week I started leaning toward joining in. This week I couldn’t help myself. I have to try it. Or as Yoda says, “There is no try. Do or Do not.” So I will DO it. I have ordered my yarn from my local indie store! Thanks for the beautiful photos and instructions. You have done such a good job convincing me mentally that I can do it. You have also got so much awesome feedback on the comments…so thanks to all the commenters too. My heart was waiting and ready to go…just waiting on the mind.
Jenny says
Let your heart rule your mind you will, Esther! ;)
Dedri Uys says
Lol, Jenny :) Esther, just jump in. You have nothing to lose! If you find that this is not your cup of tea after all, you can stop at the end of Part 3 (with a lovely large mandala) or at the end of Part 4 (with a lovely big square to use as the starting point of another project). I am excited to see your progress :)
Tammy Cooney says
Jenny. You CAN do it! I have only been crocheting for one year, just doing lapghans with basic stitches. Until now that is! Dedri’s patterns, instructions, tutorials, links to other tutorials and support on here and on the FB page are fabulous. I feel like I am taking a very expensive crochet class with a master crotcheter (is that even a word?) and 100’s of my best friends. I love this and am learning so much. Just finishing part 3 now… But no worries! I can go at my own pace. A big Texas thank you to Dedri and everyone else making this possible!!!!
Jenny says
It’s Dedri’s master plan for world crochet domination ;) and we love her for it!
Marty says
I’m so excited that you’re going to carry on with the pattern! I’m on row 36 and was trying to figure out how to keep working to make it bigger but stay with the pattern. Delightful! Thank you so much!
Ingrid says
Wow, this is so amazing!
This is the best CAL I’ve ever joined, I love to crochet round after round and see my blanket becoming more beautiful. :-)
Thank you for this great pattern.
libby cable says
How do I block? I have just finished Part 4, do I put a towel on top and iron it? Sorry, have never blocked anything!!
Mary Ann says
What an exciting adventure that I have embarked upon! Thanks to you, I anticipate each Sunday’s new instructions!
Kimberly McCrady says
This is soooo beautiful that even tho I’m already doing 2 other afghan CALS, I couldn’t pass it up! I placed a yarn order over a week ago and am still waiting for it to arrive. I’m really hoping I’m not getting too far behind!
The instructions look pretty detailed…I can’t wait to get started! Thank you for this! It’s gorgeous!
Jenny says
So pleased to hear you are joining us for Sophie’s Universe, Kimberley :)
Dee says
Thanks, Dedri, for such beautiful work and extremely easy to follow instructions!
Would you recommend blocking after part 4 before going on? Thanks!
Elaine says
I am so impressed with myself for getting this pattern right!
When I first saw it, I was determined to follow along, but used 10 colors I already had in my stash, figuring once I did a “practice” one, I could get the colors I really want, and make one without the mistakes I would undoubtedly make along the way the first time. Well, to my utter surprise, I’m starting Part 4 with not one single error or problem encountered! So, okay, it’s a pretty wild color scheme (sort of like your Stonewashed colors, but with three bright and two neon shades, LOL!), but I’ve grown to love it!!
Once I’ve completely finished it, I’ll probably make the second one after all – but because I want to, not because I’ll HAVE to!
Thank you so much for the wonderfully clear instructions.
Jenny says
So happy you are getting on well with Dedri’s lovely tutorials, Elaine :)
Betty Parker says
I am not sure you will be able to help me, but here goes. I have ordered my yarn from deramores. I received an 2 emails dated Jan 12 saying that the following items will be despatched. Well I got one order and did not get the other order. I have tried to telephone but I live in the States and so far the call has not gone through. I have sent 3 emails to them but have not received any back. If you could just let them know to check their emails carefully and get back to me it might help. I can’t get started because the Moon Stone yarn is in the missing order and it is the first color. I am so looking forward to doing the CAL 2015.
Thank you for any help.
Betty
Jenny says
Hello Betty.
I am not sure that we can do that for you as we have no affiliations as such with Deramores, any more than you do. I would persevere with the emails or maybe respond in an email they have already sent you.
I hope it all gets sorted out for you soon!
Jenny
Betty Parker says
My missing yarn came today. I have already finished part 1 and it is looking good. I was not so much worried about the yarn as I was that Deramores didn’t know it had not arrived. I think they are having a hard time with so many people needing the same yarn.
Jenny says
Quite possibly! Similar things happened with the Scheepjeswol CAL. The response was enormous! :)
Linda says
I too had difficulty reaching them by email. It took several emails before they responded. Email every day.
Marty says
They respond in about a week. They receive hundreds of emails. Sending them more only slows down the process. Do yourself a favor and be patient!
Cathy says
I too had trouble with Deramores and my order of the cotton 8. The light turquoise did not arrive so I sent them an email. They did not reply and a week later an email was sent giving me a tracking number. However the parcel never left Deramores and it arrived via Royal Mail! After I received my order I got an email apologizing and asking if I had received it! Do they know what they are doing? I won’t use them again. Wool Warehouse are so much better ! Good luck! Keep hounding them!!
Sylvia Lau-McDonald says
I am in exactly the same boat and am seriously considering filing internet fraud charges. They took my money alright but no delivery except for a tiny part of the order. My dates, btw, correspond as well. I am so excited to start working on this but cannot, for the exact same reasons.
Sally says
This is such a fun CAL!!! :) And I have to say, I do believe this IS the most beautiful thing I’ve made yet! Thank you!
Jenny says
We are delighted that you, like us, are enjoying the CAL so much!
Jenny
Shami Immanuel says
Hello Dedri,
Today only it happened to visit your site. OMG amazing cal. I too have joined and started. Finished part1. Eager to try my hands on different crochet stitches. Nice going. Thanks for the CAL and the clear cut tutorials.
Jenny says
Keep up the good work, Shami! :)
Sharyn says
Diedre, this is the most challenging, beautiful, well written/documented/pictured pattern I have ever, in my 30+ years of crocheting, done. I switch between reading, looking – following the written diagram, following the picture diagram. You have covered every learning style to ensure that this pattern is accessible and doable to everyone! I am so very impressed with the detail of description and photo. This is a great joy to do. Sharyn
Jenny says
I have to say I am in total agreement! Lol
Ruth says
Oh boy, I’m ready to dig my fingers & hook in!!
Dedri Uys says
:)
Julia Burn says
I am not sure whether what I am feeling is excitement or whether I am having a panic attack after seeing part 4.
I remember seeing all of the amazing Sophies Gardens and thinking I could never manage that with my limited skill level.
I have been working on Sophies Universe and taking it slowly….is it just me that feels daft for getting scared at tackling a new pattern?….and fingers crossed so far its looking like it should. I am at the popcorn stitch stage and have been putting off but after seeing that I am only a few more rows from finishing a Sophies Garden has spurred me on. I would never have thought I would be capable of creating something so beautiful.
Thank you so much for giving me the chance to expand my stitch knowledge and confidence
Dedri Uys says
Julia, I do hope it’s excitement and not a panic attack! There are tons of people in the facebook group that can help you and if you take it one round at a time, one stitch at a time, you will be just fine. if you could manage part 1 you can manage it all. Just focus on the row at hand and cheer for yourself every time you complete a particularly scary spot. What’s the worst that could happen?
D
Miriam says
Thank you, thank you, thank you! I am so excited to work on this CAL. I’ve crocheted along with a few earlier Cal’s, but never had such a challenge! And your photo tutorials are so good!!! I don’t need the Dutch translation at all! So much work you did for us! Thank you again, i’m enjoying myself immensely.
Dedri Uys says
You are very welcome, Miriam. I am so pleased that you aren’t needing the translation, although Dianne has done an amazing job!
Carol says
I’m so excited I’m almost caught up! Didn’t start til this past Wednesday ’cause I was working feverishly to finish a prayer shawl for a friend who had surgery this week. (She was thrilled to get it!)
I’m almost finished with Part 3 – and once I got over a small problem (my idiocy!) in Rnd 7, it’s been smooth sailing!
I just LOVE this piece so working on it is a joy!
Thanks again to Dedri for these awesome tutorials…..you make it so easy. You are helping so many others to improve their skills. I had told a friend about this site – and she now loves it almost as much as I do.
Dedri Uys says
I’m glad we got over the Round 7 hiccup so easily and very pleased that you haven’t had any more issues, Carol.
Lynn says
I’ve been waiting for the last few days for this part and I am not disappointed. IT IS LOVELY! Just can’t wait to start, but our time here is 11pm and it is bedtime, so will have to wait til the morning, boo hoo!
Dedri Uys says
Hopefully it will get you out of bed early tomorrow morning :)
Dolores says
So excited to get started this morn, can’t believe I’ve made it to part 4 !!
Jenny says
We hope you carry on right through to the end, Dolores :)
bernieg says
thank u u made me want to crochet again nearly put down the needles and give up thank u and ur wonderful team for making this possible for me to believe in myself again
Jenny says
Glad to hear your hook is back in your hand again Bernie! :)
Bonnie says
Wondering how your “unblocked” pieces are so smooth looking. I didn’t use the designated yarn as I felt it was too expensive for me. I am using Vanna’s Choice yarn and it is all ruffled looking. I am wondering how to block this as I have no place to lay it down unless I use my bed, which would be a little inconvenient. TIA
Dedri Uys says
Bonnie, just tug on it a bit and it will lie better. That is what I did with mine. The front post stitches have a tendency to “pull”, but with a bit of gentle manipulation you can shape your mandala or square so that it doesn’t pull or wobble (much). Have you completed part 4 and it is still ruffled? I sometimes block mine on a towel without even pinning it. I just wet it and then stretch it out nicely on the towel and wait for it to dry.
Bonnie says
Thanks for your answer. I started late and have only completed Part 2. Hope to start on Part 3 today (Sun). Glad to hear that it won’t need pinning. I do love the pattern. Tuned in late just after the CAL 2014 and was hoping to make Sophie’s Mandala and Sophie’s Garden. Which I may still do.
Jenny says
Sophie’s Garden is part 4, Bonnie, so keep on hooking away :)
Dee says
Bonnie, I bought foam blocking mats from Amazon.com that can be linked together to make the surface larger or smaller. You could just spread the mat out on the floor to mat your work.