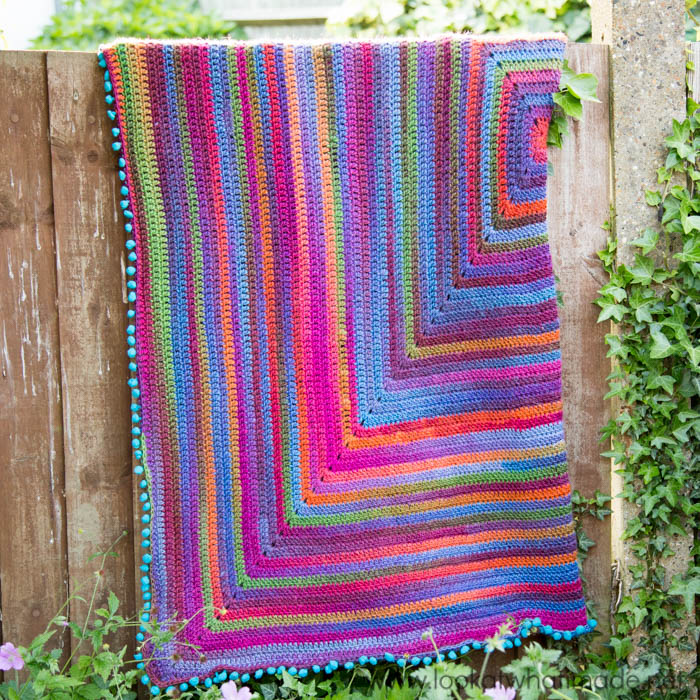
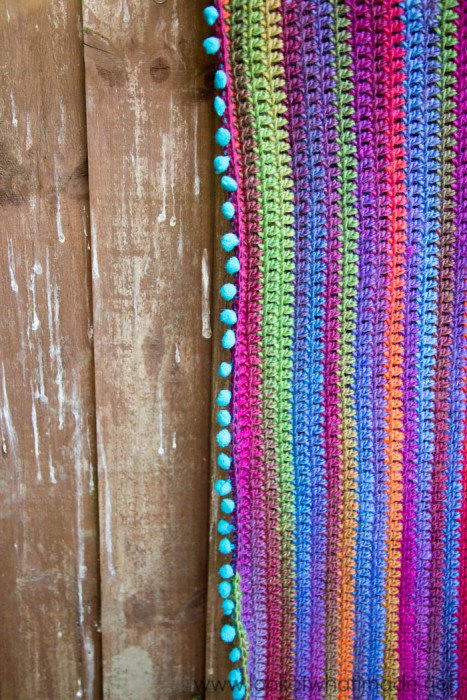
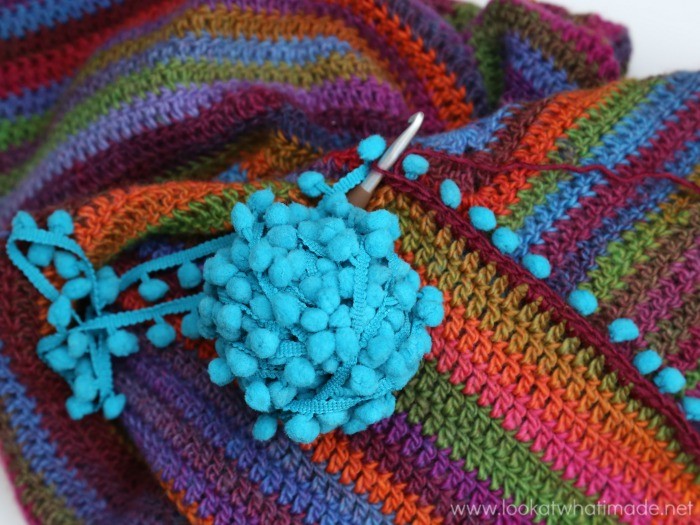
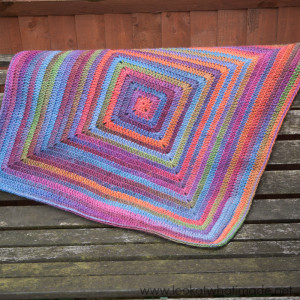
Joy’s Journey is a continuous square blanket with a fun, tactile pompom edging. The blanket was specifically designed for people with Alzheimer’s or Dementia and is dedicated to Jenny’s mom Joyce (Joy), who suffered from Dementia.
The blanket is worked in a spiral, so there is no need to join at the end of each round, and the simple, meditative pattern grows very quickly. I found myself saying: *”I just want to see what the next colour change is going to look like”*. Repeat from * to * until well past 1 in the morning!
Joy’s Journey Pattern
© Dedri Uys 2016. All Rights Reserved. Please see my Terms of Use.
This is a written-only pattern. If you need step-by-step help or more details, please see How to Crochet: Continuous Solid Square. Please note that your sides won’t all have the same number of stitches. That is because this blanket is worked in a spiral, not in joined rounds.
Resources
Pompoms and Colours
This blanket has a bright, tactile pompom edging to give wandering hands something to toy with. The colours are rich but soothing. Green, in particular, is believed to reduce activity in the central nervous system to help people feel calm.
Size
At 130 cm x 130 cm (51″ by 51″), the blanket is larger than a regular lapghan but small enough to be portable. It does stretch a bit due to the weight. When placed over the foot of the bed, the pompom edge will be within reach for people who are bed-bound.
Materials
- 1900 meters (12 skeins) of Scheepjes Noorse Sokkenwol (968) – See Yarn Packs below
- 6 mm Clover Amour Crochet Hook
(US 10/J UK 4)
- 6 m Pompom Ribbon
- Sewing Needle and Thread
- Yarn Needle
Yarn Packs
There are 2 yarn packs available for this pattern. The small yarn pack contains 3 skeins and enough pompom ribbon to create a preemie/car seat size blanket. The large yarn pack contains 12 skeins and enough pompom ribbon to create this lapghan size. Both packs are available from my Wool Warehouse Shop.
Gauge
Using dc, your gauge should be 8 rows and 13 stitches per 10 cm (4″) square. If your gauge is more relaxed, please check your yarn usage at the end of Round 23. If you have used more than 3 skeins at that point, you will need to stop the blanket a few rounds earlier.
If you are intending to add the pompom edge that forms part of the yarn pack, you will need to make sure that your finished blanket is no larger than 135 cm x 135 cm, otherwise, you won’t have enough pompom ribbon to go around the whole blanket.
Abbreviations
US Terminology Used (US/UK Comparison Available HERE)
- Ch – Chain
- Dc – Double crochet
- St/st’s – Stitch/stitches
- () – Repeat instructions between parentheses the number of times specified
- [] – Repeat instructions between square brackets the number of times specified
- * – Repeat instructions between asterisks the number of times specified
Special Techniques
Magic Ring – See THIS TUTORIAL. Please remember to work your initial tail of yarn away very well when using the magic ring, otherwise, your work will come undone!
Instructions
Round 1
Into a magic ring: Ch 3 (counts as first dc) and make 2 dc’s. (Ch 2, make 3 dc’s) 3 times. Pull the magic ring closed before continuing. Working into the side of the initial ch-3, make 2 dc’s. You should now have 5 dc’s on the last side. Please see THIS TUTORIAL if you are having difficulty understanding these instructions.
Round 2
Ch 2. Make 2 dc’s in the first dc of Round 1. Dc in the next dc, which will be the last dc before the next ch-2 corner space. Make 2 dc’s in the next ch-2 corner space. *Ch 2. Make 2 dc’s in the same ch-2 corner space. Dc in each dc across. Make 2 dc’s in the next ch-2 corner space.* Repeat from * to * 2 more times. {28 stitches – 5, 7, 7, and 9 for the respective sides}
Round 3
*Ch 2. Make 2 dc’s in the same ch-2 corner space. Dc in each dc across. Make 2 dc’s in the next ch-2 corner space.* Repeat from * to * 3 more times. {44 stitches – 9, 11, 11, and 13 for the respective sides}
Rounds 4 – 45
Repeat Round 3.
Lay your blanket out flat every few rounds. If you notice that it is becoming a bit wavy, skip the first ‘hidden’ stitch of each side for a few rounds. This is highly individual and you might find that you never have to skip a stitch. I skipped it every 5 rounds (or thereabouts).
Round 46 (or Last Round)
You should have at least 100 g of yarn left to complete the last round and add the pompom edging. If you are going to add the pompom edging, your blanket should be no larger than 133 cm x 133 cm at this point.
*Ch 2. Make 2 dc’s in the same ch-2 corner space. Dc in each dc across. Make 2 dc’s in the next ch-2 corner space.* Repeat from * to * 2 more times. You have now completed 3 of the sides for this round.
Last Side of Last Round: Ch 2. Make 2 dc’s in the same ch-2 corner space. Skip the first (hidden) stitch. Dc in each of the remaining dc’s. Make 1 dc in the next ch-2 corner space. Ch 2 and sl st into the first dc of the next side.
If you are going to add the pompom edging, fasten off and continue with Pompom Edging below. If you do not want to add the pompoms, don’t fasten off and continue with Sl St Edging below.
Pompom Ribbon Edging
Notes
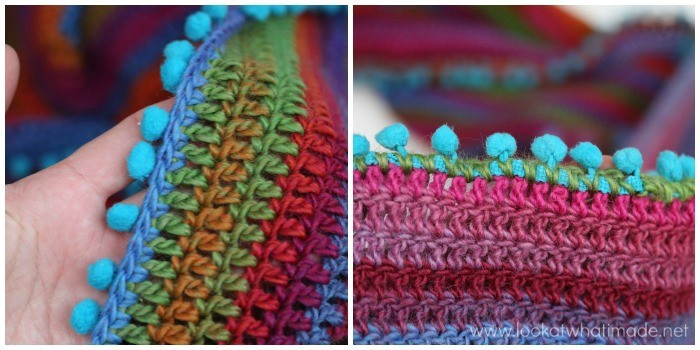
Please note that adding the ribbon is not an exact science. Depending on your gauge, you might need to make more or less sc’s between pompoms. You will be working over the pompom ribbon to secure it to the back of the blanket. You will also be working between the posts of the stitches instead of into the top of each stitch.
To ensure that your pompoms don’t stick out in front of your blanket or hide behind it, please pay special attention to how you should ‘catch’ the pompoms when you get to them.
You don’t want to pull your pompom ribbon too tight, otherwise it won’t have as much give as the stitches in your blanket. You also don’t want it too floppy, otherwise, it will cause the edges of your blanket to go wavy. To remedy this, you will occasionally have to make 3 sc’s between pompoms instead of 2. I ended up making 3 sc’s roughly every 5 repeats.
To ensure that you don’t run out of pompom ribbon, take a small scrap of yarn and tie it around the ribbon (between pompoms) every 1.5 meters. This will serve as a visual aid that each side is not using more than a quarter of the ribbon.
Instructions
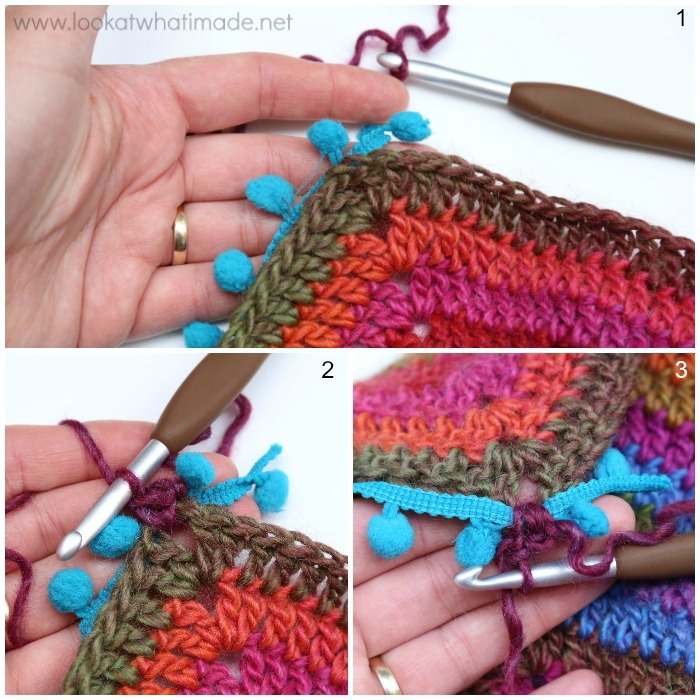
Place the pompom ribbon behind the last round with a pompom in the corner. The pompoms should all face away from the edge of the blanket {Photo 1}. Starting after the corner pompom, sc into the first ch-2 space twice, working OVER the ribbon part of the pompom ribbon {Photos 2 and 3}.
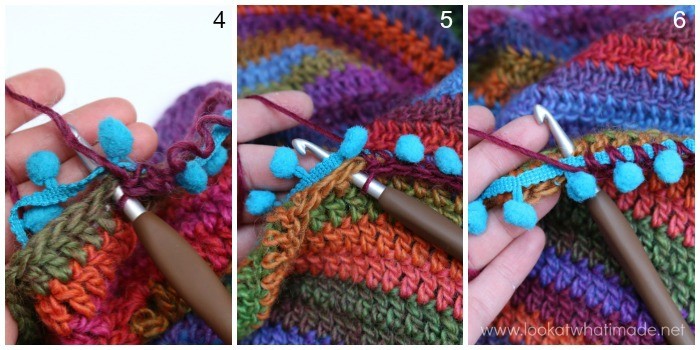
You will now crochet ‘over’ the pompom. To do this, make a sc between the posts of the first and second dc, making sure that your pompom is behind your hook but in front of your working yarn. Photo 4 shows you how NOT to do it. Notice that the pompom is behind the working yarn. Photo 5 shows you how you SHOULD do it. The pompom is between your working yarn and your hook. Photo 6 shows the back of your work with the hook inserted correctly and the pompom between your working yarn and your hook.
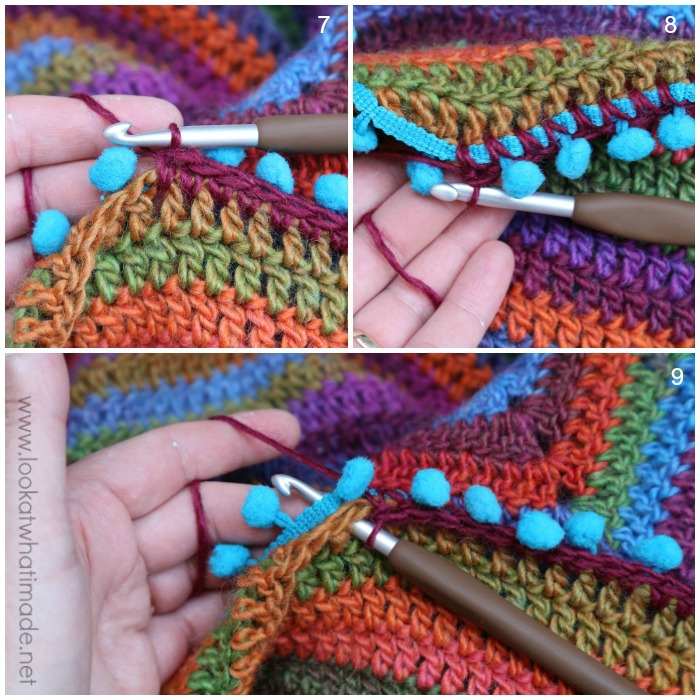
*[(Sc between the next 2 st’s) twice (or 3 times – see Notes above) – Photo 7. Remember to work over the ribbon {Photo 8}. Sc between the next 2 st’s and OVER the pompom as before {Photo 9}.]
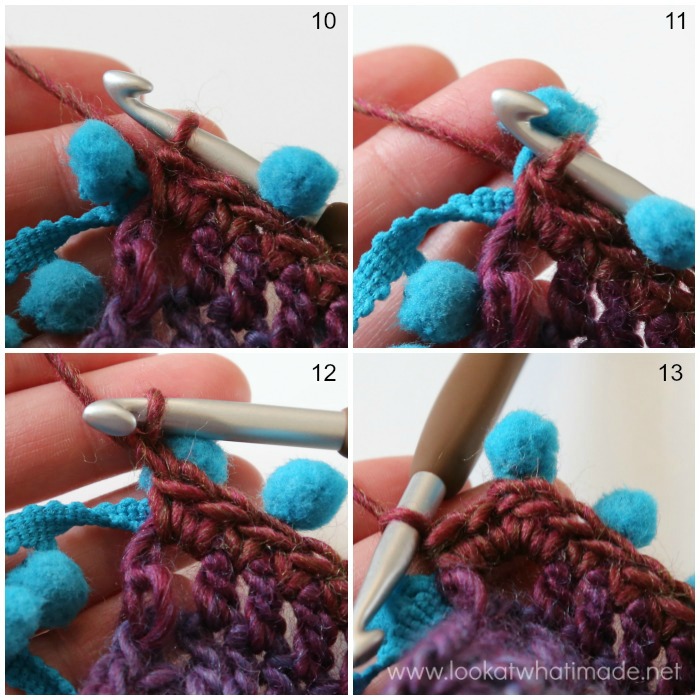
Repeat from [ to ] until you get to the next corner. Try to fudge it so that the last stitch before the corner catches a pompom. Make 2 sc’s into the ch-2 corner space, working over the ribbon as before {Photo 10}. Push the next popcorn so that it lies between your hook and your yarn {Photo 11}. Make a sl st around the post of the pompom {Photo 12}. Make 2 sc’s into the same ch-2 space {Photo 13}. This (2 sc, sl st, 2 sc) forms your corner.*
Repeat from * to * 3 more times, stopping before you make the first half of the last corner. Make 2 sc’s in the ch-2 space, working over the ribbon. You should now have 2 pompoms in the corner (the pompom at the very start of the round and the next pompom on the ribbon. Take your scissors and remove the next pompom on the ribbon, cutting close to the ribbon. Cut the ribbon before the next pompom.
Pick your hook back up and make a sl st around the post of the first pompom of the round (the one right in the corner). Fasten off, leaving a 20 cm (8″) tail of yarn.
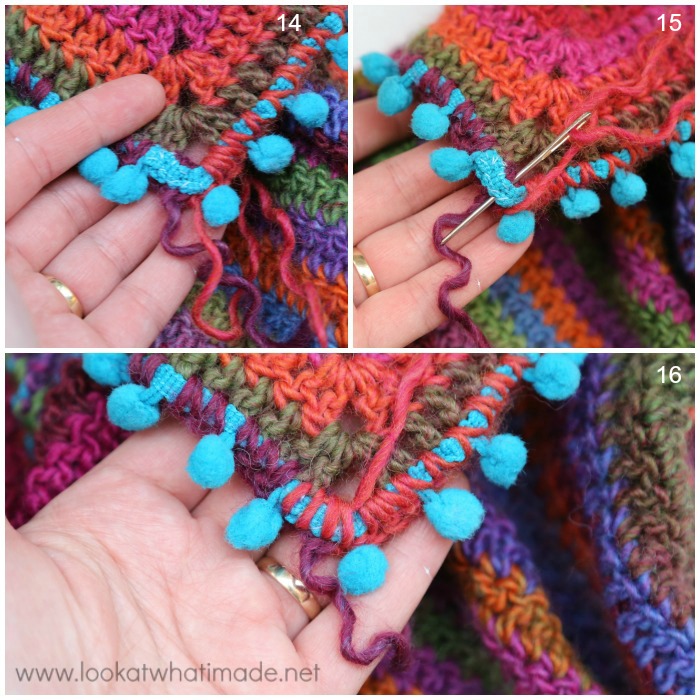
Gather the 2 ends of the ribbon and fold them over onto the first 2 sc’s of the round. With your sewing needle and thread, sew the ends to the ribbon under the first 2 sc’s, taking care to sew only through the back of the sc’s and the ribbon, not through the front of the stitches {Photo 14}.
Take your yarn needle and thread it with your end tail of yarn. Make a few stitches over the exposed ribbon, working through all 3 layers of ribbon and inserting your needle from the bottom of the ribbon to the top {Photos 15 and 16}. Work away your ends.
Sl St Edging
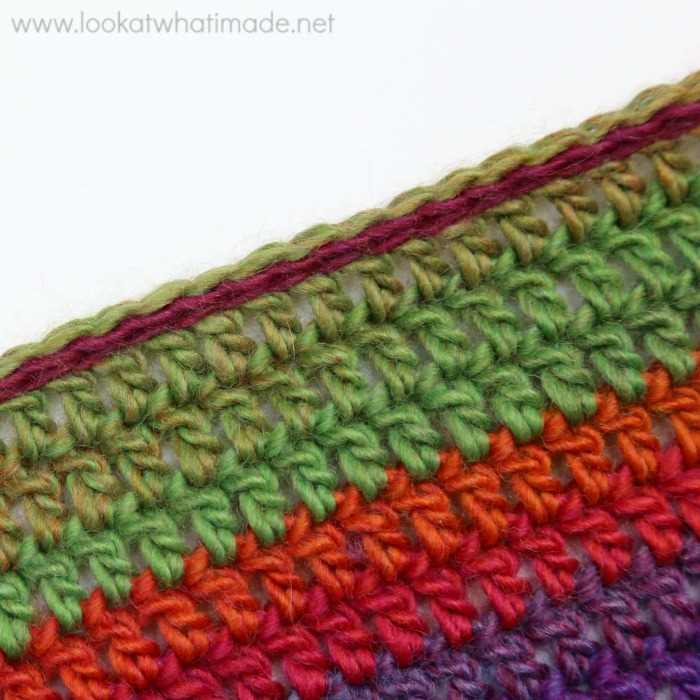
If you want to make a simple sl st edge, continue making a sl st through both loops of each dc across. When you get to a corner, sl st in the top loop of both of the corner ch st’s. Continue in this way until you get back to the first sl st.
Fasten off and pull the tail of yarn through the same dc so that it is to the back of your work. Work away your tails of yarn.
You can find a tutorial for Surface Slip Stitches HERE.
More Continuous Crochet Square Patterns
If you don’t feel like making the large version of this blanket, but you want to try the pattern using Noorse Sokkenwol, you can find the pattern for the Preemie/Car Seat version HERE.
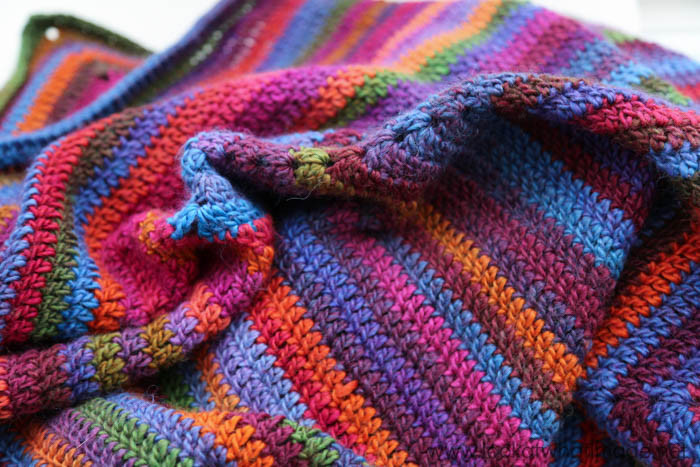
- I love the texture of the stitches
- Rich Autumnal Colours
You can also find a pattern for a matching cushion HERE. Joy’s Cushion was made by Esther Dijkstsra from It’s All in a Nutshell and includes a video tutorial for making the continuous square.
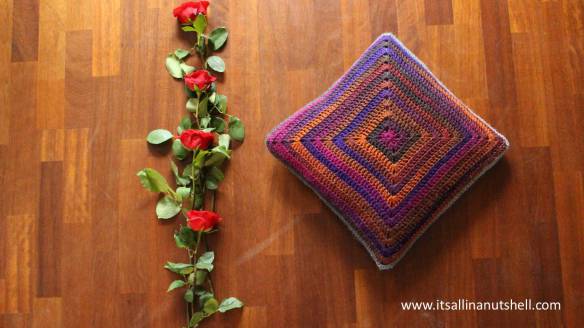
Joy’s Cushion – photo by Esther Dijkstra from It’s All in a Nutshell

This blog post contains affiliate links. I only link to products I personally use or would use. All opinions are my own.



Jacqui Smith says
Hi Dedri, I’ve only just discovered this blanket and would love to make it. The recommended yarn has been discontinued and I’ve seen the comments about this. I’ve had a look around and wondered if Scheepjes Wanderlust would be a good alternative? Thank you and take care x
Jenny Lowman says
Hi Jacqui.
Wanderlust would make a nice replacement. It may be a little lighter in weight, but not by too much. I would just buy extra balls to compensate :)
Gail Turvey says
Will you be putting any more of these Patterns out in the future as I am hoping you will be putting more out as I love to both Knit and crochet.?
Jenny says
There are always new patterns coming out, Gail.
Dedri is a little busy at present with preparing for her move from London to Exeter, but she gives regular updates on the Facebook page as well.
BW Jenny :)
Gail Turvey says
I Love the idea of the fact that you have involved your family in this project, As I hav also had a family member whom had dementia and can do this project with Family in mind. As I also Volunteer at a Resthome and hospital near where I live so I know that they would love something like this for there Dementia unit in the hospital part as well as the other Residents whom live there. I can’t wait to get started on this project and make some one happy.
Jenny says
This project was created in honour of my dearly departed mum, Joy. It is such a lovely blanket, and a great comfort to me when I pick it up to work on.
BW Jenny
Betty says
Beautiful pattern, looking forward to getting started! However, when I click on the “yarn packages” link, I’m not seeing the package for this pattern.
Can you provide me with more information so that I may get the yarn? I’m in the US, hoping I can get the yarn shipped here.
Many thanks,
Betty
Dedri Uys says
Hi Betty. I wasn’t aware that it was no longer in the shop. I will investigate and get back to you.
Dedri
Betty says
Were you able to find an answer? Thank you!
Betty says
Dedri, were you able to find the package?
Thank you so much.
Dedri Uys says
Sadly, no. The yarn has been discontinued and I wasn’t informed. I will update the pattern when I get back from Yarndale next week. Also, sadly, I don’t know of any suitable alternative. I will have a google and a think.
Dedri
Marian says
This is a lovely pattern with wonderful colors. Your photos are always so helpful! Can you recommend a yarn that would be of similar weight and have similar colors but without the wool? And, of course, how many skeins of each color would I need?
Many thanks!
Dedri Uys says
Hi Marian. The yarn is a colour-change yarn, so it does all the work for you. I am not familiar with other ones in a similar weight/colourway that I can recommend. Have you tried googling worsted weight colour change yarn to see if anything grabs you? It brings up loads of pretty results.
Megan says
Hi, I love this pattern and was hoping to make it into a slightly bigger blanket. As I’ll have to buy more length of the Pom Pom edging, I’m looking on wool warehouse and wondering, would you be able to share the size of the Pom poms? They appear to come in sizes of 7mm, 10mm, 15mm, and 20mm. Thanks so much!
Megan
Dedri Uys says
I’ve asked Wool Warehouse and as soon as I know I will get back to you :)
Dedri Uys says
Hi again. Speedy service on their end :) This is the one: https://www.woolwarehouse.co.uk/ribbons/pom-pom-trim-15mm-teal-per-metre
Megan says
Thank you so much!! A year later, and I’m finally getting around to making this. Beautiful blanket, and wonderful tutorial.
Thanks again,
Megan
Jenny says
So happy that you have enjoyed this blanket, Megan. I still have to finish mine. I pick it up and work on it whenever I want to feel close to my beautiful mum. I even have some white flecks in the yarn that are as white as her lovely hair used to be!
Jenny :)
Janet says
Hello Dedri,
Thank you for this wonderful pattern. I’m on my third one, and I just saw the note about skipping the invisible stitch. All of the blankets corners are curled up. But on my current blanket even skipping the stitch, it is still curling up. I’ve tried increasing the corner ch-space to three, which sort of helped. I’ve tried 3 dc, ch 2, 2 dc in the corner and sometimes doing or skipping the invisible st. In my head, skipping a stitch would make it curl, and adding stitches, theoretically, would make it lie flat. It’s baffeling. I still love the pattern.
Dedri Uys says
Hi Janet. Do you mean that it forms a bowl or that it ruffles? Usually it ruffles slightly, so if it is ‘bowling’, it could indicate that you are a lifter. Could you have a look at this video tutorial by It’s All in a Nutshell and tell me it that makes any sense? If you ‘lift’, your stitches will be taller than regular dc, which will mean that there is too much surface area for the circumference of the blanket. Have you got any photos?
Dedri
Js says
I love the idea of just crocheting away without worrying about starting and stopping to count.
Two Questions:
How well would this work using Mandala cakes?
Would it be possible to make this a rectangle by using doubles on two sides? (3x6x3x6)
Thank you for providing the pattern.
Dedri Uys says
Hi. I think it would work very well with Mandala Cakes, and you can find a rectangular version of the pattern here on It’s All in a Nutshell: https://itsallinanutshell.com/2016/12/07/merry-go-round-free-crochet-blanket-pattern/
Victoria says
Thank you for these patterns! They’re lovely!
I’m having a problem you’ve probably troubleshot before. I’ve got a case of curling I can’t seem to resolve. I’ve changed hook sizes and tension. Is this something that resolves as it gets bigger? I wanted to check before I got too far in because I’ve already started over three times.
Dedri Uys says
Hi Victoria. Are you def making US dc stitches? Have you got a photo of your work so that I can help you diagnose the issue? You can send me a photo by using the Contact Me tab above. Once I reply to your email, you can attach a photo.
Dedri
Amy says
This is so lovely, and just what I was looking for. Easy, but still fun and beautiful. I love your designs. Thank you.
Dedri Uys says
Thank you, Amy :)
Margaret B says
Hands down, my favorite pattern. Elegantly simple, works with all kinds weights of yarns, and the results are stunning. It’s just perfect for variegated yarn with medium to long color changes! (I am attracted to color changing yarn, but rarely happy with the results—this pattern is a lovely exception!) Thank you! What fun!
Dedri Uys says
Thank you, Margaret!
Linda says
What a beautiful blanket! This is one I want to do asap.
My mother died 2 years ago from PSP, a disease of the brain, like Alzheimer’s that comes with dementia as one its components. She lived the last 3 years of her life in a nursing home where my dad visited her every single day and had lunch with her. It’s so very sad to watch dementia steal the person you love.
Thank you for the beautiful pattern and for calling attention to dementia!
Dedri Uys says
Linda, your comment really moved me. I cannot imagine how hard it must have been for you and your dad. Thank you for taking the time to share your mother’s story with us.
JoAnn McLean says
I would like to take the time to thank you so very much for sharing this emotionally beautiful pattern with us! I am sure many of us have a link to someone suffering from this insidious disease who would love to make it as a gift. Again… THANK YOU….. both for this pattern and tutorial, and for all other patterns and ideas and help you pass on to us, your eager followers.
Dedri Uys says
Thank you for your lovely comment, JoAnn. It does look like everyone knows someone who has been touched by it.
Carolyn says
Oh wow! I love this! And just a note…my husband’s grandmother always told us that we should sit on the front porch with her and gaze at the green because it would be relaxing. I think she knew what she was talking about. A fitting tribute to those with dementia.
Dedri Uys says
I wonder if that is why parks and forrests calm people down too!