There is something rhythmic and meditational about making a solid crochet square using yarn with a medium/slow colour change. It’s almost like playing Solitaire. I keep thinking: ‘Just a few more stitches. I just want to see what the next colour change will look like,’ and before I know it, another hour has gone by.
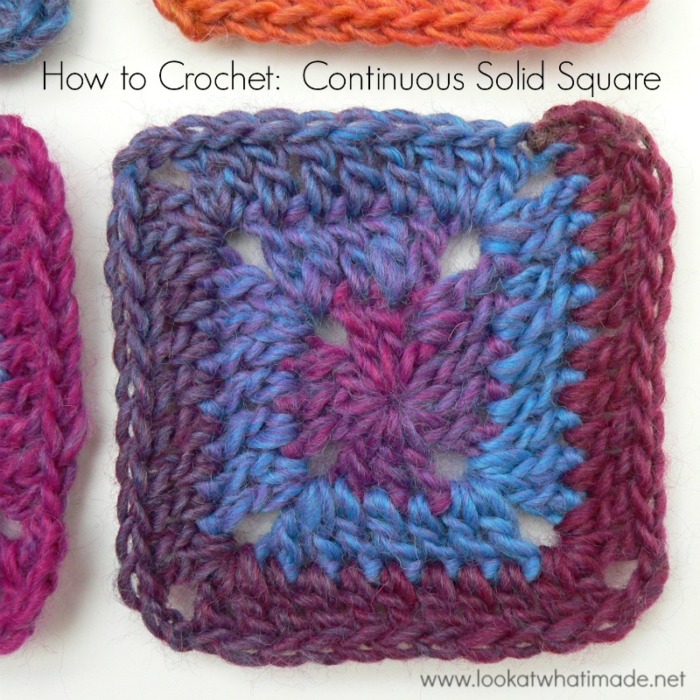
The only difference between this continuous solid square and a standard (traditional) solid square is that this one is worked in a spiral instead of joining at the end of every round.
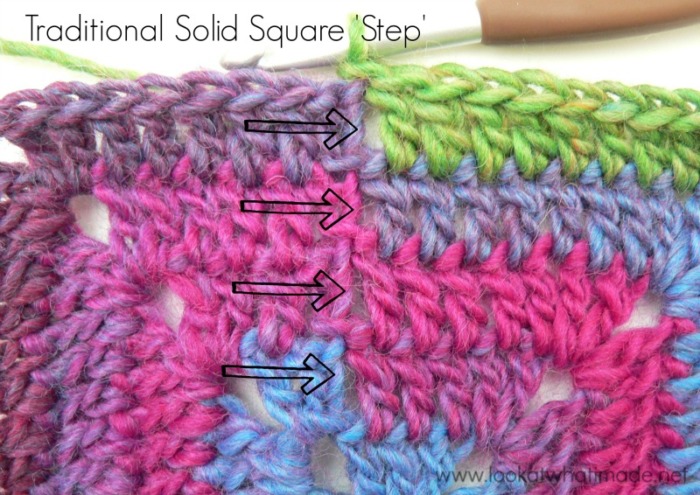
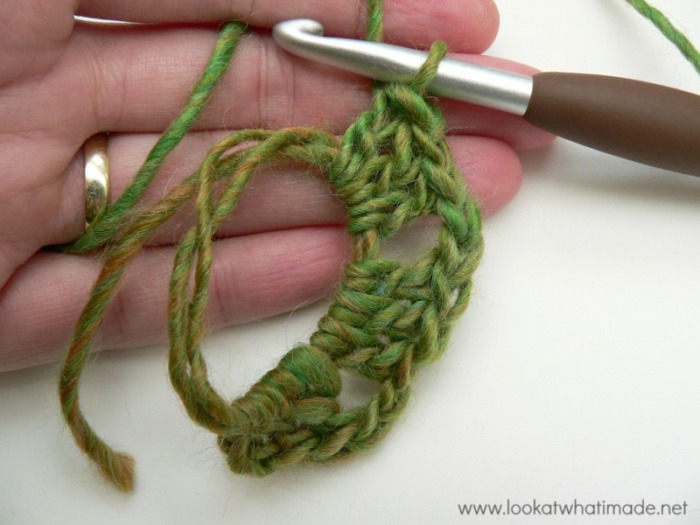
When you work with a medium/slow colour change yarn and join at the end of each round, you will notice a ‘step’ formed by the difference in colour between the first and last stitch of each round.
In the photo below you can clearly see this ‘step’. And right about now someone is bound to pipe up and say: “Hang on a bit! There is a neater way to start your rounds to make the join less visible!” And I would have to respond: “I am aware of the fact that using a chainless starting double crochet is neater. I am aware of the fact that Mrs. Micawber has a brilliant post about getting rid of the tell-tale seam. These suggestions are great (and I use a both of them when working in the round myself), but they still won’t make the first and last stitch of each round the same colour if you are using a colour change yarn!”
Right. Lets get stuck into making a continuous solid square. Like I have already said, this square is worked in a spiral. For the purposes of this tutorial, I am making a 3-round square (the written instructions for which can be found below the tutorial), but you can continue on to make the square as big as you want to.
How to Crochet a Continuous Solid Square
© Dedri Uys 2015. All Rights Reserved. Please see my Terms of Use.
Resources and Patterns
- Video Tutorial by It’s All in a Nutshell
- Continuous Crochet Baby Blanket
- Joy’s Journey (Large Continuous Lapghan)
- Joy’s Cushion
Abbreviations
US Terminology Used (US/UK Comparison Available HERE)
- Ch – Chain
- Dc – Double crochet
- St/st’s – Stitch/stitches
- () – Repeat instructions between parentheses the number of times specified
- * – Repeat instructions between asterisks the number of times specified
Special Techniques
Magic Ring – See THIS TUTORIAL. Please remember to work your initial tail of yarn away very well when using the magic ring, otherwise your work will come undone!
Materials
- Scheepjes Noorse Sokkenwol (968) – Available from Scheepjeswol.com and Wool Warehouse
- 6 mm Clover Amour Crochet Hooks
(US 10/J UK 4)
Instructions
To make it easier to explain, I am going to break the instructions up into ‘sides’.
Round 1
Sides 1 – 4 are all worked into a magic ring, apart from the last 2 dc’s of Side 4.
Into a magic ring:
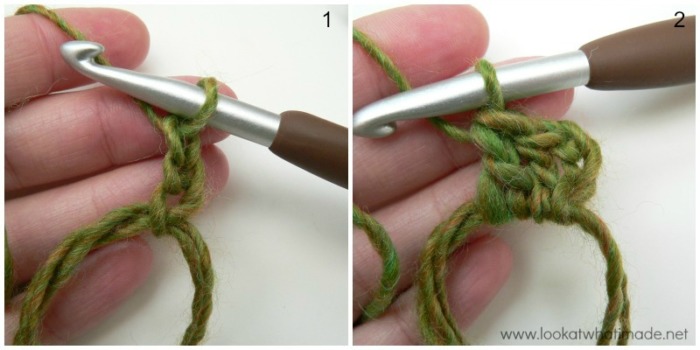
Side 1: Ch 3 (Photo 1). This counts as your first dc. Make 2 dc’s. This is your first side made (Photo 2).
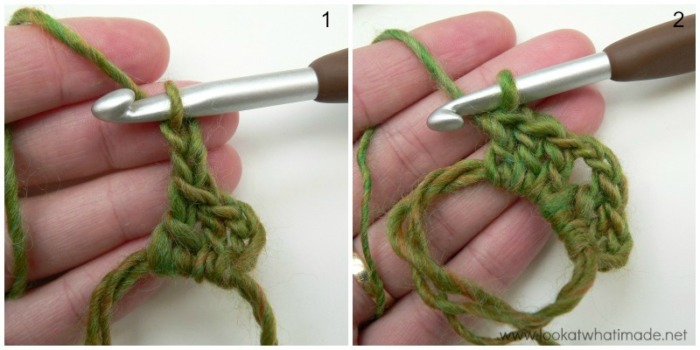
Side 2: Ch 2 (Photo 1), make 3 dc’s (Photo 2). This is your second side made.
Side 3: Ch 2 and make 3 dc’s. This is your third side made.
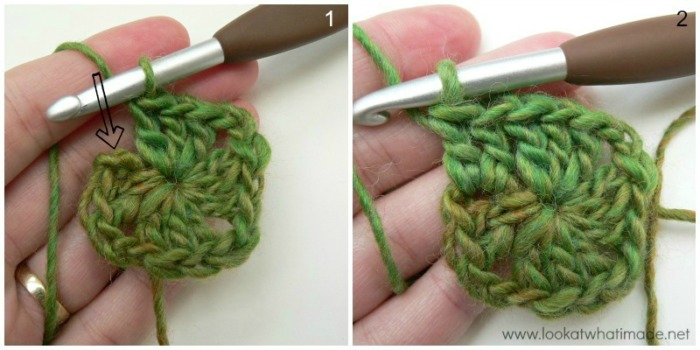
Side 4: Ch 2. Make 3 dc’s. Pull the magic ring closed before continuing (Photo 1). Working into the side of the initial ch-3 (from the first side), make 2 dc’s (Photo 2). You should now have 5 dc’s on this side. This is your fourth side made.
Round 2
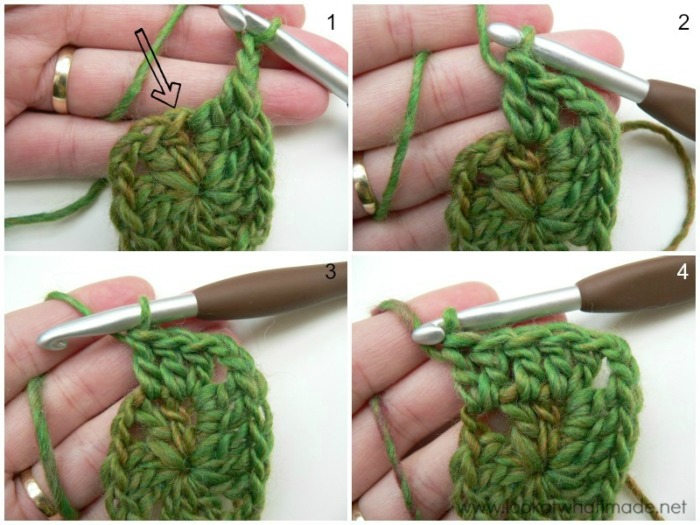
Side 1: Ch 2 (Photo 1). Working into the 2 dc’s of Side 1, make 2 dc’s in the first dc (Photo 2) and dc in the last dc (Photo 3). Make 2 dc’s in the next ch-2 corner space (Photo 4). This is your first side made. {5 dc’s}
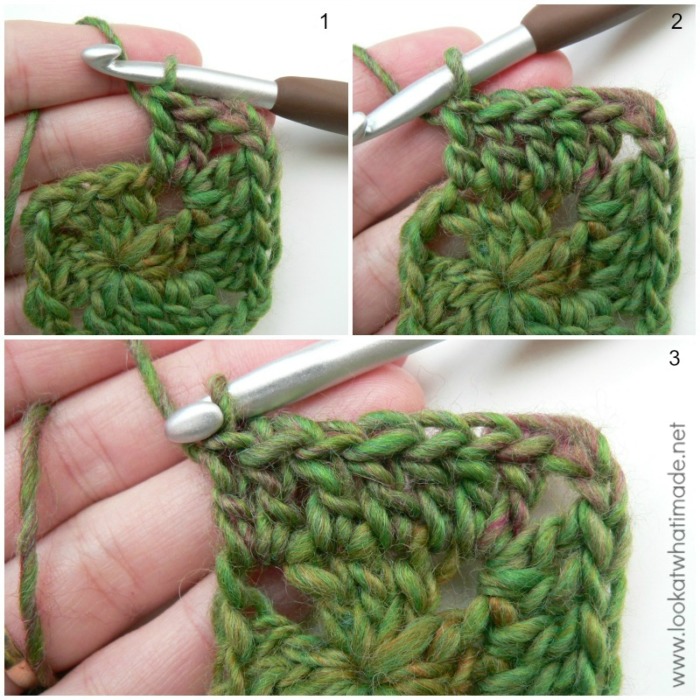
Side 2: Ch 2. Make 2 dc’s in the same ch-2 corner space (Photo 1). Dc in each dc across (Photo 2). Don’t accidentally skip the first (hidden) stitch. Make 2 dc’s in the next ch-2 corner space (Photo 3). This is your second side made. {7 dc’s}
Sides 3 and 4: Ch 2. Make 2 dc’s in the same ch-2 corner space. Dc in each dc across. Make 2 dc’s in the next ch-2 corner space.
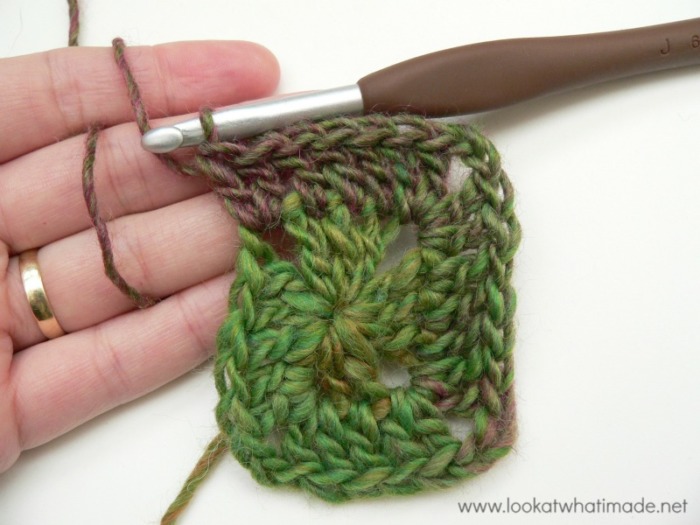
The photo below shows the third side of Round 2 completed. Side 3 will have 7 stitches, side 4 will have 9 stitches. See Things to Note below if you have questions about the difference in stitch counts.
Round 3
*Ch 2. Make 2 dc’s in the same ch-2 corner space. Dc in each dc across. Make 2 dc’s in the next ch-2 corner space.* Repeat from * to * 3 more times.
Subsequent Rounds
Repeat Round 3 until your square (or blanket) is as large as you want it to be. When you decide that it is big enough, make the last round as instructed in Best Way to Finish Off below.
Things to note
I find it easier to think of this blanket in terms of Sides rather than Rounds. By the time that I have completed 3 rounds, for example, I will have completed 12 sides (4 sides per round).
- The number of stitches in a side will increase by 2 every second side. Sides 4 and 5 (the last side of Round 1 and the first side of Round 2) will have 5 dc’s each. Sides 6 and 7 have 7 st’s each. Sides 8 and 9 have 9 st’s each. Following this pattern, Sides 100 and 101 will have 101 st’s each.
- If you feel that the center of your square is in danger of twisting, or your square starts to buckle, skip the first dc of each side for 4 consecutive sides.
- To make things easier, use a stitch marker to mark the corner at the end of each round.
Best Way to Finish Off
The best place to finish off is on the last side of any round. To do that, you will need to work the fourth side of the last round as follows:
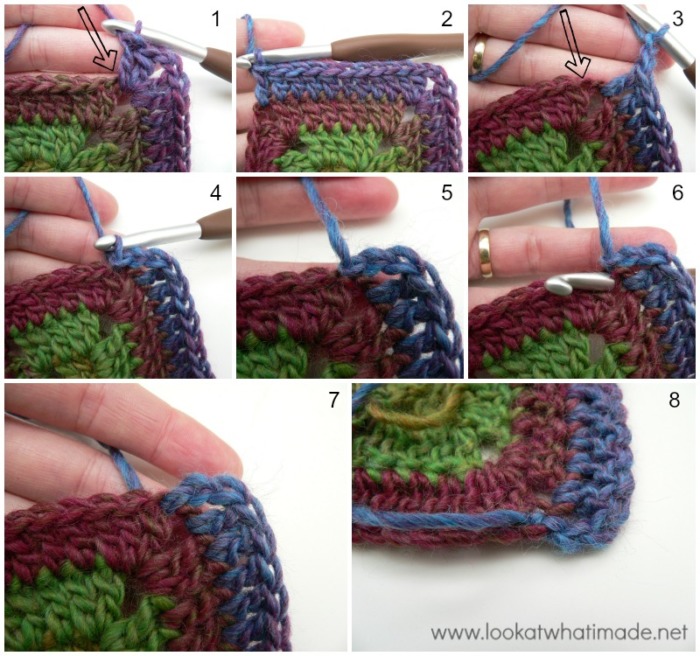
Ch 2. Make 2 dc’s in the same ch-2 corner space (Photo 1). Skip the first (hidden) stitch (indicated with an arrow in Photo 1). Dc in each of the remaining dc’s across (Photo 2). Make 1 dc in the next ch-2 corner space. Ch 2 (Photo 3) and sl st into the first dc of the next side (indicated with an arrow in Photo 3 and illustrated in Photo 4).
If you want to make a sl st edging, continue with Sl st Edging below. If you just want to finish, continue with Finishing below.
Finishing
Fasten off (Photo 5) and pull the tail of yarn through the same dc so that it is to the back of your work (Photos 6 – 8). Work away your tails of yarn.
Sl st Edging
Continue making a sl st through both loops of each dc across. When you get to a corner, sl st in the top loop of both of the corner ch st’s. Continue in this way until you get back to the first sl st.
Fasten off and pull the tail of yarn through the same dc so that it is to the back of your work. Work away your tails of yarn.
You can find a tutorial for Surface Slip Stitches HERE.
If you have stumbled on this post by accident and are looking for a pattern for a regular (standard/traditional/normal) solid square, have a look at this Solid Granny Square by A Creative Being.
3-Round Continuous Solid Crochet Square
(Written-only Pattern)
Round 1
Into a magic ring: Ch 3 (counts as first dc) and make 2 dc’s. (Ch 2, make 3 dc’s) three times. Pull the magic ring closed before continuing. Working into the side of the initial ch-3, make 2 dc’s. You should now have 5 dc’s in the last side.
Round 2
Ch 2. Make 2 dc’s in the first dc. Dc in the next (last) dc. Make 2 dc’s in the next ch-2 corner space. *Ch 2. Make 2 dc’s in the same ch-2 corner space. Dc in each dc across. Make 2 dc’s in the next ch-2 corner space.* Repeat from * to * two more times. {28 stitches – 5, 7, 7, and 9 for the respective sides}
Round 3
*Ch 2. Make 2 dc’s in the same ch-2 corner space. Dc in each dc across. Make 2 dc’s in the next ch-2 corner space.* Repeat from * to * 2 more times. You have now completed 3 of the sides for this round.
Ch 2. Make 2 dc’s in the same ch-2 corner space. Skip the first (hidden) stitch. Dc in each of the remaining 8 dc’s. Make 1 dc in the next ch-2 corner space. Ch 2 and sl st into the first dc of the next side. {42 stitches – 9, 11, 11, and 11 for the respective sides}
Fasten off and work away your tails of yarn.
Although the first side of the last round only has 9 dc’s, the final ch-2 will count as 2 stitches when you go to join the squares, giving you 11 stitches per side. You do lose that ch-2 space, though, so you’ll have to fudge a bit when attaching the squares to each other!
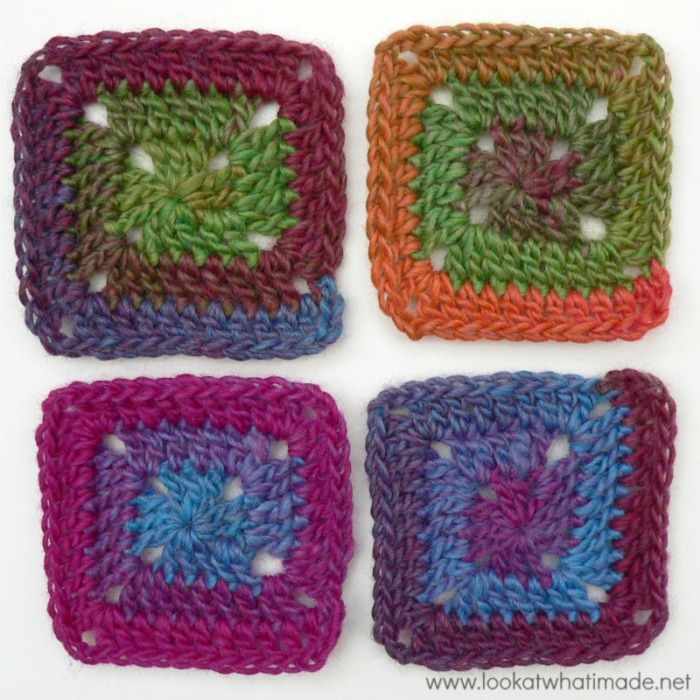
Next week I will show you the continuous square baby blanket I made using this same pattern and yarn (but with more rounds).
Update: You can now find the pattern for the Continuous Square Baby Blanket HERE.

This blog post contains affiliate links. I only link to products I personally use or would use. All opinions are my own.



Lyns says
Hi! Some of the instruction images are not loading, and instead of a pic I’m seeing a link to the image. I’m having this problem on two different browsers and also in the print-friendly version. I can still use the pattern by opening the images in a separate tab, but it’s quite confusing. Is there any chance you can fix this?
Thank you for providing all these wonderful free patterns :)
Jenny Lowman says
Hi! The pattern displays completely for us here, Lyns. Have you tried clearing your cookies? Other than that, we are at a loss for why the pattern isn’t displaying properly for you.
Jill Bainbridge says
Hello
I am an experienced crocheter. I just attempted “Continuous crochet baby blanket”. I have had disappointing results with buckling despite a normal tension, not tight nor loose. I do not have a problem in any other blanket projects. I tried steaming with no result. I can try wetting and blocking on my blocking board but my yarn is acrylic and I doubt I’ll be successful.
After almost completing the blanket I saw the highlighted blue sentences suggesting skipping the first DC of each side for four consecutive sides. Is this for one four sided round only?
I look forward to your response. Many thanks! Jill Bainbridge
Jenny Lowman says
Hi Jill.
Dedri has suggested this tip for whenever the blanket starts to buckle again, so if you do it once and continue as per the pattern, it can be repeated again if needed further on.
As for the buckling, I usually rely on steam to help block acrylic, but I believe some folks just use a hairdryer to warm up the yarn before blocking.
Amy says
Wow! Thank you so much for this pattern! I tried so many solid granny’s with no luck on the final product- but this one is perfect ! It lays flat- has no ugly joint lines- and is absolutely beautiful when finished ! I put a shell border on it and couldn’t be happier. This granny also works up fast .
Dedri Uys says
Oh yay! I do like the simplicity of it :)
SarahAnne (sash) Hazlewood says
I’m so excited about this pattern. I’m BRAND new to crocheting & the way you’ve described & pictured this is exactly how my brain works. I have one question (something so basic that I can’t find it expressed anywhere). When you say ” make 2 dc’s in the first dc” (for example), does that mean I’m inserting the hook into the gap between one dc & the next? Or am I inserting it into some part of the dc itself? I don’t know if it’s clear what I’m asking. If one side of row 1 is 3 short “segments” side by side & attached together at bottom & top (3 dc’s next to each other) is the next row going to attach into the top of one of those segments or in the space between those “segments”?
Your blog is a delight to look thru. Someday I hope that all the other lovely patterns seem possible. Thanks for you help!!
Dedri Uys says
Hi SarahAnne. Unless otherwise stated, you will be inserting your hook into the two loops at the top of each ‘segment’, not in the spaces between ‘segments’, as you put it. The loops will look like a chain link or a teardrop. Sometimes you will only work into the front loop and sometimes you will only work into the back loop. Sometimes you will be asked to work around the post (whole other discussion) and sometimes you will be asked to work between stitches. For this specific pattern (and any other time when a designer doesn’t specifically tell you to do something else, you will work into those loops. If you want a crash course in crochet, may I suggest giving part 1 of Sophie’s Universe a go? It is complex, but it has been written specifically for adventurous beginners and many people have learned to crochet by following that pattern. There are step by step photos, more hints than you can count, AND step by step videos by my friend Esther. I hope you decide to give it a try, because that pattern will teach you SO much.
Dedri
Harriet says
Love the pattern, thank you! I tried skipping the first dc for four sides, but the square still curves inward. What else could be going wrong with my work?
Dedri Uys says
Hi Harriet. Have you had a look at twinky chan’s post about yankers, riders, and lifters? If you ‘lift’ while you crochet, it might explain why your work is curving. Also, are you def using us terms?
Dedri
Stacy Cunniff says
Do you think it would work with homemade t shirt yarn? I made tshirt quilts for both my kids when the graduated high school recently. And I save the parts of the shirts leftover. I think it could be pretty. What crochet hook would I use?
Dedri Uys says
That could work, but it would be very dense (like a rug). You’d use a 9 or 10 mm hook.
Nikki King says
Fantastic pattern, just made a cushion, next is a skirt! Don’t know how to post a photo of mine here tho.
Dedri Uys says
Hi Nikki. You can post on facebook and Instagram, and if you tag me, I will be able to find your photos. You can find my links in the sidebar or at the bottom of any post.
Margie says
Thank you ever so much, that was the best and most detailed description I’ve found! It’s great, and I started off making a beautiful square afghan from yarn left overs from another project! You are aces!
Jenny says
Hi Margie!
We would love to see photos on the Facebook page!
Jenny :)
fay says
Love patterns like this that use up stash and good with variegated/print yarns. The continuous method is just a wonderful way to work.
Lynda says
Hi, Dedri~
Just wanted to let you know that I’m so excited to have found this tutorial. I love the idea of being able to continue on without starting a new row all the time. I’ve been teaching my daughter how to crochet and this will be a God-send for her also. Thank you so much!
Dedri Uys says
Thank you, Lynda. I would love to hear how your daughter is progressing :)
Ruth Gokey says
Can I use this type square for a solid Double crochet square for a cocoon type cardigan says can use any stitch to make a 41_45 inch square for the body the Original tutorial is only in granny sq which I Don’t want the hole spaces I want it Solid for Warmth we hv to smoke Outside cz it’s a Smoke free building. Is a Christmas gift for a Friend bt I want one for me as well. Please reply. Thanks
Dedri Uys says
Yes, you can use this square. You can use any square made to the size specified in the pattern.
Deborah says
Your printer friendly button isn’t working. :/
Jenny says
It does work, Deborah. Try clearing your cache/cookies etc and trying again :)
Andrea Schultz says
Hello, Dedri. For some reason, the PrintFriendly button is not working correctly for this tutorial. It is only providing the link to the site and “Happy Hooking.” I also tried going directly to the PrintFriendly website but it is not producing the tutorial either.
Jenny says
The print friendly button is working forme,Andrea. Have you tried clearing your cookies/cache and trying again? :)