
Block 15 of the Block a Week CAL (hosted by Kimberly Slifer) is Melinda Miller’s More V’s Please. This square worked up very quickly and is one of the easiest ones so far.
This is the last square I will be doing from South Africa, as our holiday is almost at an end. How horrible to think that I will be back in England this time next week. I wonder how the boys will handle going back. Pieter keeps telling me that he is South African and that he belongs here. Deep thinking for a 5 year-old.
Anyway…back to the CAL…
This is the sixth of Melinda’s designs to be featured in the CAL.
More Melinda Miller Blocks:
- Week 2 – Popcorn Parade
- Week 4 – Basket of Berries
- Week 5 – Starfire
- Week 6 – Blooming Lace
- Week 11 – Wish Upon a Star
If this is the first you’ve heard of the CAL (crochet-along), it’s not too late to join in. You can find all the relevant information and links for the CAL HERE.
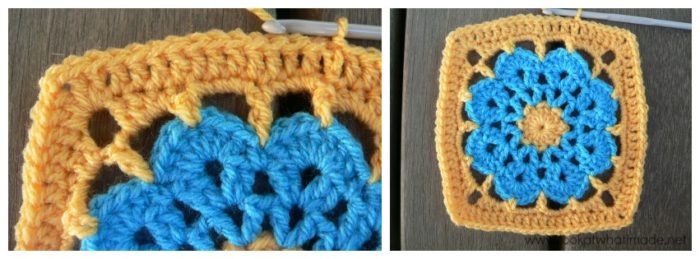
More V’s Please Crochet Square
{Pattern © 20011 Melinda Miller. Photo tutorial done with kind permission}
Pattern
Suggested Materials
- 5.5 mm Clover Amour Crochet Hook (US I/9 UK 5)
- Worsted weight yarn
Size
- Using the hook and yarn specified, your square should be a nice even 12″ when you are done.
- Using a 4 mm crochet hook (US G/6 UK 8) and double knit yarn, as I have done, your finished square will be about 8″ big.
My Yarn and Colour Choices
I am using the Stylecraft Special DK.
- Saffron (Rounds 1, 5, 6, and 7)
- Turquoise (Rounds 2, 3, 4, and Optional Round 12)
- Meadow (Round 8)
- Pomegranate (Round 9)
- Magenta (Round 10)
- Sherbet (Round 11)
Notes
- The initial ch st’s in each round are counted as a stitch.
- Stitch counts have not been supplied for all the rounds, so I have added them here.
- US Crochet Terminology used. (See this comparative chart if you need help transcribing from US to UK)
- Please Note: The yarn used in most of the tutorial photos is Drops Paris Cotton.
Special Stitches
The only special stitch in this square is the V-stitch, which consists of (dc, ch 1, dc) into the same stitch/space. When making a V-stitch into a V-stitch, it will be worked into the ch-1 space between the two dc’s of the relevant V-stitch in the previous round.
More V’s Please Photo Tutorial
This photo-walkthrough is NOT the actual pattern and should not be used instead of the pattern, but rather in conjunction with it.
Thank you very much to Melinda Miller for giving us permission to do this photo-tutorial for her More V’s Please Square. And a special thank you to Kimberly Slifer for letting me do these tutorials and for obtaining the necessary permission.
Round 1
You can start this round with a magic ring instead of the initial ch-6.
Magic Ring Instructions for Round 1
Into a magic ring: ch 3 (this counts as your first dc). Dc x 15 into the ring and pull the ring tight. Join to the top of the initial ch-3 with a sl st. If you are not familiar with working into a magic ring, this video tutorial from The Crochet Crowd is very good. Please remember, when working into a magic ring you HAVE to work away your initial tail very well. If you just cut it, your whole square might unravel!
Stitch count: 16 dc’s
Round 2
Ch 5 (Photo 1). This counts as the first dc and ch-2. Dc in the same stitch (Photo 2) and ch 1 (Photo 3). *Skip the next dc. Into the next dc, work (dc, ch 2, dc) and then ch 1 (Photo 4).* Repeat around as instructed in the pattern and join to the third ch of the beginning ch-5 with a sl st (indicated with an arrow in Photo 5).
You should end up with 8 modified v-stitches (dc, ch 2, dc), each separated by one skipped stitch and one chain stitch.
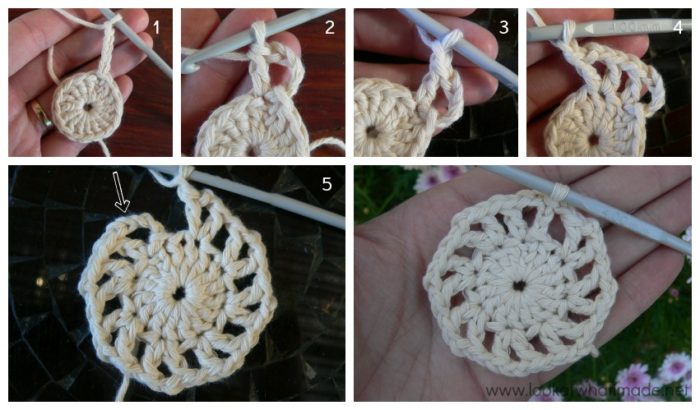
Stitch count: 8 modified V-stitches {16 dc’s, 8 ch-1 spaces, and 8 ch-2 spaces}
Round 3
Sl st into the first ch-2 space. Ch 3 (Photo 1). This counts as your first dc. Into the same space: (dc, ch 2, 2 x dc). See Photo 2. Ch 1 (Photo 3). This is your first “petal”, although it doesn’t really look like a petal yet. *Into the next ch-2 space: (2 x dc, ch 2, 2 x dc). Ch 1*. Repeat as instructed in the pattern. When you get to the end, join to the top of the beginning ch-3 with a sl st.
Alternative start: If you are going to change colours, as I have done, you can start with a standing double crochet instead of the initial ch-3. If you don’t know what a standing double crochet is, see this excellent tutorial by Tamara from Moogly.
At the end of this round you should have 8 “petals”, each worked into a ch-2 space and each separated by one chain stitch. 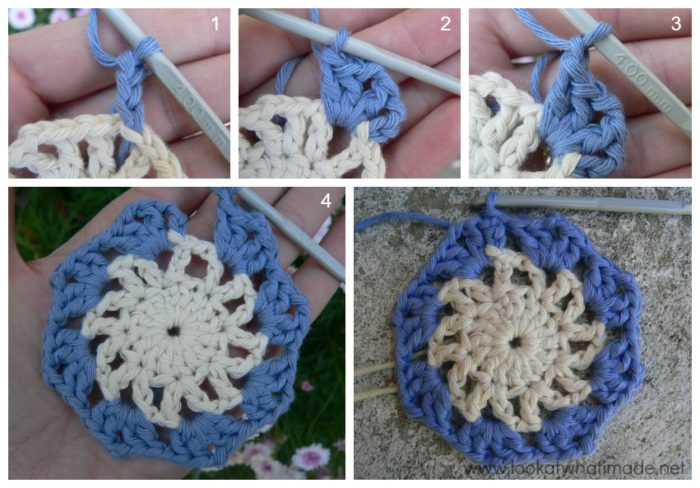
Stitch count: 8 “petals” {32 dc’s, 8 ch-1 spaces and 8 ch-2 spaces}
Round 4
In this round, you will be working into the ch-1 and ch-2 spaces from the previous round.
Sl st your way to the first ch-2 space and then ch 3. This counts as your first dc. Alternatively start with a standing double crochet. Make 6 more dc’s into the same ch-2 space (Photo 1) and then sc into the next ch-1 space (Photo 2). *7 x dc in the next ch-2 space, sc in the next ch-1 space (Photo 3).* Repeat around as instructed in the pattern and join to the top of the beginning ch-3 with a sl st.

Stitch count: 8 Petals {56 dc’s and 8 sc’s}
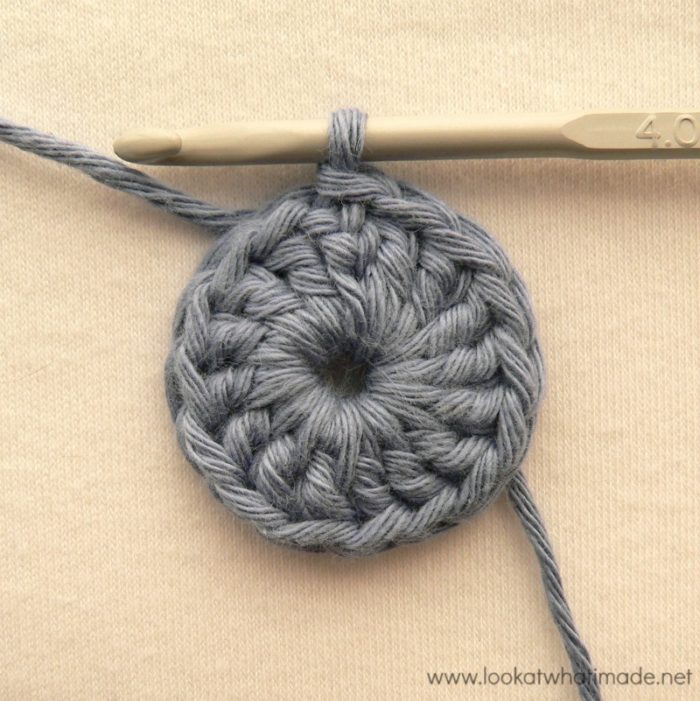
Round 5
You will start this round in the central dc of the next petal (in other words, in the fourth dc of the 7 dc’s of the petal). See the arrow in Photo 1.
Two ways to start:
- If you are keeping the same colour yarn, sl st your way to the fourth dc. Ch 1 and sc in the same stitch. (The ch-1 won’t count as a stitch in this instance.)
- If you are changing colours, start with a standing single crochet in the fourth dc of the 7 dc’s of the petal.
Whichever way you choose to start, you should now have a single crochet stitch in the central dc of the petal. Ch 4 (Photo 2). *Dc in the next sc (Photo 3) and ch 4. Sc in the fourth dc of the next petal (Photo 4) and ch 4.* Repeat around as instructed in the pattern and join to the first sc with a sl st.

Stitch count: 8 dc’s, 8 sc’s, 16 ch-4 spaces
Round 6
Round 6 is fairly straightforward. You will be working into the ch-4 spaces from the previous round.
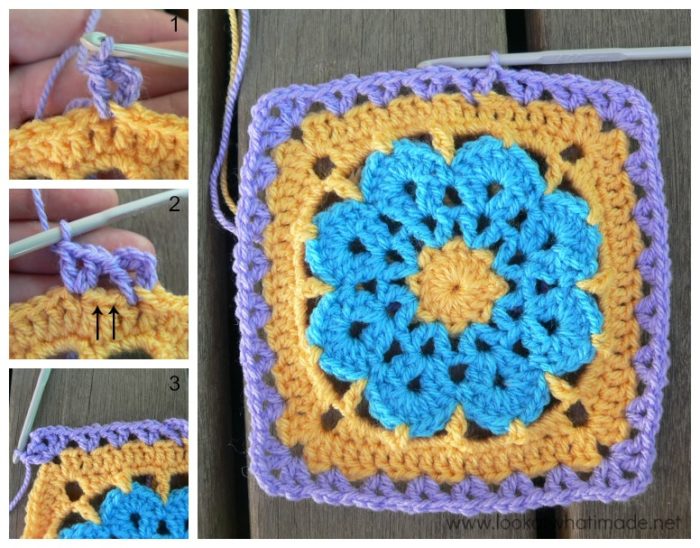
Sl st into the next ch-4 space and ch 1. Into the same ch-4 space: 4 x sc (Photo 1). 4 x sc into the next ch-4 space as well. The corner is created over the next 2 ch-4 spaces. In the next ch-4 space: (2 x hdc, 2 x dc, ch 2). See Photo 2. In the next ch-4 space: (2 x dc, 2 x hdc). See Photo 3.
Repeat around as in the pattern and join to the first sc with a sl st. Photo 4 shows you what one completed side should look like.

Stitch count:
- Total: 64 stitches {32 sc’s, 16 hdc’s, 16 dc’s, and 4 ch-2 spaces}
- Per Side: 8 sc’s, 4 hdc’s, and 4 dc’s
Round 7
Round 7 is a simple dc round. Once you have made your initial ch-3, the pattern tells you to dc in each st to corner. It might help to know that there should be 11 dc’s (excluding the initial ch-3) before the first corner. A stitch more or less wouldn’t usually make a difference, but in this case it will make a difference, as it can throw your alignment out in Round 8.
Once you have made your corner, be mindful of the fact that the loops of the first stitch after the corner might be slightly hidden. Please see this tutorial if you need help identifying the first stitch after a corner.
Stitch count:
- Total: 80 dc’s and 4 ch-2 spaces
- Per Side: 20 dc’s per side {16 dc’s between corners}
Round 8
Round 8 starts almost in the middle of one side. To get your stitches to work out, you need to be confident that you haven’t fudged something in the previous round. If you HAVE fudged something to get it to work out, scroll down a bit and see my suggestion for an alternative start.
Right.
Sl st in the next 2 st’s. You should end up in the second dc of the previous round, which should be the dc worked into the second sc from Round 6. Ch 4. This counts as your first dc and ch st. Dc in the same st (Photo 1). Skip 2 st’s (indicated with arrows in Photo 2). *Make a V-stitch in the next stitch (Photo 2) and skip 2 st’s.* Repeat until you get to the corner. In the corner space: (V-stitch, ch 2, V-stitch). See Photo 3.
Repeat around as in the pattern, joining to the top of the beginning ch-3 with a sl st.
You should end up with 2 V-stitches in each corner, separated by 2 ch st’s, and a V-stitch in every third st of each side.
Alternative: If your stitch counts aren’t working out, and you are using a new colour for this round, consider starting with one of the corners instead, using a standing double crochet as your first stitch. Have a look at the photos for Round 10 if you need some visual help.
Stitch count:
- Total: 32 V-stitches and 4 ch-2 corners {64 dc’s, 32 ch-1 spaces, and 4 ch-2 spaces.
- Per Side: 8 V-stitches per side {6 V-stitches between corners}
Round 9
Round 9 is a repeat of Round 8, but working into the ch-1 spaces of the V-stitches in the previous round. If you want to change colours for each of the V-stitch rounds, consider starting with a standing double crochet instead of a ch-3.

Stitch count:
- Total: 40 V-stitches and 4 ch-2 corners {80 dc’s, 40 ch-1 spaces, and 4 ch-2 spaces.
- Per Side: 10 V-stitches per side {8 V-stitches between corners}
Round 10
Round 10 is a repeat of Rounds 8 and 9. Remember what I said in Round 8 about alternatively starting in one of the corners? I started Round 10 in one of the corners, with a standing double crochet, to illustrate what I mean.
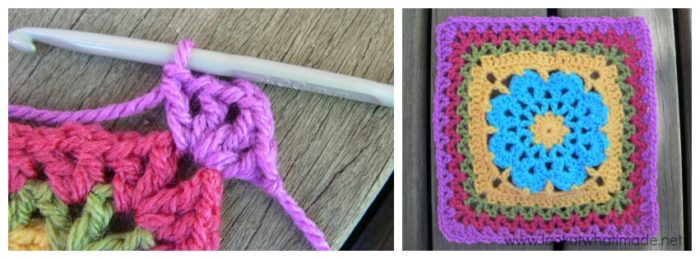
Stitch count:
- Total: 48 V-stitches and 4 ch-2 corners {96 dc’s, 48 ch-1 spaces, and 4 ch-2 spaces.
- Per Side: 12 V-stitches per side {10 V-stitches between corners}
Round 11
Round 11 is a straightforward hdc round. Remember to work into each dc and ch-1 space across. You should have 36 hdc’s between the 3-hdc corners.

Stitch count:
- Total: 156 hdc’s
- Per Side: 38 hdc’s per side (excluding the central hdc of the 3-hdc corner) and 36 hdc’s between corners
I have added an optional additional Round 12 to get this square to 8.5″ (or the same size as the other squares to date). You can find the details of that HERE.
Remember to subscribe to my Weekly Newsletter if you would like to be kept in the loop. You can also like my Facebook page or follow me on Bloglovin, Google+, Pinterest, Twitter, or Instagram.
Happy Hooking!


Pat says
The written pattern says to use hdc in first 2 rounds. 1sr round ends with 8 stitches and round 2 with 16. It’s different from what you have written
Jenny Lowman says
Dedri’s photo walk through of the pattern is just that, and not the actual pattern itself. Always refer to the original pattern for correct stitch counts please :)
janet says
Hi i am having trouble with round five it seems no matter what i do it doesn’t turn out right is there any chance you could a small tutorial for round five a step by step please
Dedri Uys says
Hi Janet. There are already step-by-step photos for round 5, so I am not sure how you would like me to elaborate, but I am happy to help you if you tell me what you need.
Suzanne says
This is my first CAL and I’ve been avoiding getting started till I have the time… Forgetting that ‘Time & tide wait for no man’. So I’m playing catch up working backwards from 15 ,as you do, as this is when I signed up. Also forgetting there would be more going forward! You have to laugh. I want to say thank you kindly for your tutorials. I look at the piece to do, think… That won’t take long! Settle down and find many happy hours have disappeared. Sigh. Nothing quite like wool and a hook.
Thanks a million <3
Dedri Uys says
I’m pleased you’ve joined us, Suzanne. You are too right. There is nothing quite like having a hook and yarn in hand :)
marjo says
Hi Dedri,
Thanks again for your tutorial. This is my 15th block and I could not have made them without your help! Looking forward to the next 30 blocks!!
Dedri Uys says
Just a pleasure, Marjo.
fariba says
Hi , I love your pattern and try to make for myself. Thank you :) Have a good time………
Joanne Morrow says
Thank you so much – again – Dedri for another wonderful tutorial! You make the CAL stressfree and enjoyable!
Minette says
Ek het gekroek in die laaste ry, maar dit lyk reg!
Dedri Uys says
Lol. Dit maak nie saak nie x