
Block 11 of the Block a Week CAL (hosted by Kimberly Slifer) is Melinda Miller’s Wish Upon A Star.
If this is the first you’ve heard of the CAL, it’s not too late to join in. You can read more about the CAL, and see a list of all the squares to date, HERE.
Wish Upon a Star
{Pattern © Melinda Miller. Photo tutorial done with kind permission}
Please Note: This pattern was updated in 2018 with significant changes. Please consult the written pattern for the updated version.
Pattern
The pattern is available as a Free Ravelry download HERE.
Suggested Materials
- 5 mm Clover Amour Crochet Hook (US H/8 UK 6)
- Worsted weight yarn
Size
- Using the hook and yarn specified, your square should be a nice even 12″ when you are done.
- Using a 4 mm crochet hook (US G/6 UK 8) and double knit yarn, as I have done, your finished square will be about 8″ big.
My Yarn and Colour Choices
I am using the Stylecraft Special DK.
- Saffron (Rounds 1, 2 and 12)
- Turquoise (Rounds 3, 4 and 13)
- Wisteria (Rounds 5-9 and 11)
- Pomegranate (Round 10)
- Meadow (Optional Additional Round 14)
You will notice that I used different colours when taking the photos for the tutorial. I got all the way to Round 10 and then decided that I didn’t like the way my block was turning out, so I started again with the colours listed above.
Notes
- The initial ch st’s in each round are counted as a stitch, except in Rounds 6 and 7.
- Each round is joined by making a sl st into the top of the initial ch-3. If you prefer to start your rounds with a standing double crochet, you should join to the top of the standing double crochet. {See this tutorial by Tamara from Moogly if you would like to learn how to start a round with a standing double crochet.}
- Stitch counts have not been supplied, so I have added them here.
- US Crochet Terminology used. (See this comparative chart if you need help transcribing from US to UK)
- Please Note: The yarn used in most of the tutorial photos is Drops Paris Cotton.
Corrections
Round 11 – see photo tutorial below.
Wish Upon a Star Photo Tutorial
This photo-walkthrough is NOT the actual pattern and should not be used instead of the pattern, but rather in conjunction with it.
Thank you very much to Melinda Miller for giving us permission to do this photo-tutorial for her Wish Upon a Star Crochet Square. And a special thank you to Kimberly Slifer for letting me do these tutorials and for obtaining the necessary permission.
Round 1
You can start this round with a magic ring instead of the initial ch-4.
Magic Ring Instructions for Round 1
Into a magic ring: ch 2 (this counts as your first hdc). Hdc x 8 into the ring and pull the ring tight. Join to the top of the initial ch-2 with a sl st. If you are not familiar with working into a magic ring, this video tutorial from The Crochet Crowd is very good. Please remember, when working into a magic ring you HAVE to work away your initial tail very well. If you just cut it, your whole square might unravel!

Stitch count: 9 hdc’s
Round 2
Round 2 doesn’t need explaining.
Stitch count: 18 hdc’s
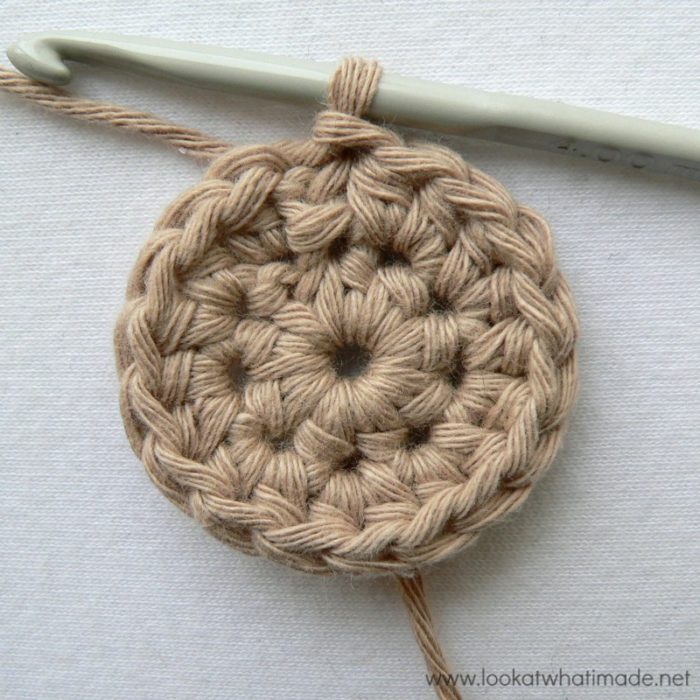
Round 3
In Round 3 you will make a shell into every third stitch (in other words, skipping 2 st’s between each shell).
First Shell: (ch 3, 2 x dc, ch 2, 3 x dc) all in the same stitch (Photo 1).
Subsequent Shells: (3 x dc, ch 2, 3 x dc) all in the same stitch (Photo 2).
You should end up with a pretty little hexagon (Photo 3).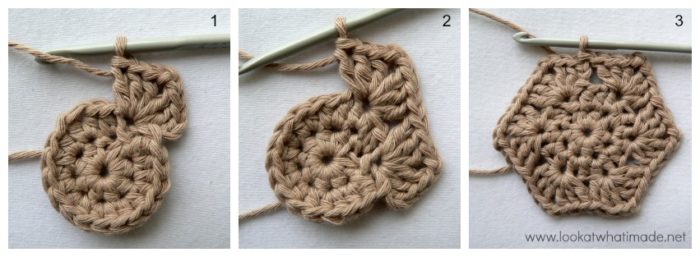
Stitch count: 6 shells {36 dc’s and 6 ch-2 spaces}
Round 4
- If you are going to use the same colour to make Round 4, sl st your way to the next ch-2 space (Photo 1). Into the ch-2 space: (ch 3, 2 x dc, ch 3, 3 x dc). See Photo 2.
- If you want to start this round with a standing double crochet, start in any ch-2 space around. Into the ch-2 space: (3 x dc, ch 3, 3 x dc). See Photo 3.
Whichever of the above methods you prefer, you should now have one “petal” made. Now sc in the space between the shells of the previous round (Photo 4).
*In next ch-2 space: (3 x dc, ch 3, 3 x dc). Sc in the space between shells (Photo 5).* Repeat around, joining to the third ch of the beginning ch-3 with a sl st. If you started this round with a standing double crochet, join to the top of the standing double crochet with a sl st.

Stitch count: 6 petals and 6 sc’s {36 dc’s, 6 sc’s and 6 ch-3 spaces}
Round 5
Sc in any ch-3 space (Photo 1). See this tutorial if you need a bit of help making this standing single crochet. *Ch 4 (Photo 2). Skip 3 dc’s and dc in the sc between “petals” (Photo 3). Ch 4, skip 3 dc’s and sc in the ch-3 space of the next “petal” (Photo 4).* Repeat around as instructed in the pattern.
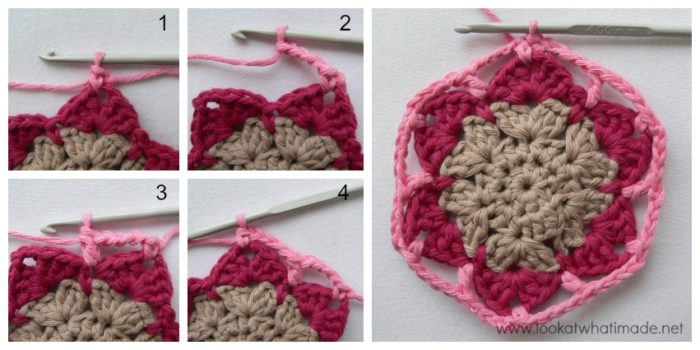
Stitch count: 6 dc’s, 6 sc’s and 12 ch-4 spaces
Round 6
Sl st into the next ch-4 space (Photo 1). Ch 1 and make 6 sc’s into the first ch-4 space (Photo 2). Make 6 sc’s into each of the remaining ch-4 spaces (Photo 3). Join to the first sc with a sl st.
You will notice that you ignore the initial ch st because it doesn’t count as a st.
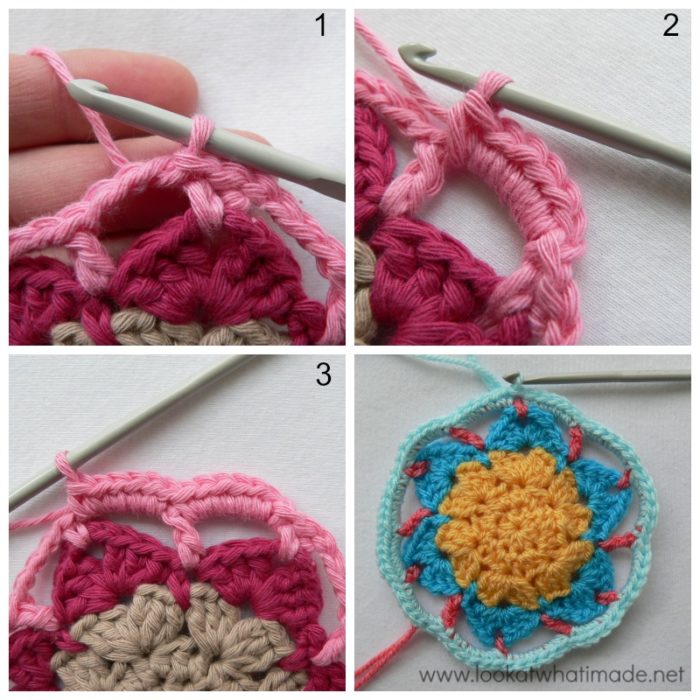 Stitch count: 72 sc’s
Round 7
In Round 7 you will start “squaring up”. Follow the instructions as in the pattern. Take a look at the stitch counts below if you want to check that your sides are correct.
Stitch counts:
- Total: 76 st’s and 4 ch-2 corners {8 tr’s, 16 dc’s, 24 hdc’s, 28 sc’s}
- Per Side: 19 st’s {2 tr’s, 4 dc’s, 6 hdc’s, 7 sc’s}
Round 8
Round 8 is a straightforward dc round and doesn’t need explaining.
Helpful Note: After you have made your initial ch-3, you will need to make 9 dc’s to reach the first corner. When you have worked your way around the square and get back to the first side, you will need to make 9 dc’s before you join to the initial ch-3 with a sl st. You need to make 19 dc’s between corners on each side.
Stitch counts:
- Total: 92 st’s and 4 ch-2 corners
- Per Side: 23 dc’s {19 dc’s between corners and 2 dc’s in each corner}
Round 9
Round 9 is breezy as well.
Stitch count:
- Total: 36 dc’s, 32 ch-2 spaces, 4 ch-3 corner spaces
- Per Side: 9 dc’s and 8 ch-2 spaces
Round 10
Another easy one.
Slip stitch into the corner ch-3 space. (Ch 3, 4 x dc) into the corner space. The initial ch-3 counts as a stitch, remember, so technically you have 5 dc’s in the corner space. You can also start with a standing double crochet if you prefer (Photo 1).
- In each ch-2 space around: 3 x dc.
- In each corner ch-3 space: 5 x dc.
If you are going to work over your tails of yarn, as I have done (arrow in Photo 2), make very sure that you block you square before securing your yarn tails, otherwise it is easy to pull the tails of yarn so tight that they distort your final block.
Stitch count: 116 dc’s {28 dc’s per side, NOT including the central dc of the 5-dc corner}
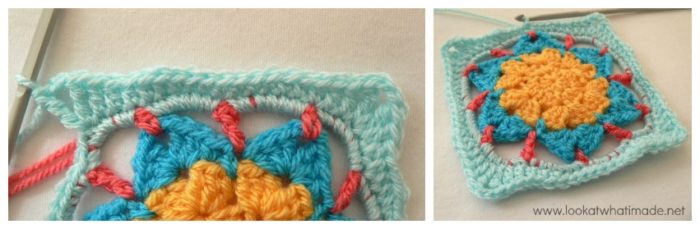
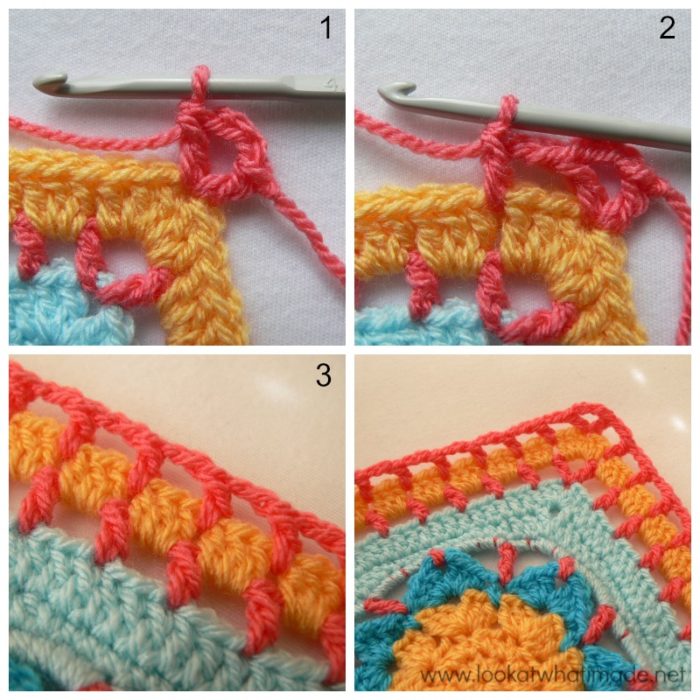
Round 11
There are some corrections in Round 11. I have made them bold below.
In Round 10 you worked 3 dc’s into each ch-2 space on each side. You will make the stitches of this round BETWEEN these 3-dc clusters.
Join new colour with a sl st in the third dc of any 5-dc corner group. Ch 6 (this counts as your first dc and ch-3). Dc in the same st (Photo 1).
{Ch 2. Skip 2 dc’s and dc between the posts of the next 2 dc’s. This dc should fall directly above the dc from Round 9 (Photo 2). *Ch 2, skip 3 dc’s and dc between the posts of the next 2 dc’s. This dc should fall directly above the dc from Round 9 (Photo 3).* Repeat until you get to the 5-dc corner. Skip 2 dc’s. In the central dc of the 5-dc corner: (dc, ch 3, dc).}
Repeat the instructions between {} for each side, omitting the last corner. Join to the top of the beginning ch-3 with a sl st.
Stitch count:
- Total: 44 dc’s, 40 ch-2 spaces, 4 ch-3 corner spaces
- Per Side: 11 dc’s and 10 ch-2 spaces
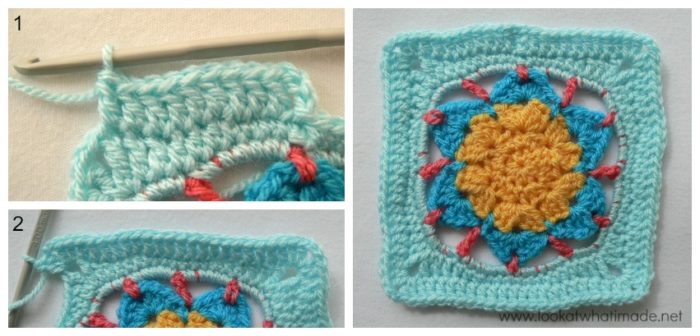
Round 12
Round 12 is a repeat of Round 10. I didn’t take a photo of this round because I decided to redo the square at this point and forgot that I hadn’t taken a photo yet. My bad.
Stitch count: 140 dc’s {34 dc’s per side, NOT including the central dc of the 5-dc corner}
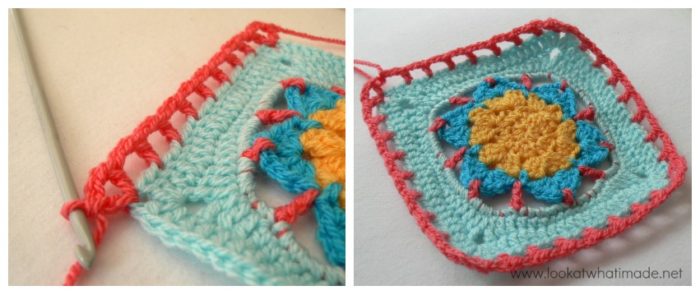
Round 13
Round 13 is a super easy hdc round. For the first side you will need to make 1 hdc before reaching the corner.

Stitch counts:
- Total: 148 hdc’s
- Per Side: 36 dc’s – NOT including the central hdc of the 3-hdc corners {34 hdc’s between 3-hdc corners }
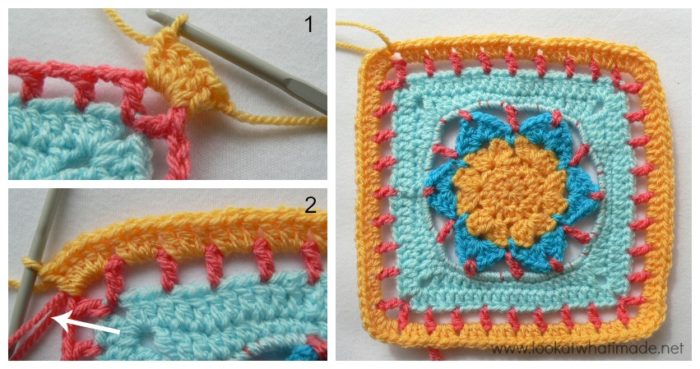
I have added an optional additional Round 14 to get my square to the same size as the others so far. You can find the instructions for that HERE.
You can find a list of all the squares HERE.
Remember to subscribe to my Weekly Newsletter if you would like to be kept in the loop. You can also like my Facebook page or follow me on Bloglovin, Google+, Pinterest, Twitter, or Instagram.

More Blogs Following the CAL
- San from Loopsan – using Stylecraft in sophisticated Parchment, Denim, Mocha and Meadow
- Lou Mander from Tea, Crochet and Me – using Stylecraft in White, Mocha and Raspberry
Happy Hooking!


Alicia Fierro Clavero says
Hi Dedri, I love your explanations and all your CALs. I recently crocheted your gorgeous Sophie’s universe and it was great fun! I love it and whoever sees it says: this is a work of art. I love the patterns and your masterful use of color.
I’m now going through this lovely CAL. And I want to ask you something:
I love the colors you make the step by step models with. Those ecru, and simple tan colors are my favorite. Can you tell me which brand are those. I guess they’re cotton. I hope I can find them here in Spain. Thanks so much again for the huge inspiration you are for many and so many more!
Alicia, Madrid (Spain)
Jenny says
Hi Alicia. I am sure Dedri used Drops Paris Cotton yarn in those photographs. I hope that helps. Jenny :)
Alyss says
Thanks! I don’t think I have that much yarn in the colors I wanted… but there is something called improvisation :). I’ll just add a couple other colors and stop when I run out. The over all blanket will be smaller, but hey! I’ll have fun ;). Now, I have 11 squares to catch up on, if you’ll please excuse me :)
Alyss says
Hey Dedri! I was wondering how much yarn you thought this blanket might take. I’m debating whether or not I can join. Of course I would LOVE to but I’m on a yarn “diet” where I’m going to buy as little yarn a possible till Christmas. I know it’s a hard question so I understand perfectly if you don’t know.
By the way, you blocks are BEAUTIFUL! That is what finally convinced me in the end to make blanket. :)
God Bless You,
Alyss
Dedri Uys says
Thank you, Alyss.
I have added a round to almost every square to get them to be 164/168 stitches in the last round…just to make it easier when I go to attach them. For the first 10 squares I used 250g of Stylecraft Special DK. That is roughly 750 meters. So I am guessing I will need 5 times that to complete the blanket (including attaching the blocks and border). So 3750 meters? Or 12 balls of stylecraft.
Hope this helps.
God Bless,
Dedri
San says
Lovely as usual <3 <3 <3. Even though I also liked your first version, why did you stop so close before the finish line with it? :)xx
Dedri Uys says
Hehe…I didn’t like the way the shrimp looked. I have a love/hate relationship with that colour. I was pretty annoyed with myself afterwards, because I didn’t really like the final version much more than the first. I struggle with my colours every week :(
Jolanda says
Hello Deirdre,
I would like to thank you for the photo tutorials on the CAL.
I am from the Netherslands and sometimes i dont understand the written pattern.
At those moments your photos are a big help.
Dedri Uys says
Thank you, Jolanda. I am always pleased to hear that they are helpful. It gives me the motivation to keep going on with them x
Sangeetha says
Wonderful tutorial. Your colors are so beautiful. Have a great week.
Dedri Uys says
Thank you Sangeetha :) You have a great week too!
Dane says
bonjour je vois que vous avancez bien dans ce cal c’ est très beau je fais moi aussi une jupe avec des grannys j’ avance bien bravo aux participantes
je mets un lien vers mon blog a bientôt biz
http://www.dane-et-le-crochet.fr/?post/2014/03/Grannys-pour-jupe-au-crochet
Carrie says
“My little Sunshine, my little Sunshine…”
Nice, sweet, simple, to the point. This will certainly brighten up my day.