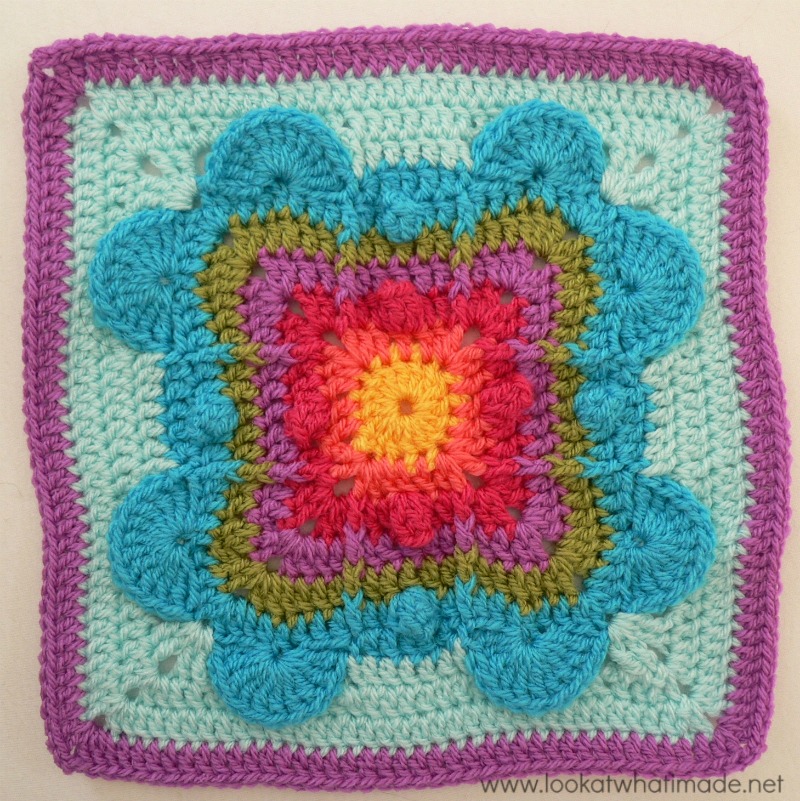
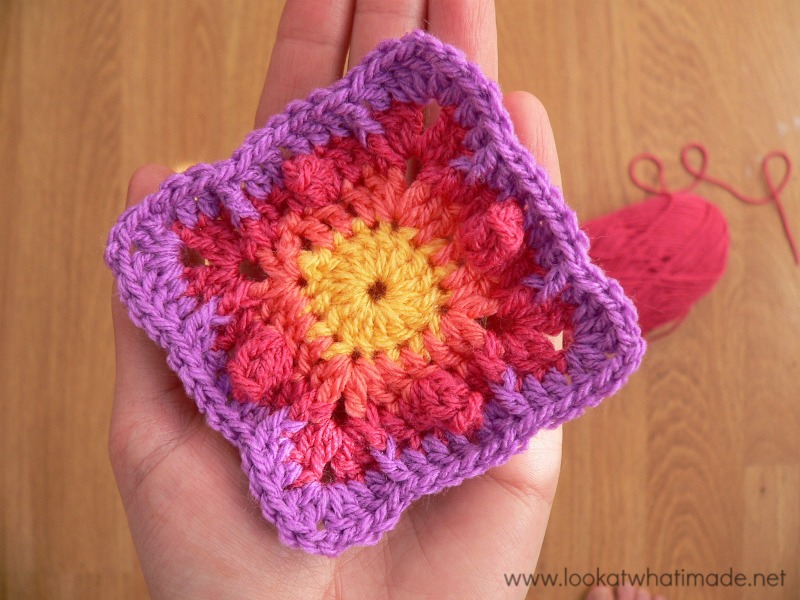
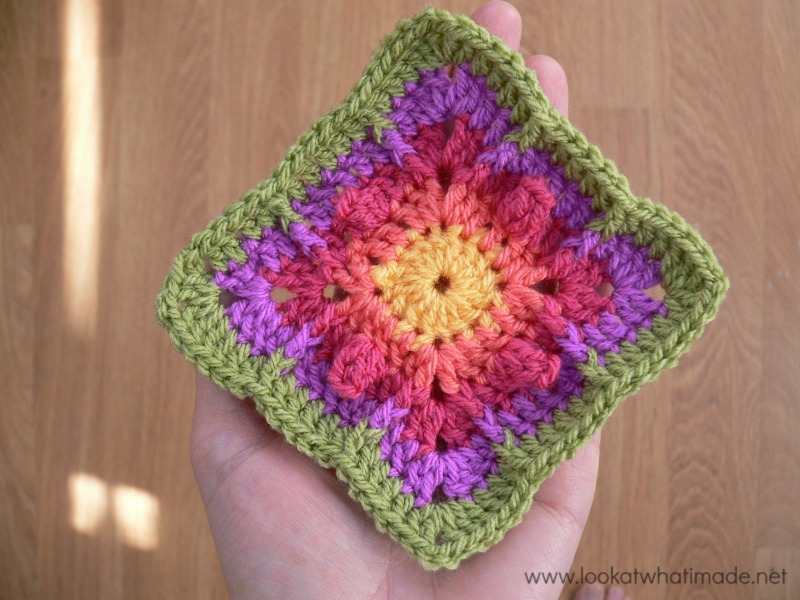
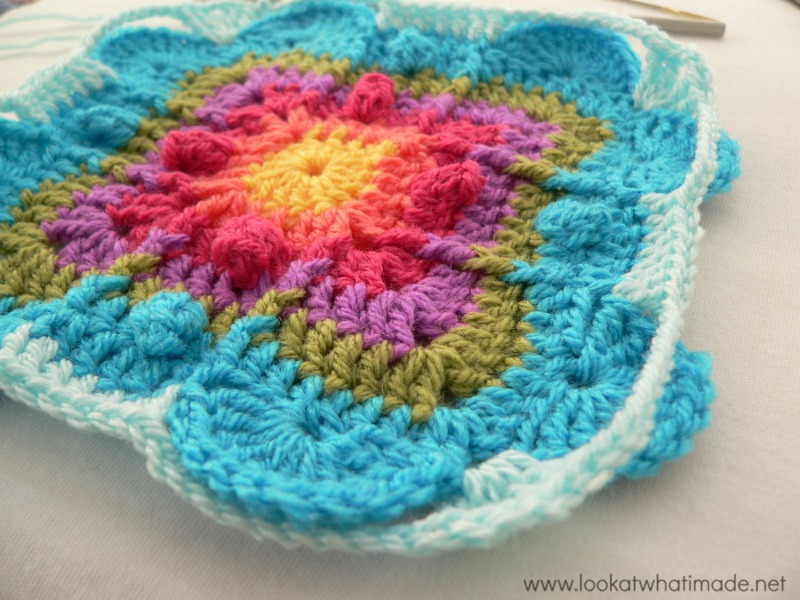
Block 9 of the Block a Week CAL (hosted by Kimberly Slifer) is Aurora Suominen’s gorgeous Never Ending Love Square. I found this square easy to work up and I love how mine turned out. I can see myself making a few more of these!
If this is the first you’ve heard of this CAL, please have a look at THIS POST. It contains all the information and links for the crochet-along.
Update June 2020: Aurora’s patterns are not currently available on her website. With her permission, I am now sharing the complete pattern for this square below.
Never Ending Love Square
Pattern © 2010 Aurora Suominen. Photo and pattern shared here with kind permission.
Add This Pattern to Your Ravelry Queue.
Suggested Materials
- 5.5 mm Clover Amour Crochet Hook (US I/9 UK 5)
- Worsted weight yarn
Size
- Using the hook and yarn specified, your square should be a nice even 12″ when you are done.
- Using a 4 mm crochet hook (US G/6 UK 8) and double knit yarn, as I have done, your finished square will be about 7.5″ big.
This square, like the Eight Pointed Flower from Week 7 and the Cocoa Puff from Week 8, comes out smaller than the rest so far. Feel free to add a round or two by repeating the last round.
My Yarn and Colour Choices
I am using the Stylecraft Special DK.
- Saffron (Round 1)
- Shrimp (Round 2)
- Pomegranate (Round 3)
- Magenta (Rounds 4 and Optional Additional Round 11)
- Meadow (Round 5)
- Turquoise (Rounds 6 and 7)
- Sherbet (Rounds 8-10)
Abbreviations
US Crochet Terminology
- Ch – Chain
- Dc – Double crochet
- Sl st – Slip stitch
- Sp/sps – Space/spaces
- St/st – Stitch/stitches
- Tr – Treble crochet
Punctuation
- [] – Stitches made into the same st/sp
- * – Repeat instructions between asterisks the number of times stated
Special Stitches and Techniques
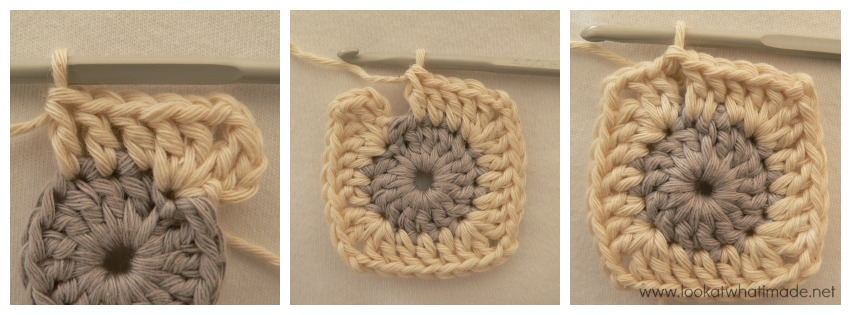
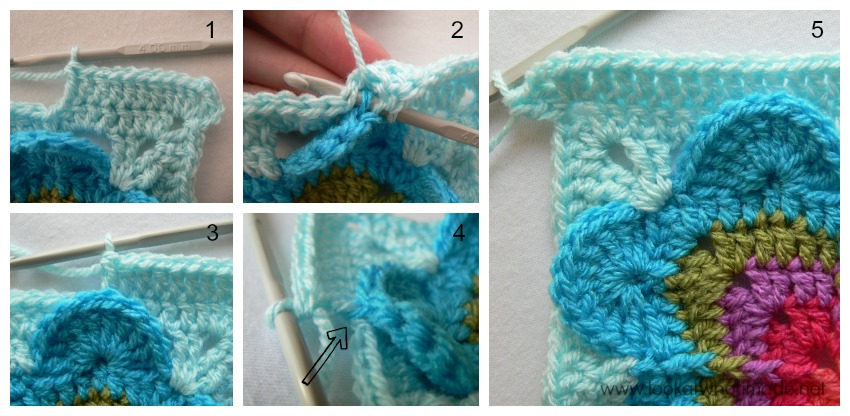
BEG CORNER (Beginning Corner)
Sl st until you get to the ch-2 corner sp. Sl st into the ch-2 sp (Photo 2). [Ch 3 (counts as the first dc), dc, ch 2, 2 dc] in the same ch-2 sp(Photo 3).

Alternative Beginning Corner
If you want to change colours at the beginning of a round, you can always start with a standing double crochet instead of the initial ch-3. That way you won’t have to sl st your way to the corner AND you won’t have to worry about changing colours seamlessly. If you are not familiar with the standing double crochet, see this excellent tutorial by Tamara from Moogly.

CORNER

Into the ch-2 sp: [2 dc, ch 2, 2 dc].
FPDC (FRONT POST DOUBLE CROCHET)
Yarn over. Insert your hook from front to back and then from back to front around the post of the indicated st. Yarn over and pull up a loop. *Yarn over and pull through 2 loops* twice.
As you can see, the front post double crochet is just a regular old double crochet worked around the post of the stitch, instead of into the loops at the top of the stitch. See this quick video tutorial if you need some help.
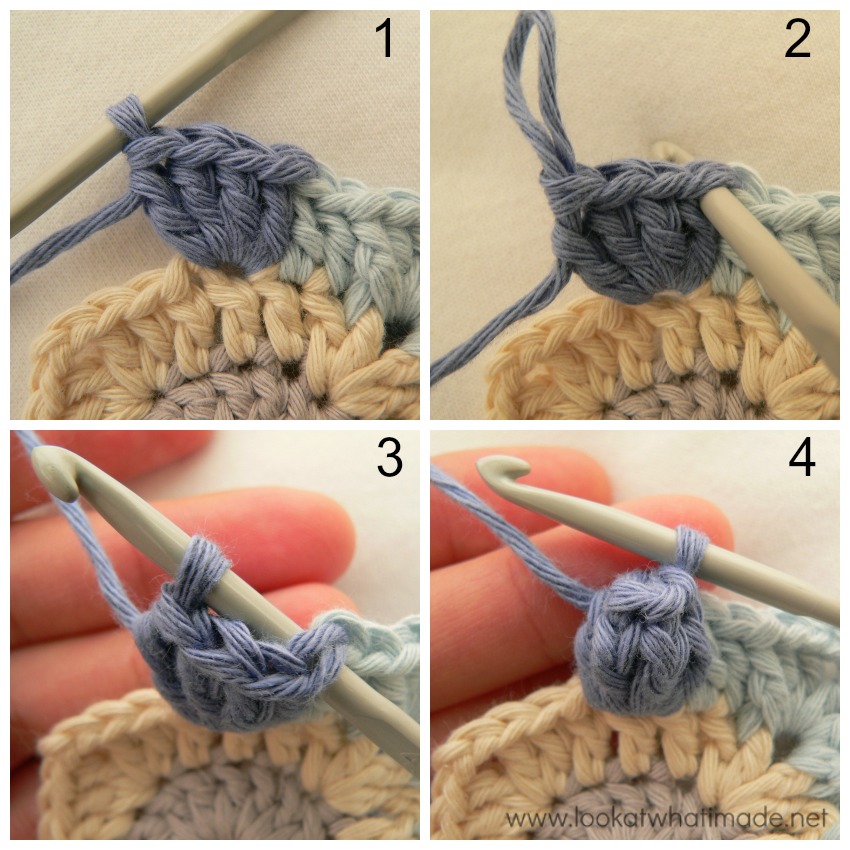
POPCORN
Make 4 dc into the indicated st/sp (Photo 1). Pull the stitch on your hook up a bit so that it forms a loop and then drop this loop. Insert your hook from front to back into the top of the first dc (Photo 2). Grab the dropped loop (Photo 3) and pull it through the top of the first dc (Photo 4).
Notes
- The initial ch sts in each round are counted as a stitch.
- Please Note: The yarn used in most of the tutorial photos is Drops Paris Cotton.
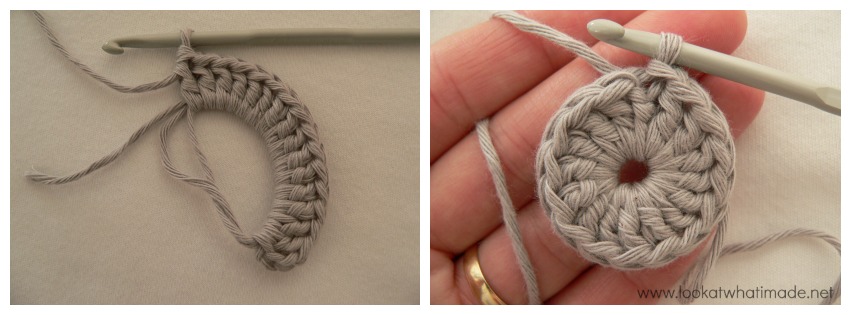
Round 1
You can start this round with a magic ring instead of the initial ch-4. If you are not familiar with working into a magic ring, this video tutorial from The Crochet Crowd is very good.
Ch 4. Join to the first st with a sl st to form a ring. Ch 3 (counts as first dc throughout), make 15 dc into the ring. Join to the top of the initial ch-3 with a sl st.
Stitch Count: 16 dc
Round 2
[Ch 3, dc, ch 2, 2 dc] in the same st as the sl st join. This is your first BEG CORNER made.
*Dc in the next 3 sts, [2 dc, ch 2, 2 dc] in the next st.*
Repeat from * to * 3 more times, omitting the last corner on the last repeat. Join to the top of the initial ch-3 with a sl st.
Stitch Count Per Side: 7 dc, not including ch-2 corner sps
Round 3
Make a BEG CORNER (Photo 1).
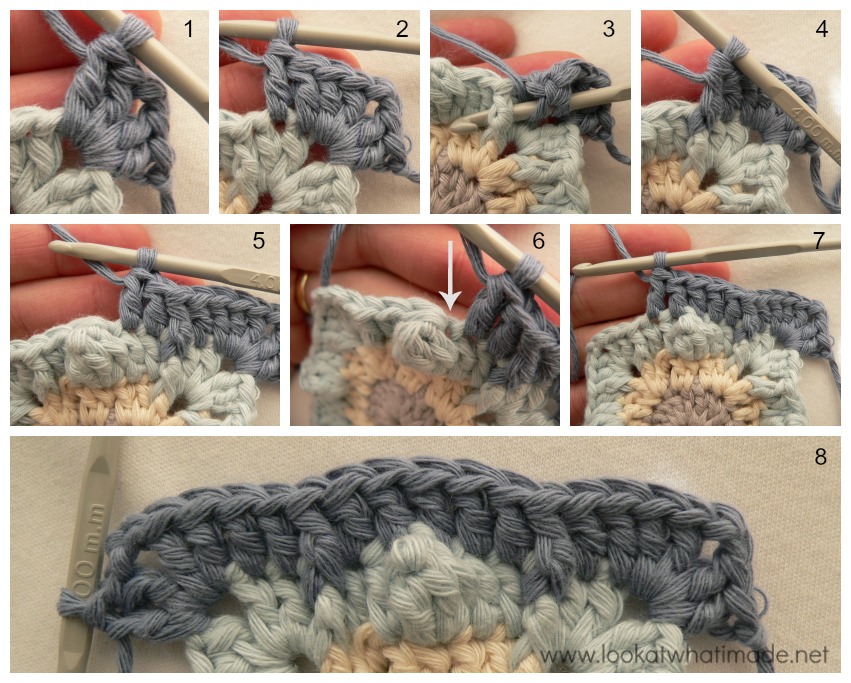
*FPDC around the next st (Photos 2 and 3). Dc in the next 2 sts (Phot0 4). Make sure that you make the first dc in the top of the next dc, which will be slightly hidden behind the Fpdc you just made. See THIS TUTORIAL if you need help identifying which loops belong to which stitch. Make a POPCORN in the next st (Photo 5). Dc in the next 2 sts (Photo 6). FPDC around the next st, which should be the last dc before the ch-2 corner (Photo 7). Make a CORNER in the next ch-2 sp.*
Repeat from * to * 3 more times, omitting the last corner on the last repeat. Join to the top of the initial ch-3 with a sl st.
Stitch Count Per Side: 8 dc, 2 FPDC, and 1 POPCORN, not including ch-2 corner sps

Round 4
In this round (and subsequent rounds), it is easy to accidentally skip the first st after the corner. Pay special attention, therefore, to the placement of your first st after each corner. The FPDCs in this round (and subsequent rounds) should fall around the post of the FPDCs in the previous round.
Make a BEG CORNER (Photo 1).
*Dc in the next 2 sts (Photo 2), FPDC around the next st FPDC (Photos 3 and 4). Dc in the next 5 sts (Photos 5 – 7). The third dc should fall in the first dc of the POPCORN in the previous round (indicated with an arrow in Photo 6). FPDC around the next FPDC, dc in the next 2 sts. Make a CORNER.*
Repeat from * to * 3 more times, omitting the last corner on the last repeat. Join to the top of the initial ch-3 with a sl st.
Stitch Count Per Side: 13 dc and 2 FPDC, not including ch-2 corner sps
Here is a peek of my square at the end of Round 4. See the glare on the colours? Someone (me) dropped my camera because someone (Xander) fiddled with the legs on the tripod it was standing on. And now it sounds like a baby rattle when I shake it and it has a bit of trouble focussing and adjusting brightness. Ah well… My little Lumix has served me well for 8 years, so I really can’t complain. But you guys might when my photos start getting progressively worse…
Round 5
Make a BEG CORNER.
*Dc in the next 4 sts, FPDC around the next st FPDC. Dc in the next 5 sts. FPDC around the next FPDC, dc in the next 4 sts. Make a CORNER.*
Repeat from * to * 3 more times, omitting the last corner on the last repeat. Join to the top of the initial ch-3 with a sl st.
Stitch Count Per Side: 17 dc and 2 FPDC, not including ch-2 corner sps
Round 6
Round 6 is straightforward as well. It is pretty much a repeat of Round 3 (obviously with more stitches). I’ve included some progress photos (just in case).
Make a BEG CORNER.
*Dc in the next 6 sts, FPDC around the next st FPDC. Dc in the next 2 sts. Make a POPCORN in the next st. Dc in the next 2 sts. FPDC around the next FPDC, dc in the next 6 sts. Make a CORNER.*
Repeat from * to * 3 more times, omitting the last corner on the last repeat. Join to the top of the initial ch-3 with a sl st.
Stitch Count Per Side: 20 dc, 2 FPDC, and 1 POPCORN, not including ch-2 corner sps
I do love this Turquoises!
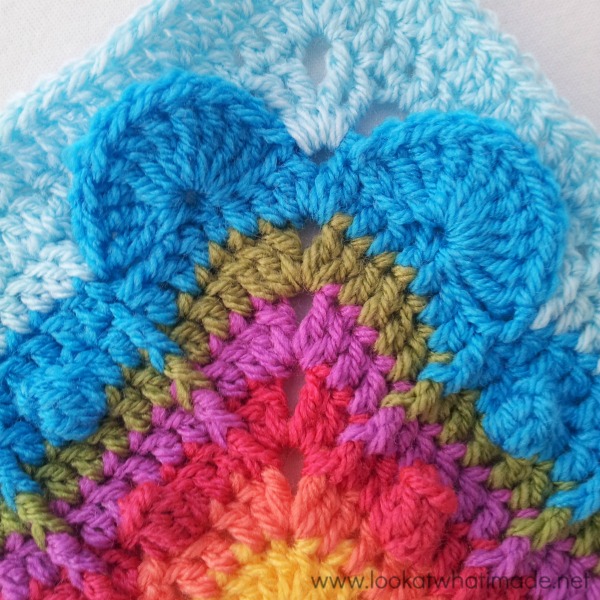
Round 7
Making the “Heart Humps” isn’t tricky at all, you just have to remember not to accidentally skip those “hidden” stitches. To help make it easier for you, I will give you some landmarks.
Sl st into the next dc. Skip the ch-2 corner sp, sl st into the next dc (Photo 1).
*Skip 3 dc and make 10 tr in the next dc to form a Heart Hump (Photo 2). Skip the next 3 dc and sl st into the next FPDC (Photo 3). Dc in the next 5 sts and sl st into the next FPDC (Photo 4). Skip the next 3 sts and make 10 tr in the next dc (Photo 5). Skip the next 3 dc and sl st into the next dc, which should be the last dc before the ch-2 corner sp. Skip the ch-2 sp and sl st into the first dc after the ch-2 space.*
Repeat from * to * 3 more times, omitting the last sl st on the last repeat.
Stitch Count Per Side: 20 tr and 5 dc, not including sl sts
I love how the little heart comes out.

And you will notice that I have included a random photo of the square from the back. Why? Because it made me think of my mom. When I was little and used to sew something (and I started sewing almost before I could walk!), my mom would always turn whatever I’d made inside-out and inspect the workmanship.
I used to say: “It doesn’t matter what it looks like where no-one can see!”, but as I’ve grown older I find myself caring more and more about making everything as neat as possible (even the bits no-one will see). I wish I could say the same about my house!
Ps. That FPDC line that looks like it’s going progressively skew…the square wasn’t flat when I took the photo. That line is actually very straight. Your FPDCs shouldn’t go wonky like that! If you have a look at the photo of the square at the end of Round 9, you will see that the FPDCs are all symmetric.
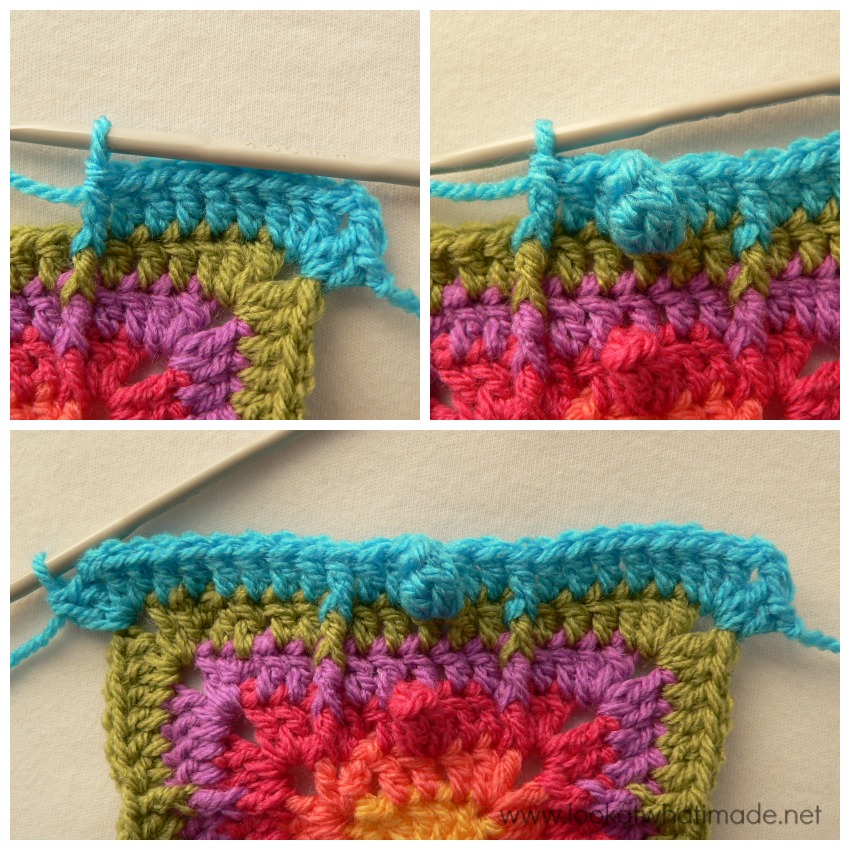
Round 8
Sl st into the next ch-2 corner sp from Round 6. Ch 4 (counts as tr throughout). [Tr, ch 2, 2 tr] in the same ch-2 sp.
*Ch 10 and skip the next Heart Hump. Dc in the next sl st. Dc in the next 5 dc. Dc in the next sl st. Ch 10 and skip the next Heart Hump. [2 tr, ch 2, 2 tr] in the next ch-2 sp from Round 6.*
Repeat from * to * 3 more times, omitting the last corner on the last repeat. Join to the top of the initial ch-4 with a sl st.
Stitch Count Per Side: 4 tr, 7 dc, and 2 ch-10 sps, not including ch-2 corner sps
- Photo 2 shows the ch-10.
- Photo 3 shows the 7 dc’s between the 2 ch-10 spaces on each side.
- Photo 4 is just a corner…how exciting!
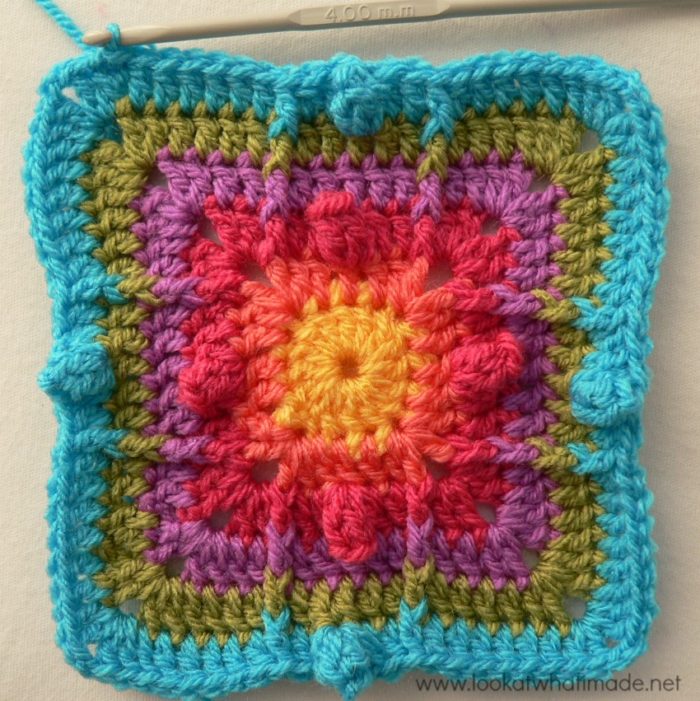
This is Round 8 completed…before Xander got his hands on it.
And this is what it looked like after my soon-to-be-two-year-old got hold of it. Yikes.

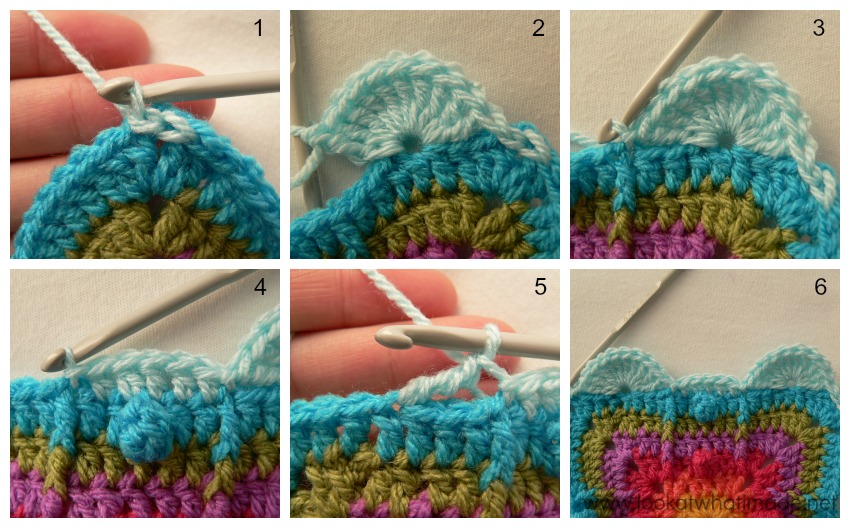
Round 9
In Round 9 you will be working into the ch-10 sps and anchoring them to the bottom of each Heart Hump. When making the tr in the middle of the ch-10 sp, insert your hook into the ch-10 sp AND into the back horizontal loop of the st from Round 7 you made your 10 tr sts into (Photos 2 and 3). If you flick your Heart Hump forward, you will see that there is a little loop right below the hole formed by making those 10 tr sts.
Don’t make the tr in front of the ch-10 (Photo 2). Rather make it OVER the ch-10 (Photo 3), as this will anchor the ch-10 and give you a neater finish.
Make a BEG CORNER.
*Dc in the next 2 sts. Make 4 dc in the next ch-10 sp. Working OVER the ch-10, make a tr in the back bump of the st from Round 7 that contains the 10 tr that form the Heart Hump. Make 4 more dc in the same ch-10 sp. Dc in the next 7 sts. Make 4 dc in the next ch-10 sp. Working OVER the ch-10, make a tr in the back bump of the st from Round 7 that contains the 10 tr that form the Heart Hump. Make 4 more dc in the same ch-10 sp. Dc in the last 2 sts. Make a CORNER.*
Repeat from * to * 3 more times, omitting the last corner on the last repeat. Join to the top of the initial ch-3 with a sl st.
Stitch Count Per Side: 31 dc and 2 tr, not including ch-2 corner sps
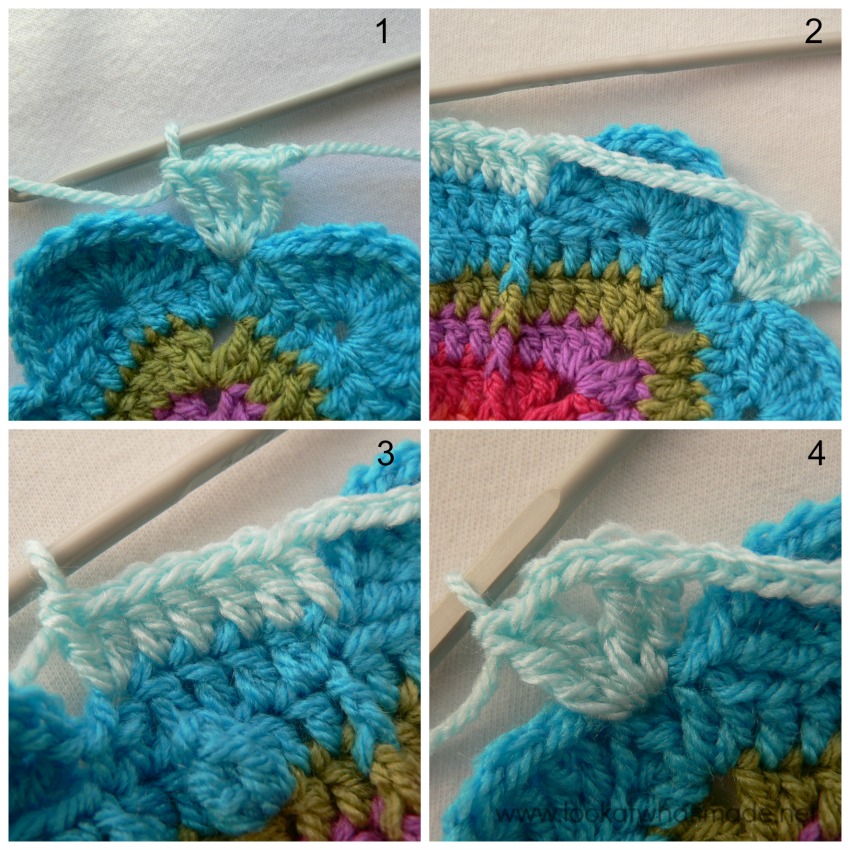
A close-up of the [4 dc, tr, 4 dc] worked into the ch-10 sp behind each heart hump:

Oooo…just one more round left…
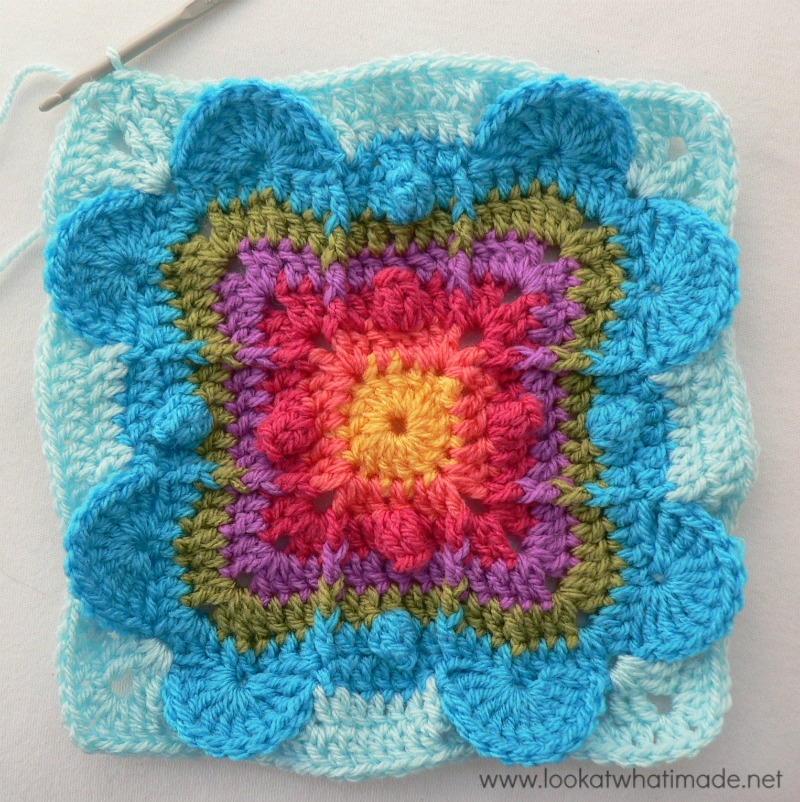
Round 10
Round 10 is the easiest of the lot. Just a whole lot of dc sts with the occasional corner. Making the last round as instructed will leave the tops of the hearts free so that they can flit backwards and forwards like butterfly wings. If you want to anchor them down, follow Alternative Round 10 below instead.
Make a BEG CORNER.
*Dc in the next 33 sts. Make a CORNER.*
Repeat from * to * 3 more times, omitting the last corner on the last repeat. Join to the top of the initial ch-3 with a sl st. Fasten off and work away your ends.
Stitch Count Per Side: 37 dc, not including ch-2 corner sps
Alternative Round 10
If you would like to “anchor” the tops of your hearts instead, you can do it like this:
Make a BEG CORNER.
*Dc in the next 8 sts (Photo 1). Make the next dc through the back horizontal loop of the central tr of the heart hump AND the next dc from Round 9 (Photo 2). You will find the back horizontal loop just behind the back loop of the relevant treble crochet. Working through the back horizontal loop instead of the back loop will make the join invisible from the front (Photo 3). Photo 4 illustrates the dc made through both layers. Dc in the next 15 sts. Dc into the next dc AND the central treble of the heart hump as before (so both layers). Dc in the next 8 sts. Make a CORNER (Photo 5).*
Repeat from * to * 3 more times, omitting the last corner on the last repeat. Join to the top of the initial ch-3 with a sl st. Fasten off and work away your ends.
Stitch Count Per Side: 37 dc, not including ch-2 corner sps
I have added an Optional Additional Round 11 to my square to get it to the same size as the others. You can find the instructions for that HERE.
Join the Block a Week CAL
You can find the rest of the squares in the CAL HERE.

This blog post contains affiliate links. I only link to products I personally use or would use. All opinions are my own.
More Blogs Following the CAL
- San from Loopsan – using Stylecraft in sophisticated Parchment, Denim, Mocha and Meadow
- Lou Mander from Tea, Crochet and Me – using Stylecraft in White, Mocha and Raspberry


Carmen says
Hello, I know it’s been maybe about a week, but any word on when the pattern for this square will be available?
Dedri Uys says
Hi Carmen.
Aurora has given me permission to add the instructions to my website for now. I will do that as soon as I have time. D
Phillipa Godfrey says
Hello again Dedri
I am having difficulty located the written pattern for this block. Would you be able to send me a link or the designers email contact, So love this one.
Many thanks
Phillipa
Dedri Uys says
Hi Phillipa.
I have just had a look on Ravelry and Aurora has sent out a message saying that she has removed all her squares from her blog for the time being. I have contacted her there to find out how we can continue sharing her gorgeous work. As soon as she gets back with an answer, I will update the post.
Dedri
phillipa Godfrey says
Awesome….thank you!
Pat Dehnke says
I couldn’t pass this one by on Pintrest. It mesmerized me. I just love it and the colors are amazing. Love all the pictures, I wish you had a tutorial for me as I am a slow learner but I will do my best. I am going to try to make a blanket for my niece’s baby.
Dedri Uys says
Hi Pat. I have done step-by-step photos for all the bits I thought would be tricky, so if you have a look at those, and print the full pattern (available under the ‘Pattern’ heading, you’ll be just fine :)
pam says
hi I am new to the group and was wondering how to download the patterns I have missed so far so I can catch up.
thanks, this is going to be fun!
Pam
Jenny says
Hi Pam!
There is a Print Friendly button at the end of each section that allows you to print off or make a PDF.
Hope you find it ok :)
Mabel Muuduri says
Thank you so much, this makes it so easier for the women to follow how to make a creative square.
Keep up the good work.
Jean says
Hi i want to do this pattern with the hearts in one colour like the 3 colour pattern not the multiple colours but am not sure where the hearts actually start
Jenny Lowman says
Hi Jean. If you look hard at the photos, you will see round 2 is the start of the bottom of the hearts, with the two inner stitches of the corners.
Hope that helps a bit.
Dedri Uys says
I am glad you found it useful, Cindy!
Carrie says
Lovely square I like the bright colors :)
I’ve noticed that in each of the tutorials you kindly made, you use a cotton yarn not the – am I right in saying acrylic? – yarn you have for the blanket. Does that mean you’re making two blankets?
Dedri Uys says
I wish, Carrie. I only use the cotton yarn for the first few rounds because they are generally more “tricky” and the cotton yarn just shows the stitches better…for me anyway. Now I have a whole bunch of cotton “flowers” from all the insides and I do have a project planned with them x