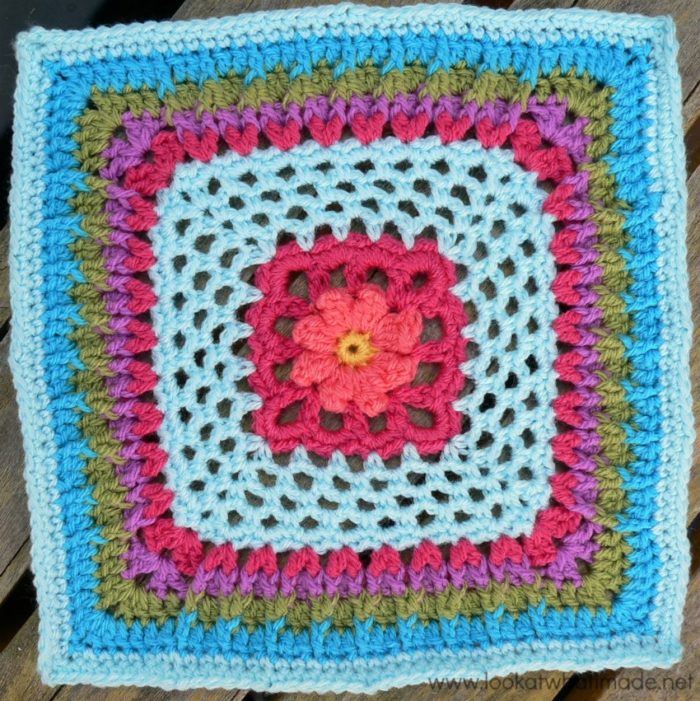
Block 17 of the Block a Week CAL (hosted by Kimberly Slifer) is Julee Reeves’ beautiful Winter Rose Square . This square might look complicated, but it is actually quite easy. You will have to concentrate, though! I absolutely love the front post detail in the last few rounds.
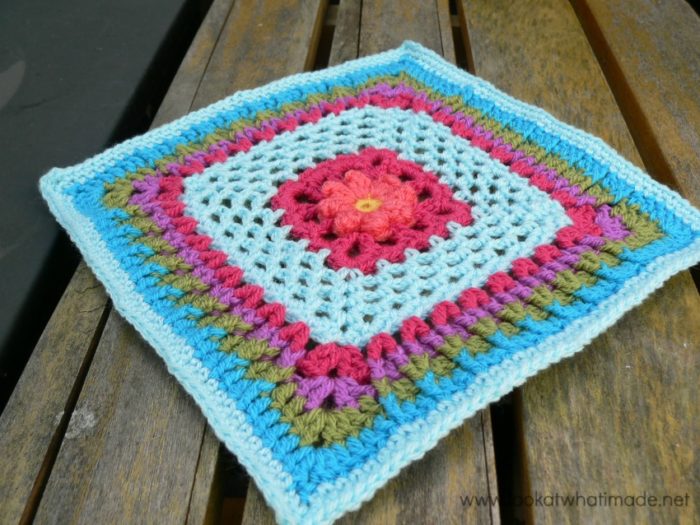
Winter Rose Crochet Square
{Pattern © 2008 Julee Reeves. Photo tutorial done with kind permission}
Pattern
- On Julee’s website
- Add to Ravelry queue
Suggested Materials
- 4 mm Clover Amour Crochet Hook (US G/6 UK 8)
- Worsted weight yarn
Size
This is a bit tricky. This square has 19 rounds, and using the hook and yarn specified you should get a nice even 12″ square when you are done.
Using a 4 mm hook (as specified) and double knit yarn, and making only the first 15 rounds, this square should be as big as the largest square we have made so far (Odyssey). It is completely up to you whether you want to continue on and make more rounds, but bear in mind that the stitch count at the end of Round 15 tallies with the stitch count of the largest square (Odyssey – Week 1). After blocking they should be the same size.
My Yarn and Colour Choices
I am using the Stylecraft Special DK. Most of the tutorial photos are done using Drops Paris Cotton because it photographs better.
- Saffron (Round 1)
- Shrimp (Round 2)
- Pomegranate (Rounds 3, 4, and 10)
- Sherbet (Rounds 5 – 9, 14, and 15)
- Magenta (Round 11)
- Meadow (Round 12)
- Turquoise (Round 13)
Notes
- The initial ch st’s in each round are counted as a stitch, except for the sc rounds, in which the initial ch st does NOT count as a stitch.
- Most rounds require you to sl st your way to the next stitch/space. Make sure that you don’t forget to do this, as I did on numerous occasions!
- US Crochet Terminology used. (See this comparative chart if you need help transcribing from US to UK)
Special Stitches
Hold your breath…we are going in!
- Popcorn Stitch – see this tutorial
- Shell – (2 dc, ch 2, 2 dc) into indicated space
- V-stitch – (dc, ch 1, dc) into the indicated space/stitch
- Front Post Double Crochet (Fpdc) – video tutorial by Tamara from Moogly.
- Front Post Double Crochet Two Together (Fpdc2tog) – see photo tutorial below
Optional for Round 17
Winter Rose Photo Tutorial
This photo-walkthrough is NOT the actual pattern and should not be used instead of the pattern, but rather in conjunction with it.
Thank you very much to Julee Reeves for giving us permission to do this photo-tutorial for her Winter Rose Square. And a special thank you to Kimberly Slifer for letting me do these tutorials and for obtaining the necessary permission.
Round 1
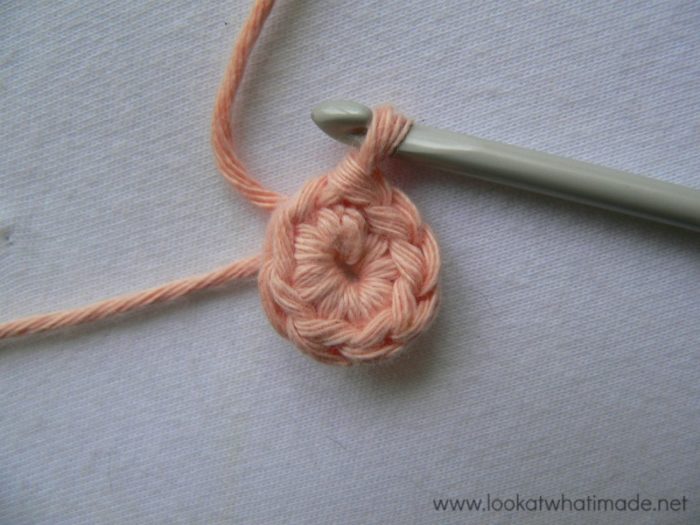
You can start this round with a magic ring instead of the initial ch-2.
Magic Ring Instructions for Round 1
Into a magic ring: ch 1 (this does not count as a stitch). Sc x 8 into the ring and pull the ring tight. Join to the first sc with a sl st.
If you are not familiar with working into a magic ring, this video tutorial from The Crochet Crowd is very good. Please remember, when working into a magic ring you HAVE to work away your initial tail very well. If you just cut it, your whole square might unravel!
Round 2
In Round 2, you will be making a Popcorn stitch in each of the 8 sc’s around. Don’t forget the 2 ch st’s between popcorns, otherwise your circle will become a tube!
Make a your first popcorn following the instructions in this tutorial. Ch 2. (Make a popcorn stitch and ch 2) in each of the remaining 7 st’s.
When you have made all 8 popcorns, join to the top of the first popcorn with a sl st and then sl st into the next ch-2 space.
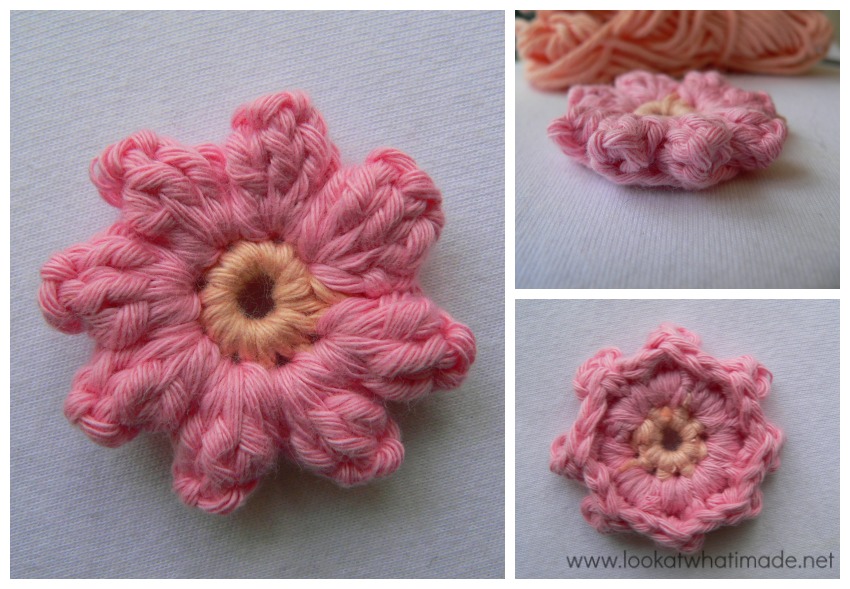 Stitch count: 8 popcorns and 8 ch-2 spaces
Round 3
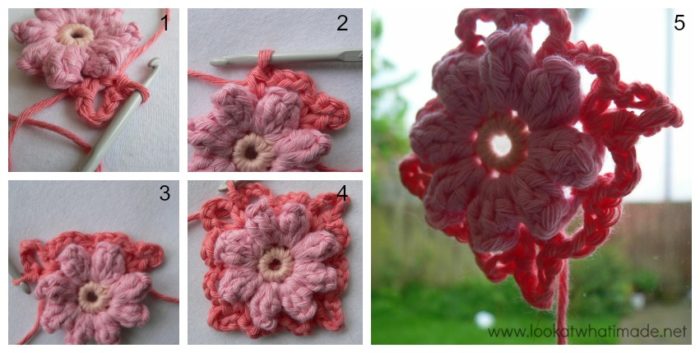 Stitch count: 12 sc’s, 8 ch-4 spaces, and 4 ch-5 spaces
Round 4
Make sure that you’ve slip stitched into the ch-5 space.
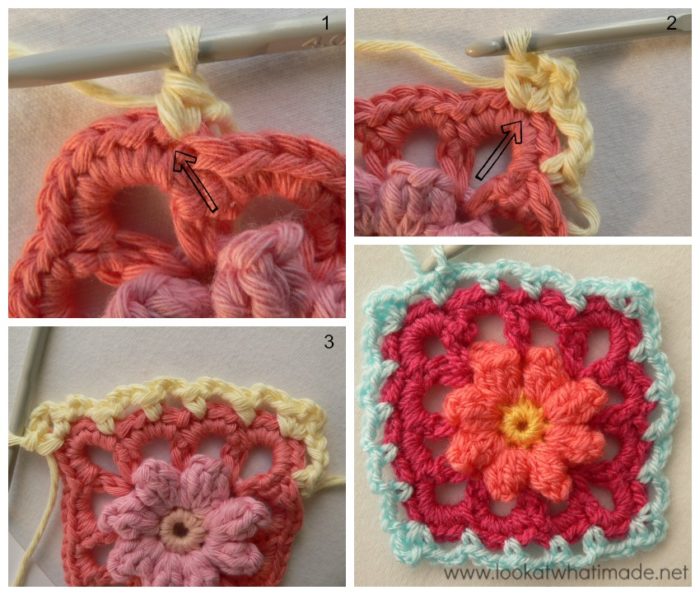
Ch 1. *Make 7 sc’s into the ch-5 space (Photo 1). Make 4 sc’s into each of the next 2 ch-4 spaces.* Repeat around as instructed in the pattern and join to the top of the first sc with a sl st.
Photo 2 shows one completed side with both corners done. Photo 3…well…that’s Xander examining my work for flaws. I don’t know if you can see by his eyes, but he had the cutest smile on his face!
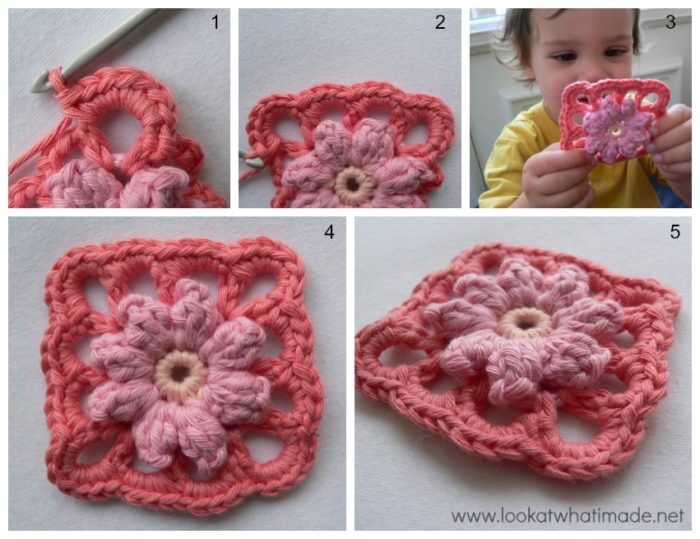 Stitch count: 60 sc‘s {14 sc’s per side, not including the central corner sc}
Round 5
This round is quite straightforward and I am not going to explain it here.
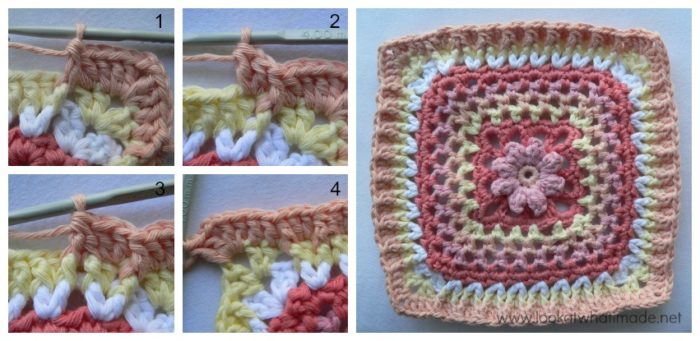
If you are changing colours, make sure that you start in the same stitch stitch as the sl st join. Your first sc should fall in the first sc of the seven corner sc’s (Photo 1). Your corner (sc, ch 3, sc) should fall in the fourth stitch of the seven corner sc’s (Photo 2).
Photo 3 shows you one completed side with both corners made. Photo 4 shows you the completed round.
Don’t forget to sl st into the next ch-3 space after joining with a sl st.
Stitch count: 24 sc’s and 24 ch-3 spaces {6 sc’s and 5 ch-3 spaces per side – not including the corner ch-3 space}
Round 6
Round 6 is similar to Round 5. Each sc should fall in a ch-3 space. Your corners should fall in the corners of the previous round.
Stitch count: 28 sc’s and 28 ch-3 spaces {7 sc’s and 6 ch-3 spaces per side – not including the corner ch-3 space}
Round 7
The same as Round 6, but with one more sc (and ch-3 space) on each side.
Stitch count: 32 sc’s and 32 ch-3 spaces {8 sc’s and 7 ch-3 spaces per side – not including the corner ch-3 space}
Round 8
Round 8 differs from the previous 3 rounds in that you will only be making 2 ch’s between sc’s – apart from the corners, which are still (sc, ch 3, sc).
At the end of Round 8, remember to sl st into the next ch-2 space after joining with a sl st.
Stitch count: 36 sc’s, 4 ch-3 spaces, and 32 ch-2 spaces {9 sc’s and 8 ch-2 spaces per side – not including the corner ch-3 space}
Round 9
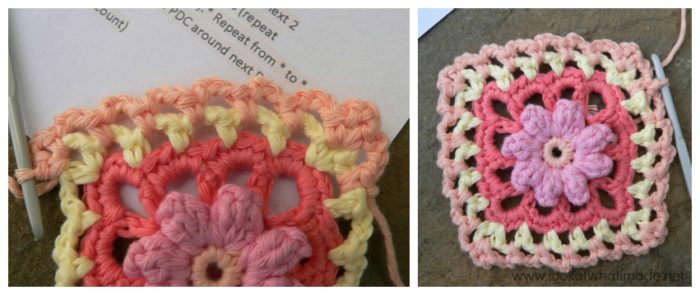
Starting in the next ch-2 space: ch 1 and make 3 sc’s in the same ch-2 space (Photo 1). This should be the last ch-2 space of the side. *(Sc, ch 3, sc) into the corner ch-3 space (Photo 2). Make 3 sc’s into each ch-2 space across.* Repeat around as instructed in the pattern and join to the first sc with a sl st. Sl st into the next sc.
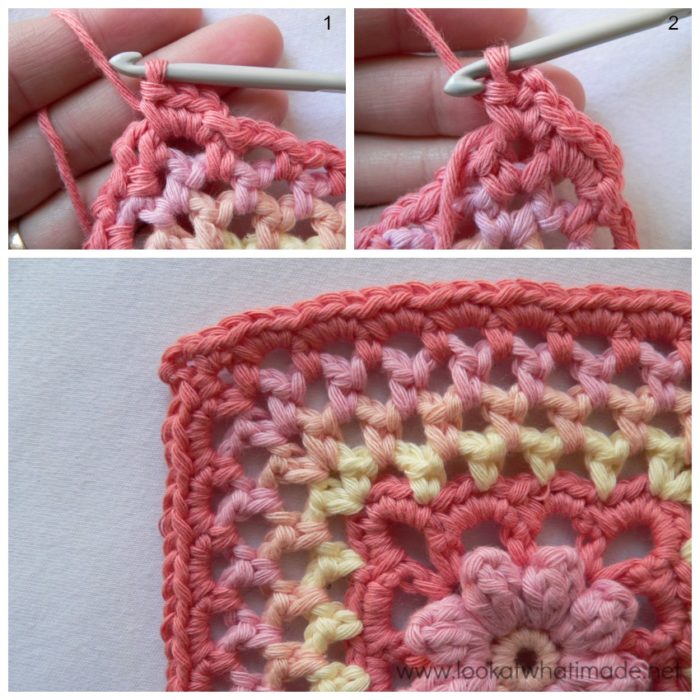 Stitch count: 104 sc’s and 4 ch-3 corners. {26 sc’s per side – 24 sc’s between corners}
Round 10
Start in the same st as the last sl st. This should be the second sc of the 3 sc’s made into the last ch-2 space of the side (Photo 1). You can start with a (ch-4, dc) as the pattern suggests, or you can start with (a standing double crochet, ch 1, dc) as I have done (Photo 2). This counts as your first V-stitch.
Skip the next 2 sc’s and make a Shell into the ch-3 corner space. To make the Shell: (2 dc, ch 2, 2 dc) into the corner ch-3 space (Photo 3).
*Skip the next 2 st’s, make a V-stitch in the next st* x 8. When you make the Shell in the corner, the top of the next st will be slightly hidden. Make sure that you don’t accidentally miss it and skip 3 st’s instead of 2. See this tutorial if you need more help with identifying which loops belong to which stitch.
Skip the last 2 st’s and make a Shell in the corner ch-3 space (Photo 4).
Repeat around as instructed in the pattern and join to the third ch of the beginning ch- 4 (or the standing double crochet) with a sl st. Sl st into the next ch-1 space! I forgot to do this, as you will see at the beginning of the next round. My bad!
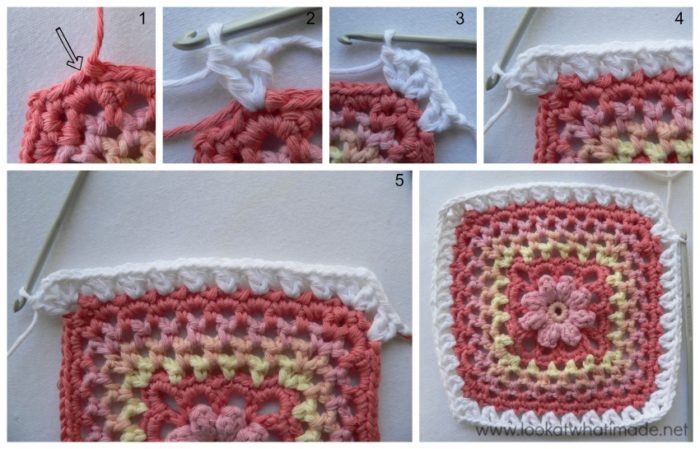 Stitch count: 32 V-stitches and 4 Shells {80 dc’s, 32 ch-1 spaces, and 4 ch-2 spaces – 20 dc’s per side}
Round 11
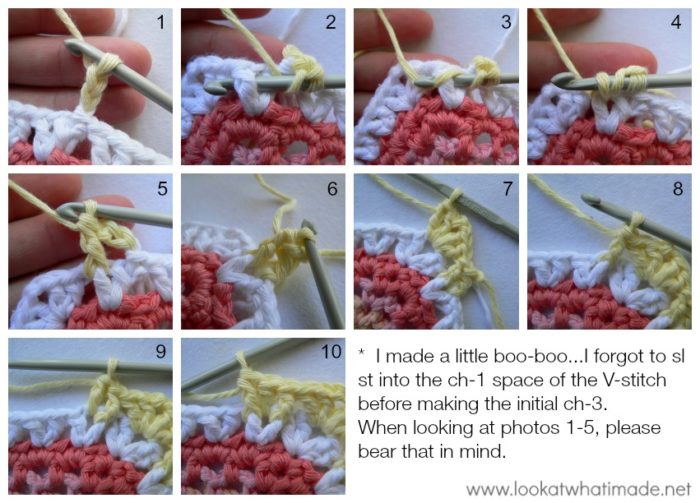
I made a little boo-boo at the beginning of this round. I accidentally corrected it from Photo 6 onwards, only realizing what had happened when I was looking at the photos.
Please note that you should start this round in the ch-1 space of the last V-stitch of the side, not in the first dc of the last V-stitch as I have done.
You can start with a ch-3 (Photo 1) or a standing double crochet (see Photo 6 onwards). Once you have made that first st, fpdc around the post of the next dc, which should be the last dc of the last V-stitch of the side. To make the fpdc, insert your hook from front to back around the post of the next dc (Photo 2). Yarn over (Photo 3) and pull up a loop (Photo 4). Complete your dc as normal (Photo 5).
Photo 6 shows you what the fpdc should look like from the side. Notice that it “pops” out of the crochet work.
Skip the next 2 dc’s. Make a Shell in the corner ch-2 space (Photo 7). Skip the next 2 dc’s.
*Fpdc around the next dc (Photo 8). Dc in the ch-1 space (Photo 9). Fpdc around the next dc (Photo 10)* x 8. You are basically repeating those 3 st’s for each V-stitch across.
Repeat as in the pattern and join to the top of the beginning ch-3 (or the standing double crochet) with a sl st.
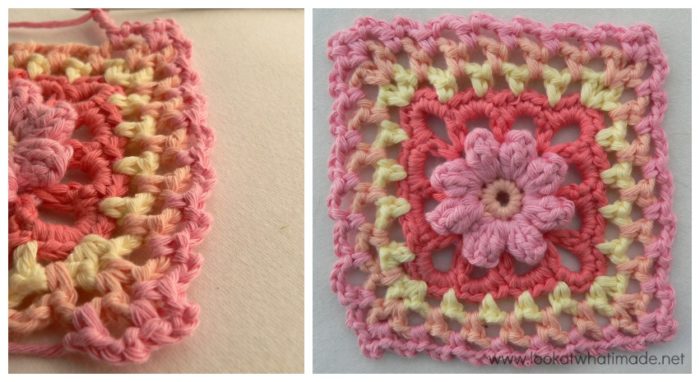
I thought you might find it useful to know what your work should look like from the back. It’s actually quite pretty.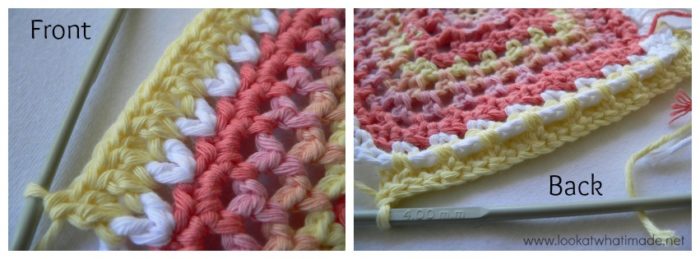 Round 11 Completed. Notice the skipped dc’s on either side of the corners. I got carried away at one point and forgot to skip them. Don’t do it!
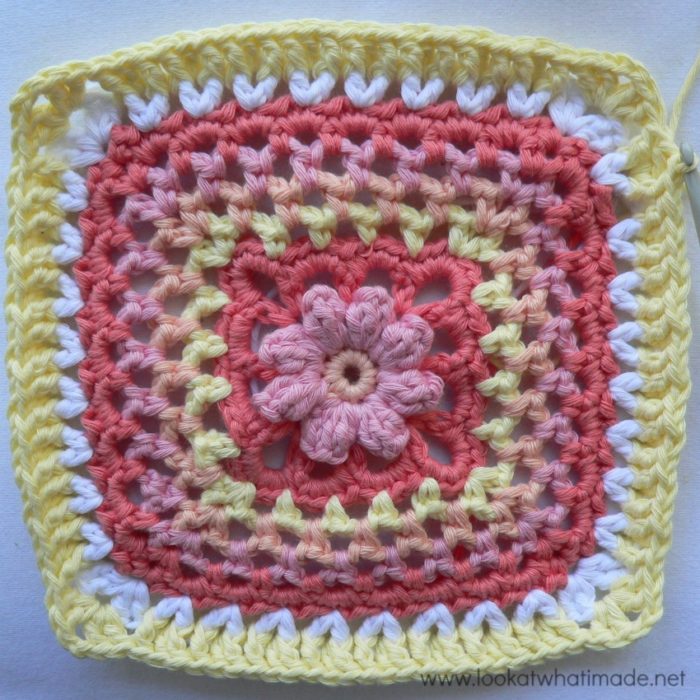 Stitch count: 112 st’s and 4 ch-2 spaces {12 dc’s and 16 fpdc’s per side}
Round 12
Before we do Round 12, I should probably tell you how to make a front post double crochet 2 together. This is the same as a dc2tog, but done around the posts of 2 stitches instead of into the top of the stitches.
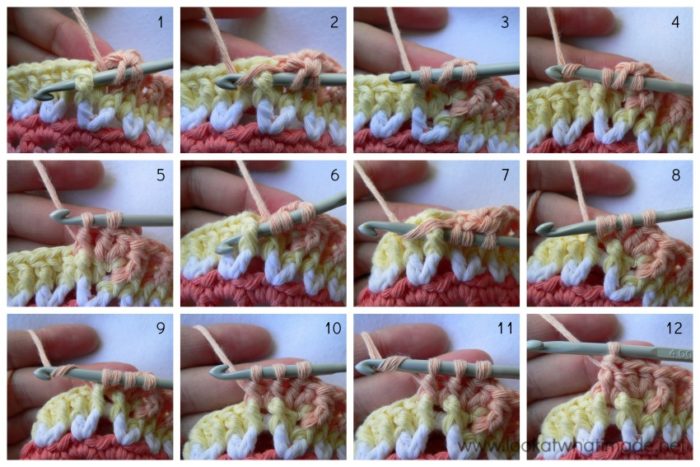
Front Post Double Crochet Two Together
Yarn over and insert your hook from the front to back and again from back to front around the post of the next stitch (Photo 1). Yarn over (Photo 2) and pull up a loop (Photo 3). There should be 3 loops on your hook. Yarn over (Photo 4) and pull through 2 loops (Photo 5). There should now be 2 loops on your hook.
Yarn over and insert your hook from front to back and again from back to front around the post of the next stitch (Photo 6). Yarn over (Photo 7) and pull up a loop (Photo 8). There should be 4 loops on your hook. Yarn over (Photo 9) and pull through 2 loops (Photo 10). There should now be 3 loops on your hook. Yarn over (Photo 11) and pull through all 3 loops (Photo 12).
Congratulations! You have now completed one front post double crochet two together.
Round 12 starts with a (Ch 3, dc) in the same st as the sl st join. Fpdc around the post of the next st, dc in the next 2 dc (which will be the 2 dc’s of the corner in the previous round) and then (2 dc, ch 2, 2 dc) in the next ch-2 corner space. Dc in the next 2 st’s and fpdc around the post of the next fpdc. See Photo 1.
*Make 2 dc’s in the next st (Photo 2) and then make a fpdc2tog (Photo 3) * x 7. The fpdc2tog should fall over the two fpdc’s from the previous round. You are looking to get a zigzag effect.
Make 2 dc’s in the next dc and fpdc around the next dc. Dc in the next 2 dc. (2 dc, ch 2, 2 dc) in the ch-2 corner space (Photo 4).
Repeat around as instructed in the pattern. Join to the top of the ch-3 (or the standing double crochet) with a sl st.
 Stitch count: 132 st’s and 4 ch-2 spaces {33 st’s per side – 24 dc’s, 7 fpdc2tog, and 2 fpdc’s per side}
Round 13
Ch 3 and dc in the next st. Alternatively make a standing double crochet in the same st as the sl st join and dc in the next st. (Photo 1).
**Fpdc around the fpdc (Photo 2). Dc in the next 4 dc’s. (2 dc, ch 2, 2 dc) into the ch-2 corner space (Photo 3). Dc in the first 4 dc’s (Photo 4). Fpdc around the fpdc and dc in the next 2 st’s (Photo 5). *Fpdc around the fpdc2tog, dc in the next 2 st’s (Photo 6)* x 7.**
Repeat around as instructed in the pattern. Join to the top of the beginning ch-3 or standing double crochet with a sl st.
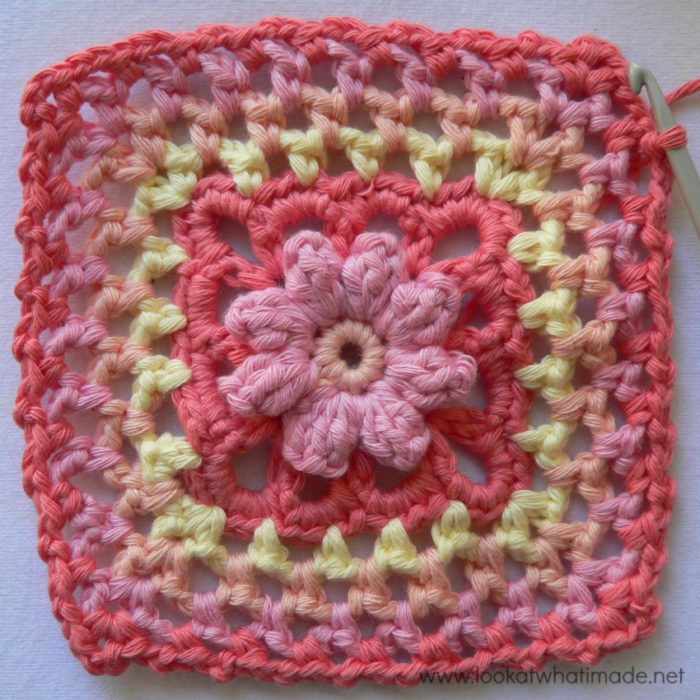
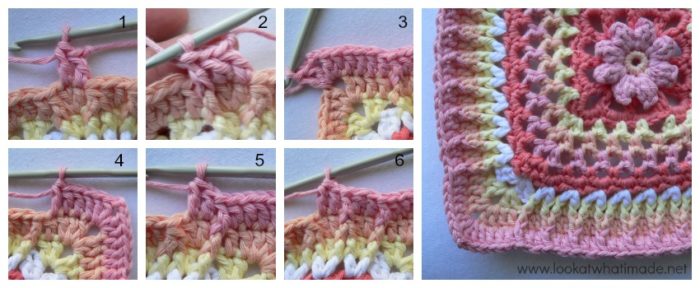 Stitch count: 148 st’s and 4 ch-2 spaces {37 st’s per side – 28 dc’s and 9 fpdc’s}
Round 14
Round 14 is a simple sc round. The only unusual thing is that the corners are not made into the ch-2 space, but into the actual chain stitches.
When working into the chains like this, it can sometimes obscure the loops of the first st after the corner. Make sure that you don’t accidentally skip the first stitch after the corner.
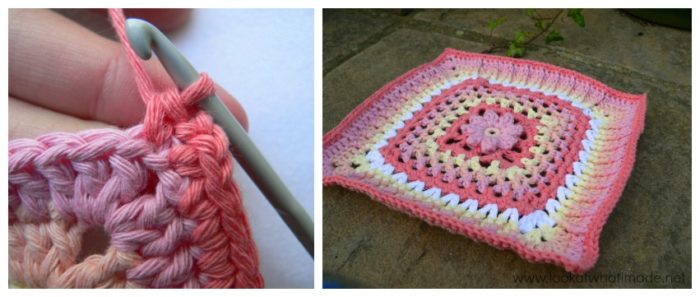 Stitch count: 156 sc’s and 4 ch-2 spaces {39 sc’s per side}
Round 15
Round 15 is a repeat of Round 14.
Stitch count: 164 sc’s and 4 ch-2 spaces. {41 sc’s per side}
Join the Block a Week CAL
If you would like to be part of the Block a week CAL on Facebook, please join the Official CCC Social Group (you must be logged into Facebook to do so) so that you can access and utilize the support and encouragement of all the lovely ladies on there.
You can also join the Block a Week CAL Flickr Group so that you can inspire others and be inspired yourself.
For those of you who do not like Facebook, you can always follow along with me here. I will be posting the blocks every week.
Remember to subscribe to my Weekly Newsletter if you would like to be kept in the loop. You can also like my Facebook page or follow me on Bloglovin, Google+, Pinterest, Twitter, or Instagram.
Happy Hooking!



Lynda says
Hi Dedri. I was working away on the blocks but took a break at this week to make a baby blanket for a friend. When I came back to the this block after a few weeks I think I started using the wrong size hook. I think I was using a 4mm but did this block with a 5mm. I only got to round 12 and my block is the same size as my other blocks? I have finished it on that round. Do you think I should go back to the 4mm for next weeks block? Hope that makes sense to you.
Thanks Lynda:o)
Dedri Uys says
I would go back to the 4 mm, Lynda, otherwise the discrepancy in final stitch counts is going to be huge when you come to joining them.
Cindy Arts says
Dear Dedri,
I’m so proud of my blocks and the techniques used in this cal2014, but that’s all possible because of your tips and very helpful foto-tutorials! Thanks you so very much for all your time and effort!
Dedri Uys says
Just a pleasure, Cindy :) And you should be proud. I’m proud of myself for learning all these new techniques too!
karina Leblanc says
Amazing as always!!! You take the confusion out of the pattern that’s what I love of your tuts thank you!!!
Dedri Uys says
Thank you, Karina :)
Rhondda says
Hi Dedri,
This is a lovely square and your tutorial is fabulous (as always!!) – I cannot wait to see your finished blanket!! It is going to be exquisite!
Hugs,
R
Dane says
merci pour ce beau tutoriel, ce granny est magnifique tes couleurs bien jolies bravo tu verras sur mon blog je fais des grannys moi aussi pour une jupe a bientôt biz
Carrie says
I love the way your doing the tuts now! It makes it so much more interesting. (bwt your little guy is adorable!). The cotton colors are so beautiful :)
P.S. I find these tutorials really helpful. Sadly not everyone writes patterns as well as you, and while I could figure it out, it eliminates a lot of headache :) THANK YOU!!!
Dedri Uys says
Thank you, Carrie. I’m glad you like them a bit more relaxed like this. I just needed to inject a little bit of “me-ness” into the posts. I was starting to feel like a machine!