Today we will be squaring up the large mandala (created by Parts 1 – 3 of the Universe) to create Sophie’s Garden. Up to this point the playing field has not been exactly level, because those who have heard of/made Sophie’s Garden before soon recognised it and knew roughly what to expect from the CAL up to this point. After today, however, the CAL will indeed be a mystery to everyone!
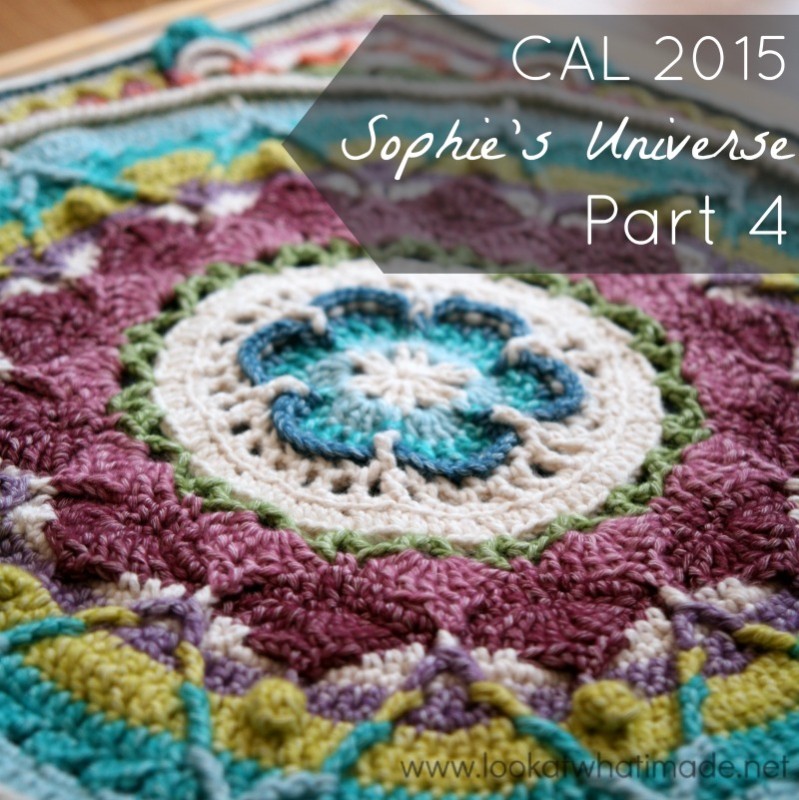
It is important to note that today will be the last time you will comfortably be able to stop until we get to Week 12 again. I can’t say more without giving the game away…
Sophie’s Universe CAL Part 4 {Sophie’s Garden}
©Dedri Uys 2014. All Rights Reserved.
Special design credit to Chris Simon for the use of a modified version of her Lace Petals flower.
Resources
- Add this CAL to your Ravelry Queue
- Sophie’s Universe CAL 2015 Information
- Use the Print-friendly button at the bottom (right) of this post to print/save this tutorial. Don’t know how? Find out HERE.
- **Part 4 VIDEO TUTORIAL** by Esther Dijkstra from It’s All in a Nutshell
Translations
- Dutch Photo Tutorial by Dianne Baan
- German Translation by Gabriele Rogers
- Spanish Translation by Lynda Hernandez
- Finnish Translation by Sari Åström
- French Translation by Sandra Larvin (with Video Tutorials by Géraldine Cymer)
- Danish Translation by Tina Poulsen
- Russian Translation (with Video) by Natalie V. Alimpieva
- Swedish CAL Information by Emma Vingqvist, Agnetha Magnusson, Åza Karlsson, and Ulrika Larsson
- Arabic Video Tutorial by Banan Felimban
Materials
See the Information Post.
Size
| Large | Medium | Small | |
| Sophie’s Universe Part 4 | 56 – 58 cm (22″ – 23″) | 46 – 48 cm (18″ – 19″) | 35.5 cm (14″) |
Abbreviations
US Terminology used (US/UK comparison chart here)
- Bpsc – Back post single crochet
- Bphdc – Back post half-double crochet (Squaring Up)
- Bpdc – Back post double crochet (Squaring Up)
- Bptr – Back post treble crochet (Squaring Up)
- Dc – Double crochet
- Fpdc – Front post double crochet
- Fphdc – Front post half-double crochet (Squaring Up)
- Fpsc – Front post single crochet
- Fptr – Front post treble crochet
- Hdc – Half-double crochet
- Sc – Single crochet
- Sl st – Slip stitch
- St/st’s – Stitch/stitches
- Tr – Treble crochet
- * – Repeat instructions between asterisks the number of times specified. This is a hardcore repeat and will consist of multiple instructions.
- () – Repeat instructions between parentheses the number of times specified. This is a lower level repeat.
Special Stitches
- Tr Cluster: Tr3tog – see this tutorial. Please note that we will be working around the front posts of the stitches, not into the tops of the stitches as in this tutorial.
- Standing Stitches – Standing sc’s, hdc’s, and dc’s are stitches used to start the round without the need for the traditional beginning chain. Links to tutorials are supplied in each relevant round.
Instructions
Rounds 1 – 25
You can find the links for Rounds 1 – 25 HERE.
Remember to check the Helpful Tips before starting Part 4. You will need to change to the recommended hook size at the start of this part if you started with a smaller hook (as suggested).
Round 26
In this round, you will be working around the back posts of the stitches from Round 24. Make very sure that you don’t accidentally skip a stitch or work around 2 posts at the same time. To help you with that I have included references to when you should end up at the next fpdc from Round 24.
Making the bptr’s for the corners might be a bit tricky, but I am sure you can manage!
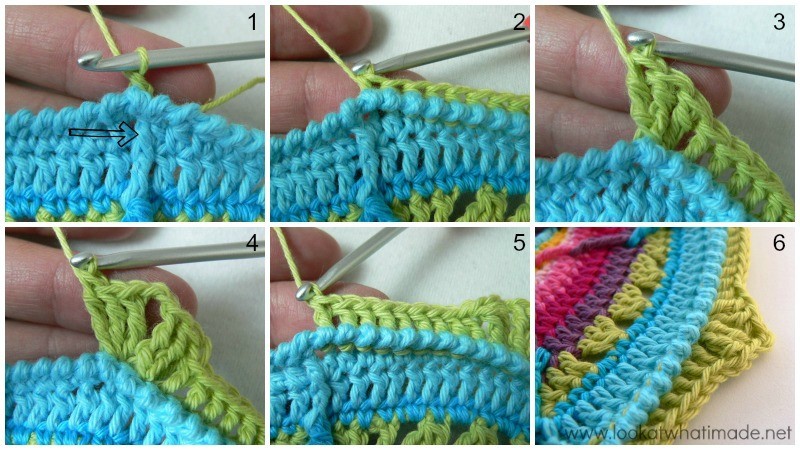
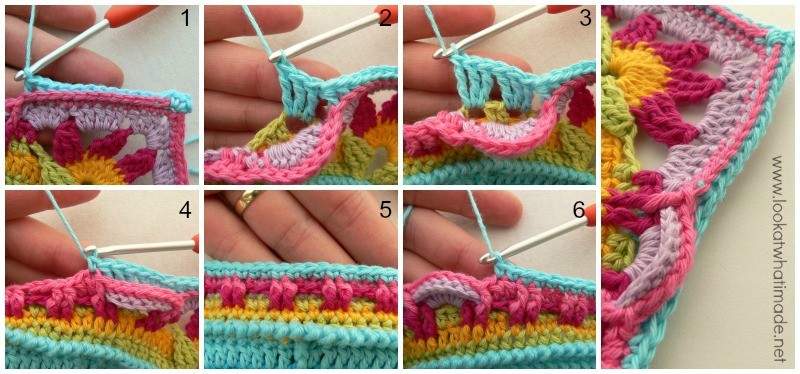
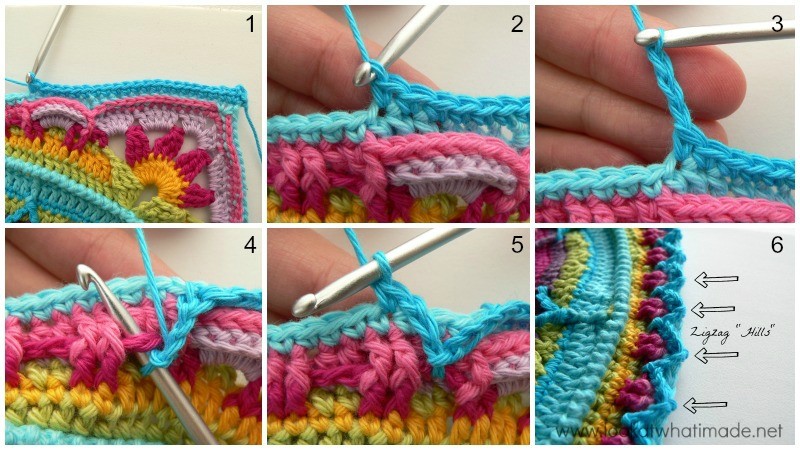
Join your yarn by making a standing single crochet around the back post of any fpdc from Round 24 {Photo 1}. Bpsc in the next 9 st’s.
*Bphdc in the next 10 st’s. The last bphdc should fall in the st before the fpdc from Round 24 {Photo 2}. Bpdc in the next 9 st’s. (Make 3 bptr’s in the next st, ch 2 and make 3 bptr’s in the next st.) This will form your corner {Photos 3 and 4}. Bpdc in the next 9 st’s. The last bpdc should fall in the stitch before the fpdc from Round 24 {Photo 5}. Bphdc in the next 10 st’s. Bpsc in the next 20 st’s.* Repeat from * to * 3 more times. Omit the last 10 bpsc’s on the last repeat. Join to the first sc with a sl st.
Stitch Counts:
- Total: 256 st’s and 4 ch-2 corner spaces {80 bpsc’s, 80 bphdc’s, 72 bpdc’s, and 24 bptr’s}
- Per Side: 64 st’s {20 bpsc’s, 20 bphdc’s, 18 bpdc’s, and 6 bptr’s}
Round 27
- If you are going to use the same colour, ch 1 and sc in the same st. Sc in the next 13 st’s.
- If you are going to use a different colour, start with a standing single crochet in the same st as the sl st join {Photo 1}. Sc in the next 13 st’s.
*Hdc in the next 3 st’s and dc in the next 12 st’s. The last dc should fall in the last bpdc before the 3 bptr’s that form the corner {Photo 2}. Skip the 3 bptr’s. Into the ch-2 corner space: (6 dc, ch 3 and sl st into the third ch from the hook to form a picot, 6 dc). It will be a tight fit getting all 12 dc’s into the corner space. Squish them up good {Photos 3 – 5}. Skip the 3 bptr’s. Dc in the next 12 st’s {indicated with an arrow in Photo 5 and illustrated in Photo 6}, hdc in the next 3 st’s, and sc in the next 28 st’s.* Repeat from * to * 3 more times. Omit the last 14 sc’s on the last repeat. Join to the first sc with a sl st. Fasten off and work away your tails of yarn.
Stitch Count:
- Total: 280 st’s and 4 corner picots {112 sc’s, 24 hdc’s, and 144 dc’s}
- Per Side: 70 st’s {28 sc’s, 6 hdc’s, and 36 dc’s per side}
Round 28
When you make the corners in this round, they will seem too tight for the round. Do not worry about it.
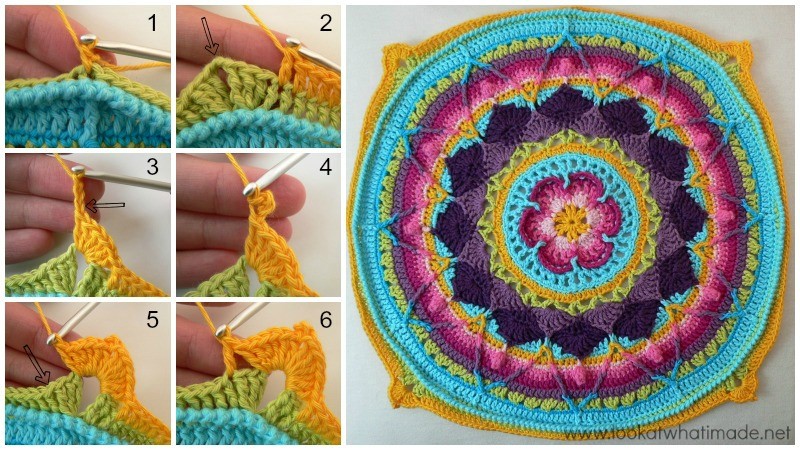
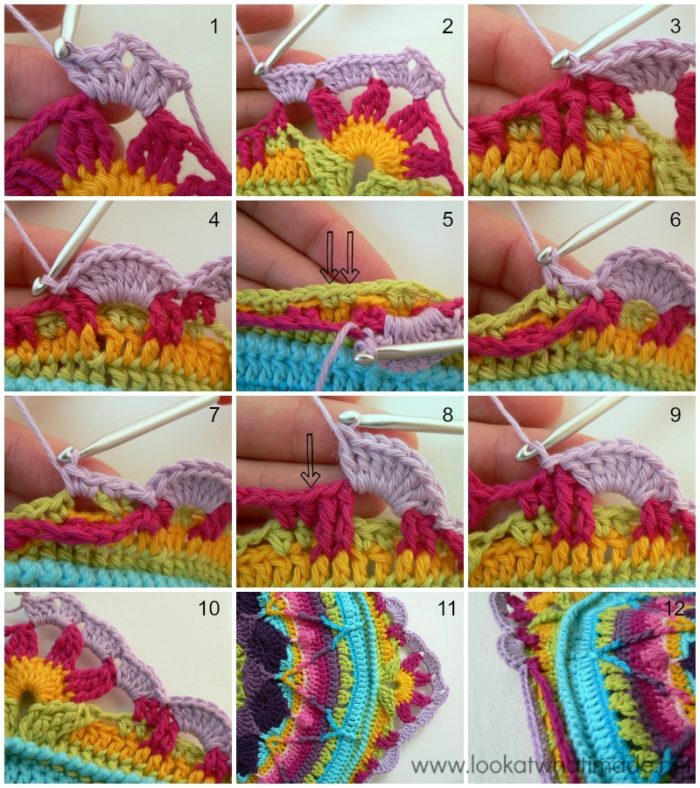
Join your yarn by making a standing single crochet in any ch-3 picot around {Photo 1}.
*Ch 4. Make a tr cluster, working around the front posts of the 3 bptr’s in Round 26 {Photos 3 and 4}. Ch 2 {Photo 5}. Skip the first 4 dc’s after the bptr’s. Hdc in the next 2 st’s {indicated with an arrow in Photo 6 and illustrated in Photo 7}. Ch 2, skip the next 2 st’s and hdc in the next 2 st’s. (Ch 2, skip the next 2 st’s and sc in the next 2 st’s) 9 times. (Ch 2, skip the next 2 st’s and hdc in the next 2 st’s) twice. There should now be 4 dc’s left before the bptr’s from Round 26 {Photo 8}. Ch 2. Make a tr cluster by working around the front posts of the 3 bptr’s in Round 26 {Photo 9}. Ch 4. Sc in the picot {Photo 10}.*
Repeat from * to * 3 more times, omitting the last sc on the last repeat. Join to the top of the first sc with a sl st. Fasten off and work away your tails of yarn.
Once you have completed the round, push the (ch-4, sc, ch-4) bits in each corner to the back of your work, never to be seen or used again {Photos 11 and 12}!
Stitch Counts:
- Total: 116 st’s, 8 ch-4 spaces, and 56 ch-2 spaces {8 tr clusters, 32 hdc’s, and 76 sc’s – including corner sc’s}
- Per Side: 29 st’s, 2 ch-4 spaces, and 14 ch-2 spaces {2 tr clusters, 8 hdc’s, and 19 sc’s – including corner sc }
Round 29
Except for 16 stitches, you will be working only into the stitches of Round 27 in this round. When working into the st’s from Round 27 below the ch-2 spaces, work in front of the ch-2 spaces, not over them!
You will notice that there is a fpdc in the instructions below that has been underlined, bolded, and made red. Why? Because a lot of people have gotten back to me to say that they missed the fact that those stitches should be fpdc’s, not fptr’s. Will the sky fall if I accidentally make them all fptr’s? Nope. Your square will just bulge the teeniest bit on each side.
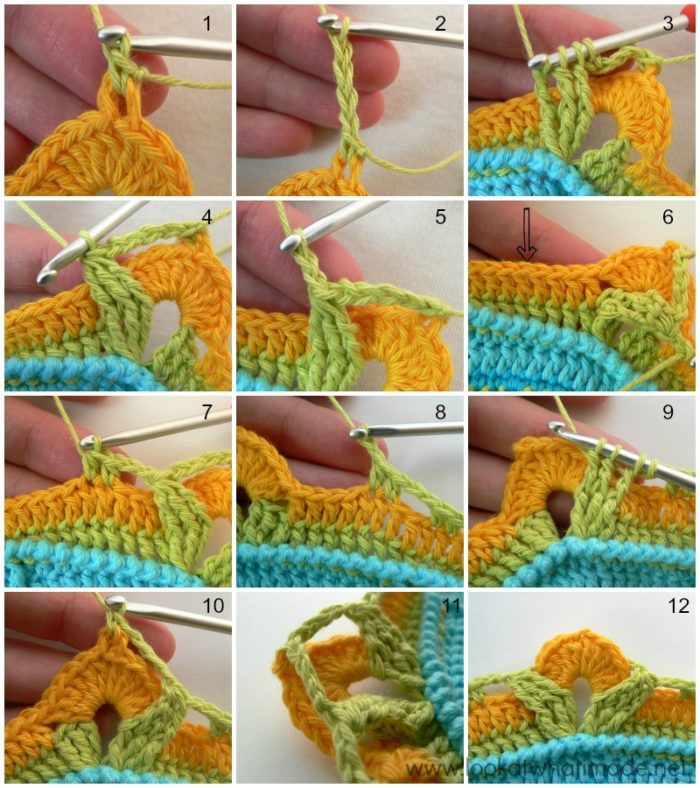
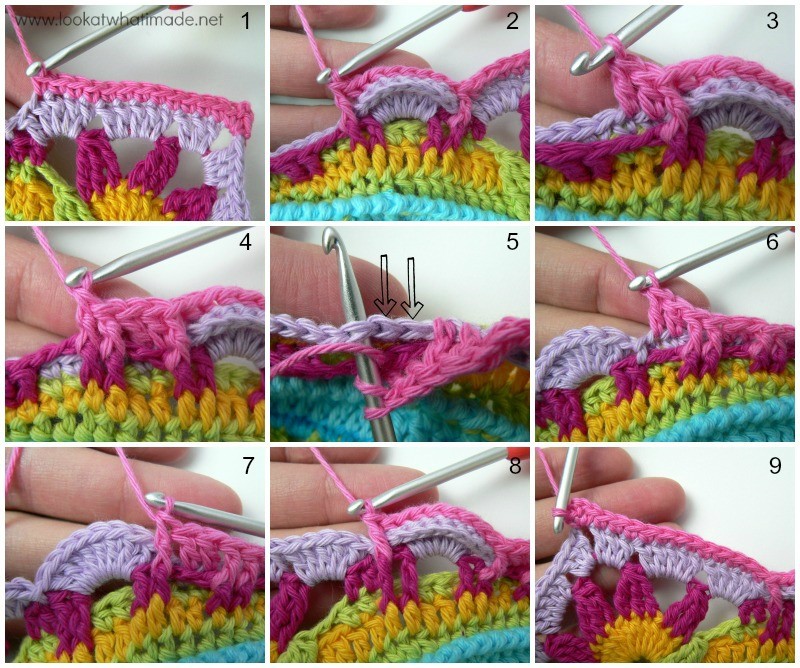
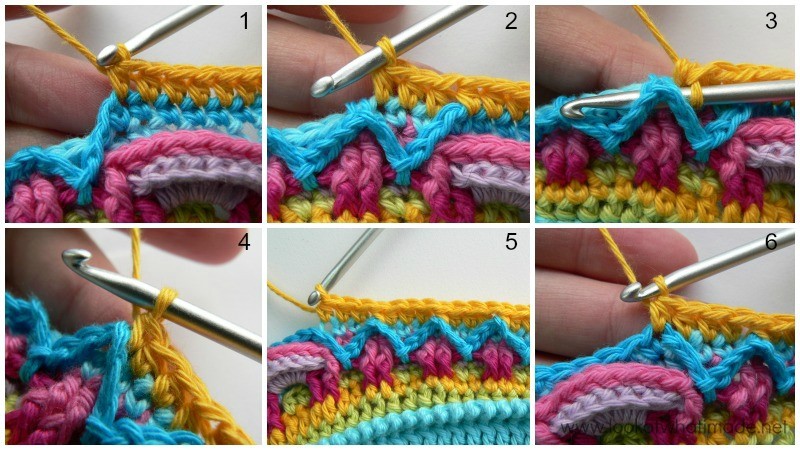
Join your yarn by making a standing half-double crochet in the second hdc from Round 28 on any side {Photo 1}.
*Fptr in the 2 st’s from Round 27 directly below the next ch-2 space {Photo 2}. Remember to work in front of the ch-2 space, not over it {Photo 5}. (Ch 2 and fpdc in the 2 st’s from Round 27 directly below the next ch-2 space {Photos 3 and 4}) 10 times. Ch 2 and fptr around the 2 st’s from Round 27 directly below the next ch-2 space. Hdc in the next 2 hdc’s from Round 28 {Photo 6}.
You will now be working into the half-circle formed by the (6 dc, picot, 6 dc) from Round 27, and in front of the ch-4 spaces from Round 28. You will have to push the “leaves” out of the way to find the first and last st’s of the half-circle {Photo 7}. Ch 2 and make a tr cluster in the first 3 dc’s of the half-circle {Photos 7 and 8}. (Ch 4 and make a tr cluster in the next 3 dc’s of the half-circle) three times {Photos 9 and 10}. Ch 2 and hdc in the next 2 hdc’s from Round 28 {Photo 11}.*
Repeat from * to * 3 more times, omitting the last hdc on the last repeat. Join to the top of the first hdc with a sl st.
Stitch Counts:
- Total: 128 st’s, 12 ch-4 spaces, and 52 ch-2 spaces {16 tr clusters, 16 hdc’s, 16 fptr’s, and 80 fpdc’s}
- Per Side: 32 st’s, 3 ch-4 spaces, and 13 ch-2 spaces {4 tr clusters, 4 hdc’s, 4 fptr’s, and 20 fpdc’s}
Round 30
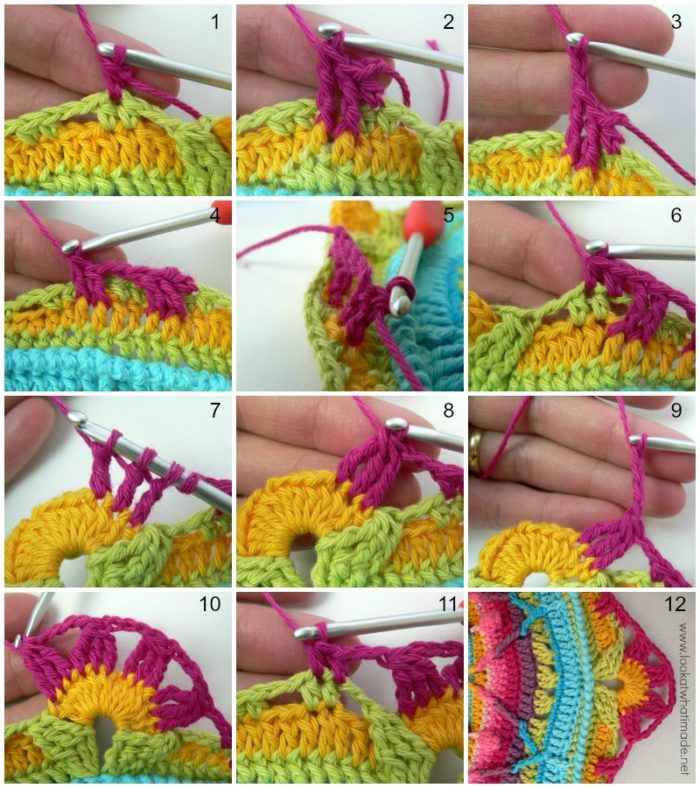
Join your yarn by making a standing double crochet in the central ch-4 space of any corner around. (2 dc, ch 2, 3 dc) in the same ch-4 space. This is your first corner made {Photo 1}.
*Make 5 dc’s in the next ch-4 space. Make 5 dc’s in the next ch-2 space {Photo 2}. Skip the next 2 hdc’s and sl st in the next fptr {Photo 3}. Make 8 dc’s in the next ch-2 space. Skip the next fpdc and sl st into the next fpdc {Photo 4}. Now you will be working into the st’s and ch-2 spaces of Round 28, which you will find behind the st’s of Round 29. (Sc in the next 2 sc’s of Round 28 {indicated with arrows in Photo 5 and illustrated in Photo 6}, make 2 sc’s in the next ch-2 space of Round 28 {Photo 7}) 8 times. Sc in the next 2 st’s of Round 28. You should now have made 34 sc’s in total.
Working into Round 29 again: sl st in the next fpdc. Skip the next fpdc and make 8 dc’s in the next ch-2 space {Photo 8}. Skip the next 2 fptr’s and sl st in the next hdc {indicated with an arrow in Photo 8 and illustrated in Photo 9}. Skip the next hdc and make 5 dc’s in the next ch-2 space. Make 5 dc’s in the next ch-4 space. (3 dc, ch 2, 3 dc) in the central corner ch-4 space {Photo 10}.*
Repeat from * to * 3 more times, omitting the last corner on the last repeat. Join to the top of the standing double crochet with a sl st.
Stitch Counts:
- Total: 304 st’s and 4 ch-2 spaces {168 dc’s and 136 sc’s}
- Per Side: 76 st’s {42 dc’s and 34 sc’s}
Round 31
This round is very involved!
- If you are using the same colour, sl st into the next 2 dc’s and into the corner ch-2 space. (Ch 1, sc, ch 2, sc) into the same ch-2 space.
- If you are using a new colour, start with a standing single crochet in any ch-2 corner space. (Ch 2, sc) in the same ch-2 space.
*Sc in the next 12 dc’s {Photo 1}. Skip the next dc and make a fpdc around the first fptr of Round 29. Make a bpsc in each of the 8 dc’s of the half-circle from Round 30. Skip the next fpdc from Round 29 and fpdc around the next fpdc from Round 29, which will be the fpdc that contains the sl st from Round 30 {Photo 2}. Dc in the next 2 sc’s of Round 30, behind the next ch-2 space of Round 29 {Photo 3}. Fpdc around the next 2 fpdc’s of Round 29 {Photo 4} and skip the next 2 st’s of Round 30, which will be the 2 sc’s made into the ch-2 space of Round 28, directly behind the front post stitches {indicated with arrows in Photo 5}.
Hdc in the next 2 st’s of Round 30. Fphdc around the next 2 fpdc’s of Round 29 and skip the next 2 sc’s of Round 30.
(Sc in the next 2 st’s of Round 30. Fpsc around the next 2 fpdc’s of Round 29 and skip the next 2 sc’s of Round 30) 4 times. Sc in the next 2 st’s of Round 30.
Fphdc around the next 2 fpdc’s of Round 29 and skip the next 2 sc’s from Round 30. Hdc in the next 2 st’s of Round 30. Fpdc around the next 2 fpdc’s of Round 29 and skip the next 2 st’s of Round 30. Dc in the next 2 st’s of Round 30 {Photo 6}.
Fpdc around the next fpdc from Round 29 {Photo 7}. Bpsc in each of the 8 dc’s of the half-circle from Round 30. Skip the next fptr from Round 29 and fpdc around the next fptr {Photo 8}. Skip the next dc from Round 30 and sc in the next 12 dc’s. (Sc, ch 2, sc) in the ch-2 corner space {Photo 9}.* Repeat from * to * 3 more times, omitting the last corner on the last repeat. Join to the first sc with a sl st.
Stitch Counts:
- Total: 320 st’s and 4 ch-2 spaces
- Per Side: 80 st’s {8 fpsc’s, 36 sc’s, 16 bpsc’s, 4 fphdc’s, 4 hdc’s, 8 fpdc’s, and 4 dc’s}
Isn’t that pretty?
Round 32
- If you are using the same colour, sl st into the ch-2 space. (Ch 1, sc, ch 2, sc) in the same ch-2 space.
- If you are using a new colour, join your yarn by making a standing single crochet in any ch-2 corner around. (Ch 2, sc) in the same corner space.
*Bpsc in the next 12 st’s. Bphdc in the next st {Photo 1}. Make 3 tr’s in the first ch-2 space from Round 28 (behind the “petal”) – see Photo 2. Make 3 tr’s in the next ch-2 space from Round 28 {Photo 3}. Skip the 8 bpsc’s of the petal and the next fpdc. Sc in each of the next 34 st’s {Photos 4 and 5}. The last sc should fall in the stitch before the fpdc from Round 31 {Photo 6}.
(Make 3 tr’s in the next ch-2 space from Round 28) twice – as before. Skip the 8 bpsc’s of the petal and the next fpdc of Round 31. Bphdc in the next st. Bpsc in the next 12 st’s. (Sc, ch 2, sc) in the corner ch-2 space.*
Repeat from * to * 3 more times, omitting the last corner on the last repeat. Join to the first sc with a sl st.
Stitch Counts:
- Total: 296 st’s and 4 ch-2 spaces
- Per Side: 74 st’s {24 bpsc’s, 36 sc’s, 2 bphdc’s, and 12 tr’s}
Round 33
In this round you will be making little zigzag “hills” using surface crochet. This round is very slightly asymmetrical. There are 20 sc’s before the zigzags, and only 19 sc’s after them (including the last st of the last “hill”, but not including the corner sc’s).
- If you are using the same colour, sl st into the ch-2 space. (Ch 1, sc, ch 2, sc) in the same ch-2 space.
- If you are using a new colour, join your yarn by making a standing single crochet in any ch-2 corner around. (Ch 2, sc) in the same corner space.
*Sc in the next 20 st’s {Photos 1 and 2}. The last sc will fall in the last tr worked into the ch-2 spaces behind the petal. If it doesn’t, check that you haven’t accidentally skipped the first (hidden) st after the corner. (Ch 3 and sl st into the next ch-2 space from Round 29. This ch-2 space will be in front of your work and between front post groups {Photos 3 and 4}. Ch 3, skip the next 3 st’s from Round 32 and sc in the next st from Round 32 {Photo 5}) 9 times. The last sc should fall in the second tr worked into the ch-2 spaces behind the petal.
Sc in the next 18 st’s. You will now have 19 sc’s (including the last st of the last “hill”). (Sc, ch 2, sc) in the corner ch-2 space.* Repeat from * to * 3 more times, omitting the last corner on the last repeat. Join to the first sc with a sl st.
Stitch Counts:
- Total: 196 sc’s, 32 zigzag “hills”, and 4 ch-2 corners
- Per Side: 49 sc’s per side and 8 zigzag “hills”
Round 34
- If you are using the same colour, sl st into the ch-2 space. (Ch 2, hdc, ch 2, 2 hdc) in the same ch-2 space.
- If you are using a new colour, join your yarn by making a standing half-double crochet in any ch-2 corner around. (Hdc, ch 2, 2 hdc) in the same corner space.
*Skip the first (hidden) stitch and hdc in the next 20 st’s {Photo 1}. (Hdc in the next 3 st’s from Round 32 {Photo 2}, make a bpsc around the next sc from Round 33 {Photos 3 and 4}, which will be at the top of the zigzag “hill”) 8 times. Hdc in the next 3 st’s of Round 32. Hdc in the next 20 st’s of Round 33, making sure not to accidentally skip the first st after the last ch-3 {Photo 6}.
(2 hdc, ch 2, 2 hdc) in the next ch-2 corner space.* Repeat from * to * 3 more times, omitting the last corner on the last repeat. Join to the top of the beginning ch-2 (or the standing half-double crochet) with a sl st.
Stitch Count: 284 hdc’s, 32 sc’s, and 4 ch-2 corner spaces {79 st’s per side}
Round 35
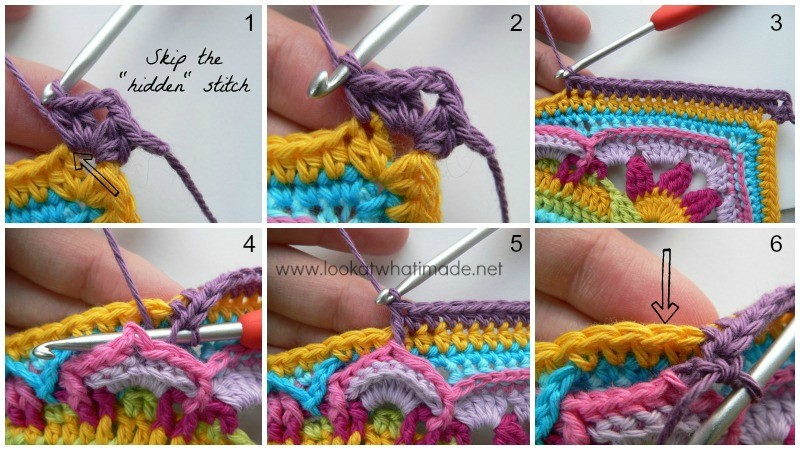
Join your yarn by making a standing half-double crochet in any ch-2 corner space around. (Hdc, ch 2, 2 hdc) in the same corner space {Photo 1}.
*Skip the first hdc, which will be hidden anyway {Photo 1} and hdc in the next 18 st’s {Photos 2 and 3}. Bpdc around the fourth bpsc of the “petal” formed by Rounds 30 and 31 {Photos 4 and 5}. Skip the next st of Round 34 {indicated with an arrow in Photo 6} and hdc in the next 40 st’s. Bpdc around the fourth bpsc of the “petal” formed by Rounds 30 and 31. Skip the next st of Round 34 and hdc in the next 18 st’s. (2 hdc, ch 2, 2 hdc) in the next ch-2 corner space.*
Repeat from * to * 3 more times, omitting the last corner on the last repeat. Join to the top of the first hdc with a sl st.
Stitch Count: 328 st’s and 4 ch-2 corner spaces {82 st’s per side}
Round 36
- If you are using the same colour, sl st into the next hdc and into the ch-2 space. (Ch 1, sc, ch 2, sc) in the same ch-2 space.
- If you are using a new colour, join your yarn by making a standing single crochet in any ch-2 corner around. (Ch 2, sc) in the same corner space.
*Bphdc in each of the 82 st’s across. (Sc, ch 2, sc) in the next ch-2 corner space.* Repeat from * to * 3 more times, omitting the last corner on the last repeat. Join to the first sc with a sl st.
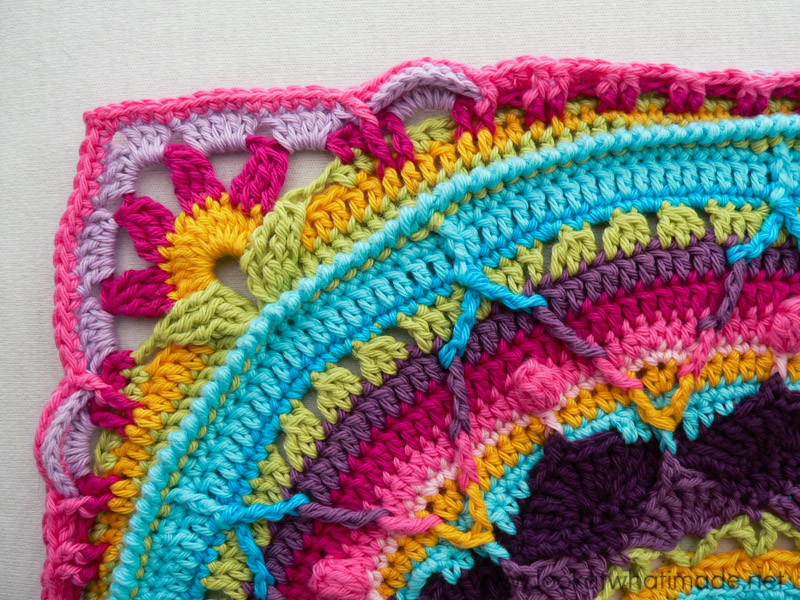
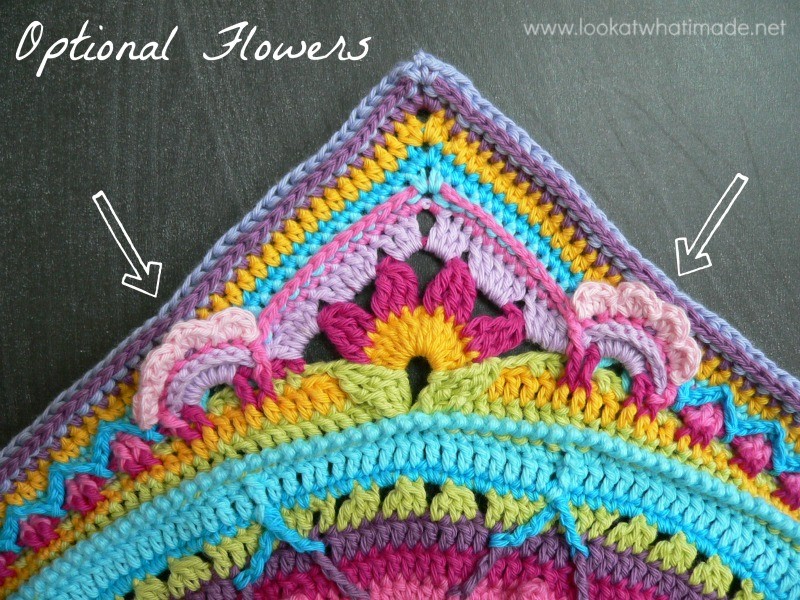
Bind off and work away your tails of yarn. If you need visual help, see the photo for the Optional Flowers below.
Stitch Count: 336 st’s and 4 ch-2 corner spaces {84 st’s per side}
Optional Flowers
These flowers will be made into the bpsc’s of the 8-dc “petals” formed by Rounds 30 and 31. If you think this makes the corners look too busy, feel free to leave them out. You can make all the flowers in the same colour, or each one in a different colour. It is totally up to you.
And if you feel like making totally different flowers, that’s also fine!
Join your yarn to the first bpsc (Round 31) of any 8-dc “petal” from Round 30 with a sl st. (Make 4 hdc’s in the next st, sl st in the next st) 4 times. The last sl st should fall in the top of the fpdc after the petal. Bind off and work away your tails of yarn.
Repeat for each of the 8 “petals” from Rounds 30 and 31.
Phew! I think I deserve a glass of wine (and so do you)!
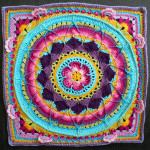
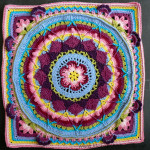
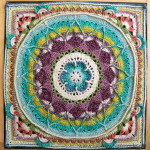
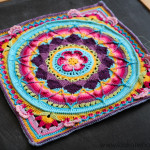
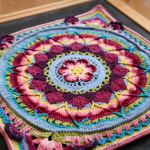
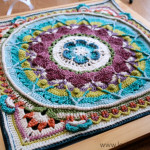
Here are all 3 “Gardens”, unblocked but still pretty :)
Credit
This pattern was originally tested up to this point by the following people:
Kimberly Slifer, Claire Martin, Beth Spaulding, and Venetia Smith.
Thank you for testing and proofing this pattern for me!

This blog post contains affiliate links. I only link to products I personally use or would use. All opinions are my own.


Kath says
I just want to say thank you. These are the very best, clearest and most helpful crochet instructions I have ever followed. Thank you so much.
Jenny Lowman says
Aren’t they just? I am lucky to have learnt how to crochet properly under Dedri’s wing, with such beautifully written patterns :)
J
Suzanna says
Good afternoon,
Can someone verify the stitch count info for rounds 28 and 29? Round 27 has 280 total stitches; however, round 28 says 116 with 29 per side. Even with skipping stitches and doing clusters, it doesn’t seem like you should lose 164 stitches. Am I missing something. Thanks!
Jenny Lowman says
Round 28 has 116 physical stitches, plus 8 chain 4 spaces, and 56 chain 2 spaces. Round 29 has 128 physical stitches, plus 12 chain 4 spaces and 52 chain 2 spaces.
Please do trust the pattern, as it really does work out :)
Suzanna says
Thank you. I think I was counting the chains as stitches so wasn’t coming up with the right number. I will double check. Thanks again.
Alison says
Hi Dedri,
Thank you for such a marvellous pattern, and for all the lovely support you’ve provided since it’s release.
I’m hoping you, or some kind soul, can help me with Round 26, please.
I’ve double checked Rnd 24, and confirmed I have 18 dc sts between each ‘post’ st.
My trouble is that if I start in one of those posts, do the next 9 sc, then the next 10 hdc, that’s 20 sts. In rnd24, 1 posts + 18 between + 1post = 20 sts too, so rather than landing in the st before the post, I’m landing on the next post, which feels right in the numbers, but not in the pattern and I’ve only found one other mention of it here so I figure it’s me stuffing something up. What am I missing please!?
Jenny Lowman says
Have you looked at Esther’s video, Alison? That may give you a visual help as I can’t see your work to check it.
Look here
Greer says
Morning. Love this pattern. Christmas presents for a the family this year. Just one question….after the last row in Part 4 you seem to have many more parts to go. Is this an option to continue on the same Mandela? I still have lots of bits of yarn left and was wondering if I should continue or start a new one.
Jenny Lowman says
Hi Greer. Sophie’s Universe has 21 parts to it. It grows the original 3 round mandalas in to a garden square and then transforms the very same square after part 4 I. To a big and beautiful square blanket with additional squares available to transform that square in to a rectangular blanket if you so desire.
Terry says
I want to thank you for such a beautiful and fantastically written pattern. It has become my go to for family Wedding Blankets and a version for baby blankets. Always stunning whether it’s Sophie’s Universe or Sophie’s garden!
Jenny Lowman says
Sophie certainly is special, Terry. Have a go at Charlotte’s Universe. I find the same connection is there :)
Tom says
This pattern is the most fun of any I have ever worked. One small problem. I tried the link for the triple cluster. It says it is a private video and does not play.
Jenny Lowman says
You can check out Esther’s video, or Google if you are stuck on that stitch. I will pass the info on to Dedri. Thank you!
Esther’s video link part 4
Pippa Wood says
This pattern is beautiful! Thank you so much Jenni and Debri! I am using it as a centre piece for one of the 11 blankets I am making for my grandchildren. I will probably use it again for another. I was wanting to make them all different but this is soooo nice and such fun to do I think I am addicted for a while! Thank you for taking the time to publish it and make it available for us all to enjoy! XX
Jenny Lowman says
So glad you are enjoying the design, Pippa! Have you seen Sophie’s Dream that uses Sophie’s Garden square? I made it because I love Dedri’s beautiful pattern so much!
Amanda says
I’ve been eyeing this pattern for a few years, pretty much since I began crocheting. I was intimidated by it because it looked complicated.
But my dad passed away 2 weeks ago and I needed a distraction, so I decided to give this bad boy a try. Wasn’t all that hard after all! Beautiful pattern!!
Jenny Lowman says
So sorry for your loss. Sophie’s Universe has given so many of us comfort since her creation in 2015. We hope she brings you some comfort and quiet of mind while you work through all your emotions at this difficult time.
BW
Jenny and Dedri
Elizabeth Stuart says
Well, I would like to say that instead of a virtual apple after completing the crab stitch row, think I deserve it with a cherry on top for doing the back post crochet row! Absolutely delighted to end at exactly the right place! Using Scheepjes Whirl in Watermelon Hell Raiser. I have loved this pattern since you first posted it, and finally, with lockdown can get on with it! I usually do quick snoods and hats, but was snooded out making them for Christmas and wanted to do something for me!
Jenny says
We are so happy that you are enjoying your Sophie! Do share pics on our Facebook page!
BW Dedri and Jenny :)
Anja says
Hello Dedri,
Thank you so much for this lovely pattern and for the help at the beginning.
I just finished my first Cal with part 4.
I did it with a 100% Cotton yarn with 3 strands and a lovely color change. I kept the hook size. But because of the different yarn the work was 39 cm at the end. But its gonna be a blanket, so the bigger the better :D
Dedri Uys says
That sounds delightful, Anja :) I hope you will share photos with us x
Annie says
Hi! After seeing quite a few of these completed on Reddit, I finally started my own and just finished Part 4. I wanted to thank you for making this pattern available for free. It’s been so much fun to do and so meditative. I’m excited to continue on.
Dedri Uys says
Hi Annie. I’m so glad you are finding it meditative!
Kate G. says
This pattern is so much fun! I’m a beginner so it is slow going, but as I do each garden it gets easier. There is no way I would make the gauge so I made round 35 in the border color and think I will omit 36 altogether… that way I hope I don’t run out of the (very expensive!) yarn. It will be unique!
Question: have you ever put any sort of backing on your blanket? Like fleece? I’d like to make it a little heavier. Any suggestions?
Thank you for your amazing pattern!
Dedri Uys says
Hi Kate. that sounds like a great plan and I shall look forward to seeing how your blanket turns out. I don’t personally like putting backing on the blankets, but I know that many other people do it with great success. You can find lots of tutorials online if you Google it :)
Enjoy the journey!
Dedri
Val says
Hi again…I just commented asking about going to a bigger hook size again, but I watched the video, and after 29 her work also appeared to be cupping in at the corners, so I guess I’m ok! I haven’t had to watch a video yet (other than for a couple of new to me stitches) as your instructions are so clear, and my stitch counts have been good!
Thanks again!
Val
Val says
I just finished 29, and mine is still pulling in quite a bit. I know it says some will buckle some will be floppy and it should work itself out, but it’s curling up pretty good. Should I switch to a bigger hook now? Or is this a common spot for this to be happening?
By the way, thank you for saying adventurous beginners could do this! Looking at this gorgeous blanket, I was sure this would be too hard for my experience level but decided to be adventurous! So glad I did! I’m loving the challenge, and you do such a good job describing where stitches go, and I love at points you include where you should end up as well! Thanks for all your work!!
Val
Jenny says
Stick to following Dedri’s instructions, Val. All will be well in the end.
Jenny :)
Betty Webster says
Hi, first thank you so much for sharing your beautiful patterns, I am making the Sophie Loves Lila Bjorn Winter Blanket and I have finished my Dandelion Mandela it says to use this pattern the Sophies Garden Pattern rows 26 – 34 to square up my Mandela. I have 240 stitches, but my spaces between my front post triples are 7 and it looks like this is 10. Should I just not worry about the part where they say I should be one stitch before the Fpdc ? Thank you
Dedri Uys says
Hi. Yes, when marrying the two, you can disregard that tip.
Renee Epstein says
I had the same problems but in Row 35 I did not skip the Stiches where the petal Bp dc is , and it does get confusing where it tells you to skip the stitch after the chain 2 corners , you just have to keep count constantly if you are having trouble. I have pics if any wants to see my work .
Amanda says
I’m having trouble with round 26. I can’t seem to get counts to fall at the front post stitches from 24 where the pattern indicates. I can make it, but it makes the double, half double and single stitch count drift 1-3 stitches. Does it matter? I know it’s going to look like it’s not centered or rotated right if I just go off straight counts. IDK. I think I messed up.
Dedri Uys says
Hi Amanda. If you use the contact me tab at the top of this website to send me an email, we can open up an email dialogue which will allow you to send me a photo. That will help me to see what might be going awry.
Dedri
Jana says
Hi I just read your comment Haydn. On row 35 I ended up with 2 stitches short on every side. I’ve followed the video and the written pattern to the letter. Big sigh. I doubled up on to stitches to get to a count of 84 for the last round. I didn’t know what else to do.
I love your work Dedri. Thank you xxx
Val says
Hi! I might know where the 2 stitches went! When I did row 34 I automatically did 1 hdc, 2 chains, 1 hdc in the corners because that’s how it went the row before. Then I realized when looking closer at instructions, it had changed to 2 hdc, ch 2, 2 hdc! Losing me exactly 2 stitches per side! I thought about just adding a couple extra stitches per side to catch up, but after all the hard work getting there I couldn’t leave the mistakes, I ripped it back. If only I would learn to read pattern properly the first time!
Val
Kat says
This comment is from awhile ago, but I had the exact same issue. I started yelling at the pattern that it was impossible for there to be this many stitches. Val, thanks for catching that because I just immediately read it as (1 hdc, ch 2, 1 hdc) as well and would’ve never caught it myself.
hayden says
Hey! Thanks for sharing your creativity and making this beautiful and incredibly well written, thorough pattern. I’m having a great time and learning so much. I just have a question- in round 32 when I get to the sc’s on either side of the zig zags, I’m consistently coming up 3 stitches short of where I need to be, despite having no mistakes or extra stitches otherwise in this round or the one before. Do you have any idea where I may be going wrong? Thanks in advance.
Dedri Uys says
Hi Hayden. Without seeing a photo of your work, it is impossible for me to comment on what might be going wrong. Have you had a look at the video for this part to see if it might shed any light on the issue? If you send a photo to dedri(at)lookatwhatimade(dot)net, I will have a look for you.
Dedri