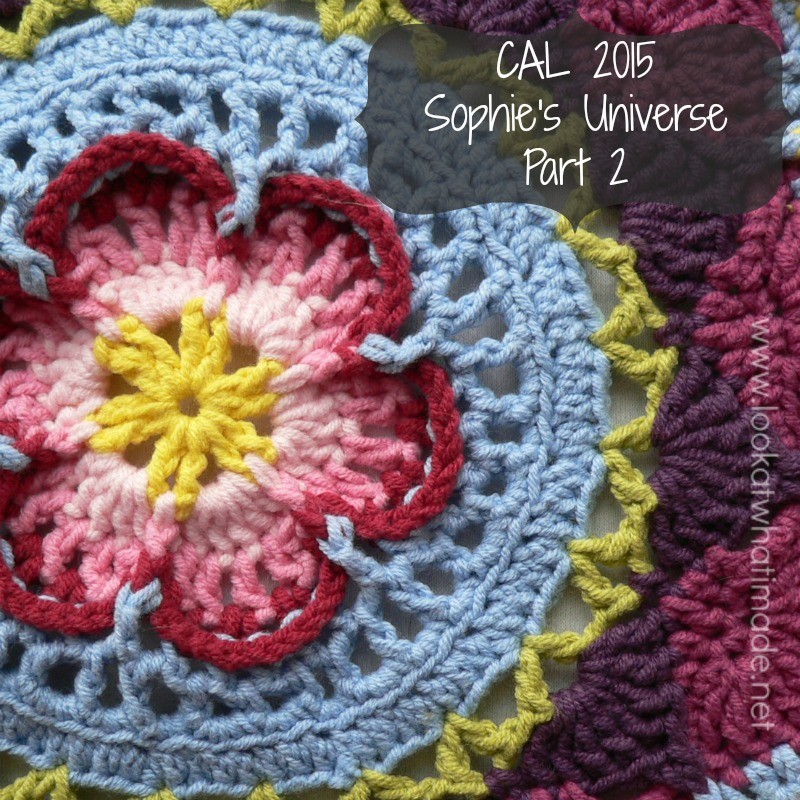
Sophie’s Universe Part 2 {Photo Tutorial}
©Dedri Uys 2014. All Rights Reserved.
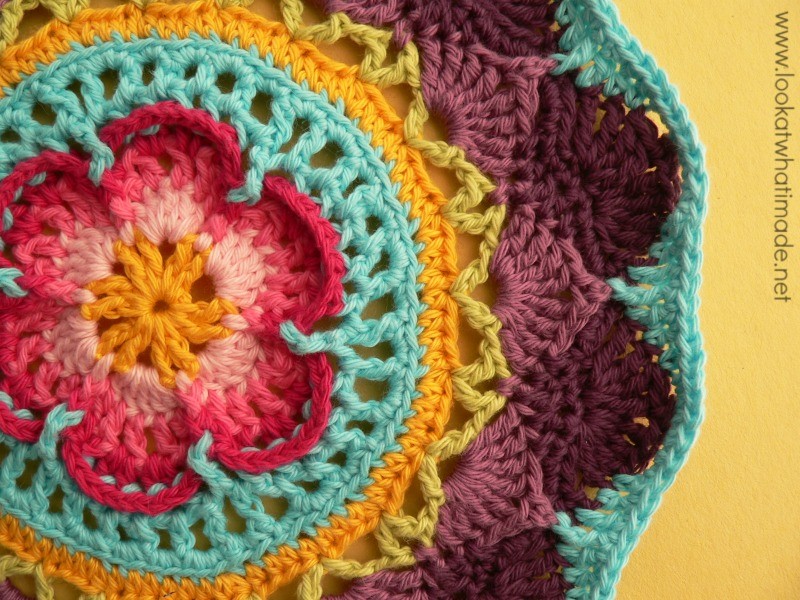
Special design credit to Chris Simon for allowing me to use a modified version of her Lace Petals flower.
Resources
- Add this CAL to your Ravelry Queue
- Sophie’s Universe CAL 2015 Information
- Use the Print-friendly button at the bottom (right) of this post to print/save this tutorial. Don’t know how? Find out HERE.
- **Part 2 VIDEO TUTORIAL** by Esther Dijkstra from It’s All in a Nutshell
Translations
- Dutch Translation by Dianne Ban
- German Translation by Gabriele Rogers
- Spanish Translation by Lynda Hernandez
- Danish Translation by Tina Poulsen
- Finnish Translation by Sari Åström
- French Translation by Sandra Larvin (with Video Tutorials by Géraldine Cymer)
- Russian Translation (with Video) by Natalie V. Alimpieva
- Swedish CAL Information by Emma Vingqvist, Agnetha Magnusson, Åza Karlsson, and Ulrika Larsson
- Arabic Video Tutorial by Banan Felimban
Materials
For the purposes of this tutorial, I am using Scheepjeswol Cotton 8 (available from Deramores) and a 3.25 mm Clover Amour Crochet Hook (US D/3 UK 10).
Please Note: In some of the photos I have photographed the Softfun or Stonewashed XL instead of the Cotton 8 to make it easier for you to see the stitches. Occasionally I will use a different colour in some of the photos for the same reason. In this particular tutorial, this affects Rounds 11 – 13.
 |
 |
 |
|
| Cotton 8 | Softfun | Stonewashed XL | |
| Round 9 | Light Green | Olive | Canada Jade |
| Round 10 | Moors | Heath | Corundum Ruby |
| Round 11 | Heath | Cyclamen | Garnet |
| Round 12 | Heath | Cyclamen | Garnet |
| Round 13 | Heath | Cyclamen | Garnet |
| Round 14 | Light Turquoise | Light Blue | Moonstone |
| Round 15 | Light Turquoise | Light Blue | Moonstone |
Abbreviations
US Terminology used (US/UK comparison chart HERE)
- BLO – Back loop only
- Bpsc – Back post single crochet
- Ch – Chain
- Dc – Double crochet
- Fpdc – Front post double crochet
- Fpsc – Front post single crochet
- Hdc – Half-double crochet
- Sc – Single crochet
- Sl st – Slip stitch
- St/st’s – Stitch/stitches
- Tr – Treble crochet
- * – Repeat instructions between asterisks the number of times specified. This is a hardcore repeat and will consist of multiple instructions.
- () – Repeat instructions between parentheses the number of times specified. This is a lower level repeat.
Special Stitches
- Picot: Ch 3, sl st in the third chain from the hook
- Standing Stitches: Standing sc’s, hdc’s, and dc’s are stitches used to start the round without the need for the traditional beginning chain. Links to tutorials are supplied in each relevant round.
- V-stitch: (Dc, ch 2, dc) in the same stitch
Invisible Join
If you would like to use the invisible join instead of the sl st join at the end of each round, you can find a step-by-step photo tutorial HERE. If you DO decide to use it, make very sure that you understand which stitch to join to and which stitch to start your new round in, otherwise, your mandala is going to come out all wonky!
Instructions
You will find the instructions for Rounds 1 – 8 HERE.
Round 9
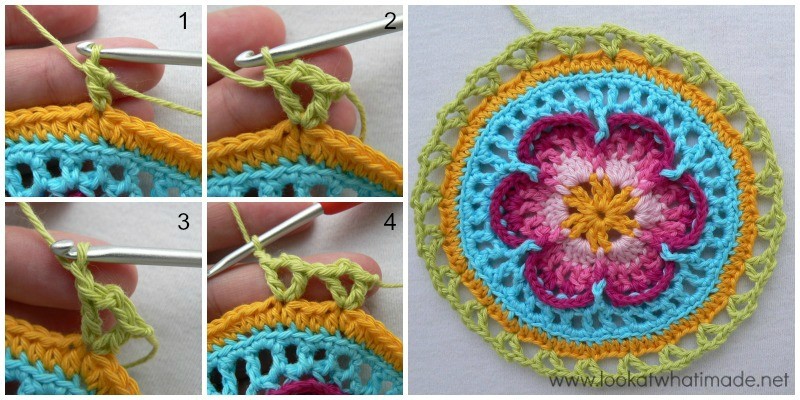
- If you are going to use the same colour: ch 5 (counts as the first dc and ch-2) and then dc in the same st. This is your first V-stitch made. Ch 1.
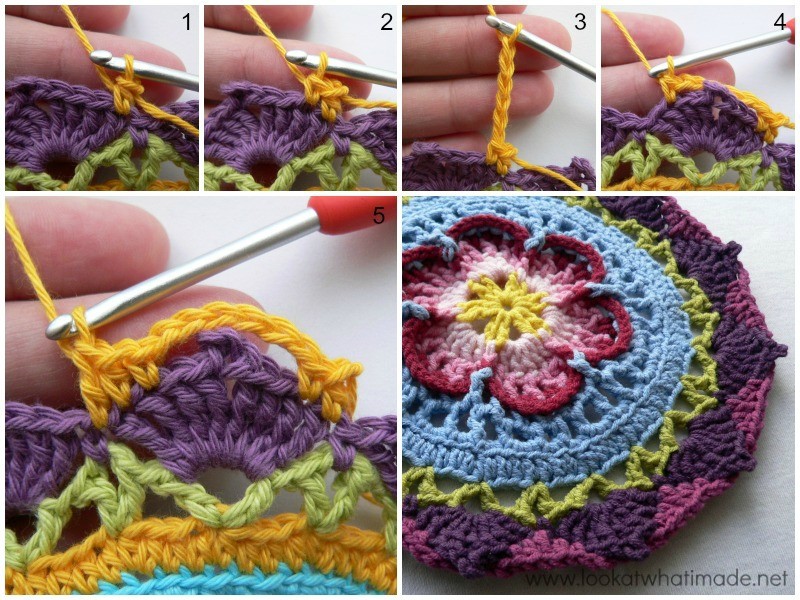
- If you are going to use a different colour, start with a standing double crochet in the same stitch as the sl st join, then ch 2 and dc in the same st {Photos 1 and 2}. This is your first V-stitch made. Ch 1 {Photo 3}.
*Skip 3 st’s, make a V-stitch in the next st, ch 1 {Photo 4}.* Repeat from * to * 22 more times. Join to the third ch of the beginning ch 5 (or to the top of the standing double crochet) with a sl st.
Stitch Count: 24 V-stitches and 24 ch-1 spaces between V-stitches {48 dc’s, 24 ch-1 spaces, and 24 ch-2 spaces}
Round 10
Note: In this round, you will only be working into the ch-2 space (the space between the 2 “legs” of each V-stitch). You will be skipping all the ch-1 spaces between V-stitches.
- If you are going to use the same colour, sl st in the next ch-2 space, ch 1 and sc in the same space.
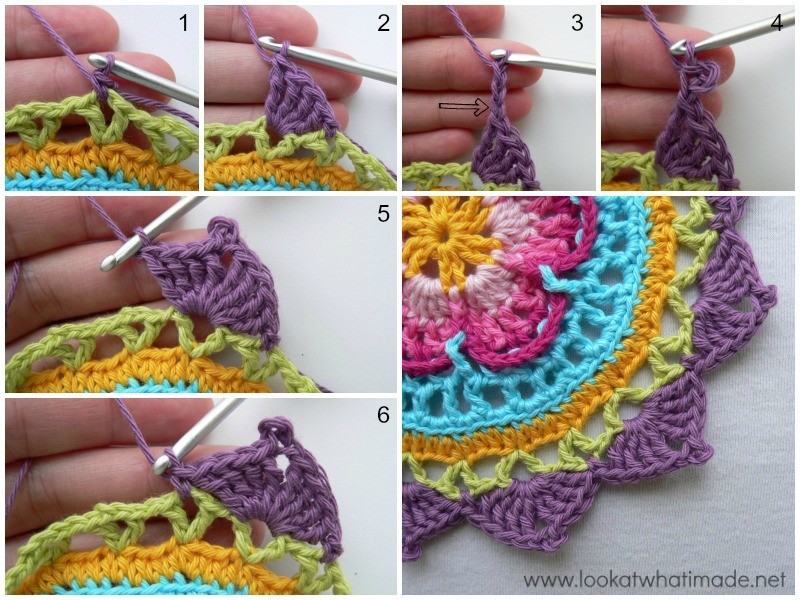
- If you are going to use a different colour, start with a standing single crochet in the next ch-2 space {Photo 1}.
*Make 4 tr’s into the next ch-2 space (Photo 2). Ch 3 and sl st in the third ch from the hook {Photos 3 and 4}. You should now have a little picot at the top of the fourth tr. Make 4 more tr’s into the same ch-2 space {Photo 5}. Sc in the next ch-2 space {Photo 6}.* Repeat from * to * 11 more times. Omit the last sc on the last repeat. Join to the first sc with a sl st. Fasten off and change colours.
Hint: If you have more than 12 petals at the end of this round, you haven’t skipped the ch-1 spaces between V-stitches.
Stitch Counts:
- Total: 12 petals and 12 sc’s {96 tr’s and 12 sc’s}
- Per Petal: 8 tr’s, 1 picot {1 sc’s between petals}
Round 11
Optional: if you would like to give the petals more definition, feel free to work into the BLO in this round.
Join your new yarn by making a standing half-double crochet in the first tr of any petal around {Photo 1}. If you have trouble identifying which loops belong to which stitch, see this tutorial. It touches on the anatomy of stitches when working in the round.
After making your first hdc, sc in the next tr of the petal {Photo 2}. Ch 6 {Photo 3}. Sc in the seventh tr of the petal (Photo 4) and hdc in the last tr. Dc in the sc between petals {Photo 5}.
*Hdc in the first tr of the next petal and sc in the next tr. Ch 6. Sc in the seventh tr of the petal and hdc in the last tr. Dc in the sc between petals.* Repeat from * to * 10 more times. Join to the standing hdc with a sl st.
Stitch Count: 12 dc’s, 24 hdc’s, 24 sc’s, and 12 ch-6 spaces.
Round 12
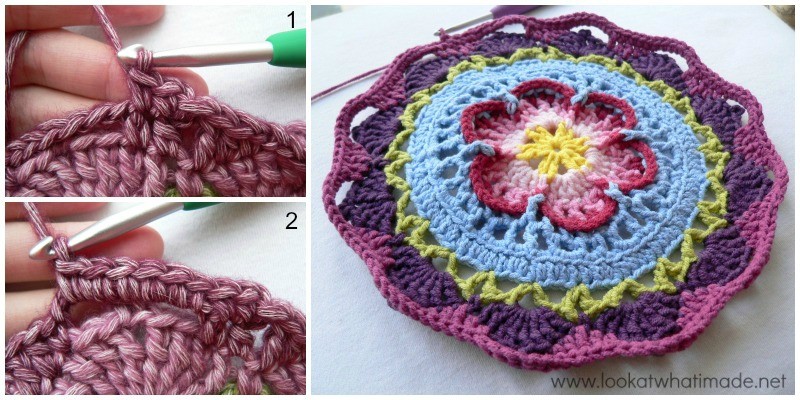
- If you are going to use the same colour, ch 1 and sc in the same st. Then sc in the next st (Photo 1).
- If you are going to use a different colour, start with a standing single crochet in the same st as the sl st join and then make a sc in the next st.
*Make 6 sc’s in the ch-6 space behind the petal {Photo 2}. Sc in the next 5 st’s.* Repeat from * to * 10 more times. Make 6 sc’s in the last ch-6 space and then sc in the last 3 st’s. Join to the first sc with a sl st.
Stitch Count: 132 sc’s
Round 13
Notes: The first sc of each repeat will fall in the third sc made into the ch-6 space – see Photo 2. The two 4-tr groups which form each petal will fall on either side of the dc in Round 11. When skipping the 3 st’s after the petal, be mindful of the fact that the first stitch to skip will be slightly hidden.
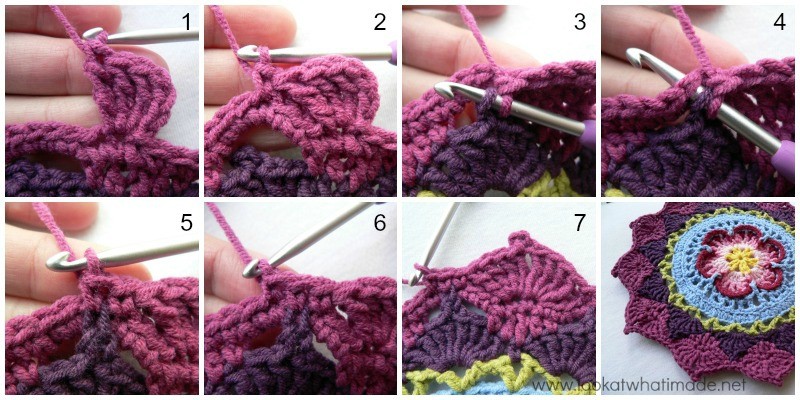
- If you are going to use the same colour, ch 4 (this counts as your first tr) and then make 3 tr’s in the same st {Photo 1}.
- If you are going to use a different colour, join your new colour by making a sl st in the same st as the sl st join. Ch 4 (this counts as your first tr) and then make 3 tr’s in the same st.
*Skip 3 st’s (see Notes above). Sc in the next st {Photo 2}. Catch the picot from Round 10 by inserting your hook into the second ch of the picot AND into the next st from Round 12 and completing a sc through both layers {Photos 3 – 5}. Sc in the next sc {Photo 6}. Skip 3 st’s. Make 4 tr’s in the next st. Make a picot (as in Round 10) and then make 4 tr’s in the next st.* Repeat from * to * 10 more times.
Skip 3 st’s. Sc in the next st. Catch the picot by making a sc through the picot from Round 10 and into the next st of Round 12 (as before). Sc in the next sc. Skip 3 st’s. Make 4 tr’s in the last st. Make a picot. Join to the top of the beginning ch-4 with a sl st. Fasten off and change colours.
Photo 7 shows the position of the 2 groups of tr’s and the position of the 3 sc’s between “petals”.
Stitch Count:
- Total: 12 petals and 36 sc’s {96 tr’s and 36 sc’s}
- Per Petal: 8 tr’s, 1 picot {3 sc’s between petals}
Round 14
Optional: if you would like to give the petals more definition, feel free to work into the BLO in this round.
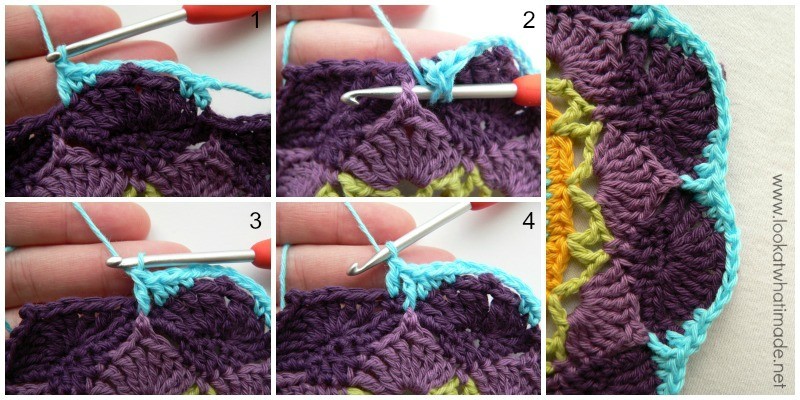
Join your new yarn by making a standing half-double crochet in the first tr of any petal around. Sc in the next tr of the petal. Ch 6. Sc in the seventh tr of the petal and hdc in the last tr. Dc in the next sc {Photo 1}, skip the next sc of Round 13 and make a fpdc around the picot from Round 10 {Photos 2 and 3}, dc in the last sc {Photo 4}.
*Hdc in the first tr of the next petal and sc in the next tr. Ch 6. Sc in the seventh tr of the petal and hdc in the last tr. Dc in the next sc, skip the next sc of Round 13 and make a fpdc around the picot from Round 10, dc in the last sc.* Repeat from * to * 10 more times. Join to the standing hdc with a sl st.
Stitch Count: 24 dc’s, 12 fpdc’s, 24 hdc’s, 24 sc’s, and 12 ch-6 spaces.
Round 15
Round 15 is the same as Round 12, but with more sc’s.
- If you are going to use the same colour, ch 1 and sc in the same st. Then sc in the next st.
- If you are going to use a different colour, start with a standing single crochet in the same st as the sl st join and then sc in the next st.
(Make 6 sc’s in the ch-6 space behind the petal. Sc in the next 7 st’s) 11 times. Make 6 sc’s in the last ch-6 space. Sc in the last 5 st’s. Join to the first sc with a sl st.
Stitch Count: 156 sc’s
How was that? Has everyone managed to follow the tutorial so far?

This blog post contains affiliate links. I only link to products I personally use or would use. All opinions are my own.


Jersey says
I’ve been a crocheter for years & LOVE this pattern!!
First time I’ve seen such a complex pattern, but the pictures and
step-by-step instructions are great –
I had to let you know how much I am enjoying this!!
Thank You!
Dedri Uys says
Hi :) Thank you for your positive feedback. I hope you are still enjoying it!
Sharon Talbot says
Dedri,
Dedri, I think Sophie is the most spectacular crochet pattern every created. I fall in love every time I make one (this is my fifth) and I just couldn’t continue crocheting today without letting you know how she makes me feel. Thank you.
Dedri Uys says
Wow, 5? Well done! Thank you :)
Ruth Persephone says
This is so beautiful! Thank you so much for posting it! Quick question – can I combine different brands/lines of yarn, as long as they are all worsted weight acrylic? I would like to at least start out with stash busting, but I don’t want it all to be ruined in the wash. Thanks in advance for the advice!
Dedri Uys says
You certainly can, as long as the yarns are all the same thickness. Often different brands are slightly thicker/thinner than each other.
Annie James says
Had just started a ripple blanket in the same colours of your medium version when I stumbled on your pattern accidentally. Out came all the work I had done as I just had to make this – it is so eye catching. Just done round 10 and it already looks great. Thanks Dedri for inspiring me
kim s says
Love it love it have started one of my own. Loving all the different stitches in the rounds so I can not get bored thanks
Marlene says
Dedri I think we are going to apply to the Queen to get you an OBE!!! This is such a wonderful thing you have done!!!
Dedri Uys says
Haha. Thank you!
Kathy McFadden says
I’m so happy to find a Mandala pattern with such a thorough tutorial with pictures. I’m not so good about reading patterns. I love that you explain how to complete the round including stitch counts as well as color changes. I’ve got a free form project in mind and I want to use the Mandala as part of it.
Dedri Uys says
I am pleased to hear that you like the way the pattern has been presented. Good luck with your free-form project :)
Maureen Philbert says
Hi and thank you so much for sharing such a beautifully stunning afghan! I just started my Sophie in large & have completed round 8…I checked the gauge & it’s sitting at 21cm…3cm wider than it should be.
I followed the instructions that advised using a smaller hook at this stage to avoid a bulging centre.
I’m in Australia & ordered my yarn pack from the UK – it wasn’t cheap & the last thing I want is to run out!
Do you have any suggestions as to how I should continue?
Thanks in advance
Jenny says
Everyone’s working gauge is different, Maureen. You could consider tightening up your tension a little, but Dedri’s approximations are there as a rough guide only. You could frog and try working a little tighter if concerned enough.
Maureen Philbert says
Thanks Jenny, I was eager to get started so I frogged it & began again with a 4.5mm hook.
The gauge is now only a cm out, but I can live with that!
Kim Fox says
Dedri,
Could you contact me privately about a mandela design? Thanks!!
Dedri Uys says
I’ve emailed you, Kim
Kim says
Just wanted to tell you how excited I am to start my Sophie.. it is one of the most incredible pieces of crochet art I have ever seen. I have been crocheting since I was eight and this old dog is learning some new stitches. How important is it to stick to the 80/20 blend of yarn. I see a lot of people using Scheepjeswol Soft Fun. For now I am practicing with regular old red heart until I can get a feel for working up one of these mandelas. I am torn between doing a solid color and two or more colors. The first Sophie I make is going to be for me. My fave colors are turquoise and purple and Im having trouble deciding what colors will accentuate it best. Thanks again.. How long did it take you to design Sophie?? It really is amazing.. Thank you soo much for sharing!!!
Dedri Uys says
Hi Kim. You can use any blend of yarn, any weight, and any colours. It really is up to you. If you are comfortable with acrylic, by all means use that. I am pleased that you like Sophie and I hope you continue to enjoy the journey!
Oneida Callaway says
This is my first large project! I’m only 17 and found this pattern beautiful! I just started round 9 but hopefully I’ll be getting further shortly. I decided to use up my scrap yarn rather than full balls of yarn. It gives it more character.
Dedri Uys says
I hope you enjoy the rest of the journey, Oneida :)
Eman samadony says
Hi, thanks alot for sharing this beautiful pattern. This is my first large project and i’m so exciting about it
I’m in round 13 but I have a question why we don’t start with standing tr instead of 4ch when using different color?
Thanks
Dedri Uys says
Hi,
You are welcome to start with a standing treble. I chose not to, because the tops of trebles are always ‘baggy’ and especially if they are standing stitches. I you use a standing tr at the start of this round, it will create a gap when you join the last picot to it.
Eman samadony says
Thanks for your reply♥
Glorie Kayhart says
Hi, my name is Glorie, I’m proud of being deaf. I follow your video but no caption. It’s ok. I print pattern and read pattern and follow you on video. I’m on round 8. Wow
Dedri Uys says
Glorie, how great! The videos don’t have captions because they compliment the written pattern only, so if you have both, you should be able to manage. I am very interested to follow your progress.
Dedri
Mona says
Thank you for such an easy to follow pattern! I am self taught and this has been the best way for me to learn some new stitches. Making it for my daughter for Christmas!
Dee Dee says
WOW Dedri, the Sophie’s Universe pattern is AMAZING, I so love it, thank you so much for sharing your totally wonderful pattern with the world, it’s a work of art :D I am just about to start part 3 and so far I’m on track YAAAY :D
Jenny says
Isn’t it just fab, Dee Dee? I am still doing my second Sophie. I pick it up every now and again and it is like sitting in your favourite arm chair! :)
Lett says
Absolutely amazing! I just started yesterday 3/27 and just finished round 2 and I have 156 stitches as my final count. Woowho!!!! New crocheter here and this thing is friggin fabulous.
Thank you so much for all that you’ve done creating this.
Dedri Uys says
Lol, thank you, Lett :) I hope you continue to enjoy the journey with us!
Alana says
At the end of round 15, I keep getting 159 stitches. I frogged it 2 times and triple counted. Same every time. And my stitches were correct on all of the previous rows.
What am I doing wrong?
Dedri Uys says
Alana, have you had a look at the video for this part? If you are still stuck, you can always share a photo on the Official CCC Social group on Facebook and someone will be happy to help you. Alternatively you can email me a photo by using the “Contact Me” tab at the top of the page.
Dedri
Paula Foulsham says
I am a relatively newbie to crochet started last August, made eight afghans for christmas pressies, spotted sophie and fell in love. So have just finished this piece, will post pic on fb, I adore it, thank you so much x
Jenny says
We look forward to the photos Paula :)
Jen says
Dedri, thank you SO much for this pattern, and the CAL. It is so generous of you to put such a gorgeous pattern up for free, and to then offer help with it. You are very talented! And being less skilled, I would be in trouble without Ester’s fabulous videos. She’s very kind to do those for us.
I was afraid I wouldn’t be able to do the whole project, because it looks so intricate and my skills are barely intermediate, but I am nearly done with part two and so far I’ve done okay. I started yesterday, and I’m working in a cheap, acrylic yarn, because of my worries about not being able to do it. But even in cheap yarn, the pattern looks gorgeous and works up so nicely. It’s my first time working in the round, and my first time working in multiple colors, and I love it. I had to try the magic ring a few times, but I finally got it right. Finishing a round is so satisfying, especially if it was a color change. It’s so easy to see progress! I can’t wait to see what it looks like at the end. I’m hoping to be caught up with the CAL here in a week or so.
Jenny says
So glad you are enjoying the CAL! I learnt to read patterns with Sophie last year and just love it :)
Fiona says
I started doing this CAL yesterday and I have already started my second one! I have never done a CAL before, but when I saw your beautiful design, I couldn’t stop myself! Thank you so much for this!
I am about to start part 4.
Dedri Uys says
You are very welcome, Fiona. You started yesterday and you’re already on Part 4? Wow. Do you live close by me so that you can come help me crochet?