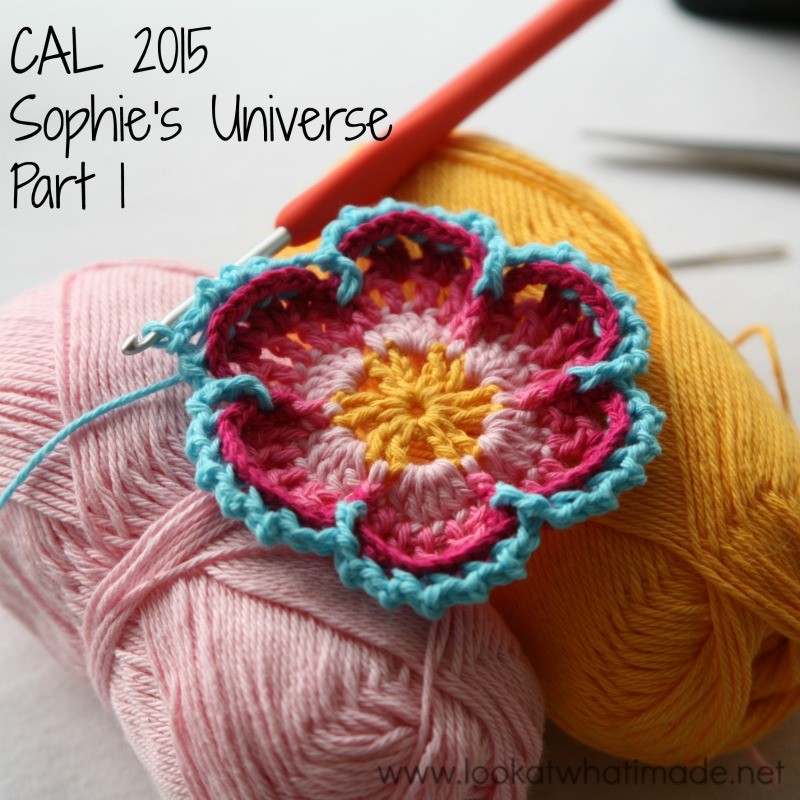
Welcome to Sophie’s Universe Part 1. I hope you are all super excited and eager to get started! If you haven’t already read the Information Post, please take a minute to do so now. It contains important details like yarn weight, hook size, and completed size, as well as a quick outline of what to expect and which resources are available.
It is worth bookmarking that post because it also contains a list of all 20 tutorials, which I will update with links as soon as each tutorial is available.
Once you have read all of that, make a cup of coffee (or tea if you must), find a cosy corner, and come join me for Part 1 of Sophie’s Universe. And then join me for Part 2. Part 2? Yes!! To reward you all for your not-so-patient waiting we are kicking this crochet-along off with 2 Parts!
Sophie’s Universe Part 1 {Photo Tutorial}
©Chris Simon and Dedri Uys 2014. All Rights Reserved.
The first 6 rounds of this Mandala were heavily inspired by Chris Simon’s Lace Petals Square (Block 16 of the Block a Week CAL 2014). In fact, if you take away the front post stitches and back loop stitches, it is an unashamed copy of Chris’ gorgeous design. So before I could even think about publishing this pattern, I had to get Chris’ permission to use her centre. Luckily she agreed. Thank you very much, Chris!
Resources
- Add this CAL to your Ravelry Queue
- Sophie’s Universe CAL 2015 Information
- Use the Print-friendly button at the bottom (right) of this post to print/save this tutorial. Don’t know how? Find out HERE.
- **Part 1 VIDEO TUTORIAL** by Esther Dijkstra from It’s All in a Nutshell
Translations
- Dutch Translation by Dianne Baan
- German Translation by Gabriele Rogers
- Spanish Translation by Lynda Hernandez
- Danish Translation by Tina Poulsen
- Finnish Translation by Sari Åström
- French Translation by Sandra Larvin (with Video Tutorials by Géraldine Cymer)
- Russian Translation (with Videos) by Natalie V. Alimpieva
- Swedish CAL Information by Emma Vingqvist, Agnetha Magnusson, Åza Karlsson, and Ulrika Larsson
- Arabic Video Tutorial by Banan Felimban
Materials and Colours
For the purposes of this tutorial, I am using Scheepjeswol Cotton 8 (available from Deramores) and a 3.25 mm Clover Amour Crochet Hook (US D/3 UK 10).
Remember to check the Helpful Tips before starting. There is some important information about adjusting your hook size to prevent bulging.
Colour Packs for Sophie’s Universe
If you are interested in the colour packs for Sophie, you can find them below.
Wool Warehouse
- Cotton 8 (Small)
- Softfun (Medium)
- Stonewashed XL (Large)
- **NEW** Colour Crafter Pack (Medium) – You can find the details HERE.
Deramores
- Cotton 8 (Small)
- Softfun (Medium)
- Stonewashed XL (Large)
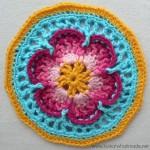
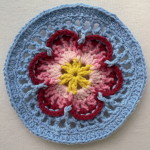
Colours Per Round for Part 1
| Cotton 8 | Softfun | Stonewashed XL | |
 |
 |
 |
|
| Round 1 | Canary | Canary | Moonstone |
| Round 2 | Light Pink | Light Rose | Amazonite |
| Round 3 | Pink | Rose | Green Agate |
| Round 4 | Fuchsia | Bordeaux | Blue Apatite |
| Round 5 | Light Turquoise | Light Blue | Moonstone |
| Round 6 | Light Turquoise | Light Blue | Moonstone |
| Round 7 | Light Turquoise | Light Blue | Moonstone |
| Round 8 | Canary | Light Blue | Moonstone |
Abbreviations
US Terminology used (US/UK comparison chart HERE)
- BLO – Back loop only
- Bpsc – Back post single crochet
- Ch – Chain
- Dc – Double crochet
- Fpdc – Front post double crochet
- Fpsc – Front post single crochet
- Hdc – Half-double crochet
- Sc – Single crochet
- Sl st – Slip stitch
- St/st’s – Stitch/stitches
- * – Repeat instructions between asterisks the amount of times specified. This is a hardcore repeat and will consist of multiple instructions.
- () – Repeat instructions between parentheses the amount of times specified. This is a lower level repeat.
Special Stitches
- Standing Stitches: Standing sc’s, hdc’s, and dc’s are stitches used to start the round without the need for the traditional beginning chain. Links to tutorials are supplied in each relevant round.
Invisible Join
If you would like to use the invisible join instead of the sl st join at the end of each round, you can find a step-by-step photo tutorial HERE. If you DO decide to use it, make very sure that you understand which stitch to join to and which stitch to start your new round in, otherwise your blanket is going to come out all wonky!
Instructions
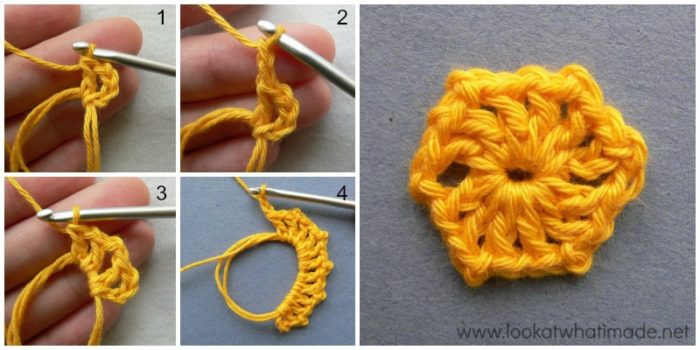
Round 1
Into a magic ring: ch 4 (this counts as your first dc and ch 1) and then make a dc {Photo 1}. (Ch 2, dc, ch 1, dc ) five times {Photos 2 – 4}. Ch 2 and join to the third st of the beginning ch-4 with a sl st.
If you are not familiar with working into a magic ring, this video tutorial by Tamara from Moogly is very good. Please remember, when working into a magic ring you HAVE to work away your initial tail very well. If you just cut it, your whole project might unravel!
Stitch Count: 12 dc’s, 6 ch-2 spaces and 6 ch-1 spaces
Round 2
- If you are going to use the same colour for Round 2, sl st into the next ch-1 space, ch 1 and sc in the same space.
- If you are going to use a new colour for Round 2, join your new yarn by making a standing single crochet in any ch-1 space around {Photo 1}.
(Make 5 dc’s in the next ch-2 space {Photo 2}, sc in the next ch-1 space {Photo 3}) five times. Make 5 dc’s in the last ch-2 space {Photo 4}. Join to the first sc with a sl st.
Stitch Count: 30 dc’s and 6 sc’s {6 Petals}

Round 3
- If you are using the same colour, ch 1 and make a fpsc around the post of the same sc.
- If you are using a new colour, join your new colour with a fpsc around the post of any sc from the previous round. You will make the fpsc exactly the same as the standing single crochet, but working around the post of the stitch instead of into the top 2 loops {Photos 1 and 2}.
*(Dc, ch 1) in the next 4 dc’s. Dc in the last dc {Photo 3}. Fpsc in the next sc {Photo 4}.* Repeat from * to * 5 more times, omitting the last fpsc on the last repeat. Join to the top of the first sc with a sl st.
If you started with a standing fpsc, you might find it tricky to join to it with a sl st. Pull the beginning tail of yarn so that you can see the top loops of the stitch. If you cannot manage to poke your hook through both loops, you are more than welcome to join to the FLO of the standing fpsc.
You should now have 6 Petals. Each Petal should contain 5 dc’s and 4 ch-1 spaces. There should be one FPsc between Petals.
Stitch Count: 30 dc’s, 6 fpsc’s, and 24 ch-1 spaces {6 Petals}

Round 4
Round 4 is simple, but you have to concentrate! I had to frog this round a few times because I either forgot the ch-1′s or I made the stitches in the wrong spots. At the end of this round your flower will probably buckle. Don’t worry about it! See Photo 4 below.
- If you are using the same colour, ch 1 and fpsc around the post of the same fpsc as the sl st join.
- If you are using a new colour, start with a fpsc around the post of any fpsc around {Photo 1}.
*Hdc in the first dc. This first dc might be slightly tricky to get into because it is right next to the fpsc. (Ch 1, dc in the next dc, ch 1, dc in the next ch-1 space) twice. Ch 1 and dc in the next dc {Photo 2}. Ch 1 and hdc in the last dc. Fpsc in the next fpsc {Photo 3}.* Repeat from * to * 5 more times, omitting the last fpsc on the last repeat. Join to the first fpsc with a sl st. Fasten off and change colours.
Stitch Counts:
- Total: 48 st’s and 36 ch-1 spaces {6 fpsc’s, 12 hdc’s, 30 dc’s, and 36 ch-1 spaces}
- Per Petal: 2 hdc’s, 5 dc’s, and 6 ch-1 spaces per petal {1 fpsc between petals}

Round 5
You will not be working into the hdc’s in this round. In other words, you will skip the first and last st of every petal, which will be the hdc’s.
Join your new yarn by making a standing single crochet around the back of the post of the last dc of any petal around {Photos 1 and 2}. Phew…I say “of” a lot in that sentence! Hehe. You are basically starting with a standing back post sc.
*Ch 2 and fpdc around the post of the fpsc between the petals. (Ch 2, bpsc around the post of the next dc) 5 times.* Repeat from * to * 5 more times. Omit the last bpsc of the last repeat. Join to the first bpsc with a sl st.
Stitch Counts:
- Total: 30 bpsc’s, 6 fpdc’s, and 36 ch-2 spaces
- Per Petal: 5 bpsc’s and 6 ch-2 spaces per petal, and 1 fpdc between petals

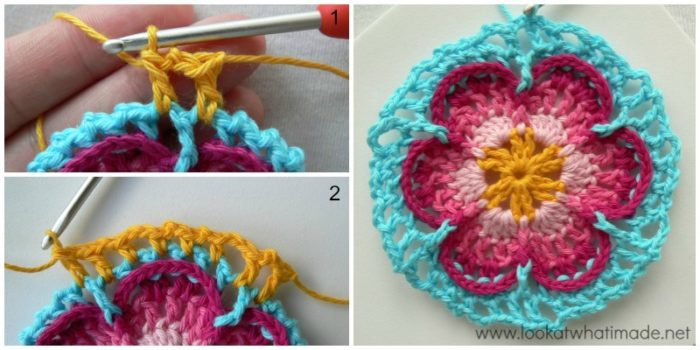
Round 6
- If you are going to use the same colour, sl st into the next ch-2 space. Ch 5 (this counts as the first dc plus ch-2) and dc in the next ch-2 space. These 2 dc’s should fall on either side of the fpdc from the previous round {Photo 1}.
- If you are going to use a different colour, start with a standing double crochet in the next ch-2 space. Ch 2 and dc in the next ch-2 space. These 2 dc’s should fall on either side of the fpdc from the previous round {Photo 1}.
*Ch 2 and hdc in the next ch-2 space. (Ch 2, sc in the next ch-2 space) twice. Ch 2, hdc in the next ch-2 space. (Ch 2, dc in the next ch-2 space) twice {Photo 2}.* Repeat from * to * 4 more times.
Ch 2 and hdc in the next ch-2 space. (Ch 2, sc in the next ch-2 space) twice. Ch 2 and hdc in the next ch-2 space. Ch 2 and join to the third ch of the beginning ch-5 (or the standing double crochet) with a sl st.
Notice that the dc’s fall on either side of the fpdc’s from the previous round {Photo 2}. Notice also that I am using yellow in Photos 1 and 2 so that you can see the stitch placement better.
Stitch Count: 36 st’s and 36 ch-2 spaces {12 sc’s, 12 hdc’s, 12 dc’s and 36 ch-2 spaces}
Round 7
- If you are going to use the same colour, sl st into the next ch-2 space. Ch 1 and make 2 sc’s in the same ch-2 space.
- If you are going to use a different colour, start with a standing single crochet in the next ch-2 space and then make another sc in the same ch-2 space.
Make 2 sc’s in the next ch-2 space. Make 3 sc’s in the next ch-2 space. *Make 2 sc’s in each of the next 2 ch-2 spaces, make 3 sc’s in the next ch-2 space.* Repeat from * to * 10 more times. Join to the BLO of the first sc with a sl st.
Stitch Count: 84 sc’s
Count your stitches!
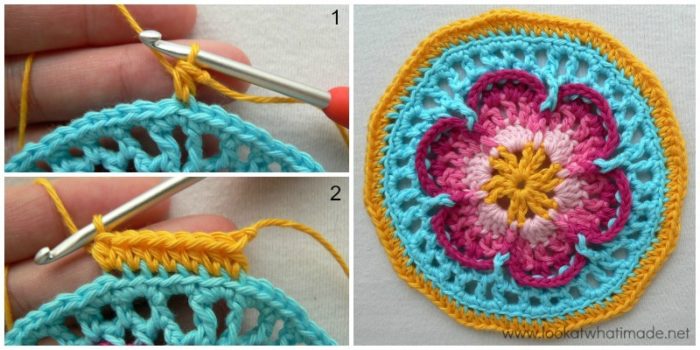
Round 8
You will be working in the back loops only (BLO) for this round.
- If you are going to use the same colour, ch 2 (this counts as your first hdc).
- If you are going to use a different colour, start with a standing hdc in the BLO of the same st as the sl st join. {Photo 1}
Hdc in the BLO of the next 5 st’s and make 2 hdc’s in the BLO of the next st {Photo 2}. *Hdc in the BLO of the next 6 st’s, make 2 hdc’s in the BLO of the next st.* Repeat from * to * 10 more times. Join to the top of the beginning ch-2 (or the standing hdc) with a sl st.
Stitch Count: 96 hdc’s (worked into the BLO)
There! Now that wasn’t so hard, was it?
If you want to check your gauge, this is an excellent time to do it. Refer to the Gauge listed HERE to check if you are on the right track.

This blog post contains affiliate links. I only link to products I personally use or would use. All opinions are my own.


Aleksandra Bareja says
Hi, I am new to crocheting and I was wondering if i did something wrong between rounds. I crochet in one colour and when i end one round wit slip stich and in another it says i have to do another slip stich or chain one i have a wrong number of stiches. Do I just not do the earlier slip stich or am i missing something?
Sorry if that’s a stupid question, but I am really determined to do this <3
Jenny Lowman says
Hi!
If you have a look at the video link, it may assist you better. Esther has done the entire blanket in video format for you to follow along.
I made the pale grey Sophie and I followed the pattern exactly, and I was also a beginner when I made it.
I am not sure what round of part one you are referring to, so watching the video may help you a lot.
Natasha Rose says
Round 5 doesnt give instructions for single color. Do I have to cut the yarn?
Jenny Lowman says
Yes Natasha. You cut the yarn at the end of round 4 and start where instructed for round 5.
Emerald says
I just slip stitched over to where the next round started; its a little bulkier than the rest of that round but it got the job done
Rebekah Tunks says
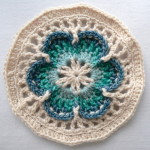
Hi have just started this and I am learning so much. My colour scheme is alternating pale blue and cream from Rows 1-25. Rows 26-90 will be cream, 91-97 pale blue, 98-106 cream,107 blue, 108-109 cream, 110 blue and rows 111-113 cream.
I have also ordered your book which should arrive next week.
Jenny Lowman says
Hi Rebekah. Your colours sound lovely! Do join our Facebook group and share progress pics if you would like to. We love seeing everyone’s work!
The group is called “Look At What I Made – Crochet Patterns By Dedri Uys” if you aren’t already a member. Please remember to answer the questions when joining, in order to rapidly process your acceptance.
Annie L Graham says
like a previous comment i also cannot find the printer button, on either the right or left hand side of anything – feel like such an idiot
Jenny Lowman says
Hi Annie. On every blog post Dedri makes, at the end, after her written signature there is a sentence about affiliate links and then under that there is a Print and PDF button for you to create print friendly PDFs and print or save them.
Look for Dedri’s signature and they will be there below it :)
Jutta says
Thank you for sharing this beautiful pattern, Dedri! It is really an adventure for me and I am glad to learn so many nice stitches. Part 1 was really hard for me and I had to start for several times. But today I have finished it successfully and start now with part 2!!!
Thanks a lot and kind regards
Jenny Lowman says
Well done Jetta! Keep up the good work :)
Rita says
Grazie mille per questo schema meraviglioso. L’ho seguito fino alla parte 7 con risultati strepitosi. Sono entusiasta
Sophie says
Hey,
Love this pattern but I had a little trouble with getting the right hook for this in a DK weight yarn.
Do you have any recommendations? I am determined to make this as it is stunning also has the same name as me :)
Thanks in advance x
Jenny Lowman says
Hi! To meet Dedri’s gauge for DK yarn (medium size blanket), she used a 3.5 and 4mm clover amour hook. Are you finding the work coming up too large or too small? Adjust the hook size down half a size of too big, and up half a size if too small, and see if that helps.
Stephanie Blew says
I’m not seeing a printer friendly version at the bottom right of this post. Was it taken down?
Jenny Lowman says
Hi Stephanie. It is definitely still there under Dedri’s signature on the left hand side :)
HeatherJ says
Thank you for this lovely pattern and I’m really enjoying it so far. I am out of my comfort zone using the US terms but determined to become bilingual!
I am having doubts about round 8 as the stitch count doesn’t seem to match the number of stitches instructed. I had a gap at the end so filled it in with Hdcs to get to the 96 stitches and it seems to have worked out ok (now on round 10) but I’m worried I might have to unpick it later if that is not correct?
Jenny Lowman says
Hi Heather!
Well done for pushing yourself with learning US terminology.
I wouldn’t go any further if you haven’t got the correct stitch count and have had to ‘fill in a gap’.
You really need to work back and check each round to find out where you have gone wrong. Sophie needs her stitch count to be correct after each round in order not to go wildly wrong later down the line :)
Kathy Wymore says
I thought I’d make it more than five rounds before having a question…Ha! In round five it says to “Omit the last bpsc of the last repeat” which means to me that the last petal would only have four bpsc which would make a total of 29 bpsc but the pattern stitch count says 30 bpsc. I added the omitted stitch back in. But I need to understand what I am misinterpreting because I have a looong way to go. I’m more than a beginner but am relearning reading patterns after a 20 year gap. I’ve been okay with charts but my brain isn’t totally connecting reading the patterns. Thanks for any help.
Jenny Lowman says
If you divide you round into petal repeats (the part written in brackets), you are starting with the end of a repeat, then moving across to the next petal, therefore you leave that stitch out when you complete the round.
I hope that makes more sense! :)
Kathy Wymore says
Thank you Jenny Lowman!
Jennifer H says
On round 4 please help.
I have the correct number of dc in round 3 but when I count the number of dc in each petal in round 4 in the instructions, I only get 4. I stitched it out and I get 2 hdc and 4 dc per petal. I’ve worked on this for hours and can’t figure it out. What am I missing?
Jennifer H says
So I just figured it out. I guess it’s never good to work on it late at night.
Dedri Uys says
I’m glad you managed to figure it out. I often find it’s best to walk away and come back later. My projects spend a lot of time in time-out :)
Jacqui Crombie says
My next crochet blanket – can’t wait!!!!
Brenda L Rowe says
Hi Dedri, I have been sick and I am having a slow recovery. I need to crochet but for some reason I am having a hard time. thank you for this beautiful pattern. I was in your original Sophie’s Universe Cal. I have never had so much fun as during that cal. I am hoping by making Sophie’s garden my crochet will come back. I am just using what ever yarn I can lay my hands on for now. I don’t have the strength to go shopping. Thank you!
Jenny Lowman says
Take care Brenda! We hope Sophie helps you to heal again with a walk around her Garden.
BW
Jenny and Dedri :)