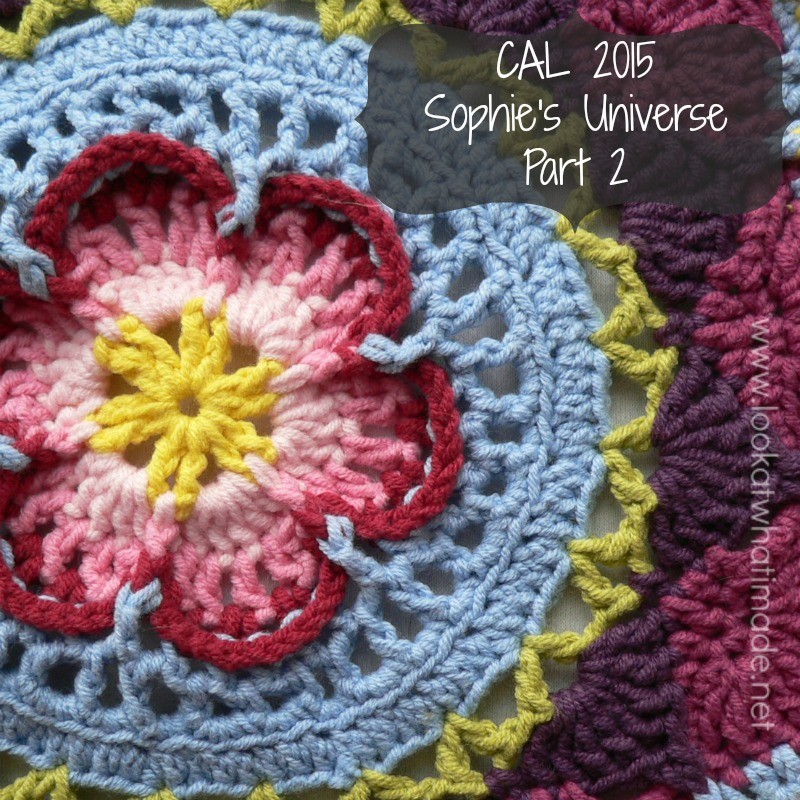
Sophie’s Universe Part 2 {Photo Tutorial}
©Dedri Uys 2014. All Rights Reserved.
Special design credit to Chris Simon for allowing me to use a modified version of her Lace Petals flower.
Resources
- Add this CAL to your Ravelry Queue
- Sophie’s Universe CAL 2015 Information
- Use the Print-friendly button at the bottom (right) of this post to print/save this tutorial. Don’t know how? Find out HERE.
- **Part 2 VIDEO TUTORIAL** by Esther Dijkstra from It’s All in a Nutshell
Translations
- Dutch Translation by Dianne Ban
- German Translation by Gabriele Rogers
- Spanish Translation by Lynda Hernandez
- Danish Translation by Tina Poulsen
- Finnish Translation by Sari Åström
- French Translation by Sandra Larvin (with Video Tutorials by Géraldine Cymer)
- Russian Translation (with Video) by Natalie V. Alimpieva
- Swedish CAL Information by Emma Vingqvist, Agnetha Magnusson, Åza Karlsson, and Ulrika Larsson
- Arabic Video Tutorial by Banan Felimban
Materials
For the purposes of this tutorial, I am using Scheepjeswol Cotton 8 (available from Deramores) and a 3.25 mm Clover Amour Crochet Hook (US D/3 UK 10).
Please Note: In some of the photos I have photographed the Softfun or Stonewashed XL instead of the Cotton 8 to make it easier for you to see the stitches. Occasionally I will use a different colour in some of the photos for the same reason. In this particular tutorial, this affects Rounds 11 – 13.
 |
 |
 |
|
| Cotton 8 | Softfun | Stonewashed XL | |
| Round 9 | Light Green | Olive | Canada Jade |
| Round 10 | Moors | Heath | Corundum Ruby |
| Round 11 | Heath | Cyclamen | Garnet |
| Round 12 | Heath | Cyclamen | Garnet |
| Round 13 | Heath | Cyclamen | Garnet |
| Round 14 | Light Turquoise | Light Blue | Moonstone |
| Round 15 | Light Turquoise | Light Blue | Moonstone |
Abbreviations
US Terminology used (US/UK comparison chart HERE)
- BLO – Back loop only
- Bpsc – Back post single crochet
- Ch – Chain
- Dc – Double crochet
- Fpdc – Front post double crochet
- Fpsc – Front post single crochet
- Hdc – Half-double crochet
- Sc – Single crochet
- Sl st – Slip stitch
- St/st’s – Stitch/stitches
- Tr – Treble crochet
- * – Repeat instructions between asterisks the number of times specified. This is a hardcore repeat and will consist of multiple instructions.
- () – Repeat instructions between parentheses the number of times specified. This is a lower level repeat.
Special Stitches
- Picot: Ch 3, sl st in the third chain from the hook
- Standing Stitches: Standing sc’s, hdc’s, and dc’s are stitches used to start the round without the need for the traditional beginning chain. Links to tutorials are supplied in each relevant round.
- V-stitch: (Dc, ch 2, dc) in the same stitch
Invisible Join
If you would like to use the invisible join instead of the sl st join at the end of each round, you can find a step-by-step photo tutorial HERE. If you DO decide to use it, make very sure that you understand which stitch to join to and which stitch to start your new round in, otherwise, your mandala is going to come out all wonky!
Instructions
You will find the instructions for Rounds 1 – 8 HERE.
Round 9
- If you are going to use the same colour: ch 5 (counts as the first dc and ch-2) and then dc in the same st. This is your first V-stitch made. Ch 1.
- If you are going to use a different colour, start with a standing double crochet in the same stitch as the sl st join, then ch 2 and dc in the same st {Photos 1 and 2}. This is your first V-stitch made. Ch 1 {Photo 3}.
*Skip 3 st’s, make a V-stitch in the next st, ch 1 {Photo 4}.* Repeat from * to * 22 more times. Join to the third ch of the beginning ch 5 (or to the top of the standing double crochet) with a sl st.
Stitch Count: 24 V-stitches and 24 ch-1 spaces between V-stitches {48 dc’s, 24 ch-1 spaces, and 24 ch-2 spaces}
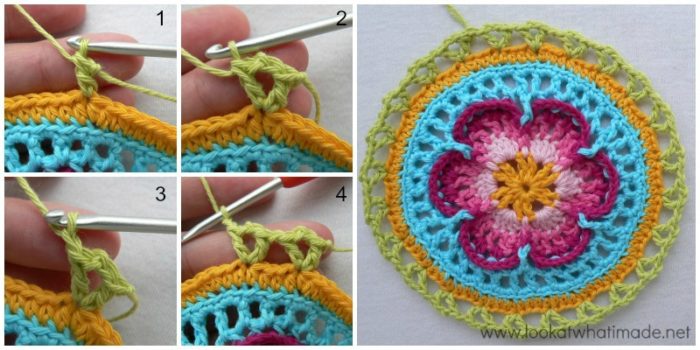
Round 10
Note: In this round, you will only be working into the ch-2 space (the space between the 2 “legs” of each V-stitch). You will be skipping all the ch-1 spaces between V-stitches.
- If you are going to use the same colour, sl st in the next ch-2 space, ch 1 and sc in the same space.
- If you are going to use a different colour, start with a standing single crochet in the next ch-2 space {Photo 1}.
*Make 4 tr’s into the next ch-2 space (Photo 2). Ch 3 and sl st in the third ch from the hook {Photos 3 and 4}. You should now have a little picot at the top of the fourth tr. Make 4 more tr’s into the same ch-2 space {Photo 5}. Sc in the next ch-2 space {Photo 6}.* Repeat from * to * 11 more times. Omit the last sc on the last repeat. Join to the first sc with a sl st. Fasten off and change colours.
Hint: If you have more than 12 petals at the end of this round, you haven’t skipped the ch-1 spaces between V-stitches.
Stitch Counts:
- Total: 12 petals and 12 sc’s {96 tr’s and 12 sc’s}
- Per Petal: 8 tr’s, 1 picot {1 sc’s between petals}
Round 11
Optional: if you would like to give the petals more definition, feel free to work into the BLO in this round.
Join your new yarn by making a standing half-double crochet in the first tr of any petal around {Photo 1}. If you have trouble identifying which loops belong to which stitch, see this tutorial. It touches on the anatomy of stitches when working in the round.
After making your first hdc, sc in the next tr of the petal {Photo 2}. Ch 6 {Photo 3}. Sc in the seventh tr of the petal (Photo 4) and hdc in the last tr. Dc in the sc between petals {Photo 5}.
*Hdc in the first tr of the next petal and sc in the next tr. Ch 6. Sc in the seventh tr of the petal and hdc in the last tr. Dc in the sc between petals.* Repeat from * to * 10 more times. Join to the standing hdc with a sl st.
Stitch Count: 12 dc’s, 24 hdc’s, 24 sc’s, and 12 ch-6 spaces.
Round 12
- If you are going to use the same colour, ch 1 and sc in the same st. Then sc in the next st (Photo 1).
- If you are going to use a different colour, start with a standing single crochet in the same st as the sl st join and then make a sc in the next st.
*Make 6 sc’s in the ch-6 space behind the petal {Photo 2}. Sc in the next 5 st’s.* Repeat from * to * 10 more times. Make 6 sc’s in the last ch-6 space and then sc in the last 3 st’s. Join to the first sc with a sl st.
Stitch Count: 132 sc’s

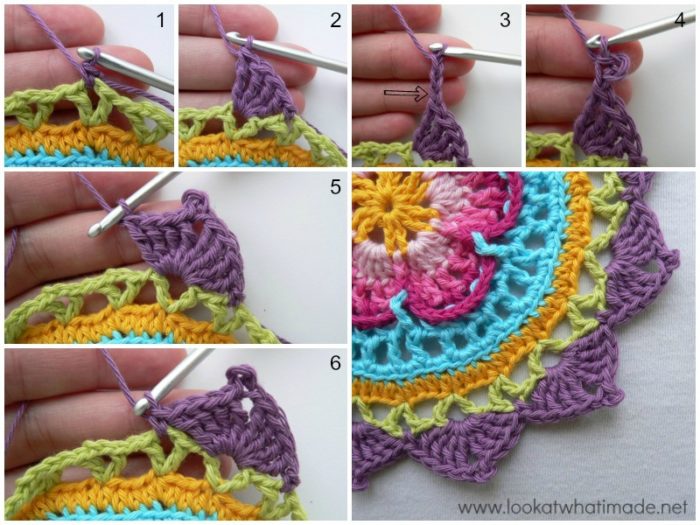
Round 13
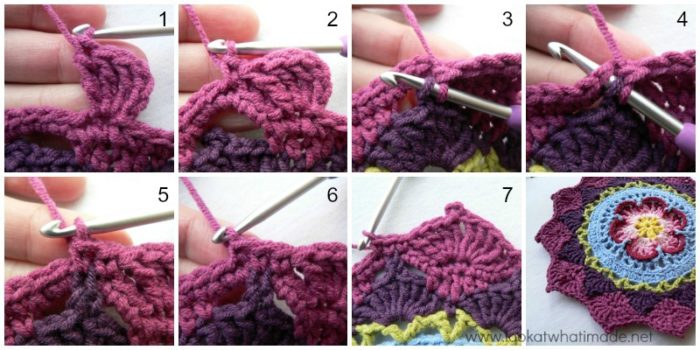
Notes: The first sc of each repeat will fall in the third sc made into the ch-6 space – see Photo 2. The two 4-tr groups which form each petal will fall on either side of the dc in Round 11. When skipping the 3 st’s after the petal, be mindful of the fact that the first stitch to skip will be slightly hidden.
- If you are going to use the same colour, ch 4 (this counts as your first tr) and then make 3 tr’s in the same st {Photo 1}.
- If you are going to use a different colour, join your new colour by making a sl st in the same st as the sl st join. Ch 4 (this counts as your first tr) and then make 3 tr’s in the same st.
*Skip 3 st’s (see Notes above). Sc in the next st {Photo 2}. Catch the picot from Round 10 by inserting your hook into the second ch of the picot AND into the next st from Round 12 and completing a sc through both layers {Photos 3 – 5}. Sc in the next sc {Photo 6}. Skip 3 st’s. Make 4 tr’s in the next st. Make a picot (as in Round 10) and then make 4 tr’s in the next st.* Repeat from * to * 10 more times.
Skip 3 st’s. Sc in the next st. Catch the picot by making a sc through the picot from Round 10 and into the next st of Round 12 (as before). Sc in the next sc. Skip 3 st’s. Make 4 tr’s in the last st. Make a picot. Join to the top of the beginning ch-4 with a sl st. Fasten off and change colours.
Photo 7 shows the position of the 2 groups of tr’s and the position of the 3 sc’s between “petals”.
Stitch Count:
- Total: 12 petals and 36 sc’s {96 tr’s and 36 sc’s}
- Per Petal: 8 tr’s, 1 picot {3 sc’s between petals}
Round 14
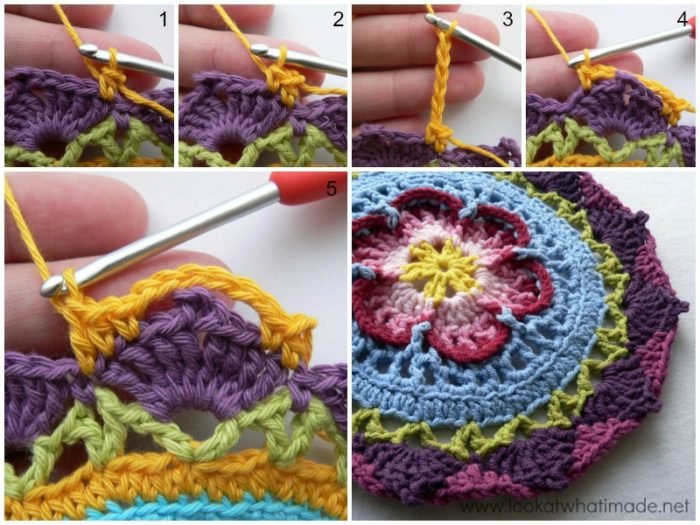
Optional: if you would like to give the petals more definition, feel free to work into the BLO in this round.
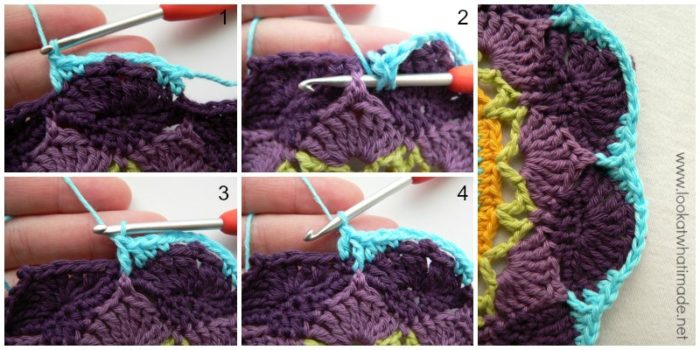
Join your new yarn by making a standing half-double crochet in the first tr of any petal around. Sc in the next tr of the petal. Ch 6. Sc in the seventh tr of the petal and hdc in the last tr. Dc in the next sc {Photo 1}, skip the next sc of Round 13 and make a fpdc around the picot from Round 10 {Photos 2 and 3}, dc in the last sc {Photo 4}.
*Hdc in the first tr of the next petal and sc in the next tr. Ch 6. Sc in the seventh tr of the petal and hdc in the last tr. Dc in the next sc, skip the next sc of Round 13 and make a fpdc around the picot from Round 10, dc in the last sc.* Repeat from * to * 10 more times. Join to the standing hdc with a sl st.
Stitch Count: 24 dc’s, 12 fpdc’s, 24 hdc’s, 24 sc’s, and 12 ch-6 spaces.
Round 15
Round 15 is the same as Round 12, but with more sc’s.
- If you are going to use the same colour, ch 1 and sc in the same st. Then sc in the next st.
- If you are going to use a different colour, start with a standing single crochet in the same st as the sl st join and then sc in the next st.
(Make 6 sc’s in the ch-6 space behind the petal. Sc in the next 7 st’s) 11 times. Make 6 sc’s in the last ch-6 space. Sc in the last 5 st’s. Join to the first sc with a sl st.
Stitch Count: 156 sc’s

How was that? Has everyone managed to follow the tutorial so far?

This blog post contains affiliate links. I only link to products I personally use or would use. All opinions are my own.

Amy says
I love love this exquisite design. It’s November 2024 and I just ordered the Yarn from your Warehouse for the Color Crafter Medium Size. Although it is extremely busy time of year- I can’t wait for the yarn to get here so I can start.
I’ve been watching the Tutorial on It’s All In A Nutshell and as a seasoned crocheter, she has done an exceptional job instructing on this. Your picture and written instructions are thorough as well.
I would encourage any beginner to try this. It may appear intimidating for a newbie to crochet, however these ladies will guide you through it and you will have a very exquisite piece of art.
Thank you so much. I’ll be watching every day for my yarn to arrive.
Jenny Lowman says
Hi Amy!
We hope you don’t have to wait too much longer for your yarn. Do post photos of your progress on our Facebook group so we can all see how you get on! :)
Cristina Dionísio says
Obrigada,
por este trabalho tão bonito, só a descobri agora no pinterest e adorei!
Estou a começar até agora está a correr muito bem.
Também estou a segui-la no instagram e pedi para aderir ao grupo de facebook
Bem haja
Cristina Dionísio
Jenny Lowman says
Enjoy, Cristina. We are not in charge of the Sophie’s Universe Facebook group, so can’t add you to it.
Good luck with your journey.
Natalie Beck says
Finally found the yarn to make this. It’s working up so nicely. Thank you for designing such a wonderful pattern.
Jenny Lowman says
So glad you are enjoying your Sophie journey, Natalie!
BW
Jenny :)
Freda Davison says
I do love this design. I had started another one, but it didn’t lay out straight. I ended up ripping it out. Your design is perfect so far; very easy to follow.
Working this for a granddaughter.
F. D
Dedri Uys says
Thank you Freda. I hope she loves it!
Tania says
Well. I am a newby. My very first attempt at chrocheting. The steps are easy. I decided to take this one on as the normal blankets dont interest or keep me interested for long enough to finish it. I am having so much fun and it is coming out exactly as it should. Thank u!
Kel says
Thank you so much for these easy to follow instructions! I’ve never attempted anything remotely complicated like this before but Im able to follow your instructions after a few attempts on some rounds.
I’m doing a solid color. In the few round where you say it’s necessary to cut and start again in a different spot, I’ve had good luck so far just carefully slip stitching my way over to the required beginning stitch for the next round. So far, it’s been no problem and I’ve got just one strand of yarn. I’ve seen at least one other person asking this question so I wanted to mention that it seems to be possible :)
Thank you again for sharing this beautiful pattern. I love how it is turning out. I’m using Caron simply soft in Pagoda, it’s a dark turquoise/teal kind of blue.
Dedri Uys says
Hi Kel. Thank you for your comment.
Where I say to fasten off despite colour, it is either to make it neater and/or easier (usually because the next rounds starts in a different spot). You are welcome to slip stitch your way to where you need to start if that is your preference.
Eugenia says
I have just completed part 2 of Sophie’s Universe and I am smitten. I am a nursing sister in South Africa and am feeling all the stresses related to being in the frontline of working in this Covid pandemic. As we are approaching the peak in the next few weeks, and my province becoming the hotspot, I felt the need to create and focus on something beautiful. I have admired Sophie since she was first published and am so grateful to you for being so generous in sharing your pattern so freely. It means more than words can say. Thank you.
Sarah says
Just bought the book for it on amazon as I like paper in front of me as I’m working. So excited to get it delivered, just finished this round and can’t wait to get onto the next. Pregnant and bored in lockdown, lovely to have something pretty to make
Helen Borgen says
What an inspirational pattern. I have crocheted for years and can honestly say that this is one of the most beautiful pieces of art i have ever attempted to do. I have just finished the second part. Can’t wait for part 3
Dedri Uys says
Thank you Helen!
Jersey says
Coming along just great, thanks to your wonderful instructions!
Thank You for this pattern, I am doing it in colors similar to yours,
really colorful hippie / boho colors, Thanks Again!!
Dedri Uys says
You are very welcome :) Gotta love bold colours!
Lee Moss says
Dear Dedri, thank you for this beautiful pattern! We are in national lockdown in South Africa due to the Covet-19. This is such an inspiring fun project to be busy with! Will post pictures on fb.
Dedri Uys says
Hi Lee.
My thoughts go out to you. I know my family is struggling with the lockdown, which is much harsher than the one here in the UK. Please let me know how you get on with Sophie.
Dedri
Namrata says
Thank you dear Dedri. God bless you. It’s a very beautiful pattern. Already started with this pattern.
Melann Johnston says
I was a little intimidated when I first looked at this pattern and put it on the back shelf for awhile. I kept going back and looking at it and decided to try it. I absolutely love it!! I just finished part two and am ready to start part 3! This is one of the most amazing patterns ever! Can’t wait to get it finished and put on my couch! What a conversation starter that will be!
Dedri Uys says
Hi. I am so happy to hear that you decided to give it a go and even more so to hear that you are enjoying it. Thank you for letting me know,
Dedri
Nina Brown says
I agree! I like vet this pattern.
Sunniva says
Hey Dedri,
I just started my first Sophie. I want to weave in my ends as I go (after each part I finish), because I know I will be too lazy to do them all in the end! Do you mention the best way to weave in the ends? I would love to know, I want my Sophie to be as secure as possible!
Love from Germany ;-)
Dedri Uys says
Hi Sunniva. I do have a tutorial for working away ends, although it is not specifically aimed at Sophie. You can find it HERE.
Aleshia Tarr says
I’m working on my second one with my 14 year old daughter who is also making one. Love this! Many more to come I believe. I too also wanna try the Mandala madness! My cousin did one and it’s beautiful.
Dedri Uys says
What a lovely thing to do with your daughter. I hope you are making many memories in the process. Good luck with Mandala Madness :)
Dedri Uys says
Yay!!! All good now?
Charlie says
This pattern and the tutorial are perfect! It was my first attempt to make something beyond a traditional granny square and it opened me up to so many new stitches and patterns. I actually completed the Mandala Madness blanket this year which if you know it is a huge feat! Im back to this pattern though because it is so beautiful, I’m trying to put it into a hooded shawl to wear to work. Thank you for sharing this tutorial!
Dedri Uys says
Hi Charlie. If you have made Mandala Madness, I would say that you are well on your way to leaving traditional granny squares in the dirt!! I am so pleased that you are challenging yourself to learn new stitches and techniques :)
Sarah says
I love this project so much, I often get bored at the repetitive nature of larger projects, but with this project, each round is a new challenge and I love the mix of different colours, it’s a great way to use up odd balls in my stash.. thanks so much for sharing xx
Dedri Uys says
I am so happy to hear that you are enjoying Sophie!
Anna Jarczynska says
Hi there.Just to say a massive thank you for this wonderful pattern and absolutely amazing tutorial.I am rather new to crochet but thanks to your superb instructions I am doing well,mastering the skills;-))) and being very very happy with what I am trying to achieve here.
Greetings from Poland and once again a big THANK YOU!!!DZIEKUJE!!!
Dedri Uys says
Hi Anna. Thank you for your lovely comment. I am so pleased that you are happy with your progress x