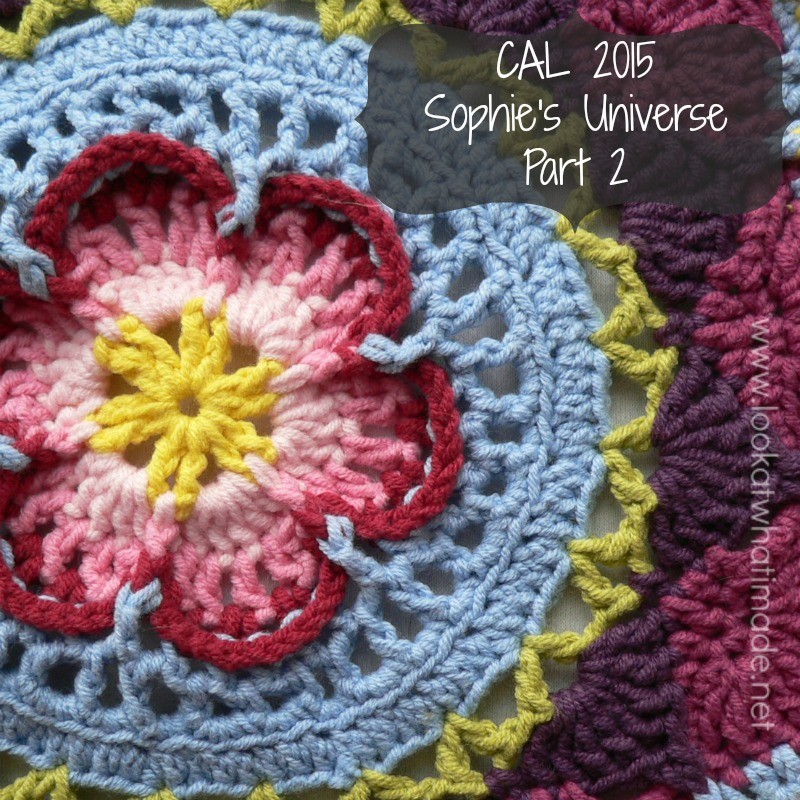
Sophie’s Universe Part 2 {Photo Tutorial}
©Dedri Uys 2014. All Rights Reserved.
Special design credit to Chris Simon for allowing me to use a modified version of her Lace Petals flower.
Resources
- Add this CAL to your Ravelry Queue
- Sophie’s Universe CAL 2015 Information
- Use the Print-friendly button at the bottom (right) of this post to print/save this tutorial. Don’t know how? Find out HERE.
- **Part 2 VIDEO TUTORIAL** by Esther Dijkstra from It’s All in a Nutshell
Translations
- Dutch Translation by Dianne Ban
- German Translation by Gabriele Rogers
- Spanish Translation by Lynda Hernandez
- Danish Translation by Tina Poulsen
- Finnish Translation by Sari Åström
- French Translation by Sandra Larvin (with Video Tutorials by Géraldine Cymer)
- Russian Translation (with Video) by Natalie V. Alimpieva
- Swedish CAL Information by Emma Vingqvist, Agnetha Magnusson, Åza Karlsson, and Ulrika Larsson
- Arabic Video Tutorial by Banan Felimban
Materials
For the purposes of this tutorial, I am using Scheepjeswol Cotton 8 (available from Deramores) and a 3.25 mm Clover Amour Crochet Hook (US D/3 UK 10).
Please Note: In some of the photos I have photographed the Softfun or Stonewashed XL instead of the Cotton 8 to make it easier for you to see the stitches. Occasionally I will use a different colour in some of the photos for the same reason. In this particular tutorial, this affects Rounds 11 – 13.
 |
 |
 |
|
| Cotton 8 | Softfun | Stonewashed XL | |
| Round 9 | Light Green | Olive | Canada Jade |
| Round 10 | Moors | Heath | Corundum Ruby |
| Round 11 | Heath | Cyclamen | Garnet |
| Round 12 | Heath | Cyclamen | Garnet |
| Round 13 | Heath | Cyclamen | Garnet |
| Round 14 | Light Turquoise | Light Blue | Moonstone |
| Round 15 | Light Turquoise | Light Blue | Moonstone |
Abbreviations
US Terminology used (US/UK comparison chart HERE)
- BLO – Back loop only
- Bpsc – Back post single crochet
- Ch – Chain
- Dc – Double crochet
- Fpdc – Front post double crochet
- Fpsc – Front post single crochet
- Hdc – Half-double crochet
- Sc – Single crochet
- Sl st – Slip stitch
- St/st’s – Stitch/stitches
- Tr – Treble crochet
- * – Repeat instructions between asterisks the number of times specified. This is a hardcore repeat and will consist of multiple instructions.
- () – Repeat instructions between parentheses the number of times specified. This is a lower level repeat.
Special Stitches
- Picot: Ch 3, sl st in the third chain from the hook
- Standing Stitches: Standing sc’s, hdc’s, and dc’s are stitches used to start the round without the need for the traditional beginning chain. Links to tutorials are supplied in each relevant round.
- V-stitch: (Dc, ch 2, dc) in the same stitch
Invisible Join
If you would like to use the invisible join instead of the sl st join at the end of each round, you can find a step-by-step photo tutorial HERE. If you DO decide to use it, make very sure that you understand which stitch to join to and which stitch to start your new round in, otherwise, your mandala is going to come out all wonky!
Instructions
You will find the instructions for Rounds 1 – 8 HERE.
Round 9
- If you are going to use the same colour: ch 5 (counts as the first dc and ch-2) and then dc in the same st. This is your first V-stitch made. Ch 1.
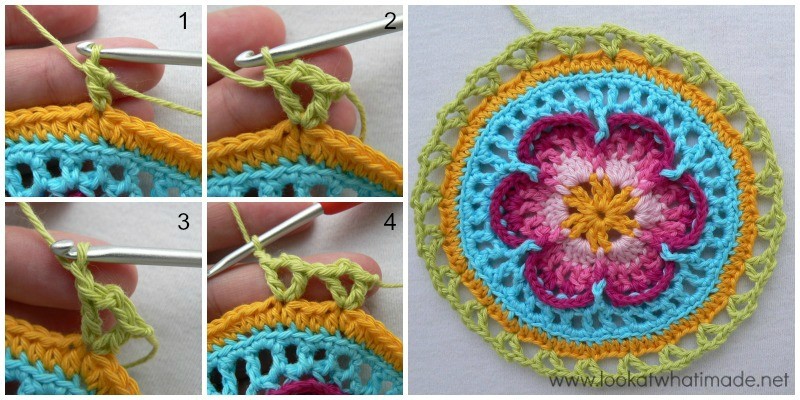
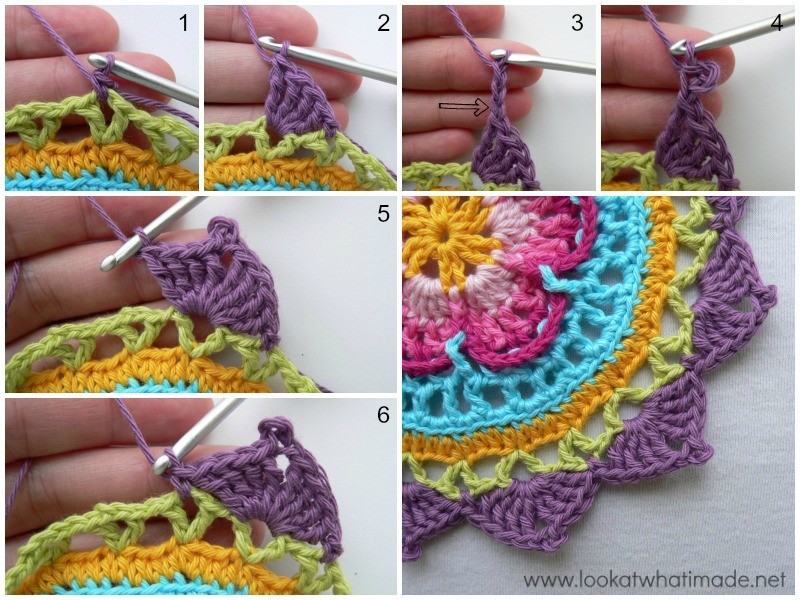
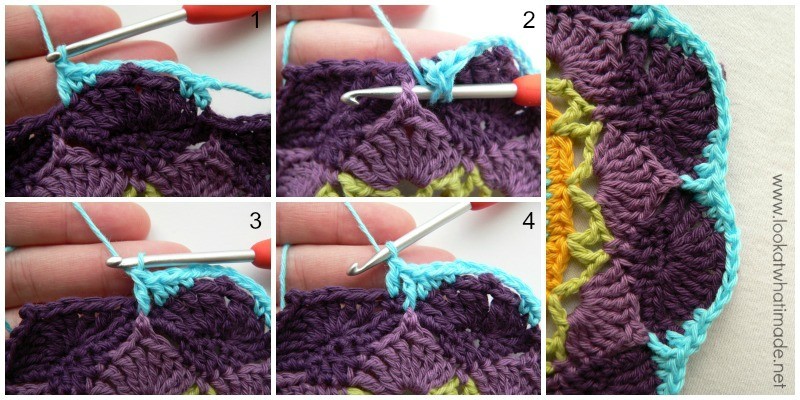
- If you are going to use a different colour, start with a standing double crochet in the same stitch as the sl st join, then ch 2 and dc in the same st {Photos 1 and 2}. This is your first V-stitch made. Ch 1 {Photo 3}.
*Skip 3 st’s, make a V-stitch in the next st, ch 1 {Photo 4}.* Repeat from * to * 22 more times. Join to the third ch of the beginning ch 5 (or to the top of the standing double crochet) with a sl st.
Stitch Count: 24 V-stitches and 24 ch-1 spaces between V-stitches {48 dc’s, 24 ch-1 spaces, and 24 ch-2 spaces}
Round 10
Note: In this round, you will only be working into the ch-2 space (the space between the 2 “legs” of each V-stitch). You will be skipping all the ch-1 spaces between V-stitches.
- If you are going to use the same colour, sl st in the next ch-2 space, ch 1 and sc in the same space.
- If you are going to use a different colour, start with a standing single crochet in the next ch-2 space {Photo 1}.
*Make 4 tr’s into the next ch-2 space (Photo 2). Ch 3 and sl st in the third ch from the hook {Photos 3 and 4}. You should now have a little picot at the top of the fourth tr. Make 4 more tr’s into the same ch-2 space {Photo 5}. Sc in the next ch-2 space {Photo 6}.* Repeat from * to * 11 more times. Omit the last sc on the last repeat. Join to the first sc with a sl st. Fasten off and change colours.
Hint: If you have more than 12 petals at the end of this round, you haven’t skipped the ch-1 spaces between V-stitches.
Stitch Counts:
- Total: 12 petals and 12 sc’s {96 tr’s and 12 sc’s}
- Per Petal: 8 tr’s, 1 picot {1 sc’s between petals}
Round 11
Optional: if you would like to give the petals more definition, feel free to work into the BLO in this round.
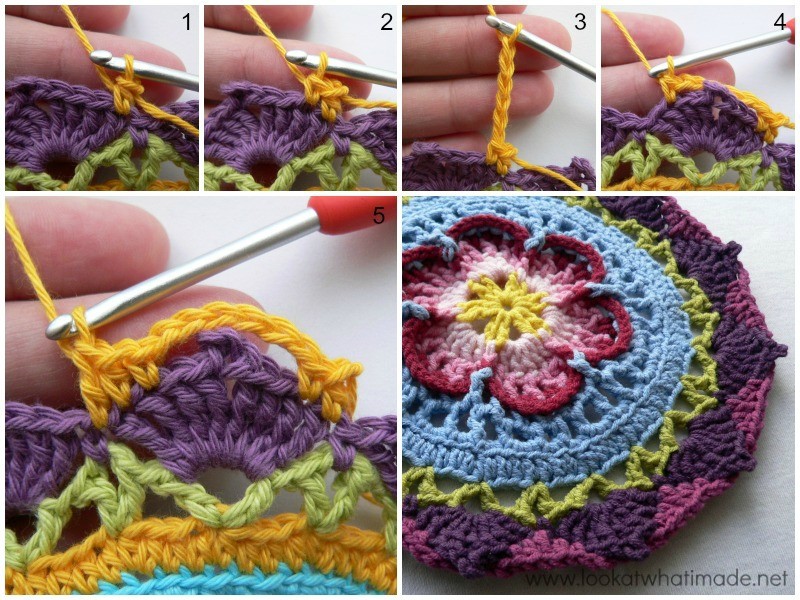
Join your new yarn by making a standing half-double crochet in the first tr of any petal around {Photo 1}. If you have trouble identifying which loops belong to which stitch, see this tutorial. It touches on the anatomy of stitches when working in the round.
After making your first hdc, sc in the next tr of the petal {Photo 2}. Ch 6 {Photo 3}. Sc in the seventh tr of the petal (Photo 4) and hdc in the last tr. Dc in the sc between petals {Photo 5}.
*Hdc in the first tr of the next petal and sc in the next tr. Ch 6. Sc in the seventh tr of the petal and hdc in the last tr. Dc in the sc between petals.* Repeat from * to * 10 more times. Join to the standing hdc with a sl st.
Stitch Count: 12 dc’s, 24 hdc’s, 24 sc’s, and 12 ch-6 spaces.
Round 12
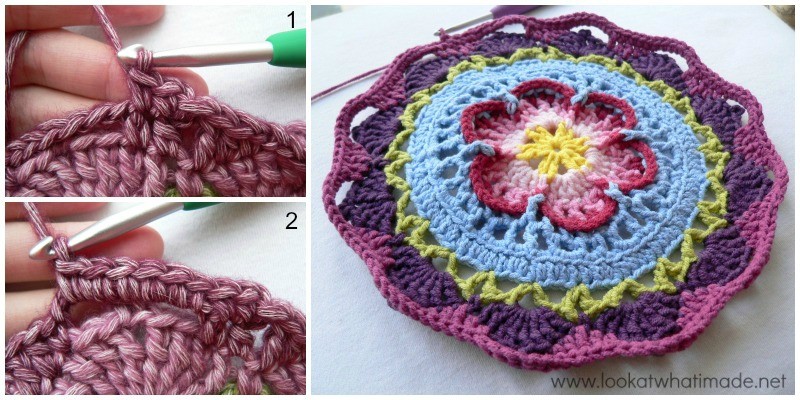
- If you are going to use the same colour, ch 1 and sc in the same st. Then sc in the next st (Photo 1).
- If you are going to use a different colour, start with a standing single crochet in the same st as the sl st join and then make a sc in the next st.
*Make 6 sc’s in the ch-6 space behind the petal {Photo 2}. Sc in the next 5 st’s.* Repeat from * to * 10 more times. Make 6 sc’s in the last ch-6 space and then sc in the last 3 st’s. Join to the first sc with a sl st.
Stitch Count: 132 sc’s
Round 13
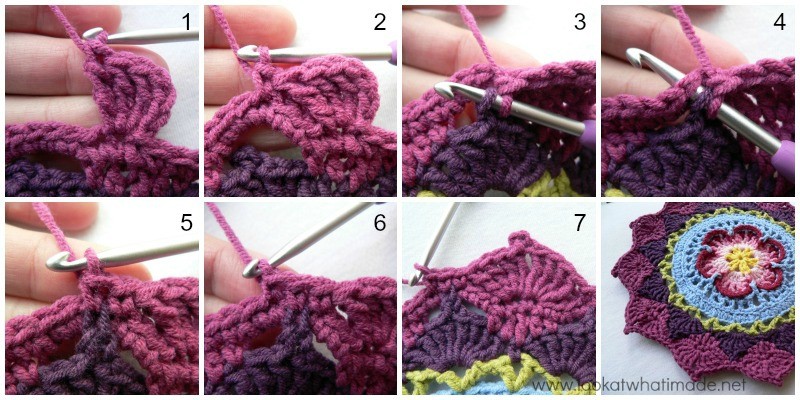
Notes: The first sc of each repeat will fall in the third sc made into the ch-6 space – see Photo 2. The two 4-tr groups which form each petal will fall on either side of the dc in Round 11. When skipping the 3 st’s after the petal, be mindful of the fact that the first stitch to skip will be slightly hidden.
- If you are going to use the same colour, ch 4 (this counts as your first tr) and then make 3 tr’s in the same st {Photo 1}.
- If you are going to use a different colour, join your new colour by making a sl st in the same st as the sl st join. Ch 4 (this counts as your first tr) and then make 3 tr’s in the same st.
*Skip 3 st’s (see Notes above). Sc in the next st {Photo 2}. Catch the picot from Round 10 by inserting your hook into the second ch of the picot AND into the next st from Round 12 and completing a sc through both layers {Photos 3 – 5}. Sc in the next sc {Photo 6}. Skip 3 st’s. Make 4 tr’s in the next st. Make a picot (as in Round 10) and then make 4 tr’s in the next st.* Repeat from * to * 10 more times.
Skip 3 st’s. Sc in the next st. Catch the picot by making a sc through the picot from Round 10 and into the next st of Round 12 (as before). Sc in the next sc. Skip 3 st’s. Make 4 tr’s in the last st. Make a picot. Join to the top of the beginning ch-4 with a sl st. Fasten off and change colours.
Photo 7 shows the position of the 2 groups of tr’s and the position of the 3 sc’s between “petals”.
Stitch Count:
- Total: 12 petals and 36 sc’s {96 tr’s and 36 sc’s}
- Per Petal: 8 tr’s, 1 picot {3 sc’s between petals}
Round 14
Optional: if you would like to give the petals more definition, feel free to work into the BLO in this round.
Join your new yarn by making a standing half-double crochet in the first tr of any petal around. Sc in the next tr of the petal. Ch 6. Sc in the seventh tr of the petal and hdc in the last tr. Dc in the next sc {Photo 1}, skip the next sc of Round 13 and make a fpdc around the picot from Round 10 {Photos 2 and 3}, dc in the last sc {Photo 4}.
*Hdc in the first tr of the next petal and sc in the next tr. Ch 6. Sc in the seventh tr of the petal and hdc in the last tr. Dc in the next sc, skip the next sc of Round 13 and make a fpdc around the picot from Round 10, dc in the last sc.* Repeat from * to * 10 more times. Join to the standing hdc with a sl st.
Stitch Count: 24 dc’s, 12 fpdc’s, 24 hdc’s, 24 sc’s, and 12 ch-6 spaces.
Round 15
Round 15 is the same as Round 12, but with more sc’s.
- If you are going to use the same colour, ch 1 and sc in the same st. Then sc in the next st.
- If you are going to use a different colour, start with a standing single crochet in the same st as the sl st join and then sc in the next st.
(Make 6 sc’s in the ch-6 space behind the petal. Sc in the next 7 st’s) 11 times. Make 6 sc’s in the last ch-6 space. Sc in the last 5 st’s. Join to the first sc with a sl st.
Stitch Count: 156 sc’s
How was that? Has everyone managed to follow the tutorial so far?

This blog post contains affiliate links. I only link to products I personally use or would use. All opinions are my own.


fabiana says
hay forma de ver el paso a paso en ESPAÑOL??? no way to see step by step SPANISH ??? THANK YOU
Dedri Uys says
Fabiana, you can find all the spanish links HERE.
Leslie says
I really really wanted to do a CAL this year but the one I chose first was totally un-doable for me. I did not particularly like any of the first three blocks and I found the instructions confusing, to say the least. I was so lucky to stumble on this one! It’s absolutely gorgeous, and your instructions are some of the clearest I’ve ever seen. Thanks so much!
Dee Davenport says
I had the same situation with a CAL. It ws the most irritating thing. Wonder if we were doing the same one?
Helen says
Hi,
I have just tired to use the print friendly button for this page and it doesn’t bring up the Sophie pattern, it brings up an essay about Islam!! Any ideas what’s happened and where I can get the print friendly version of part 2? I am saving them to my iBooks.
Julie Norman says
Hi Dedri, my friend Claire got me into this CAL malarky and have to say I’m really enjoying it :) I’m waaay behind, just done round 13, about 6 times! Note to self: if in doubt read the pattern… Love my Sophie, thank you so much for guiding us through :)
Dedri Uys says
Hi and welcome, Julie. Sometimes you just need to walk away for a bit (and then come back with a highlighter and a firm resolve). Try and have a look at the videos if you get stuck. Esther has done an amazing job with them!
Sarah Bonvillian says
it seems to be fairly easy but i believe it is more intermediate. but i love it, can’t wait to see it finished. i just received my package of skeins for this cal, can’t wait to start!
Jenny says
It certainly is an exciting CAL, Sarah :)
Laurie says
I’ve really enjoyed this so far, the hardest part for me has been the sc in the 6 ch. It’s so pretty I can’t wait to see it grow.
Sandra Hamlett says
I have been crocheting since I was 9 yrs old and have completed many items but never to this magnitude, I am having so much fun seeing the beautiful stitches come together in this beautiful project! I am loving my Sophie CAL! Thanks ladies for this lovely project!!!
Regi says
The start is beautifull, i love this one in Stonewashed XL, Thank you from Holland
Bonnie Bazensky says
I really like the look of using the BLO. I took the suggestion to do so in round 11 and 14. But I got so caught up in doing that that I forgot and kept doing BLO for rounds 12 and 13. Will it make any difference in the work? It looks ok to me but I have never done anything like this before so I don’t know if I have to frog it.
Thanks
Dedri Uys says
It shouldn’t be a problem :) you must really like blo to get that carried away with it :)
Pati Ply m ale says
I would just like to thank you for all the hard work you put into setting this up. I really appreciate it. I have not picked up a hook in 30 years. You make starting so easy.
Jenny says
We are glad to have enticed that hook back in to your hand, Pati :)
Barbara Beck says
A HUGE thank you ladies for all the hard work that you have put into Sophies CAL. I have not picked up a crochet hook for some 35 years, but your easy to follow instructions and ‘artistic design’ has brought back the love of crochet. Didn’t know half these stitches even existed, yet alone ‘how’ to do them, but with your easy to follow tutorials I am crocheting again. Thank you, Barbara
Jenny says
How wonderful to hear that Sophie has encouraged your hook back in to your hand again, Barbara!
This really has made us both smile!
Jenny
Edith R. Gonzales says
Hi Dedri, if there is one thing i am learning from this CAL is the amount of time and skill and patience you have inputted in the project. Looks complicared at first, but seeing how clear the instructions and photo tuts are I think I will give it a try. Thank you for sharing your creativity with us.
Dedri Uys says
I hope you do try it, Edit. Will you post a pic if you do?
Edith R. Gonzales says
Surely, Dedri.
Kathleen Fowler says
Thanks so much for all the hard work that went into this project. While I’m a novice I’ve been able to follow along easily. The tutorials are very helpful. Looking forward to the next steps
Dedri Uys says
I am so pleased to hear that, Kathleen. If you could do Parts 1 and 2, you can do the rest of it :)
Angela says
Thank you for all the work that went into this CAL. I am really enjoying it! The directions and the photos are SO clear I can’t go wrong. This is my first CAL….had the option of several. I had just “discovered” your website Dedri and so loved your tutorials and how clearly you put things that I had an easy choice of which CAL to choose! :)
I’m sure you get all sorts of comments but I do hope that most of them at least are positive.
Thank you, thank you!
Angela
Dedri Uys says
Thank you, Angela. The majority of the comments have been positive, but this style of pattern-writing is not to everyone’s taste, so there have been a bit of negative feedback too. I embrace the diversity, because if we were all the same, or all liked the same things, life would be terribly boring.
I hope you enjoy the rest of the CAL.
Dedri
Amy West says
The pictures are great! When I wasn’t quite sure, looking at the pictures answered the question. Thank you and I can’t wait for this Sunday’s addition!
Maria Caroline Nakafeero says
i love this, this is beautiful, am planning on a project out of this, thank you for the sharing, it’s detailed and beneficial. God bless u
Sheery says
This pattern is so clear and so gorgeous! Thank you so much!
Dedri Uys says
Thank you :)
Lori says
Is there a chart/list showing what color will be used for each row for the completed project? I’m starting the crochet along today. The pattern I have seen so far is beautiful! I can’t wait to get started. I went to order the same yarn you are using but they are on back order, so I had to substitute my own colors.
Jenny Lowman says
Hello Lori!
The pattern certainly is one to make us all smile, isn’t it?
Dedri has listed all the colours she is using for all three versions of the CAL here https://lookatwhatimade.net/crafts/yarn/crochet/sophies-universe-cal-2015/sophies-universe-cal-2015-information/
How you use each colour is totally up to you. You can follow your own colour order entirely, or try and use some of the phototgraphs in the tutorials for inspiration.
Jenny :)
Sue says
I just finished till here (ends woven in, too) in knitting cotton. Just popped by to say Dedri, there is no way I’d have attempted this without your tutes. So much fun though, this pattern. Can hardly wait till the next bit!
Dedri Uys says
Thank you, Sue :)
fiddlyfingers says
Loving this CAL. First time I’ve ever taken part in anything like this. I’ve just completed the first two parts. How do I go about sharing a picture with everyone? I shall blog about it as I go along but would like to join in with the Sophie’s Universe CAL community also.
The pattern is a little familiar so far as I have just completed another of your fabulous patterns!! I am using Axminster carpet yarn (yes the yarn they use to make carpets!) as I have loads of it and it was all free! It’s not the softest yarn so I am using a 6mm hook to give it a softer feel. My measurement for the first part was 8″ so I think this will be a huge blanket by the time I’m finished.
Thank you so much for all your time and effort. Your instructions and photos are brilliant. Can’t wait for the next part!
Jenny Lowman says
Hello! I love your ‘username’! :)
There are several places you can post photos of your progress –
on our Facebook page
https://www.facebook.com/Lookatwhatimade
and/or on the official CCC CAL Facebook page
https://www.facebook.com/groups/officialcccsocialgroup/
Either way, we look forward to seeing your photos! Both Dedri and I haven’t stopped smiling since the first photos went up. It is truly wonderful to see so many lovely Sophies starting to bloom!
Jenny
Jenny Lowman says
Hi Fiddlyfingers! Love your username :)
You can share your photos on our Facebook page
https://www.facebook.com/Lookatwhatimade
and on the official CCC page
https://www.facebook.com/groups/officialcccsocialgroup/?ref=bookmarks
Dedri and I are just loving seeing all the new Sophies blossoming up everywhere. It is fab to see all the different colourways!
Your Sophie is intriguing – are you going to use it for a rug when finished? I love the idea of using carpet wool!
Jenny