Good morning!
This week we are going to do 8 relatively simple rounds, so don’t gulp when you see all the words and photos. Explaining 2 different kinds of sides for each round takes a lot of photos and words, but the rounds are fairly straightforward and should go quickly.
I keep being amazed at all the stunning colour combinations you guys are coming up with, and I have a little favour to ask. Before you get to the end of Part 6, could you take your Sophie on a little photo shoot outing? I love seeing pictures of Sophie draped over landmarks or in pretty landscapes. There is something extra special about seeing the habitat/loves/interests/landmarks that reveal a little bit about the hooker behind the project.
I know I loved seeing Sophie in different South-African settings: draped over a stack of tyres, with Table Mountain in the background; being held by 2 boys at a Sports day; in front of the Union Building in Pretoria.
I got to thinking. If these photos make me feel nostalgic and less homesick (at the same time), wouldn’t they do the same for other ex-pats doing the CAL, wherever they are from or wherever they find themselves now?
Share your Scenic Sophies using #scenicsophie.
And now you may continue…
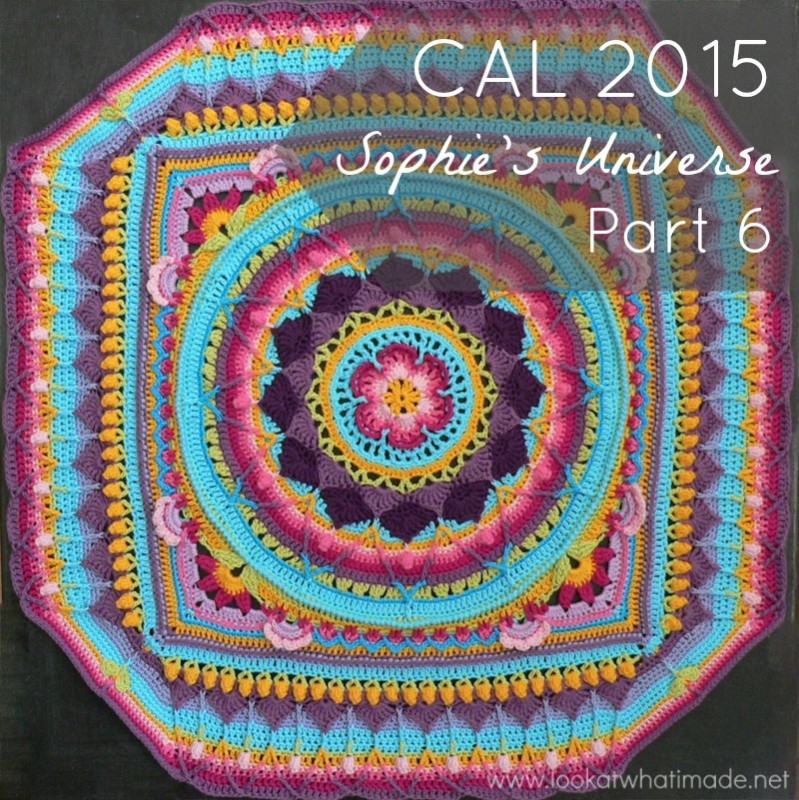
Sophie’s Universe Part 6
©Dedri Uys 2014. All Rights Reserved.
Resources
- Add this CAL to your Ravelry Queue
- Sophie’s Universe CAL 2015 Information
- Use the Print-friendly button at the bottom (right) of this post to print/save this tutorial. Don’t know how? Find out HERE.
- **Part 6 VIDEO TUTORIAL** by Esther Dijkstra from It’s All in a Nutshell
Translations
- Dutch Photo Tutorial by Dianne Baan
- German Translation by Maja Heidingsfelder
- Spanish Translation by Lynda Hernandez
- Finnish Translation by Sari Åström
- French Translation by Sandra Larvin
- Danish Translation by Tina Poulsen
- Russian Translation (with Video) by Natalie V. Alimpieva
- Swedish CAL Information by Emma Vingqvist, Agnetha Magnusson, Åza Karlsson, and Ulrika Larsson
- Arabic Video Tutorial by Banan Felimban
Materials
See the Information Post.
In some of the photos, I have used a different colour than the specified colour to make it easier for you to see where the stitches go.
Abbreviations
US Terminology Used (Basic US/UK comparison chart here)
- BLO – Back loop only
- Ch – Chain
- Dc – Double crochet
- Fpdc – Front post double crochet
- FLO – Front loop only
- Fpdtr – Front post double treble
- Fptr – Front post treble crochet
- Hdc – Half-double crochet
- Sc – Single crochet
- Sl st – Slip Stitch
- St/st’s – Stitch/stitches
- * – Repeat instructions between asterisks the number of times specified. This is a hardcore repeat and will consist of multiple instructions.
- () – Repeat instructions between parentheses the number of times specified. This is a lower level repeat.
Special Stitches
- Popcorn stitch: Make 5 dc’s in the same stitch. Remove your hook from the last stitch. Insert your hook into the first dc of the 5 dc’s. Grab the last stitch with your hook and pull it through the first stitch. Ch 1. See this tutorial.
- Standing Stitches: Standing sc’s, hdc’s, and dc’s are stitches used to start the round without the need for the traditional beginning chain. Links to tutorials are supplied in each relevant round.
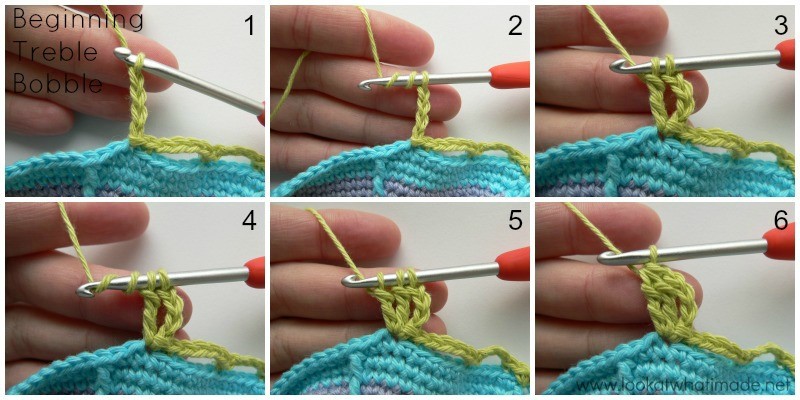
- Beginning Tr Bobble: Ch 4 (Photo 1). Yarn over twice (Photo 2) and insert your hook into the stitch at the base of the ch-4. Yarn over and pull up a loop. (Yarn over and pull through 2 loops) twice – 2 loops on your hook (Photo 3). Yarn over twice (Photo 4) and insert your hook into the same stitch. Yarn over and pull up a loop – 5 loops on your hook. (Yarn over and pull through 2 loops) twice – 3 loops on your hook (Photo 5). Yarn over and pull through all 3 loops (Photo 6).
Instructions
Rounds 1 – 45
You can find the links for Rounds 1 – 45 HERE.
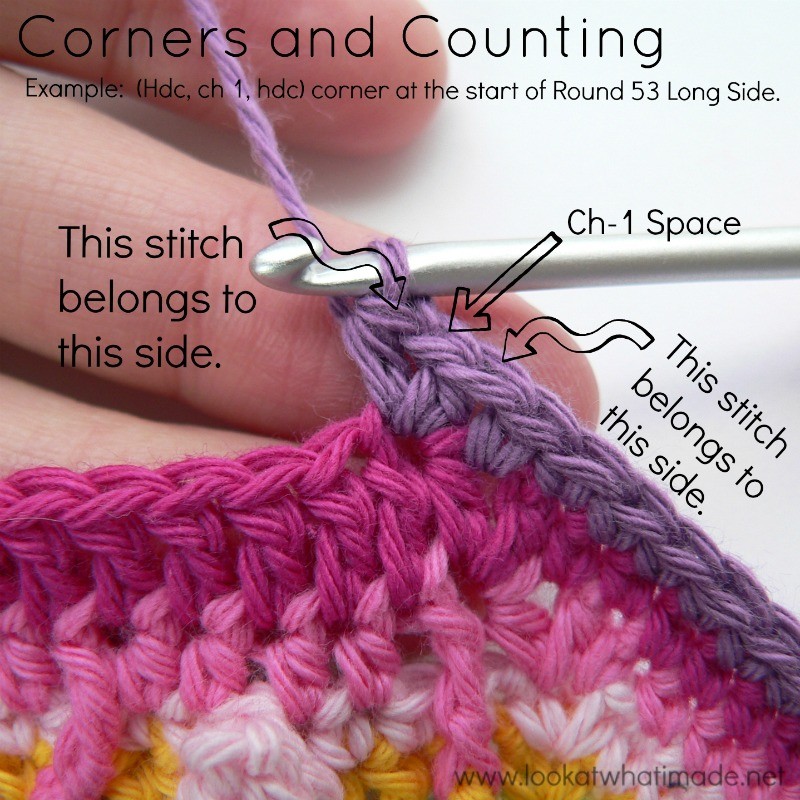
Corners and Counting
When counting the stitches for each side, you will be counting from ch-1 corner space to ch-1 corner space. In other words, wherever the corners are formed by making a stitch on either side of a ch-1 space, the stitch on one side of the ch-1 space will belong to one side and the stitch on the other side of the ch-1 space will belong to the other side. Just like when you are making squares. Any exceptions will be highlighted.
Mark the corner spaces with stitch markers if you think you might have trouble identifying them.
Round 46
- If you are using the same colour, (ch 1, sc, ch 1, sc) in the same stitch. This is your first corner made.
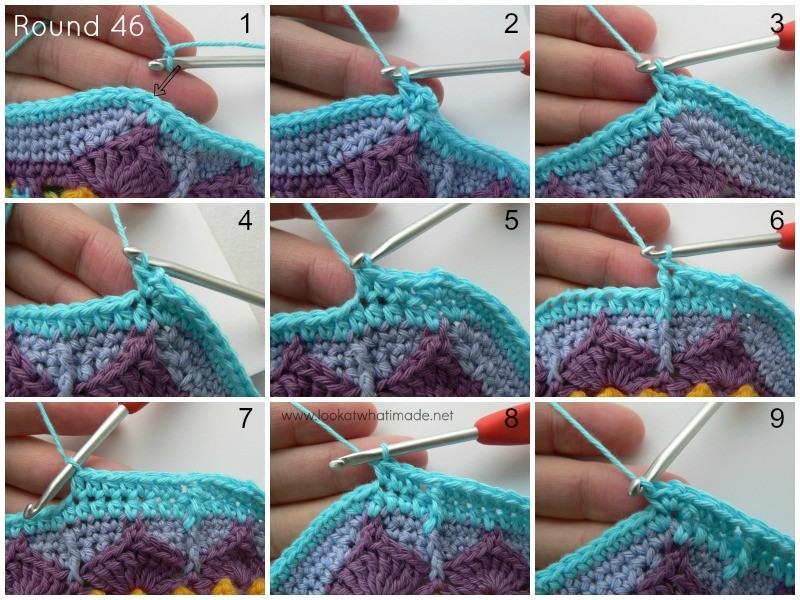
- If you are using a new colour, join your yarn by making a standing single crochet in the same stitch as the sl st join, which should be the first sc of the 2-sc corner at the start of any short side. (Ch 1, sc) in the same stitch. This is your first corner made (Photos 1 and 2).
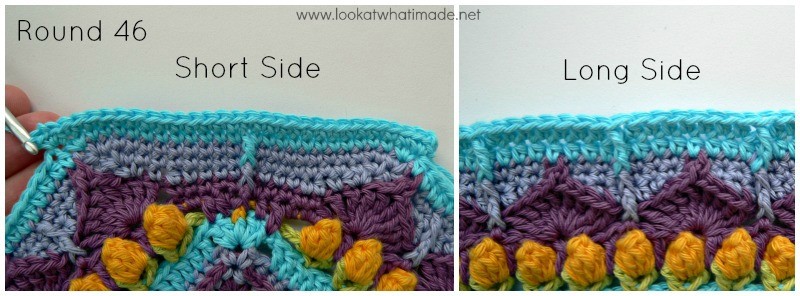
Sc in the next 26 st’s. The last sc should fall in the second sc of the 2-sc corner – see Photo 3. (Sc, ch 1, sc) in the next stitch (Photo 4).
*Long Side: Skip the next hdc. Hdc in the next 3 st’s. The last hdc should fall in the hdc made into the fpdc from Round 44 – see Photo 5. (Fptr around the fpdc from Round 44 – see Photo 6, skip the next st of Round 45 and hdc in the next 7 st’s. The last hdc should fall in the hdc you made into the fpdc from Round 44- see Photo 7) 8 times. Fptr around the fpdc from Round 44. Skip the next st of Round 45 and hdc in the next 3 st’s. The last hdc should fall in the hdc you made into the picot (Photo 8).
Short Side: (Sc, ch 1, sc) in the next stitch (Photo 9). Sc in the next 26 st’s. The last sc should fall in the second sc of the 2-sc corner. (Sc, ch 1, sc) in the next stitch.*
Repeat from * to * 3 more times, omitting the last short side on the last repeat. Join to the first sc with a sl st.
Stitch Counts:
- Total: 404 st’s and 8 ch-1 corner spaces {120 sc’s, 248 hdc’s, and 36 fptr’s}
- Per Short Side: 28 sc’s
- Per Long Side: 73 st’s {2 sc’s, 62 hdc’s, and 9 fptr’s}
Round 47
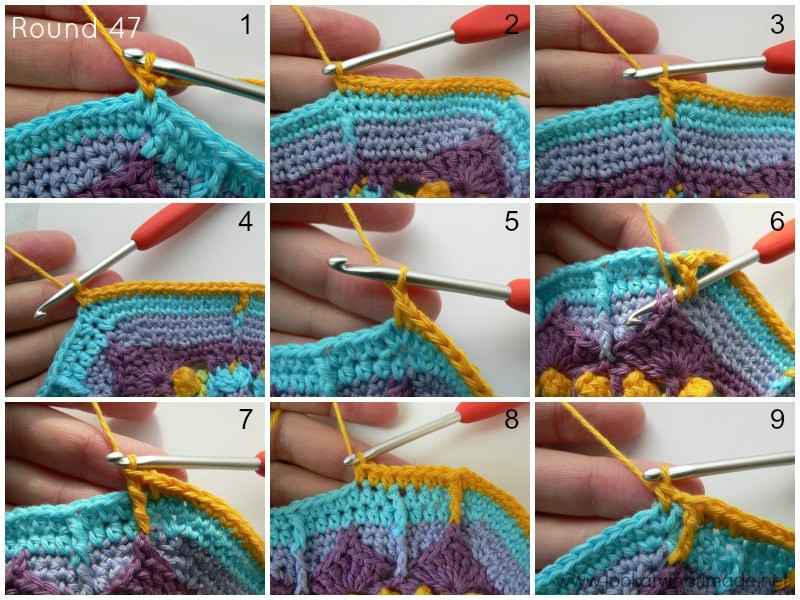
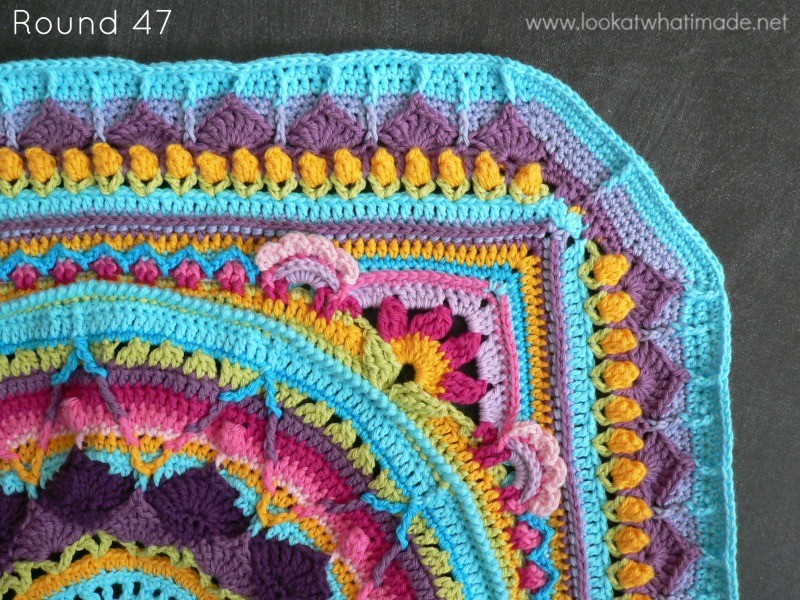
The front-post trebles will be slightly skew in this round – see the photo of Round 47 completed below. This will correct itself in the next couple of rounds. Do not forget to make the ch-1 spaces at the start and end of each long side, which will count as your ch-1 corner spaces. Mark these ch-1 spaces if you are going to have trouble identifying them later.
- If you are using the same colour, sl st into the ch-1 space. (Ch 1, sc) in the same ch-1 space.
- If you are using a new colour, join your yarn by making a standing single crochet in the ch-1 space at the start of any short side (Photo 1).
Sc in the next 14 st’s. Don’t accidentally skip the first (hidden) stitch. The last sc should fall in the sc made into the fpdc from Round 45 (Photo 2). Fpdc around the fpdc from Round 45 (Photo 3). Sc in the next 14 st’s (Photo 4). Sc in the next ch-1 space.
*Long Side: Ch 1 (Photo 5). (Fptr around the picot from Round 41 – see Photos 6 and 7. Skip the next st of Round 46 and hdc in the next 7 st’s. The fourth hdc should fall in the fptr from Round 46 – see Photo 8) 9 times. Fptr around the picot from Round 41. Ch 1 and skip the next st of Round 46.
Short Side: Sc in the next ch-1 space (Photo 9). Sc in the next 14 st’s. Don’t accidentally skip the first (hidden) stitch. Fpdc around the fpdc from Round 45. Sc in the next 14 st’s. Sc in the next ch-1 space.*
Repeat from * to * 3 more times, omitting the last short side on the last repeat. Join to the top of the first sc with a sl st. Fasten off and work away your tails of yarn.
Don’t worry if your short sides curl up a bit at the end of this round.
Stitch Counts:
- Total: 416 st’s and 8 ch-1 corner spaces {120 sc’s, 252 hdc’s, 4 fpdc’s, and 40 fptr’s}
- Per Short Side: 31 st’s {30 sc’s and 1 fpdc}
- Per Long Side: 73 st’s {63 hdc’s and 10 fptr’s}
Round 48 {Leaves}
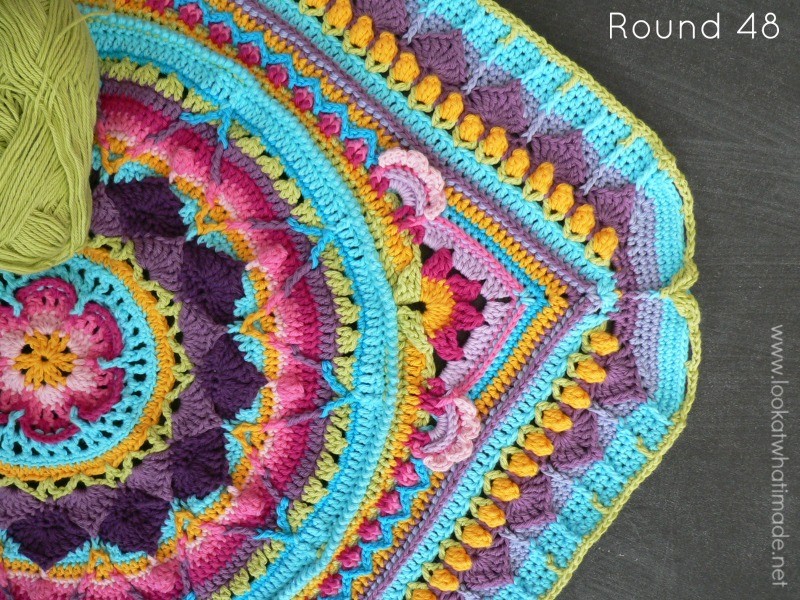
You will be making leaves in this round, but only on the short sides.
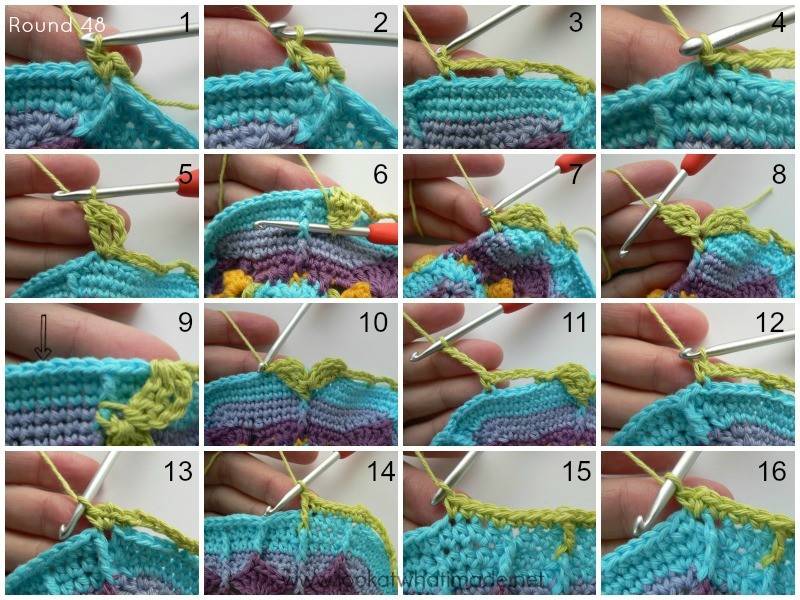
Join your yarn by making a standing single crochet in the ch-1 space at the start of any short side. (Ch 1, sc) in the same ch-1 space. This is your first corner made (Photo 1).
*Short Side: Skip the first (hidden) stitch and sc in the blo of the next st (Photo 2). (Ch 4, skip the next 4 st’s and sc in the blo of the next st) twice (Photo 3). Sl st in the next st (Photo 4). There should now be 2 sc’s left unworked before the fpdc.
Now you are going to make your first leaf by making a Beginning Tr Bobble in the same st as the sl st (Photo 5). See Special Stitches above if you need some help. Anchor the leaf to the “stem” in the middle of the short side by making a sc around the fpdc from Round 45 (in other words, the second fpdc down) – see Photos 6 and 7.
To make the second leaf, make a Beginning Tr Bobble in the sc that you made around the base of the “stem” (Photo 8). Skip the next 6 st’s of Round 47 (in other words, the 2 sc’s before the fpdc, the fpdc, and the 3 sc’s after the fpdc). Sl st in the next st (indicated with an arrow in Photo 9 and illustrated in Photo 10).
(Sc in the blo of the next st. Ch 4 and skip the next 4 st’s) twice (Photo 11). Sc in the blo of the next st (Photo 12).
Long Side: (Sc, ch 1, sc) in the next ch-1 space (Photo 13). Skip the fptr. Sc in the next 4 st’s. (Fptr around the fptr from Round 46 – see Photo 14. Skip the next st of Round 47 and sc in the next 7 st’s. The third sc should fall in the fptr from Round 47 – see Photo 15) 8 times. Fptr around the fptr from Round 46. Skip the next st of Round 47 and sc in the last 3 st’s. (Sc, ch 1, sc) in the next ch-1 space (Photo 16).*
Repeat from * to * 3 more times, omitting the last (sc, ch 1, sc) corner on the last repeat. Join to the top of the first sc with a sl st.
Stitch Counts:
- Total: 360 st’s, 8 leaves, 16 ch-4 spaces, and 8 ch-1 corner spaces {296 sc’s, 8 sl st’s, and 36 fptr’s}
- Per Short Side: 9 sc’s (including the sc that anchors the first leaf), 2 sl st’s, 4 ch-4 spaces, and 2 leaves
- Per Long Side: 74 st’s {65 sc’s and 9 fptr’s}
Round 49
- If you are using the same colour, sl st into the ch-1 space. (Ch 1, sc, ch 1, sc) into the same ch-1 space. This is your first corner made.
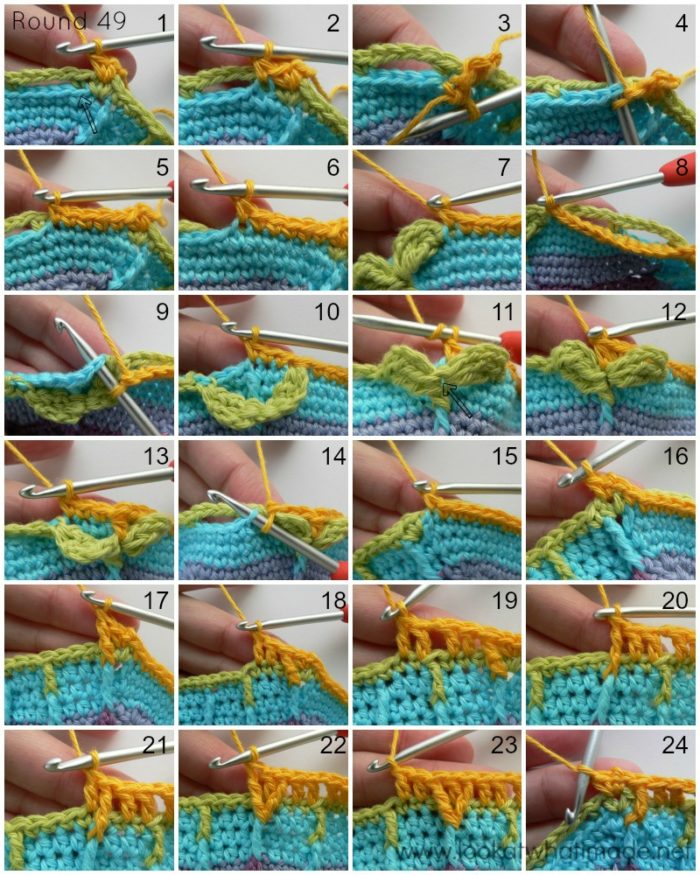
- If you are using a new colour, join your yarn by making a standing single crochet in the ch-1 space at the start of any short side. (Ch 1, sc) in the same ch-1 space. This is your first corner made (Photo 1).
*Short Side: Skip the first (hidden) stitch. Sc in the flo of the next st from Round 47 (that already contains a sc in the blo) – indicated with an arrow in Photo 1 and illustrated in Photos 2 and 3.
(Working in front of the ch-4 space from Round 48, sc in the 4 skipped st’s from Round 47 –Photos 4 and 5. Sc in the flo of the next st of Round 47 – see Photo 6) twice (Photos 7 and 8). Skip the sl st from Round 48.
Working behind the first leaf, sc in the first 3 skipped stitches from Round 47 (Photo 9). The last sc should fall in the top of the fpdc from Round 47 (Photo 10). Make an hdc into the sc between the two leaves. This is the sc that contains the Beginning Tr Bobble of the second leaf (indicated with an arrow in Photo 11 and illustrated in Photo 12). Sc in the next 3 st’s from Round 47, behind the second leaf (Photo 13).
Skip the next sl st. (Sc in the flo of the next st from Round 47 – see Photo 14. Working in front of the ch-4 space, sc in the 4 skipped st’s from Round 47) twice. Sc in the flo of the next st from Round 47 (Photo 15). Skip the next st of Round 48.
Long Side: (Sc, ch 1, sc) in the next ch-1 space (Photo 16). Make a fptr around the fptr from Round 47 (Photo 17). Skip the first (hidden) stitch AND the next 2 st’s from Round 48. Dc in the next 2 st’s. The last dc should fall in the sc before the fptr (Photo 18).
(Ch 1 and skip the next st, which will be the fptr from Round 48. Dc in the next 2 st’s – see Photo 19. Fptr around the next fptr from Round 47 – see Photo 20. Skip the next st of Round 48 and dc in the next st – see Photo 21. Fptr around the same fptr from Round 47- see Photo 22. Skip the next st from Round 48. Dc in the next 2 st’s – see Photo 23) 8 times.
Ch 1 and skip the next st, which will be the fptr from Round 48. Dc in the next 2 st’s. Fptr around the next fptr from Round 47. Skip the last 2 st’s of Round 48. (Sc, ch 1, sc) in the next ch-1 space- (Photo 24).*
Repeat from * to * 3 more times, omitting the last (sc, ch 1, sc) corner on the last repeat. Join to the top of the first sc with a sl st.
Stitch Counts:
- Total: 380 st’s and 44 ch 1 spaces – including the 8 corner ch-1 spaces (128 sc’s, 4 hdc’s, 176 dc’s, and 72 fptr’s)
- Per Short Side: 31 st’s {30 sc’s and 1 hdc’s}
- Per Long Side: 64 st’s and 9 ch-1 spaces {2 sc’s, 44 dc’s and 18 fptr’s}
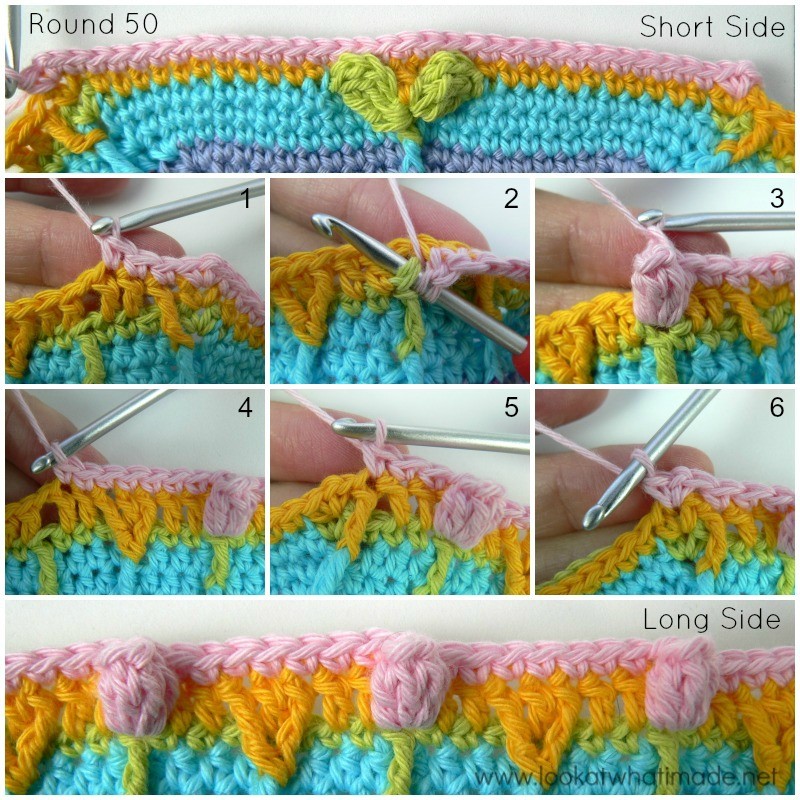
Round 50 {Tulips}
- If you are using the same colour, sl st into the next ch-1 space. (Ch 1, sc, ch 1, sc) in the same ch-1 space. This is your first corner made.
- If you are using a new colour, join your yarn by making a standing single crochet in the ch-1 space at the beginning of any short side. (Ch 1, sc) in the same ch-1 space. This is your first corner made.
Skip the first (hidden) stitch and sc in the next 30 st’s. The 15th sc should fall in the hdc between the leaves. (Sc, ch 1, sc) in the next ch-1 space. This is your first short side made – see the “Short Side” photo below.
*Long Side: Skip the first (hidden) st. Sc in the next 3 st’s (Photo 1). (Working in front of the next ch-1 space, make a popcorn stitch in the skipped fptr from Round 48 – see Photos 2 and 3. Sc in the next 7 st’s of Round 49 – see Photo 4) 8 times. Working in front of the next ch-1 space, make a popcorn stitch in the skipped fptr from Round 48. Sc in the next 3 st’s. The last sc should fall in the top of the fptr from Round 49 (Photo 5). Skip the next st.
Short Side: (Sc, ch 1, sc) in the next ch-1 space. Skip the first (hidden) stitch and sc in the next 30 st’s. The 15th sc should fall in the hdc between the leaves. (Sc, ch 1, sc) in the next ch-1 space (Photo 6). *
Repeat from * to * 3 more times, omitting the last short side on the last repeat. Join to the top of the first sc with a sl st.
Stitch Counts:
- Total: 420 st’s and 8 ch-1 corner spaces {384 sc’s and 36 popcorns}
- Per Short Side: 32 sc’s
- Per Long Side: 73 st’s {64 sc’s and 9 popcorns}
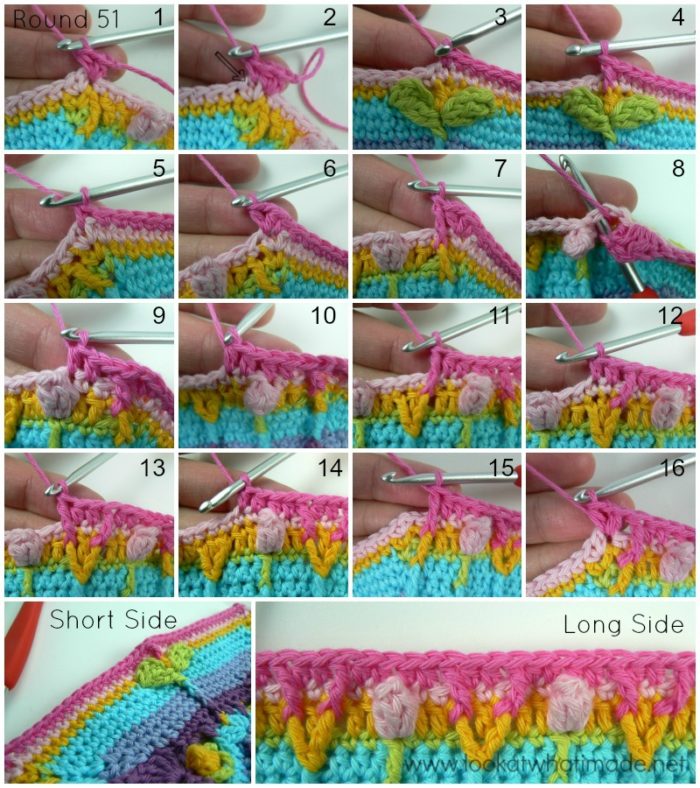
Round 51
When working into the top of the popcorn stitches you will be working into the first dc of the popcorn, through which you pulled the last dc of the popcorn. You will find this stitch immediately to the right of the popcorn (left if you are left-handed).
- If you are using the same colour, ch 3 (counts as hdc + ch-1). Hdc in the same stitch. This is your first corner made.
- If you are using a new colour, join your yarn by making a standing half-double crochet in the same st as the sl st join. (Ch 1, hdc) in the same stitch. This is your first corner made (Photo 1).
*Short Side: Sc in the next ch-1 space (Photo 2). Skip the first (hidden) stitch – indicated with an arrow in Photo 2. Sc in the next 15 st’s. The last sc should fall in the sc made into the hdc from Round 49 (Photo 3). Fpdc around the hdc between the leaves from Round 49 (Photo 4). Sc in the next 15 st’s. Skip the last st and sc in the next ch-1 space (Photo 5).
Long Side: (Hdc, ch 1, hdc) in the next (hidden) stitch (Photo 6). Make a fptr around the fptr from Round 49 (Photo 7). Skip the next 2 st’s (Photo 8). Hdc in the next 4 st’s (Photos 9 and 10). The second hdc should fall in the top of the popcorn stitch – see the note at the start of the round and Photo 9 below.
(Fptr around the next fptr from Round 49 – see Photo 11. Skip the next st of Round 50 and hdc in the next 2 st’s – see Photo 12. Fptr around the next fptr from Round 49 and skip the next st of Round 50 – see Phto 13. Hdc in the next 4 st’s. The second hdc should fall in the top of the popcorn stitch – see Photo 14) 8 times.
Fptr around the next fptr from Round 49 and skip the next st of Round 50 (Photo 15). (Hdc, ch 1, hdc) in the next st, which will be the first sc of the previous (sc, ch-1, sc) corner (Photo 16).*
Repeat from * to * 3 more times, omitting the last (hdc, ch 1, hdc) corner on the last repeat. Join to the second ch of the beginning ch-3 (or the top of the standing hdc) with a sl st.
Stitch Counts:
- Total: 428 st’s and 8 ch-1 corner spaces {128 sc’s, 224 hdc’s, 4 fpdc’s, and 72 fptr’s}
- Per Short Side: 35 st’s {32 sc’s, 2 hdc’s, and 1 fpdc}
- Per Long Side: 72 st’s {54 hdc’s and 18 fptr’s}
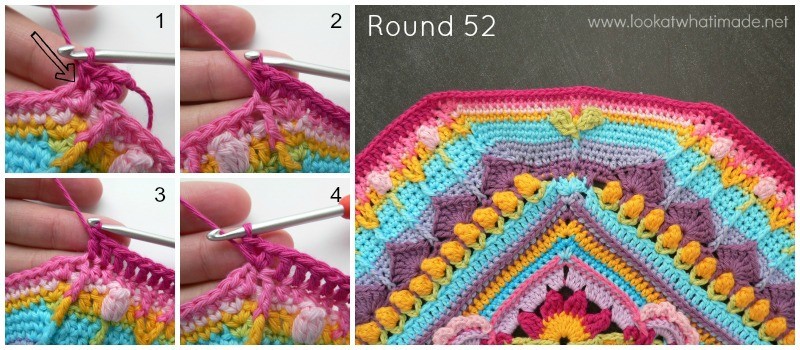
Round 52
- If you are using the same yarn, ch 3 (counts as your first hdc + ch-1). Hdc in the same st. This is your first corner made.
- If you are using a new colour, join your yarn by making a standing half-double crochet in the same st as the sl st join. (Ch 1, hdc) in the same st. This is your first corner made.
*Short Side: Sc in the next ch-1 space (Photo 1). Skip the first (hidden) st and sc in the next 34 st’s. The 17th sc should fall in the top of the fpdc from the previous round. Sc in the next ch-1 space.
Long Side: Skip the first (hidden) stitch and (hdc, ch 1, hdc) in the next stitch, which will be the fptr from the previous round (Photo 2). Dc in the next 69 st’s (Photo 3). (Hdc, ch 1, hdc) in the next st, which should be the first hdc of the (hdc, ch 1, hdc) corner from the previous round (Photo 4).*
Repeat from * to * 3 more times, omitting the last (hdc, ch 1, hdc) corner on the last repeat. Join to the second ch of the beginning ch-3 (or the top of the standing half-double crochet) with a sl st.
Stitch Counts:
- Total: 436 st’s and 8 ch-1 corner spaces {144 sc’s, 16 hdc’s, and 276 dc’s}
- Per Short Side: 38 st’s {36 sc’s and 2 hdc’s}
- Per Long Side: 71 st’s {2 hdc’s and 69 dc’s}
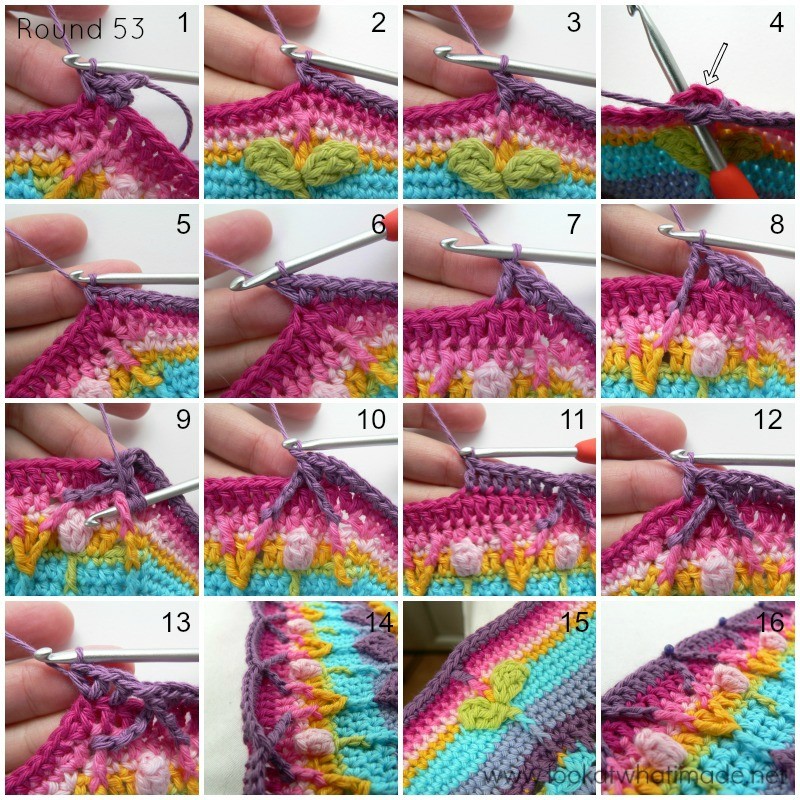
Round 53
When you make the fpdtr’s you will be adding a stitch to each repeat by making 2 and only skipping 1. Do not worry about this. We will decrease again in the next round. You will notice that this round has a tendency to curl right over. Do not worry about this (Photo 14 below)!
- If you are going to use the same colour, ch 3 (counts as hdc + ch-1). Hdc in the same stitch. This is your first corner made.
- If you are using a new colour, join your yarn by making a standing half-double crochet in the same st as the sl st join. (Ch 1, hdc) in the same stitch. This is your first corner made.
*Short Side: Sc in the next ch-1 space (Photo 1). Skip the first (hidden) st. Sc in the next 18 st’s. The last sc should fall in the sc made into the fpdc from Round 51 (Photo 2). Make a fpdc around the fpdc from Round 51 (Photo 3) and skip the next st of Round 52 (Photo 4). Sc in the next 18 st’s. Sc in the next ch-1 space (Photo 5).
Long Side: Skip the first (hidden) stitch and (hdc, ch 1, hdc) in the next stitch (Photo 6). Skip the next st. Dc in the next st, which should be the dc right above the popcorn stitch from Round 49 (Photo 7).
(Make a fpdtr around the fptr from Round 51 to the left of the popcorn stitch (right if you are left-handed) – see Photo 8. Make a fpdtr around the fptr from Round 51 to the right of the same popcorn stitch (left if you are left-handed) – see Photos 9 and 10. Skip the next st of Round 52 and dc in the next 7 st’s. The last dc should fall in the dc right above the next popcorn stitch from Round 49 – see Photo 11) 8 times.
Make a fpdtr around the fptr from Round 51 to the left of the last popcorn stitch (right if you are left-handed). Make a fpdtr around the fptr from Round 51 to the right of the same popcorn stitch (left if you are left-handed). Skip the next st of Round 52 and dc in the next st (Photo 12). (Hdc, ch 1, hdc) in the next st, which will be the first hdc of the (hdc, ch 1, hdc) corner from the previous round (Photo 13).*
Repeat from * to * 3 more times, omitting the last (hdc, ch 1, hdc) corner on the last repeat. Join to the second ch of the beginning ch-3 (or the top of the standing hdc) with a sl st.
Stitch Counts:
- Total: 476 st’s and 8 ch-1 corner spaces {152 sc’s, 16 hdc’s, 232 dc’s, 4 fpdc’s, and 72 fpdtr’s}
- Per Short Side: 41 st’s {38 sc’s, 2 hdc’s, and 1 fpdc}
- Per Long Side: 78 st’s {2 hdc’s, 58 dc’s, and 18 fpdtr’s}
This part of the pattern was tested by Kimberly Slifer and Claire Martin, and proofread by Claire Martin and Venetia Smith.

This blog post contains affiliate links. I only link to products I personally use or would use. All opinions are my own.



constance says
I just realized now that I misread the equivalence table I had found and that I was doing the wrong treble for the pattern, and was actually doing a double treble crochet all along :<
I was wondering why it seems like my stitches were a little bit too long but I accepted it for what it was because it didn't look ugly at all. It just means that the center of my blanket is a little bit stretchy and I kind of want to make it all over again to fix the issue.
It's a lot of hours of work but I think it would be worth it.
Do you have any advice, or do you think I should remake the whole thing?
Jenny Lowman says
There is no easy fix to be honest, Constance. If it is irritating you, chalk it down to experience and start over. You can always frog back your work to save on yarn.
Good luck!
Constance says
I redid the whole thing and am so much happier with my work now and I’m excited to continue!! Thank you for this wonderful pattern
Jenny Lowman says
So glad you have sorted things out.
Wieke Boiten says
im loving my sophie so far, im just a little pissed off at myself for not reading well, and accidantally using sc in the long side of round 52 instead of dc, and only noticing when i scrolled past the pictures and realised it didnt look like mine. well at least i get to spend another two hours on sophie.
Jenny Lowman says
You are not alone in doing things like this, Wieke! :)
Suzanne Ellison says
Hi Dedri
I am loving Sophie! I’m using my own colour way on the xl pattern and everyone adores it in my family. Thank you for such a beautiful pattern!
Round 48 I have become a bit wayward. I’m hoping my stitch count works out – it’s the first time I’ve been a bit wobbly with the pattern. My leaves also look wonky – could it be because I’m a lefty?!
Suzanne x
Dedri Uys says
Hi Suzanne,
Being a lefty won’t affect the placement or make the leaves look wonkly. Your blanket will just be a mirror image of mine and since it is visually symmetrical, it will make no difference. Have you got a photo of your work so that I can take a look? I’m sure we can figure out what’s going on.
Dedri
Sharon Trent says
I am using a fingerling weight yarn. I initially was planning on making Sophie’s Garden using a color changing yarn. I did not change hook sizes in round 3 either, but am not having any problems with the lay of the piece. If I choose to continue with the Universe do you think that I should go up a hook size ? I am currently on Part 4 round 32.
Thanks for such a beautiful pattern!
Dedri Uys says
Hi Sharon. That is totally up to you. You can see whether the middle buckles in the next few rounds and go up then if you feel it needs it. have fun!
Avril says
You asked for an image of Sophie during part 6.
Where can I send my image?
Dedri Uys says
Hi Avril. You can use the contact tab at the top of this website to send me an email :)
Laura says
Hi,
Not sure if this will be seen but I’m up to round 48 and my short sides are not straight like yours (they haven’t really been straight except for the first few rows), there is even a little bit of a ripple on one (like I’ve increased too much). The stitch count is right. I didn’t notice the instructions about going up a hook size for part 3, but that would make it looser and therefore more rippled wouldn’t it? Just trying to figure out if I should just keep going or if I need to frog it and correct this.
Dedri Uys says
Hi Laura. I’m so sorry to hear that you are struggling with Sophie. Could you please email me using the contact me tab at the top of this website? We can then open a dialogue that will allow you to send me a photo. That, in turn, will help me to best help you.
I am confident that we can figure out what’s going on.
Dedri
Ashley says
What did you find out? I didn’t realize the pattern called for a bigger hook size until I read your comment and I’m almost done with row 50. I’m not having too much rippling but I’m just curious if I should backtrack also.
Lisa says
I just came across this pattern a couple weeks ago, and I am currently turning it into a winter skirt for an arts and music camp gathering in January. I really like how it’s turning out so far. If I wanted to show a photo when I’m done, what would be the best place to post it or send it to you?
Dedri Uys says
Hi Lisa. Did you email me as well? I’m so sure that I have already answered this comment, but can’t find my reply. A skirt sounds wonderful. You can use the contact me tab to open up an email conversation with me. When I respond, you can send me a photo.
Dona Lock says
I think there is a mistake in row 50 where at the end of long side it states:Working in front of the next ch-1 space, make a popcorn stitch in the skipped fptr from Round 48. Sc in the next 3 st’s. my question is shouldn’t it say make a “fptr” instead of popcorn? I do not see anything like that in the photos. I am enjoying making sophie. Thank you for sharing the pattern. Mahalo Dona
Jenny says
Hi Dona.
Round 50 is the Tulips round. The photos are correct in this link HERE
you should see the Round 50 pics that are in pale pink and creating the tulip heads on the long side (see pic 3). There are no fptr stitches in round 50 in part 6.
Jenny :)
Honor says
I only discovered Sophie’s Universe recently and I am loving it, thank you! Just wanted to ask: are the photos from people’s photo shoots available to look at somewhere online please? I’ve searched but can’t find them and I’d love to see them :-)
Dedri Uys says
Hi, the photos are available on instagram under the suggested hashtags or under #subookpermission.
Honor says
Thank you for your help, Dedri, I found them, had to learn how to use Instagram :-) And thank you for the wonderful pattern and the beautiful book, I am now on part 5 of my Sophie and really enjoying it!
Dedri Uys says
Oh good!
Kim says
Just had to leave you a note to tell you how totally in love with this pattern I am <3 ! I'm just at the end of part 6 and already thinking about colour schemes for the next one!! Kim xx
Dedri Uys says
Thank you, Kim :) I love that you share your charity shop hauls. Most of my clothes come from second-hand shops, and we have gotten some amazing things from Freecycle (and even listed a few ourselves).
Rachel says
On round 53, I accidentally made FPTR instead of FPDTR. Will it affect the pattern, or do I need to frog that row and do it over again?
Dedri Uys says
Hi Rachel. I have only just seen your comment, sorry. It’s not the end of the world. I’m sure you’ll be fine :)
Cindy says
Dedri;I started 3 of your Sophie ‘s garden only to find out on row 53 my grand daughter wants another color added. How can I add another color & it blend with the rest? Trial & error? Start another one is not a option.lol thanks for a great pattern.Cindy Hall
Dedri Uys says
Hi Cindy, if you introduce the other colour gradually (like one row here and there), it will work. The more rounds you make, the less obvious individual colours actually are.
Connie says
Are the chain fours on the short sides of round 48 supposed to be loose on the back side? It says to work in front of them on round 49 and I kept thinking I would use them somewhere so they wouldn’t be showing on the back but I have gone through the instructions several times.
Dedri Uys says
Connie, I don’t mind the ch-4’s being behind my work, which is why I didn’t include instructions to catch them. I also think it is neater that way. You are free to catch them if you feel you need to.
Julie Hooper says
Hello Dedri,
I don’t know what I am doing wrong. To be honest I haven’t been watching my stitch count on the long side until I reached round 52 where I began to count the actual stitches rather than checking the pattern was correct and I have far more stitches on the long side than you state I need, I have got 9 tulips and am fairly confident I have the right amount of stitches between each pattern but that means I have far more than 69 stitches on the long side (the short side is correct). I go by looking far more than counting but will this work out in the end or what should I do?
Julie
Dedri Uys says
Hi Julie.
Counting is incredibly important in this pattern. Because of the changing shape, the pattern will not work if your stitch count isn’t correct at the end of every round. Have you got a photo so that I can better assist you?
Michael Franciosa says
Hi Dedri,
I am loving your design and my mom is falling in love with the design with every part I finish. I would Love to show you my progress.
Michael
Dedri Uys says
Hi Michael. You can post photos on Facebook and Instagram. You can tag me so that I can see it! I would love to see it :)
Bianca says
Hi Dedri,
I’m a late starter on this CAL but loving the journey so far.
In round 51 when you write:
“(Fptr around the next fptr from Round 49 – see Photo 11. Skip the next st of Round 50 and hdc in the next 2 st’s – see Photo 12. Fptr around the next fptr from Round 49 and skip the next st of Round 50 – see Phto 13. Hdc in the next 4 st’s. The second hdc should fall in the top of the popcorn stitch – see Photo 14) 8 times.
Your photo’s don’t match the description. You have what looks like 2 hdc’s in between the v created by the Fptr’s from round 49, yet the pattern says I need 4?
From what I can see it should be: 4 hdc, fptr, 2 hdc, fptr, 4 hdc in the middle there. Is that correct?
Bianca says
Sorry Dedri,
Nevermind, I re-read the instructions. This is why I work so much better with visuals.
Thank you for such an amazing pattern.
Dedri Uys says
Glad you got it sorted, Bianca.
Jamie says
Hi, ive been working on this pattern and its been Fantastic! I love it. So far i havent had an issue with my stitch count but i may have found a mistake or a mistype? In round 47 on the short side it only mentions to sc. Yet in round 48 at the end of the long side it says to sc, ch1, sc in the ch1 space from rnd 48 yet it was never mentioned to do a chain 1 on the short side. (Only mention was when you start the round but not for the next 3 sides) I dont know if im just reading it wrong or not, for now im just inprovising to make this round have to correct amount as i dont want to redo the last round as i wont have enough of that colour. Please let me know ether way :) Thanks.
Dedri Uys says
Hi Jamie. Thank you for getting in touch with me. There is a note at the start of Round 47: “Do not forget to make the ch-1 spaces at the start and end of each long side, which will count as your ch-1 corner spaces. Mark these ch-1 spaces if you are going to have trouble identifying them later.”
In Round 47 you will notice that the corners are formed by a (sc, ch 1, fptr). The sc is included in the instructions for the short side, the (ch 1, fptr) is included in the instructions for the long side and have been made purple and bold so that they stand out.
Very rarely I have had to split up the corner instructions to make it easier to write or follow in subsequent rounds. As stated at the start of the part, you will always count from ch-1 space to ch-1 space for your sides, unless otherwise specified.
I hope that makes sense. Let me know if it is still unclear.
Thank you,
Dedri