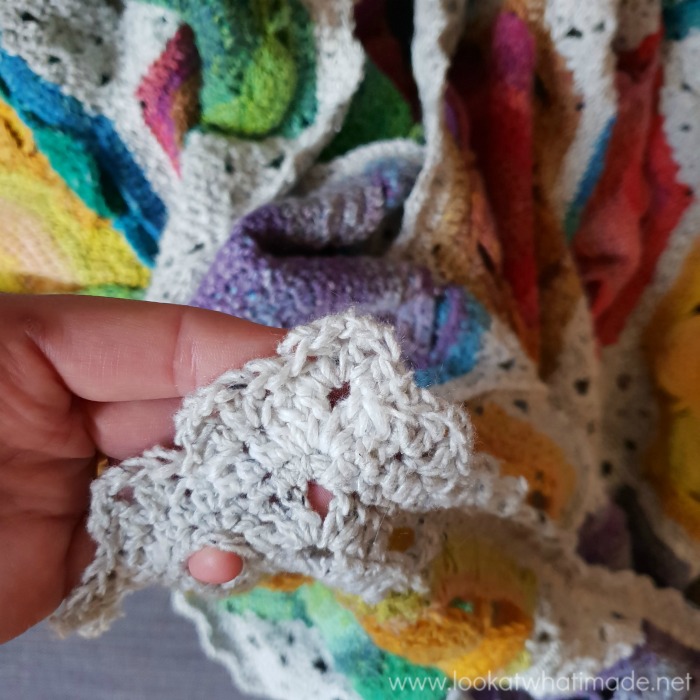
I designed this blanket with a very dear friend and tester constantly in my thoughts. It is a vintage celebration of colour and friendship.
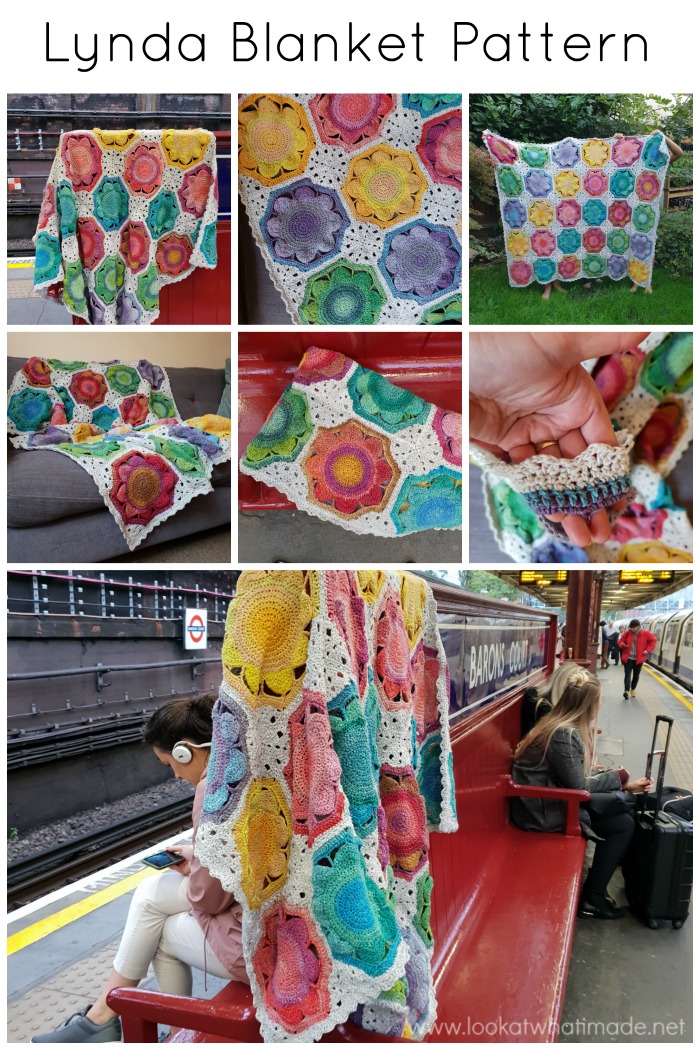
I don’t have much more to say about it, other than: “I LOVE IT!” If this is the first time you’ve heard of this pattern, you can read the Yarn Arrival, WIP, and Reveal posts for a bit of background :)
Enjoy!!
Resources
- Add to Your Ravelry Queue
- Hashtag: If you share photos, please use #lyndablanket so that we can find your projects and have a gleeful look.
- PDF: You can buy a print-friendly, ad-free, US PDF of this pattern from my Ravelry Store HERE. Please note that I have only included a few photos in the print-friendly version (not all the photos or the charts from the tutorial below). Alternatively, you can use the print-friendly button at the bottom of this post to save it to PDF.
- Yarn Packs: Yarn packs for this blanket are available from my Wool Warehouse shop. They include a printed version of the pattern (with a few select photos).
- More Retailers:
- Black Sheep Wools (International)
- Deramores (International)
- Caro’s Atelier (Netherlands)
- Knotty House (Canada)
- More Retailers
Lynda Blanket Pattern
© Dedri Uys and Scheepjes 2019. All Rights Reserved.
Materials
- Scheepjes Secret Garden Yarn (20% Silk/ 20% Cotton/ 60% Polyester), 50g/93m/101yds
- Contrasting Colours
- Yarn A – 702 Herb Garden x 4 balls
- Yarn B – 703 Secluded Lake x 4 balls
- Yarn C – 705 Rambling Blooms x 4 balls
- Yarn D – 707 Summer House x 4 balls
- Yarn E – 708 Rose Arch x 4 balls
- Yarn F – 709 Lily Pond x 4 balls
- Main Colour: 736 Bird Bath x 10 balls
- Contrasting Colours
- 5mm crochet hook (for octagons, squares, and border)
- 5.5mm crochet hook (for joining only)
- Stitch markers and a piece of scrap yarn to use as a running stitch marker.
Abbreviations
US Terminology
- CC – Contrasting colour
- Ch – Chain
- Dc – Double crochet
- Hdc – Half-double crochet
- MC – Main colour
- Rem – Remaining
- RS – Right side facing
- RSM – Running stitch marker
- Sp/sps – Space/spaces
- Sl st – Slip stitch
- Sc – Single crochet
- SM – Stitch Marker
- St/sts – Stitch/stitches
- Tr – Treble
- WS – Wrong side facing
Charts
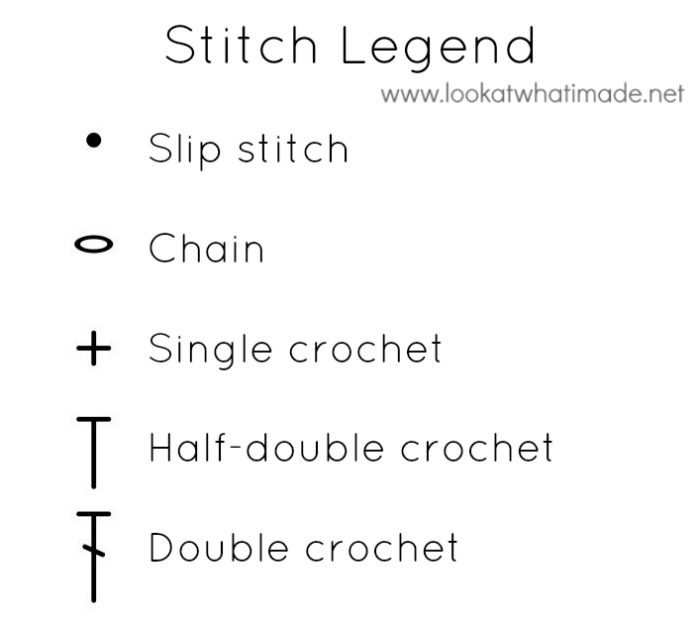
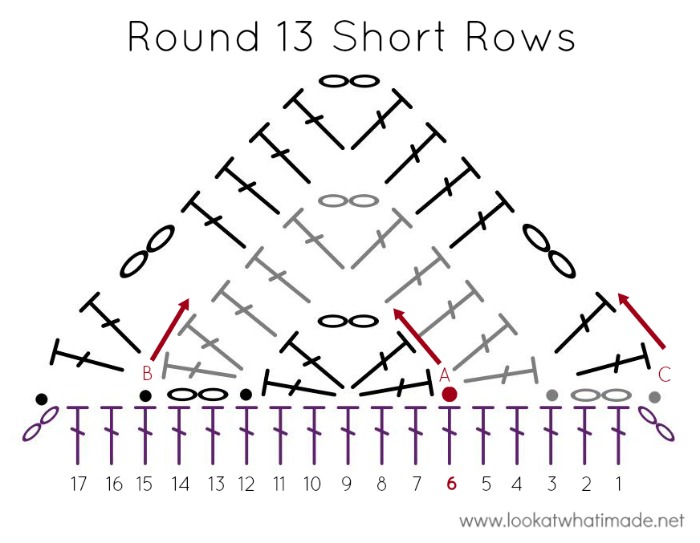
I have supplied charts for the short rows only. Here is the legend:
Punctuation
* An asterisk indicates pattern repeats. You will need to repeat all the instructions between asterisks the number of times specified. This is a hard-core repeat and will consist of multiple instructions.
Square Brackets [] indicate repeats. You will need to repeat the instructions between square brackets the number of times specified. This is a lower level repeat.
Parentheses () are used to indicate a group of stitches to be worked into the same stitch/space. Parentheses are also used to indicate a repeat when using square brackets would be too confusing.
Gauge
Due to the organic nature of this yarn, it does vary in thickness throughout each ball and also from colour to colour. I will discuss this a little bit more under Notes below.
Because of this, I recommend that you make three gauge swatches, using different colours for each. These will not be wasted as you can just continue with the rest of the rounds if you do meet gauge.
At the end of Round 3, your motif should measure 5.5cm (2.2”).
Size
Finished Blanket: 130cm x 155cm (51.2” x 61”)
Stitch Markers (SM) and Running Stitch Markers (RSM)
I suggest using a running stitch marker for the first 8 rounds and stitch markers as indicated in Rounds 9 and 13 – at least for the first two or three squares. Stitch markers are your friends!
A running stitch marker is a piece of scrap yarn that you flick back and forth over your work before making the first st of every round. It will form a dotted line up your work, helping you identify the first st of every round. It will also help you diagnose when a round has gone awry.
To use a running stitch marker, place a 15cm/6” piece of scrap yarn over your work at the end of Round 1.
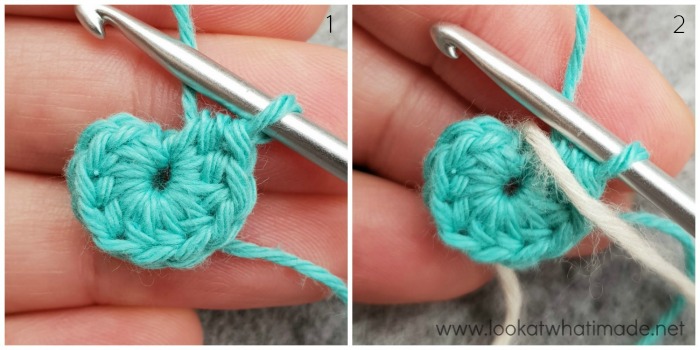
Continue crocheting Round 2, working over the piece of scrap yarn when making the first st of Round 2 {Photo 3}. Don’t accidentally miss the first st of Round 1 (or subsequent rounds), which might be hidden by the scrap yarn {Photos 4 and 5}. At the end of Round 2, flick the scrap yarn back over your work before starting Round 3.

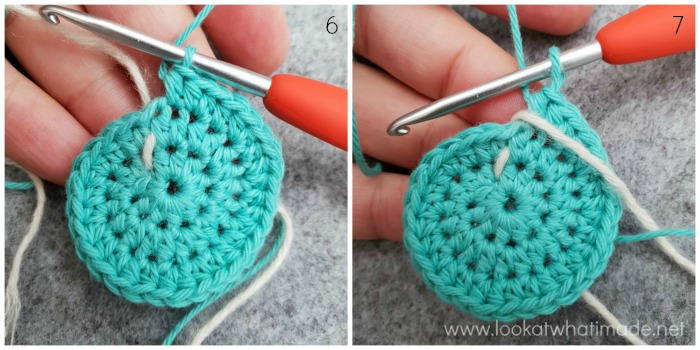
Continue flicking the scrap yarn back and forth over your work before making the first st of every round {Photos 6 and 7}.
Am I Doing It Right?
The last st of every round should fall in the st before the RSM. If it doesn’t, you have accidentally skipped a st in the previous round {see Photos 3 and 6 above}.
The running stitch marker should form a dotted line that creeps slightly to the right as it goes up the rounds. If there is a jagged shift in the dotted line, it means that you have skipped or added a stitch somewhere.
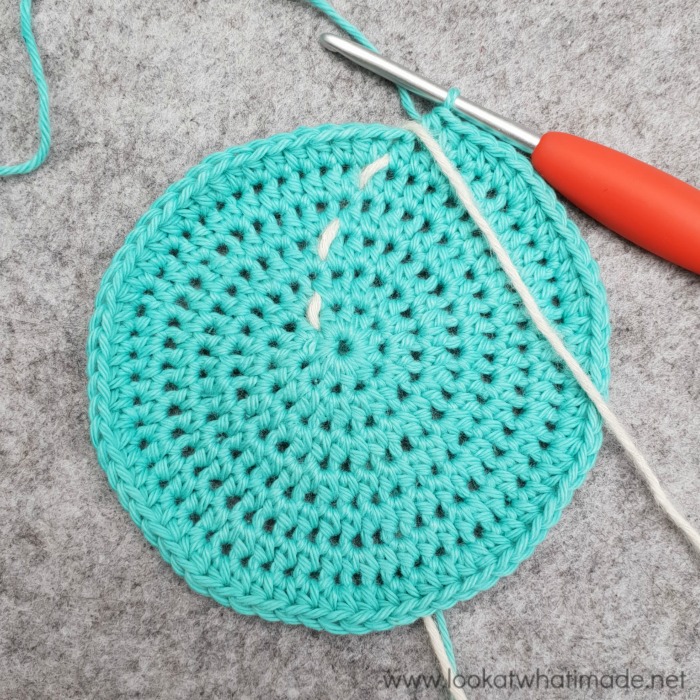
Why are you making me do this? Stitch markers work just as well…
Yes and no. Although working in a spiral gives you a very smooth transition from round to round, it poses its own challenges. Once you remove a stitch marker, you have no ‘reference point’ to help you diagnose exactly where an error occurred. With a running stitch marker (providing that you keep it in your work until you are done), you can ‘see’ errors as they happen, and if you don’t, you can count the stitches of each previous round at any point during the process. I find this invaluable!
Keeping stitch markers from previous rounds in your work until you finish will distort those stitches slightly because the stitch markers take up space. Using a RSM takes up very little space and won’t distort your stitches. Once you are sure all your rounds are correct, this RSM can be removed by gently pulling it out of your work.
Notes
As I have already mentioned under gauge, the thickness of this yarn is quite variable. That makes for an interesting hands-on learning opportunity. Occasionally (not often, don’t worry!), you will have to fudge a round to make the squares the same size.
I am attaching a table that shows you how large our squares were at the end of some parts. You do NOT have to measure your motif after every round, but I will tell you where you should measure, and how you can adjust for changes in size. Ideally, your finished squares will be within 1cm/0.4” of each other.
| Size | ||
| (cm) | (“) | |
| Round 3 | 5.5 | 2.2 |
| Round 4 | 7.2 | 2.8 |
| Round 5 | 8.9 | 3.5 |
| Round 6 | 10.6 | 4.2 |
| Round 7 | 12.3 | 4.8 |
| Round 8 | 14 | 5.5 |
| Round 12 | 24 | 9.5 |
| Round 14 | 25 | 9.8 |
I suggest checking your motif against a finished motif at the end of Round 8.
- If it is much bigger, re-do Round 8 with sc instead of hdc, keeping the stitch counts the same.
- If it is much smaller, re-do Round 8 with dc instead of hdc, keeping the stitch counts the same.
Check your motif against a completed motif again at the end of Round 12.
- If it is much bigger, re-do Round 12 with hdc (or even sc) instead of dc, keeping the stitch counts the same.
- If it is much smaller, re-do Round 12 with tr instead of dc, keeping the stitch count the same.
As you progress with the motifs, you will get a feel for when a specific colour or ball might need adjustment and this adjustment will become second nature.
Instructions
Squares
Make 30 – 5 with each Contrasting Colour
The first 8 rounds are worked in a spiral. Use a running stitch marker (RSM) to mark the first st of every round. Please note that your increases should always fall in the first st of the increase from the previous round. If they do not, something has gone awry! If you want to check the first 3 rounds, please see the first 3 collages under Stitch Markers (SM) and Running Stitch Markers (RSM) above.
Round 1: With CC and working into a Magic Ring, ch 1 (doesn’t count as a st), sc, 9 hdc. RSM {10 sts}
Round 2: 2hdc in each st. {20 sts}
Round 3: [2hdc in next st, hdc in next st] 10 times. RSM {30 sts}
Round 4: [2hdc in next st, hdc in next 2 sts] 10 times. RSM {40 sts}
Round 5: [2hdc in next st, hdc in next 3 sts] 10 times. RSM {50 sts}
Round 6: [2hdc in next st, hdc in next 4 sts] 10 times. RSM {60 sts}
Round 7: [2hdc in next st, hdc in next 5 sts] 10 times. RSM {70 sts}
Round 8: [2hdc in next st, hdc in next 6 sts] 9 times {Photo 1}. There should now be 7 sts left. Hdc in the next 6 sts. Sc in the last st {Photos 2 and 3}. RSM {79 sts}
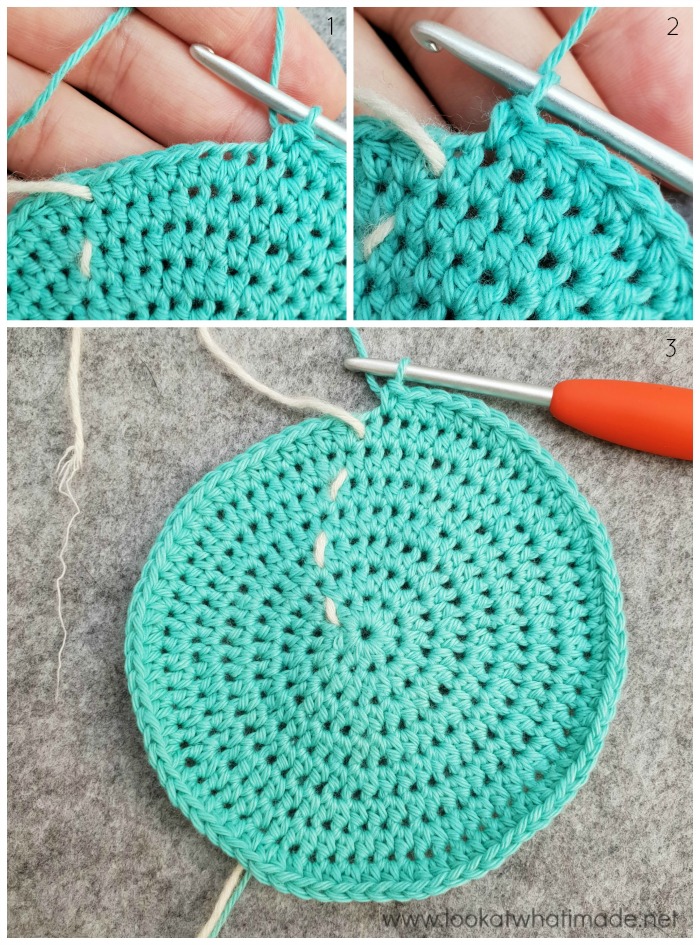
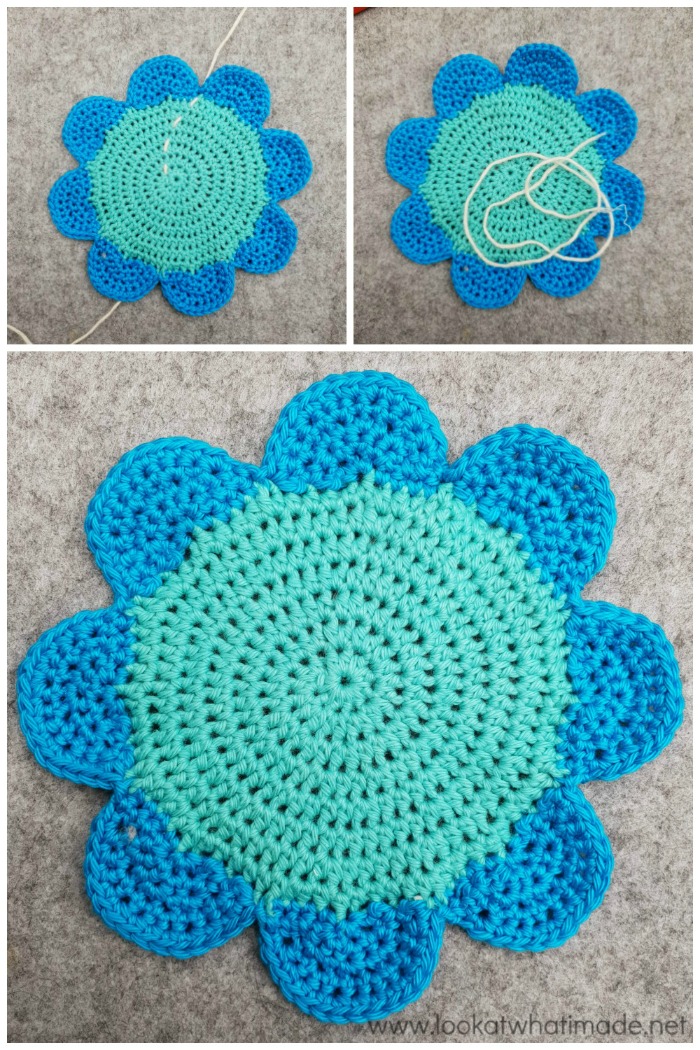
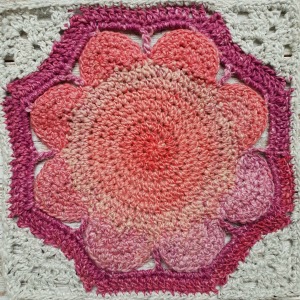
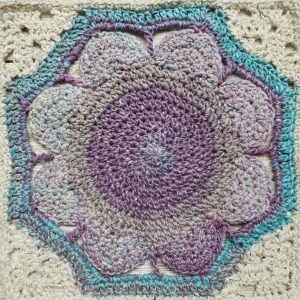
Round 9 – Petals
The petals in Round 9 are created by working short rows. Each petal will consist of 5 short rows. To make this easier for yourself, mark stitches 10, 20, 30, 40, 50, 60, and 70 with a SM. The first st will already contain a RSM, which should remain right where it is (for now, at least)! You don’t have to do this for every motif, just until you get the hang of the short rows. Once you have worked into the stitches that contain the SM, and are sure that your stitch placement is correct, you can remove the markers.
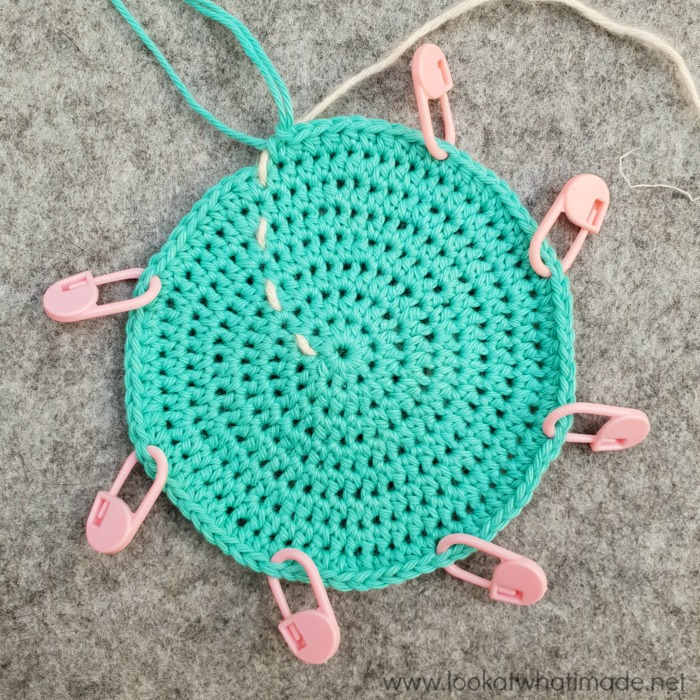
Petal Round A: Sc in the next 4 sts, 3 sc in the next st, sl st in the next 2 sts, turn, leaving rem sts unworked. {7 sc}
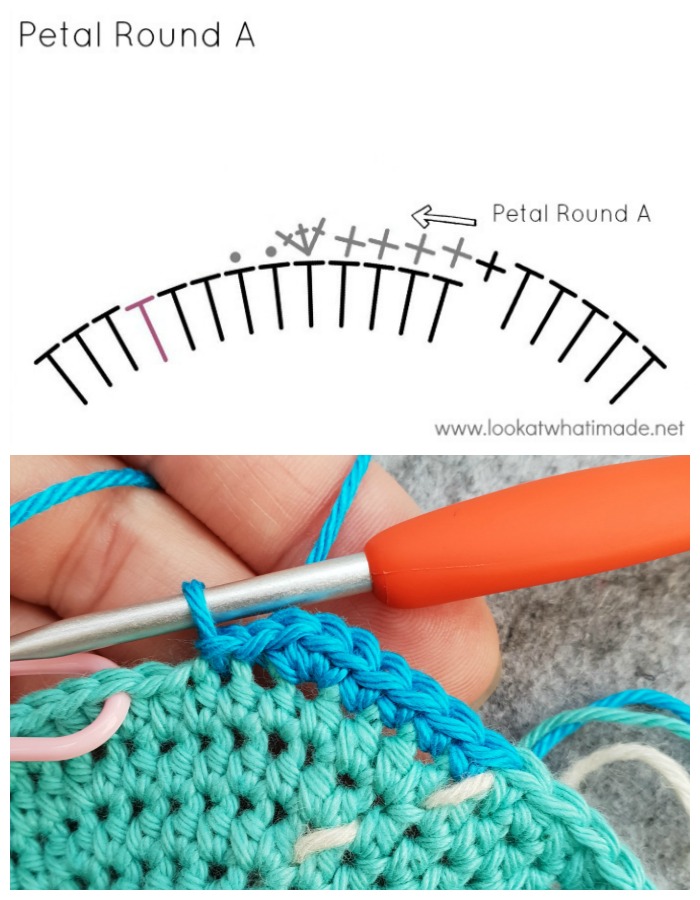
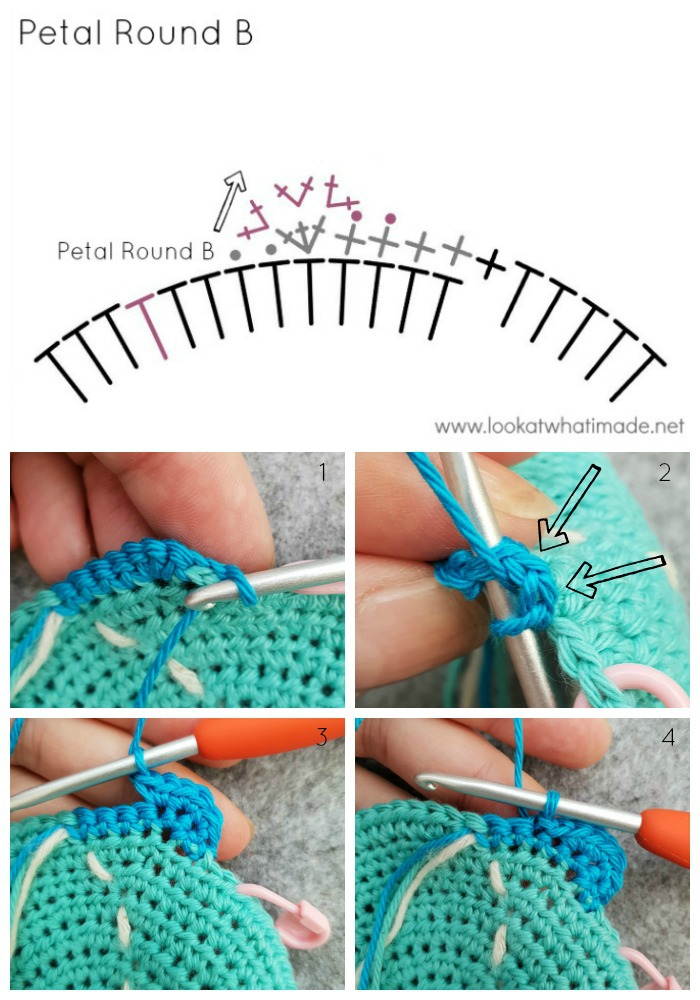
Petal Round B: With WS facing, skip the 2 sl sts {indicated with arrows in Photo 2}, make 2 sc in each of the next 3 sc from Petal Round A {Photo 3}. Sl st in the next 2 sts of Petal Round A {Photo 4}, turn, leaving rem 2 sts of Petal Round A unworked. {6 sc}
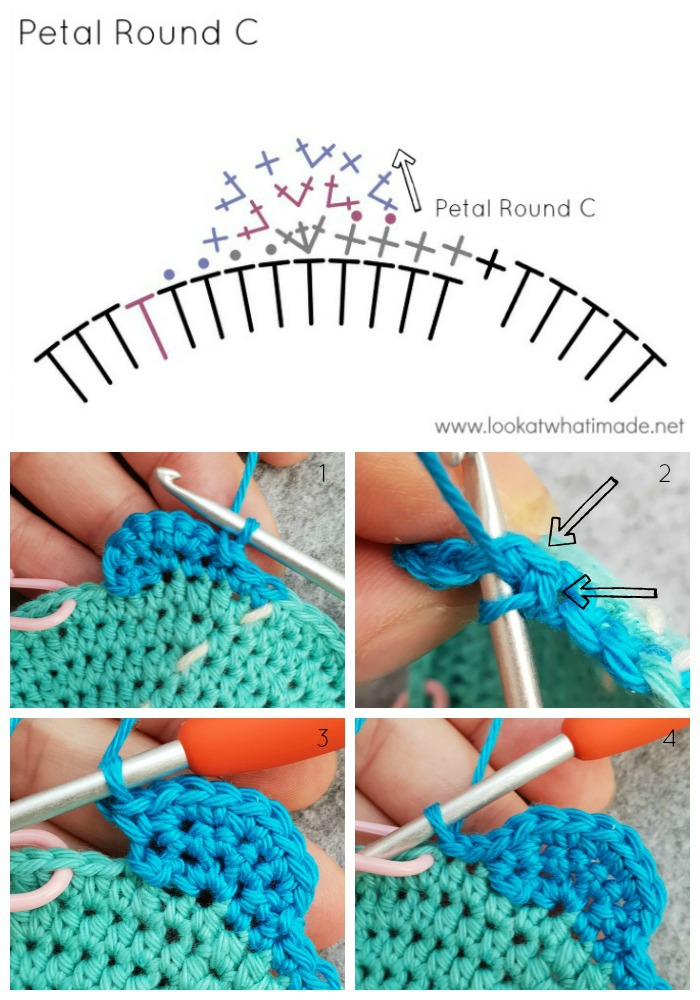
Petal Round C: With RS facing, skip the 2 sl sts {indicated with arrows in Photo 2}, [2 sc in the next st, sc in the next st] three times. This will bring you to the ‘step’ at the start of Petal Round B {Photo 3}. Sl st in the next 2 unworked sts of Round 8 {Photo 4}, turn, leaving rem sts unworked. {9 sc}
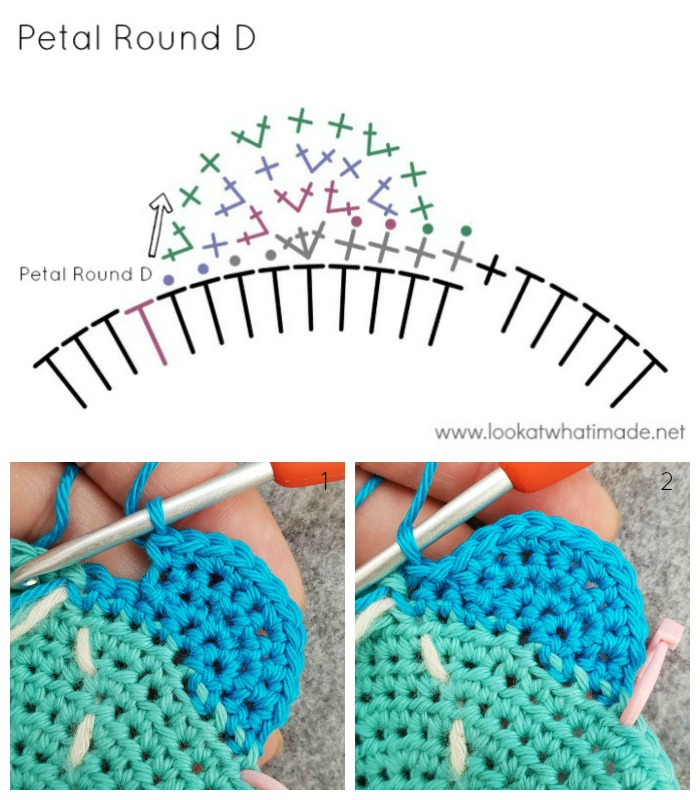
Petal Round D: With WS facing, skip the 2 sl sts, [2 sc in the next st, sc in the next 2 sts] three times. This will bring you to the ‘step’ at the start of Petal Round C {Photo 1}. Sl st in the last 2 unworked sts of Petal Round A {Photo 2}, turn. {12 sc}
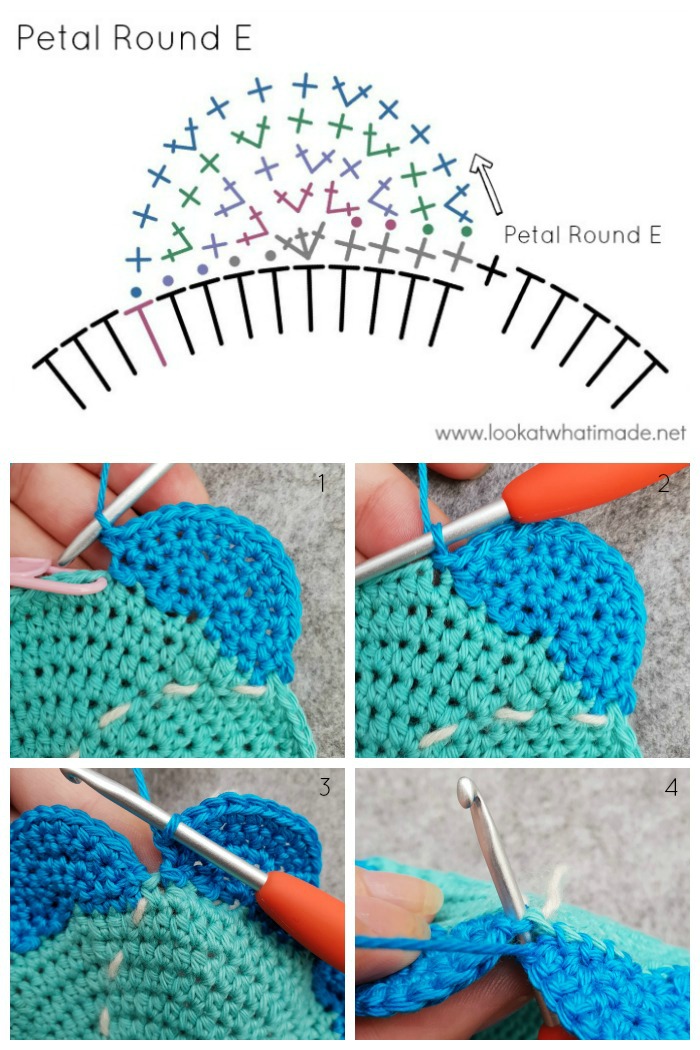
Petal Round E: With RS facing, skip the 2 sl sts, [2 sc in the next st, sc in the next 3 sts] three times. This will bring you to the ‘step’ at the start of Petal Round D {Photo 1}. Sl st in the next unworked st of Round 8, which should contain a SM {Photos 1 and 2}. Do not turn! {15 sc}
You have now created your first Petal. Repeat Petal Rounds A – E seven more times. Your last sl st should fall in the first st of Petal Round A, which already contains a sl st and the RSM {Photos 3 and 4}.
When you have completed all 8 Petals, remove the RSM and marvel at your brilliance!
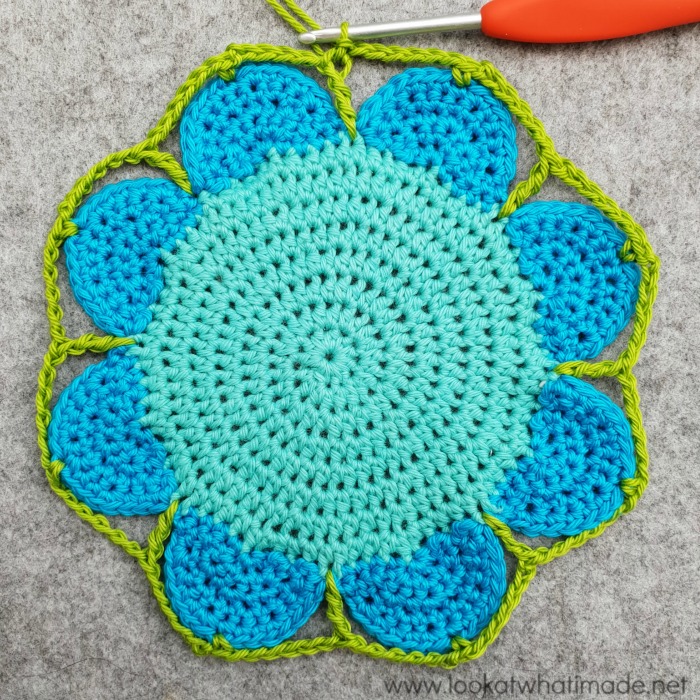
Round 10
Ch 10 (counts as tr and ch-6). *Sc in the 8th sc of the next petal, ch 6, tr in the st from Round 8 that contains the next sl st, ch 6.* Repeat from * to * 6 more times. Sc in the 8th sc of the last Petal, ch 6 and join to the 4th ch of the beg ch-10 with a sl st. Remove stitch markers.
Stitch Count: 8 tr, 8 sc, and 16 ch-6 sps
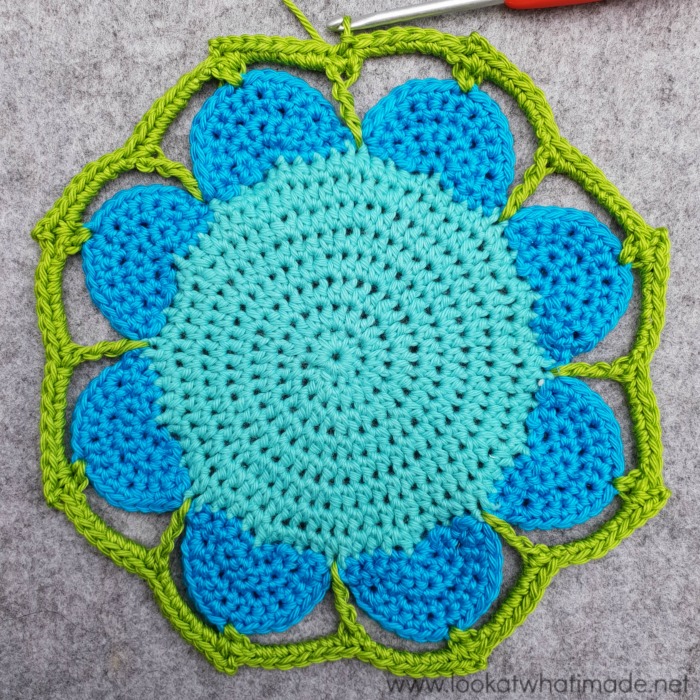
Round 11
Ch 1 (doesn’t count as a st), sc in the same st, 6 sc in the next ch-6 sp. *(Sc, ch 2, sc) in the next sc, make 6 sc in the next ch-6 sp, sc in the next tr, make 6 sc in the next ch-6 sp*. Repeat from * to * 6 more times. (Sc, ch 2, sc) in the next sc, make 6 sc in the next ch-6 sp, join to the first sc with a sl st.
Stitch Counts:
- Total: 120 sc and 8 ch-2 sps
- Per Side: 15 sc
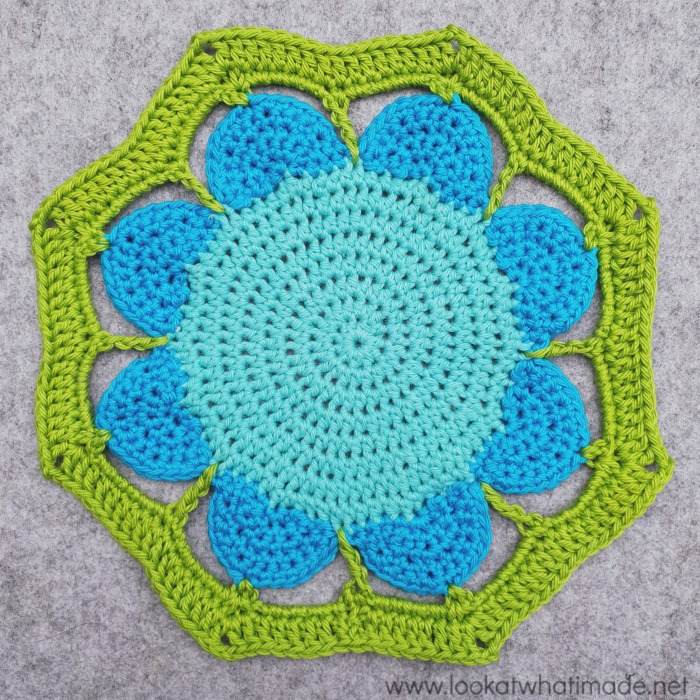
Round 12
Ch 3 (counts as a dc), dc in the next 7 sts. *(Dc, ch 2, dc) in the next ch-2 sp, dc in the next 15 sts.* Repeat from * to * 6 more times. (Dc, ch 2, dc) in the last ch-2 sp. Dc in the last 7 sts. Join to the top of the beg ch-3 with a sl st. Fasten off and work away your ends.
Stitch Counts:
- Total: 136 dc and 8 ch-2 sps
- Per Side: 17 dc
Round 13
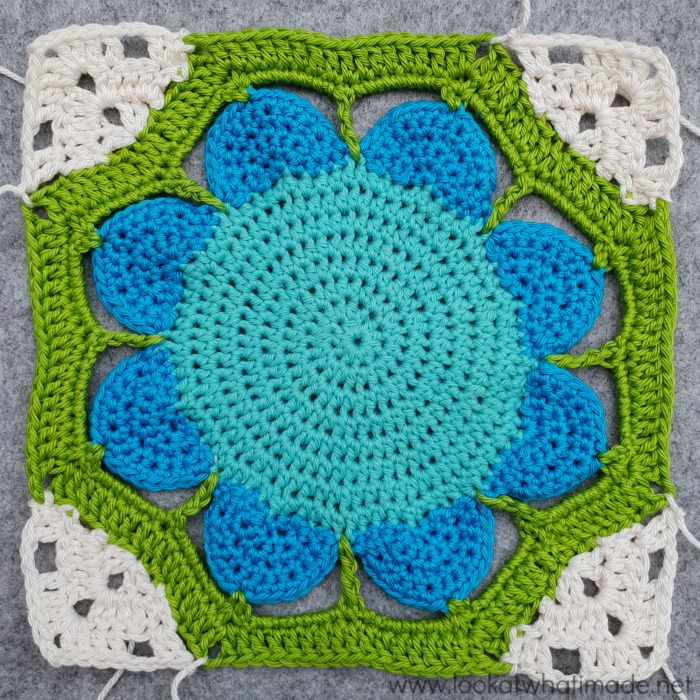
In Round 13, we will create 4 corners so that we end up with a square. We will, therefore, only work into every second side. We are going to use short rows again, but in a slightly different way.
Before you start, identify the 6th dc of every second side and mark with a SM. Again, this is something you will only need to do until you get used to creating the corners.
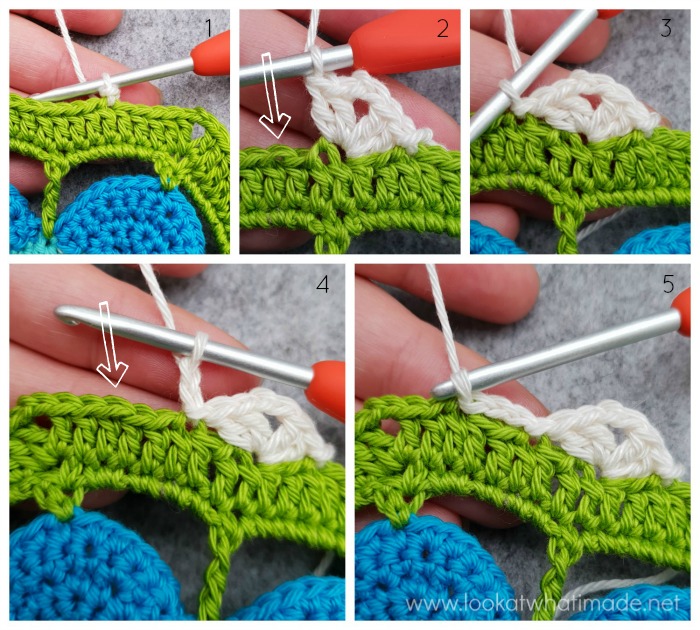
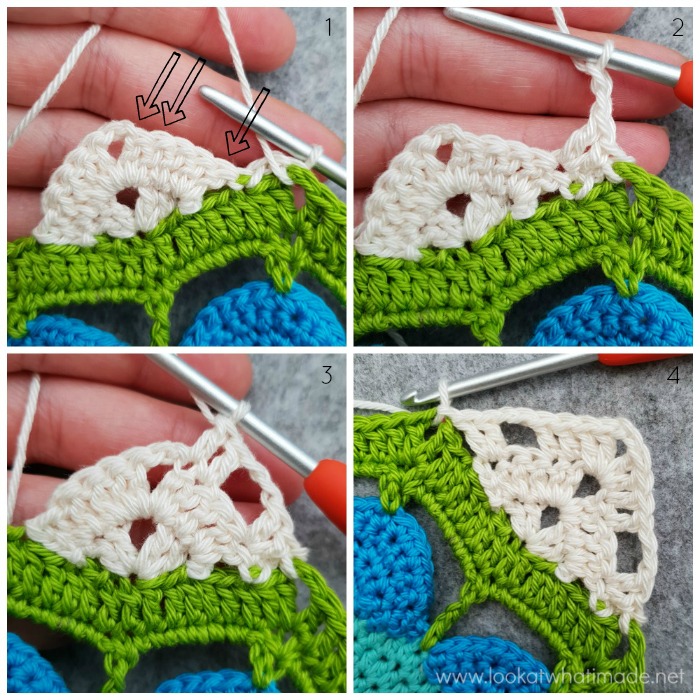
Corner Round A: With RS facing, join your MC yarn by making a sl st in the marked (sixth) st of one of the sides {Photo 1}. Skip next 2 sts, (2 dc, ch 2, 2 dc) in the next st, which will be the 9th dc of the side. Skip the next 2 sts and sl st in the next st {Indicated with an arrow in Photo 2 and illustrated in Photo 3}. Ch 2 (doesn’t count as a ch-2 sp – Photo 4), skip the next 2 sts and sl st in the next st {Photo 5}. Turn. {4 dc and 1 ch-2 corner space}
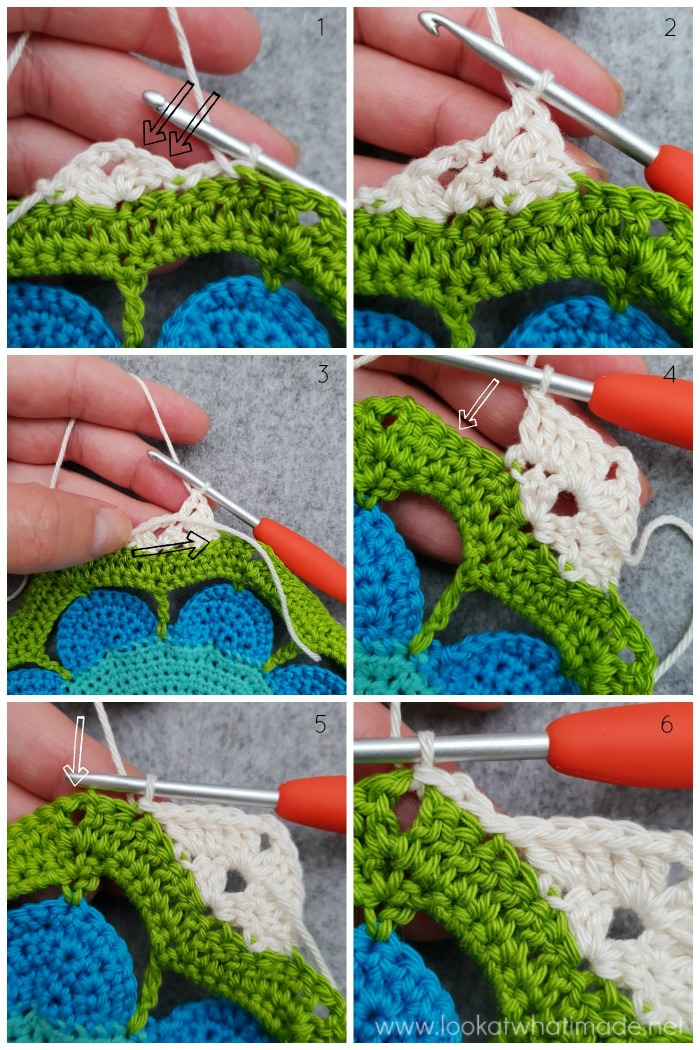
Corner Round B: With WS facing, make 2 dc in the first dc of Corner Round A. Dc in the next dc {Indicated with arrows in Photo 1 and illustrated in Photo 2}. Tip: Fold the beginning yarn end over your work so that it lies on top of your stitches {Photo 3} and work the rest of this short-row over it.* (2 dc, ch 2, 2 dc) in the ch-2 corner space. Dc in the next dc. Make 2 dc in the last dc. Skip the next 2 sts of Round 12 and sl st in the next st {Indicated with an arrow in Photo 4 and illustrated in Photo 5}. Ch 2 (doesn’t count as a ch-2 sp), skip the last 2 sts and sl st into the ch-2 corner sp {Photo 6}. Turn. {10 dc and 1 ch-2 corner sp}
*Due to the nature of this yarn, it is enough to simply work over the yarn end as above before snipping it. Apart from the initial magic ring, there is no need for excessive back-and-forthing. I found that this tip (and the one in Round 14) saved me A LOT of working away.
Corner Round C: With RS facing, make 2 dc in the first dc of Corner Round B. Ch 2 and skip the next 2 dc. Dc in the next 2 dc {Indicated with arrows in Photo 1 and illustrated in Photos 2 and 3}. (2 dc, ch 2, 2 dc) in the ch-2 corner sp. Dc in the next 2 dc. Ch 2 and skip the next 2 dc. Make 2 dc in the last dc. Skip the last 2 sts of Round 12 and sl st into the ch-2 corner sp {Photo 4}. Fasten off and work away your ends*. {12 dc and 3 ch-2 sps}
*Alternatively, just work over your final yarn ends when making Round 14.
This is what your first finished corner will look like:
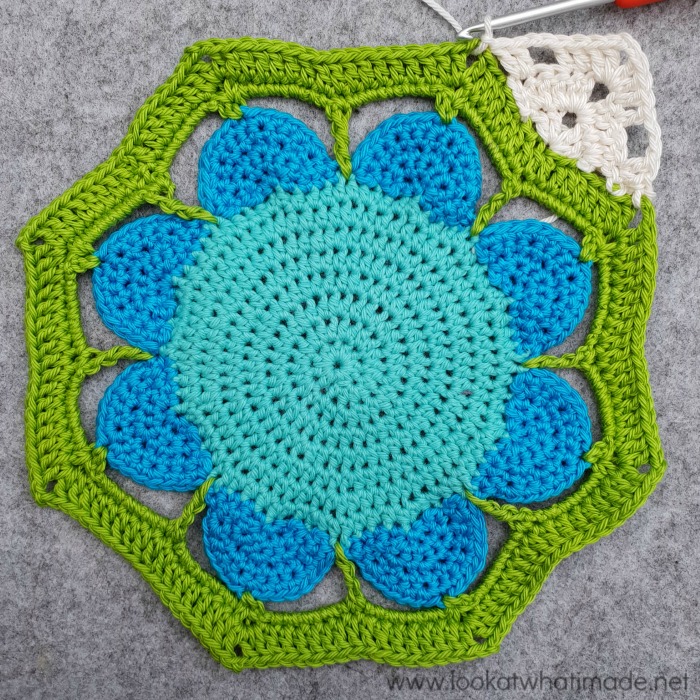
Repeat Corner Rounds A to C on every second side until you have made all 4 corners {See Photo at the start of this round}.
Round 14
Join your MC yarn by making a standing sc in any ch-2 corner space. (Ch 2, sc) in the same ch-2 corner space.
*Sc in the next 4 sts, make 2 sc in the next ch-2 sp, sc in the next 2 sts. Make 2 sc in the next ch-2 corner sp from Round 12. Sc in the next 17 sts. Tip: Make the first 10 sc OVER the final yarn end from Corner Round C. It saves you from having to work those ends away. Make 2 sc in the next ch-2 corner sp. Sc in the next 2 sts from Corner Round C. Make 2 sc in the next ch-2 sp, sc in the next 4 sts. (Sc, ch 2, sc) in the next ch-2 corner sp.*
Repeat from * to * three more times, omitting the last corner on the last repeat. Join to the first sc with a sl st. Fasten off and work away your ends. {39 sc per side}
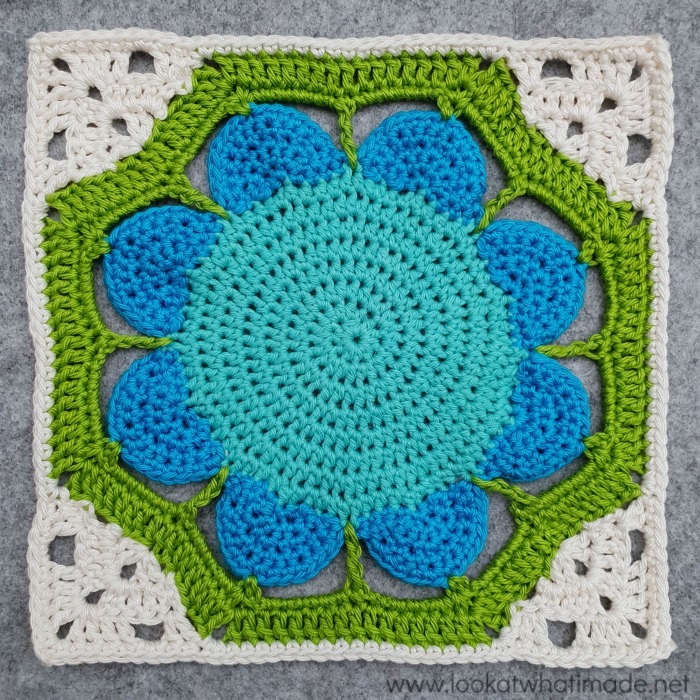
Well done! You have completed your first square. Now you need to make 29 more – 5 in each of the Contrasting Colours.
Deciding on Layout
My Layout
When you have made all 30 squares, you will need to join them to each other. I am going to show you how I chose to do my layout, but you are free to move the colours around to express your own personality! You can see some examples in the Reveal post I did last week.
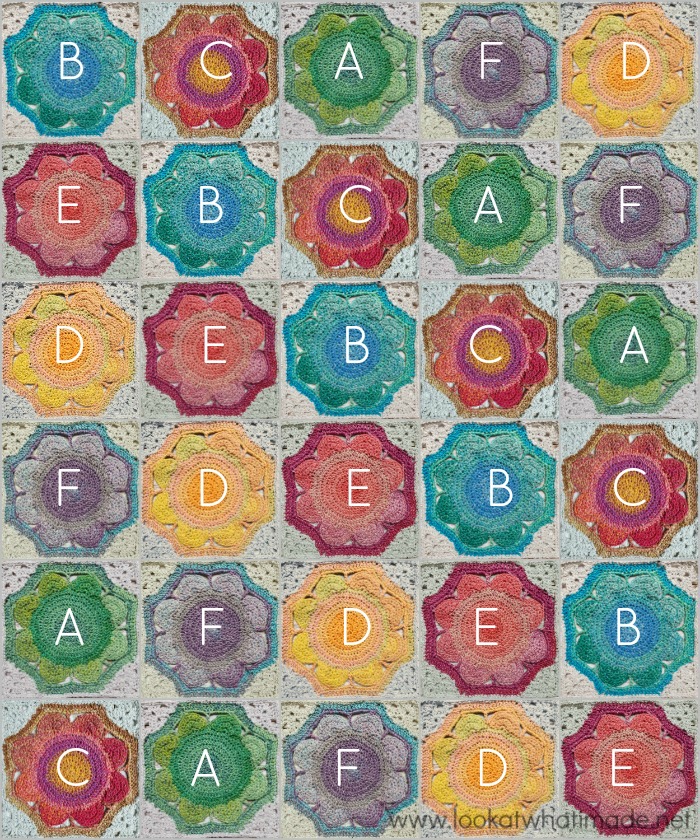
Choosing Your Own Layout
If you do decide to move the colours around to better suit your taste, try not to put too many light or dark colours next to each other as this will make the blanket appear a bit lopsided.
- The best way to decide on a layout, in my opinion, is to photograph each blocked square and then crop them so that there is no background visible beyond the last Round. Make sure that you label them in a way that will be easily identifiable to you.
- Go to Picmonkey (free for this purpose, although paid options are available) and create a Collage in a 5 x 6 grid, roughly 1500 x 1800 pixels.
- Upload your photos and drop them into the Collage until you are happy with the results. You might want to save many different variations so that you can compare them later.
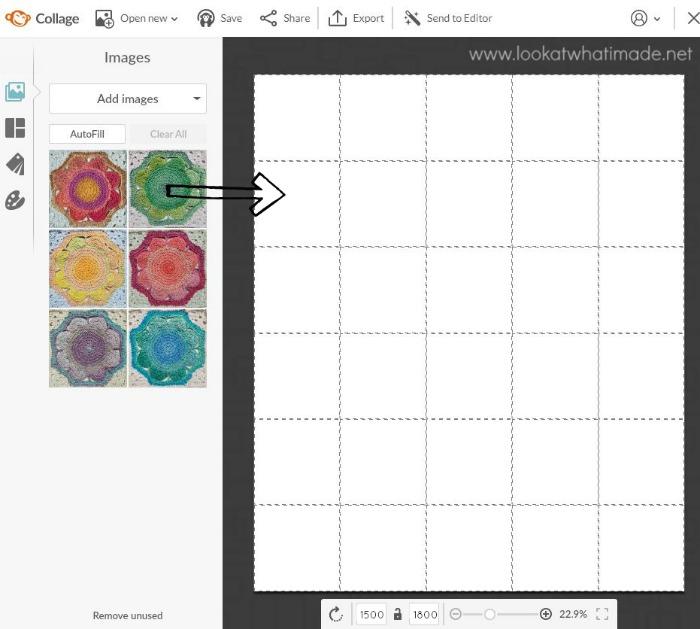
Alternatively, you can save the following individual photos and use them instead.
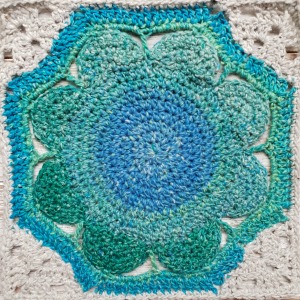
- A Herb Garden 702
- B Secluded Lake 703
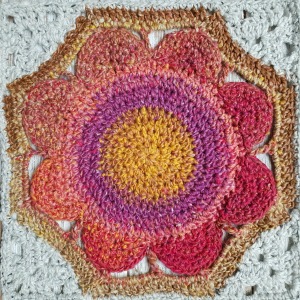
- C Rambling Blooms 705
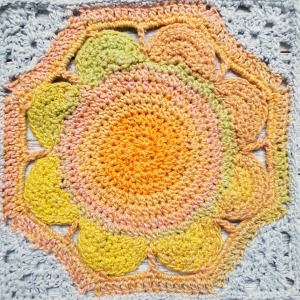
- D Summer House 707
- E Rose Arch 708
- F Lily Pond 709
Joining the Squares
When you are happy with your layout, you will join your squares using the diagonal (Sc, ch 1, skip 1) join my granny taught me. It yields a flat seam on the front of your work that will look like little stitches. On the back of your work, the seam will be raised (but not as much as if you had made a sc in each stitch). This seam is reasonably elastic, provided that you don’t make your chains too tight.
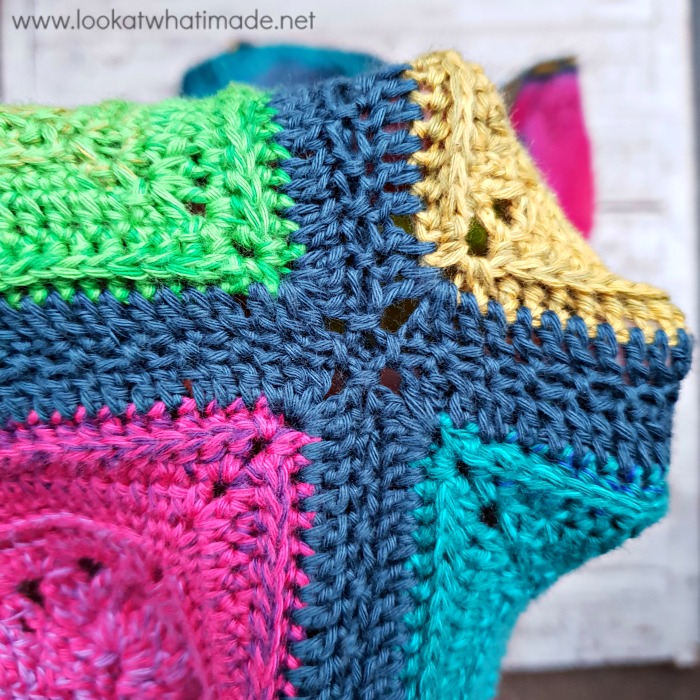
Pictured: The (sc, ch 1, skip 1 join) as used in Sophie’s Dream.
Starting the Diagonal Join
Join with a 5.5mm hook (or a slightly bigger hook than the one used for the squares) and MC.
Note: When joining squares, the WS of one square will be facing you and the RS of the other will be facing you. If you need any help with Stitch Anatomy, you can find it HERE.
Step 1
To join on the diagonal with the (Sc, ch 1, skip 1) Join, you will start with the bottom right square (bottom left, if you are left-handed). You will be attaching it to the square above it first, followed by the square directly next to it. You will need to refer to the layout photo above (or your own created layout photo).
Flip the square above the corner square over onto the corner square so that their RS are facing each other. With MC yarn, a slip knot already on your hook, and starting in the corner sp, make a sc through both layers of the ch sp. Ch 1. Skip the first st of both layers (please see Note above). Insert your hook into the next sc (through both layers) and make a sc.
*Ch 1, skip the next st of both layers, and sc through the next st of both layers.*
Repeat from * to * until one st rem. Ch 1 and skip the last st of both layers. Into the corner space: (sc, ch 1) through both layers.
Step 2
Unfold your squares. Now that you have attached the square above the corner square, you need to attach the square next to it, so flip that square over onto the corner square so that their RS are facing each other. Insert your hook into the corner sp of the top square and then insert it into the corner sp of the bottom square. Make a sc through both layers and ch 1. Skip the first st of both layers and sc in the next st of both layers.
*Ch 1, skip the next st of both layers, and sc through the next st of both layers.*
Repeat from * to * until one st rem. Ch 1 and skip the last st of both layers. Into the corner space: (sc, ch 1) through both layers.
Fasten off and pull the ch st tight to form a little knot. Unfold the squares again. You should now have 3 squares attached to each other: two in the bottom row and one in the top row. They should look like steps. See Numbers 1-3 in the image below.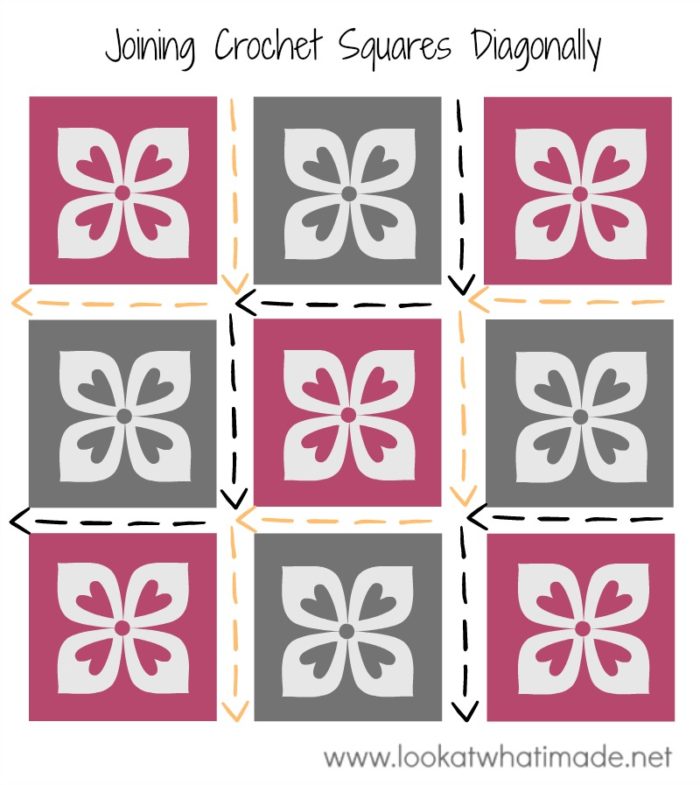
You will now continue to add your squares in diagonal strips.
Adding the Next Diagonal Strip
Place the next square above the top right-hand square (left, if you are left-handed). Place a square in the gap formed where the previous 3 squares meet. Place a square next to the bottom-left square (bottom-right, if you are left-handed). See Numbers 4-6 in the picture above.
Starting on the right (left, if you are left-handed), join the first 2 squares of the next strip as before. This will bring you to the ‘inside’ corner where the initial 3 squares meet. Unfold your squares and then fold the top 3 squares (2, 4, and 5 in the picture) over onto the bottom 2 so that you can attach the other side of the square.
Before you can join the next side, you need to anchor your work to the ‘inside’ corner created when you joined the first 3 squares. To do this, sl st into the ch-1 corner sp created when joining the first 3 squares. When you have made the sl st, ch 1. This is your corner made.
Insert your hook into the corner sp of the squares (through both layers as before) and make a sc. Continue with the (sc, ch 1, skip 1) seam as before, until you have attached all 3 squares to the previous 3 squares. When you have joined the last side, fasten off as before.
Adding Subsequent Diagonal Strips
Continue adding squares in a diagonal fashion, like steps. You will always start joining top-right (top-left if you are left-handed) and end bottom-left (bottom-right if you are left-handed). When you have 5 squares along the bottom, stop adding a square to the bottom-left corner of every strip (bottom-right if you are left-handed), so that you get a straight edge. When your blanket is 6 squares long, stop adding a square to the top-right corner of every strip (top-left if you are left-handed). Continue until you have joined all the squares.
Adding the Border
When you have joined all your squares to each other, you are ready to add your border.
Border Round 1 (MC)
When adding the first round of the border, you will work into each st and ch-2 sp along the sides. Only the four ch-2 spaces in the corners of the blanket will be referred to as ch-2 corner spaces.
With a 5mm hook, join MC yarn by making a standing double crochet in the ch-2 corner sp at the start of any long side. (Dc, ch 2, 2 dc) in the same ch-2 sp. This is your first corner made.
*Skip the first (hidden) st of the long side, hdc in the next 38 sts, [hdc in the next two ch-2 sps, hdc in the next 39 sts] 5 times. (2 dc, ch 2, 2 dc) in the next ch-2 corner sp. Hdc in the first 39 sts of the short side, [hdc in the next two ch-2 sps, hdc in the next 39 sts] 4 times. (2 dc, ch 2, 2 dc) in the next ch-2 corner sp. *
Repeat from * to * once more, omitting the last corner on the last repeat. Join to the first dc with a sl st.
Stitch Counts:
- Long Sides: 243 hdc and 4 dc
- Short Sides: 203 hdc and 4 dc
Border Round 2 (MC)
Sl st in the next st and into the ch-2 corner sp. Ch 2 (counts as hdc). (Dc, ch 2, dc, hdc) in the same ch-2 corner sp. This is your first corner made.
*Skip the first (hidden) st. [Sc in the next st, skip the next st, (hdc, dc) in the next st, ch 2, (dc, hdc) in the next st, skip the next st] until 1 st rem. Sc in the last st.
(Hdc, dc, ch 2, dc, hdc) in the next ch-2 corner sp.*
Rep from * to * three more times, omitting the last corner on the last repeat. Join to the top of the beg ch-2 with a sl st. Fasten off and work away your ends.
Stitch Counts:
- Long Sides: 50 sc, 100 hdc, 100 dc, and 49 ch-2 sps (not including ch-2 corner sp)
- Short Sides: 42 sc, 84 hdc, 84 dc, and 41 ch-2 sps (not including ch-2 corner sp)
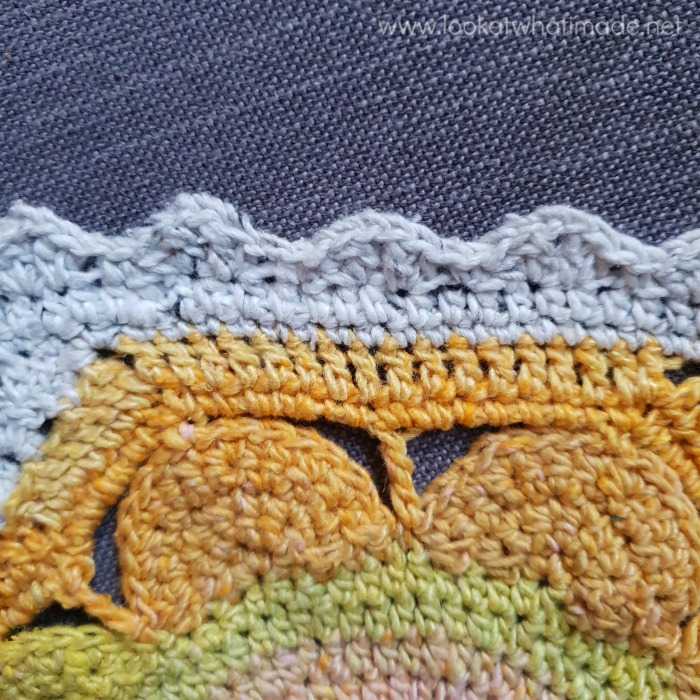
I have thoroughly enjoyed every stage of the creation of this blanket. It is my sincere hope that you wil enjoy it too.
Want to see more of our Lynda Blanket journey?

This blog post contains affiliate links. I only link to products I personally use or would use. All opinions are my own.



Mariola says
Wow, it’s very beautiful blanket. Greetings from Poland.
Jenny Lowman says
Hello! We are so glad you love it as we do!
Patricia Kock says
Love your crochet patterns, they are stunning.
Lynda where is your shop situated.
Lots of Regard
Patricia Kock.
Vanessa Feinman says
I got the yarn for an Xmas gift but I’ll admit I’m struggling with the running stitch marker in the round. Is there a video tutorial I can watch? I’m on rnd 7 and it’s not working out right. The yarn is so gorgeous I hate being stuck.
Dedri Uys says
Hi Vanessa.
I’m sorry to hear that the running stitch marker is causing you grief. Maybe THIS VIDEO tutorial will help? Alternatively, use a stitch marker to mark the first stitch of each round.
Dedri
Carol says
Love it!!! Thank you for sharing your pattern…
Dedri Uys says
You’re welcome :)
Minette says
Wow, am I glad to see your site up and running again :)
Dedri Uys says
Me too, Mom x
Katharina says
Hallo ! I started this beautiful pattern and translate step by step the pattern in to german. Can you tell me, what the sentence:
‚Make 30 – 5 with each Contrasting Colour‘ mean?
Jenny says
Hi Katharina.
It means make 5 pieces in each colour to total 30 individual ‘squares’.
BW Jenny :)
Margaret says
I love your blanket. Thank You for sharing this great pattern and for all you work to design this pattern and to make a tutorial and pattern.
Have a great day, Margaret
Dedri Uys says
Thank you very much, Margaret x
Michelle says
So gorgeous! Pinning!
Shirley Hill says
Beautiful blanket! How do I get a kit??
Dedri Uys says
Hi Shirley. The kits are available in my wool warehouse shop. You can find the link under materials at the start of the pattern :)