Welcome to the Summer in Swanage Pattern! This blanket was inspired by the beach huts of my youth (Mossel Bay and Muizenberg in South Africa). This inspiration was fuelled into flame on our recent trip to Swanage. The pattern is long and wordy (as are most of my patterns) with plenty of photos to help you on your way. I hope you enjoy it!
If you want to see more photos of the completed blanket, you can find them HERE.
Summer in Swanage Crochet Blanket
- Add this Pattern to your Ravelry Queue
- Dutch Translation HERE
- Blank Template (for Colouring in) HERE
Materials
- 2 strands of Double Knit Yarn (#3) – I am using Scheepjes Colour Crafter (see Colours and Colour Packs below)
- 5.5 mm Clover Amour Crochet Hook
(US 9/I UK 5)
- 6 mm Clover Amour crochet hook
(US 10/J UK 4) for border only!
- Yarn needle…sigh
Colours and Colour Packs
You can buy the Summer in Swanage Colour Packs from Wool Warehouse* or Deramores (both retailers ship Internationally). You can also find the individual balls of Colour Crafter on Scheepjeswol.com (NL).
*Wool Warehouse Colour Packs contain a written-only version of the pattern!
If this blanket is a little bit too bright for you, the ‘Birthday in Malmö‘ colourway might suit you better. You can read more about that HERE. And if you prefer using your own unique colourway, you can use this TEMPLATE to help you figure out your colours.
Huts
- Den Helder (1068) – 45 g
- Meppel (1061) – 45 g
- Tilburg (1083) – 45 g
- Maastricht (1246) – 45 g
- Nijmegen (1712) – 70 g
- Eindhoven (1114) – 70 g
Beach
- Gouda (1081) – 140 g (2 skeins)
- Bergen (1420) – 95 g
- Burum (1709) – 60 g
Waves and Sky
- Barneveld (1005) – 40 g
- Urk (1034) – 290 g (3 skeins)
- Alphen (1722) – 120 g (2 skeins)
- Ameland (1725) – 160 g (2 skeins)
- Dordrecht (1062) – 160 g (2 skeins)
- Alkmaar (1708) – 90 g
Abbreviations
US Terminology Used (see this comparative chart for US/UK conversion)
- Ch – Chain
- Sc – Single Crochet
- Sc2tog – Single Crochet 2 Together
- Dc – Double Crochet
- Dc2tog – Double Crochet 2 Together
- Hdc – Half-double Crochet
- Hdc2tog – Half-double Crochet 2 Together
- Tr – Treble Crochet
- Blo – Back Loop Only
- St/st’s – Stitch/Stitches
- * and () – Repeat instructions between * or () the amount of times specified.
Gauge
Using dc stitches (US Terminology): 14 stitches and 8 rows per 10 cm (4”) square.
If you are not meeting the gauge, you can go up or down a hook size until you do achieve the same gauge. If your width is correct, but your height is off, have a look at THIS TUTORIAL. You do not HAVE to achieve the same gauge as me, but you need to keep in mind that your yardages will be different if you don’t.
Size
120 cm x 150 cm (stretches to 170…because it’s heavy!)
Notes
- This blanket is made using 2 strands of double knit yarn held together. You might find it helpful to make 50g yarn cakes of each of the colours that use less than 1 skein of yarn. I use a Stanwood 4 oz Yarn Winder for this. Alternatively, work from the inside AND the outside of the skein. If you do, I cannot guarantee that you will still like me at the end of this blanket.
- The turning chains in this pattern do not count as stitches! Please remember this when joining pieces and when working into joined segments.
Instructions
This blanket is made in parts. The first part consists of Beach Huts and Sandy Triangles that have to be joined together before continuing. The second part consists of the Beach, Waves, and Sky, which are made using the lazy wave stitch pattern. The last part is the border, which is simple and quick.
Beach Huts
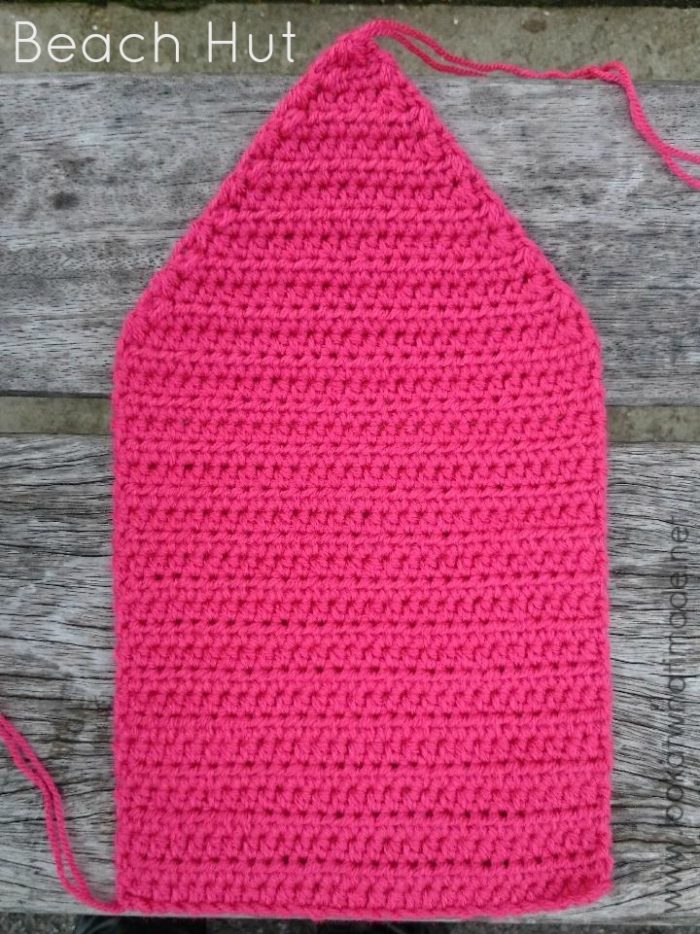
Make one in each of the following colours: Den Helder (1068), Meppel (1061), Tilburg (1083), Maastricht (1246), Nijmegen (1712), and Eindhoven (1114)
- Row 1: Ch 29, leaving a 30 cm (12”) tail of yarn that will later be used to sew the huts together. Hdc in the third chain from the hook and each chain across for a total of 27 hdc’s (initial ch-2 doesn’t count as a stitch). Ch 1 and turn. This ch-1 does not count as a stitch. (27 hdc’s)
- Row 2: Hdc in each hdc across for a total of 27 hdc’s. The last hdc will be slightly tricky to get into. Ch 1 and turn. (27)
- Row 3: Hdc in each hdc across. Ch 1 and turn. (27)
- Rows 4 – 24: Repeat Row 3. (27) When you have turned at the end of Row 24, have a look at your work. Your hook should be to the right (left if you are left-handed). Your initial tail of yarn should be to the left (right if you are left-handed). The hdc’s will form a ridge in every second row, making it easy to count your rows in twos.
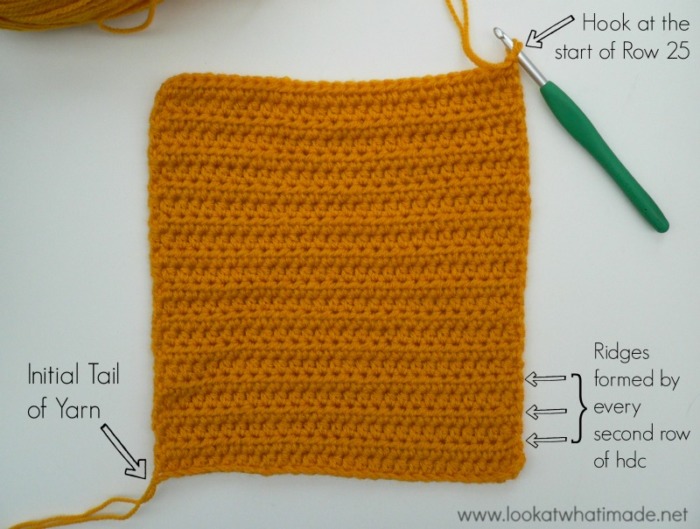
- Row 25: Hdc2tog. Hdc in the next 23 st’s. Hdc2tog. Ch 1 and turn. (25)
- Row 26: Hdc2tog. Hdc in the next 21 st’s. Hdc2tog. Ch 1 and turn. (23)
- Row 27: Hdc2tog. Hdc in the next 19 st’s. Hdc2tog. Ch 1 and turn. (21)
- Row 28: Hdc2tog. Hdc in the next 17 st’s. Hdc2tog. Ch 1 and turn. (19)
- Row 29: Hdc2tog. Hdc in the next 15 st’s. Hdc2tog. Ch 1 and turn. (17)
- Row 30: Hdc2tog. Hdc in the next 13 st’s. Hdc2tog. Ch 1 and turn. (15)
- Row 31: Hdc2tog. Hdc in the next 11 st’s. Hdc2tog. Ch 1 and turn. (13)
- Row 32: Hdc2tog. Hdc in the next 9 st’s. Hdc2tog. Ch 1 and turn. (11)
- Row 33: Hdc2tog. Hdc in the next 7 st’s. Hdc2tog. Ch 1 and turn. (9)
- Row 34: Hdc2tog. Hdc in the next 5 st’s. Hdc2tog. Ch 1 and turn. (7)
- Row 35: Hdc2tog. Hdc in the next 3 st’s. Hdc2tog. Ch 1 and turn. (5)
- Row 36: Hdc2tog. Hdc in the next st. Hdc2tog. Ch 1 and turn. (3)
- Row 37: Hdc3tog. Ch 1 and bind off. (1)
Sandy Triangles
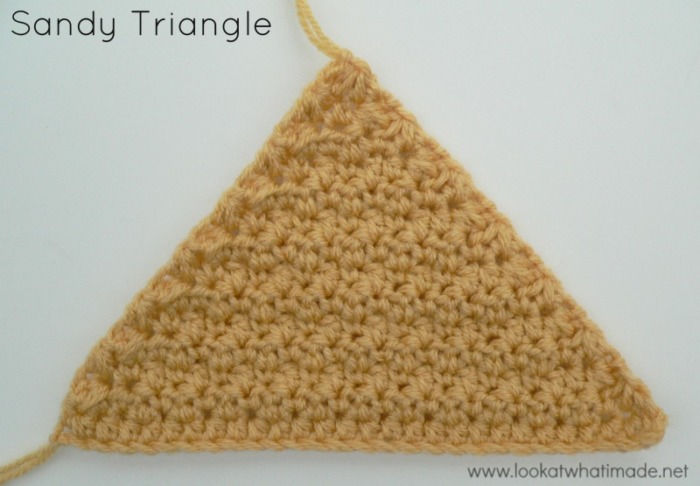
Make 5 in Gouda (1081).
You should make your turning chains loosely; otherwise, your work will pucker. Leave an initial tail of 40 cm (15”) when making the Sandy Triangles.
- Row 1: Ch 29. Hdc in the third chain from the hook and each chain across for a total of 27 hdc’s (initial ch-2 doesn’t count as a stitch). Ch 1 and turn. This ch-1 does not count as a stitch. (27 hdc’s)
- Row 2: Hdc2tog. Hdc in the next st. (Dc in the next st, sc in the next st) 11 times. Hdc2tog. Ch 1, turn. (25)
- Row 3: Hdc2tog. Hdc in the next st. (Dc in the next st, sc in the next st) 10 times. Hdc2tog. Ch 1, turn. (23)
- Row 4: Hdc2tog. Hdc in the next st. (Dc in the next st, sc in the next st) 9 times. Hdc2tog. Ch 1, turn. (21)
- Row 5: Hdc2tog. Hdc in the next st. (Dc in the next st, sc in the next st) 8 times. Hdc2tog. Ch 1, turn. (19)
- Row 6: Hdc2tog. Hdc in the next st. (Dc in the next st, sc in the next st) 7 times. Hdc2tog. Ch 1, turn. (17)
- Row 7: Hdc2tog. Hdc in the next st. (Dc in the next st, sc in the next st) 6 times. Hdc2tog. Ch 1, turn. (15)
- Row 8: Hdc2tog. Hdc in the next st. (Dc in the next st, sc in the next st) 5 times. Hdc2tog. Ch 1, turn. (13)
- Row 9: Hdc2tog. Hdc in the next st. (Dc in the next st, sc in the next st) 4 times. Hdc2tog. Ch 1, turn. (11)
- Row 10: Hdc2tog. Hdc in the next st. (Dc in the next st, sc in the next st) 3 times. Hdc2tog. Ch 1, turn. (9)
- Row 11: Hdc2tog. Hdc in the next st. (Dc in the next st, sc in the next st) 2 times. Hdc2tog. Ch 1, turn. (7)
- Row 12: Hdc2tog. Hdc in the next st. Dc in the next st, sc in the next st. Hdc2tog. Ch 1, turn. (5)
- Row 13: Hdc2tog. Sc in the next st. Hdc2tog. Ch 1, turn. (3)
- Row 14: Hdc3tog. Ch 1 and bind off, leaving a 40 cm (15”) tail of yarn. (1)
Sandy Half-triangle
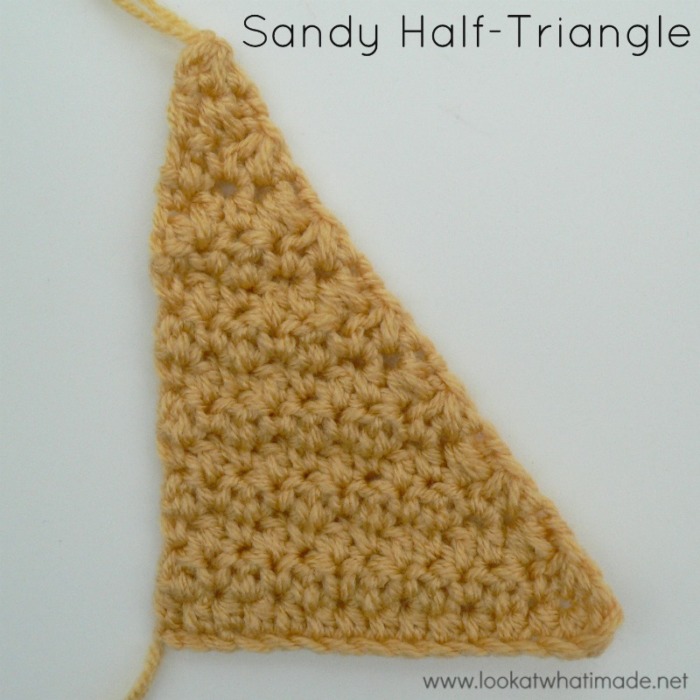
Make 2 in Gouda (1081).
You should make your turning chains loosely, otherwise your work will pucker. Leave an initial tail of 20 cm (7.5”) when making the Half-triangles.
- Row 1: Ch 16. Hdc in the third chain from the hook and each chain across for a total of 14 hdc’s (initial ch-2 doesn’t count as a stitch). Ch 1 and turn. This ch-1 does not count as a stitch. (14 hdc’s)
- Row 2: (Dc in the next st, sc in the next st) 6 times. Hdc2tog. Ch 1 and turn. (13)
- Row 3: Hdc2tog. Hdc in the next st. (Dc in the next st, sc in the next st) 5 times. Ch 1 and turn. (12)
- Row 4: (Dc in the next st, sc in the next st) 5 times. Hdc2tog. Ch 1 and turn. (11)
- Row 5: Hdc2tog. Hdc in the next st. (Dc in the next st, sc in the next st) 4 times. Ch 1 and turn. (10)
- Row 6: (Dc in the next st, sc in the next st) 4 times. Hdc2tog. Ch 1 and turn. (9)
- Row 7: Hdc2tog. Hdc in the next st. (Dc in the next st, sc in the next st) 3 times. Ch 1 and turn. (8)
- Row 8: (Dc in the next st, sc in the next st) 3 times. Hdc2tog. Ch 1 and turn. (7)
- Row 9: Hdc2tog. Hdc in the next st. (Dc in the next st, sc in the next st) 2 times. Ch 1 and turn. (6)
- Row 10: (Dc in the next st, sc in the next st) 2 times. Hdc2tog. Ch 1 and turn. (5)
- Row 11: Hdc2tog. Hdc in the next st. Dc in the next st, sc in the next st. Ch 1 and turn. (4)
- Row 12: Dc in the next st, sc in the next st. Hdc2tog. Ch 1 and turn. (3)
- Row 13: Hdc2tog. Hdc in the next st. Ch 1 and turn. (2)
- Row 14: Dc2tog. Ch 1 and bind off. (1)
Assembling the Huts and Triangles
Attaching the Huts to Each Other
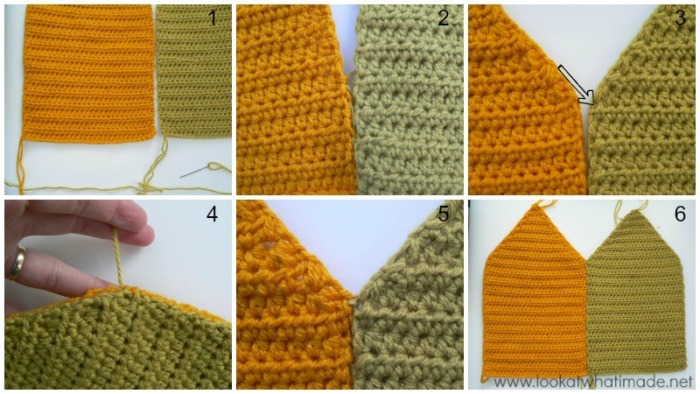
The right sides of the huts will be facing you when the initial tail of yarn is to the left (to the right if you are left-handed) – see Photo 1.
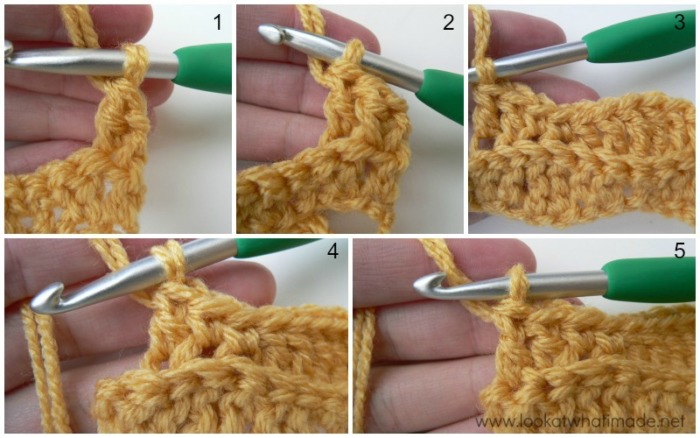
Attach the huts to each other with whip stitches, using the initial tail of yarn from the hut on the right (left if you are left-handed) – see Photo 2. It is important to note that you will get a better result if you make your whip stitches through a loop to the back of each hut, instead of through a loop on the side of the huts, as your stitches will be much less visible. Start at the bottom of the huts and end in Row 24 of the huts, just above the visible ridge below the first hdc2tog’s of Row 25 (indicated with an arrow in Photo 3 and illustrated in Photos 4 and 5).
Continue in this way until you have attached each of the 6 huts to their adjacent huts.
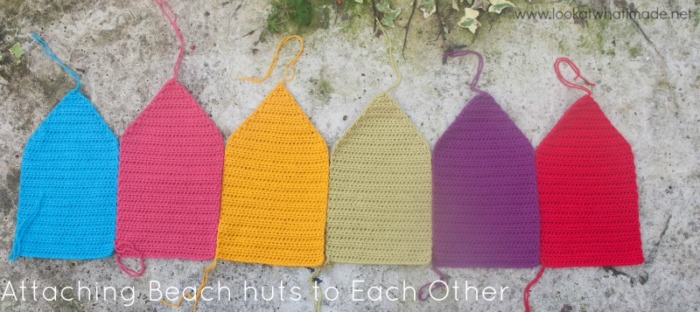
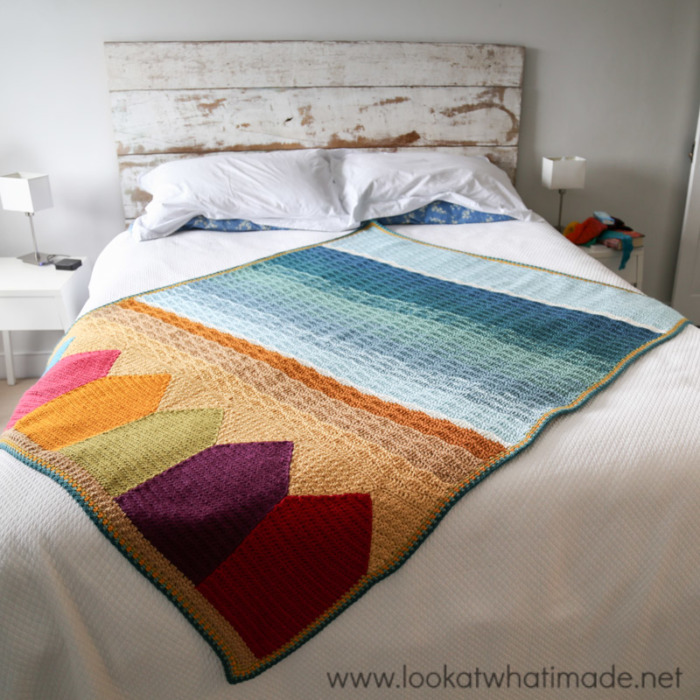
Use the photo below as a guide for which hut should go where.
Attaching the Triangles to the Huts
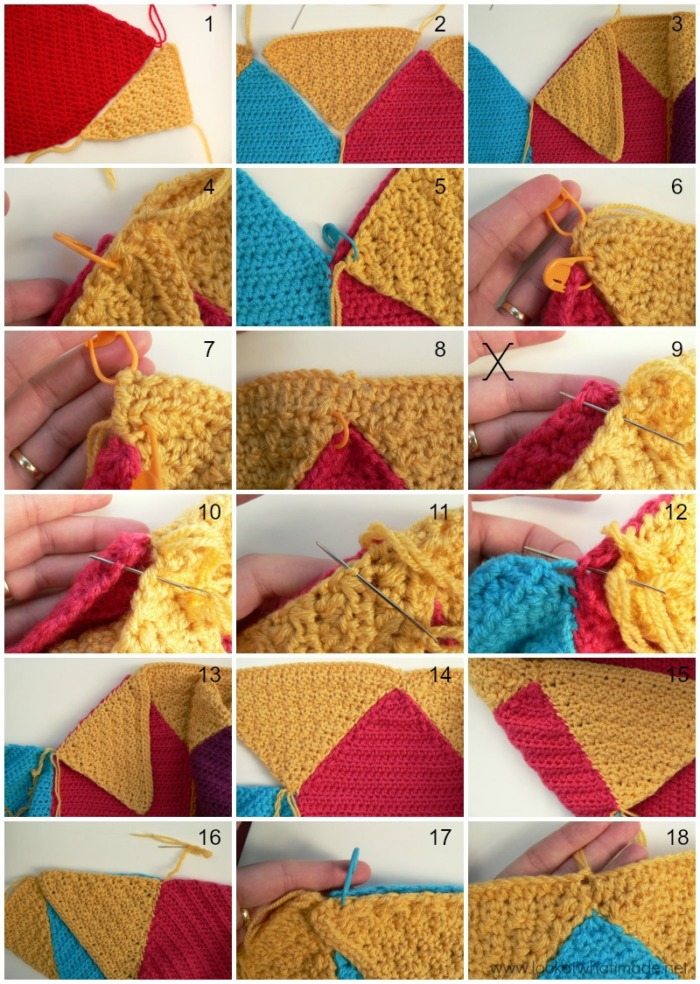
You will sew the Sandy Triangles and Half-triangles into the triangular spaces between the huts using whip stitches and the initial tails of yarn from the triangles. This can be a bit fiddly, so I am going to take you through it step by step.
You will need to sew a Half-triangle to the side of the first Beach Hut on the right (left if you are left-handed). Line the second row of one of the Half-triangles up with the point of the roof of the Beach Hut. Line the last row of the Half-triangle up to Row 24 of the Beach Hut (just above the visible ridge described above) – see Photo 1. Use whip stitches and the initial tail of yarn from the Half-triangle to sew it to the side of the Beach Hut roof. The last Half-triangle will be attached in the same way. Please note that the first row of the Half-triangle should still be unattached, as you will be attaching the first row of the next Triangle to it. Also note that the Half-triangle might bulge a bit where it meets the hut. The bulge will be corrected when you make the border.
Place the next Triangle into the space between the first and second huts (Photo 2). Fold the Triangle onto the Beach hut as shown in Photo 3. Line the second row of the Triangle up with the point of the Beach Hut. I suggest using a stitch marker to secure the two layers together (Photo 4). Line the point of the Triangle up with Row 24 of the Beach Hut and secure it with a stitch marker (Photo 5). Use another stitch marker to join the foundation chains of the two triangles together (Photo 6).
Using whip stitches, sew Row 1 of the Triangle to Row 1 of the Half-triangle (Photo 7). Photo 8 shows this join from the front.
Sew the Triangle to the side of the Beach Hut’s roof. Do not work into the side of the Beach Hut’s roof (Photo 9). Instead, try to insert your needle into any edge loop at the back of the Beach Hut’s roof (Photo 10) and into any edge loop at the front of the Triangle (Photo 11) so that your join won’t show from the front of your work when you open it up (Photo 14).
Your last stitch should fall in the tip of the Triangle and in the stitch of Row 24 of the Beach Hut that already contains a whip stitch from when you joined the huts to each other (Photo 12).
Photo 13 shows the join completed. Photo 14 shows the join from the front (neat) and Photo 15 shows it from the back (less neat).
Line the other side of the Triangle up with the side of the next Beach Hut’s roof (Photo 16), lining Row 2 of the Triangle up with the tip of the next Beach Hut and securing it with a stitch marker (Photo 17). Attach this side as before. Continue in this way until you have joined all the Triangles and Half-triangles to the Beach Huts.
Photo 18 illustrates what the join should look like at the top of each Beach Hut.
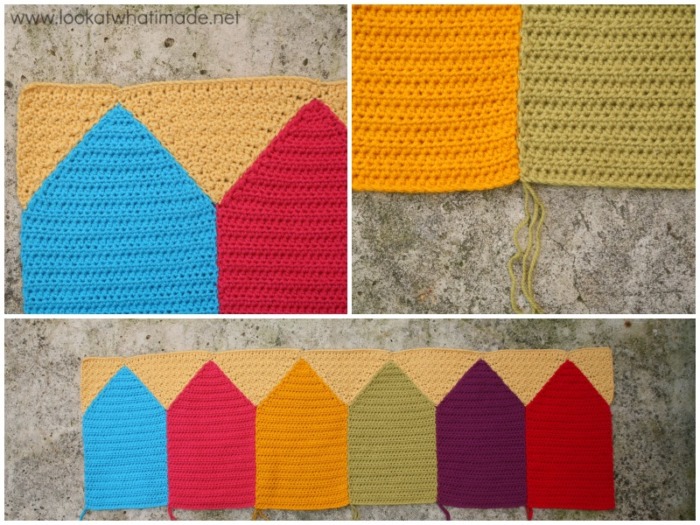
Below you can see what the joins should look like.
Now that you have attached the Triangles to the Beach huts, it’s time to start on the Beach, Wea, and Sky.
Beach, Waves, and Sky
Note
To start the Beach, you will need to make 162 stitches across the top of the Sandy Triangles. You will make 14 stitches into the top of the first half-triangle, 27 stitches into the top of each Triangle, and 13 stitches into the top of the last Half-triangle (see detailed instructions for Foundation Row below).
Remember that the initial ch-2’s of the triangles don’t count as a stitch, but they still take up a space, so you might need to fudge it slightly when you get to the end of each triangle. If you need to get rid of an extra loop, the best way to do this is to sc2tog.
Foundation Row (Single Crochet)
Worked in Single Crochet with Gouda (1081).
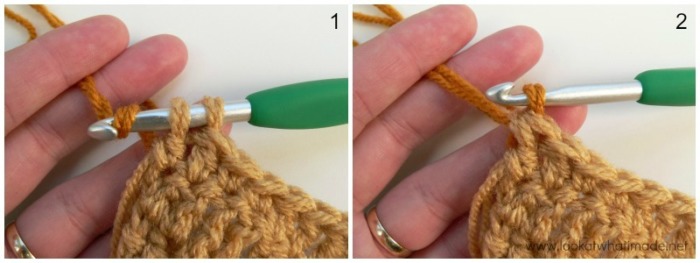
With right side facing, join your yarn by making a standing single crochet in the remaining loop/loops of the first chain stitch of the first Half-triangle (Photo 1). Make 13 more sc’s into the top of the first Half-triangle, increasing or decreasing as needed – Photos 2 and 3 (see Note above).
Make 27 sc’s into the top of each Triangle, again increasing or decreasing as needed (Photo 4). Make 13 sc’s into the top of the last Half-triangle, decreasing as needed. You should now have 162 sc’s. Ch 1 and turn. This ch st does not count as a stitch.
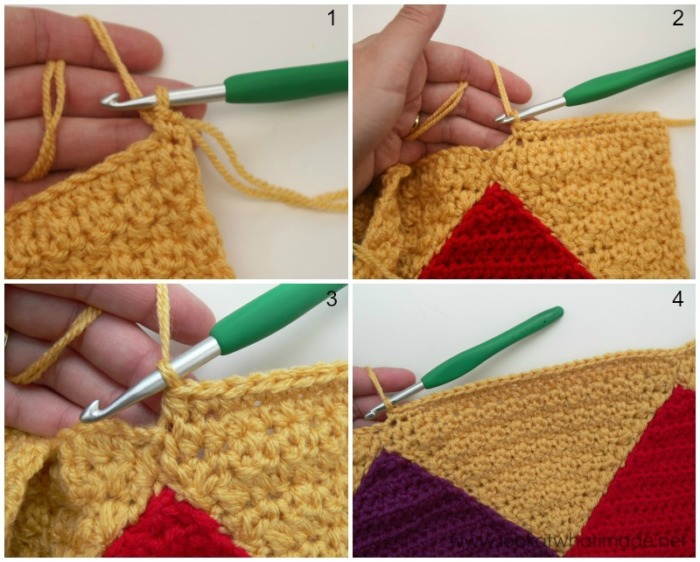
Row 1
Dc in the first 2 st’s. Remember that the turning chain does not count as a stitch, so you should work into the very first available stitch (indicated with an arrow in Photo 1). *Tr in the next 2 st’s, dc in the next 2 st’s, sc in the next 2 st’s, dc in the next 2 st’s (Photo 2)*.
Repeat from * to * until you reach the end of the row (Photo 3). The last st of the last repeat should fall in the standing single crochet. Ch 1 and turn (Photo 4). This ch st does not count as a st.
Stitch Count: 162 st’s {40 sc’s, 82 dc’s, and 40 tr’s}
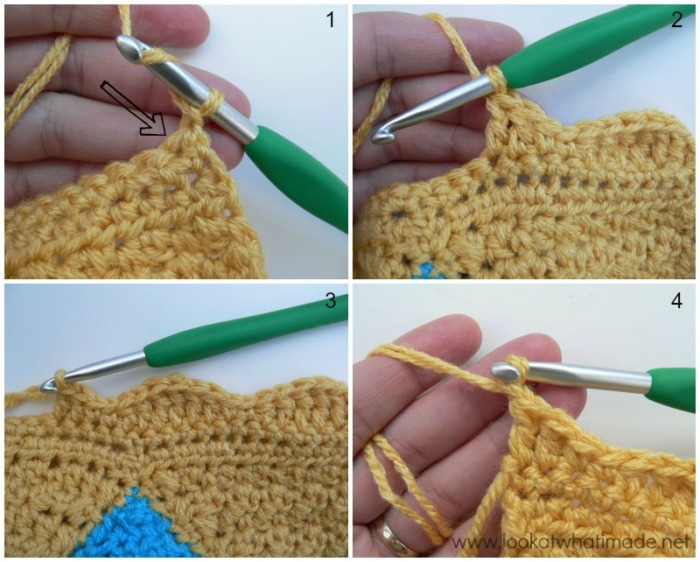
Row 2
Dc in the same st as the turning chain (indicated with an arrow in Photo 1). Dc in the next dc. *Tr in the next 2 sc’s, dc in the next 2 dc’s, sc in the next 2 tr’s, dc in the next 2 dc’s (Photo 2)*.
Repeat from * to * until you reach the end of the row. The last st of the last repeat should fall in the last dc, not in the turning chain (which doesn’t count as a stitch). Ch 1 and turn. This ch st does not count as a st.
Stitch Count: 162 st’s {40 sc’s, 82 dc’s, and 40 tr’s}
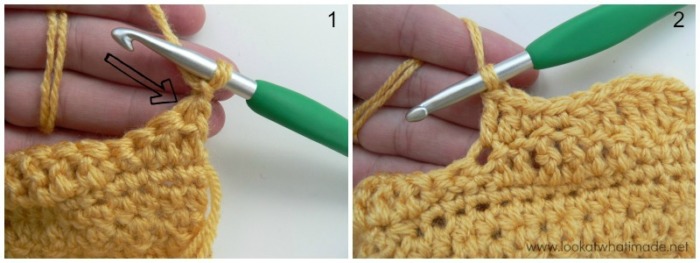
Row 3
Dc in the next 2 dc’s. *Tr in the next 2 sc’s, dc in the next 2 dc’s, sc in the next 2 tr’s, dc in the next 2 dc’s*. Repeat from * to * until you reach the end of the row. Ch 1 and turn. This ch st does not count as a st.
Stitch Count: 162 st’s {40 sc’s, 82 dc’s, and 40 tr’s}
Row 4
Except for the first and last stitches of this row, the row is worked in the back loop only! The back loops won’t be visible from the front of your work, so you will have to tilt the top of your stitches towards you in order to see them.
Photo 1 below shows the work tilted forward with the back loops visible (arrow). Photo 2 shows the hook inserted into the back loop only.
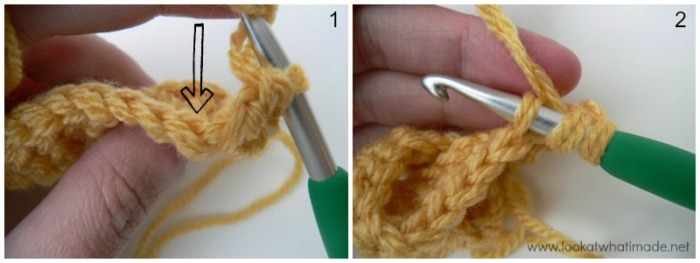
Dc in the same st as the turning chain (Photo 1). Dc in the blo of the next dc (Photo 2). *Tr in the blo of the next 2 sc’s, dc in the blo of the next 2 dc’s, sc in the blo of the next 2 tr’s, dc in the blo of the next 2 dc’s (Photo 3)*.
Repeat from * to * until you reach the end of the row, making the last dc of the row through both loops (Photo 5). Ch 1 and turn. This ch st does not count as a st.
Stitch Count: 162 st’s {40 sc’s, 82 dc’s, and 40 tr’s}
Rows 5 to 71 (Beach and Waves)
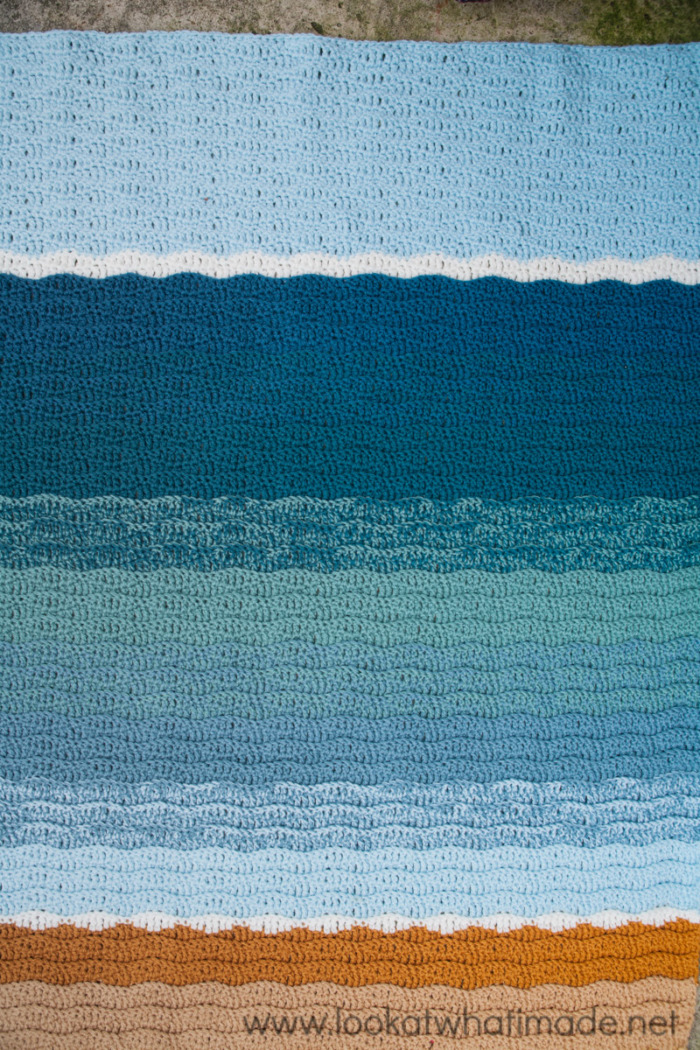
Repeat Rows 3 and 4 so that every second row (every even-numbered row) is worked in the back loop only, with the right side of the work facing you. Below, you will find a list of which rows are worked in which colour.
Rows 72 to 91 (Sky)
Repeat Row 3. In other words, work through both loops of every stitch for each row.
Changing Colour
Change colour on the last yarn-over of the last dc of the relevant row. Don’t forget the turning ch-1 at the end of each row!
Colours for the Beach
- Row 5 – Gouda (1081) – 1 Row
- Rows 6 to 11 – Bergen (1420) – 6 Rows
- Rows 12 to 16 – Burum (1709) – 5 Rows
- Row 17 – Barneveld (1005) – 1 Row
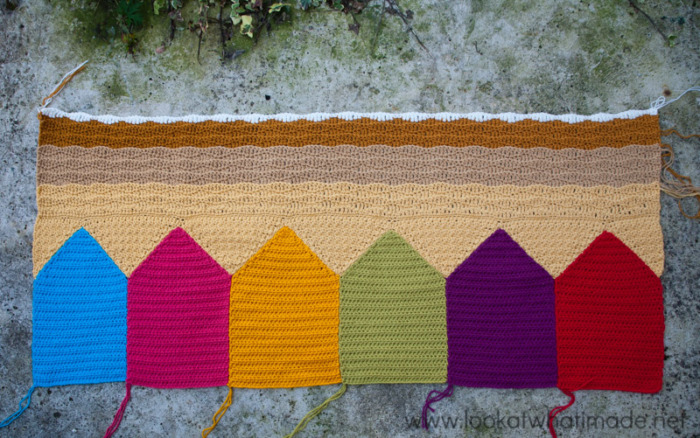
Colours for the Waves
For the waves, you will be creating an ombre effect by swapping one strand of yarn at the end of every 6th row. For example, the first 6 rows will be made in 2 strands of Urk, the next 6 rows will be made in one strand of Urk and one strand of Alphen, and the next 6 rows will be made in 2 strands of Alphen.
- Rows 18 – 23 – Urk (1034) – 6 Rows. Cut 1 strand of the Urk and add in one strand of Alphen (1722).
- Rows 24 – 29 – Urk (1034) and Alphen (1722) – 6 Rows. Cut the other strand of Urk and add in one more strand of Alphen.
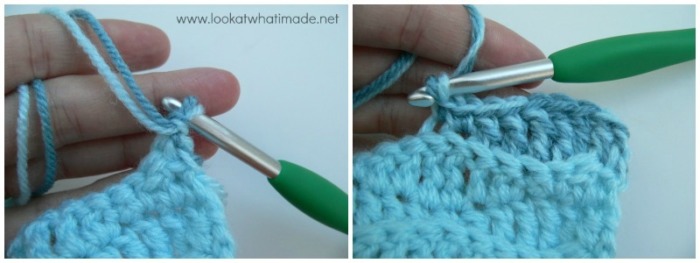
Swapping One Strand of Yarn
- Rows 30 – 35 – Alphen (1722) – 6 Rows. Cut 1 strand of Alphen and add in one strand of Ameland.
- Rows 36 – 41 – Alphen (1722) and Ameland (1725) – 6 Rows. Cut the other strand of Alphen and add in one more strand of Ameland.
- Rows 42 – 47 – Ameland (1725) – 6 Rows. Cut 1 strand of Ameland and add in one strand of Dordrecht (1062).
- Rows 48 – 53 – Ameland (1725) and Dordrecht (1062) – 6 Rows. Cut the other strand of Ameland and add in one more strand of Dordrecht.
- Rows 54 – 59 – Dordrecht (1062) – 6 Rows. Cut 1 strand of Dordrecht and add in one strand of Alkmaar (1708).
- Rows 60 – 65 – Dordrecht and Alkmaar – 6 Rows. Cut the other strand of Dordrecht and add in one more strand of Alkmaar.
- Rows 66 – 71 – Alkmaar (1708) – 6 Rows. Cut both strands of Alkmaar and add in 2 strands of Barneveld (1005).
Colours for the Sky
For the remainder of the blanket, you will work through both loops for every stitch and row.
- Rows 72 – 73 – Barneveld (1005) – 2 Rows, both rows worked through both loops! Cut both strands and add in 2 strands of Urk (1034).
- Rows 74– 91 – Urk (1034) – 18 Rows, working through both loops!
Row 92
Hdc in the same st as the turning chain. Hdc in the next dc. *Dc in the next 2 sc’s, hdc in the next 2 dc’s, sc in the next 2 tr’s, hdc in the next 2 dc’s*.
Repeat from * to * until you reach the end of the row. The last st of the last repeat should fall in the last dc. Ch 1 and fasten off. Work away your tails of yarn.
Stitch Count: 162 st’s {40 sc’s, 82 hdc’s, and 40 dc’s}
Sand Below Huts
Use Bergen (1420).
As when working into the tops of the triangles, you will be making 27 stitches into the bottom of each hut, decreasing as needed to compensate for the initial ch-2’s of the huts (which don’t count as a stitch).
Row 1
With right side facing, join your yarn by making a standing single crochet through the remaining loop/loops of the first chain stitch at the bottom of the first hut. Dc in the next ch. (Sc in the next ch, dc in the next ch) 80 times, remembering that each hut should contain 27 stitches and that the 28th ‘hole’ does not count as a stitch and should be either skipped or decreased as per your preference.
When you get to the end of the row, ch 1 and turn. (162)
Row 2
(Sc in the next dc, dc in the next sc) 81 times. Ch 1 and turn. (162)
Row 3
Repeat Row 2. Ch 1 and bind off. Work away your tails of yarn.

Linen Stitch Border
Change to a 6 mm hook for the border rounds. (Ignore the 5.5 mm hook in my photos.)
Round 1
Using Nijmegen (1712).
Right Side (Left if you are left-handed)
- Starting in the last stitch of the last row of Sand, with the right side facing you: (Sc, ch 1, sc, ch 1) in the same stitch. This is your corner made (Photo 1).
- Working up the side of the blanket: (Sc, ch 1) 2 times into the side of the Sand rows.
- (Sc, ch 1) into the bottom of the hut (into the stitch that contains the last Sand stitch) – see Photo 2.
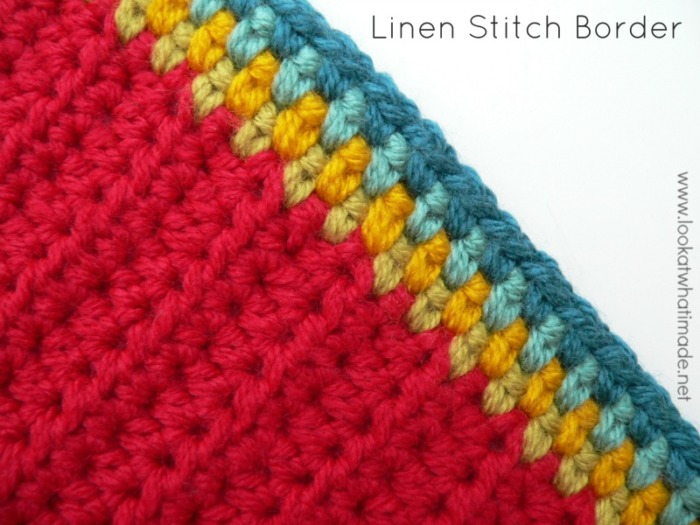
- (Sc, ch 1) into the side of each of the 24 rows of the hut (Photo 5). Tip: Every second stitch will fall just below the visible ridge formed by every second row of the hut (Photos 3 and 4). The photo at the end of the Linen Stitch Border shows the 2 stitches between each ridge really well.
- (Sc, ch 1) into the sewn join between the hut and the Sandy Half-triangle (Photo 6).
- (Sc, ch 1) 11 times evenly into the Sandy Half-triangle, with the last stitch falling just below the ‘holes’ formed by the sc’s made into the foundation chain at the top of the Half-triangle (Photo 7).
- (Sc, ch 1) into the foundation chain that contains the first sc before the ‘Beach’ (Photo 8).
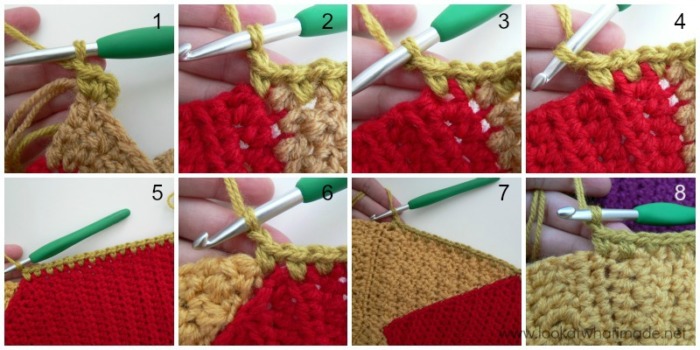
- (Sc, ch 1) into the side of each wave row (for a total of 91).
- (Sc, ch 1, sc, ch 1) into the first stitch of the last row of Waves (Round 92). This is your second corner made.
Top
(Skip the next stitch, sc in the next st, ch 1) 80 times. (Sc, ch 1, sc, ch 1) in the next (last) stitch. This is your third corner made.
Left Side (Right if you are left-handed)
- Working along the side, (sc, ch 1) into the side of each wave row for a total of 91.
- (Sc, ch 1) into the foundation chain that contains the first sc of the ‘Beach’.
- (Sc, ch 1) 11 times evenly into the Sandy Triangle.
- (Sc, ch 1) into the sewn join between the hut and the Sandy Half-triangle.
- (Sc, ch 1) into each row down the side of the hut for a total of 24.
- (Sc, ch 1) into the bottom of the hut (into the stitch that contains the last Sand stitch).
- (Sc, ch 1) 2 times into the side of the Sand rows.
- Working into the first stitch of the last Sand row, (sc, ch 1, sc, ch 1) into the first stitch. This is your last corner made.
Bottom
(Skip the next stitch, sc in the next st, ch 1) 80 times. Join to the first sc with a sl st and fasten off. Work away your tails of yarn.
You should end up with 82 sc’s and 81 ch-1 spaces along the top and the bottom of the blanket. You should have 133 sc’s and 132 ch-1 spaces along the right and left sides of the blanket.
Round 2
Using Eindhoven (1114).
Join your yarn by making a standing single crochet in any ch-1 corner space around. (Ch 1, sc, ch 1) in the same ch-1 space. (Sc, ch 1) in each ch-1 space across.
*(Sc, ch 1, sc, ch 1) in the next ch-1 corner space. (Sc, ch 1) in each ch-1 space across.* Repeat from * to * 2 more times. Join to the first sc with a sl st. Fasten off and work away your tails of yarn.
Round 3
Repeat Round 2 in Ameland (1725).
Round 4
Repeat Round 2 in Dordrecht (1062).
Wow! That was a lot longer than I thought it would be. I hope you have SO MUCH fun with this pattern!
This Pattern was shared on the Link & Share Wednesday Party at Oombawka Design Crochet.

This blog post contains affiliate links. I only link to products I personally use or would use. All opinions are my own.


Lara says
Hi Dedri,
Thank you for this wonderful pattern. All your work is amazing.I
‘ve never crocheted a blanket before (do amigurumi mostly), but couldn’t resist when I saw a photo of this one. I’m nearly done, just the border left to do and my blanket is soooo pretty, but…. very short. Width is okay, 120 cm, but it’s just 125 cm in length. I’ve used the same amounts of yarn as stated in the pattern, so I thought my tension was fine. Will it stretch? Do I need to do something to stretch it, like washing it and drying vertically, before I do the border? Any advice would be appreciated.
Many thanks!
Lara
Dedri Uys says
Hi Lara. I will email you so that you can send me a photo. I think it will help me advise you. Dedri
Maureen Kane says
I love your beach hut blanket and have tried making just the ‘hut’ today but it is very big – I used a 4.5 hook with single double knitting wool. Would you by any chance have just the measurements of the beach hut – I might have missed it in the instructions? I’ve also looked at your other patterns and really love them all. Hopefully will be able to make this one ok.
Jenny says
Try going down a hook size or two, and really tightening up your tension, Maureen. That will help. The huts are made with a double strand of dk yarn, so I would expect yours to come out much smaller.
Jenny :)
Mary E Venegas says
I am always looking for “challenging” patterns for me to make and this one really caught my eye! I can not wait to get started on it, but will have to wait Before I can start on it as I am in the middle of making an afghan for my granddaughter!!! But I WIL get to it soon! Lol Thank you you for sharing this pattern with us that look for more complicated patterns than your usual ones!!
Lulu says
I am a complete beginner and have just finished making this. Thank you so much for a beautiful pattern and great instructions. Love it!
Jenny says
Isn’t it such a happy blanket, Lulu? It will keep you cosy in the cold weather. Jenny :)
Brody Ortega says
Just ordered my yarn. Cannot wait to get started. Beautiful afghan. Brought back good memories. I want to verify that at the end of rows, whether hdc or dc, there is only a ch1, with standard protocol being ch 2 and ch 3 respectively.
Dedri Uys says
Yes, only 1 chain, which doesn’t count as a st. In this particular pattern, it yields a nice, straight edge.
Clair Wall says
I knew there was a reason that beach hut piece appealed to me…
I am a Banana Girl, Born and raised… Durbs….. Visited Mosselbaai only once in my life… beautfiful… looks like I won’t see it again… Thanks for the reminder…
Dedri Uys says
I miss Mosselbaai! I’ve only been to Durban once :)
Dagmar Torres says
Hi, Dedry, this is another Dagmar.
I made the Swanage and the Malmö blanket. This time I did a gauge test and I used the necessary smaller needles for both blankets. They both look great.
There was so much yarn left over and I decided to make a smaller blanket for my grandson with only one strand. As you cannot mix two colours for the sea, I did it alternating the rows. It looks great, weighs only 420 g.
There was still yarn left over, so I made another small one. Both look a lot like the Swanage blanket, because most leftover came from there. The colour pattern was mostly dictated by the amount of yarn I had available.
Because my grandson is only 2 years old and there is still some time until Christmas, I now decided to crochet a selected amount of appliques and use them to make the blanket look even more like a picture of the sea. Not finished yet, but looking forward to it.
This pattern surely had me occupied for a long period. Thank you so much.
Jenny says
Hello Dagmar.
It is great that both blankets have given you so much joy! Have you posted pics of your projects on our Facebook page? We would love to see them!
Jenny
Dedri Uys says
Dagmar, do you have any photos? I’d love to see all your blankets :)
Dagmar says
Fotos are on facebook. As written before, I loved doing them. Thanks
Dedri Uys says
Thank you, Dagmar.
Natalie Everitt says
Dagmar …. where on Facebook have you posted photos? I’d love to see what you created but I can’t find your link anywhere?
Dedri I have also enjoyed making this blanket. Nearly finished and have gone a little off plan. The sand I carried on the same stitch as triangles all the way up to wet sand…and haven’t done wave pattern for sky. Also added extra beach hut which probably was a mistake for first big project as I couldn’t follow your stitch count…doh!
Will post picture when finished….where is best?
Dedri Uys says
Hi Natalie. You can see Dagmar’s gorgeous, playful blanket HERE (Facebook link).
Going off plan is brilliant as long as you roughly know what you are doing :) You can email me photos at dedri(at)lookatwhatimade(dot)net or tag me on instagram with #summerinswanage.
Dagmar says
Dedri, what you do is gorgeous! Thank you very much for inspirations and sharing your patterns. I love the Summer in Swanage blanket. Do you think, it could work as a wall picture, if I use Catona yarn? I think with this yarn I could find alternating colours. Dagmar
Dedri Uys says
Hi and thank you. It would def work for a wall hanging if you use 1 strand of Catona. I would LOVE to see it if you do decide to go ahead :)
Dedri
Dagmar says
Thank you for advice, I will. I want to have it above my bed :-) I will let you know, when it’s there. Dagmar
Dedri Uys says
I look forward to it :)
Jacqueline Lawes says
Hi, I’m busy doing the border for this fantastic blanket and I’ve noticed that you are saying that the 2nd and 3rd corner are on the waves, is it just me should they not be on the sky corners? This is my 1st really big project and I’ve really enjoyed doing it. I’m sorry if it’s me reading your pattern wrong but it’s starting to send me dizzy now .
Many thanks
Jackie
Dedri Uys says
Both the waves and the sky are made from the ‘wave’ pattern. I do not mean the actual waves, but the last row of ‘wave pattern’, which will be the last row of the sky. I will have another look at the pattern.
Dee says
Dedri you and your work are awsome!!! Thank you for sharing your patterns! All the best, Dee
Dedri Uys says
Thank you :)
Kelly Marlene says
Hi I love this pattern! But how could I make it to fit on a twin bed? Do you have a sizing chart or a way I could make it fit a twin bed or at least 60 inches by 90 inches?
Dedri Uys says
Hi. The blanket is just under 50″ by just over 60″. You can always add another Hut and make 40-60 more rows of sea or sky. Or you can add a wider border.
Kelly Marlene says
Thank you!
Niamh says
Hi dedri, someone on the LDOTB CAL posted they are doing a mandala madness and using a smaller hook so it’s tighter as they want to hang it on the wall. Would thus method work with your summer in swanage as I would love to hang beautiful project this on the wall?
Dedri Uys says
Hi Niamh. It would work really well and I think it would make a lovely wall hanging!
Marlene says
Told you….an OBE should be given to you with some land rights in Swanage!!!
Dedri Uys says
Haha. Yes please!
Linda says
Hi Dedri!
Well…I finally finished this wonderful pattern you shared! I can’t tell you how much I enjoyed making it! Never, ever stop sharing your beautiful creations!
Xoxo,
Linda
Dedri Uys says
Thank you, Linda!
Susanne Hansen says
I must say too: I love your parttern too, I’m just by croching your wonderful beach blanket – I will make it with an extra “boot” house, its reminding me of the boots/fishermans houses in black, red, yellow, grey in Scandinavia – thanks for sharing your wonderful pattern – Grettings Sus
Dedri Uys says
Hi Susanne, thank you for your comment :) I look forward to seeing your Scandinavian beach huts :)
Debbie says
I’m new to crochet and trying this as my first project after friends bought it for me for Christmas. I’m just a bit confused about which is the correct first and last stitch that I crochet into as all the tutorials I can find say the chain counts as the first stitch.
Dedri Uys says
Hi Debbie.
Usually the turning chain would count as a stitch, so you won’t work into the stitch at the base of the turning chain (because it already contains this fake chain stitch) and you WILL work into the turning chain at the end of the row (because it counts as a stitch).
In THIS pattern, the turning chains don’t count as stitches, purely because I found that it gave the neatest edge to the blanket. So for THIS pattern, you will make your first stitch in the stitch at the base of the turning chain and that stitch will be stitch 1. The last stitch of your row will fall in the last actual stitch, NOT in the turning chain. If you scroll down to Row 1 of the beach, you will see some photos with arrows. I hope that helps.
Dedri
terra says
What a great work – to do the blanket and than to write the tutorial ! Thank you very much for sharing and respect for all! Greetings from Germany – Sabine.
Dedri Uys says
Thank you, Sabine
Tanya C says
Hi Dedri
Firstly thanks for this fab pattern, the time and effort you give for us. I have a quick clarification question regarding the half sandy triangles. Is one sewn on in reverse, when compared to the other triangles?
I am a bit of a novice at patterns, and this is my first attempt at anything major in crochet in a v long time. I am making two of these, one each for my teenage children as they were giving plenty of oohs and ahhs as I began to make one for me initially!
Regards
Tanya x
Jenny says
The triangles pretty much look the same front and back, so you just make 2 and flip one over :)
Tanya C says
Hi Dedri
A quick question for you regarding the two half triangles. Does one get stitched on back to front? I am returning to crochet after a v long break, making two of these for my teenage children, and want to ensure I make this correctly!
Thanks for your fab pattern and excellent hints/tips they really do help
Kind Regards
Tanya x
Dedri Uys says
Hi Tanya. I have only just seen your comment, I am so sorry. One does get stitched on back to front as the only difference between front and back is a tiny ridge formed by the hdc’s, which becomes insignificant when the blanket is made.
Almudena says
Don’t stop sharing your magic projects. I am still doing your 2014 cal, but I will try this pattern when I finish it.
I think I will have to buy more beds and sofas for all these blankets!
Regrets from Spain
Dedri Uys says
I know what you mean! We have about 3 blankets for each sofa and bed in our house, but I LOVE it :)