Welcome to the Summer in Swanage Pattern! This blanket was inspired by the beach huts of my youth (Mossel Bay and Muizenberg in South Africa). This inspiration was fuelled into flame on our recent trip to Swanage. The pattern is long and wordy (as are most of my patterns) with plenty of photos to help you on your way. I hope you enjoy it!
If you want to see more photos of the completed blanket, you can find them HERE.
Summer in Swanage Crochet Blanket
- Add this Pattern to your Ravelry Queue
- Dutch Translation HERE
- Blank Template (for Colouring in) HERE
Materials
- 2 strands of Double Knit Yarn (#3) – I am using Scheepjes Colour Crafter (see Colours and Colour Packs below)
- 5.5 mm Clover Amour Crochet Hook
(US 9/I UK 5)
- 6 mm Clover Amour crochet hook
(US 10/J UK 4) for border only!
- Yarn needle…sigh
Colours and Colour Packs
You can buy the Summer in Swanage Colour Packs from Wool Warehouse* or Deramores (both retailers ship Internationally). You can also find the individual balls of Colour Crafter on Scheepjeswol.com (NL).
*Wool Warehouse Colour Packs contain a written-only version of the pattern!
If this blanket is a little bit too bright for you, the ‘Birthday in Malmö‘ colourway might suit you better. You can read more about that HERE. And if you prefer using your own unique colourway, you can use this TEMPLATE to help you figure out your colours.
Huts
- Den Helder (1068) – 45 g
- Meppel (1061) – 45 g
- Tilburg (1083) – 45 g
- Maastricht (1246) – 45 g
- Nijmegen (1712) – 70 g
- Eindhoven (1114) – 70 g
Beach
- Gouda (1081) – 140 g (2 skeins)
- Bergen (1420) – 95 g
- Burum (1709) – 60 g
Waves and Sky
- Barneveld (1005) – 40 g
- Urk (1034) – 290 g (3 skeins)
- Alphen (1722) – 120 g (2 skeins)
- Ameland (1725) – 160 g (2 skeins)
- Dordrecht (1062) – 160 g (2 skeins)
- Alkmaar (1708) – 90 g
Abbreviations
US Terminology Used (see this comparative chart for US/UK conversion)
- Ch – Chain
- Sc – Single Crochet
- Sc2tog – Single Crochet 2 Together
- Dc – Double Crochet
- Dc2tog – Double Crochet 2 Together
- Hdc – Half-double Crochet
- Hdc2tog – Half-double Crochet 2 Together
- Tr – Treble Crochet
- Blo – Back Loop Only
- St/st’s – Stitch/Stitches
- * and () – Repeat instructions between * or () the amount of times specified.
Gauge
Using dc stitches (US Terminology): 14 stitches and 8 rows per 10 cm (4”) square.
If you are not meeting the gauge, you can go up or down a hook size until you do achieve the same gauge. If your width is correct, but your height is off, have a look at THIS TUTORIAL. You do not HAVE to achieve the same gauge as me, but you need to keep in mind that your yardages will be different if you don’t.
Size
120 cm x 150 cm (stretches to 170…because it’s heavy!)
Notes
- This blanket is made using 2 strands of double knit yarn held together. You might find it helpful to make 50g yarn cakes of each of the colours that use less than 1 skein of yarn. I use a Stanwood 4 oz Yarn Winder for this. Alternatively, work from the inside AND the outside of the skein. If you do, I cannot guarantee that you will still like me at the end of this blanket.
- The turning chains in this pattern do not count as stitches! Please remember this when joining pieces and when working into joined segments.
Instructions
This blanket is made in parts. The first part consists of Beach Huts and Sandy Triangles that have to be joined together before continuing. The second part consists of the Beach, Waves, and Sky, which are made using the lazy wave stitch pattern. The last part is the border, which is simple and quick.
Beach Huts
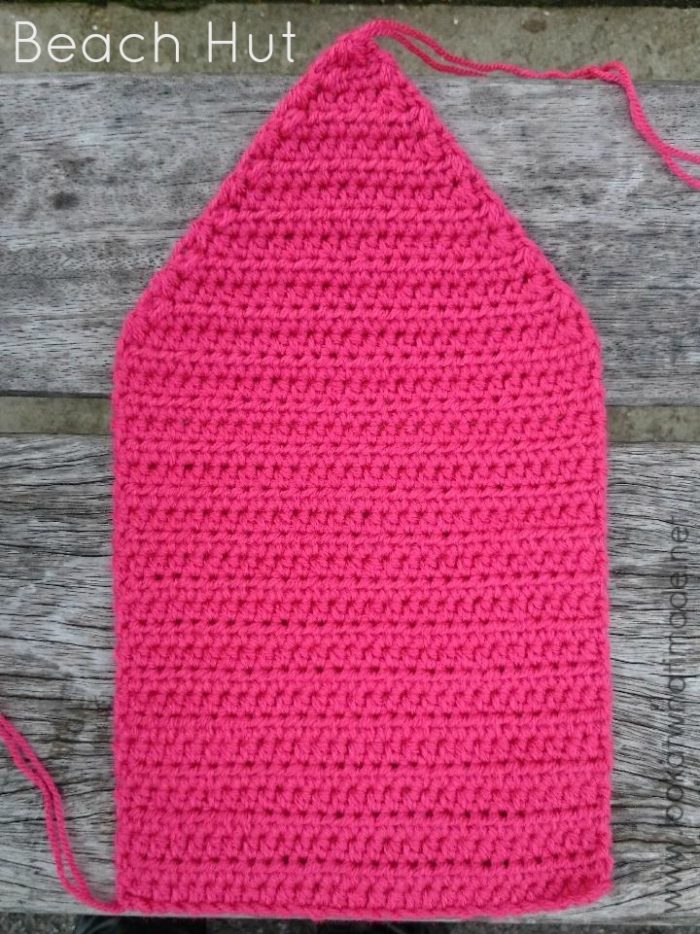
Make one in each of the following colours: Den Helder (1068), Meppel (1061), Tilburg (1083), Maastricht (1246), Nijmegen (1712), and Eindhoven (1114)
- Row 1: Ch 29, leaving a 30 cm (12”) tail of yarn that will later be used to sew the huts together. Hdc in the third chain from the hook and each chain across for a total of 27 hdc’s (initial ch-2 doesn’t count as a stitch). Ch 1 and turn. This ch-1 does not count as a stitch. (27 hdc’s)
- Row 2: Hdc in each hdc across for a total of 27 hdc’s. The last hdc will be slightly tricky to get into. Ch 1 and turn. (27)
- Row 3: Hdc in each hdc across. Ch 1 and turn. (27)
- Rows 4 – 24: Repeat Row 3. (27) When you have turned at the end of Row 24, have a look at your work. Your hook should be to the right (left if you are left-handed). Your initial tail of yarn should be to the left (right if you are left-handed). The hdc’s will form a ridge in every second row, making it easy to count your rows in twos.
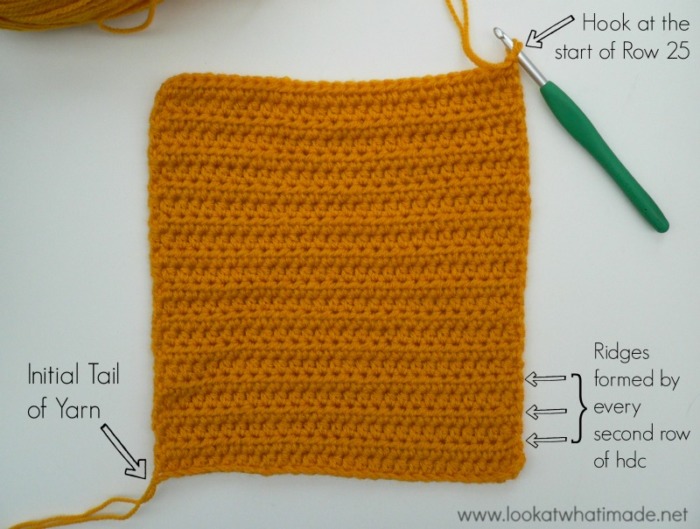
- Row 25: Hdc2tog. Hdc in the next 23 st’s. Hdc2tog. Ch 1 and turn. (25)
- Row 26: Hdc2tog. Hdc in the next 21 st’s. Hdc2tog. Ch 1 and turn. (23)
- Row 27: Hdc2tog. Hdc in the next 19 st’s. Hdc2tog. Ch 1 and turn. (21)
- Row 28: Hdc2tog. Hdc in the next 17 st’s. Hdc2tog. Ch 1 and turn. (19)
- Row 29: Hdc2tog. Hdc in the next 15 st’s. Hdc2tog. Ch 1 and turn. (17)
- Row 30: Hdc2tog. Hdc in the next 13 st’s. Hdc2tog. Ch 1 and turn. (15)
- Row 31: Hdc2tog. Hdc in the next 11 st’s. Hdc2tog. Ch 1 and turn. (13)
- Row 32: Hdc2tog. Hdc in the next 9 st’s. Hdc2tog. Ch 1 and turn. (11)
- Row 33: Hdc2tog. Hdc in the next 7 st’s. Hdc2tog. Ch 1 and turn. (9)
- Row 34: Hdc2tog. Hdc in the next 5 st’s. Hdc2tog. Ch 1 and turn. (7)
- Row 35: Hdc2tog. Hdc in the next 3 st’s. Hdc2tog. Ch 1 and turn. (5)
- Row 36: Hdc2tog. Hdc in the next st. Hdc2tog. Ch 1 and turn. (3)
- Row 37: Hdc3tog. Ch 1 and bind off. (1)
Sandy Triangles
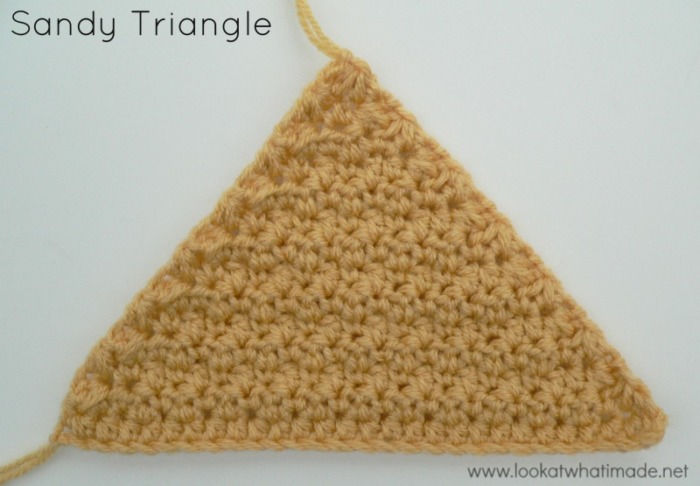
Make 5 in Gouda (1081).
You should make your turning chains loosely; otherwise, your work will pucker. Leave an initial tail of 40 cm (15”) when making the Sandy Triangles.
- Row 1: Ch 29. Hdc in the third chain from the hook and each chain across for a total of 27 hdc’s (initial ch-2 doesn’t count as a stitch). Ch 1 and turn. This ch-1 does not count as a stitch. (27 hdc’s)
- Row 2: Hdc2tog. Hdc in the next st. (Dc in the next st, sc in the next st) 11 times. Hdc2tog. Ch 1, turn. (25)
- Row 3: Hdc2tog. Hdc in the next st. (Dc in the next st, sc in the next st) 10 times. Hdc2tog. Ch 1, turn. (23)
- Row 4: Hdc2tog. Hdc in the next st. (Dc in the next st, sc in the next st) 9 times. Hdc2tog. Ch 1, turn. (21)
- Row 5: Hdc2tog. Hdc in the next st. (Dc in the next st, sc in the next st) 8 times. Hdc2tog. Ch 1, turn. (19)
- Row 6: Hdc2tog. Hdc in the next st. (Dc in the next st, sc in the next st) 7 times. Hdc2tog. Ch 1, turn. (17)
- Row 7: Hdc2tog. Hdc in the next st. (Dc in the next st, sc in the next st) 6 times. Hdc2tog. Ch 1, turn. (15)
- Row 8: Hdc2tog. Hdc in the next st. (Dc in the next st, sc in the next st) 5 times. Hdc2tog. Ch 1, turn. (13)
- Row 9: Hdc2tog. Hdc in the next st. (Dc in the next st, sc in the next st) 4 times. Hdc2tog. Ch 1, turn. (11)
- Row 10: Hdc2tog. Hdc in the next st. (Dc in the next st, sc in the next st) 3 times. Hdc2tog. Ch 1, turn. (9)
- Row 11: Hdc2tog. Hdc in the next st. (Dc in the next st, sc in the next st) 2 times. Hdc2tog. Ch 1, turn. (7)
- Row 12: Hdc2tog. Hdc in the next st. Dc in the next st, sc in the next st. Hdc2tog. Ch 1, turn. (5)
- Row 13: Hdc2tog. Sc in the next st. Hdc2tog. Ch 1, turn. (3)
- Row 14: Hdc3tog. Ch 1 and bind off, leaving a 40 cm (15”) tail of yarn. (1)
Sandy Half-triangle
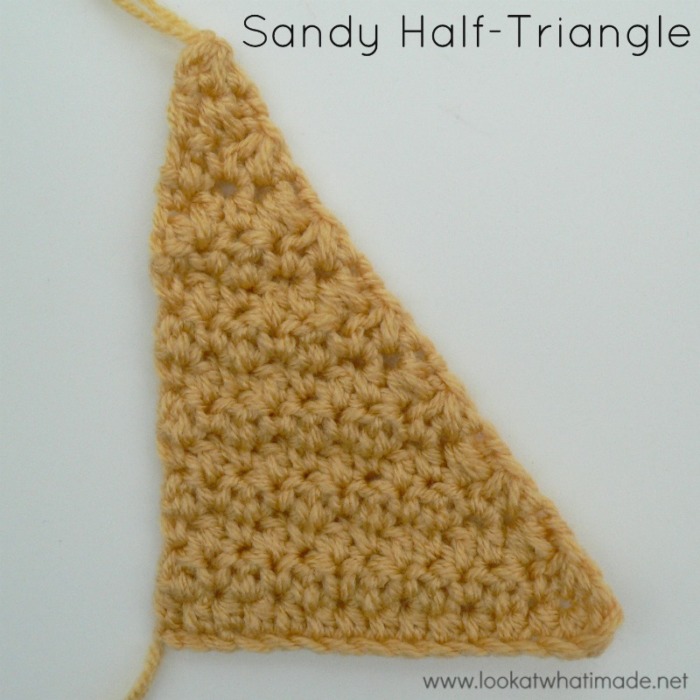
Make 2 in Gouda (1081).
You should make your turning chains loosely, otherwise your work will pucker. Leave an initial tail of 20 cm (7.5”) when making the Half-triangles.
- Row 1: Ch 16. Hdc in the third chain from the hook and each chain across for a total of 14 hdc’s (initial ch-2 doesn’t count as a stitch). Ch 1 and turn. This ch-1 does not count as a stitch. (14 hdc’s)
- Row 2: (Dc in the next st, sc in the next st) 6 times. Hdc2tog. Ch 1 and turn. (13)
- Row 3: Hdc2tog. Hdc in the next st. (Dc in the next st, sc in the next st) 5 times. Ch 1 and turn. (12)
- Row 4: (Dc in the next st, sc in the next st) 5 times. Hdc2tog. Ch 1 and turn. (11)
- Row 5: Hdc2tog. Hdc in the next st. (Dc in the next st, sc in the next st) 4 times. Ch 1 and turn. (10)
- Row 6: (Dc in the next st, sc in the next st) 4 times. Hdc2tog. Ch 1 and turn. (9)
- Row 7: Hdc2tog. Hdc in the next st. (Dc in the next st, sc in the next st) 3 times. Ch 1 and turn. (8)
- Row 8: (Dc in the next st, sc in the next st) 3 times. Hdc2tog. Ch 1 and turn. (7)
- Row 9: Hdc2tog. Hdc in the next st. (Dc in the next st, sc in the next st) 2 times. Ch 1 and turn. (6)
- Row 10: (Dc in the next st, sc in the next st) 2 times. Hdc2tog. Ch 1 and turn. (5)
- Row 11: Hdc2tog. Hdc in the next st. Dc in the next st, sc in the next st. Ch 1 and turn. (4)
- Row 12: Dc in the next st, sc in the next st. Hdc2tog. Ch 1 and turn. (3)
- Row 13: Hdc2tog. Hdc in the next st. Ch 1 and turn. (2)
- Row 14: Dc2tog. Ch 1 and bind off. (1)
Assembling the Huts and Triangles
Attaching the Huts to Each Other
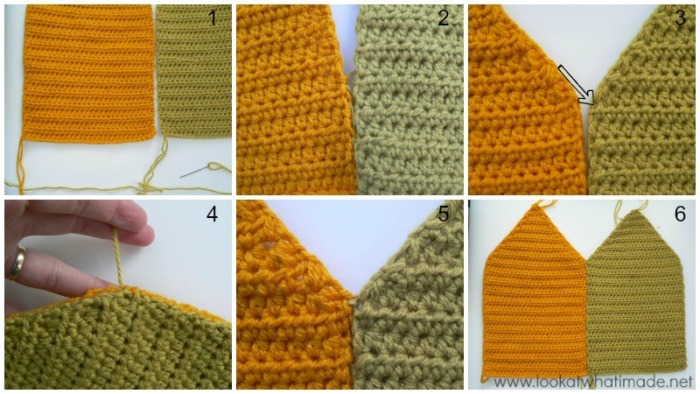
The right sides of the huts will be facing you when the initial tail of yarn is to the left (to the right if you are left-handed) – see Photo 1.
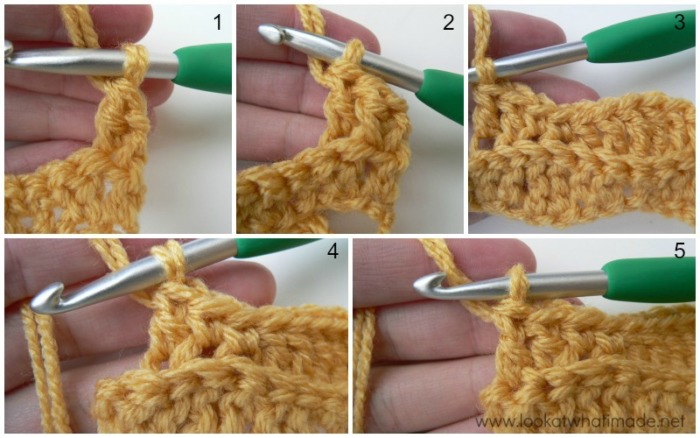
Attach the huts to each other with whip stitches, using the initial tail of yarn from the hut on the right (left if you are left-handed) – see Photo 2. It is important to note that you will get a better result if you make your whip stitches through a loop to the back of each hut, instead of through a loop on the side of the huts, as your stitches will be much less visible. Start at the bottom of the huts and end in Row 24 of the huts, just above the visible ridge below the first hdc2tog’s of Row 25 (indicated with an arrow in Photo 3 and illustrated in Photos 4 and 5).
Continue in this way until you have attached each of the 6 huts to their adjacent huts.
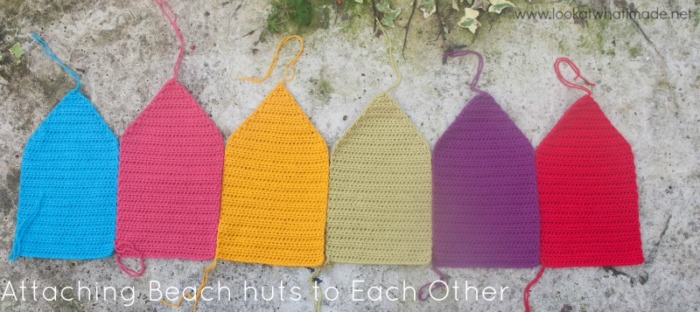
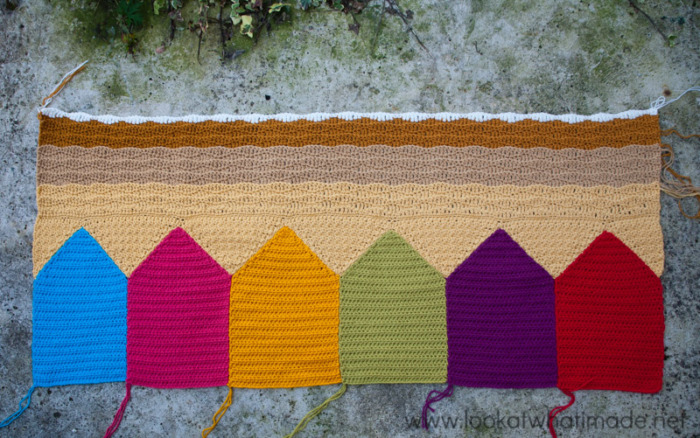
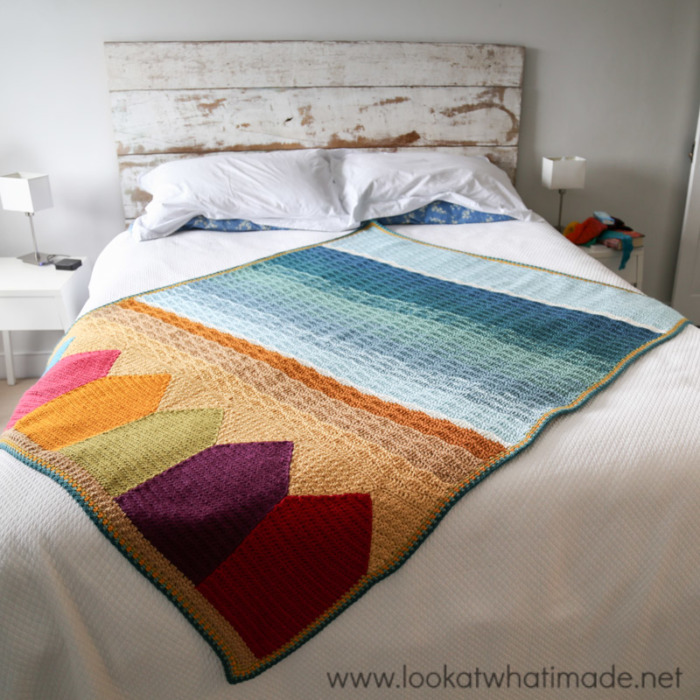
Use the photo below as a guide for which hut should go where.
Attaching the Triangles to the Huts
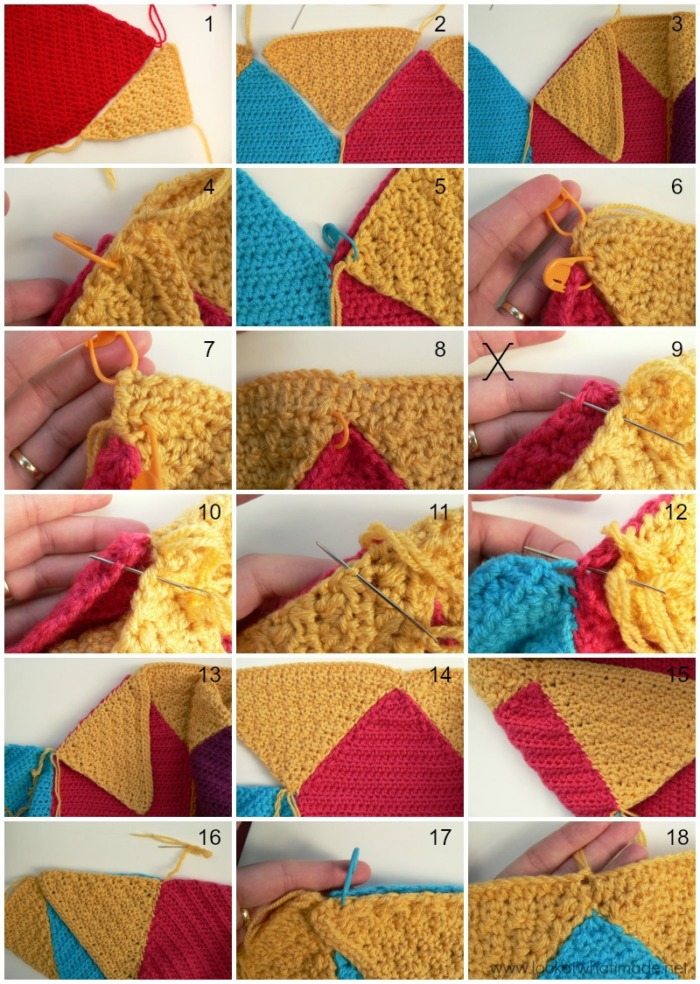
You will sew the Sandy Triangles and Half-triangles into the triangular spaces between the huts using whip stitches and the initial tails of yarn from the triangles. This can be a bit fiddly, so I am going to take you through it step by step.
You will need to sew a Half-triangle to the side of the first Beach Hut on the right (left if you are left-handed). Line the second row of one of the Half-triangles up with the point of the roof of the Beach Hut. Line the last row of the Half-triangle up to Row 24 of the Beach Hut (just above the visible ridge described above) – see Photo 1. Use whip stitches and the initial tail of yarn from the Half-triangle to sew it to the side of the Beach Hut roof. The last Half-triangle will be attached in the same way. Please note that the first row of the Half-triangle should still be unattached, as you will be attaching the first row of the next Triangle to it. Also note that the Half-triangle might bulge a bit where it meets the hut. The bulge will be corrected when you make the border.
Place the next Triangle into the space between the first and second huts (Photo 2). Fold the Triangle onto the Beach hut as shown in Photo 3. Line the second row of the Triangle up with the point of the Beach Hut. I suggest using a stitch marker to secure the two layers together (Photo 4). Line the point of the Triangle up with Row 24 of the Beach Hut and secure it with a stitch marker (Photo 5). Use another stitch marker to join the foundation chains of the two triangles together (Photo 6).
Using whip stitches, sew Row 1 of the Triangle to Row 1 of the Half-triangle (Photo 7). Photo 8 shows this join from the front.
Sew the Triangle to the side of the Beach Hut’s roof. Do not work into the side of the Beach Hut’s roof (Photo 9). Instead, try to insert your needle into any edge loop at the back of the Beach Hut’s roof (Photo 10) and into any edge loop at the front of the Triangle (Photo 11) so that your join won’t show from the front of your work when you open it up (Photo 14).
Your last stitch should fall in the tip of the Triangle and in the stitch of Row 24 of the Beach Hut that already contains a whip stitch from when you joined the huts to each other (Photo 12).
Photo 13 shows the join completed. Photo 14 shows the join from the front (neat) and Photo 15 shows it from the back (less neat).
Line the other side of the Triangle up with the side of the next Beach Hut’s roof (Photo 16), lining Row 2 of the Triangle up with the tip of the next Beach Hut and securing it with a stitch marker (Photo 17). Attach this side as before. Continue in this way until you have joined all the Triangles and Half-triangles to the Beach Huts.
Photo 18 illustrates what the join should look like at the top of each Beach Hut.
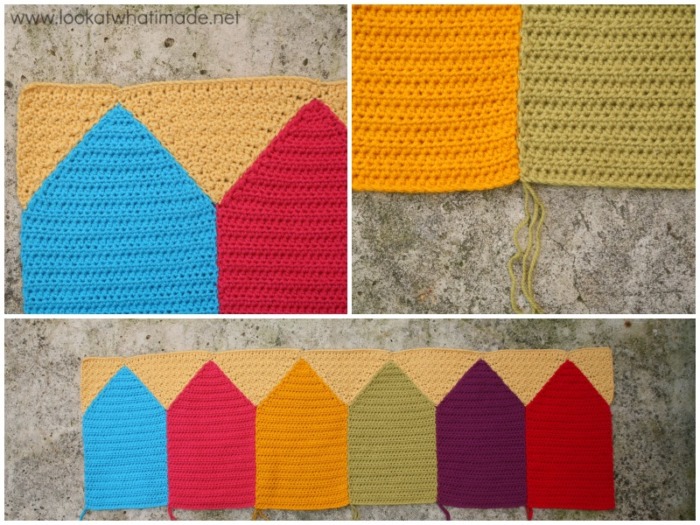
Below you can see what the joins should look like.
Now that you have attached the Triangles to the Beach huts, it’s time to start on the Beach, Wea, and Sky.
Beach, Waves, and Sky
Note
To start the Beach, you will need to make 162 stitches across the top of the Sandy Triangles. You will make 14 stitches into the top of the first half-triangle, 27 stitches into the top of each Triangle, and 13 stitches into the top of the last Half-triangle (see detailed instructions for Foundation Row below).
Remember that the initial ch-2’s of the triangles don’t count as a stitch, but they still take up a space, so you might need to fudge it slightly when you get to the end of each triangle. If you need to get rid of an extra loop, the best way to do this is to sc2tog.
Foundation Row (Single Crochet)
Worked in Single Crochet with Gouda (1081).
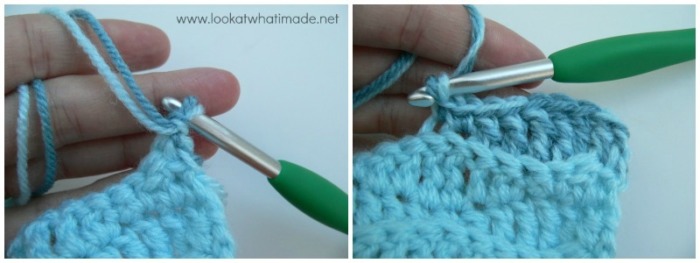
With right side facing, join your yarn by making a standing single crochet in the remaining loop/loops of the first chain stitch of the first Half-triangle (Photo 1). Make 13 more sc’s into the top of the first Half-triangle, increasing or decreasing as needed – Photos 2 and 3 (see Note above).
Make 27 sc’s into the top of each Triangle, again increasing or decreasing as needed (Photo 4). Make 13 sc’s into the top of the last Half-triangle, decreasing as needed. You should now have 162 sc’s. Ch 1 and turn. This ch st does not count as a stitch.
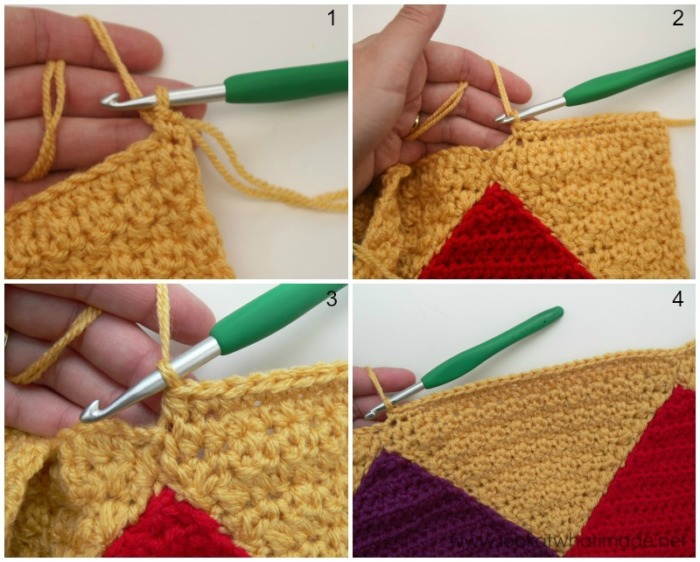
Row 1
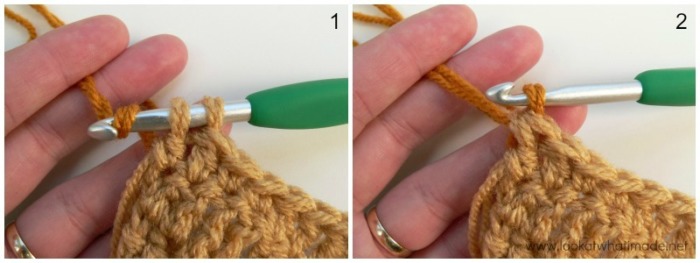
Dc in the first 2 st’s. Remember that the turning chain does not count as a stitch, so you should work into the very first available stitch (indicated with an arrow in Photo 1). *Tr in the next 2 st’s, dc in the next 2 st’s, sc in the next 2 st’s, dc in the next 2 st’s (Photo 2)*.
Repeat from * to * until you reach the end of the row (Photo 3). The last st of the last repeat should fall in the standing single crochet. Ch 1 and turn (Photo 4). This ch st does not count as a st.
Stitch Count: 162 st’s {40 sc’s, 82 dc’s, and 40 tr’s}
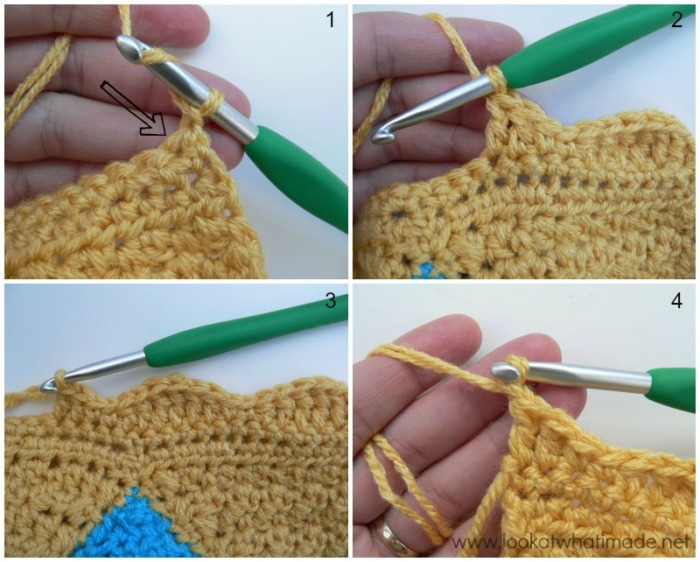
Row 2
Dc in the same st as the turning chain (indicated with an arrow in Photo 1). Dc in the next dc. *Tr in the next 2 sc’s, dc in the next 2 dc’s, sc in the next 2 tr’s, dc in the next 2 dc’s (Photo 2)*.
Repeat from * to * until you reach the end of the row. The last st of the last repeat should fall in the last dc, not in the turning chain (which doesn’t count as a stitch). Ch 1 and turn. This ch st does not count as a st.
Stitch Count: 162 st’s {40 sc’s, 82 dc’s, and 40 tr’s}
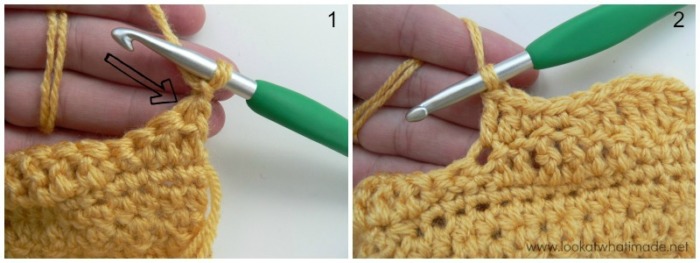
Row 3
Dc in the next 2 dc’s. *Tr in the next 2 sc’s, dc in the next 2 dc’s, sc in the next 2 tr’s, dc in the next 2 dc’s*. Repeat from * to * until you reach the end of the row. Ch 1 and turn. This ch st does not count as a st.
Stitch Count: 162 st’s {40 sc’s, 82 dc’s, and 40 tr’s}
Row 4
Except for the first and last stitches of this row, the row is worked in the back loop only! The back loops won’t be visible from the front of your work, so you will have to tilt the top of your stitches towards you in order to see them.
Photo 1 below shows the work tilted forward with the back loops visible (arrow). Photo 2 shows the hook inserted into the back loop only.
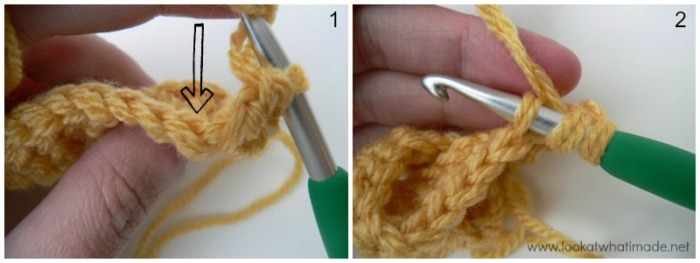
Dc in the same st as the turning chain (Photo 1). Dc in the blo of the next dc (Photo 2). *Tr in the blo of the next 2 sc’s, dc in the blo of the next 2 dc’s, sc in the blo of the next 2 tr’s, dc in the blo of the next 2 dc’s (Photo 3)*.
Repeat from * to * until you reach the end of the row, making the last dc of the row through both loops (Photo 5). Ch 1 and turn. This ch st does not count as a st.
Stitch Count: 162 st’s {40 sc’s, 82 dc’s, and 40 tr’s}
Rows 5 to 71 (Beach and Waves)
Repeat Rows 3 and 4 so that every second row (every even-numbered row) is worked in the back loop only, with the right side of the work facing you. Below, you will find a list of which rows are worked in which colour.
Rows 72 to 91 (Sky)
Repeat Row 3. In other words, work through both loops of every stitch for each row.
Changing Colour
Change colour on the last yarn-over of the last dc of the relevant row. Don’t forget the turning ch-1 at the end of each row!
Colours for the Beach
- Row 5 – Gouda (1081) – 1 Row
- Rows 6 to 11 – Bergen (1420) – 6 Rows
- Rows 12 to 16 – Burum (1709) – 5 Rows
- Row 17 – Barneveld (1005) – 1 Row
Colours for the Waves
For the waves, you will be creating an ombre effect by swapping one strand of yarn at the end of every 6th row. For example, the first 6 rows will be made in 2 strands of Urk, the next 6 rows will be made in one strand of Urk and one strand of Alphen, and the next 6 rows will be made in 2 strands of Alphen.
- Rows 18 – 23 – Urk (1034) – 6 Rows. Cut 1 strand of the Urk and add in one strand of Alphen (1722).
- Rows 24 – 29 – Urk (1034) and Alphen (1722) – 6 Rows. Cut the other strand of Urk and add in one more strand of Alphen.
Swapping One Strand of Yarn
- Rows 30 – 35 – Alphen (1722) – 6 Rows. Cut 1 strand of Alphen and add in one strand of Ameland.
- Rows 36 – 41 – Alphen (1722) and Ameland (1725) – 6 Rows. Cut the other strand of Alphen and add in one more strand of Ameland.
- Rows 42 – 47 – Ameland (1725) – 6 Rows. Cut 1 strand of Ameland and add in one strand of Dordrecht (1062).
- Rows 48 – 53 – Ameland (1725) and Dordrecht (1062) – 6 Rows. Cut the other strand of Ameland and add in one more strand of Dordrecht.
- Rows 54 – 59 – Dordrecht (1062) – 6 Rows. Cut 1 strand of Dordrecht and add in one strand of Alkmaar (1708).
- Rows 60 – 65 – Dordrecht and Alkmaar – 6 Rows. Cut the other strand of Dordrecht and add in one more strand of Alkmaar.
- Rows 66 – 71 – Alkmaar (1708) – 6 Rows. Cut both strands of Alkmaar and add in 2 strands of Barneveld (1005).
Colours for the Sky
For the remainder of the blanket, you will work through both loops for every stitch and row.
- Rows 72 – 73 – Barneveld (1005) – 2 Rows, both rows worked through both loops! Cut both strands and add in 2 strands of Urk (1034).
- Rows 74– 91 – Urk (1034) – 18 Rows, working through both loops!
Row 92
Hdc in the same st as the turning chain. Hdc in the next dc. *Dc in the next 2 sc’s, hdc in the next 2 dc’s, sc in the next 2 tr’s, hdc in the next 2 dc’s*.
Repeat from * to * until you reach the end of the row. The last st of the last repeat should fall in the last dc. Ch 1 and fasten off. Work away your tails of yarn.
Stitch Count: 162 st’s {40 sc’s, 82 hdc’s, and 40 dc’s}
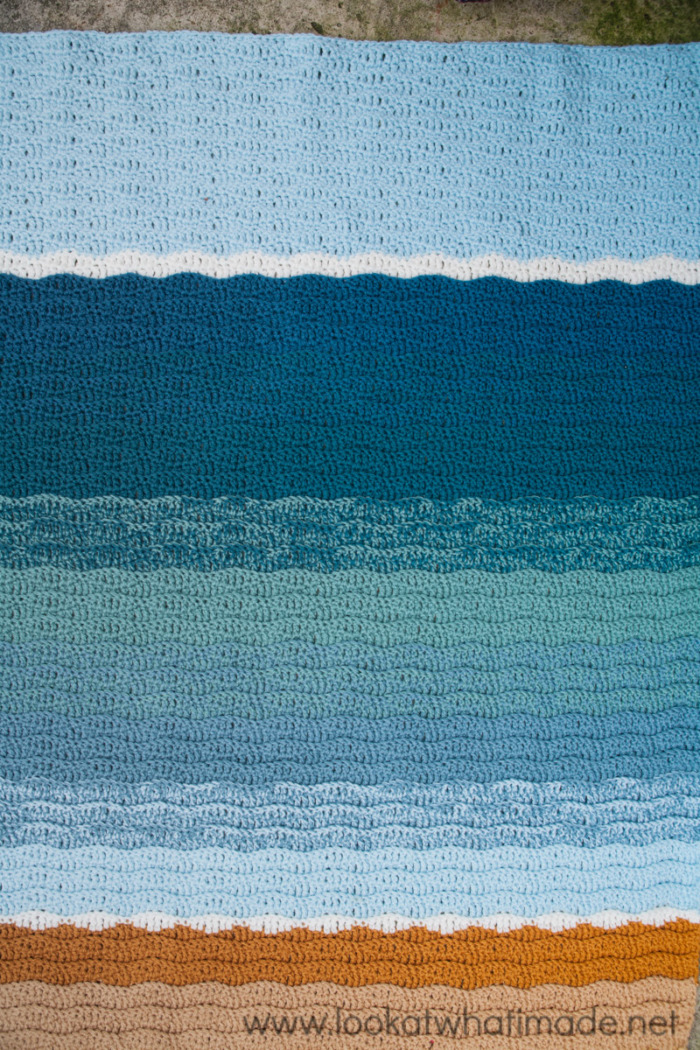
Sand Below Huts
Use Bergen (1420).
As when working into the tops of the triangles, you will be making 27 stitches into the bottom of each hut, decreasing as needed to compensate for the initial ch-2’s of the huts (which don’t count as a stitch).
Row 1
With right side facing, join your yarn by making a standing single crochet through the remaining loop/loops of the first chain stitch at the bottom of the first hut. Dc in the next ch. (Sc in the next ch, dc in the next ch) 80 times, remembering that each hut should contain 27 stitches and that the 28th ‘hole’ does not count as a stitch and should be either skipped or decreased as per your preference.
When you get to the end of the row, ch 1 and turn. (162)
Row 2
(Sc in the next dc, dc in the next sc) 81 times. Ch 1 and turn. (162)
Row 3
Repeat Row 2. Ch 1 and bind off. Work away your tails of yarn.

Linen Stitch Border
Change to a 6 mm hook for the border rounds. (Ignore the 5.5 mm hook in my photos.)
Round 1
Using Nijmegen (1712).
Right Side (Left if you are left-handed)
- Starting in the last stitch of the last row of Sand, with the right side facing you: (Sc, ch 1, sc, ch 1) in the same stitch. This is your corner made (Photo 1).
- Working up the side of the blanket: (Sc, ch 1) 2 times into the side of the Sand rows.
- (Sc, ch 1) into the bottom of the hut (into the stitch that contains the last Sand stitch) – see Photo 2.
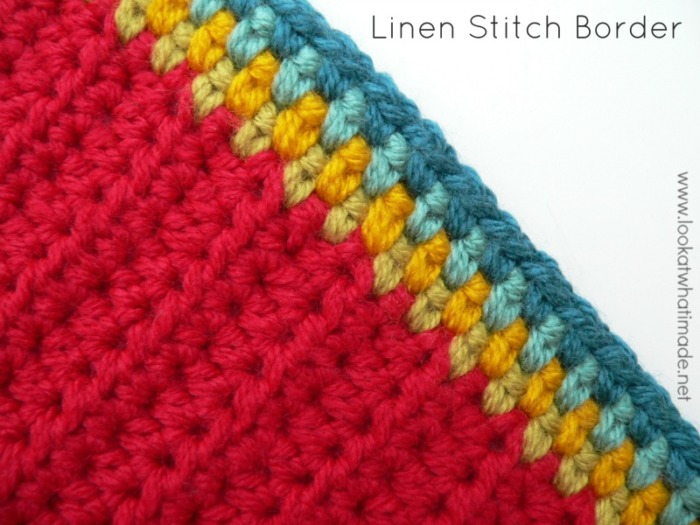
- (Sc, ch 1) into the side of each of the 24 rows of the hut (Photo 5). Tip: Every second stitch will fall just below the visible ridge formed by every second row of the hut (Photos 3 and 4). The photo at the end of the Linen Stitch Border shows the 2 stitches between each ridge really well.
- (Sc, ch 1) into the sewn join between the hut and the Sandy Half-triangle (Photo 6).
- (Sc, ch 1) 11 times evenly into the Sandy Half-triangle, with the last stitch falling just below the ‘holes’ formed by the sc’s made into the foundation chain at the top of the Half-triangle (Photo 7).
- (Sc, ch 1) into the foundation chain that contains the first sc before the ‘Beach’ (Photo 8).
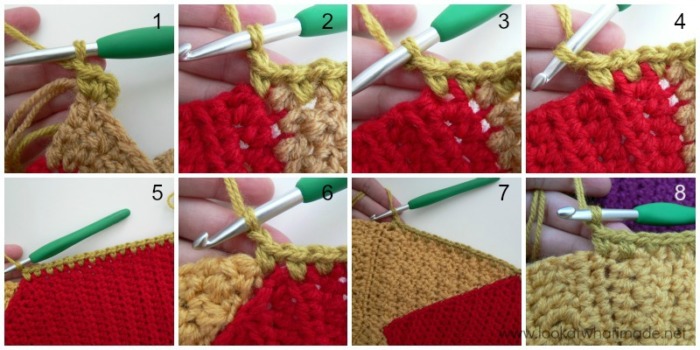
- (Sc, ch 1) into the side of each wave row (for a total of 91).
- (Sc, ch 1, sc, ch 1) into the first stitch of the last row of Waves (Round 92). This is your second corner made.
Top
(Skip the next stitch, sc in the next st, ch 1) 80 times. (Sc, ch 1, sc, ch 1) in the next (last) stitch. This is your third corner made.
Left Side (Right if you are left-handed)
- Working along the side, (sc, ch 1) into the side of each wave row for a total of 91.
- (Sc, ch 1) into the foundation chain that contains the first sc of the ‘Beach’.
- (Sc, ch 1) 11 times evenly into the Sandy Triangle.
- (Sc, ch 1) into the sewn join between the hut and the Sandy Half-triangle.
- (Sc, ch 1) into each row down the side of the hut for a total of 24.
- (Sc, ch 1) into the bottom of the hut (into the stitch that contains the last Sand stitch).
- (Sc, ch 1) 2 times into the side of the Sand rows.
- Working into the first stitch of the last Sand row, (sc, ch 1, sc, ch 1) into the first stitch. This is your last corner made.
Bottom
(Skip the next stitch, sc in the next st, ch 1) 80 times. Join to the first sc with a sl st and fasten off. Work away your tails of yarn.
You should end up with 82 sc’s and 81 ch-1 spaces along the top and the bottom of the blanket. You should have 133 sc’s and 132 ch-1 spaces along the right and left sides of the blanket.
Round 2
Using Eindhoven (1114).
Join your yarn by making a standing single crochet in any ch-1 corner space around. (Ch 1, sc, ch 1) in the same ch-1 space. (Sc, ch 1) in each ch-1 space across.
*(Sc, ch 1, sc, ch 1) in the next ch-1 corner space. (Sc, ch 1) in each ch-1 space across.* Repeat from * to * 2 more times. Join to the first sc with a sl st. Fasten off and work away your tails of yarn.
Round 3
Repeat Round 2 in Ameland (1725).
Round 4
Repeat Round 2 in Dordrecht (1062).
Wow! That was a lot longer than I thought it would be. I hope you have SO MUCH fun with this pattern!
This Pattern was shared on the Link & Share Wednesday Party at Oombawka Design Crochet.

This blog post contains affiliate links. I only link to products I personally use or would use. All opinions are my own.


Lee Ann says
Wow, Dedri! You’ve done it again with another outstanding design!
I absolutely love this!!!!! Thank you very, very much! :)
Dedri Uys says
Aw, thank you, Lee Ann :)
Janine C says
This is gorgeous!
Jana says
Oh Dedri this is just beautiful!
I want to make this as well but I’m not wild about the huts. They are cute, but I have always wanted to make a blanket with sea colors… so I’m thinking just the sand and waves, ocean and sky.
You will not be hurt will you? I hope not because I want to thank you for the lovely pattern. I have yet to make a Sophie but it’s on my list, pretty high up!
Thank you for your wonderful pattern, wonderful print button that makes PDFs and wonderful you!!
Jana
Dedri Uys says
Jana, feel free to do whatever you feel led to do. That’s the beauty of creating :)
Margaret says
I’ve just come across this pattern. I must have a go at making this as it has a special interest for me. We have a static caravan holiday home in Swanage, Dorset, UK. It would be lovely in our van.
Dedri Uys says
Oh, I hope you do make one! A Summer in Swanage…in Swanage :)
Felicity says
Hello there Dedri,
This blanket pattern is absolutely stunning!! I absolutely love the coast and wish I could live by the sea – I may just have to make this blanket!!
I was wondering if you could help me choose the colours that I would need, and the amounts needed, to make this blanket in Stylecraft a Special DK and/or Woolcraft New Fashion DK, please? I would love to use the Scheepjes yarn but sadly I can’t afford it!
Thank you so much for any help you can offer me, and for this amazing pattern!
Best wishes,
Felicity
Jenny says
Felicity, Stylecraft special DK is 295 metres per 100g ball (Scheepjes is 300 metres per ball).
Dedri tells you how many balls of each colour of Scheepjes you need, so working it out should be pretty easy. I would use the same amount of balls in Stylecraft colours that you like.
Choose from the Stylecraft colours to match the number of sand colours there are and the same with the sea colours. The huts you can pick your favourite colours too. Let your imagination go wild :) Jenny
Brenda says
This is absolutely fabulous and can only have been created by a very generous genius. Thank you.
Have promised to make one for my sisters holiday cottage for her 50th birthday…..
Soooooo looking forward to see it complete.
Wish there were more kind souls in this world like you Deirdre
Rachel says
I keep coming back to look at this afghan. It takes my breath away every time.The tranquility in it is awesome. thank you.
Dedri Uys says
I am so glad you like it, Rachel :)
Donna K says
I just adore this pattern and couldn’t wait to get started on it! But I must be doing something awfully wrong, because I’ve used 50g of yarn, (8ply, double strand – either end of the ball) and a 5.5 hook, but I’ve only got ten rows on the first hut! To get to 24 rows I’ll need another 75 g (which will make 125g, but then I’ve got the roof to go so that would be around 150g or 200g for each hut. 27 hdcs is 27cm across, 10 rows is just under 13cms high. That makes the width, if I keep going, 6 x 27cm wide = 162cm wide without borders.
I’m just a little baffled at what I’ve done so very wrong :-) Any suggestions gratefully received!
Dedri Uys says
Hi Donna.
I am happy to help you, but I will need to check a few things with you.
Did you make a gauge swatch before you started? You should get 14 st’s and 8 rows in a 10 cm (4″) square if making a dc swatch. You should get 14 st’s and 12 rows in a 10 cm square if you are making a hdc swatch. The huts should be just under 20 cm wide. It sounds to me like you either crochet very loosely or you are maybe using a thicker yarn than I am using (which I think is what has happened)? Your first 10 rows are 7 cm wider and 4.5 cm higher than they need to be for the yardages suggested.
Can you tell me the name of the yarn you are using and we will take it from there?
Dedri
Karlijn says
Thank you so much for the beautiful pattern! I’m a little bit confused about the yarn I should use. Deramores said 21 and when I’m counting I’m getting at 23…
Dedri Uys says
Hi Karlijn. There are only 21 skeins listed. If you let me know how you get 23 I can help you?
Karlijn says
I was not confused, Deramores was. The 21 skeins is absolutely correct! I already finished your blanket and I really, really love it! So much, I’m gonna make another one and try to work as neat as you do.
Thank you soo much for all the hours of fun I had with your absolutely beautiful pattern!
Love,
Karlijn
Molly says
My mother desperately wants me to make this for her but the double strand would be way too much… She lives in Hawaii! What would it look like if I did this in only a single strand? I’m sorry to question your beautiful pattern, she is just in love with it! Just trying to make my Mama happy!
Dedri Uys says
Hi Molly. If you made it in a single strand it would come out as a baby blanket size, but you could always continue adding rounds around the outside to make it a large blanket with a central sea-side panel. Alternatively you could make 12 huts and more repeats and rows?
Karlijn says
Hello Molly, I was worried about the double strand, but it’s very easy to do!
Jo Navin says
Dedri this blanket is stunning ! I love how the colours worked out and your ombré effect is genius⛵️♥️ You’re so generous to make this fab tutorial for free! Love Jo xxx
Dedri Uys says
Thank you, Jo! And thank you for helping me to decide on the colours!!
Tatsiana says
This is AMAZING blanket, Dedri! Thank you very much for sharing free pattern. You are a true artist! and I also hope to make one for myself.
Dedri Uys says
Thank you, Tatsiana!
Krikit says
Hi there!
Lately, no matter how I try to alleviate it, using your printer friendly button to download a PDF copy of your latest 2 patterns, the picture will not show up in the download, just a blank frame where a photo should be. I use an iPad, and have not had any previous problems. Has anyone else mentioned this issue? Do you have any suggestion of how I can get the PDF to include the photos?
Dedri Uys says
Hi,
I am sorry you are having problems with the images. I have printed successfully using Chrome. Which browser are you using so that I can try to emulate the problem?
fairyhedgehog says
That’s such a beautiful blanket. I love your choices of colours, textures, and techniques. It was a joy just reading through the pattern!
Dedri Uys says
Thank you!!
sue-anne says
Thanks so much for the pattern I can’t wait to make it. The colours are perfect for the beach!!
jenneke van maurik says
https://www.facebook.com/jennekevm?fref=ts here i have linked youre pattern ♥♥ x jenneke
Dedri Uys says
Thank you :)
Susan says
Thank you so much for this pattern it’s fantastic
Monika Llau says
Dear Dedri,
you rally make me speechless. First your wonderful Sophie which has made me so much fun (and still does) and now another beautiful free pattern from you. You are a very kind warm-hearted person. This makes me very happy, thank you so much.
xxx
Monika
Melissa says
This is so lovely, my mum really loves the beach, I hope to make this for her in time for Mother’s Day next year.
Jenny says
That will be a lovely gift indeed :)
Wendy says
I really like this design …reminds me of my favourite beach in summer !