Welcome to this pattern for Pockets of Joy – Dedri. This square is part of a series of stand-alone patterns designed to celebrate the many Pockets of Joy we experienced at the Crochet Guild of Australia’s National Crochet Conference in Sydney.
![]()
I wish I could convey just how much fun I had at the conference. I met so many wonderful people, including Jenny King (I got to wear her beautiful Lily the Pink on the runway), Wendy Thompson of Mosaic Bookcase fame, Erinna Lee (amazing Amigurumi), Kelly Lonergan (tech editor), and the lovely Maya and her mom. I also saw some familiar faces from when I went on the Cruise in 2019 to run workshops for Mary’s Memory and My Voyage Shawl!
And we laughed. A LOT! If you skip to the very end of the video tutorial for this pattern, you’ll see a little behind-the-scenes mischief :) Don’t worry, Shelley was not harmed in the making of the video.
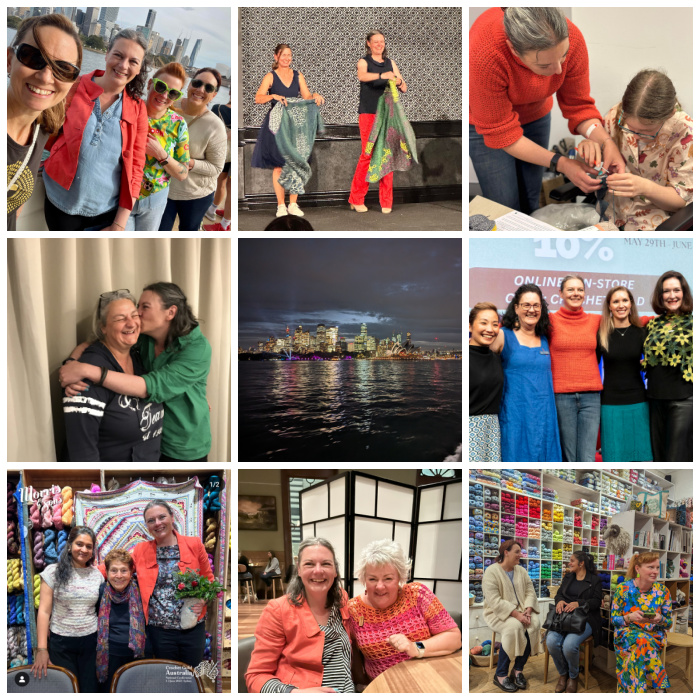
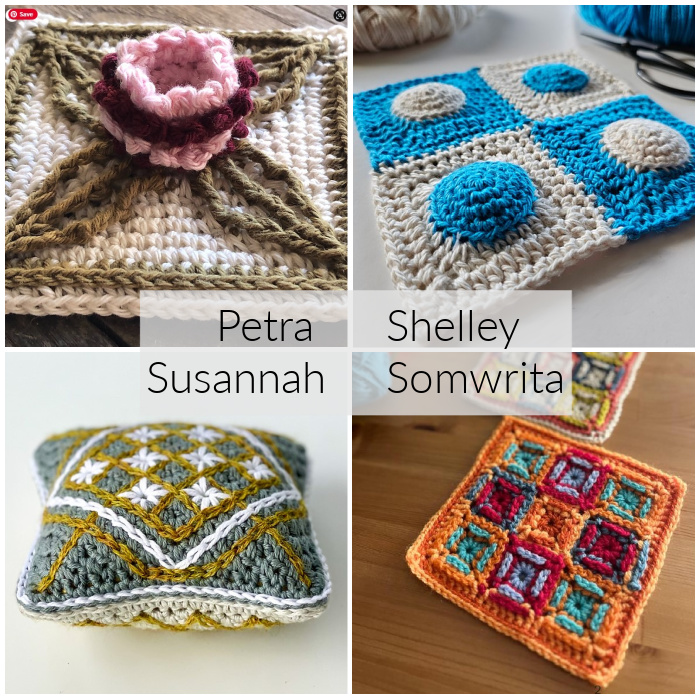
When I told my sister about the conference and ‘all the pockets of joy’ I had experienced, she suggested doing a series of patterns around this idea. When a few of us went out for dinner one night, I told them about it, and they embraced the idea of creating their own little pockets of joy, each in their own style.
You can find their patterns HERE:
- Pockets of Joy Petra (Free for Crochet Guild Australia members, paid pattern on Ravelry)
- Pockets of Joy Shelley (Free pattern on Shelley’s App)
- Pockets of Joy Somwrita (Free pattern on Ravelry)
- Pockets of Joy Susannah (Paid pattern on Ravelry)
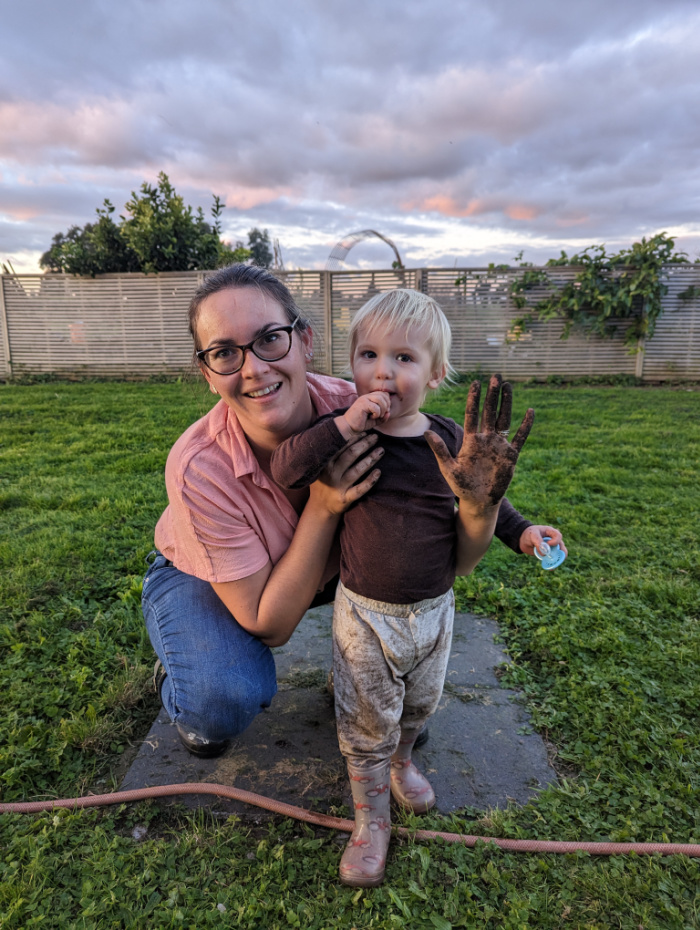
After my week in Australia, I spent a week with my sister and her family to celebrate my nephew’s second birthday. That was the biggest pocket of joy. A GIANT-SIZED pocket of joy! I’m sharing my favourite picture from the visit – my sister and Greyson doing what they love most: digging in the dirt! Now you know the faces behind the ‘I Carry Your Heart’ Mandala.
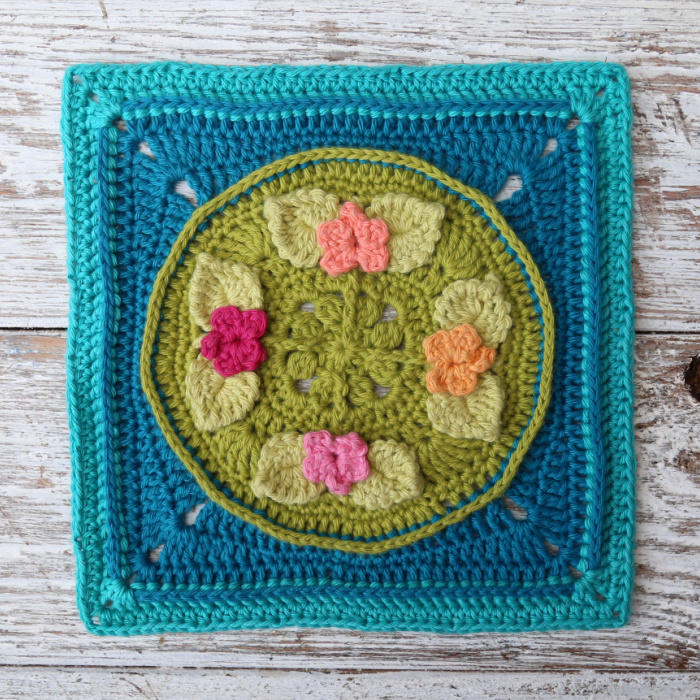
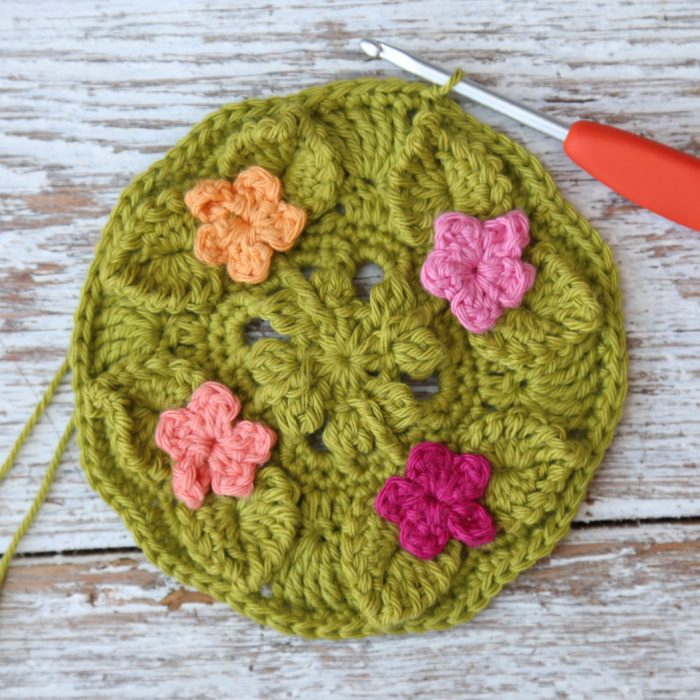
Righto, back to my Pockets of Joy square. I used Scheepjes Organicon left over from the Maya’s Meadow CAL and a 3.25mm hook. The Flowers and tunisian-style leaves in this square were actually part of the first border I tried for Maya. Sadly, it added nothing to the blanket, so I designed a square specifically to showcase them.
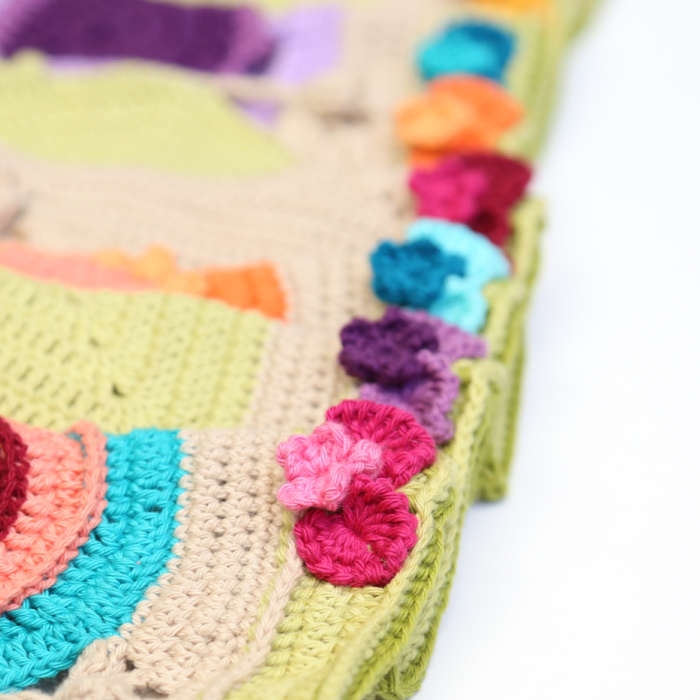
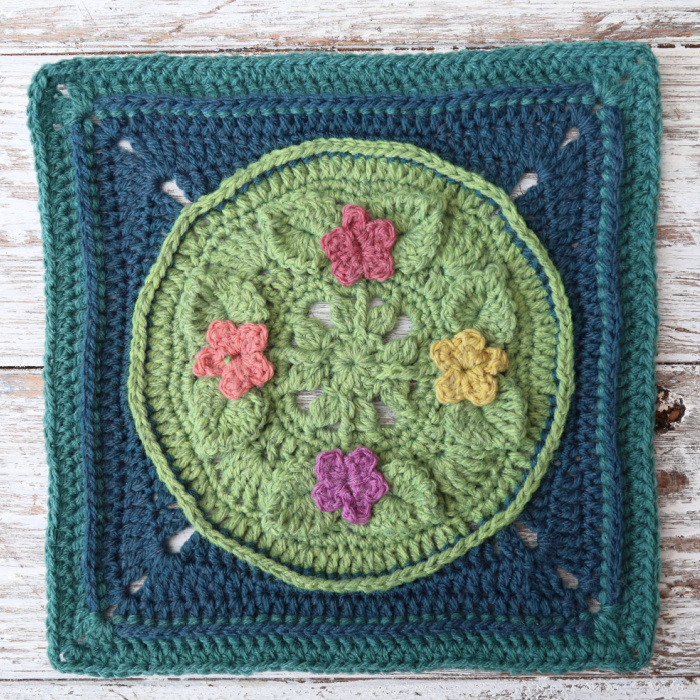
I have also made one in Scheepjes Scrumptious (which is a double knit yarn), using the same colours as for my Daisy’s Bouquet Square and a 4mm hook.
The square has a final-round stitch count of 40 stitches and will be compatible with any square with a similar or the same final-round stitch count. Provided, of course, that you use the same hook and yarn to make your squares.
Pockets of Joy – Dedri {Crochet Square Pattern}
© Dedri Uys 2023. All Rights Reserved.
Video Tutorials
If you need more help with any aspect of this pattern, especially making the Leaves, please see the video tutorials HERE:
A paid PDF is also available on Ravelry HERE. It includes a photo tutorial and a written-only pattern.
Abbreviations
US Terminology
- Beg – Beginning
- BP – Back post
- Ch – Chain
- Dc – Double crochet
- Edc – Extended double crochet (See Special Stitches)
- FP – Front post
- Hdc – Half-double crochet
- Rep – Repeat
- Sc – Single crochet
- Sp/sps – Space/spaces
- St/sts – Stitch/stitches
- SM – Stitch Marker
- Tr – Treble crochet
Punctuation
- * – repeat instructions between asterisks the number of times specified.
- () – repeat instructions between parentheses the number of times specified.
- [] – square brackets are used to indicate stitches to be made in the same st/sp.
Special Stitches
2-dc Bobble
Yarn over and insert your hook into the indicated st/sp. Yarn over and pull up a loop. Yarn over and pull through 2 loops. Yarn over and insert your hook into the same st/sp. Yarn over and pull up a loop. Yarn over and pull through 2 loops. Yarn over and pull through all 3 loops on your hook.
3-dc Bobble
Yarn over and insert your hook into the indicated st/sp. Yarn over and pull up a loop. Yarn over and pull through 2 loops.
(Yarn over and insert your hook into the same st/sp. Yarn over and pull up a loop. Yarn over and pull through 2 loops) twice. Yarn over and pull through all 4 loops on your hook.
Extended Double Crochet (Edc)
Yarn over, insert your hook into the indicated st, yarn over and pull up a loop. Yarn over and pull through ONE loop. (Yarn over and pull through two loops) twice.
Partial Dc
Yarn over and insert your hook into the indicated st/sp. Yarn over and pull up a loop. Yarn over and pull through 2 loops.
Techniques
If you need help with any of the following techniques, please see the Techniques Section for Charlotte’s Universe HERE.
- Magic Ring
- Stitch Anatomy (super helpful)
- Standing Stitches
- Post Stitches
- Working Away Ends
For a neater way to end your rounds when using different colours for each round or fastening off at the end of a round, see THIS TUTORIAL for the Invisible Join.
Gauge
At the end of Round 5, your motif should measure 6.5cm (2.6”) in Organicon and 8.5cm (3.3”) in Scrumptious.
Size
Each finished motif will be 17cm (6.7”) in Organicon (22g) and 20cm (8”) in Scrumptious (27g).
Materials
Organicon Version
- 3.25 mm crochet hook (US 3/D, UK 10)
- Scheepjes Organicon (100% cotton), 50g/170m/186yds
- Yarn A– Olive (228) x 1 ball
- Yarn B– Sweet Mandarin (223) x scraps for flower
- Yarn C– Desert Bloom (209) x scraps for flower
- Yarn D– Apple Blossom (207) x scraps for flower
- Yarn E– Swaying Tulip (247) x scraps for flower
- Yarn F– Sapling (213) x 1 ball for leaves (Optional)
- Yarn G– Deep Azure (263) x 1 ball
- Yarn H– Happy Thoughts (264) x 1 ball
Scrumptious Version
- 4 mm crochet hook (US 6/G, UK 8)
- Scheepjes Scrumptious (50% recycled polyester/50% acrylic), 100g/300m/328yds
- Yarn A – Matcha Chiffon Cake (326) x 1 ball
- Yarn B – Citrus Rice Pudding (315) x scraps for flower
- Yarn C – Grapefruit Curd Tart (308) x scraps for flower
- Yarn D – Summer Berry Tartlet (322) x scraps for flower
- Yarn E – Blackberry Honey Gelato (312) x scraps for flower
- Yarn F – Forest Fruit Pound Cake (354) x 1 ball
- Yarn G – Rainforest Cake (349) x 1 ball
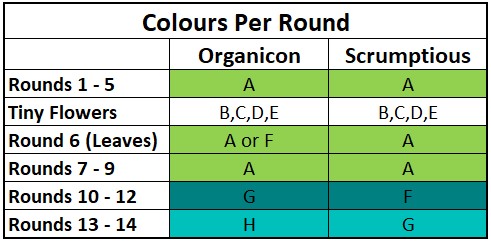
Colours Per Round
Round 1
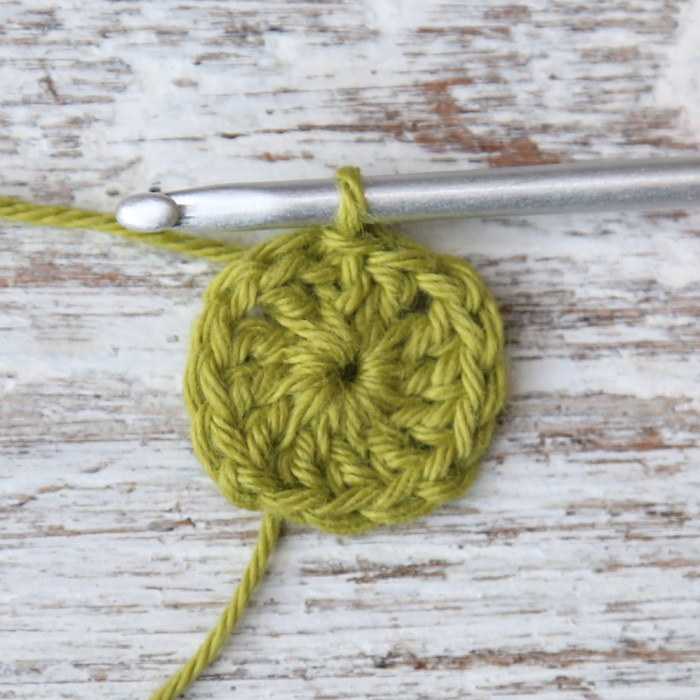
Into a magic ring, ch 3 (counts as dc), dc, ch 1, (3 dc, ch 1) 3 times, dc. Join to the top of the beg ch-3 with a sl st.
Stitch Count: 12 dc and 4 ch-1 sps
Round 2
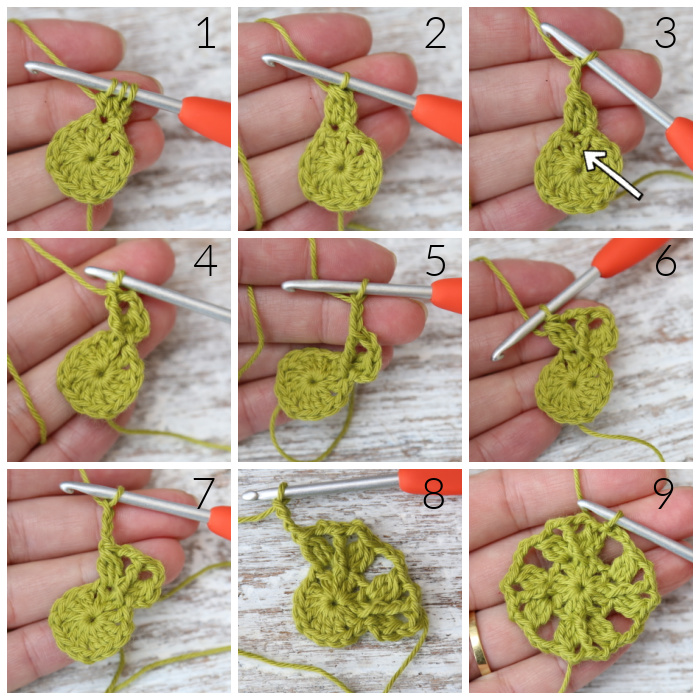
Ch 2, make a 2-dc Bobble in the same st as the sl st join. This counts as your first 3-dc Bobble {Photos 1 and 2}.
*Ch 2 {Photo 3}, make a FPtr around the same st as the 3-dc Bobble {Photo 4}, ch 2, make a 3-dc Bobble in the next st {Photos 5 and 6}. Ch 3 {Photo 7}, skip the ch-1 sp and the next dc. Make a 3-dc Bobble in the next st.*
Rep from * to * 3 more times, omitting the last 3-dc Bobble on the last repeat. Join to the top of the first 3-dc Bobble with a sl st {Photo 9}.
Stitch Count: 4 FPtr, 8 3-dc Bobbles, 8 ch-2 sps, and 4 ch-3 sps
Round 3
Sl st into the next ch-2 sp. Ch 1 (doesn’t count as a st throughout).
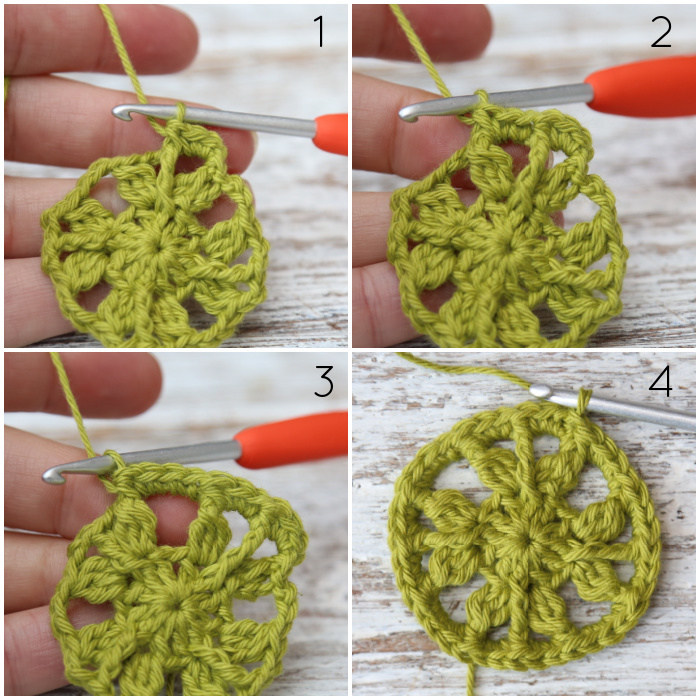
(Make 2 sc in the ch-2 sp, FPhdc around the next FPtr {Photo 1}. Make 2 sc in the next ch-2 sp, FPhdc around the next 3-dc Bobble {Photo 2}. Make 3 sc in the next ch-3 sp, FPhdc around the next 3-dc Bobble {Photo 3}) 4 times. Join to the top of the first sc with a sl st {Photo 4}.
Stitch Count: 28 sc and 12 FPhdc
Round 4
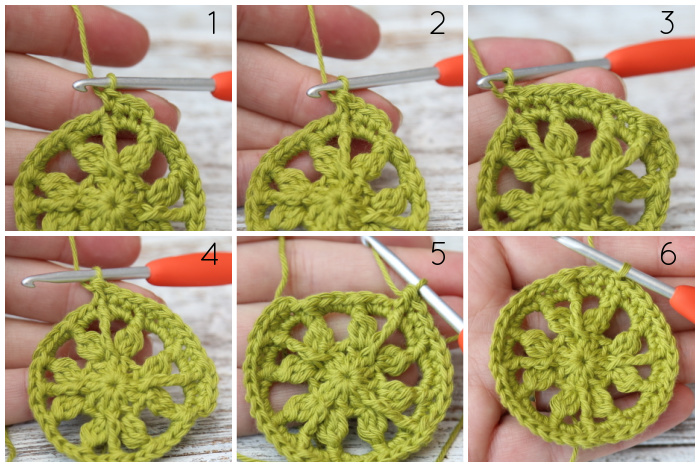
Ch 1, sc in the first 3 sts, the last of which will be the FPhdc {Photo 1}. FPhdc around the same FPhdc {Photo 2}.
(Skip the next st, sc in the next 9 sts, the last of which will be a FPhdc {Photo 3}. FPhdc around the same FPhdc {Photo 4}) 3 times {Photo 5}. Skip the next st, sc in the last 6 sts. Join to the first sc with a sl st {Photo 6}.
Stitch Count: 36 sc and 4 FPhdc
Round 5
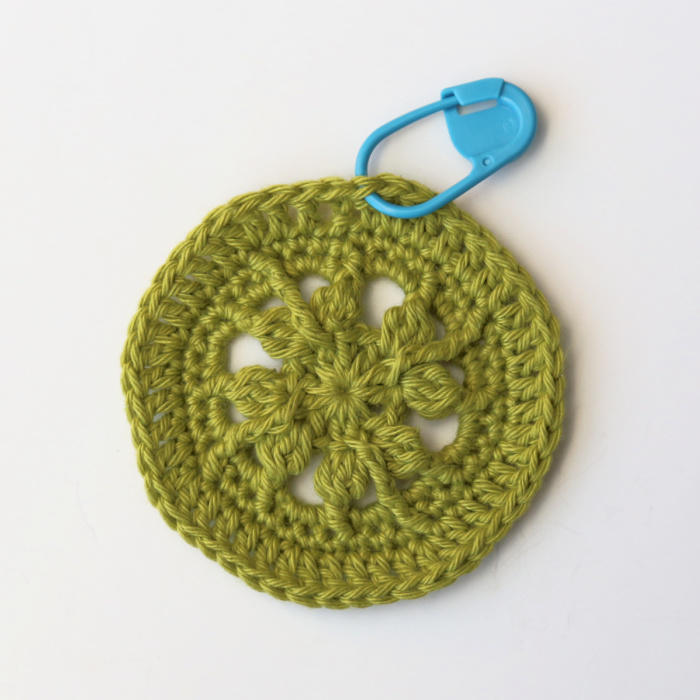
Ch 3 (counts as dc). Dc in the next 2 sts.
(Make 2 dc in the next st, dc in the next 4 sts) 7 times. Make 2 dc in the next st, dc in the last st. Mark this st with a SM. Join to the top of the beg ch-3 with a sl st. Fasten off and work away your ends.
Stitch Count: 48 dc
Make the Tiny Flowers
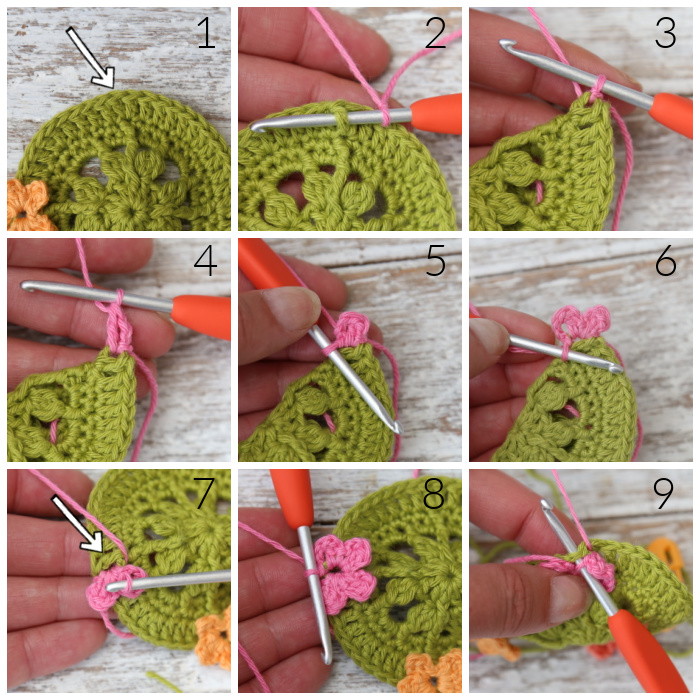
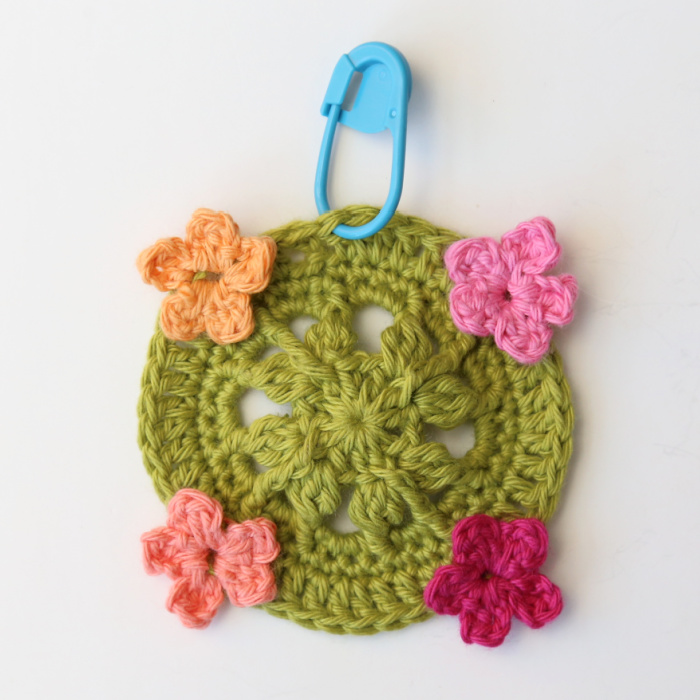
Before we continue with Round 6, we will make a Teeny Tiny Flower in four of the increases from Round 5.
- Use any colours you fancy.
- You will be working into the two dc that form each increase as if they are a ‘ring’.
With a slip knot already on your hook, insert your hook from front to back around the second dc of a dc increase made into a FPhdc and make a sl st {Photos 1 – 3}. (Ch 2, make a dc around the same dc, ch 2, make a sl st around the same dc) twice {Photos4 – 6}. Turn your work by 180 degrees so that you can work around the first dc in the same way. Insert your hook from front to back around this first dc of the increase and make a sl st. (Ch 2, make a dc around the same dc, ch 2, make a sl st around the same dc) twice {Photos 7 and 8}. Working into the top of the second dc of the increase, make a sl st {Photo 9}. Ch 2, make a dc in the same dc, ch 2, sl st in the same dc. Fasten off and work away your ends.
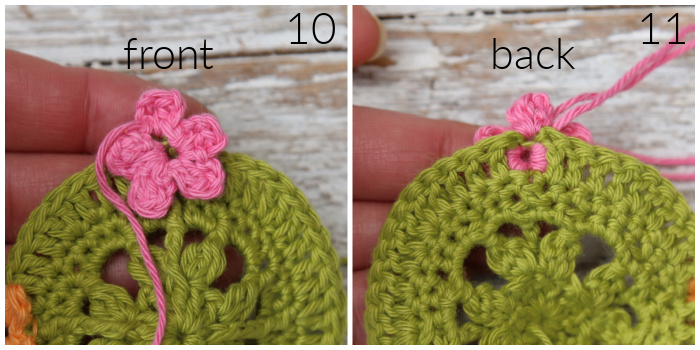
Repeat this for the remaining 3 increases made into a FPhdc.
Round 6
Please consult the video tutorial linked at the start of this post if you find this part tricky. Round 6 is at timestamp 21:53.
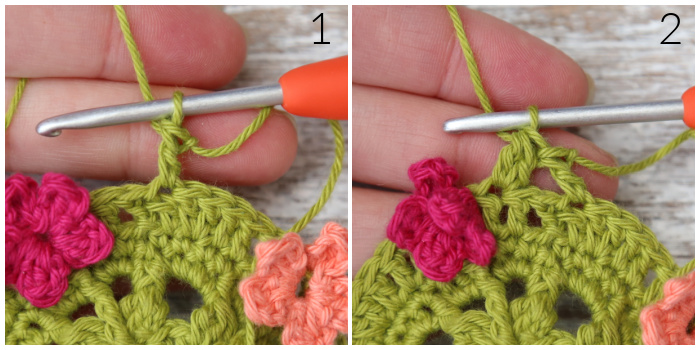
Join your yarn by making a standing dc in the marked st from the previous round {Photo 1}. Skip the next 2 sts, make a 2-dc Bobble in the next st {Photo 2}. You will now make a Leaf in this 2-dc Bobble.
How to Make a Leaf
Ch 2. Inserting your hook from front to back to front around the first ‘leg’ of the 2-dc Bobble, make 6 partial dc {Photos a – c}.

Yarn over, pull through 1 loop {Photo d}. (Yarn over, pull through 2 loops) 5 times. There should now be 2 loops left on your hook {Photos e – i}.
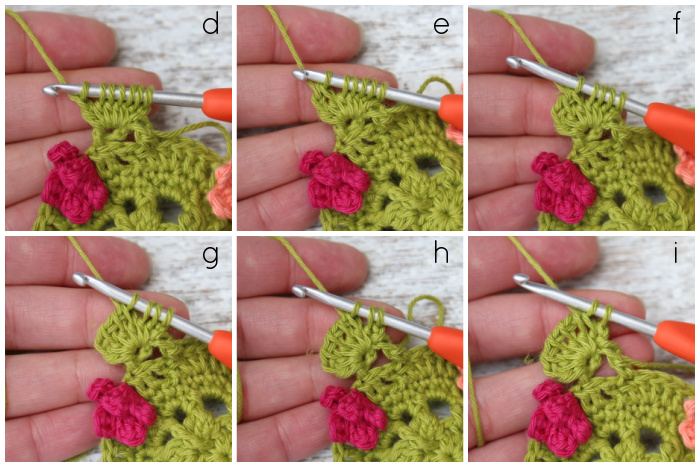
Swing your yarn under your hook from left to right (right to left, if you are left-handed) so that it runs across the bottom of the two loops left on your hook {Photo j}. Now swing the yarn under the handle from front to back so that it lies behind your work again. Pull on the yarn a bit so that the loop you just created pulls the two loops on your hook together {Photo k}.
Fold the first half of the Leaf down so that you can work into the second ‘leg’ of the 2-dc Bobble {Photo l}. Inserting your hook from front to back to front around the second ‘leg’ of the 2-dc Bobble, make 6 partial dc {Photo m}.
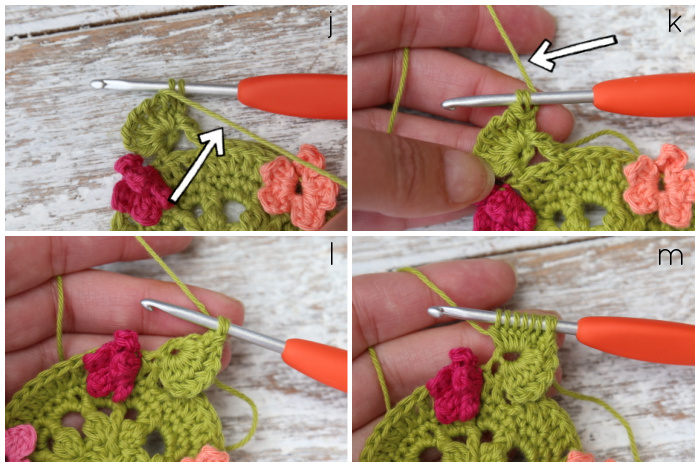
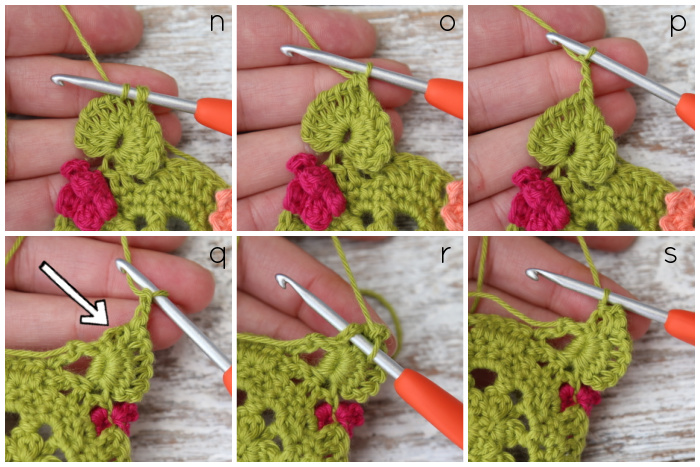
Yarn over, pull through 1 loop. (Yarn over, pull through 2 loops) 5 times. There should now be 3 loops left on your hook {Photo n}. Yarn over and pull through all 3 loops {Photo o}.
Ch 2 {Photo p}. Turn your work so that you can see the back of the Leaf {Photo q}. Sl st in the first ch-2 sp of the leaf. You’ll have to dig a little bit to find it {Photos r and s}. Turn your work back so that the front is facing you again.
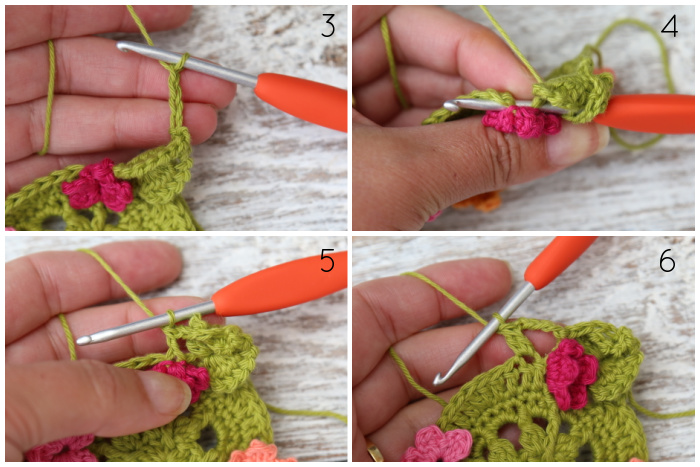
Ch 4 {Photo 3}, FPdc around the two dc that contain the Tiny Flower {Photos 4 and 5}. Ch 4, skip the first (hidden) st after the Flower, make a 2-dc Bobble in the next st {Photo 6}. There should be 2 sts left before the increase, if you want to double-check your placement.
Make a Leaf (as above) – Photo 7.
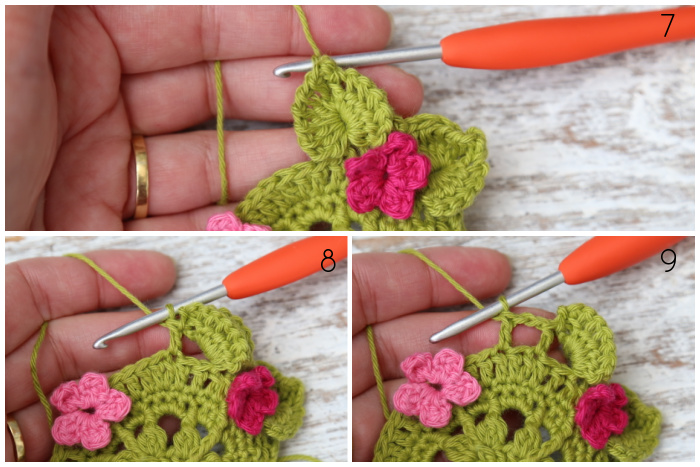
Skip the next 2 sts. Dc in the next st, which will be the first dc of the increase from the previous round, here and throughout {Photo 8}. Ch 2, skip the next st, dc in the next st {Photo 9}.
* Skip the next 2 sts, make a 2-dc Bobble in the next st. Make a Leaf. Ch 4, FPdc around the two dc that contain the Tiny Flower. Ch 4, skip the first (hidden) st after the Flower, make a 2-dc Bobble in the next st. Make a Leaf. Skip the next 2 sts. Dc in the next st. Ch 2, skip the next st, dc in the next st.*
Rep from * to * 2 more times, omitting the last dc on the last repeat. Mark the last skipped st from the previous round with a SM. Join to the first dc with as sl st. Fasten off and work away your ends.
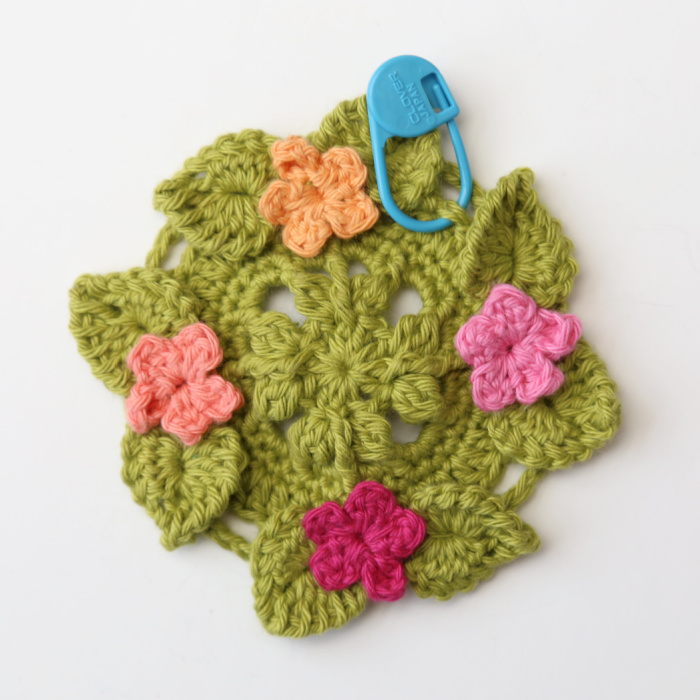
Stitch Count: 8 dc, 4 FPdc, 8 Leaves, 4 ch-2 sps, and 8 ch-4 sps
Round 7
With a sl knot already on your hook and starting with a standing st in the marked skipped st from Round 5:
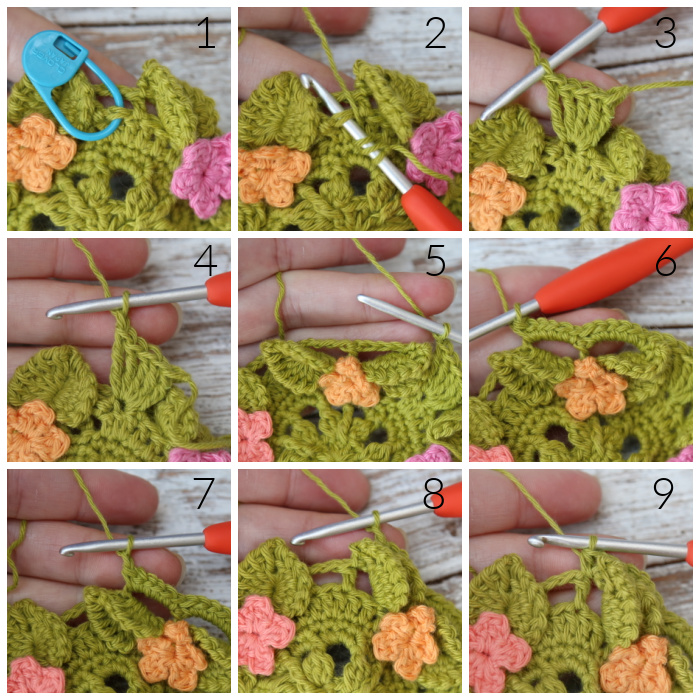
*Make 5 tr in the skipped st from Round 5, working in front of the ch-2 sp from Round 6 {Photos 1 – 3}. Ch 1 {Photo 4}. (Make 6 sc in the next ch-4 sp of Round 6) twice {Photos 5 and 6}. Ch 1 {Photo 7}, hdc between the last Leaf and the next dc {Photos 8 and 9}.*
Rep from * to * 3 more times. Join to the first tr with a sl st.
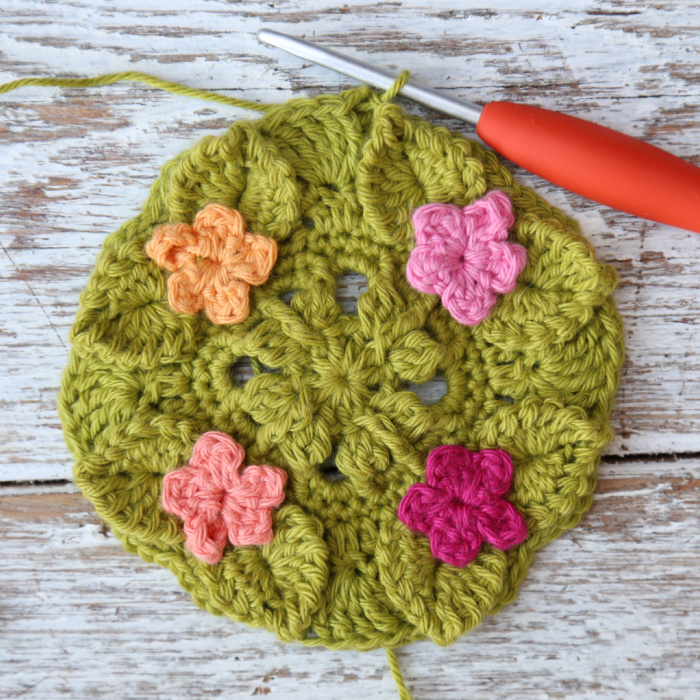
Stitch Count: 72 sts and 8 ch-1 sps {48 sc, 4 hdc, 20 tr}
Round 8
Ch 1 (doesn’t count as a st). *Sc in the next 5 tr. Sc in the next ch-1 sp. Sc in the next 12 sc. Sc in the next ch-1 sp. Sc in the next hdc.*
Rep from * to * 3 more times. Join to the first sc with a sl st.
Stitch Count: 80 sc
Round 9
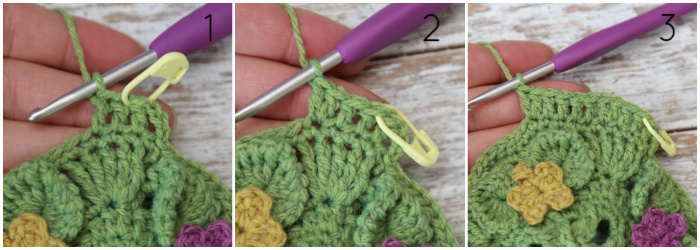
Ch 3 (counts as first dc). Dc in the next 3 sts, marking the second of these 3 sts with a SM {Photo 1}. Make 2 dc in the next st, which should be the last sc before the sc made into the ch-1 sp {Photo 2}. (Dc in the next 4 sts, make 2 dc in the next st {Photo 3}) 15 times. Join to the top of the beg ch-3 with a sl st. Fasten off and work away your ends.
Stitch Count: 96 dc
Round 10
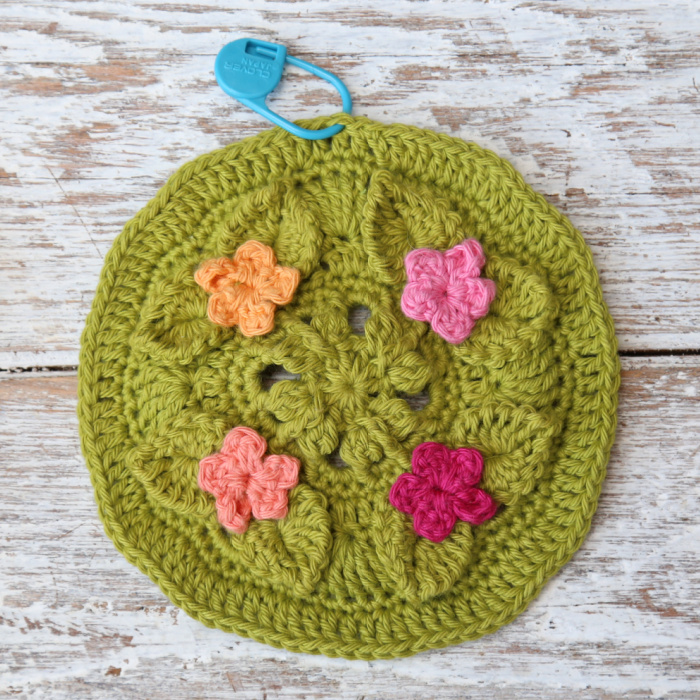
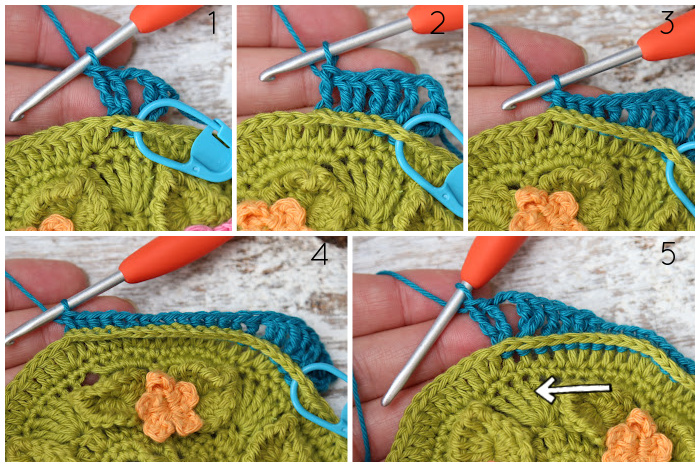
Starting with a standing st, make 2 BPtr in the marked st from the previous round. Ch 2, make 2 BPtr in the next st. This is your first corner {Photo 1}.
*BPtr in the next st, BPedc in the next 2 sts, BPdc in the next st {Photo 2}, BPhdc in the next 4 sts {Photo 3}. BPSc in the next 6 sts, BPhdc in the next 4 sts {Photo 4}, BPdc in the next st, BPedc in the next 2 sts, BPtr in the next st. Make 2 BPtr in the next st, ch 2, make 2 BPtr in the next st {Photo 5}. These last 2 BPtr should fall in the dc that falls above the third tr of the 5-tr group from Round 7.*
Rep from * to * 3 more times, omitting the last (2 BPtr, ch 2, 2 BPtr) corner on the last repeat. Join to the first BPtr with a sl st.
Stitch Count Per Side: 6 BPsc, 8 BPhdc, 2 BPdc, 4 BPedc, 6 BPtr, not including ch-2 corner sp.
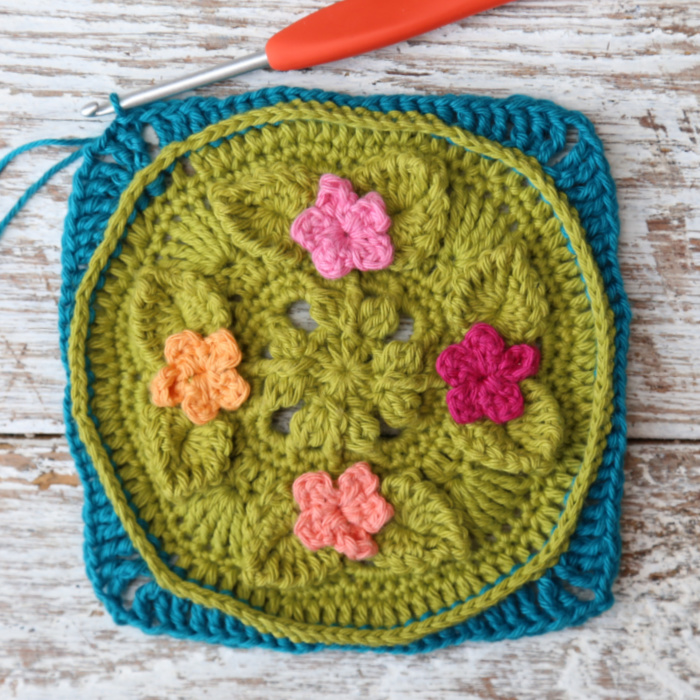
Round 11
Sl st in the next st and the ch-2 corner sp. Ch 4 (counts as tr), [2 tr, ch 2, 3 tr] in the same ch-2 sp. This is your first corner made.
*Skip the first (hidden) st, edc in the next 2 sts, dc in the next 2 sts, hdc in the next 2 sts. Sc in the next 13 sts, hdc in the next 2 sts, dc in the next 2 sts, edc in the last 2 sts. [3 tr, ch 2, 3 tr] in the ch-2 corner sp.*
Rep from * to * 3 more times, omitting the last corner on the last repeat. Join to the top of the beg ch-4 with a sl st.
Stitch Count Per Side: 13 sc, 4 hdc, 4 dc, 4 edc, 6 tr
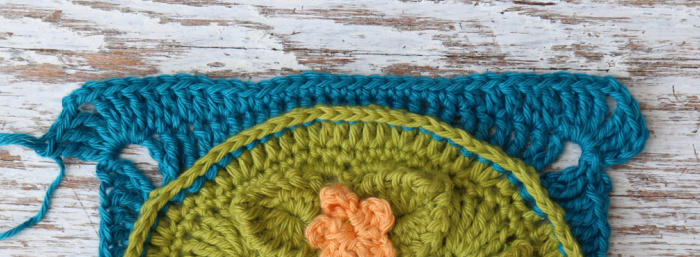
Round 12
Sl st in the next 2 sts and in the ch-2 corner sp. Ch 3 (counts as dc throughout). [Dc, ch 2, 2 dc] in the same ch-2 corner sp. This is your first corner made.
*Skip the first (hidden) st. Dc in the next 30 sts. [2 dc, ch 2, 2 dc] in the next ch-2 corner sp.*
Rep from * to * 3 more times, omitting the last corner on the last repeat. Join to the first dc with a sl st. Fasten off and work away your ends.
Stitch Count Per Side: 34 dc, not including ch-2 corner sp.

Round 13
Join your yarn by making a standing dc in any ch-2 corner sp. [Dc, ch 2, 2 dc] in the same ch-2 sp. This is your first corner made.
*BPdc in the next 34 sts. [2 dc, ch 2, 2 dc] in the next ch-2 corner sp.*
Rep from * to * 3 more times, omitting the last corner on the last repeat. Join to the first dc with a sl st.
Stitch Count Per Side: 4 dc and 34 BPdc, not including ch-2 corner sp.
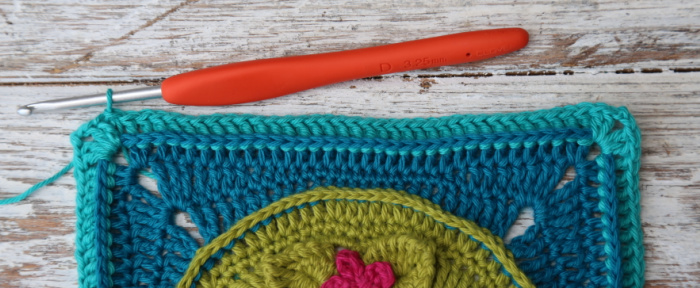
Round 14
Sl st in the next st and in the ch-2 corner sp. Ch 4 (counts as hdc + ch-2 sp). Hdc in the same ch-2 sp. This is your first corner made.
*Hdc in the next 38 sts. [Hdc, ch 2, hdc] in the ch-2 corner sp.*
Rep from * to * 3 more times, omitting the last corner on the last repeat. Join to the second ch of the beg ch-4 with a sl st. Fasten off and work away your ends.
Stitch Count Per Side: 40 hdc, not including ch-2 corner sp.
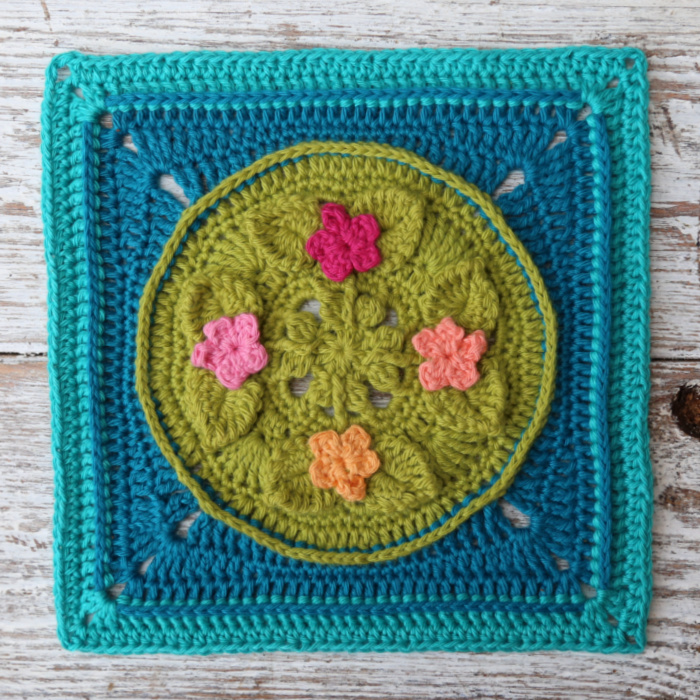

This blog post contains affiliate links. I only link to products I personally use or would use. All opinions are my own.


