At last! I am finally getting around to sharing the Namaqualand Shawl pattern with you. The Namaqualand patterns are very dear to my heart (you can read more about that HERE) and I wear my shawl often! Every time I do, I am reminded of last summer’s lazy walks to and from the station, crocheting this shawl as I walked. I hope you enjoy making it!
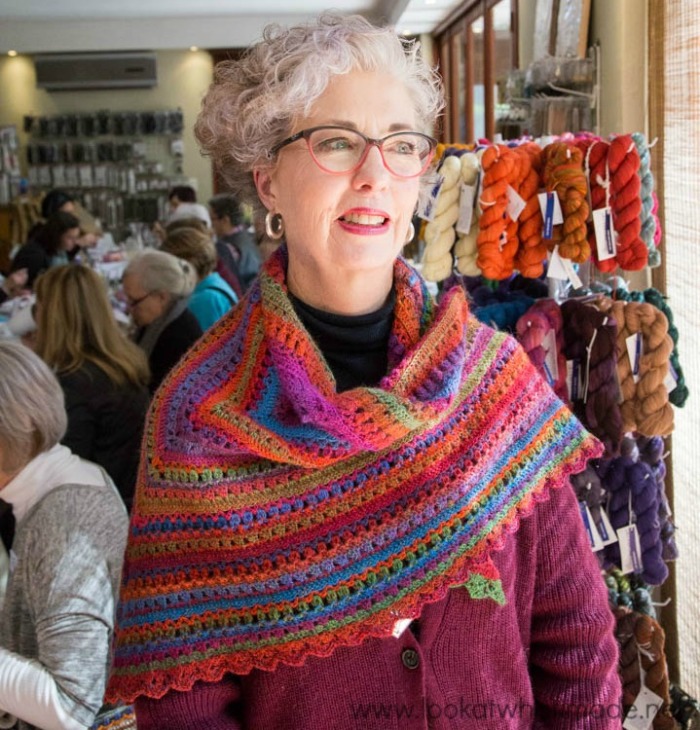
The Elegant Marilyn van Zyl Wearing the Namaqualand Shawl at one of the Pretoria Workshops with Be Inspired last year.
Namaqualand Shawl Pattern
© Dedri Uys and Scheepjes 2016. All Rights Reserved.
This Shawl is an adaptation of the Namaqualand Square/Blanket. It was specifically designed for the BeInspired Tour 2016.
Resources
Video Tutorials and Translations
Thank you to Michael Wassenaar for creating these!
- English US Terms Right-handed Video
- English US Terms Left-handed Video
- Dutch Right-handed Video
- Dutch Left-handed Video
- Dutch Translation
Materials
- 4 mm crochet hook (US 6/G UK 8)
- 2 balls (200g) of Scheepjes Invicta Colour (957) – Sock weight yarn/#1 @ 420m/460yds per 100g
This pattern works really well with a long colour-change yarn, but would look great in a single colour too.
Abbreviations
US Terminology
- Ch – Chain
- BP – Back post (insert your hook from back to front around the post of the indicated stitch and complete the stitch as normal)
- Dc – Double crochet
- RS – Right side
- Sl st – Slip stitch
- St – Stitch/stitches
- Tr – Treble crochet
- WS – Wrong side
- () and * – Repeat instructions between parentheses and/or asterisks the number of times specified.
Special Stitches
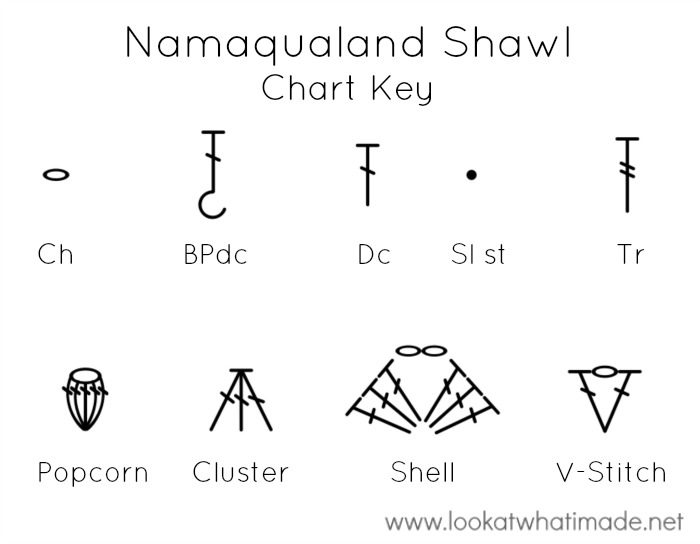
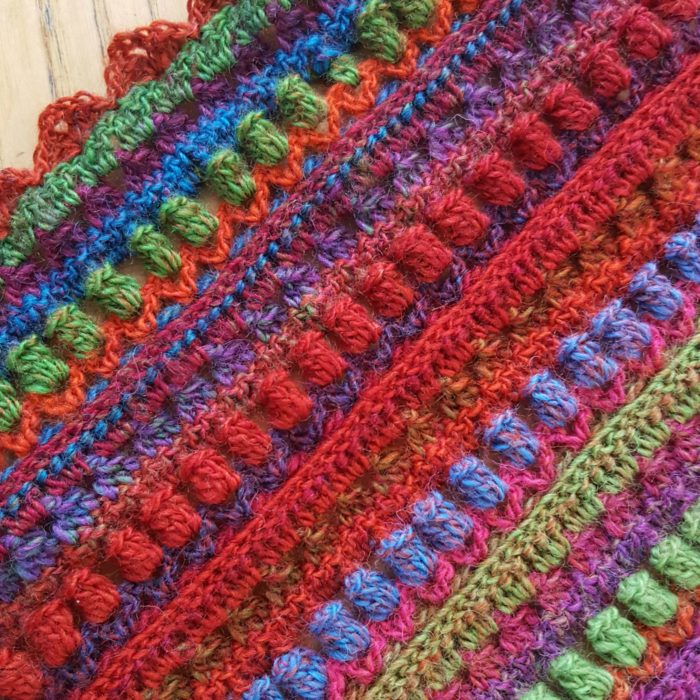
- Popcorn Stitch – Make 5 dc in the same stitch. Remove your hook from the last stitch. Insert your hook into the first dc of the 5 dc. Grab the last stitch with your hook and pull it through the first stitch.
- Cluster (Dc3tog) – (Yarn over and insert your hook into the next Yarn over and pull up a loop. Yarn over and pull through 2 loops) 3 times. Yarn over and pull through all 4 loops on your hook. See this tutorial.
- Shell – (3 dc, ch 2, 3 dc) in the same stitch
- V-Stitch – (Dc, ch 1, dc) in the same stitch
Charts and Step-by-Step Photo Tutorials
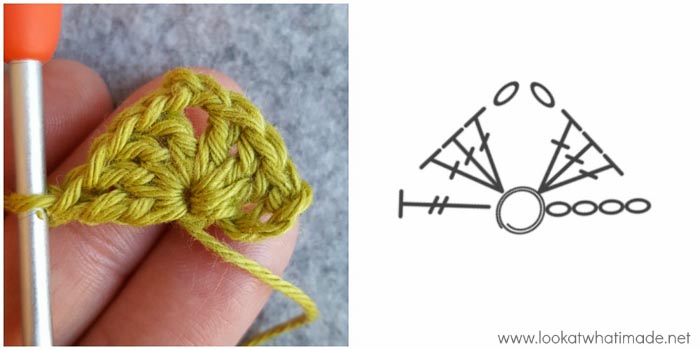
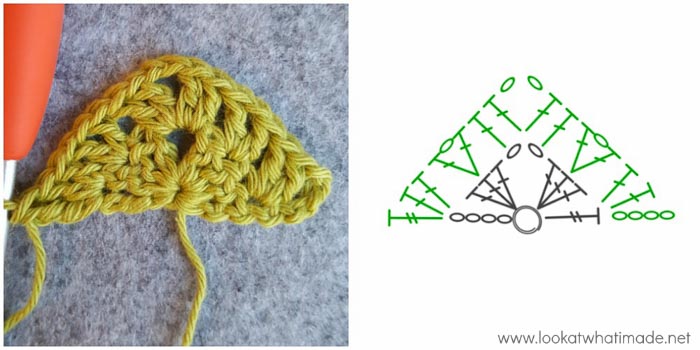
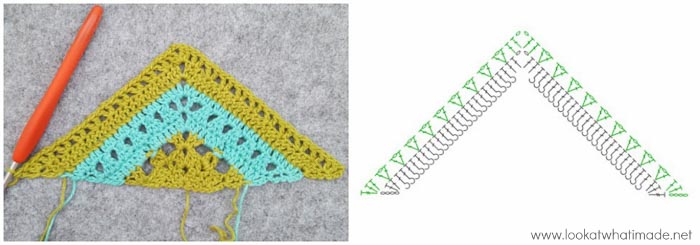
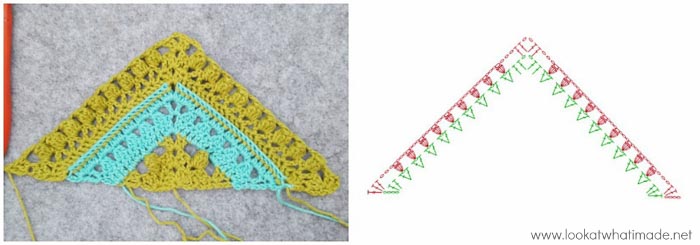
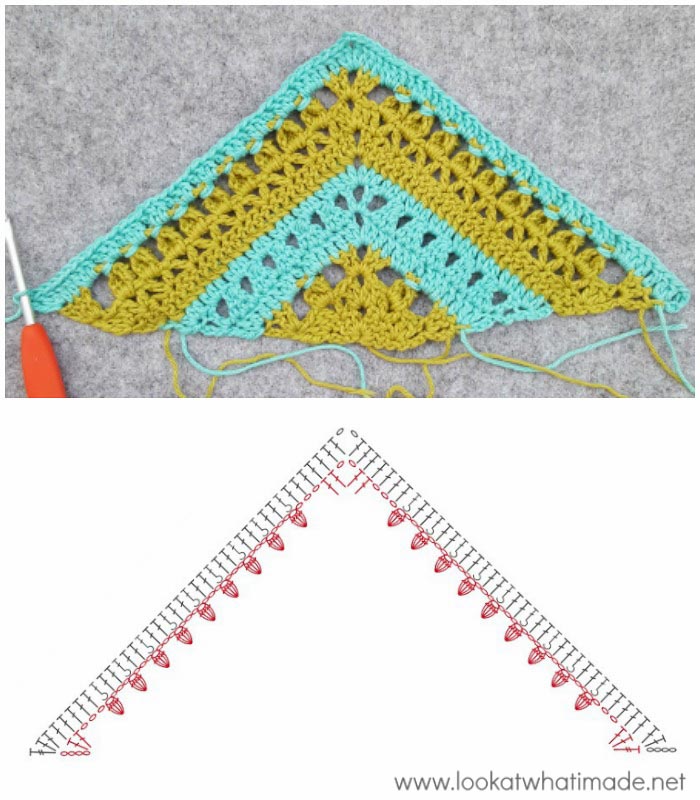
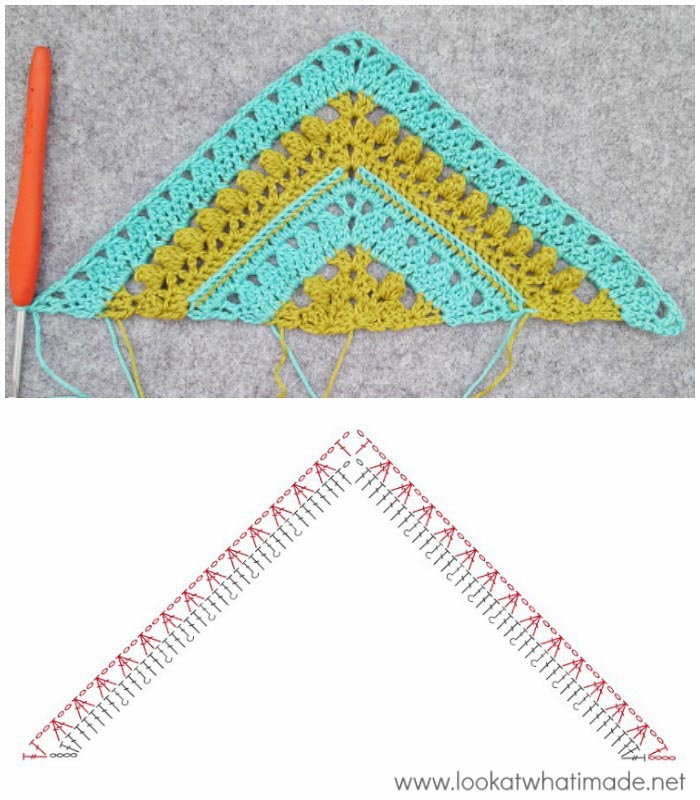
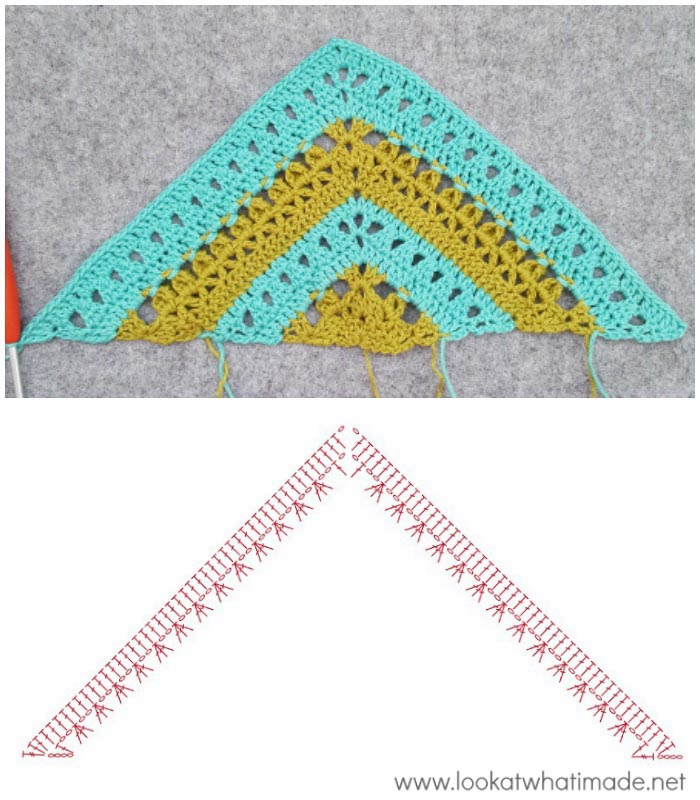
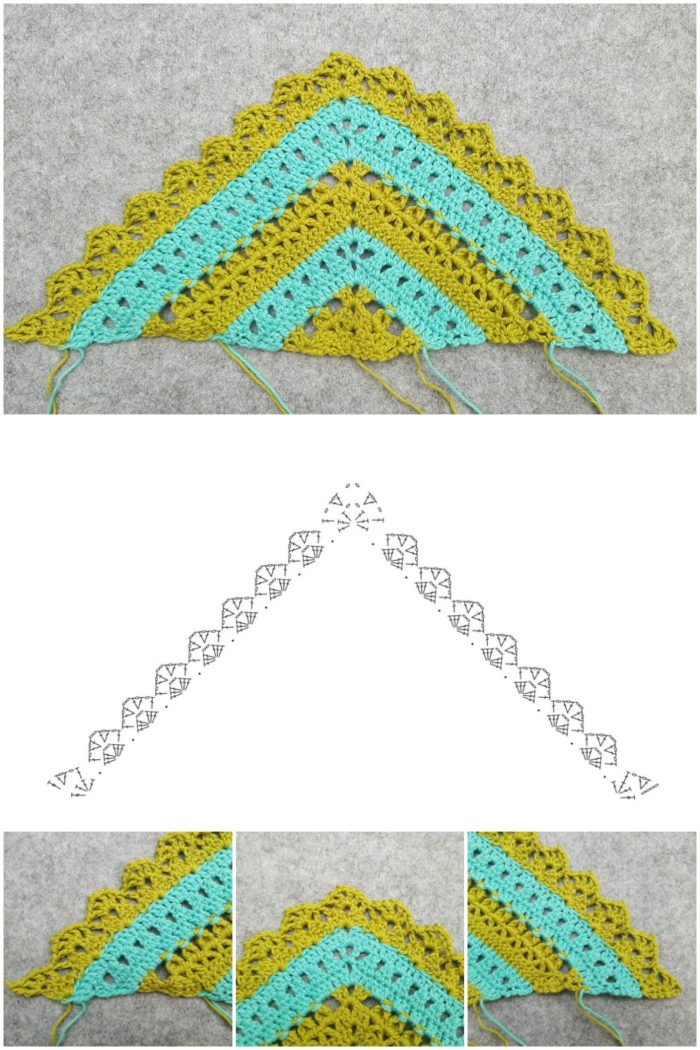
I have not done a step-by-step photo tutorial for the shawl, but I have not left you high and dry. I am including a chart and photo for each round to help you visualise how the stitches fit together. If you are not comfortable with using charts, think of this as an opportunity to demystify them. If you still need help, have a look at the step-by-step photo tutorial for the Namaqualand Blanket. The stitch repeats for the blanket and the shawl are the same…
There are only 2 differences:
- The shawl only has two sides, the blanket has four;
- For the shawl, one of the ch-2 corner spaces (the central one) remains the same, but the ch-2 corner space at the start of the first side and the one at the end of the second side have been replaced by a tr (this will make more sense when you look at the charts).
Gauge
When you have made the first 6 rows, each side should measure 10 cm/4″. Please do keep in mind that tension is not vitally important with this shawl.
Size
120 cm (47″) along the top edge (unblocked); 84 cm (33″) along the sides.
Notes
This shawl is made in rows and you will TURN your work at the end of every row. If you have trouble identifying the right side and the wrong side of your work, here’s a handy tip: when the Popcorns from Round 3 are facing you, you are looking at the right side of your work.
Instructions
This pattern is a continuous 6-row repeat. You can make it as big or as small as you like!
First 6-Row Repeat
Row 1
Into a magic ring: Ch 4 (counts as tr throughout), 3 dc, ch 2, 3 dc, tr. Pull the ring tight to close the hole and TURN. {2 tr, 6 dc, and 1 ch-2 space}
Row 2
With WS Facing: Ch 4, 2 dc in the st at base of ch-4. Skip the next st. (Dc, ch1, dc) into the next st. This is your V-Stitch made. Skip the last st. (2 dc, ch 2, 2 dc) in the ch-2 corner space. Skip the first st. (Dc, ch1, dc) into the next st. Skip the next st. (2 dc, tr) in the top of the ch-4 and TURN. {1 tr, 4 dc, and 1 V-Stitch per side}
Row 3
Note: If you want to make Really Lazy Popcorns instead of Regular Popcorns, please have a look at the instructions for Round 3 of the Namaqualand Blanket. I highly recommend it!
With RS Facing: Ch 4, 2 dc in the st at base of ch-4. *Ch 3 and skip the next 3 st. Make a Popcorn in the ch-1 space of the V-Stitch. Ch 3 and skip the next 3 st.* (2 dc, ch 2, 2 dc) in the ch-2 corner space. This is your ‘point’ made. Repeat from * to * once more. (2 dc, tr) in the top of the ch-4 and TURN. {1 tr, 4 dc, 1 Popcorn, and 2 ch-3 spaces per side}
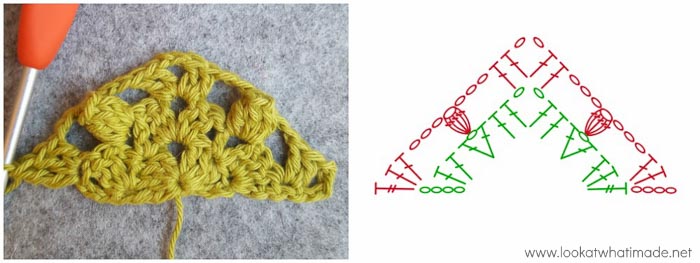
Row 4
Note: If you have made Really Lazy Popcorns in Round 3, please have a look at the instructions for Round 4 of the Namaqualand Blanket.
With WS Facing: Ch 4, 2 dc in the st at base of ch-4. *Dc in the next 2 st. Make 3 dc in the first ch-3 space. BPdc around the Popcorn. Make 3 dc in the last ch-3 space. Dc in the next 2 st.* (2 dc, ch 2, 2 dc) in the ch-2 corner space. This is your ‘point’ made. Repeat from * to * once more. (2 dc, tr) in the top of the ch-4 and TURN. {1 tr and 15 dc per side}
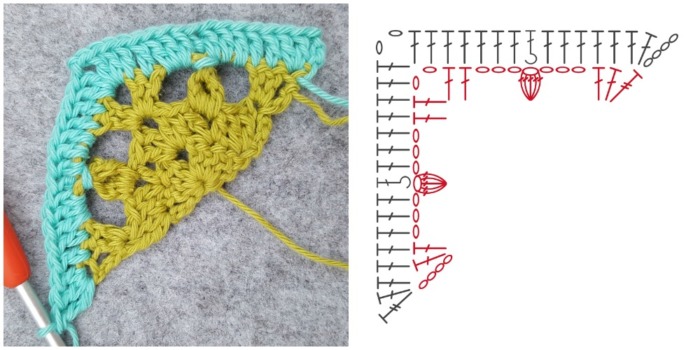
Row 5
Hint: The central ‘leg’ of the third Cluster will fall in a BPdc from Round 4.
With RS Facing: Ch 4, dc in the st at the base of the ch-4. (Ch 2, make a Cluster) 5 times. Ch 2. (Dc, ch 2, dc) in the ch-2 corner space. This is your ‘point’ made. (Ch 2, make a Cluster) 5 times. Ch 2. (Dc, tr) in the top of the ch-4 and TURN. {1 tr, 2 dc, 5 Clusters, and 6 ch-2 spaces per side}
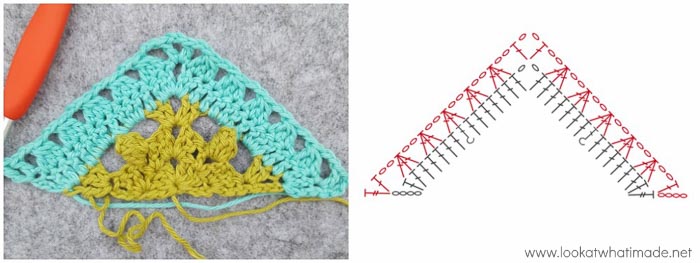
Row 6
With WS Facing: Ch 4, 2 dc in the st at base of ch-4. *Dc in the next st. (Make 2 dc in the next ch-2 space, dc in the next Cluster) 5 times. Make 2 dc in the last ch-2 space. Dc in the next st.* (2 dc, ch 2, 2 dc) in the ch-2 corner space. This is your ‘point’ made. Repeat from * to * once more. (2 dc, tr) in the top of the ch-4 and TURN. {1 tr and 23 dc per side}
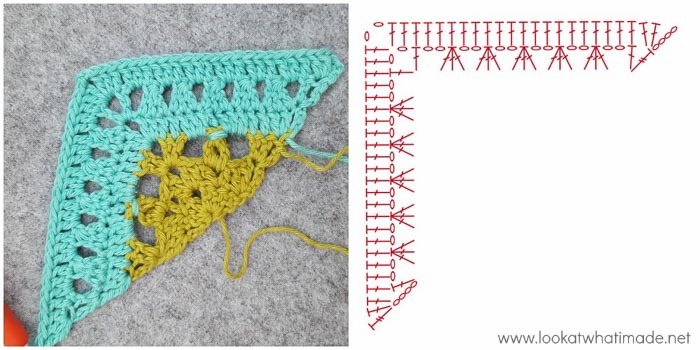
Second 6-Row Repeat
Row 7
With RS Facing: Ch 4, 2 dc in the st at base of ch-4. BPdc in the next 23 st. (2 dc, ch 2, 2 dc) in the ch-2 corner space. BPdc in the next 23 st. (2 dc, tr) in the top of the ch-4 and TURN. {1 tr and 27 dc per side}

Row 8
With WS Facing: Ch 4, 2 dc in the st at base of ch-4. *Skip the first st. V-stitch in the next st. (Skip the next 2 st’s, V-Stitch in the next st) until you have 1 dc left. Skip the last dc.* (2 dc, ch 2, 2 dc) in the ch-2 corner space. This is your ‘point’ made. Repeat from * to * once more. (2 dc, tr) in the top of the ch-4 and TURN. {1 tr, 4 dc, and 9 V-Stitches per side}
Row 9
Reminder: Seriously, think about using the Really Lazy Popcorns suggested in Row 3!
With RS Facing: Ch 4, 2 dc in the st at base of ch-4. *Ch 3 and skip the next 3 st. (Make a Popcorn in the ch-1 space of the next V-Stitch. Ch 3) until you have worked into each ch-1 space. Skip the next 3 st.* (2 dc, ch 2, 2 dc) in the ch-2 corner space. This is your ‘point’ made. Repeat from * to * once more. (2 dc, tr) in the top of the ch-4 and TURN. {1 tr, 4 dc, 9 Popcorns, and 10 ch-3 spaces per side}
Row 10
Please Note: You will be making 3 dc in the first and last ch-3 spaces, and 2 dc in all the other ch-3 spaces.
With WS Facing: Ch 4, 2 dc in the st at base of ch-4. *Dc in the next 2 st. Make 3 dc in the first ch-3 space. (BPdc around the next Popcorn. Make 2 dc in the next ch-3 space) until there is only one Popcorn and one ch-3 space left. BPdc around the last Popcorn. Make 3 dc in the last ch-3 space. Dc in the next 2 st.* (2 dc, ch 2, 2 dc) in the ch-2 corner space. This is your ‘point’ made. Repeat from * to * once more. (2 dc, tr) in the top of the ch-4 and TURN. {1 tr and 39 dc per side}
Row 11
Hint: Apart from the first and last 2 Clusters on each side, the central ‘leg’ of each Cluster will fall in a BPdc from Round 10.
With RS Facing: Ch 4, dc in the st at the base of the ch-4. *(Ch 2, make a Cluster) until you have worked into every stitch. Ch 2.* (Dc, ch 2, dc) in the ch-2 corner space. This is your ‘point’ made. Repeat from * to * once more. (Dc, tr) in the top of the ch-4 and TURN. {1 tr, 2 dc, 13 Clusters, and 14 ch-2 spaces per side}
Row 12
With WS Facing: Ch 4, 2 dc in the st at base of ch-4. Dc in the next st. (Make 2 dc in the next ch-2 space, dc in the next Cluster) until you have worked into each Cluster. Make 2 dc in the last ch-2 space. Dc in the next st.* (2 dc, ch 2, 2 dc) in the ch-2 corner space. This is your ‘point’ made. Repeat from * to * once more. (2 dc, tr) in the top of the ch-4 and TURN. {1 tr and 47 dc per side}
Subsequent 6-Row Repeats
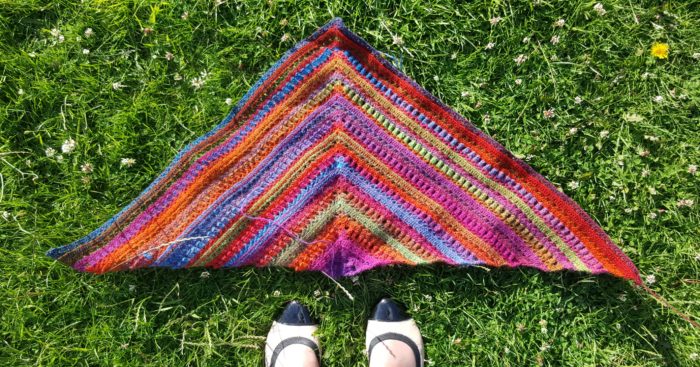
Repeat Rows 7 to 12 seven more times. You should end up with 9 repeats in total (including Rows 1 – 6).
Stitch Counts for Subsequent Repeats (not including first and last tr):
- Row 7 – multiples of 3 dc per side
- Row 8 – 4 dc and a multiple of 8 + 1 V-Stitches per side
- Row 9 – 4 dc, a multiple of 8 + 1 Popcorns, and a multiple of 8 + 2 ch-3 spaces per side
- Row 10 – multiples of 3 dc per side
- Row 11 – 2 dc, a multiple of 8 + 5 Clusters, and a multiple of 8 + 6 ch-2 spaces per side
- Row 12 – multiple of 3 + 2 dc per side
Border Rows
When you have made all 54 rows, you will add the border. If you feel that your shawl isn’t big enough at this point, you can add more repeats before adding the border. Please ensure that you stop on a repeat of Row 12 so that you have the correct amount of stitches to create the border. You will need a multiple of 6 stitches (a multiple of 3 + 2 dc and 1 tr per side).
Border Row 1
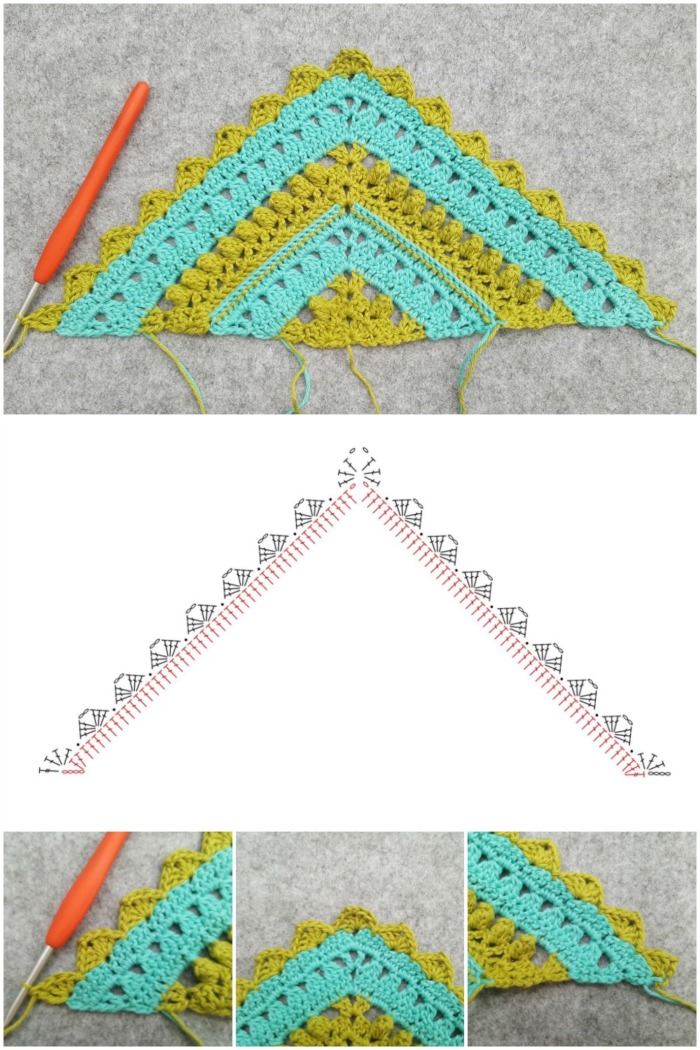
This Row starts and ends with a Half-Shell.
With RS Facing: Ch 4, 3 dc in the st at base of ch-4. Skip the next 2 st, sl st in the next st. (Skip the next 2 st, make a Shell in the next st, skip the next 2 st, sl st in the next st) until you have 2 st left before the ch-2 corner space. Skip the last 2 st. Make a Shell in the ch-2 corner space. Skip the next 2 st (the first stitch will be slightly hidden by the corner Shell), sl st in the next st. (Skip the next 2 st, make a Shell in the next st, skip the next 2 st, sl st in the next st) until you have 2 st left before the initial ch-4. Skip the next 2 st. (3 dc, tr) in the top of the ch-4 and TURN.
Border Row 2
With WS Facing: Ch 4, make a V-Stitch in st at the base of the ch-4. Skip the next dc. (Ch 1, dc) in the next dc. Skip the last dc of the Shell. *Skip the first dc of the next Shell. (Dc, ch 1) in the next dc and skip the next dc. (V-Stitch, ch 2, V-Stitch) in the ch-2 space. Skip the next dc. (Ch 1, dc) in the next dc. Skip the last dc of the Shell.* Repeat from * to * until you get to the Half-Shell at the end of the row. Skip the first dc of the Half-Shell. (Dc, ch 1) in the next dc and skip the next dc. (V-Stitch, tr) in the top of the ch-4. Fasten off and work away your yarn ends.
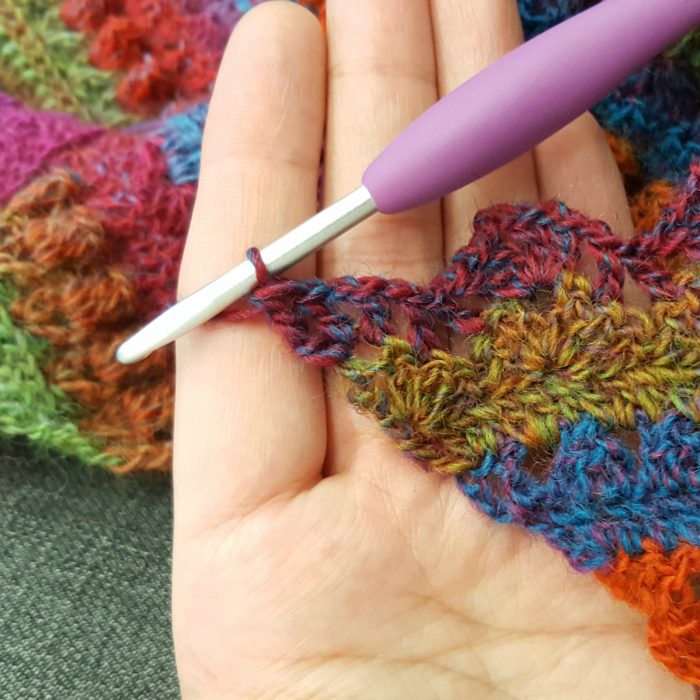
This was the moment I made the very last stitch of the border, sitting on a Piccadilly Line tube on my last journey from work before leaving for the Be Inspired Tour in South Africa.
Blocking
I suggest blocking your shawl before use. Blocking will make your edges neater and it will create a nice lacy effect. If you do not block your shawl, you will lose pattern definition, and the shawl will be much smaller.
To block the shawl, wet it and gently press out as much excess water as possible. Then place it between two towels and roll it up so that the towels absorb most of the remaining water.
Pin the shawl out (either on towels or on exercise mats), and allow to dry. Once dry, wear and ENJOY!
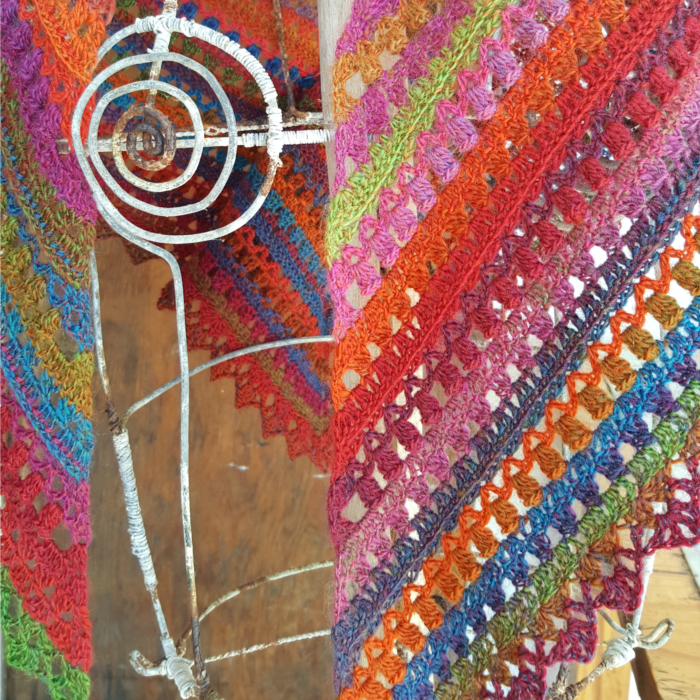
You can see more photos of my Namaqualand Shawl HERE on Instagram, and I would love it if you would share your own photos using #namaqualandshawl.
If anyone fancies making one of these in Whirl, PLEASE share your photos with me. I am so curious to see how it works up in every shade of Whirl.

This blog post contains affiliate links. I only link to products I personally use or would use. All opinions are my own.


Marie Christine Grellier says
merci pour cette merveille je l’ai réalisé avec beaucoup de plaisir en pensant à sa belle histoire, et comme j’ai envie de recommencer je vais faire un sac avec la version carrée
merci merci
Dedri Uys says
You’re welcome. I hope you enjoy making your bag :)
Marieta Iosifidou says
Thank you very much for sharing so beautiful shawl . I will share it in knitting group in fb Marieta’s Yarnland. If you want, you can visit it. It will give me happy. The shawl is so amazing. I will crocheting it at once. thanks Marieta.
Dedri Uys says
Thank you Marieta :)
Anelisa de Bruin says
Hello Dedri,
I am making a shawl with the original stonewashed blanket colors,
I just saw at the end that you didn’t do anything in the straight border.
but my up border is not straight because of all the endings, what would you recommend for me to make?
I am single stichting but I feel is kind of ruining it. Thanks. Greetings from The Netherlands
Jenny says
Anelisa, maybe you can help straighten your border with a bit of light blocking before you do that final single crochet round?
Jenny
Dedri Uys says
Hi Anelisa. That was one of the reasons I decided to use a colour-change yarn for the shawl. You can have a look at the border I did for the Memory Lane Blanket (Namaqualand in Rows). That is the border I found most aesthetically pleasing for working into the sides of the stitch repeats. You might have to tweak it a bit, because the blanket doesn’t have tr’s on the sides, only dc’s, whereas the shawl has tr’s.
I hope that helps.
Dedri
sophiebrode says
Bonjour,
Votre châle est merveilleux. Merci beaucoup, beaucoup pour vos explications, je vais essayer de le faire pour moi… :-) Ce n’est pas très compliqué avec le “chart”. Merci, merci.
Dedri Uys says
Thank you :) I’m sure you’ll manage it with the chart x
susan dennis says
This pattern is amazing. I’ve been knitting for more than 60 years but I’ve always sucked at crochet. I never understood the charts – either the how or the why. This pattern is teaching me both!! Your text is so helpful in understanding what the chart is showing me. And at the same time I’m getting to make a gorgeous piece. I particularly like the photographs of the work in both the smooth finished yarn and the bushy yarn.
There is enough difference in the rows to make it both interesting to do and to look at with enough repeats so that I can feel confident in what I’m doing. It’s really an amazing pattern.
Thank you so very very much. I’m enamored. (Oh also your printer version is a really nice bonus. It’s so nice to have the PDF on my phone for reference.)
Dedri Uys says
Hi Susan. Thank you for your lovely comment. My biggest desire is to help people demystify the art of crocheting so that they can feel confident to tackle bigger and better patterns. In the end, it’s only ever one stitch at a time :)
Marika says
Hi Dedri,
I have just ordered my first Scheepjes whirl -yarn and was looking for a pattern. This shawl looks lovely and I think it would be perfect to make of the whirl. It seems you made one yourself of this yarn, so I have to ask you if one skein is enough for the shawl-pattern? Thank you in advance! And thank you for your absolutely amazing patterns, I have used them before… =)
Dedri Uys says
Hi Marika. My friend Pat made one for me. The whirl is enough for a shawl yes. Pat ended up making 9 6-round repeats then the border.
Viv says
Lovely pattern – using my Scheepjes Whirl in Liquorice Yum Yum, and it’s looking ok :)
Dedri Uys says
Hi Viv. Thank you :) I have a My Story shawl in Liquorice Yum Yum and I love it. I hope you will share photos of your Namaqualand somewhere :)
Sue says
I have one repeat and the edging to go & just added a third ball of Elann Pippi Longcolors Lite! Apparently I crochet loose! Love this design & intend to make more than one! I may try to go down a hook size or two on my next one and see how that looks.
Dedri Uys says
Hi Sue. If you crochet more loosely than me, you can always make less repeats. If you are happy with your tension, don’t go down a hook size. If you want it to be tighter, then by all means go down a hook size :)
Alison Livesey says
Hi Dedri
Thanks so much for sharing Froggy again you are a dear. Our yarn bomb bridge has been dismantled and we are looking towards our next project! In the meantime I have gathered together a number of crocheters keen to expand their skills. I think we will have a go at your lovely shawl, I believe it will help to give folks confidence and make something beautiful at the same time. Hope all is well with you. Alison :) x
Dedri Uys says
You should be very proud of that bridge! And you are welcome about Froggy. He’s my favourite helper… my only helper, but my favourite none the less :) I hope you enjoy the shawl. It is very simple :)
eva zykánová says
i ´d like to made one for me … thank you fot the sharing
Hilary Eales says
Fabulous instructions! Clever girl I love the charts, absolutely going to get to grips with them. Thank you and the shawll is a beauty.
Dedri Uys says
Thank you, Hilary :)
shoshana vogel says
beautiful, it’s wonderful to take a wiff of that time [whatever time for whoever], and relive it’s beauty once againl may you be blessed with many many more such moments
Dedri Uys says
Hi Shoshana. It is always nice to go down memory lane :)
Tara Souther says
Lovely shawl and a great stash buster. Thanks for sharing.