The Namaqualand Blanket is very special to me for many (mostly sentimental) reasons. I am delighted to share the pattern with you today.
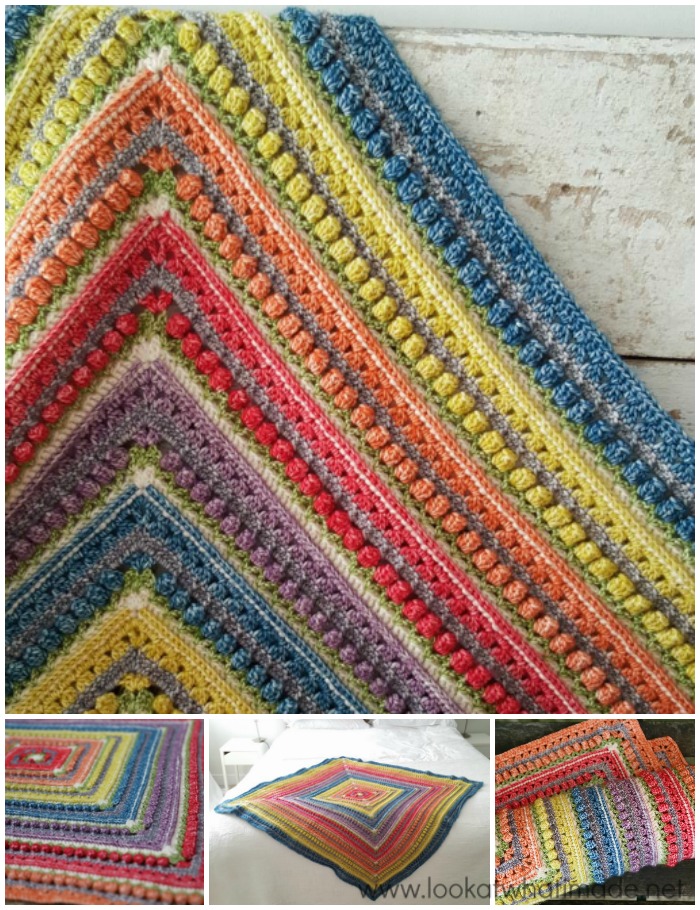
This colourful square baby blanket is made up of a simple 6-round repeat. The pattern literally contains every lesson I have learned since starting to crochet, so if the first 6 rounds seem daunting in their wordiness, please don’t be disheartened. Once I have told you (in those first 6 rounds) everything I would like you to learn/take away from this pattern, the rest of the repeats become much easier. Think of this pattern as a workshop-by-proxy (and bring tea and snacks)!
Namaqualand Blanket Pattern
© Dedri Uys 2016. All Rights Reserved
This blanket was inspired by the beautiful colours of the Namaqualand flowers. It has been specifically designed for the Be Inspired South African Tour 2016.
Materials
- 4 mm crochet hook (US 6/G UK 8)
- Scheepjes Stonewashed:
- Main Colours: Moonstone, Canada Jade, and Smokey Quartz
- Contrasting Colours (CC): Red Jasper, Coral, Lemon Quartz, Blue Apatite, and Deep Amethyst (in that order)
Yarn Packs are available from my Wool Warehouse Shop and include a printed written-only version of the pattern. You can also buy packs from Deramores. Both of these shops ship internationally. If you live in South Africa, you can buy yarn packs from Be Inspired. For a full list of Scheepjes stockists, visit Scheepjes (NL).
For a full list of yardages and colours per round, please see this spreadsheet.
Abbreviations
US Terminology
- CC – Contrasting Colour
- Ch – Chain
- BP – Back post (insert your hook from back to front around the post of the indicated stitch and complete the stitch as normal)
- Dc – Double crochet
- RS – Right side
- Sl st – Slip stitch
- St/sts – Stitch/stitches
- WS – Wrong side
- () and * – Repeat instructions between parentheses and/or asterisks the number of times specified
Special Stitches
Cluster (Dc3tog) – (Yarn over and insert your hook into the next stitch. Yarn over and pull up a loop. Yarn over and pull through 2 loops) 3 times. Yarn over and pull through all 4 loops on your hook. See this tutorial.
Popcorn Stitch – Make 5 dc in the same stitch. Remove your hook from the last stitch. Insert your hook into the first dc of the 5 dc. Grab the last stitch with your hook and pull it through the first stitch. If you want to make Really Lazy Popcorns instead (which I thoroughly endorse and will personally be using in this pattern), please see the photo tutorial HERE and Shell Stitch below.
Shell Stitch – Make 5 dc in the same stitch.
Standing Stitches – Standing stitches are exactly the same as regular stitches, except that they are made ‘in air’, without being attached to a previous stitch. Start with a slip knot already on your hook and complete the stitch as normal. Here is a tutorials for the standing double crochet.
V-Stitch – (Dc, ch 1, dc) in the same stitch
Special Instructions
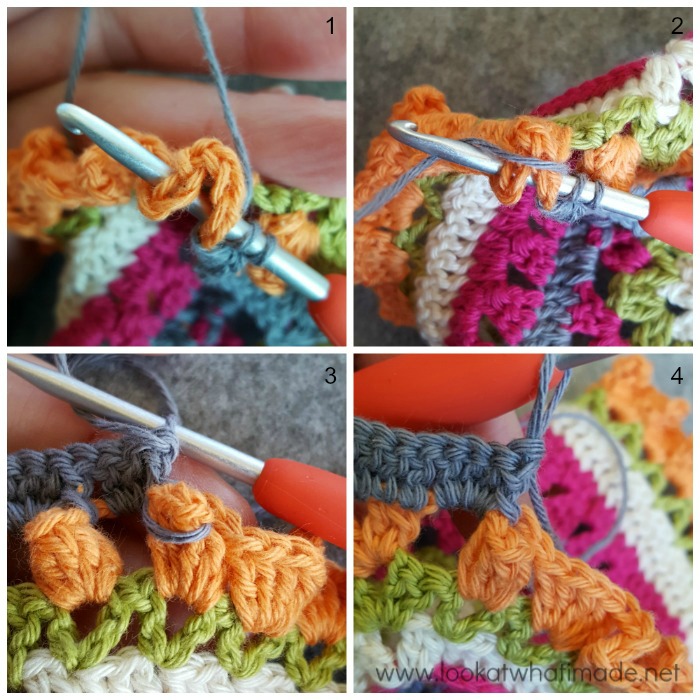
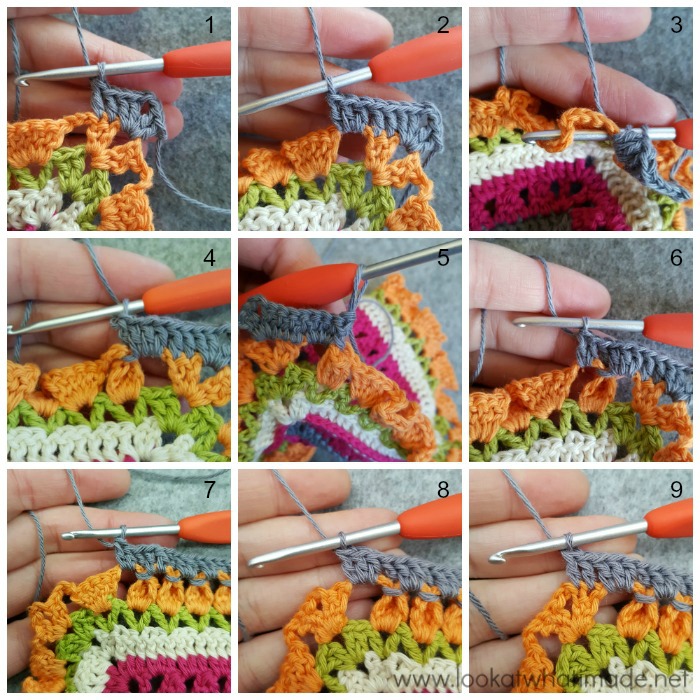
Working Around the Shells/Popcorns
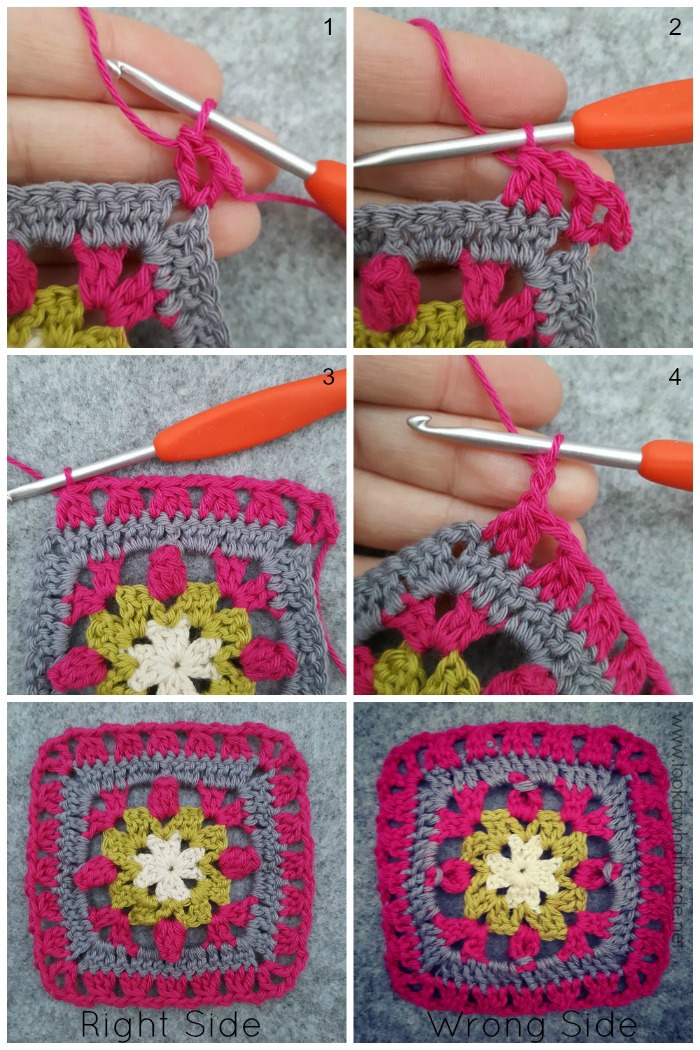
Regardless of whether you choose to make regular Popcorns or Really Lazy Popcorns, you will need to make BPdcs around these stitches. When making your BPdcs, ensure that your working yarn does not go around the back of the Shell/Popcorn {Photo 1}, but over the top {Photo 2}. If your working yarn goes around the back of the Shell/Popcorn, you will end up with a nasty-looking loop on the Right Side of your work {Photo 3}. If your working yarn goes over the top of your Shell/Popcorn, your BPdc will ‘hug’ the Popcorn and make it look nice and neat {Photo 4}.
Starting Your Rounds
You will fasten off (and TURN) at the end of each round. The first dc of each round will be a standing double crochet (see Standing Stitches above).
Gauge
First 6 Rounds should measure 11.5 cm (just shy of 5”). Please see Checking Your Gauge at the end of this post for more help.
Size
Using the yarn packs (available HERE), the blanket will be 1 m x 1 m, but you can continue to add 6-round repeats until it is as big as you want it to be.
Notes
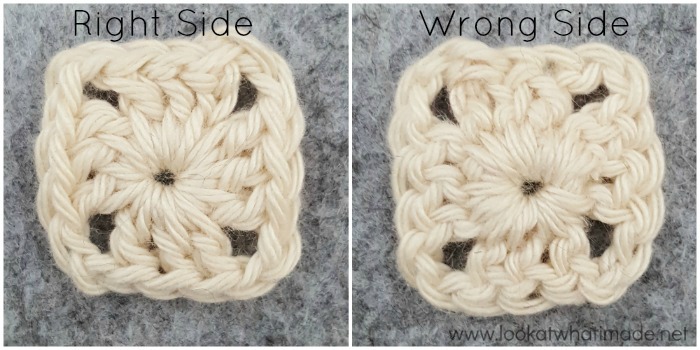
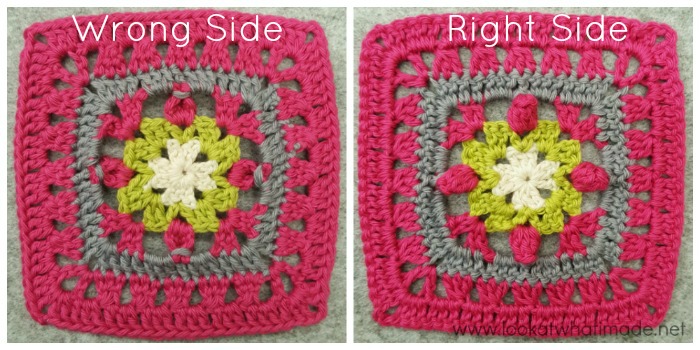
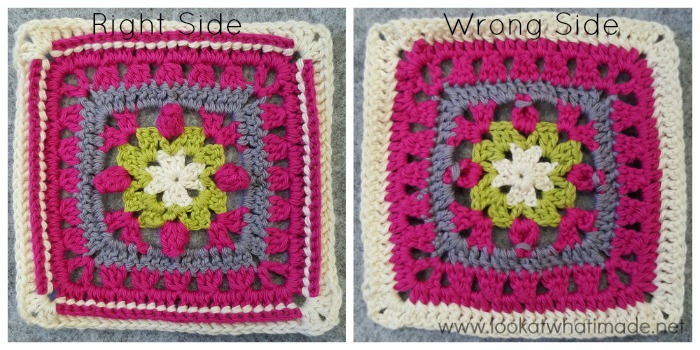
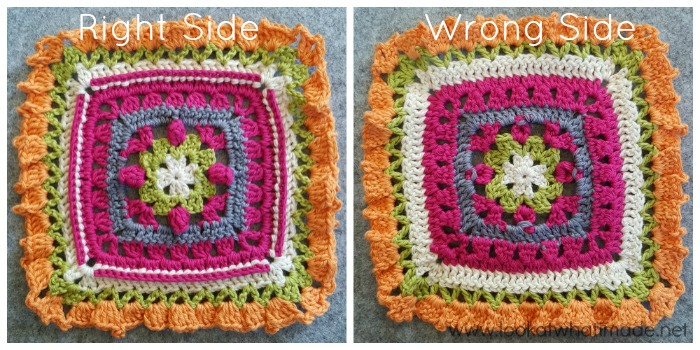
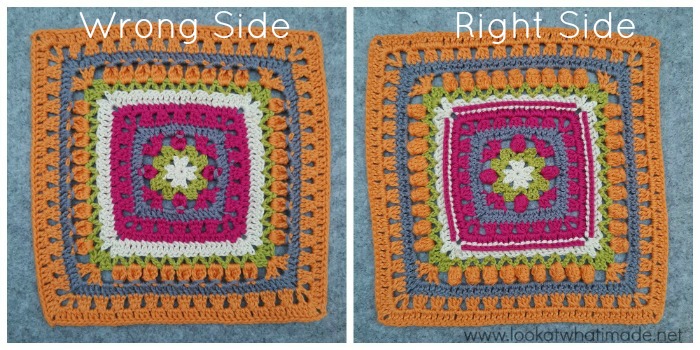
- This square is made in rounds and you will TURN your work at the end of every round. This will ensure that your central motif doesn’t twist as the blanket grows. If you have trouble identifying the Right Side and the Wrong Side of your work, here’s a handy tip: when the Popcorns from Round 3 are facing you, you are looking at the Right Side of your work.
- Stitch counts DO NOT include corner ch-2 spaces.
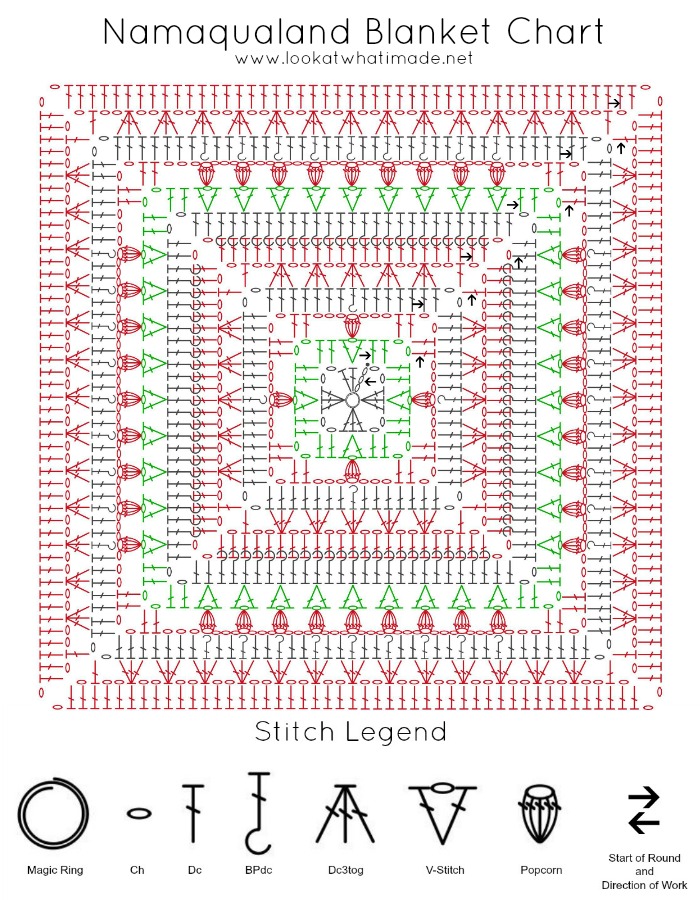
Chart
Please be mindful of the fact that you are turning at the end of every round. See Starting Your Rounds above for help with starting each round. Arrows indicate the start of each round, as well as the direction you will be working in.
Resources
Add this pattern to your Ravelry Queue
Instructions
This pattern is a continuous 6-round repeat. You can make it as big or as small as you like!
Please Note: I have used Cotton 8 and a 3.25 mm hook for the photo tutorials below because it is easier to see stitch definition with Cotton 8.
First 6-Round Repeat
Round 1 {Moonstone}
Into a magic ring: ch 3 (counts as first dc), 2 dc, ch 2, (3 dc, ch 2) 3 times. Join to the top of the beginning ch-3 with a sl st. Fasten off and TURN. Alternatively, you can use the Invisible Join. I heartily encourage you to try it if you haven’t yet. {3 dc per side}
Round 2 {Canada Jade}
With WS Facing: *(2 dc, ch 2, 2 dc) in the ch-2 corner space. Skip the first st. (Dc, ch1, dc) into the next st {indicated with an arrow in Photo 1 and illustrated in Photo 2}. This is your V-Stitch made. Skip the last st.* Repeat from * to * 3 more times. Join to the first dc with a sl st. Fasten off and TURN. {4 dc and 1 V-Stitch per side}
Hint: When the back of the last round is facing you, as it will be when you start every round in this pattern, the loops of each stitch will be AFTER the post of the stitch.
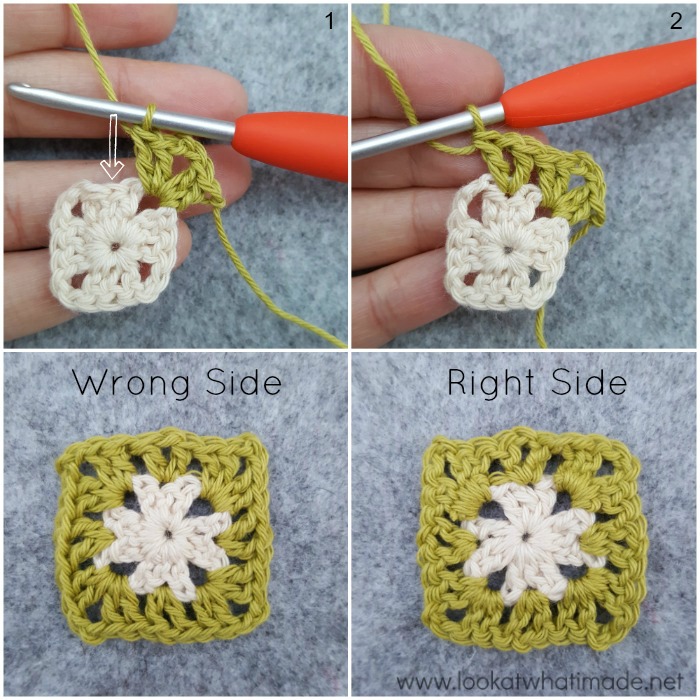
Stop for a moment and look at the ‘Right Side’ photo above. Do you see the ‘knotty’ appearance of the round we just made? That tells you that you are looking at the back of the last round. In this pattern, your last round should always look ‘knotty’ because you are turning your work at the end of every round. Until you get used to turning, pause before you start every round and make SURE that the back of the last round is facing you BEFORE you make the first stitch of the next round.
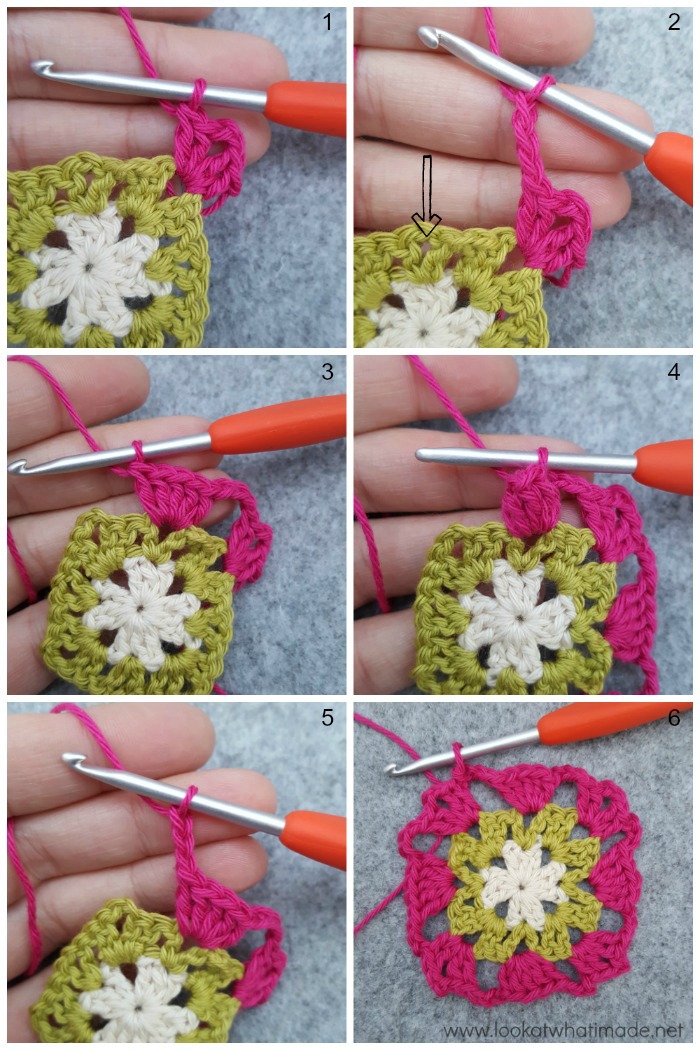
Round 3 {CC – Red Jasper}
I choose to make my Popcorns the Really Lazy way, which essentially means I don’t close them until the next round. If this method makes you uncomfortable, please feel free to make regular old popcorns as in Photo 4 below.
With RS Facing: *(2 dc, ch 2, 2 dc) in the ch-2 corner space {Photo 1}. Ch 3 and skip the first 3 sts. Make a Shell/Popcorn in the ch-1 space of the V-Stitch {indicated with an arrow in Photo 2 and illustrated in Photos 3 and 4}. Ch 3 {Photo 5} and skip the last 3 sts.* Repeat from * to * 3 more times. Join to the first dc with a sl st. Fasten off and TURN. {4 dc, 1 Popcorn, and 2 ch-3 spaces per side}
If you look at photo 6 below, you will see that I chose not to close my Popcorns in the ‘traditional’ way.
Round 4 {Smokey Quartz}
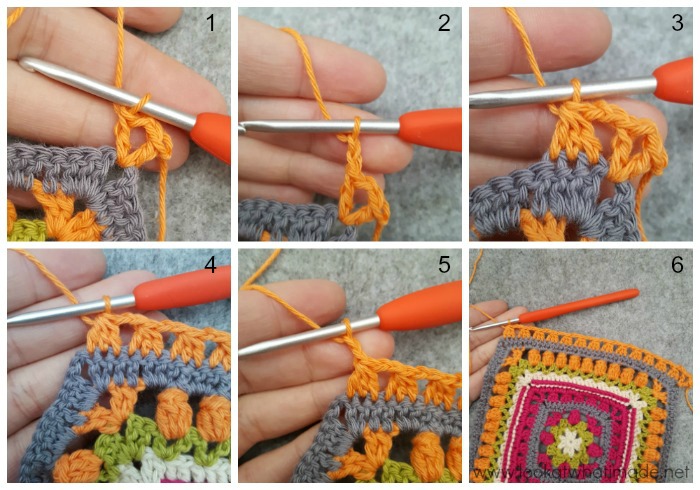
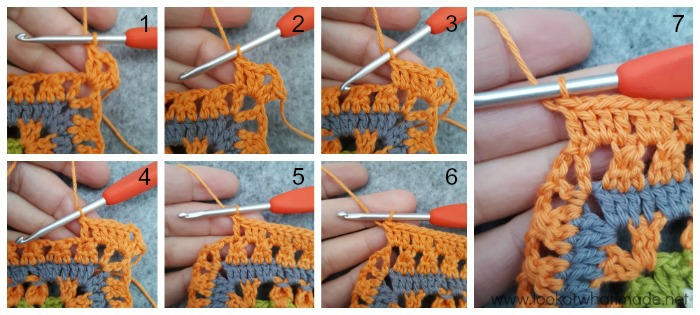
With WS Facing (knobbly side of last round should be facing you!): *(2 dc, ch 2, 2 dc) in the ch-2 corner space. Dc in the first 2 sts {Photo 1}. Make 3 dc in the first ch-3 space {Photo 2}.
BPdc around the Shell/Popcorn:
- If you are adventurous enough to try the Really Lazy Popcorns (and therefore only made Shells in the previous round), insert your hook from back to front into the ch-3 space before the Shell {Photo 3}, then insert it from front to back into the ch-3 space after the Shell, making sure that your working yarn runs over the top of the Shell, not behind it {Photo 4}, pinch the two ch-3 spaces together {Photo 5} and complete your BPdc {Photo 6}.
- If you just want to ‘use normal Popcorns already’, insert your hook from back to front into the ch-3 space before the Popcorn {Photo 7}, then insert it from front to back into the ch-3 space after the Popcorn {Photo 8} and complete your BPdc {Photo 9}.
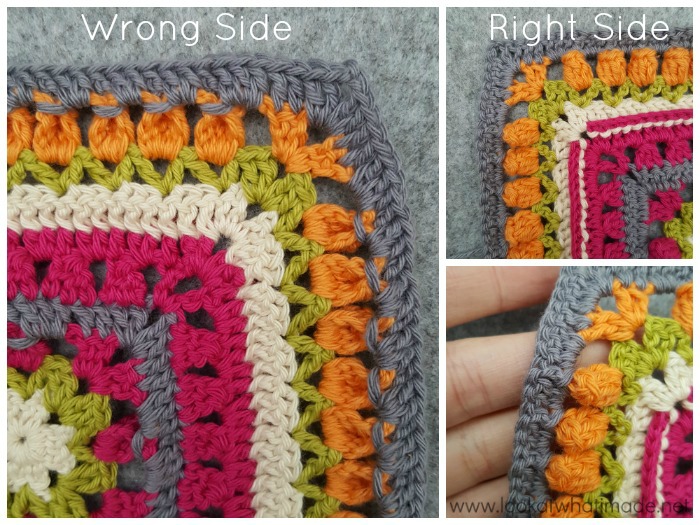
Before you go any further, take a look at what you have just done. Regardless of how you chose to make your Popcorn, you should see a dotted line running across the top of each Popcorn and the colour from the previous round (pink in these photos) should be visible above it {Photos 6 and 9}. When you turn the square so that the Right Side is facing you, the BPdc should ‘hug’ the top of the Popcorn and no pink should be visible above the Popcorn {Photo 10}. If the dotted line is on the Right Side of your work, you’ve accidentally made FPdc instead of BPdc and you will need to rip out and redo.
Make 3 dc in the last ch-3 space {Photo 11}. Dc in the last 2 sts {Photo 12}.* Repeat from * to * 3 more times. Join to the first dc with a sl st. Fasten off and TURN. {15 dc per side}
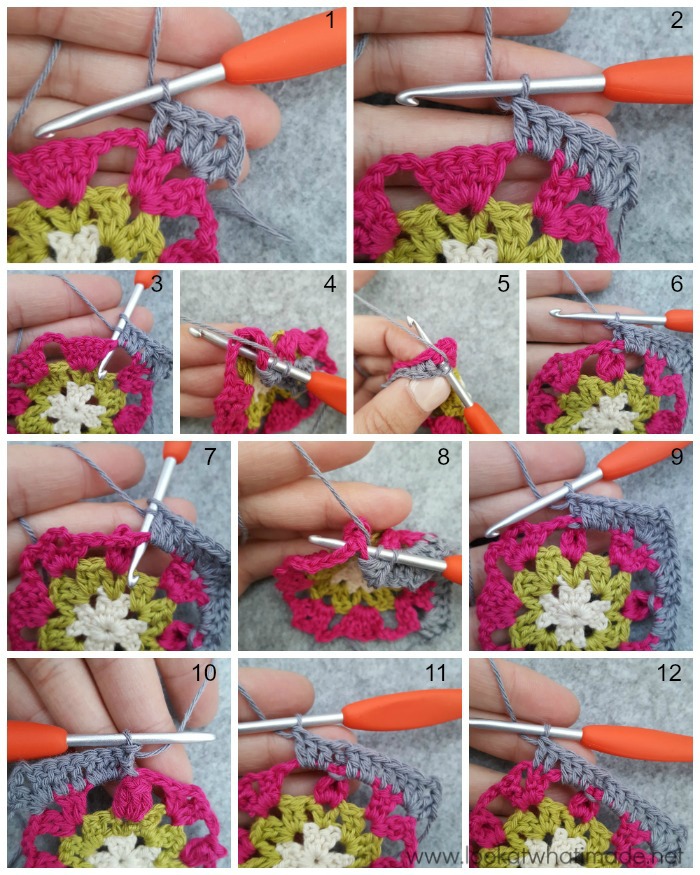
From this point on, it will be MUCH easier to identify the Right Side of your work. When the Popcorns are ‘popping’ towards you, you are looking at the Right Side.
Round 5 {CC – Red Jasper}
Hint: The central ‘leg’ of the third Cluster will fall in the BPdc from Round 4. If your square suddenly pulls in at the end of this round, it is an indication that you are making your chains too tight. You will need to either loosen your tension when making chains or add an extra chain between Clusters.
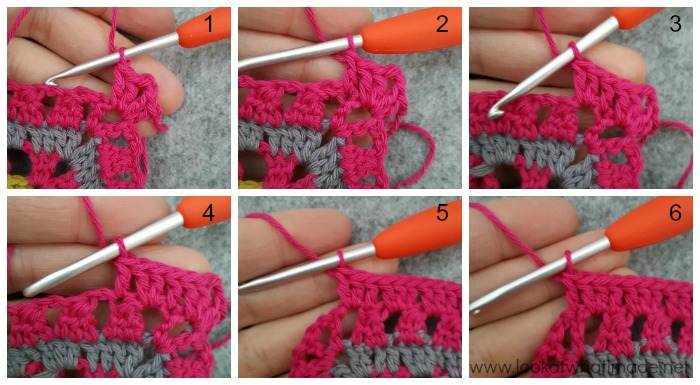
With RS Facing (Popcorns from Round 3 facing you): *(Dc, ch 2, dc) in the ch-2 corner space {Photo 2}. (Ch 2, make a Cluster) 5 times {Photos 2 and 3}. Ch 2 {Photo 4}.* Repeat from * to * 3 more times. Join to the first dc with a sl st. Fasten off and TURN. {2 dc, 5 Clusters, and 6 ch-2 spaces per side}
Stitch counts not working out? Check that each Cluster falls over 3 stitches (dc3tog as in Photo 2), not in one stitch!
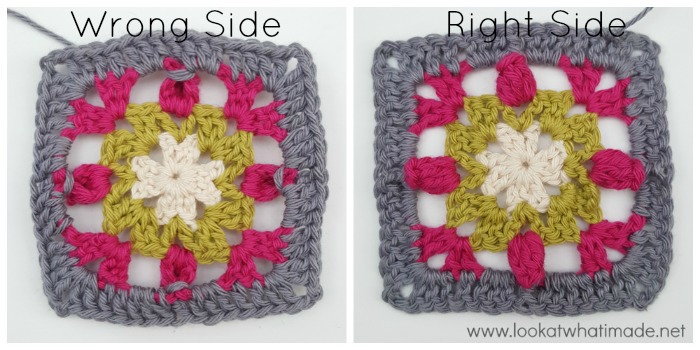
Round 6 {CC – Red Jasper}
With WS Facing: *(2 dc, ch 2, 2 dc) in the ch-2 corner space {Photo 1}. Dc in the first st {Photo 2}. (Make 2 dc in the next ch-2 space {Photo 3}, dc in the next Cluster {Photo 4}) 5 times. Make 2 dc in the last ch-2 space {Photo 5}. Dc in the last st {Photo 6}.* Repeat from * to * 3 more times. Join to the first dc with a sl st. Fasten off and TURN. {23 dc per side}
Second 6-Round Repeat
Round 7 {Moonstone}
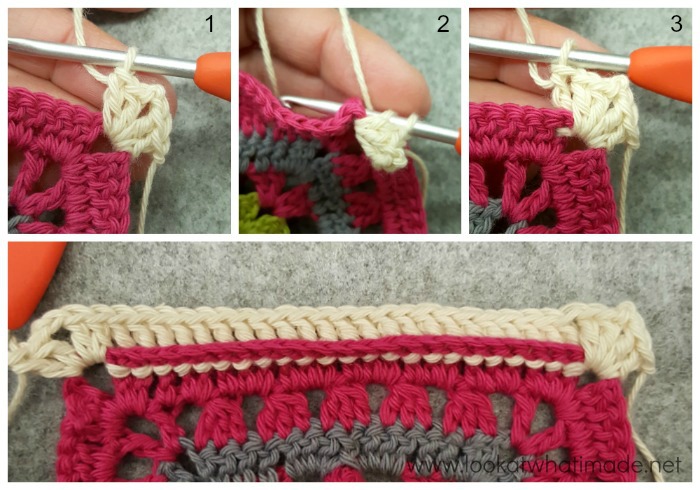
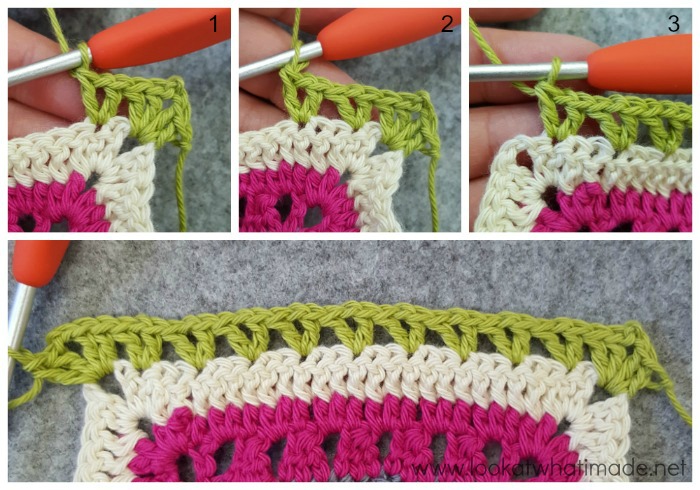
With RS Facing: *(2 dc, ch 2, 2 dc) in the ch-2 corner space {Photo 1}. BPdc in each st {Photos 2 and 3}.* Repeat from * to * 3 more times. Join to the first dc with a sl st. Fasten off and TURN. {27 dc per side}
Hint: Check for those dotted lines that indicate you have indeed made BPdc not PFdc.
Round 8 {Canada Jade}
With WS Facing: *(2 dc, ch 2, 2 dc) in the ch-2 corner space. Skip the first st. V-stitch in the next st {Photo 1}. (Skip the next 2 sts, V-Stitch in the next st {Photo 2}) until you have 1 st left {Photo 3}. Skip the last st.* Repeat from * to * 3 more times. Join to the first dc with a sl st. Fasten off and TURN. {4 dc and 9 V-Stitches per side}
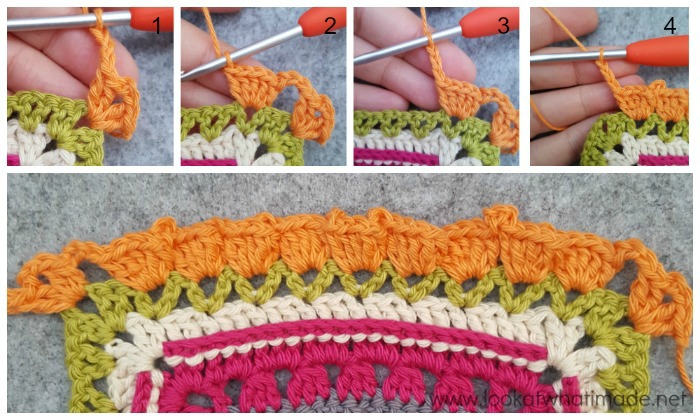
Round 9 {CC – Coral}
With RS Facing: *(2 dc, ch 2, 2 dc) in the ch-2 corner space. Ch 3 {Photo 1} and skip the first 3 sts. (Make a Shell/Popcorn in the ch-1 space of the next V-Stitch {Photo 2}. Ch 3 {Photo 3}) until you have worked into each ch-1 space {Photo 4}. Skip the last 3 sts.* Repeat from * to * 3 more times. Join to the first dc with a sl st. Fasten off and TURN. {4 dc, 9 Popcorns, and 10 ch-3 spaces per side}
Round 10 {Smokey Quartz}
Please Note: You will be making 3 dc in the first and last ch-3 space, and 2 dc in all the other ch-3 spaces. Just as in Round 4, please check that you are making BPdc not FPdc {Wrong Side photo below}.
With WS Facing: *(2 dc, ch 2, 2 dc) in the ch-2 corner space. Dc in the first 2 sts {Photo 1}. Make 3 dc in the first ch-3 space {Photo 2}. (BPdc around the next Shell/Popcorn {Photos 4 and 5}. Make 2 dc in the next ch-3 space {Photo 6}) until there is only one Popcorn and one ch-3 space left {Photo 7}. BPdc around the last Popcorn. Make 3 dc in the last ch-3 space {Photo 8}. Dc in the last 2 sts {Photo 9}.* Repeat from * to * 3 more times. Join to the first dc with a sl st. Fasten off and TURN. {39 dc per side}
Round 11 {CC – Coral}
Hint: Apart from the first and last 2 Clusters on each side, the central ‘leg’ of each Cluster will fall in a BPdc from Round 10.
With RS Facing: *(Dc, ch 2, dc) in the ch-2 corner space {Photo 1}. (Ch 2, make a Cluster {Photos 2 and 3}) until you have worked into every stitch {Photo 4}. Ch 2 {Photos 5 and 6}.* Repeat from * to * 3 more times. Join to the first dc with a sl st. Fasten off and TURN. {2 dc, 13 Clusters, and 14 ch-2 spaces per side}
Round 12 {CC – Coral}
With WS Facing: *(2 dc, ch 2, 2 dc) in the ch-2 corner space {Photo 1}. Dc in the first st {Photo 2}. (Make 2 dc in the next ch-2 space {Photo 3}, dc in the next Cluster {Photo 4}) until you have worked into each Cluster {Photo 5}. Make 2 dc in the last ch-2 space {Photo 6}. Dc in the last st {Photo 7}.* Repeat from * to * 3 more times. Join to the first dc with a sl st. Fasten off and work away your yarn ends. TURN. {47 dc per side}
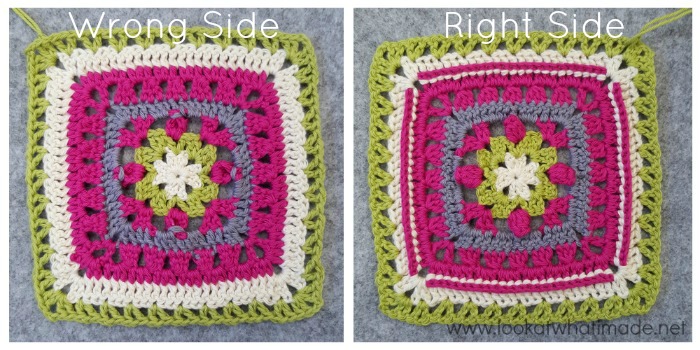
Subsequent 6-Round Repeats
Repeat Rounds 7 to 12 until you have made 54 rounds (or your blanket is as large as you want it to be). Each 6-round repeat features a different Contrasting Colour (CC). At this point you have already used Red Jasper and Coral, so your next repeat will use Lemon Quartz, followed by Blue Apatite, followed by Deep Amethyst. After that, start from Red Jasper again and finish with Blue Apatite. Please consult this spreadsheet for round-by-round colours and stitch counts.
Stitch Counts for Subsequent Repeats:
- Round 7 (Moonstone) – multiples of 3 dc per side
- Round 8 (Canada Jade) – 4 dc and a multiple of 8 + 1 V-Stitches per side
- Round 9 (CC) – 4 dc, a multiple of 8 + 1 Popcorns, and a multiple of 8 + 2 ch-3 spaces per side
- Round 10 (Smokey Quartz) – multiples of 3 dc per side
- Round 11 (CC) – 2 dc, a multiple of 8 + 5 Clusters, and a multiple of 8 + 6 ch-2 spaces per side
- Round 12 (CC) – multiple of 3 + 2 dc per side
You can find a list of stitch counts per round HERE.
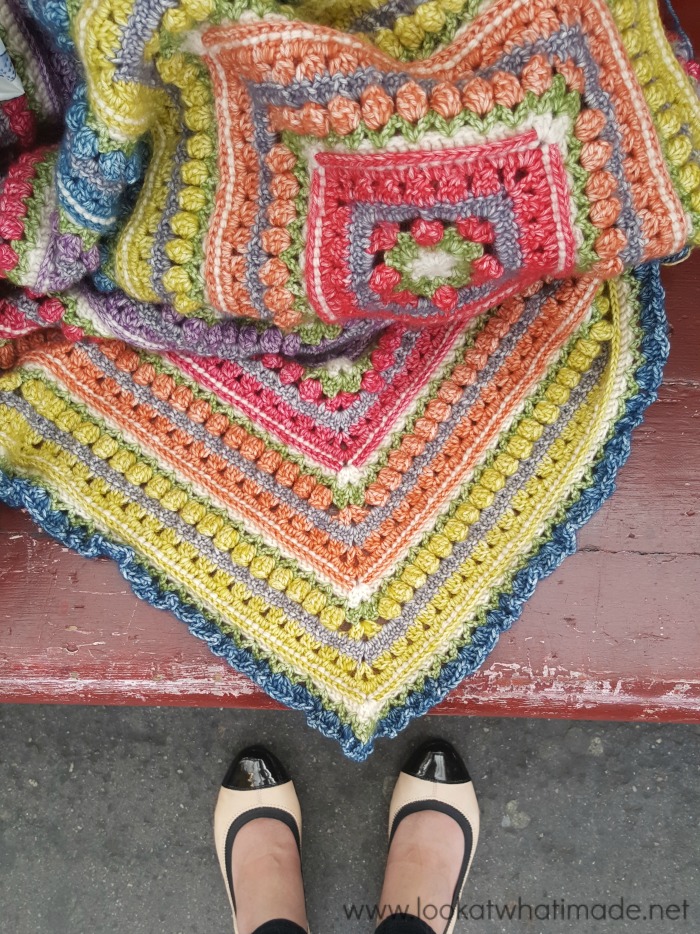
Working on the last repeat while waiting for the tube home
Checking Gauge
If you are using the colour pack, it is important that you match the gauge the blanket was written for, otherwise you will run out of yarn. Alternatively, you can buy an extra skein of Coral, Blue Apatite, and Smokey Quartz as those are the colours that will have the least amount of left-over yarn at the end of the blanket (see this spreadsheet).
At the end of Round 12, your square should measure 22.5 cm in Stonewashed, and it should weigh 39 g.
What do I do if my square is smaller?
If it is more than a 1 cm/5g smaller, you can go up to a 4.25 hook size, but you don’t have to. Going up a hook size is precarious if you are using the colour pack because if your tension relaxes, you won’t have enough yarn to complete the blanket.
What do I do if my square is larger?
If your square is larger (or it weighs much more than 41 g), you won’t have enough yarn in the yarn pack to complete the blanket. You can either buy an extra skein of Coral, Blue Apatite, and Smokey Quartz (the colours that will have the least amount of left-over yarn at the end of the blanket) or you will need to go down a hook size.
- If you are only slightly out (1 cm/5g), go down to a 3.75 mm hook.
- If you are more than 1 cm/5g out, you will need to go down to a 3.5 mm hook.
- If you are more than 2 cm/10g out, you will need to go down to a 3.25 mm hook.
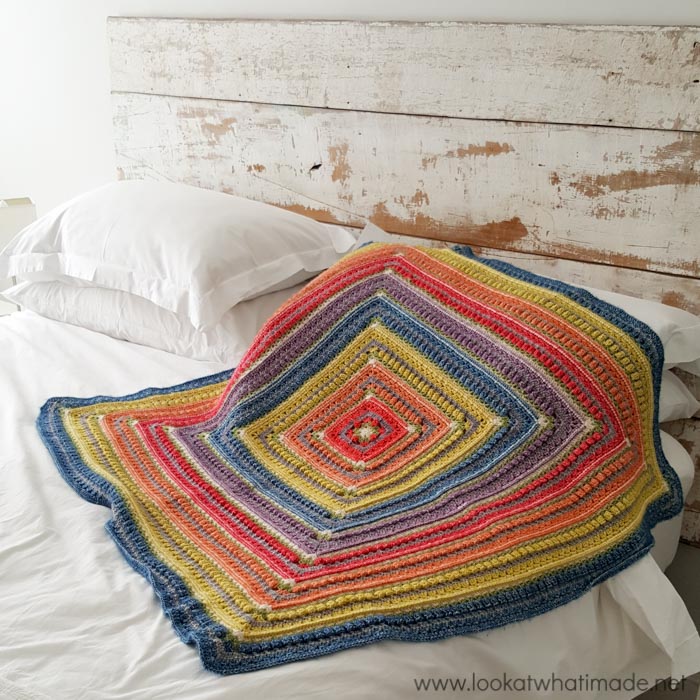
Maybe I could have neatened that edge up a bit before taking this photos *blushes*
If you share photos of your Namaqualand Blanket, please use hashtags #namaqualandblanket so that I can see your photos :)

This blog post contains affiliate links. I only link to products I personally use or would use. All opinions are my own.


Kat says
Dedri,
Thank you so much for this gorgeous pattern! I used Wool Ease, 4-ply, worsted weight yarn with a 5mm hook and I absolutely love how it turned out. All the textures and shapes in this blanket are just so stunning! I will definitely be making this again!
Jenny Lowman says
Hi Kat! We’d love to see photos on our Facebook page! :)
Emma Cassley says
I’m absolutely loving doing this blanket but am struggling to meet the gauge. I’m already down to a 3mm hook but after 12 rounds my square is 25cm and weighs 45g (so 2.5cm and 6g too big for the yarn pack.) It’s most unusual as normally I crochet tightly and have to go up a size to meet gauge!
Do you think moving to a 2.5mm hook will affect the drape of the blanket too much?
Jenny Lowman says
I have found white metal 90cm hoops on Etsy
The shop is called HoopsAndStringsUK. I think I may be buying one for my mandala too, as I haven’t yet found a wooden one.
There is this site that seem to make them to measure from 60-90cm. Google helped me.
Here
Chelse B Woods says
Firstly, thank you for sharing this lovely pattern. <3
Is there a way to make this pattern rectangular?
I've enjoyed following this pattern for a baby blanket gift, and my toddler has loved snuggling it as I've been working on it. My little one really likes the texture of this blanket, and I'd really like to make a toddler bed sized one for when she grows out of the crib.
Thank you for your time, energy and talent sharing. I hope this is not a difficult request/question. :/
– Chelse
Dedri Uys says
Hi Chelse,
I am so happy to hear that your toddler loves it :) I did have a play around with making it rectangular in the round, but I didn’t like the result. Have you had a look at the Memory Lane blanket? That is the same stitch repeat but made in rows to form a rectangular blanket. The colours are different, but there is nothing stopping you from using the Namaqualand colours with that pattern.
Jae says
Hi Dedri, love the pattern and would like to make it out of the stonewash colours, but struggle with thin yarn. Do you have a post of how much yarn would be needed if made out of the XL yarn instead? Thank you in advance. Jae
Dedri Uys says
Hi Jae,
Unfortunately, I haven’t worked this pattern up in XL, but from my experience of converting between the two, you will need roughly double the weight of XL as you do of regular. So for every 50g of regular, you will need 100g of XL. That will depend on your personal gauge and the hook size you choose to use as well (my calcs are based on a 5mm hook for XL). I would suggest buying 1.5 times the amount and then topping it up when you get closer to the end and have a general idea of how much you still need to finish.
Good luck!
Brenda Varnam says
Absolutely stunning.
Dedri Uys says
Thank you :)
Jean Sharp says
Beautiful pattern. I love mine and will do it again
Dedri Uys says
Thank you :)
Joanie says
Gorgeous
Kerry Orth says
I loved working on this pattern, it’s just challenging enough to keep my interest, but not so much that I got frustrated. Thank you so much for sharing this!!
I’d love to make it again in a rectangle shape, do you have any suggestions for how to do that?
Dedri Uys says
Hi Kerry. Lovely to hear from you. I am so pleased that you enjoyed the pattern. I have seen a few versions where people have added extra rows of the repeat on either end to create a rectangle. If you have a look at the Memory Lane pattern, you will find instructions for working the repeats in rows. I hope that helps.
Dedri
Tess Vowels says
Ah!! A new favorite!! Beautiful pattern!! Thanks, Dedri!!
Jenny says
This is indeed a beauty! Enjoy!
BW Jenny :)
Veronica Hains says
I’m just now seeing my mistake. I didn’t see the parentheses! I now see what part to repeat 5 times!
Valerie says
Why do you need to cut your yarn after each round and then turn? Why can’t you just turn?
Jenny says
Because the pattern changes colour with each round :)
Farida says
Hi Dedri
I absolutely love this colorful blanket and even though it is described as a baby blanket, I’m making it for my mother as a throw. One thing I can’t seem to find here is the border pattern. Kindly help . Once again thanks for this gorgeous blanket.
Dedri Uys says
Hi Farida. Each repeat is essentially a border. I wanted to keep the design as ‘clean’ as possible, and felt that adding a border would detract from the overall look. You are welcome to add one x
Kathryn Pless says
This is stunning! The pattern looks like a fun challenge. I like to design patterns too so I admire the creativity it took to create this one. Thank you so much for sharing it!
Dedri Uys says
Hi Kathryn. Thank you. I hope designing brings you as much joy as it has for me.
Kat says
I have skipped by this blanket several times because I was intimidated… and then I actually clicked on the instructions. You have done an AMAZING job on your instructions/photos and I appreciate all the time you put into it (your chart is also outstanding btw). I am so excited to make this blanket. While I adore the colors you chose, I’m going to first use this pattern to bleed off excess yarn from finished projects (I tend to overbuy because I inevitably run short, and the colors I need to finish are always sold out). I can definitely see making more of these as gifts. I don’t normally post, but again, I just wanted you to know how appreciated your incredibly clear instructions are. Thank you for sharing this pattern!
Dedri Uys says
Thank you for taking the time to post, Kat, and for your lovely comment. I look forward to seeing your blanket. Please tag me when you share.
Joyce Uhles says
could you use a self striping yarn for this pattern and if so would you still need to cut the yarn after every round or is there away you could turn and keep going?
Dedri Uys says
Hi Joyce. You would still need to cut your yarn as I have found that to be the neatest way to complete this blanket. But self-striping would definitely work!
Sally Lee Talbot says
Dedri,
I love this pattern. It’s absolutely stunning!
What do you think this pattern will look like all one color? My daughter is expecting baby in April, but only wants the blanket in one color – white. What are your thoughts on this.
Dedri Uys says
Hi Sally. Thank you. I think this is one of those patterns that benefit from a spot of colour as the stitches themselves don’t stand out so much in a single colour. It would look lovely, don’t get me wrong, but there are plenty of other patterns that absolutely shine in a single colour, if that makes sense. The Call the Midwife blanket, for example, is a very popular single-colour design. I hope that helps.