The Namaqualand Blanket is very special to me for many (mostly sentimental) reasons. I am delighted to share the pattern with you today.
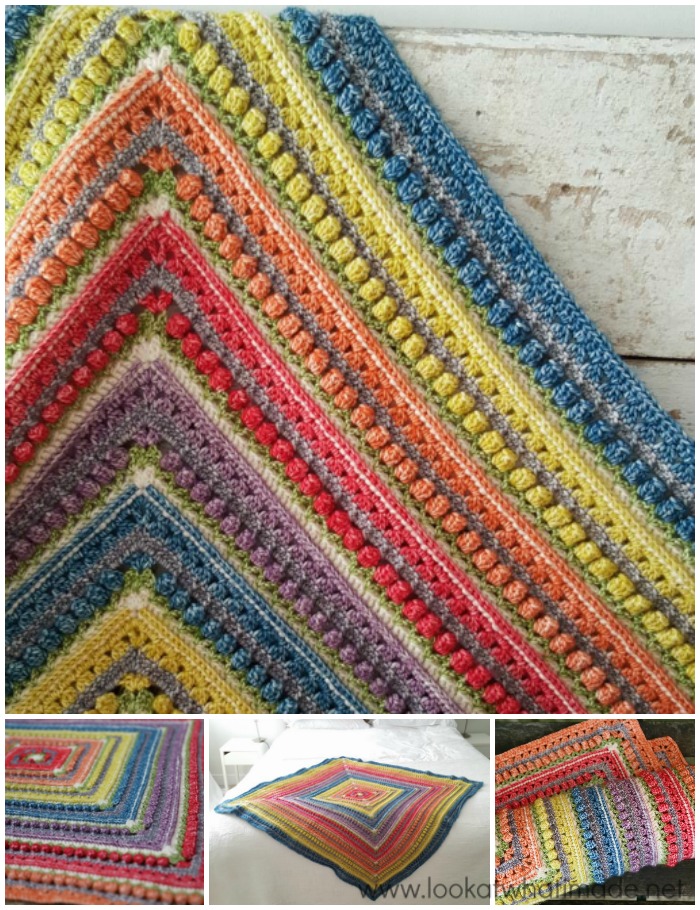
This colourful square baby blanket is made up of a simple 6-round repeat. The pattern literally contains every lesson I have learned since starting to crochet, so if the first 6 rounds seem daunting in their wordiness, please don’t be disheartened. Once I have told you (in those first 6 rounds) everything I would like you to learn/take away from this pattern, the rest of the repeats become much easier. Think of this pattern as a workshop-by-proxy (and bring tea and snacks)!
Namaqualand Blanket Pattern
© Dedri Uys 2016. All Rights Reserved
This blanket was inspired by the beautiful colours of the Namaqualand flowers. It has been specifically designed for the Be Inspired South African Tour 2016.
Materials
- 4 mm crochet hook (US 6/G UK 8)
- Scheepjes Stonewashed:
- Main Colours: Moonstone, Canada Jade, and Smokey Quartz
- Contrasting Colours (CC): Red Jasper, Coral, Lemon Quartz, Blue Apatite, and Deep Amethyst (in that order)
Yarn Packs are available from my Wool Warehouse Shop and include a printed written-only version of the pattern. You can also buy packs from Deramores. Both of these shops ship internationally. If you live in South Africa, you can buy yarn packs from Be Inspired. For a full list of Scheepjes stockists, visit Scheepjes (NL).
For a full list of yardages and colours per round, please see this spreadsheet.
Abbreviations
US Terminology
- CC – Contrasting Colour
- Ch – Chain
- BP – Back post (insert your hook from back to front around the post of the indicated stitch and complete the stitch as normal)
- Dc – Double crochet
- RS – Right side
- Sl st – Slip stitch
- St/sts – Stitch/stitches
- WS – Wrong side
- () and * – Repeat instructions between parentheses and/or asterisks the number of times specified
Special Stitches
Cluster (Dc3tog) – (Yarn over and insert your hook into the next stitch. Yarn over and pull up a loop. Yarn over and pull through 2 loops) 3 times. Yarn over and pull through all 4 loops on your hook. See this tutorial.
Popcorn Stitch – Make 5 dc in the same stitch. Remove your hook from the last stitch. Insert your hook into the first dc of the 5 dc. Grab the last stitch with your hook and pull it through the first stitch. If you want to make Really Lazy Popcorns instead (which I thoroughly endorse and will personally be using in this pattern), please see the photo tutorial HERE and Shell Stitch below.
Shell Stitch – Make 5 dc in the same stitch.
Standing Stitches – Standing stitches are exactly the same as regular stitches, except that they are made ‘in air’, without being attached to a previous stitch. Start with a slip knot already on your hook and complete the stitch as normal. Here is a tutorials for the standing double crochet.
V-Stitch – (Dc, ch 1, dc) in the same stitch
Special Instructions
Working Around the Shells/Popcorns
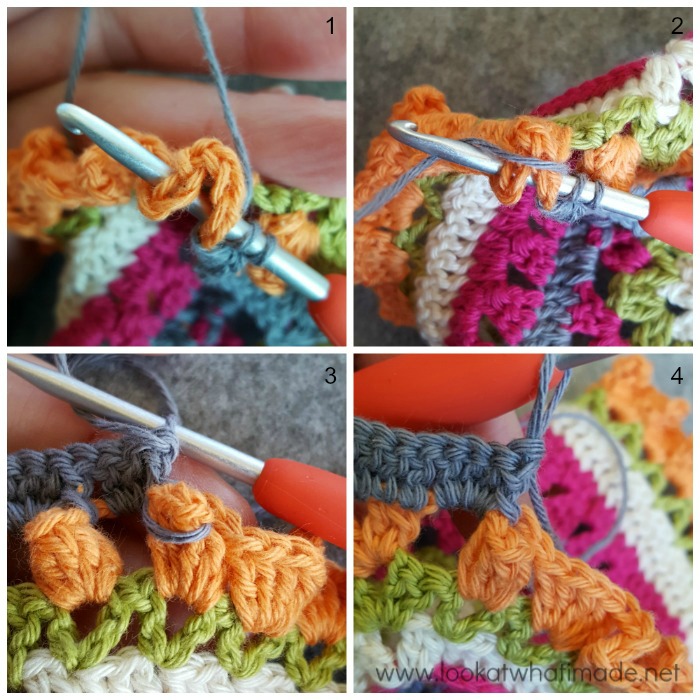
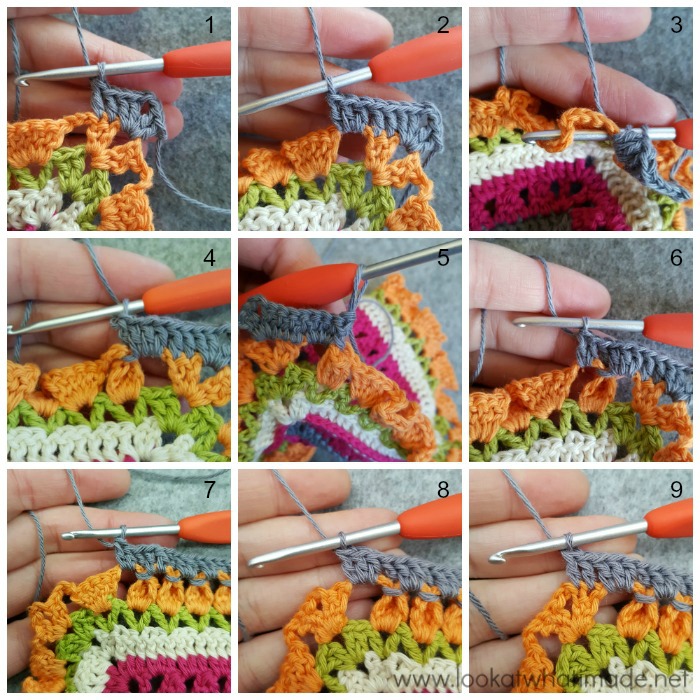
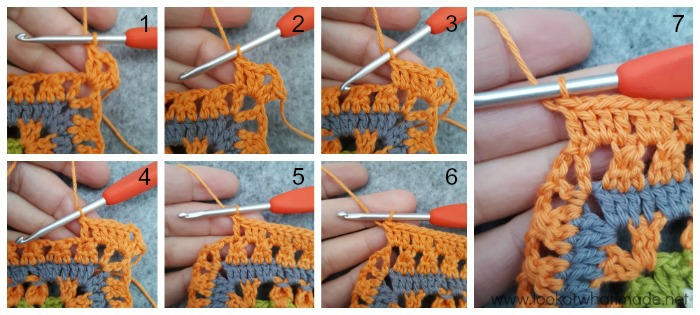
Regardless of whether you choose to make regular Popcorns or Really Lazy Popcorns, you will need to make BPdcs around these stitches. When making your BPdcs, ensure that your working yarn does not go around the back of the Shell/Popcorn {Photo 1}, but over the top {Photo 2}. If your working yarn goes around the back of the Shell/Popcorn, you will end up with a nasty-looking loop on the Right Side of your work {Photo 3}. If your working yarn goes over the top of your Shell/Popcorn, your BPdc will ‘hug’ the Popcorn and make it look nice and neat {Photo 4}.
Starting Your Rounds
You will fasten off (and TURN) at the end of each round. The first dc of each round will be a standing double crochet (see Standing Stitches above).
Gauge
First 6 Rounds should measure 11.5 cm (just shy of 5”). Please see Checking Your Gauge at the end of this post for more help.
Size
Using the yarn packs (available HERE), the blanket will be 1 m x 1 m, but you can continue to add 6-round repeats until it is as big as you want it to be.
Notes
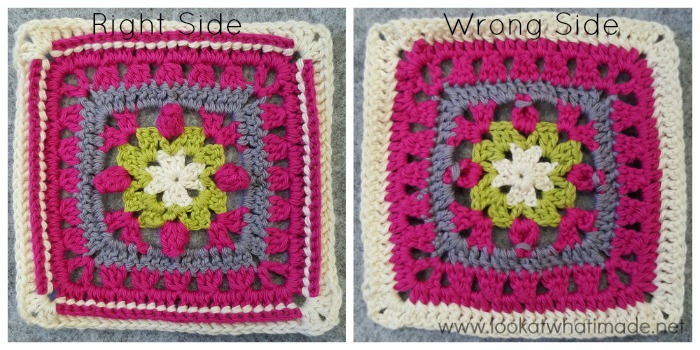
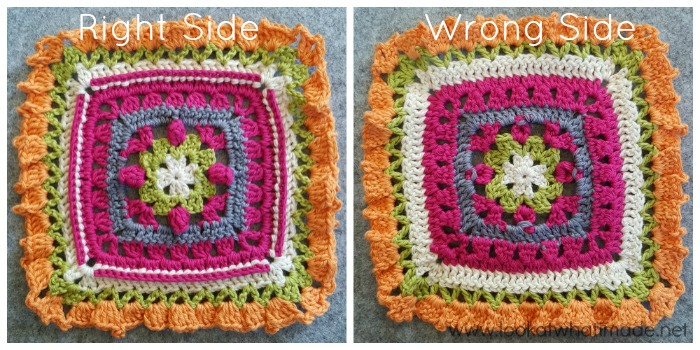
- This square is made in rounds and you will TURN your work at the end of every round. This will ensure that your central motif doesn’t twist as the blanket grows. If you have trouble identifying the Right Side and the Wrong Side of your work, here’s a handy tip: when the Popcorns from Round 3 are facing you, you are looking at the Right Side of your work.
- Stitch counts DO NOT include corner ch-2 spaces.
Chart
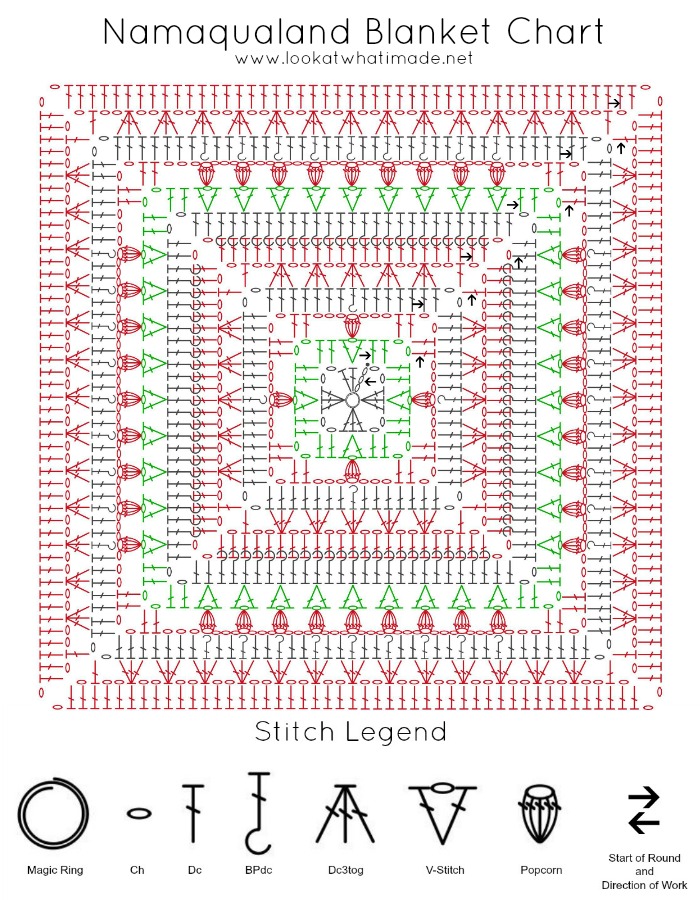
Please be mindful of the fact that you are turning at the end of every round. See Starting Your Rounds above for help with starting each round. Arrows indicate the start of each round, as well as the direction you will be working in.
Resources
Add this pattern to your Ravelry Queue
Instructions
This pattern is a continuous 6-round repeat. You can make it as big or as small as you like!
Please Note: I have used Cotton 8 and a 3.25 mm hook for the photo tutorials below because it is easier to see stitch definition with Cotton 8.
First 6-Round Repeat
Round 1 {Moonstone}
Into a magic ring: ch 3 (counts as first dc), 2 dc, ch 2, (3 dc, ch 2) 3 times. Join to the top of the beginning ch-3 with a sl st. Fasten off and TURN. Alternatively, you can use the Invisible Join. I heartily encourage you to try it if you haven’t yet. {3 dc per side}
Round 2 {Canada Jade}
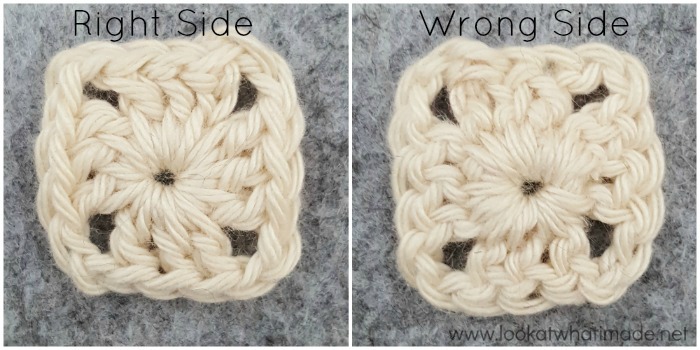
With WS Facing: *(2 dc, ch 2, 2 dc) in the ch-2 corner space. Skip the first st. (Dc, ch1, dc) into the next st {indicated with an arrow in Photo 1 and illustrated in Photo 2}. This is your V-Stitch made. Skip the last st.* Repeat from * to * 3 more times. Join to the first dc with a sl st. Fasten off and TURN. {4 dc and 1 V-Stitch per side}
Hint: When the back of the last round is facing you, as it will be when you start every round in this pattern, the loops of each stitch will be AFTER the post of the stitch.
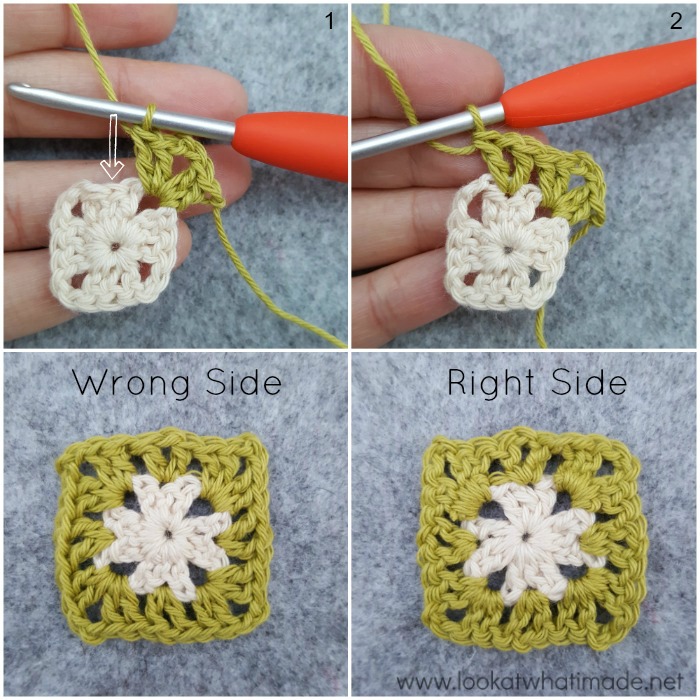
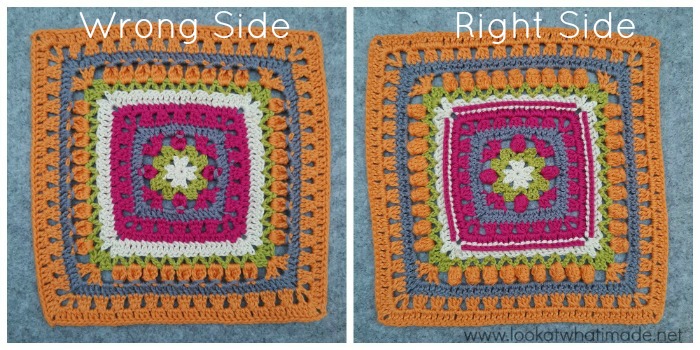
Stop for a moment and look at the ‘Right Side’ photo above. Do you see the ‘knotty’ appearance of the round we just made? That tells you that you are looking at the back of the last round. In this pattern, your last round should always look ‘knotty’ because you are turning your work at the end of every round. Until you get used to turning, pause before you start every round and make SURE that the back of the last round is facing you BEFORE you make the first stitch of the next round.
Round 3 {CC – Red Jasper}
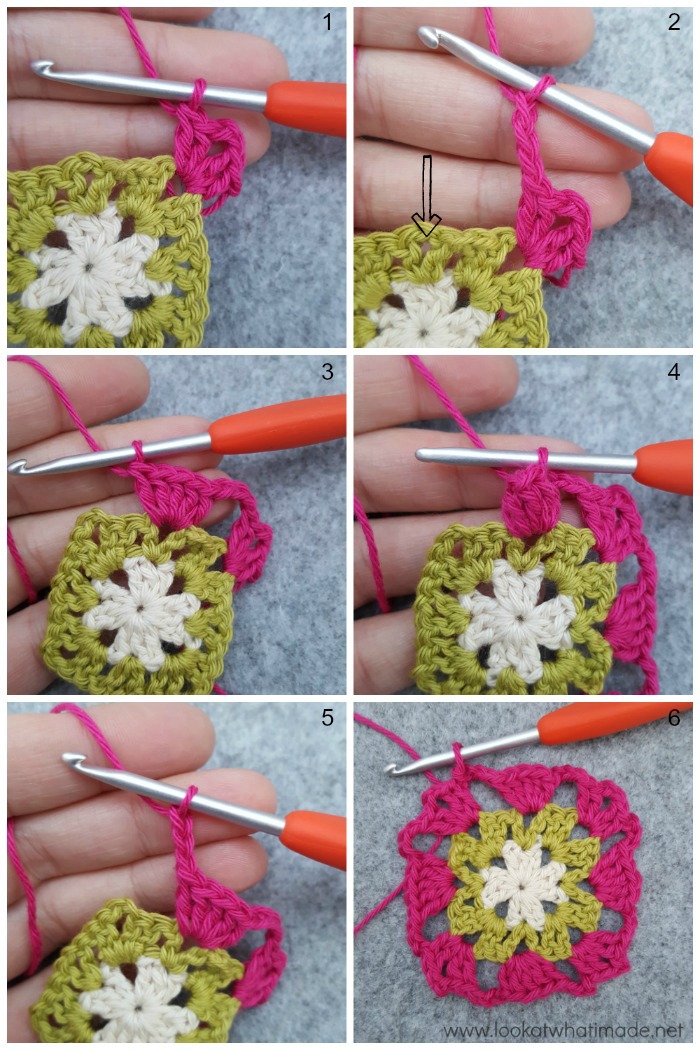
I choose to make my Popcorns the Really Lazy way, which essentially means I don’t close them until the next round. If this method makes you uncomfortable, please feel free to make regular old popcorns as in Photo 4 below.
With RS Facing: *(2 dc, ch 2, 2 dc) in the ch-2 corner space {Photo 1}. Ch 3 and skip the first 3 sts. Make a Shell/Popcorn in the ch-1 space of the V-Stitch {indicated with an arrow in Photo 2 and illustrated in Photos 3 and 4}. Ch 3 {Photo 5} and skip the last 3 sts.* Repeat from * to * 3 more times. Join to the first dc with a sl st. Fasten off and TURN. {4 dc, 1 Popcorn, and 2 ch-3 spaces per side}
If you look at photo 6 below, you will see that I chose not to close my Popcorns in the ‘traditional’ way.
Round 4 {Smokey Quartz}
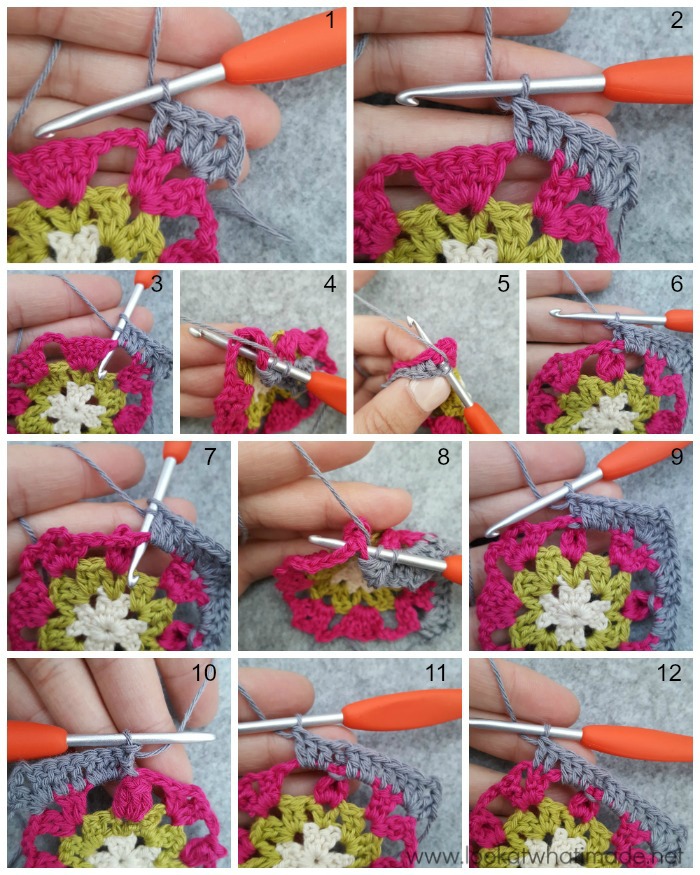
With WS Facing (knobbly side of last round should be facing you!): *(2 dc, ch 2, 2 dc) in the ch-2 corner space. Dc in the first 2 sts {Photo 1}. Make 3 dc in the first ch-3 space {Photo 2}.
BPdc around the Shell/Popcorn:
- If you are adventurous enough to try the Really Lazy Popcorns (and therefore only made Shells in the previous round), insert your hook from back to front into the ch-3 space before the Shell {Photo 3}, then insert it from front to back into the ch-3 space after the Shell, making sure that your working yarn runs over the top of the Shell, not behind it {Photo 4}, pinch the two ch-3 spaces together {Photo 5} and complete your BPdc {Photo 6}.
- If you just want to ‘use normal Popcorns already’, insert your hook from back to front into the ch-3 space before the Popcorn {Photo 7}, then insert it from front to back into the ch-3 space after the Popcorn {Photo 8} and complete your BPdc {Photo 9}.
Before you go any further, take a look at what you have just done. Regardless of how you chose to make your Popcorn, you should see a dotted line running across the top of each Popcorn and the colour from the previous round (pink in these photos) should be visible above it {Photos 6 and 9}. When you turn the square so that the Right Side is facing you, the BPdc should ‘hug’ the top of the Popcorn and no pink should be visible above the Popcorn {Photo 10}. If the dotted line is on the Right Side of your work, you’ve accidentally made FPdc instead of BPdc and you will need to rip out and redo.
Make 3 dc in the last ch-3 space {Photo 11}. Dc in the last 2 sts {Photo 12}.* Repeat from * to * 3 more times. Join to the first dc with a sl st. Fasten off and TURN. {15 dc per side}
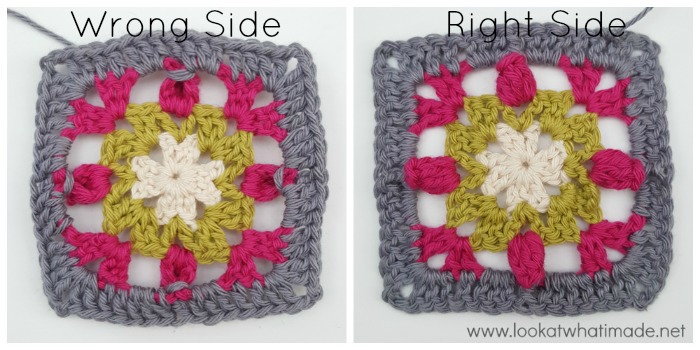
From this point on, it will be MUCH easier to identify the Right Side of your work. When the Popcorns are ‘popping’ towards you, you are looking at the Right Side.
Round 5 {CC – Red Jasper}
Hint: The central ‘leg’ of the third Cluster will fall in the BPdc from Round 4. If your square suddenly pulls in at the end of this round, it is an indication that you are making your chains too tight. You will need to either loosen your tension when making chains or add an extra chain between Clusters.
With RS Facing (Popcorns from Round 3 facing you): *(Dc, ch 2, dc) in the ch-2 corner space {Photo 2}. (Ch 2, make a Cluster) 5 times {Photos 2 and 3}. Ch 2 {Photo 4}.* Repeat from * to * 3 more times. Join to the first dc with a sl st. Fasten off and TURN. {2 dc, 5 Clusters, and 6 ch-2 spaces per side}
Stitch counts not working out? Check that each Cluster falls over 3 stitches (dc3tog as in Photo 2), not in one stitch!
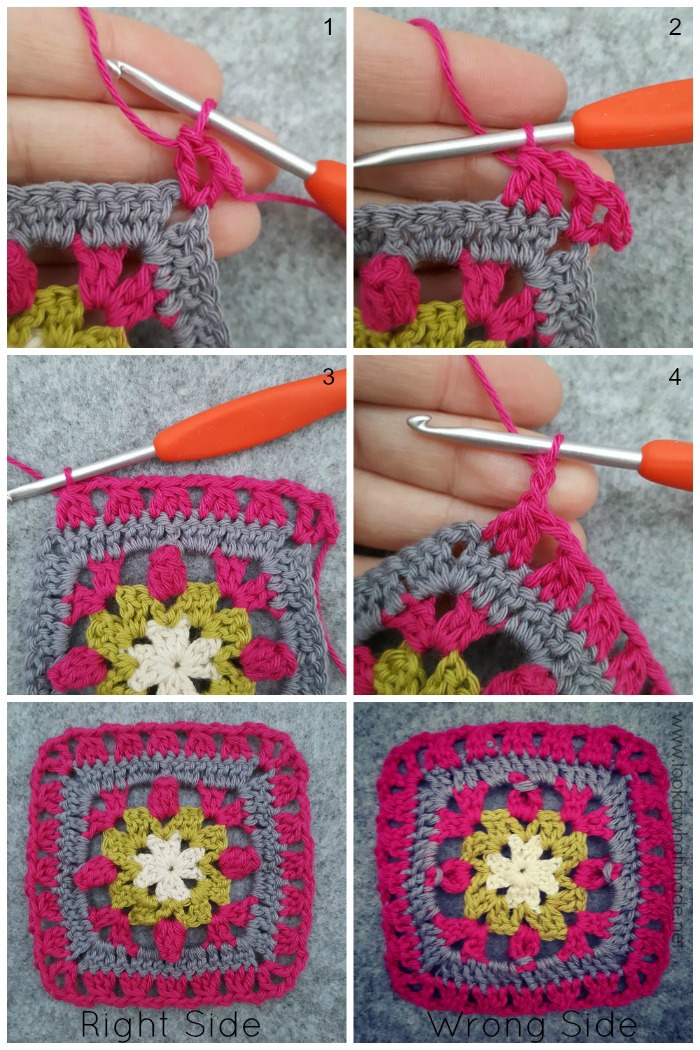
Round 6 {CC – Red Jasper}
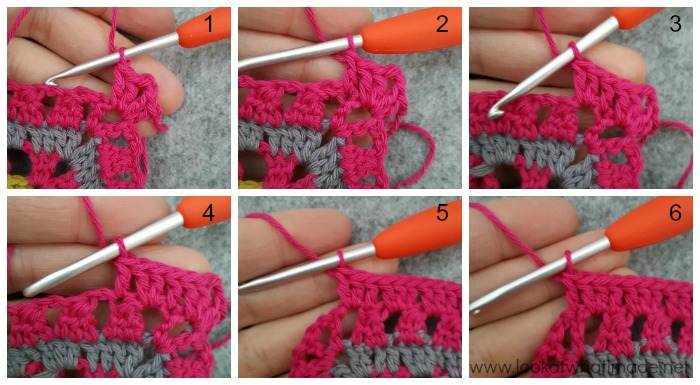
With WS Facing: *(2 dc, ch 2, 2 dc) in the ch-2 corner space {Photo 1}. Dc in the first st {Photo 2}. (Make 2 dc in the next ch-2 space {Photo 3}, dc in the next Cluster {Photo 4}) 5 times. Make 2 dc in the last ch-2 space {Photo 5}. Dc in the last st {Photo 6}.* Repeat from * to * 3 more times. Join to the first dc with a sl st. Fasten off and TURN. {23 dc per side}
Second 6-Round Repeat
Round 7 {Moonstone}
With RS Facing: *(2 dc, ch 2, 2 dc) in the ch-2 corner space {Photo 1}. BPdc in each st {Photos 2 and 3}.* Repeat from * to * 3 more times. Join to the first dc with a sl st. Fasten off and TURN. {27 dc per side}
Hint: Check for those dotted lines that indicate you have indeed made BPdc not PFdc.
Round 8 {Canada Jade}
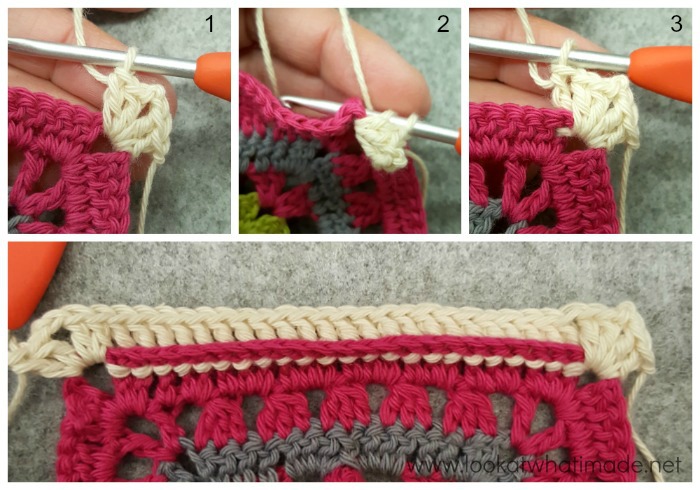
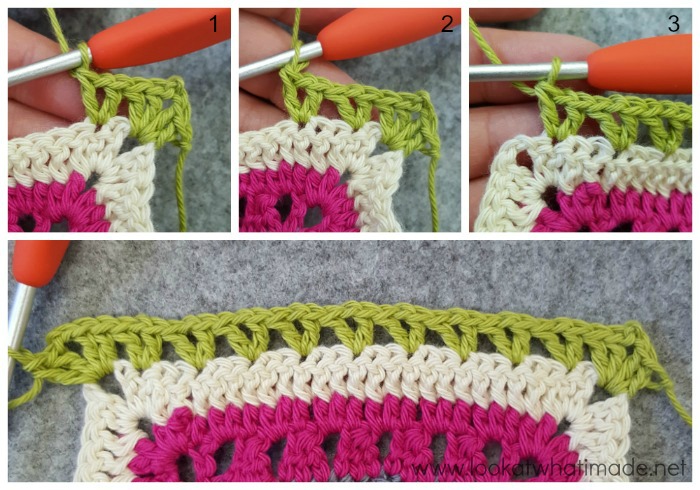
With WS Facing: *(2 dc, ch 2, 2 dc) in the ch-2 corner space. Skip the first st. V-stitch in the next st {Photo 1}. (Skip the next 2 sts, V-Stitch in the next st {Photo 2}) until you have 1 st left {Photo 3}. Skip the last st.* Repeat from * to * 3 more times. Join to the first dc with a sl st. Fasten off and TURN. {4 dc and 9 V-Stitches per side}
Round 9 {CC – Coral}
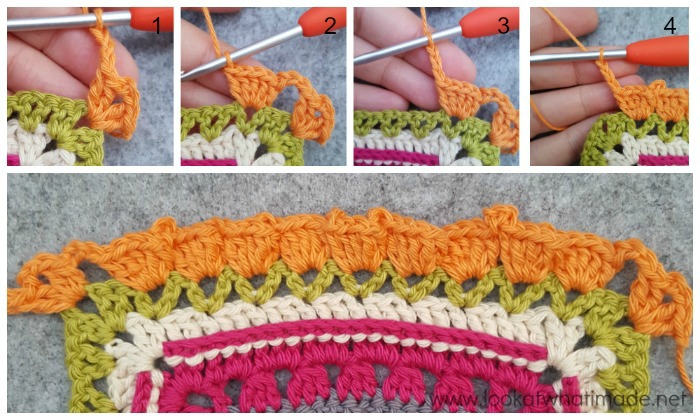
With RS Facing: *(2 dc, ch 2, 2 dc) in the ch-2 corner space. Ch 3 {Photo 1} and skip the first 3 sts. (Make a Shell/Popcorn in the ch-1 space of the next V-Stitch {Photo 2}. Ch 3 {Photo 3}) until you have worked into each ch-1 space {Photo 4}. Skip the last 3 sts.* Repeat from * to * 3 more times. Join to the first dc with a sl st. Fasten off and TURN. {4 dc, 9 Popcorns, and 10 ch-3 spaces per side}
Round 10 {Smokey Quartz}
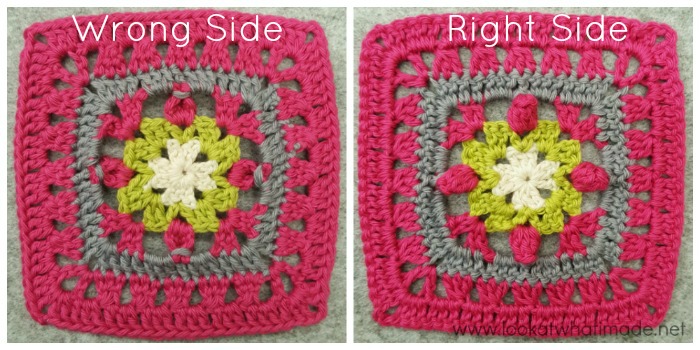
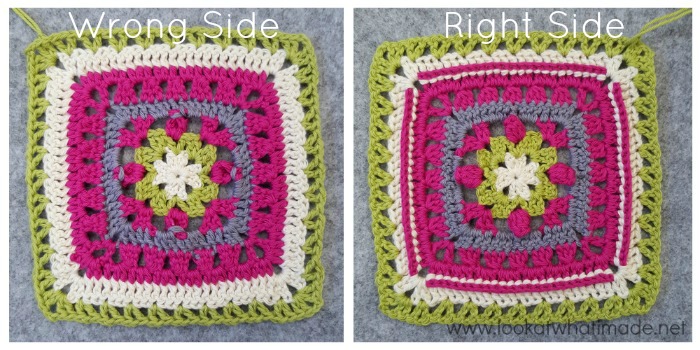
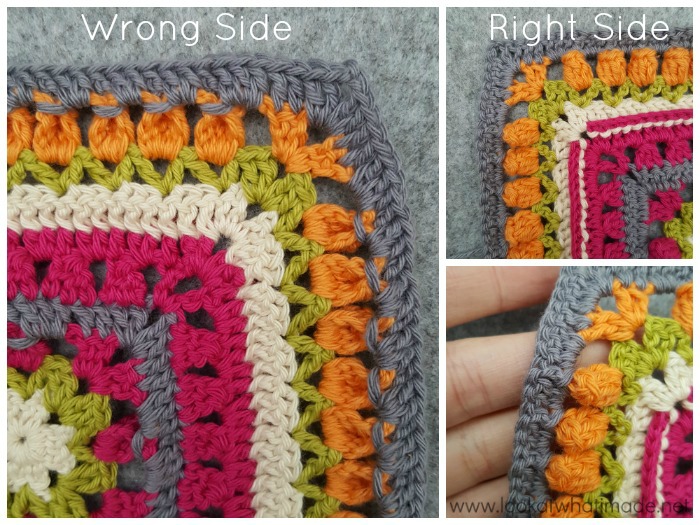
Please Note: You will be making 3 dc in the first and last ch-3 space, and 2 dc in all the other ch-3 spaces. Just as in Round 4, please check that you are making BPdc not FPdc {Wrong Side photo below}.
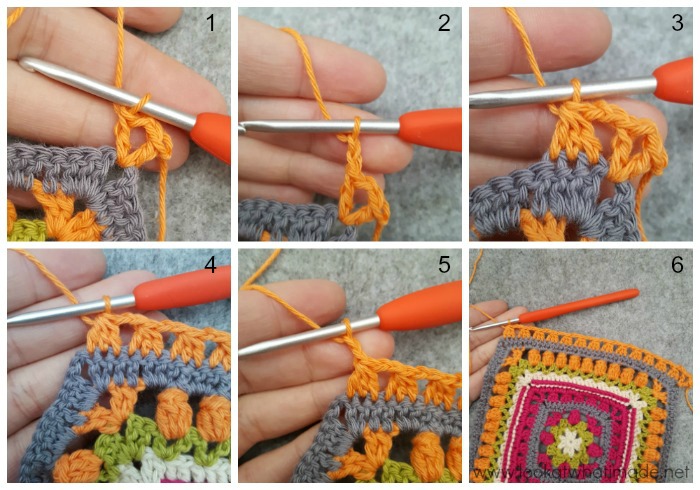
With WS Facing: *(2 dc, ch 2, 2 dc) in the ch-2 corner space. Dc in the first 2 sts {Photo 1}. Make 3 dc in the first ch-3 space {Photo 2}. (BPdc around the next Shell/Popcorn {Photos 4 and 5}. Make 2 dc in the next ch-3 space {Photo 6}) until there is only one Popcorn and one ch-3 space left {Photo 7}. BPdc around the last Popcorn. Make 3 dc in the last ch-3 space {Photo 8}. Dc in the last 2 sts {Photo 9}.* Repeat from * to * 3 more times. Join to the first dc with a sl st. Fasten off and TURN. {39 dc per side}
Round 11 {CC – Coral}
Hint: Apart from the first and last 2 Clusters on each side, the central ‘leg’ of each Cluster will fall in a BPdc from Round 10.
With RS Facing: *(Dc, ch 2, dc) in the ch-2 corner space {Photo 1}. (Ch 2, make a Cluster {Photos 2 and 3}) until you have worked into every stitch {Photo 4}. Ch 2 {Photos 5 and 6}.* Repeat from * to * 3 more times. Join to the first dc with a sl st. Fasten off and TURN. {2 dc, 13 Clusters, and 14 ch-2 spaces per side}
Round 12 {CC – Coral}
With WS Facing: *(2 dc, ch 2, 2 dc) in the ch-2 corner space {Photo 1}. Dc in the first st {Photo 2}. (Make 2 dc in the next ch-2 space {Photo 3}, dc in the next Cluster {Photo 4}) until you have worked into each Cluster {Photo 5}. Make 2 dc in the last ch-2 space {Photo 6}. Dc in the last st {Photo 7}.* Repeat from * to * 3 more times. Join to the first dc with a sl st. Fasten off and work away your yarn ends. TURN. {47 dc per side}
Subsequent 6-Round Repeats
Repeat Rounds 7 to 12 until you have made 54 rounds (or your blanket is as large as you want it to be). Each 6-round repeat features a different Contrasting Colour (CC). At this point you have already used Red Jasper and Coral, so your next repeat will use Lemon Quartz, followed by Blue Apatite, followed by Deep Amethyst. After that, start from Red Jasper again and finish with Blue Apatite. Please consult this spreadsheet for round-by-round colours and stitch counts.
Stitch Counts for Subsequent Repeats:
- Round 7 (Moonstone) – multiples of 3 dc per side
- Round 8 (Canada Jade) – 4 dc and a multiple of 8 + 1 V-Stitches per side
- Round 9 (CC) – 4 dc, a multiple of 8 + 1 Popcorns, and a multiple of 8 + 2 ch-3 spaces per side
- Round 10 (Smokey Quartz) – multiples of 3 dc per side
- Round 11 (CC) – 2 dc, a multiple of 8 + 5 Clusters, and a multiple of 8 + 6 ch-2 spaces per side
- Round 12 (CC) – multiple of 3 + 2 dc per side
You can find a list of stitch counts per round HERE.
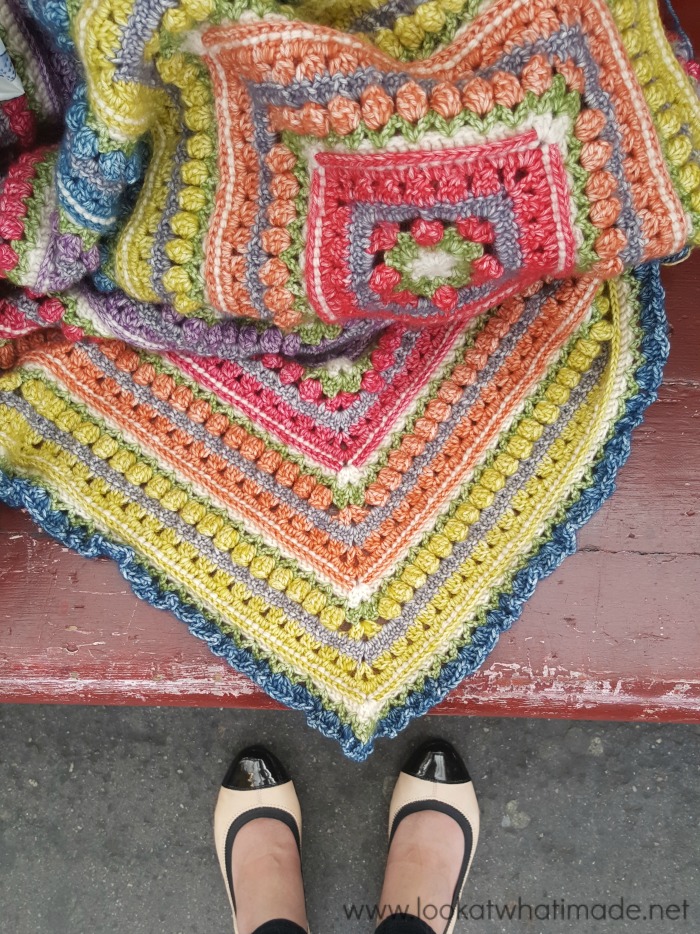
Working on the last repeat while waiting for the tube home
Checking Gauge
If you are using the colour pack, it is important that you match the gauge the blanket was written for, otherwise you will run out of yarn. Alternatively, you can buy an extra skein of Coral, Blue Apatite, and Smokey Quartz as those are the colours that will have the least amount of left-over yarn at the end of the blanket (see this spreadsheet).
At the end of Round 12, your square should measure 22.5 cm in Stonewashed, and it should weigh 39 g.
What do I do if my square is smaller?
If it is more than a 1 cm/5g smaller, you can go up to a 4.25 hook size, but you don’t have to. Going up a hook size is precarious if you are using the colour pack because if your tension relaxes, you won’t have enough yarn to complete the blanket.
What do I do if my square is larger?
If your square is larger (or it weighs much more than 41 g), you won’t have enough yarn in the yarn pack to complete the blanket. You can either buy an extra skein of Coral, Blue Apatite, and Smokey Quartz (the colours that will have the least amount of left-over yarn at the end of the blanket) or you will need to go down a hook size.
- If you are only slightly out (1 cm/5g), go down to a 3.75 mm hook.
- If you are more than 1 cm/5g out, you will need to go down to a 3.5 mm hook.
- If you are more than 2 cm/10g out, you will need to go down to a 3.25 mm hook.
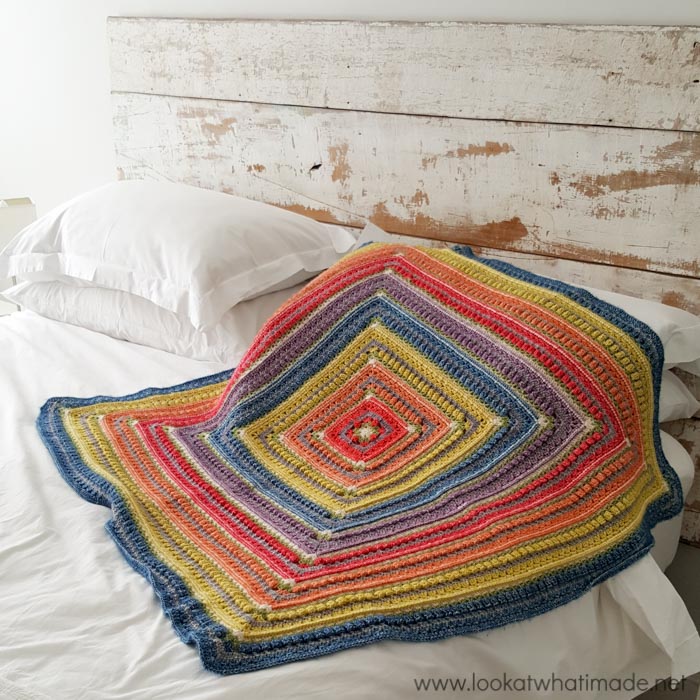
Maybe I could have neatened that edge up a bit before taking this photos *blushes*
If you share photos of your Namaqualand Blanket, please use hashtags #namaqualandblanket so that I can see your photos :)

This blog post contains affiliate links. I only link to products I personally use or would use. All opinions are my own.


Michelle Rouhier says
It just occurred to me to use this pattern to finish my Sophia’s Universe blanket! I will just use rows 7-12 until it comes out the size I want. I am so excited about this idea. I did Sophie’s Universe when the CAL was live and was shocked to see my square in your book a few times. I waited this long to finish it as I couldn’t decide how to finish it off without distracting from the beauty of it. I am so thrilled to use this pattern and will post it on IG and to your page when done. Thank you so much for all of your beautiful and easy to read patterns!
Dedri Uys says
Hi Michelle. I look forward to seeing your version :) In my mind, I picture it working perfectly!
Bo says
Hello Dedri,
What a beautiful pattern! It is very nice and very colourful.
I read the pattern and I am wondering how many stitches round 13 and round 14 must have per side. I read the info under ‘Stitch Counts for Subsequent Repeats’ and I get a bit confused how the pattern works out after round 12.
Thanks for sharing this beautiful pattern!.
Bo
Dedri Uys says
Hi Bo. Thank you :) Please see THIS SPREADSHEET for round-by-round stitch counts.
Wendy says
the link to spreadsheet stated “page not found ” :(
Dedri Uys says
Hi Wendy. It worked when I tried it on Chrome, Firefox, Safari, and Internet Explorer. Are you still having problems opening it?
Mel says
One of the easiest pattern I have found to date. Thank you for the wonderful pics too. Made it all the more easier to work. I do have one question with the pattern. Was there a reason that you didn’t finish the popcorn shells or just your personal preference. I was a little confused at first. LOL
Dedri Uys says
Hi Mel. Thank you. I prefer making really lazy popcorns, which is why I didn’t ‘finish’ the Popcorns. You are welcome to make normal popcorns, as stipulated in the pattern, but the really lazy ones save so much time!
Marilyn Aldridge says
Your obvious passion for crochet is inspiring, as well as the thought and care of your exquisite website. I can’t wait to start(in about 10 minutes) and am so excited to crochet using your chart. I so rarely find charting for crochet! I bought yarn locally for another blanket pattern from Ravelry, but it’s directions were full of errors. Once done, I’ll make another with the yarn you recommend. I’m happy to have found you.
Dedri Uys says
Hi Marilyn. Thank you very much!
Gill says
The Scheepjes site suggests that this yarn be crocheted using “Needle size: 3 – 3,5 mm needles”. You’ve used Needle size 4 as I understand to crochet the blanket.
Could you explain why?
It is a beautiful blanket and I’m looking forward to the arrival of the yarn at BeInspired so that I can attempt to recreate it.
Dedri Uys says
Hi Gill. If you crochet really loosely, you can use a 3 or a 3.5 Occasionally Jenny and I will use a 3/3.25/3.5 with this specific yarn, but We both crochet tightly, so a 4 mm gives a nice drape. This yarn is thinner than a double knit, but it works up the same as a double knit if you use a 4 mm hook (or very close to). The yarn has a nice fluff to it that fills the stitches out so that it doesn’t appear ‘holey’.
Carol D says
Dedri,
P.S. How would I go about enlarging this for a larger (maybe adult size) blanket?
what would you suggest? buy 2 packs? eek! may have to wait til new check comes in….
Hint to all…DON’T grow old…stay young – and save for retirement….I thought I’d saved enough….I have learned differently. Save so you can travel and still buy the yarn, etc. you need to keep on hooking!
Love to all….
Dedri Uys says
Hi Carol :) 2 packs (plus 1 extra ball of each colour) will get you one more colour repeat, as each repeat uses progressively more yarn. You will end up with a blanket that is roughly 160 cm squared. Still not huge, but big enough to cover Christiaan :)
Carol Derbis says
Dedri,
I have so many WIPs right now – but I have longed to make this blanket since I first saw it from your Be Inspired posts. Just beautiful! and with all those different techniques, I think it’ll be just as challenging – and FUN as Sophie was…
Don’t tell Tom but I’m going to order the yarn pack and sneak this in between other projects…that should ease the boredom of doing “routine” projects.
Thank you again for all you do – and all you give to so many! You are a rare soul in this scary world…reading your blog, looking through your beautiful designs makes this world just a bit more tolerable – and so much more beautiful!
My love to Christiaan and those beautiful boys….I have something I want to send them (but don’t say anything – this kid takes forever to follow through sometimes…been a rough summer so far with this back, so getting around just a bit slower…
Love to all….
Davy says
Hi Dedri. Thanks for this lovely pattern. The pattern reminds me of namakwaland
daisies. Very colourful like the rainbow nation. Beautiful. Thanks
Jenny says
So glad you like the pattern, Davy :)
Jenny
Davy says
Thank you. The colours and the pattern reminds me of namakwaland daisies. Beautiful. Reminds me of the rainbow nation. Very colourful and vibrant. Thanks.
Becky says
Love your colorful and unique patterns. This blanket is another favorite. I’d like to increase the size closer to adult lap size repeating the pattern from the inner blue rows as the current pattern ends in blue. Have you tried this? Any suggestions on extra yarn amounts? I’ll give it an educated guess. Thanks for sharing your patterns.
Jenny says
Hi Becky. We are delighted that you love the pattern! As for yarn amounts, it really depends on your own tension as to how much you will need, so an educated guess will be your best bet. Dedri may be able to offer more suggestion.
Jenny :)
Angela Mayers says
Would this be suitable for a left hander? What, if any, adjustments would need to be made? It’s beautiful x
Dedri Uys says
Hi Angela. This pattern is suitable for a left-hander and no adjustments need to be made. The only difference is that you will start from the left where we start from the right. Your blanket will look virtually indistinguishable from a right-hander’s blanket. If you have any problems, just ask.
Dedri
Ruth Spooner says
Would you mind giving an approximate size for this lovely blanket, please? It’s a happy piece :)
Dedri Uys says
If you stop where I have stopped, your blanket will be roughly a meter by a meter.
Viv says
My yarn pack is arriving today! I saw the original at Olympia last weekend and knew it was my next project. Such wonderful colours, and of course an inspiring story. I love the stone washed, and can’t wait to start :)
Jenny says
Please share pics of your progress with us Viv! Enjoy your journey :)
Jenny
Jean says
Hi Dedri,
I have been practicing Namaqualand with old yarn and will make it with new yarn. Where can I find how much of each color yarn I need.?
Jenny says
Jean, the pattern contains a link to the yarn pack from Wool Warehouse. That tells you how many balls you need :)
Pattern link here.
Wool Warehouse link here.
Jenny :)
susan says
So excited this pattern is available!! I have been wanting to make it ever since I saw it from your Be Inspired crochet sessions..(my dream vacation would be to go to one of your crochet weekends) Thank you so much for all you give..such a sweet soul you are. xo Susan
Dedri Uys says
Hi Susan. Maybe one day :) Thank you for your lovely comment x
Joan says
Oh Dedri, I am so happy that you finally put this pattern up on your sight. After I saw it several weeks ago, I have been waiting patiently for the pattern. I knew you wouldn’t let me wait too long. :D Thank you so much for your continual efforts to making the world a prettier place to live in, one project at a time! You’re forever faithful follower,
Dedri Uys says
Aww Joan, what a lovely comment! You are most welcome :)
Julie says
Dedri this has made my whole weekend! I have longed to make this blanket and also longed to use this type of yarn – i didnt use it for sophie – i will be ordering the pack tomorrow and cant wait to get started – its beautiful. Thanks so very much for sharing you pattern.
Dedri Uys says
You are most welcome. I am so glad you like it. Please let me know how you get on and how you find the stonewashed. If you need to frog, be gentle. This yarn loves itself and will get in a tangle if you pull hard if it snags. Hopefully you won’t have to frog a lot!
Cherie M says
Just found you – thanks so much for such beautiful patterns! I enjoy crocheting (despite the fact that it’s been awhile and my hands started to ache from making a very simple hat!) I looked through your patterns and they are SO MUCH more beautiful than anything else I’ve seen in ages! Really inspiring! Gorgeous choice of yarns and colors too! Thanks so much!
Dedri Uys says
Hi Cherie. Thank you :) I hope your hands get ‘stronger’ quickly so that you can crochet to your heart’s content.
bekki says
Thank you for sharing the pattern. This is a lovely blanket, The texture makes it look so snuggly. I love the stonewashed colours too.
Dedri Uys says
I’m glad you like it :) Your rhino is so cute! And I wish I had had a hedgehog brush as a child :)
Tammi says
I am in love with your designs!!! All the color changes frighten me off. Any hints that make weaving in ends not so painful??
Thanks
Tammi
Jenny says
Hi Tammy. Have a look at this link :)
Here.
Hope that helps.
Jenny