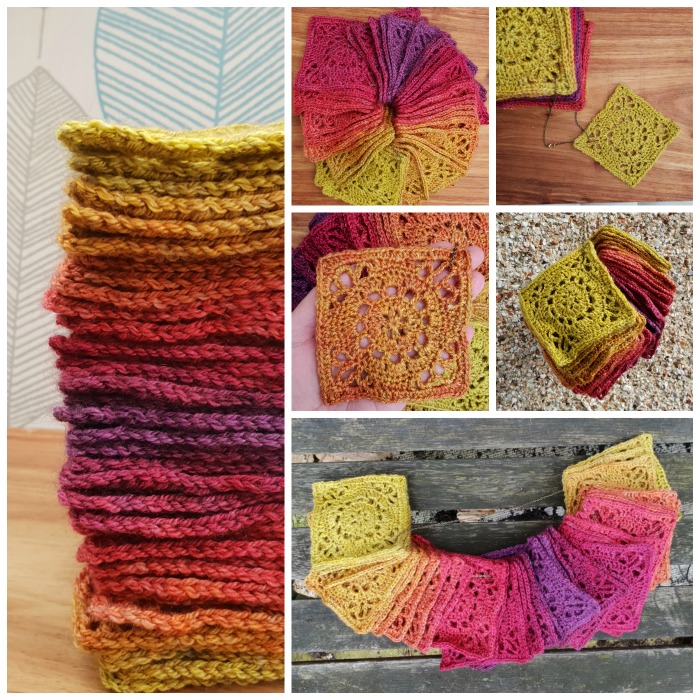
This dinky little square is the Emma Square, designed for the June 2017 Devon Sun Yarns Retreat and named after a courageous friend of mine. It’s a simple little pattern, and easy to memorise once you’ve made a few.
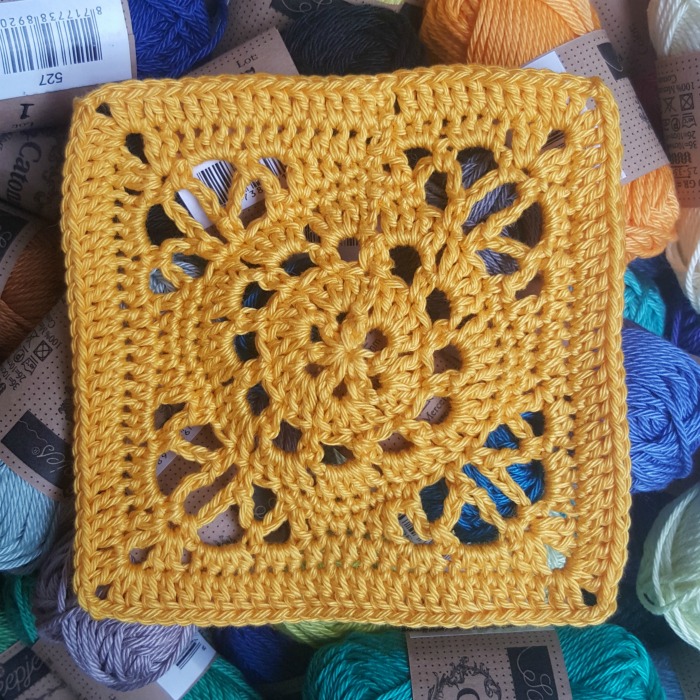
Usually, I design something more complicated for retreats (like my Ammonite Crochet Hook Roll or the Banksia Shawl), but for that retreat, we decided to give everyone undyed yarn and ask them to make as many of these squares as they could before Sunday. On Sunday, we dyed the completed squares, which was both daunting and exhilarating! You can see lots of photos in the post I wrote about the retreat HERE. The post also contains tips and links for dyeing your own yarn/squares.
This Emma Square is perfect for using up small skeins of yarn, scrap yarn, or the very popular Cutie Pie boxes from Scheepjes (see Project Ideas below).
Emma Square Crochet Pattern
Information
Resources
- Add this pattern to your Ravelry Queue
- Hashtag: #emmacrochetsquare or #emmasquare
- If you would like to print/save a specific part of this pattern, please use the Print Friendly button at the bottom of my site to select the text you would like to print/save.
Materials
You can use any hook/yarn combination your heart desires. For the photo tutorial below, I am using Scheepjes Catona Cutie Pies and a 3.25mm hook. With this hook/yarn combination, I was able to create one Emma square from each Catona Cutie Pie. My tension is extremely tight, though, so it is important that you make a test square to gauge if you need to use a smaller hook. My maker Minno, for example, has a much looser tension than I do, so she ended up using a 2.5mm hook to get one square out of one Catona Cutie Pie.
Below, you will find the yarn/hook combinations that worked for me.
| Materials | ||
| Hook Size | Yarn | |
| Small | 3mm | Catona |
| Medium | 4mm | Undyed Merino DK |
| Large | 5mm* | Riverwashed XL |
*Please see Size and Notes below if you decide to make these squares in Riverwashed XL/Stonewashed XL Cutie Pies.
Abbreviations
US Terminology (US/UK Conversion HERE)
- Beg – Beginning
- Ch – Chain
- Dc – Double crochet
- Hdc – Half-double crochet
- Rem – Remaining/remains
- Sc – Single Crochet
- Sl st – Slip stitch
- Sp/sps – Space/spaces
- St/sts – Stitch/stitches
Punctuation
* An asterisk indicates pattern repeats. You will need to repeat all the instructions between asterisks the number of times specified. This is a hard-core repeat and will consist of multiple instructions.
Parentheses () indicate repeats. You will need to repeat the instructions between parentheses the number of times specified. This is a lower level repeat.
Gauge
Gauge suggestions are supplied for all three sizes at the end of Rounds 2 and Rounds 4 below, using the recommended yarn (above) and the hook size needed to obtain gauge.
| Gauge | ||
| Round 2 | Round 4 | |
| Small | 3.7cm/1.5″ | 7cm/2.8″ |
| Medium | 4cm/1.6″ | 7.5cm/3″ |
| Large | 5.5cm/2.2″ | 10cm/4″ |
Size
| Size and Yardages Used at the End of Rounds 7 and 8 | ||||
| Round 7 | Round 8 | Round 7 | Round 8 | |
| Small | 9.5cm/3.7″ | 11cm/4.3″ | 7g/17.5m/19yds | 10g/25m/27yds |
| Medium | 10cm/4″ | 12cm/4.7″ | 8g/17.5m/19yds | 11g/25m/27yds |
| Large | 14cm/5.5″ | 17cm/6.7″ | 15g/22.5m/24.5yds* | 21g/31.5m/34yds |
* If you are planning to use the Riverwashed XL/Stonewashed XL Cutie Pies for this square, you will only have enough yarn to make the first seven rounds in each colour, provided you follow the gauge suggested above.
Notes
I am calling Round 8 ‘Optional’ because you can stop at the end of Round 7 without losing any of the simple aesthetics of the square. If you are using mini skeins/balls of yarn, you might not have enough in each colour to complete all eight rounds. If this is the case, you can fasten off at the end of Round 7 for all your squares.
Instructions
Written-Only
Round 1: Into a Magic Ring: Ch 1 (doesn’t count as a st throughout), (sc, ch 4) 6 times. Join to the first sc with a sl st. {6 sc and 6 ch-4 sps}
Round 2: Sl st into the next ch-4 sp. Ch 3 (counts as dc throughout), 3 dc in the same ch-4 sp. Make 4 dc in each rem ch-4 sp. Join to the top of the beg ch-3 with a sl st. {24 dc}
Round 3: Ch 1, sc in the same st. (Ch 4, skip the next st, sc in the next st) 11 times. Ch 4 and skip the last st. Join to the first sc with a sl st. {12 sc and 12 ch-4 sps}
Round 4: Sl st into the next ch-4 sp. Ch 3, 3 dc in same ch-4 sp. Make 4 dc in each rem ch-4 sp. Join to the top of the beg ch-3 with a sl st. {48 dc}
Round 5: Ch 1, sc in the first 6 sts. The last sc should fall in the second dc of the second 4-dc group. *Ch 5, skip the next st, sc in the next st. Ch 8, sc in the next st, which should be the first dc of the next 4-dc group. Ch 5, skip the next st, sc in the next 8 sts.* Repeat from * to * 3 more times, omitting the last 6 sc on the last repeat. Join to the first sc with a sl st. {10 sc and 2 ch-5 sps per side, not including ch-8 corner sp}
Round 6: Ch 2 (counts as hdc throughout). Sc in the next 2 sts, hdc in the next st, dc in the next st. Ch 2, skip the last st, and sc in the next ch-5 sp. *Ch 3, (sc, ch 2, sc) in the ch-8 corner sp. Ch 3, sc in the next ch-5 sp. Ch 2, skip the first sc, dc in the next st**. Hdc in the next st, sc in the next 2 sts, hdc in the next st, dc in the next st. Ch 2, skip the last st, and sc in the next ch-5 sp.* Repeat from * to * twice and from * to ** once. Join to the top of the beg ch-2 with a sl st. {6 sc, 2 hdc, 2 dc, 2 ch-2 sps, and 2 ch-3 sps per side – not including ch-2 corner sps}
Round 7: Ch 2, hdc in the next 4 sts. Make 3 hdc in the next ch-2 sp. Make 4 hdc in the next ch-3 sp. (2 dc, ch 2, 2 dc) in the next ch-2 corner sp. *Make 4 hdc in the next ch-3 sp. Make 3 hdc in the next ch-2 sp. Skip the first (hidden) st and hdc in the next 5 sts. Make 3 hdc in the next ch-2 sp. Make 4 hdc in the next ch-3 sp. (2 dc, ch 2, 2 dc) in the next ch-2 corner sp.* Repeat from * to * 2 more times. Make 4 hdc in the next ch-3 sp. Make 3 hdc in the last ch-2 sp. Join to the top of the beg ch-2 with a sl st. {23 sts per side – 19 hdc and 4 dc, not including ch-2 corner sps}
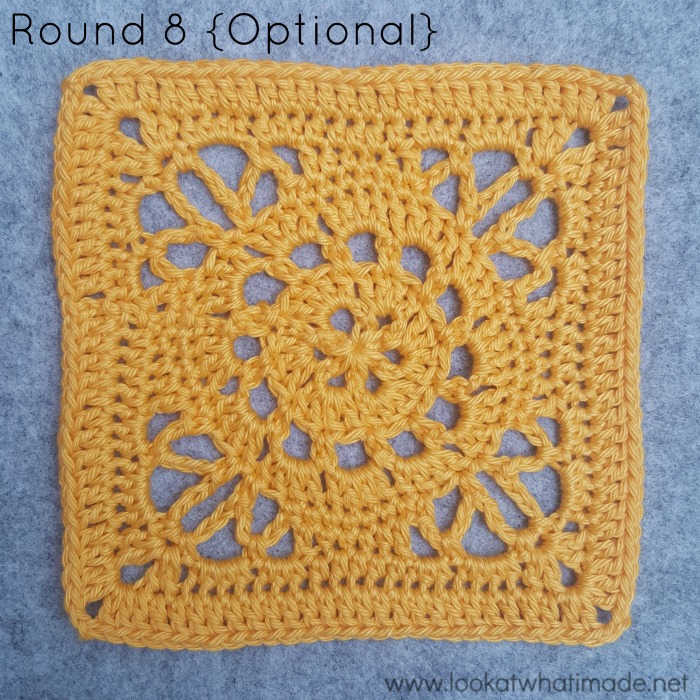
Round 8 {Optional}: Ch 3, dc in the next 13 sts. *(2 dc, ch 2, 2 dc) in next ch-2 corner sp. Dc in each of the 23 sts across.* Repeat from * to * 2 more times. (2 dc, ch 2, 2 dc) in the last ch-2 corner sp. Dc in each of the remaining 9 sts. Join to the top of the beg ch-3 with a sl st. Fasten off and work away ends. {27 dc per side – not including ch-2 corner sps}
Photo Tutorial
Round 1
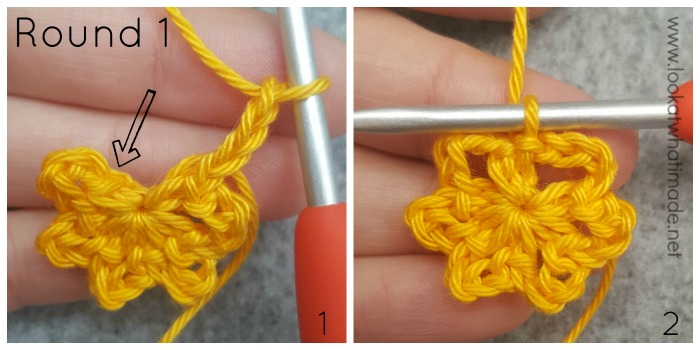
Into a Magic Ring: Ch 1 (doesn’t count as a st throughout), (sc, ch 4) 6 times {Photo 1}. Join to the first sc with a sl st {Indicated with an arrow in Photo 1 and illustrated in Photo 2}.
Stitch Count: 6 sc and 6 ch-4 sps
Round 2
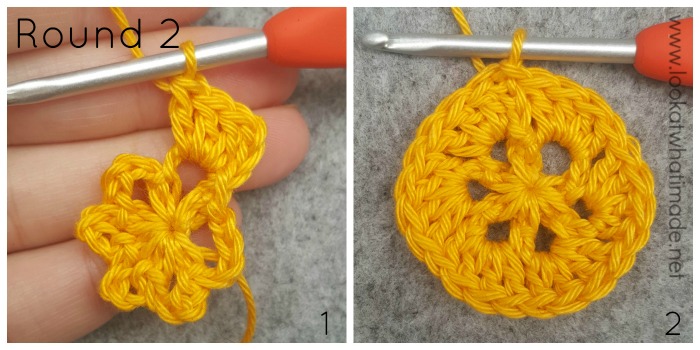
Sl st into the next ch-4 sp. Ch 3 (counts as dc throughout), 3 dc in the same ch-4 sp {Photo 1}. Make 4 dc in each rem ch-4 sp. Join to the top of the beg ch-3 with a sl st {Photo 2}.
Stitch Count: 24 dc
Round 3
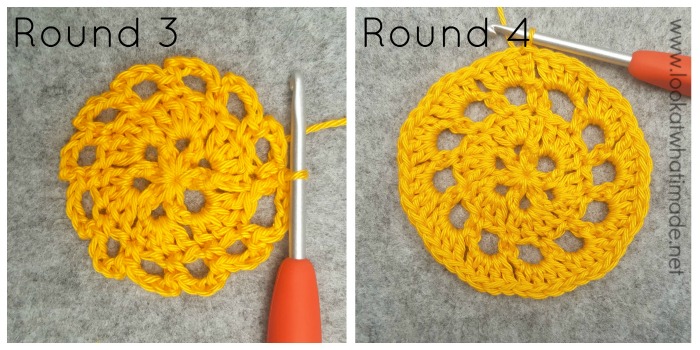
Ch 1, sc in the same st. (Ch 4, skip the next st, sc in the next st) 11 times. Ch 4 and skip the last st. Join to the first sc with a sl st.
Stitch Count: 12 sc and 12 ch-4 sps
Round 4
Sl st into the next ch-4 sp. Ch 3, 3 dc in same ch-4 sp. Make 4 dc in each rem ch-4 sp. Join to the top of the beg ch-3 with a sl st.
Stitch Count: 48 dc
Round 5
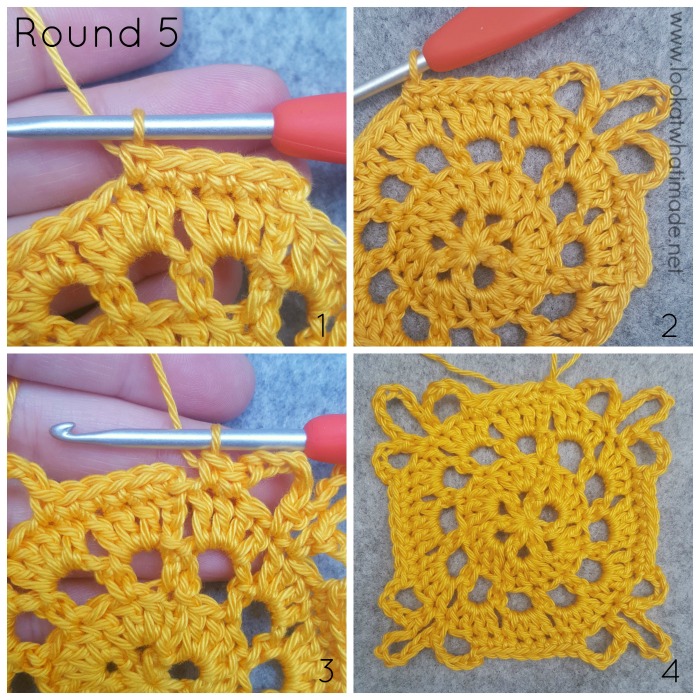
Ch 1, sc in the first 6 sts. The last sc should fall in the second dc of the second 4-dc group {Photo 1}.
*Ch 5, skip the next st, sc in the next st. Ch 8, sc in the next st, which should be the first dc of the next 4-dc group. Ch 5, skip the next st, sc in the next 8 sts {Photo 2}.*
Repeat from * to * 3 more times, omitting the last 6 sc on the last repeat {Photo 3}. Join to the first sc with a sl st {Photo 4}.
Stitch Count Per Side: 10 sc and 2 ch-5 sps – not including ch-8 corner sps
Round 6
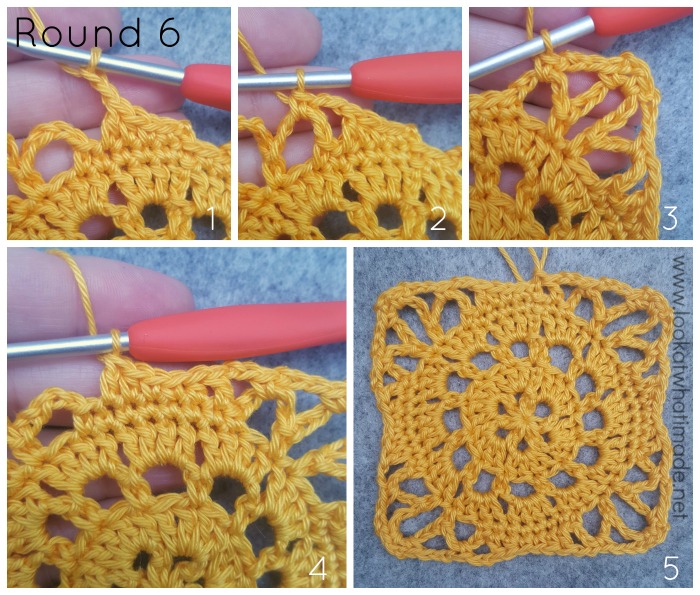
Ch 2 (counts as hdc throughout). Sc in the next 2 sts, hdc in the next st, dc in the next st. Ch 2 {Photo 1}, skip the last st, and sc in the next ch-5 sp {Photo 2}.
*Ch 3, (sc, ch 2, sc) in the ch-8 corner sp. Ch 3, sc in the next ch-5 sp {Photo 3}. Ch 2, skip the first sc, dc in the next st**. Hdc in the next st, sc in the next 2 sts, hdc in the next st, dc in the next st {Photo 4}. Ch 2, skip the last st, and sc in the next ch-5 sp.*
Repeat from * to * twice and from * to ** once. Join to the top of the beg ch-2 with a sl st {Photo 5}.
Stitch Count Per Side: 6 sc, 2 hdc, 2 dc, 2 ch-2 sps, and 2 ch-3 sps – not including ch-2 corner sps
Round 7
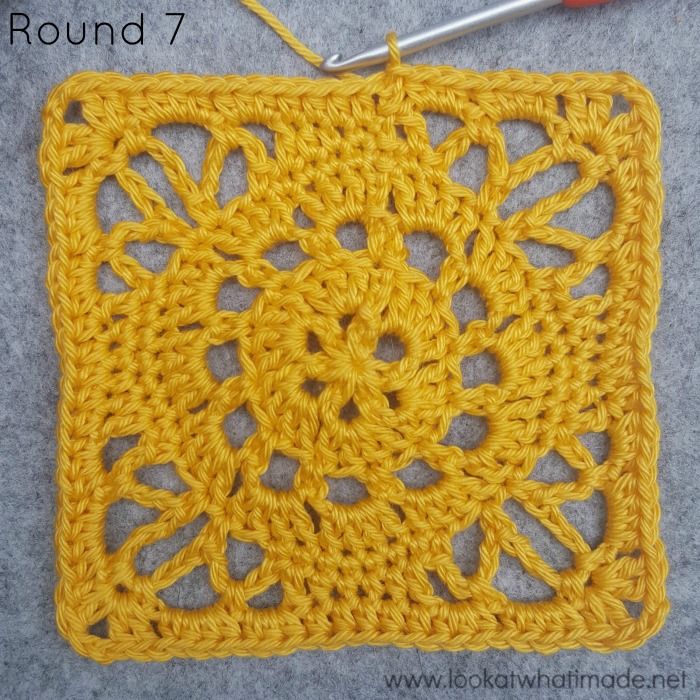
Ch 2, hdc in the next 4 sts. Make 3 hdc in the next ch-2 sp. Make 4 hdc in the next ch-3 sp. (2 dc, ch 2, 2 dc) in the next ch-2 corner sp.
*Make 4 hdc in the next ch-3 sp. Make 3 hdc in the next ch-2 sp. Skip the first (hidden) st and hdc in the next 5 sts. Make 3 hdc in the next ch-2 sp. Make 4 hdc in the next ch-3 sp. (2 dc, ch 2, 2 dc) in the next ch-2 corner sp.*
Repeat from * to * 2 more times. Make 4 hdc in the next ch-3 sp. Make 3 hdc in the last ch-2 sp. Join to the top of the beg ch-2 with a sl st.
Stitch Count Per Side: 23 sts – 19 hdc and 4 dc, not including ch-2 corner sps.
Round 8 {Optional}
Ch 3, dc in the next 13 sts.
*(2 dc, ch 2, 2 dc) in next ch-2 corner sp. Dc in each of the 23 sts across.*
Repeat from * to * 2 more times. (2 dc, ch 2, 2 dc) in the last ch-2 corner sp. Dc in each of the remaining 9 sts. Join to the top of the beg ch-3 with a sl st. Fasten off and work away ends.
Stitch Count Per Side: 27 dc – not including ch-2 corner sps}
Blocking
You will notice that my squares are unblocked. If you are going to make multiple squares and join them, I suggest blocking them before you do. You don’t HAVE to, but I always do for two reasons:
- There is something so satisfying about pristine corners and straight edges!
- Joining methods are usually tight. When you are joining unblocked squares, you might find that your join ‘pulls’ your squares in. If you are joining blocked squares, you can see immediately if you need to relax your tension or go up a hook size.
You can find my favourite joining methods HERE.
Project Ideas
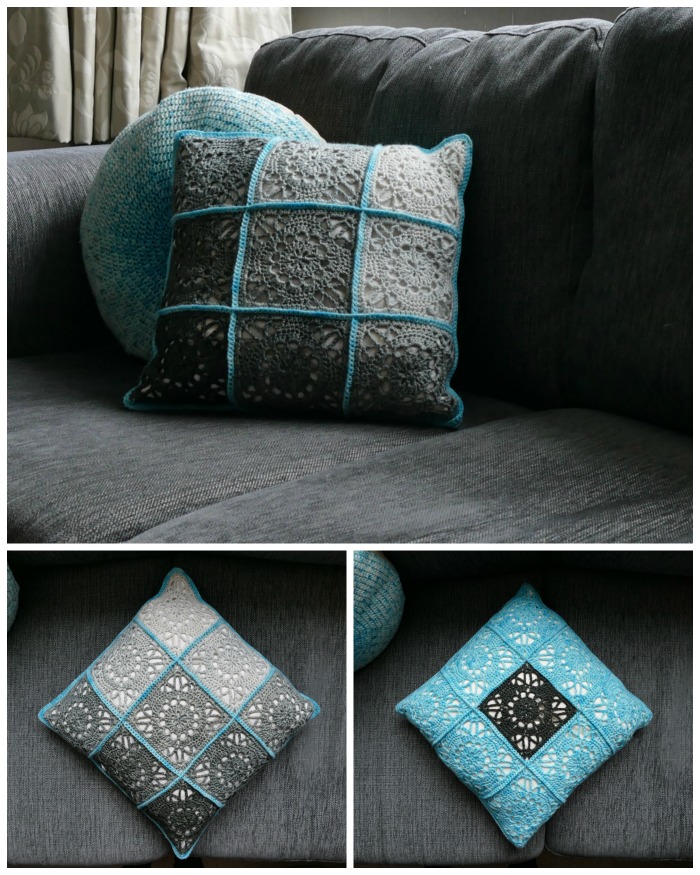
1. Cushion Cover
My friend Kay was one of the ladies who joined us at the retreat. She dyed her squares in varying shades of grey and then joined them together to create a cushion cover. She used previously-dyed blue yarn to create the remaining squares needed for the cover (and for the join).
2. Wrap
Sidekick Jenny has made a whole heap of Emma squares using two cakes of PookGB Silk/Yak/Merino blend (100g/366m per cake) in the colourway ‘Fawkes’ and a 4mm hook. She is going to join the squares to create a wrap… as soon as she figures out which join and colour will best compliment the design and colours of the squares.
3. Blanket
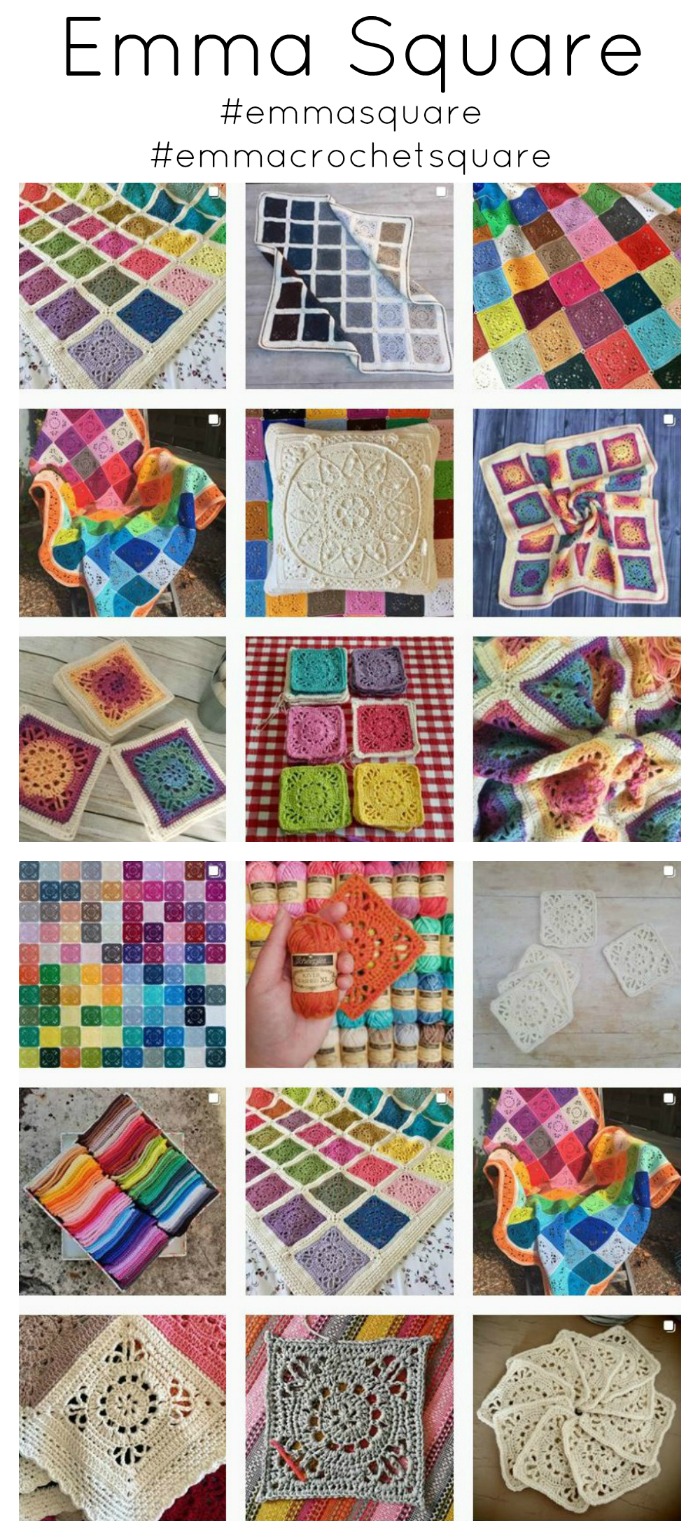
- 99 Catona Cutie Pies will give you a baby blanket that is roughly 100cm x 120cm (9 x 11 small squares up to the end of Round 8) – not including joining and border, for which you would need at least 2 x 100g balls, depending on design.
- 48 Riverwashed XL/Stonewashed XL Cute Pies will give you a blanket that is roughly 100cm x 135 cm (6 x 8 small squares up to the end of Round 7) – not including joining and border, for which you would need at least 5 x 50g balls, depending on design (see link below).
- If you are looking for layout ideas, I suggest visiting Craft the Rainbow on Instagram. They have the most amazing photos with tons of inspiration for using small amounts of a million colours of yarn.
**NEW** You can find a featured Riverwashed XL/Stonewashed XL blanket (and guidelines) HERE.
Do you know? For such a simple pattern, this post has taken an insane amount of time to put together. There were JUST so many ideas I wanted to convey, and as I sign off, I feel like I haven’t done it justice at all. I might come back and tweak a bit…
If you want more Emma Inspiration, please have a look at the Ravelry Projects HERE and the Instagram Photos HERE and HERE.

This blog post contains affiliate links. I only link to products I personally use or would use. All opinions are my own.


Pam Kane says
Thank you for this beautiful square pattern. About a week ago someone posted a pic of your square which she made into a blanket; it looked similar to the first pic under your inspiration pictures. I know this is a long shot, but do you have any idea who might have done that? She gave you credit as the square designer, but I’m trying to find the lovely blanket pattern. Since I felt certain she would have had to get your permission to do so, I’m hoping you can steer me in the right direction so I can buy the border pattern. .
Looking forward to your next CAL.
Many thanks,
Pam
Dedri Uys says
Hi Pam, if you use the contact me tab on the website to email me, we can then open a dialogue in which you can share a photo of the blanket so that I can help you with finding it. A lot of people have made blankets using this square and their own borders, so I am not sure which one you are referring to, but would love to find out.
Raewyn says
can you send me a copy of your Beautiful Square Patter
Thank you
Raewyn
Jenny Lowman says
Hi Raewyn. We don’t provide copies of patterns I am afraid.
At the end of the pattern, after Dedri’s signature, there is a Print Friendly tab that allows you to create a PDF file of the pattern and then print it off or save it to a device or pc.
Thanks. BW Jenny
Joy says
Thank you so much for this pattern. It’s such an added bonus that there are pictures. You made the pattern easy to follow and the links you share for all the extras are great!! I really enjoy making this square!
Dedri Uys says
Hi Joy.
You are most welcome. I’m glad you found all the extra bits useful :)
Charlotta says
Thank you for a lovely pattern! I very much appreciate that you have pictures to go with the instructions. I’m a somewhat experienced crocheter (I usually knit), but as a non-native English speaker the abbreviation “sp” confused me (Round two: sl st into the next ch-4 sp). Google tells me that “ch sp” stands for chain space. Could this maybe be added to the list of abbreviations at the top?
Dedri Uys says
Thank you for flagging that up. It was an oversight on my part. I have added it now.
Amelia says
Your patterns are beautiful, as usual. I love the kit for Emma.
Dedri Uys says
Thank you Amelia :)
Jenn D says
Thank you for this! I was gifted the Scheepjes Mini packs and wasn’t sure what to do with them! I appreciate the clear and concise directions that always seem to accompany your patterns. Your attention to details, as well as your lovely works of art, is what brings me back time and time again!
Dedri Uys says
Thank you very much, Jenn xx
KimAnneL says
Thank you so much for this lovely little square, I’ve begun a little blanket with it already. I appreciate immensely the Print-Friendly option as well!
Dedri Uys says
You are welcome. I look forward to seeing your blanket :)