Daisy’s Bouquet is a simple crochet square with beautiful grape hyacinths created by using Popcorn stitches and overlay crochet. It is named after the scene in Downtown Abbey where Daisy marries William.
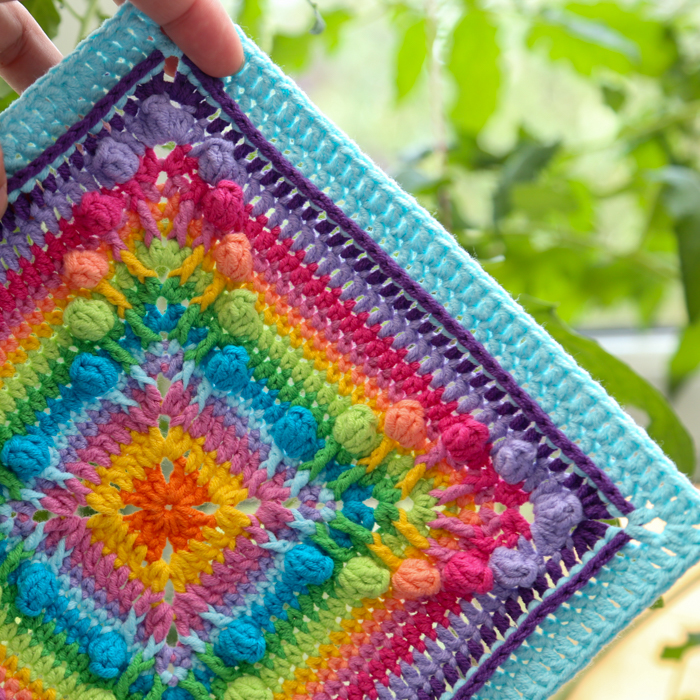
I designed this square while working on the design for Charlotte’s Universe. I needed a way to figure out the maths for the grape hyacinth corners (or what I sometimes call the wheat stalk thingies) without having to frog entire (long) rounds of Charlotte. I adore the resulting square and think it will be a great addition to any blanket. It has a final-round stitch count of 40 sts, which is roughly equivalent to other 12″ squares if made using worsted weight yarn and a 5.5mm hook.
This is the first square for which I have done a video tutorial (aided by the talented Boy 2). I hope you find it useful.
I have worked up three examples of the square, each with a very different feel.
Square A – Grey with Coloured Flowers
For this square, I used Scheepjes Scrumptious. You can read more about the yarn in this post: New Yarn, New Projects: Scheepjes Scrumptious and Truly Scrumptious. I used a single colour for the background and contrasting colours for the stems and flowers. Although it took more effort than the other two versions, it is my favourite, and well worth the extra work!
If you are going to make this version, please see Changing Colours and Working Over Contrast Yarn below.
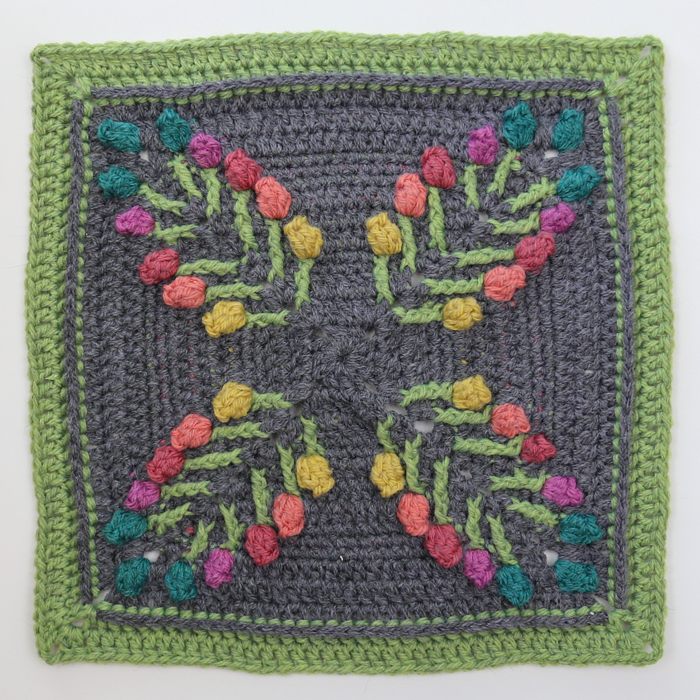
Gauge
5.5cm/2.16″ at the end of Round 3.
Size
20cm/8″
For this square, I used 16.5g of Yarn A, 11g of Yarn B, and roughly 1g each of Yarns C – G, for a total of 32g.
Materials
- 4 mm crochet hook (US 6/G, UK 8)
- Scheepjes Scrumptious (50% recycled polyester/50% acrylic), 100g/300m/328yds
- Yarn A – Black Sesame Muffin (380)
- Yarn B – Matcha Chiffon Cake (326)
- Yarn C – Citrus Rice Pudding (315)
- Yarn D – Grapefruit Curd Tart (308)
- Yarn E – Summer Berry Tartlet (322)
- Yarn F – Blackberry Honey Gelato (312)
- Yarn G – Rainforest Cake (349)
Colours Per Round
- Round 1 – Yarn A
- Round 2 – Yarn A
- Round 3 – Yarn A (Yarn B for Stems)
- Round 4 – Yarn A
- Round 5 – Yarn A (Yarn B for Stems)
- Round 6 – Yarn A (Yarn C for Flowers)
- Round 7 – Yarn A (Yarn B for Stems)
- Round 8 – Yarn A (Yarn D for Flowers)
- Round 9 – Yarn A (Yarn B for Stems)
- Round 10 – Yarn A (Yarn E for Flowers)
- Round 11 – Yarn A (Yarn B for Stems)
- Round 12 – Yarn A (Yarn B for Stems and Yarn F for Flowers)
- Round 13 – Yarn A (Yarn G for Flowers)
- Round 14 – Yarn A
- Round 15 – Yarn B
- Round 16 – Yarn B
Square B – Rainbow
This is the colourway I used for the round-by-round photos and the video tutorial. I used a different colour for each round (except the last two) to make it easier for you to see how each round interacts with the previous one. You can’t beat a good rainbow! I’ve used Scheepjes Softfun in the same colours I used for the photo tutorials for Charlotte’s Universe.
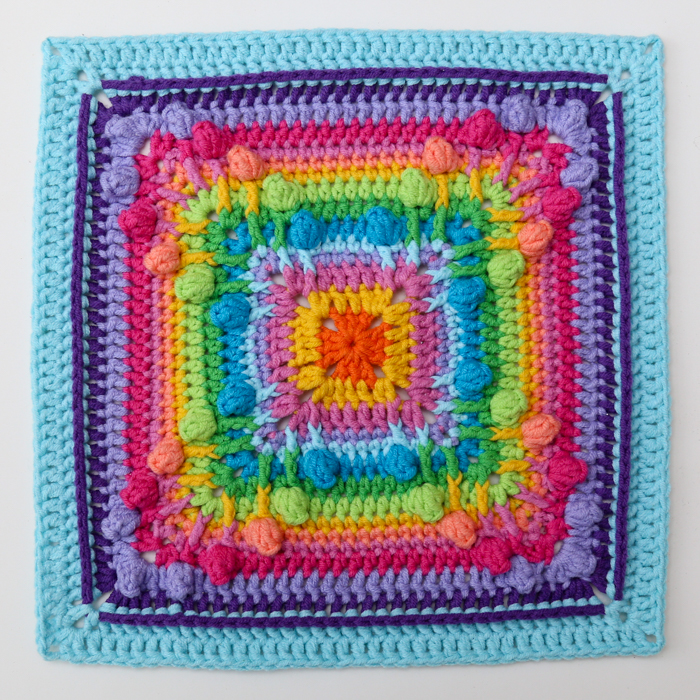
Gauge
6cm/2.36″ at the end of Round 3.
Size
21.5cm/8.5″
For this square, I used 11g of Yarn E, and between 0.5 and 5g of each of the other colours, for a total of 39g.
Materials
- 4 mm crochet hook (US 6/G, UK 8)
- Scheepjes Softfun Rainbow Pack (60% cotton/40% acrylic), 20g/56m/61yds
- Yarn A – Bumblebee (2634)
- Yarn B – Soft Coral (2636)
- Yarn C – Pink (2480)
- Yarn D – Hot Pink (2495)
- Yarn E – Cool Blue (2603)
- Yarn F – Dark Turquoise (2511)
- Yarn G – Apple (2516)
- Yarn H – Emerald (2605)
- Yarn I – Deep Violet (2515)
- Yarn J – Violet (2519)
- Yarn K – Pumpkin (2651)
Colours Per Round
- Round 1 – Yarn K
- Round 2 – Yarn A
- Round 3 – Yarn C
- Round 4 – Yarn J
- Round 5 – Yarn E
- Round 6 – Yarn F
- Round 7 – Yarn H
- Round 8 – Yarn G
- Round 9 – Yarn A
- Round 10 – Yarn B
- Round 11 – Yarn C
- Round 12 – Yarn D
- Round 13 – Yarn J
- Round 14 – Yarn I
- Round 15 – Yarn E
- Round 16 – Yarn E
Square C – Single Colour
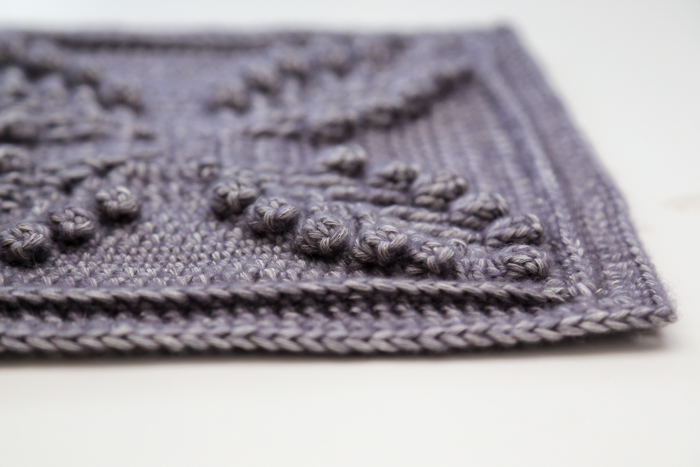
This last example was made with Stonewashed XL in a single colour. When I design, I use as many colours as possible to ensure that each round interacts with the previous round in an okay-ish manner. And I love colour, so it’s no hardship. But it is always great to see what the final design will look like when all the colour changes are stripped. Sometimes it works very well. Sometimes the design loses its magic…
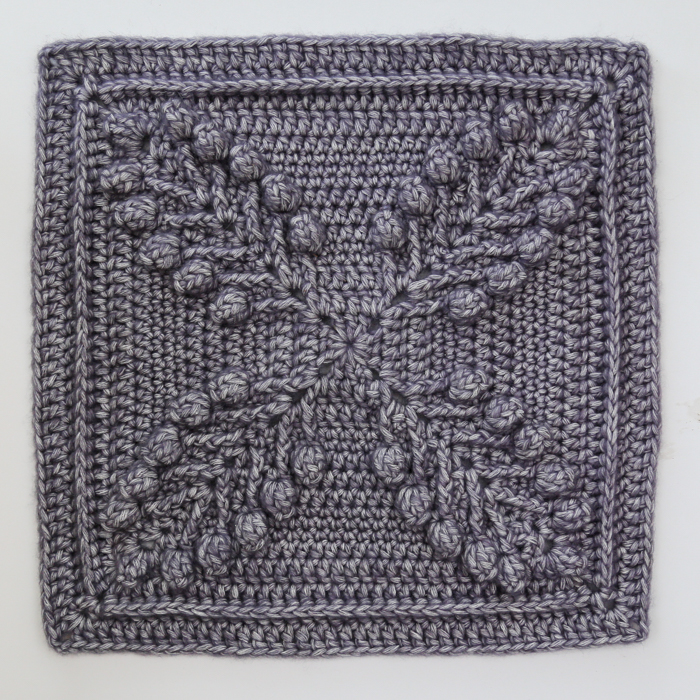
In this case, I think it worked very well. Just look at how the texture pops!
Gauge
7.5cm/2.95″ at the end of Round 3.
Size
26.5cm/10.5″
For this square, I used 92g of yarn.
Materials
- 5mm crochet hook (US 8/H, UK 6)
- Scheepjes Stone Washed XL (30% acrylic/70% cotton), 50g/75m/82yds
- Yarn A – Smokey Quartz (842) x 2 balls
Colours Per Round
Make all the rounds in Yarn A.
Daisy’s Bouquet Square Pattern
© Dedri Uys and Scheepjes. Charts by Masako Kawahara. All Rights Reserved.
Resources
- Add This Pattern to Your Ravelry Queue
- **Video Tutorial**
- Hashtag: #daisysbouquetcrochet
Abbreviations
- Beg – Beginning
- BP – Back post (see Special Stitches below)
- Ch – Chain
- Dc – Double crochet
- FP – Front post (see Special Stitches below)
- Hdc – Half-double crochet
- Sc – Single crochet
- Sl st – Slip stitch
- Sp/sps – Space/spaces
- St/sts – Stitch/stitches
- Tr – Treble crochet
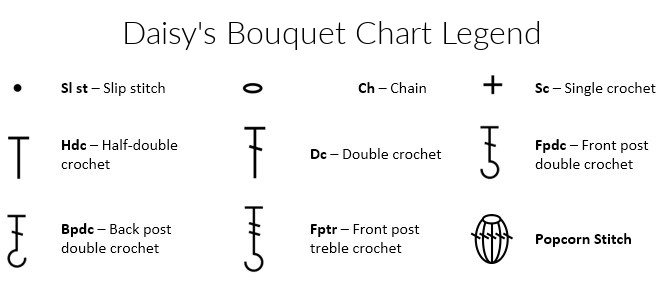
Punctuation
- * repeat instructions between asterisks the number of times specified.
- () repeat instructions between parentheses the number of times specified.
- [] square brackets are used to indicate stitches to be made in the same st/sp.
Special Stitches
- BP (Back Post) – Identify the post of the stitch you want to work around. Insert your hook from the back to the front and then from the front to the back around the post of the stitch so that the post lies behind your hook. Complete your stitch as normal.
- FP (Front Post) – Identify the post of the stitch you want to work around. Insert your hook from the front to the back and then from the back to the front around the post of the stitch so that the post lies on top of your hook. Complete your stitch as normal.
- Popcorn – Make 5 dc in the indicated st/sp. Pull up a loop and remove your hook. Insert your hook into the first dc of the 5-dc group. Grab the last st with your hook and pull it through the first st.
- Omitting – At the end of most rounds, you will see an instruction telling you to omit the last corner/stitch(es) of the last repeat. This means that your last repeat should stop before the indicated corner/stitch(es) because you will already have made that corner/stitch(es) before the repeat started.
Gauge, Size, Materials, and Colours Per Round
Please see the information for Square A, Square B, and Square C above.
Notes
Standing Stitches and Invisible Joins
If you are going to use different colours for each round like I did in Square B, you can use the Invisible Join instead of the Sl st Join. You can also start each new round with a Standing Stitch instead of the traditional Starting Chain.
Step-by-step Help
For this tutorial, I have not done step-by-step photos. I do include a photo of each round completed. If you need step-by-step help, please consult the video tutorial.
Changing Colours and Working Over Contrast Yarn
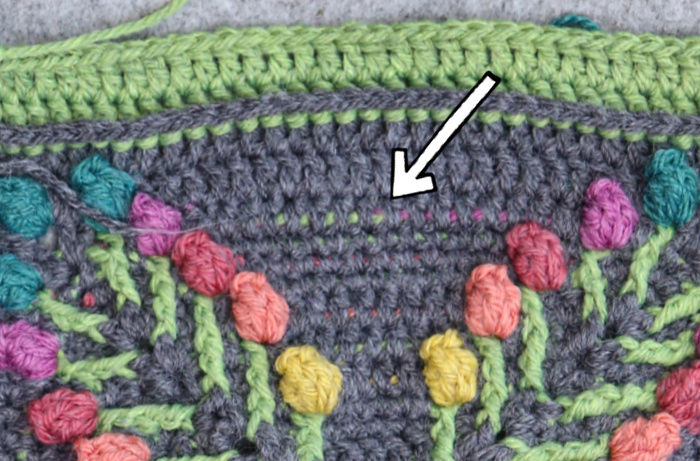
If you are going to make a single-colour background with stems and flowers in different colours, you will work over your contrast yarn. The only round where this may be a problem is Round 12, where you are making both flowers AND stems in the same round. For that round, I added my contrast yarn before each corner and cut it again after each corner. This means that you’ll have a fair amount of ends to sew away, but working over both strands of contrast yarn was just too visible for my liking (see Photo below).
When changing colours, you will do so on the last yarn-over of the last st before the colour change.
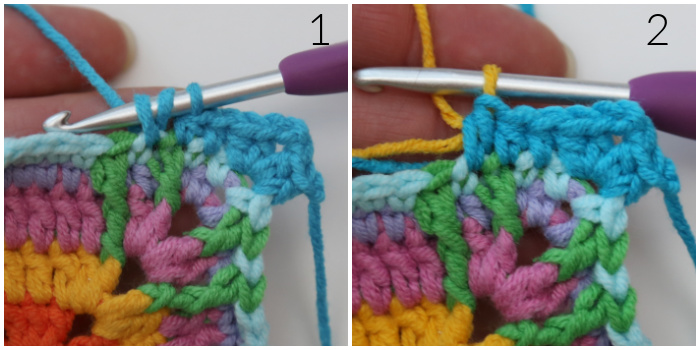
When you are making the Stems, you will need to change colours on the last st before each FPdc/FPtr. To do this, make the st before the colour change, stopping when you have 2 loops left on your hook (3 loops if this st is an hdc) – Photo 1. Pick up the colour you will be using for the stems and pull it through the loops on your hook to complete the st {Photo 2}.
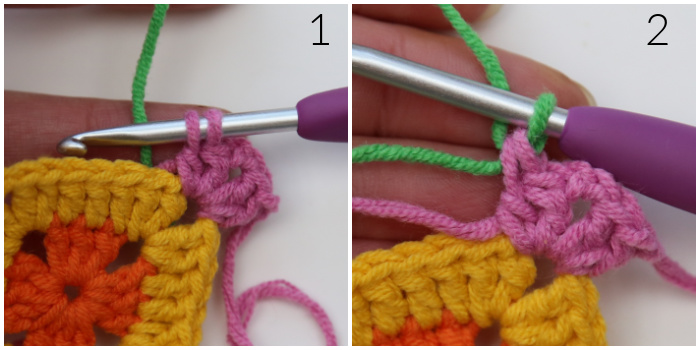
Make the FPdc/FPtr, stopping when you have 2 loops left on your hook {Photos 3 and 4}. Pick up the colour you are using for the background and pull it through all the loops on your hook to complete the st {Photo 5}.

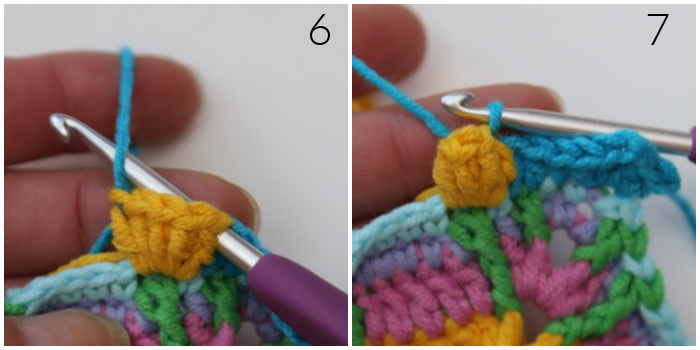
Working OVER the contrast colour/stem colour {Photo 6}, complete all the sts until you get to the last st before the next stem {Photo 7}. Repeat the instructions above until you get to the end of the round {Photo 8}. Cut your contrast colour and work away the ends.
You can see this demonstrated in Round 3 of the Video Tutorial for Daisy’s Bouquet.

When you are making the Flowers, you will need to change colours on the last st before each Popcorn. To do this, make the st before the colour change, stopping when you have 2 loops left on your hook (3 loops if this st is an hdc as in the example below) – Photo 1. Pick up the colour you will be using for the Popcorns and pull it through the loops on your hook to complete the st {Photo 2}.
Make all 5 dc for the Popcorn, stopping when you have 2 loops of the last dc left on your hook {Photo 3}. Pick up the colour you are using for the background {Photo 4} and pull it through both loops on your hook to complete the st {Photo 5}.

Pull up a long loop. Remove your hook from your work, insert your hook into the first dc of the 5-dc group, then insert it into the loop {Photo 6}. Pull the loop through the first st to complete your Popcorn {Photo 7}. As above, continue working OVER the contrast colour/Popcorn colour until you get to the next colour change. When you get to the end of the round, cut your contrast colour and work away the ends.
You can see this demonstrated in Round 6 of the Video Tutorial for Daisy’s Bouquet.
Instructions
Round 1
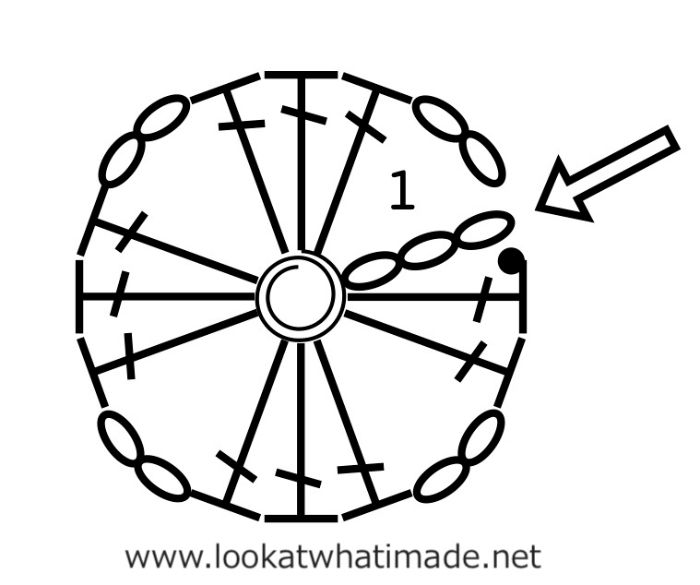
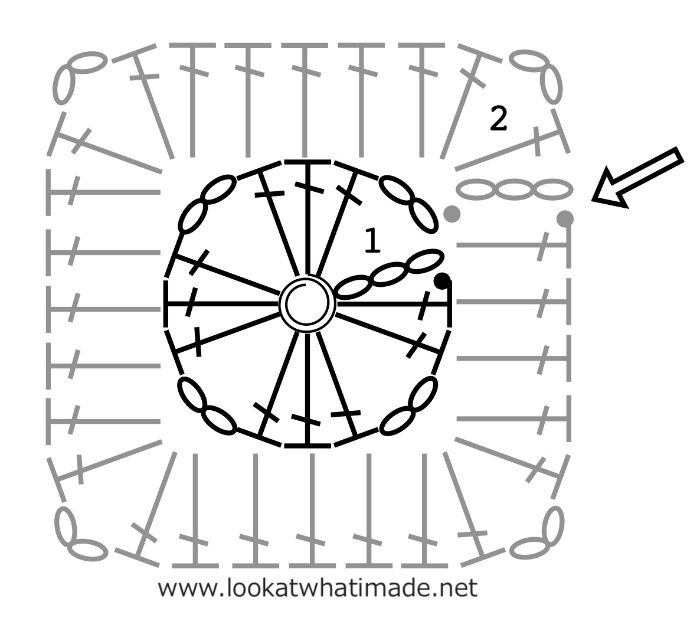
Into a magic ring: Ch 5 (counts as dc + ch-2 sp), (3 dc, ch 2) three times, 2 dc, join to the third ch of the beg ch-5 with a sl st. Sl st into the next ch-2 sp. {3 dc per side, not including ch-2 corner sps}
Round 2
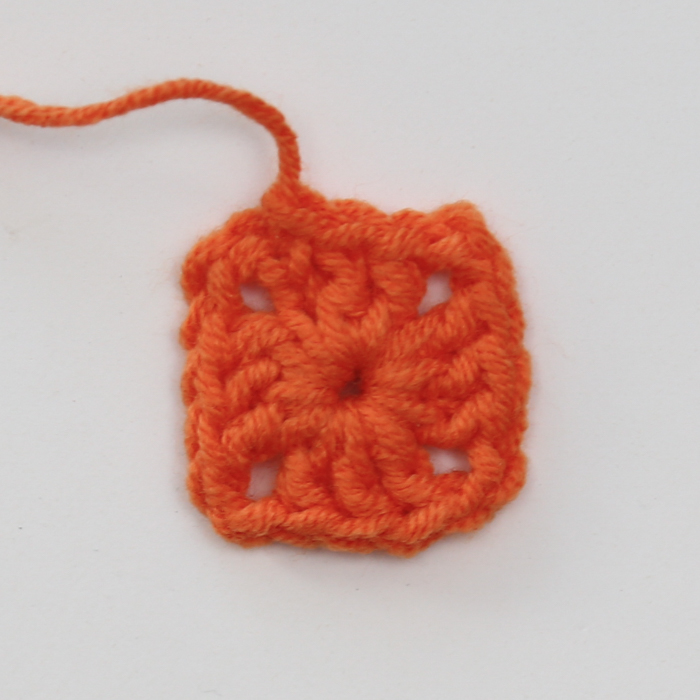
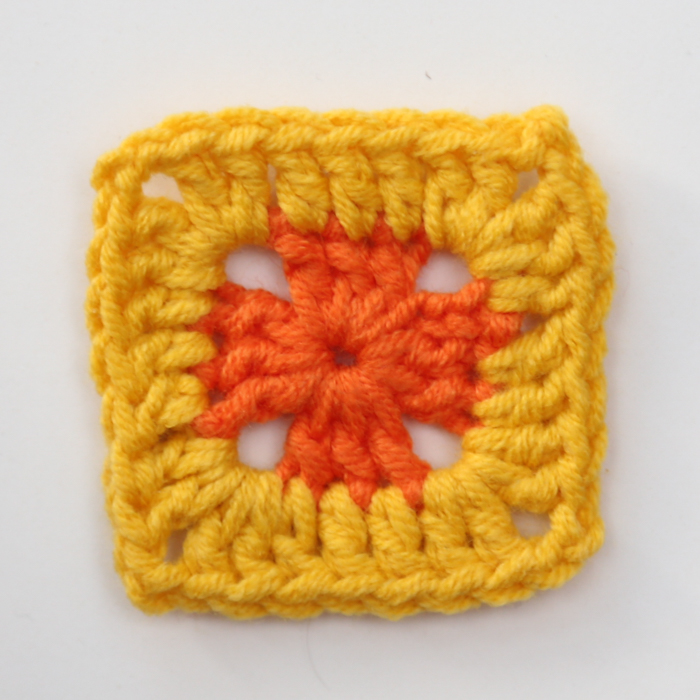
Ch 3 (counts as dc throughout), [dc, ch 2, 2 dc] in the same ch-2 corner sp. This is your first corner made. *Dc in the next 3 sts. [2 dc, ch 2, 2 dc] in the next ch-2 corner sp.* Repeat from * to * 3 more times, omitting the last corner on the last repeat. Join to the top of the beg ch-3 with a sl st. Sl st into the next st and into the ch-2 corner sp. {7 dc per side, not including ch-2 corner sps }
Round 3
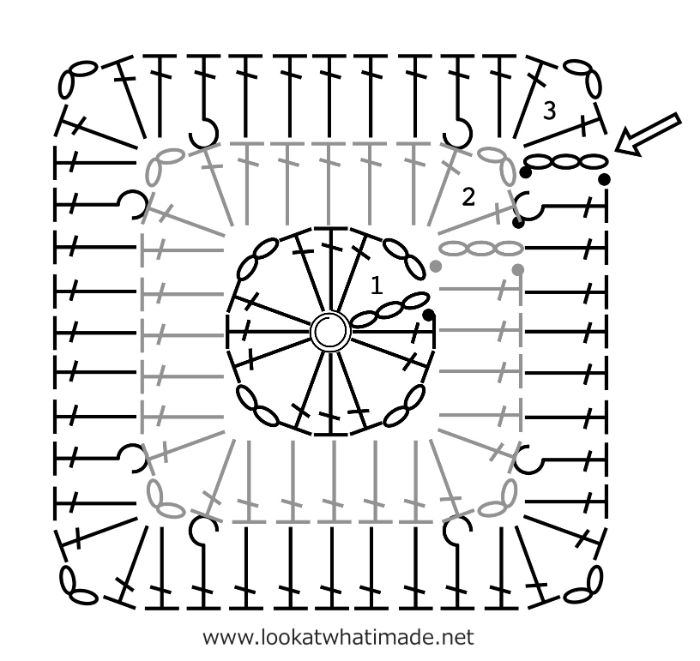
[Ch 3, dc, ch 2, 2 dc] in the ch-2 corner sp. This is your first corner made. *FPdc around the first st, dc in the next 5 sts, FPdc around the last st. [2 dc, ch 2, 2 dc] in the next ch-2 corner sp.* Repeat from * to * 3 more times, omitting the last corner on the last repeat. Join to the top of the beg ch-3 with a sl st. Sl st into the next st and into the ch-2 corner sp. {9 dc and 2 FPdc per side, not including ch-2 corner sps}
Round 4
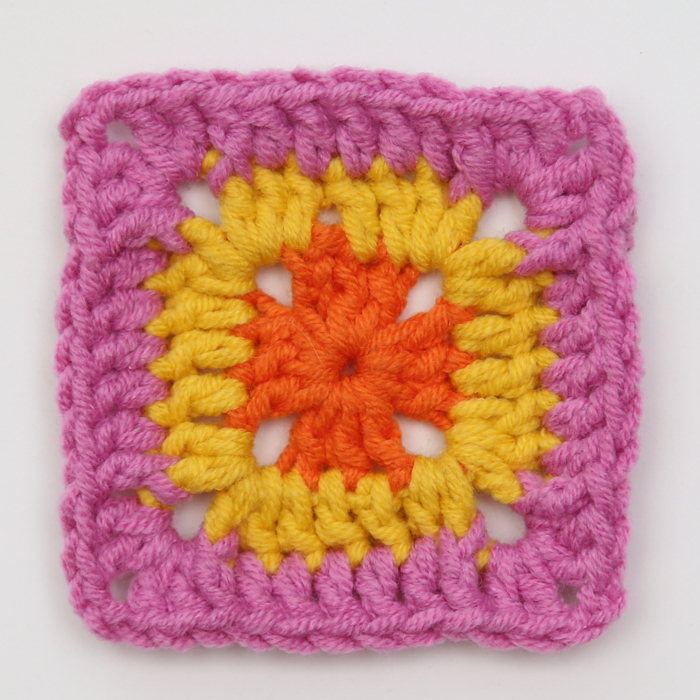
Ch 1 (doesn’t count as a st throughout). [Sc, ch 2, sc] in the same ch-2 corner sp. This is your first corner made. *Sc in each st across. [Sc, ch 2, sc] in the next ch-2 corner space.* Repeat from * to * 3 more times, omitting the last corner on the last repeat. Join to the first sc with a sl st. Sl st into the next ch-2 corner sp. {13 sc per side, not including ch-2 corner sps }
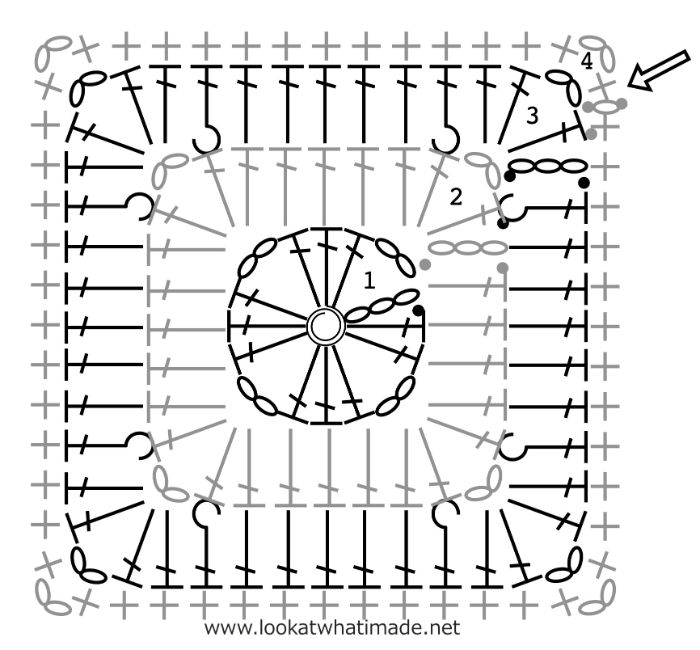
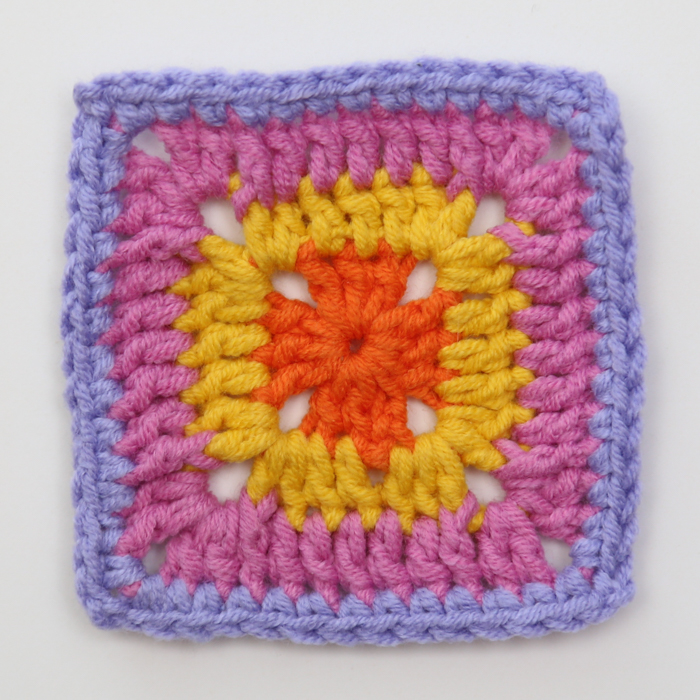
Round 5
[Ch 1, sc, ch 2, sc] in the ch-2 corner sp. This is your first corner made. *Skip the first (hidden) st. Sc in the next st, FPdc around the first dc of Round 3. Skip the next st of Round 4, sc in the next st. FPdc around the FPdc from Round 3, skip the next st of Round 4. Sc in the next 5 sts, FPdc around the next FPdc from Round 3. Skip the next st of Round 4 and sc in the next st. FPdc around the last dc of Round 3 and skip the last st of Round 4. [Sc, ch 2, sc] in the next ch-2 corner sp.* Repeat from * to * 3 more times, omitting the last corner on the last repeat. Join to the first sc with a sl st. Sl st into the next ch-2 corner sp. {10 sc and 4 FPdc per side, not including ch-2 corner sps}
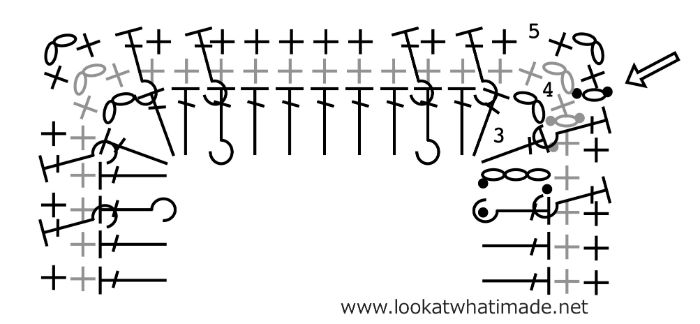
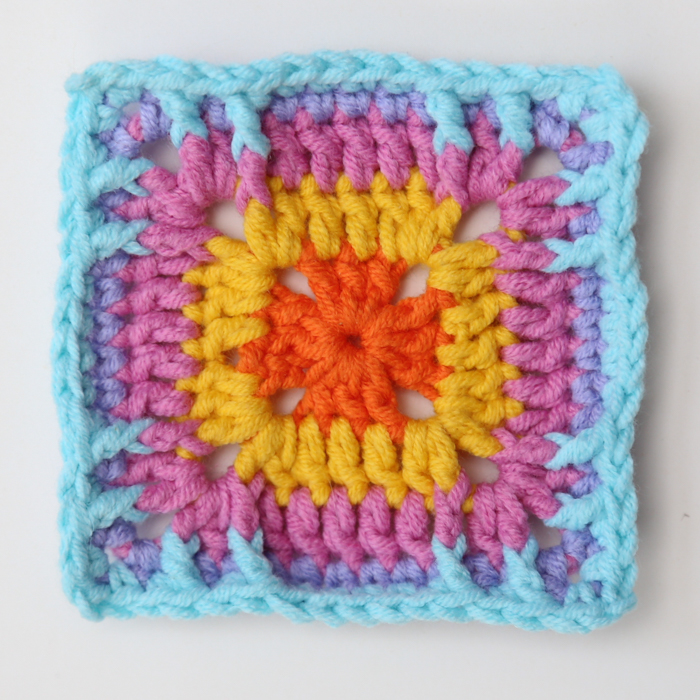
Round 6
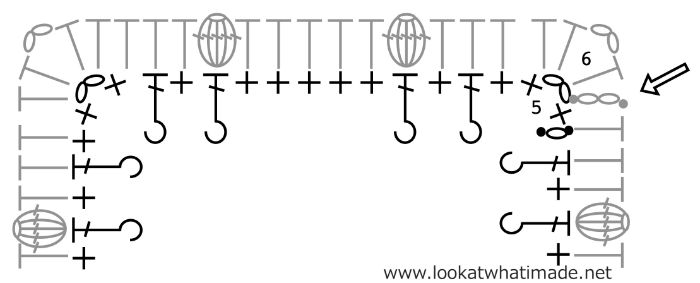
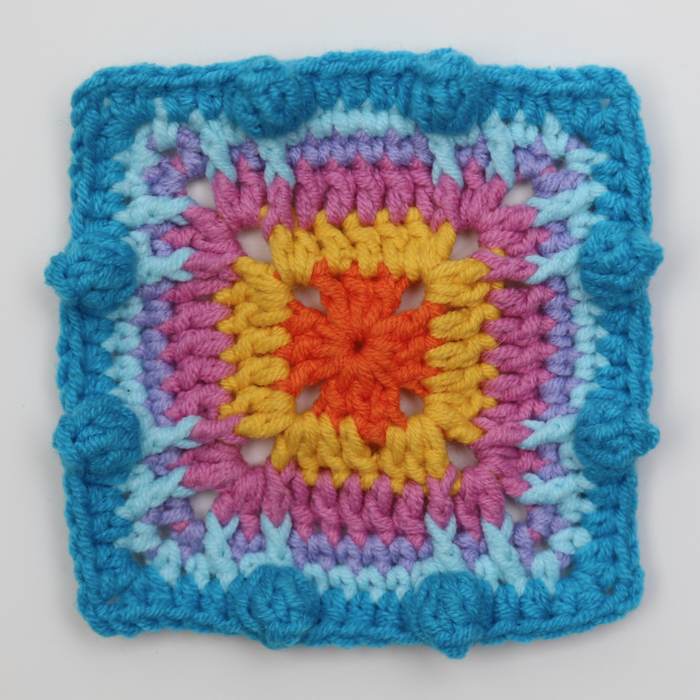
Ch 2 (counts as hdc throughout). [Hdc, ch 2, 2 hdc] in the same ch-2 corner sp. This is your corner made. *Skip the first (hidden) st. Hdc in the next 3 sts. Make a Popcorn in the next st, which should be the second FPdc from Round 5. Hdc in the next 5 sts. Make a Popcorn in the next st, which should be the next FPdc. Hdc in the last 3 sts. [2 hdc, ch 2, 2 hdc] in the next ch-2 corner sp.* Repeat from * to * 3 more times, omitting the last corner on the last repeat. Join to the top of the beg ch-2 with a sl st. Sl st in the next st and into the ch-2 corner sp. {15 hdc and 2 Popcorns per side, not including ch-2 corner sps}
Round 7
This round is asymmetric. It will feel weird, I know, but it will make the Popcorns in the next round look more symmetrical. There is always method in the madness!
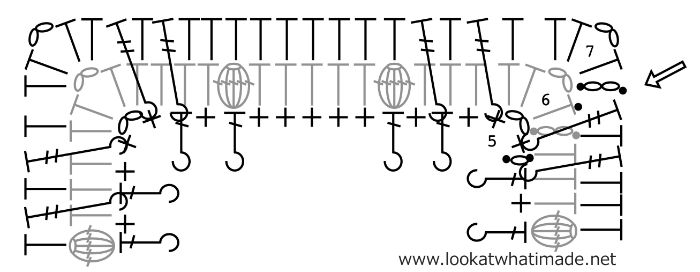
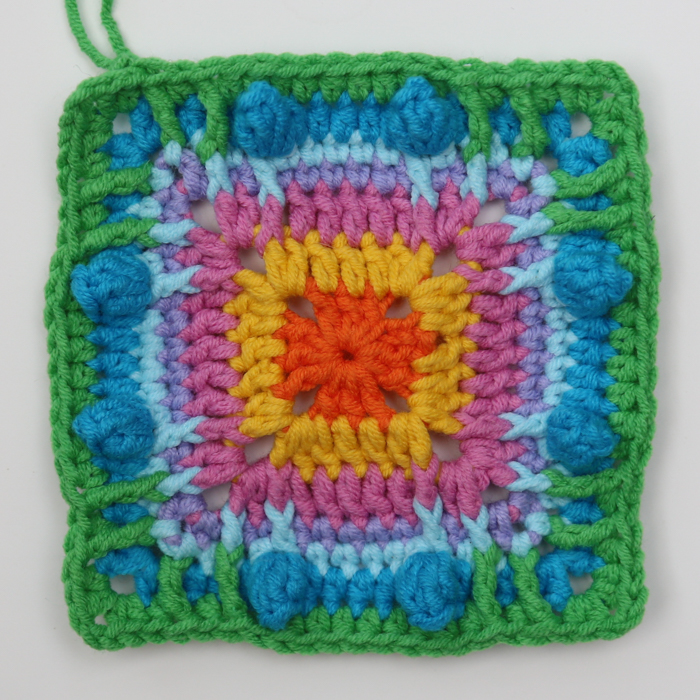
[Ch 2, hdc, ch 2, 2 hdc] in the ch-2 corner sp. This is your corner made. *Skip the first (hidden) st. Hdc in the next st. FPtr around the first sc from Round 5. Skip the next st of Round 6 and hdc in the next st. FPtr around the first FPdc from Round 5, skip next st of Round 6, and hdc in the next 9 sts. The first hdc should fall in the Popcorn. The last hdc should fall in the second hdc after the Popcorn. FPtr around the next FPdc from Round 5. Skip the next st of Round 6 and hdc in the next st. FPtr around the last sc from Round 5. Skip the next st of Round 6. [2 hdc, ch 2, 2 hdc] in the next ch-2 corner sp.* Repeat from * to * 3 more times, omitting the last corner on the last repeat. Join to the top of the beg ch-2 with a sl st. Sl st in the next st and into the ch-2 corner sp. {16 hdc and 4 FPtr per side, not including ch-2 corner sps}
Round 8
[Ch 2, hdc, ch 2, 2 hdc] in the same ch-2 corner sp. This is your corner made. *Skip the first (hidden) st. Hdc in the next 4 sts. Make a Popcorn in the next st, which should be the second FPtr. Hdc in the next 9 sts. Make a Popcorn in the next st, which should be the next FPtr. Hdc in the last 4 sts. [2 hdc, ch 2, 2 hdc] in the next ch-2 corner sp.* Repeat from * to * 3 more times, omitting the last corner on the last repeat. Join to the top of the beg ch-2 with a sl st. Sl st in the next st and into the ch-2 corner sp. {21 hdc and 2 Popcorns per side, not including ch-2 corner sps}
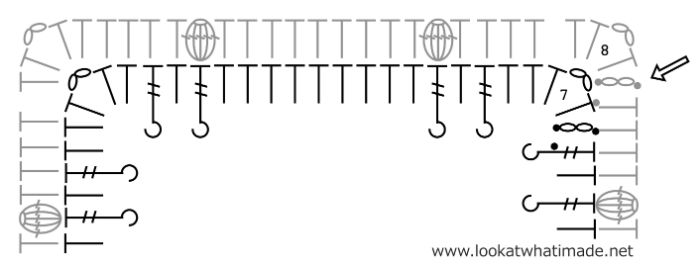
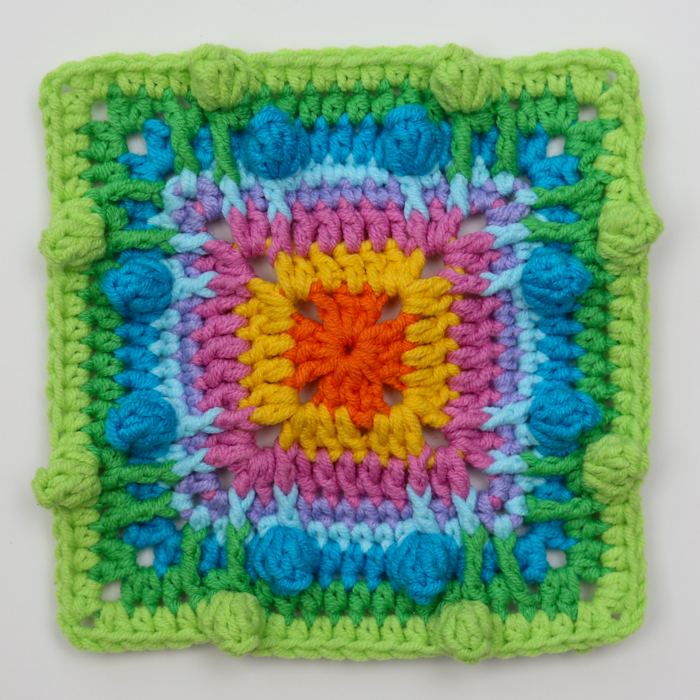
Round 9
This round is another asymmetric round.
[Ch 1, sc, ch 2, sc] in the ch-2 corner sp. This is your first corner made. *Skip the first (hidden) st. Sc in the next 2 sts. FPtr around the first hdc from Round 7. Skip the next st of Round 8 and sc in the next st. FPtr around the next FPtr from Round 7, skip the next st of Round 8, and sc in the next 13 sts. The first sc should fall in the Popcorn. The last sc should fall in the second hdc after the Popcorn. FPtr around the last FPtr from Round 7. Skip the next st of Round 8 and sc in the next st. FPtr around the last hdc from Round 7, skip next st of Round 8, and sc in the last st. [Sc, ch 2, sc] in the next ch-2 corner sp.* Repeat from * to * 3 more times, omitting the last corner on the last repeat. Join to the first sc with a sl st. Sl st into the next ch-2 corner sp. {20 sc and 4 FPtr per side, not including ch-2 corner sps}
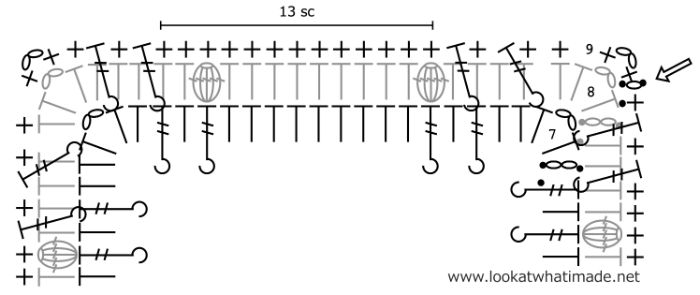
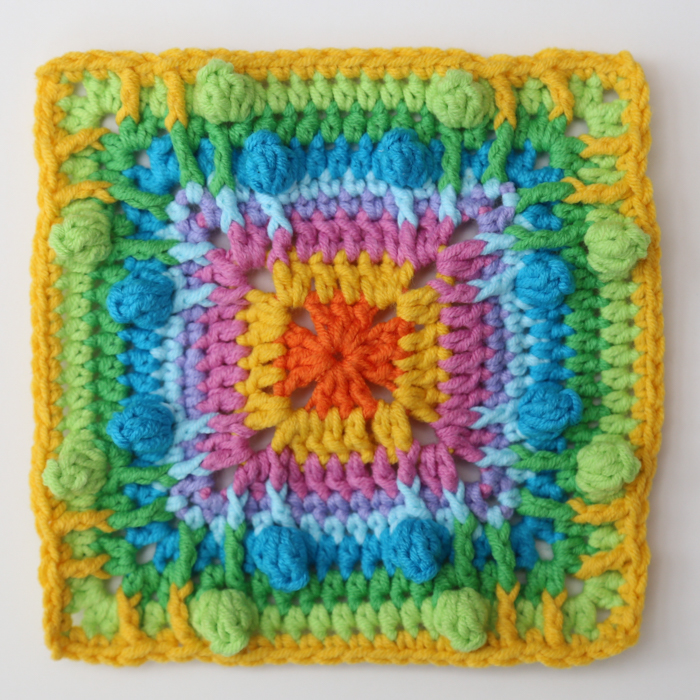
Round 10
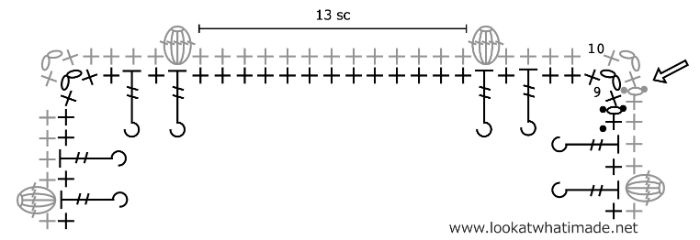
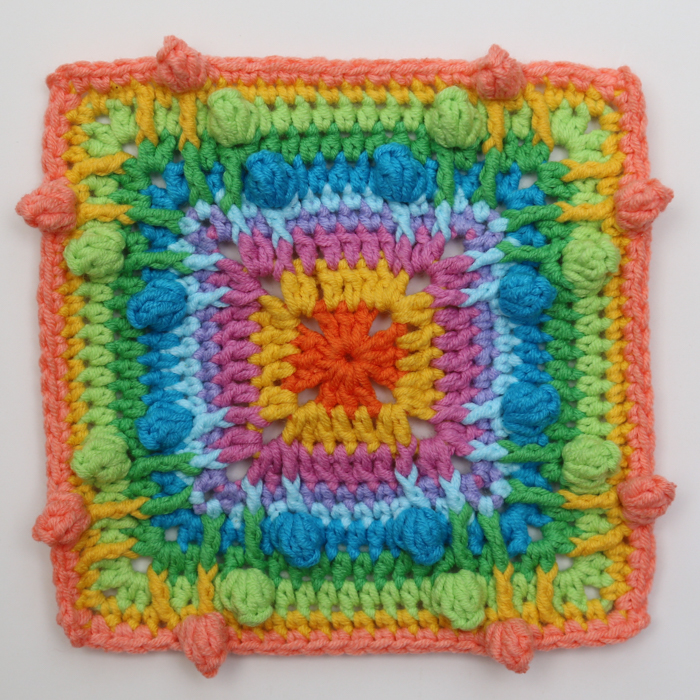
[Ch 1, sc, ch 2, sc] in the ch-2 corner sp. This is your first corner made. *Skip the first (hidden) st. Sc in the next 4 sts. Make a Popcorn in the next st, which should be the second FPtr. Sc in the next 13 sts. Make a Popcorn in the next st, which should be the next FPtr. Sc in last 4 sts. [Sc, ch 2, sc] in the next ch-2 corner sp.* Repeat from * to * 3 more times, omitting the last corner on the last repeat. Join to the first sc with a sl st. Sl st into the next ch-2 corner sp. {23 sc and 2 Popcorns per side, not including ch-2 corner sps}
Round 11
This round is another asymmetric round. If you are going to have trouble identifying the third sc of each side from Round 10, mark them before you start.
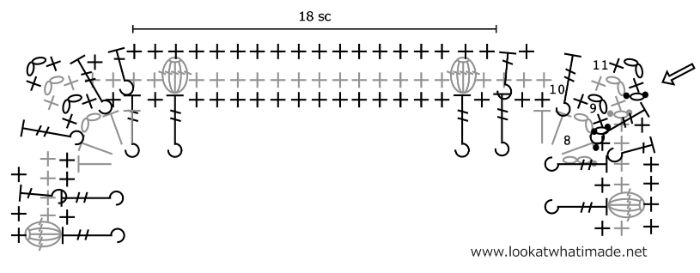
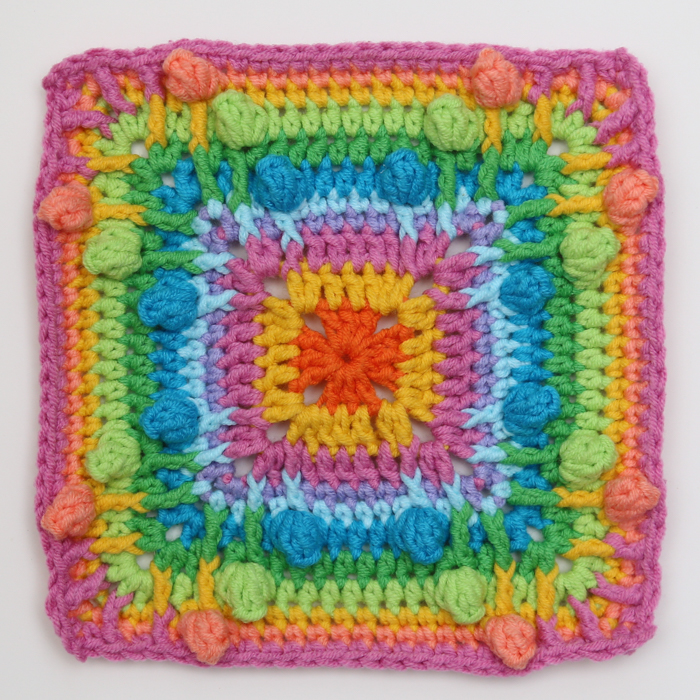
[Ch 1, sc, ch 2, sc] in the ch-2 corner sp. This is your first corner made. *FPtr around the first hdc of Round 8. Skip the first 2 sts of Round 10 and sc in the next st, which should be the third sc of Round 10. FPdc around the first FPtr of Round 9, skip next st of Round 10, and sc in the next 18 sts. The second and sixteenth sc should fall in a Popcorn from the previous round. FPdc around the last FPtr of Round 9, skip the next st of Round 10, and sc in the next st. FPtr around the last hdc of Round 8 and skip the last st of Round 10. [Sc, ch 2, sc] in the next ch-2 corner sp.* Repeat from * to * 3 more times, omitting the last corner on the last repeat. Join to the first sc with a sl st. Sl st into the next ch-2 corner sp. {22 sc, 2 FPdc, and 2 FPtr per side, not including ch-2 corner sps}
Round 12
[Ch 2, hdc, ch 2, 2 hdc] in the ch-2 corner sp. This is your corner made. *Skip the first (hidden) st. FPdc around the FPtr from Round 11. Hdc in the next st. Make a Popcorn in the next st, which should be the FPdc. Hdc in the next 18 sts. Make a Popcorn in the next st, which should be the next FPdc. Hdc in the next st. FPdc around the next FPtr and skip the last st of Round 11. [2 hdc, ch 2, 2 hdc] in the next ch-2 corner sp.* Repeat from * to * 3 more times, omitting the last corner on the last repeat. Join to the top of the beg ch-2 with a sl st. Sl st in the next st and into the ch-2 corner sp. {24 hdc, 2 Popcorns, and 2 FPdc per side, not including ch-2 corner sps}

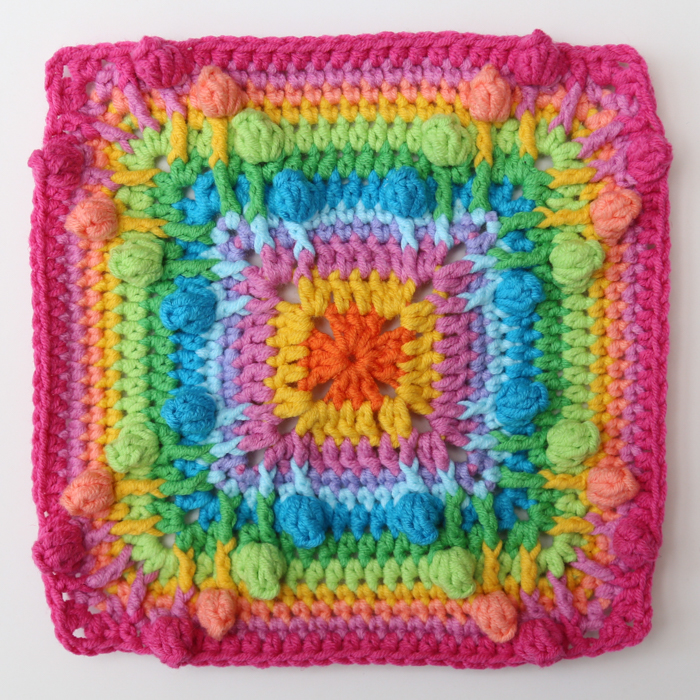
Round 13
[Ch 3, dc, Popcorn, 2 dc] in the same ch-2 corner sp. This is your first corner made. *Skip the first (hidden) st and dc in the next st. Make a Popcorn in the next st, which should be the FPdc. Dc in the next 22 sts. The second and twenty-first dc should fall in a Popcorn from the previous round. Make a Popcorn in the next st, which should be the next FPdc. Skip the next st and dc in the last st. [2 dc, Popcorn, 2 dc] in the next ch-2 corner sp.* Repeat from * to * 3 more times, omitting the last corner on the last repeat. Join to the top of the beg ch-3 with a sl st. Sl st into the next dc and into the corner Popcorn. {28 dc and 2 Popcorns per side, not including Corner Popcorns}

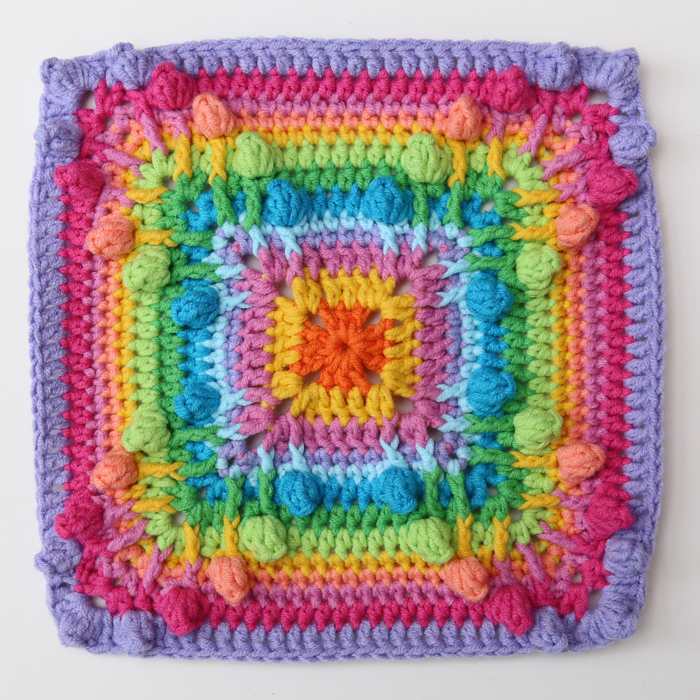
Round 14
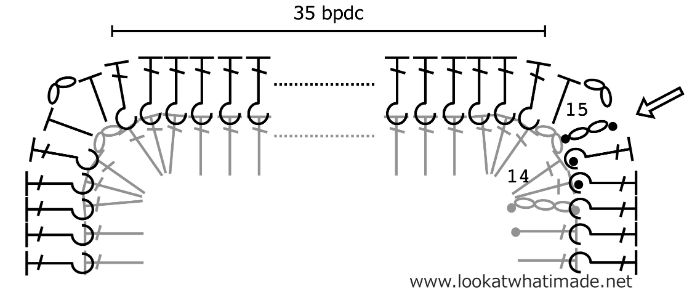
[Ch 3, 2 dc] into the same st. Ch 2 and make 3 dc in the next st. Dc in the next 29 sts. The third and twenty-sixth dc should fall in a Popcorn from the previous round. *Make 3 dc in the next st, which should be the Popcorn, ch 2, make 3 dc in the next st. Dc in the next 29 sts.* Repeat from * to * 2 more times. Join to the top of the beg ch-3 with a sl st. Sl st in the next 2 sts and into the ch-2 corner sp. {35 dc per side, not including ch-2 corner sps}
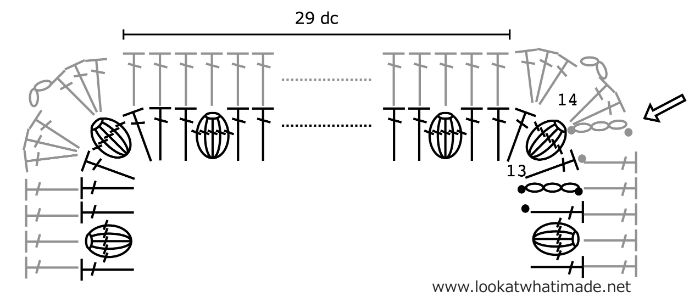
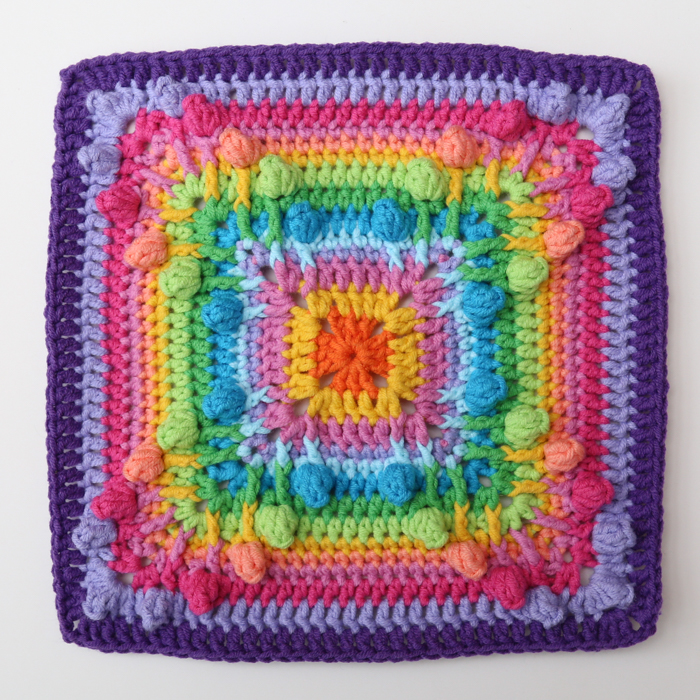
Round 15
Ch 4 (counts as hdc and ch-2 sp). Hdc in the same ch-2 corner sp. BPdc in each st. *[Hdc, ch 2, hdc] in the ch-2 corner sp. BPdc in each st.* Repeat from * to * 2 more times. Join to the second ch of the beg ch-4 with a sl st. Sl st into the ch-2 corner space. {2 hdc and 35 BPdc per side, not including ch-2 corner sps}
Round 16
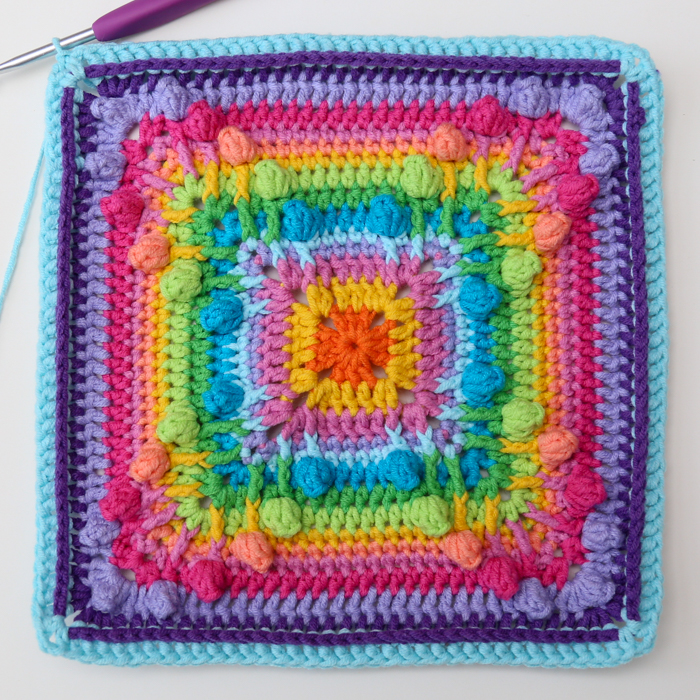
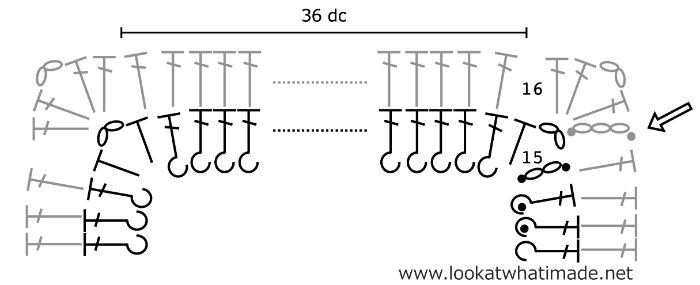
[Ch 3, dc, ch 2, 2 dc] in same ch-2 corner sp. This is your first corner made. *Skip the first (hidden) st. Dc in each rem st. [2 dc, ch 2, 2 dc] in the next ch-2 corner sp.* Repeat from * to * 3 more times, omitting the last corner on the last repeat. Join to the top of the beg ch-3 with a sl st. Fasten off and work away your ends. {40 dc per side, not including ch-2 corner sps}

And there you have it. One pretty crochet square all done.
I hope you have enjoyed making this pattern! If you share photos online, please remember to use #daisysbouquetcrochet so that I can see them :)

This blog post contains affiliate links. I only link to products I personally use or would use. All opinions are my own.


Kholoud says
I want pattern
Jenny Lowman says
This is the pattern that you have commented on :)
Amelia Vincent says
It is so good to have you back! Thank you for your always gorgeous designs.
Devika Gunawardena says
This piece very nice and because of your explanation ,I understand it very well..thank you so much
Keep it up..
I’m a bigginer for crochet your helping hand much appreciated.
Jenny Lowman says
So glad you are enjoying Dedri’s pattern, Devika!
Rena Scott says
This square is absolutely beautiful and I greatly appreciate the charts! I could never understand them, but once I did, it was a game changer. I have tried to find a program to do the charts so I can convert patterns to charts but have been unable to find any so I have to do it by hand. Could I ask what program you use? Thank you for the beautiful pattern!
Jenny Lowman says
Masako Kawahara creates the charts for Dedri. You can find her on Instagram @crochet_hmmm :)