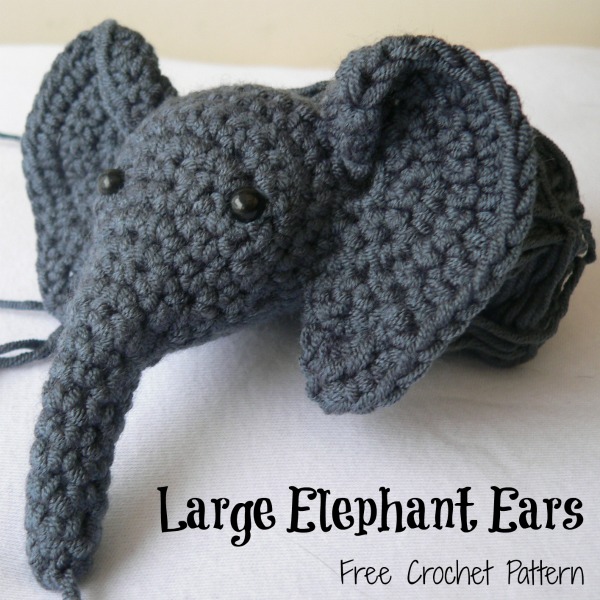
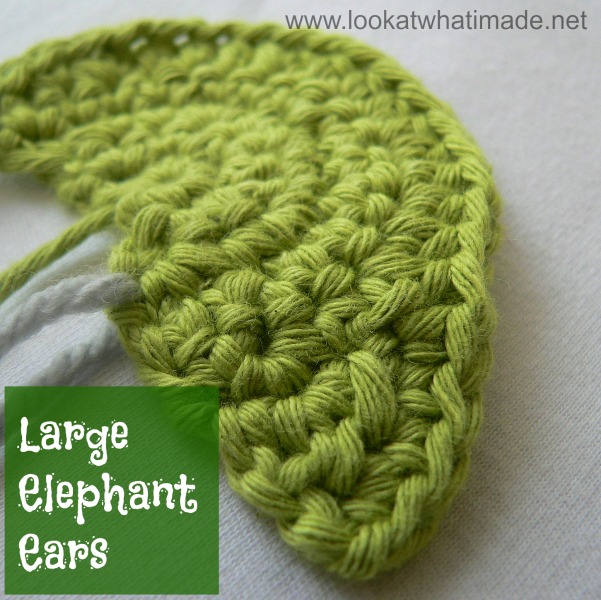
I know…a pattern for large crochet elephant ears seems very strange. These ears are meant as a substitute for the more girly ears my elephant patterns currently have. And rather than writing out the whole head again, I have decided to just post the pattern for the large ears on its own…with instructions on how to attach them, of course.
Some of you might be familiar with Meimei my baby crochet elephant, Grace my crochet elephant comfort blanket and Eleanor my crochet elephant puzzle. Most of you probably aren’t. So let me enlighten you. I have devised a method for crocheting the ears onto the head as you go, negating the need for *shudder* sewing them on later on.
Below the pattern for the Large Crochet Elephant Ears, you will find instructions for attaching the ears in this fashion (join-as-you-go) when using them in one of my patterns instead of the regular ears. This does not, however, mean that you can’t make these ears and sew them onto any old elephant.
If you find another elephant pattern you really like the look of, but you would like to add these ears instead of the ones in the pattern, be my guest!
Large Crochet Elephant Ears Pattern
© Dedri Uys 2013. All Rights Reserved.
Abbreviations
US Crochet Terminology Used
| Ch | Chain |
| Dc | Double crochet |
| Hdc | Half-double crochet |
| Hdc inc | Half-double crochet increase |
| Sc | Single crochet |
| Sc inc | Single crochet increase |
| St/st’s | Stitch/stitches |
| * | Repeat all instructions between asterisks the amount of times specified. |
Materials
- Double knit yarn (light worsted weight/#3) in grey – a couple of yards
- 4 mm crochet hook (US 6/G UK 8)
- Yarn needle
- Piece of scrap yarn as a stitch marker
Instructions
(Make 2)
1. With grey yarn: Ch 2. 5 x sc into the 2nd ch from the hook. Ch 1 and turn. (5)
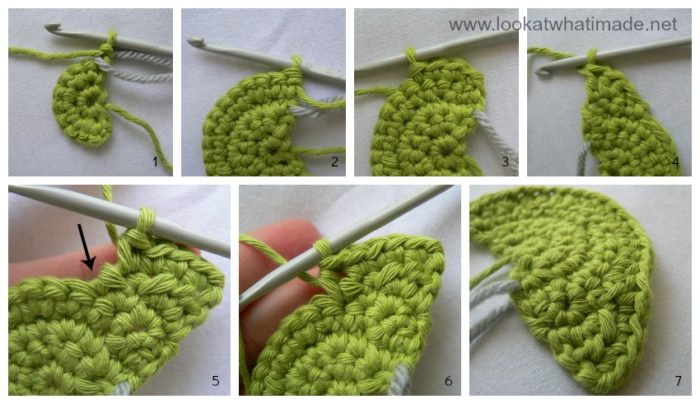
2. Sc inc in each st. Ch 1 and turn. Place a piece of scrap yarn over your work before making the first st of the next row (Photo 1). (10)
3. *Sc inc, sc* x 5. Ch 1 and turn. (15)
4. *Sc inc, 2 x sc* x 5. Turn (Photo 2). (20)
5. Short Row: Skip 2 st’s. Sc inc in the next st, sc in the next and sl st in the next (Photo 3). Ch 1 and turn. (3 – not including the sl st.)
6. Short Row: Skip the sl st. Sl st in the next st. Hdc inc in the next st and dc in the last st (Photo 4). Ch 1 and turn. (4 – including the sl st’s)
7. Sc x 4. This will bring you to the “step”. Hdc in the st at the base of the step (which already contains a sl st – indicated with an arrow in Photo). Photo 6 shows the hdc already made. *Hdc x 3, hdc inc* x 3. Sc in the third last stitch and sl st in the last 2 st’s. Ch 1 and bind off. (21 – not including the sl st’s)
If you are going to sew these ears onto an existing head, scroll up and have another look at the very first photo in the post. You should attach the ears with the fat bit of the ear to the top and folded over slightly onto itself.
If you are going to attach them to one of my elephants, make an elephant head by following the instructions for the head in the pattern for Grace the Crochet Elephant Lovie (PDF Pattern) OR by following the instructions for the head in the pattern for Meimei the Crochet Baby Elephant (pattern written out on my site). Both these heads are the same, the one is just attached to a blanket and the other is attached to a body…mneh.
When you get to the bit that tells you to attach the ears, use Note 1 and Note 2 below instead of the ones supplied in the original patterns.
Example of the round in which you attach the ears:
Sc, sc 2tog, 2 x sc. Sc through the first ear x 6 (see Note 1 below). Sc in the next 6 st’s of the head only. Sc through the second ear x 6 (see Note 2 below). Sc, sc2tog. (24)
The ears are each crocheted into/onto the head over 6 stitches. This remains the same regardless of whether or not you use the original girly ears or these large crochet ears.
Attaching the Large Crochet Ears
Please Note: I made the ears in green and yellow to make it easier to see what goes where. I have also supplied stitch counts in parentheses after each step to help you keep track of the stitches.
Note 1 – To Attach the First Ear:
- Hold the ear in front of the head and upside down, with the end tail of yarn to the left as in Photo 2 below. (If you are left-handed, remember to flip the ear so that the end tail of yarn is to your right.) You will work the 6 sc’s attaching the ear through both the head AND the ear.
- Insert your hook into the beginning of Row 3 of the ear (that will be the row JUST before the stitch marker) AND the next st of the head (Photo 3). Make a sc. Sc through Rows 2 and 1 in the same fashion, remembering to insert your hook through both the ear AND the next st of the head. Sc through the central hole of the ear AND the next st of the head (Photo 4). (4 sc’s through both the ear and the head)
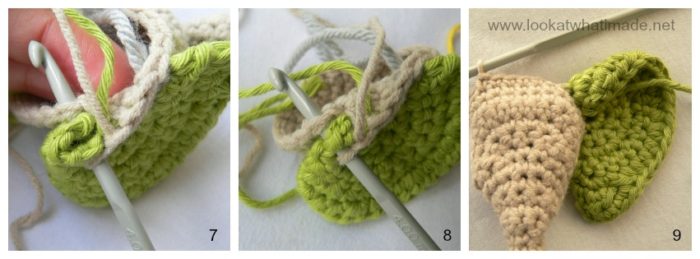
- Now insert your hook from front to back into the the next row (this will be the other end of Row 1) and then from back to front into the first st of Row 4 of the ear. This will pull the ear flat (Photos 5 and 6). Now Insert your hook into the next st of the head (Photo 7) and work one sc through all 3 layers. (1 sc through all 3 layers)
- Insert your hook through Rows 2 and 3 (Photo 8) AND the next st of the head. Sc through all 3 layers. (1 sc through all 3 layers)
Photo 9 illustrates what the ear will look like from the front. You should end up with a neat little fold at the top of the ear.


Note 2 – To Attach the Second Ear:
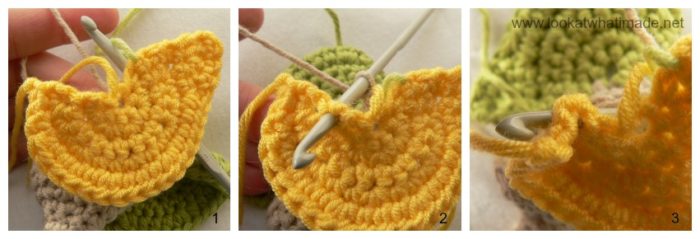
- Hold the ear in front of the head and upside down, with the end tail of yarn to the left as in Photo 1 below. (If you are left-handed, remember to flip the ear so that your end tail of yarn is pointing to the right.) You will work the 6 sc’s attaching the ear through both the head AND the ear.
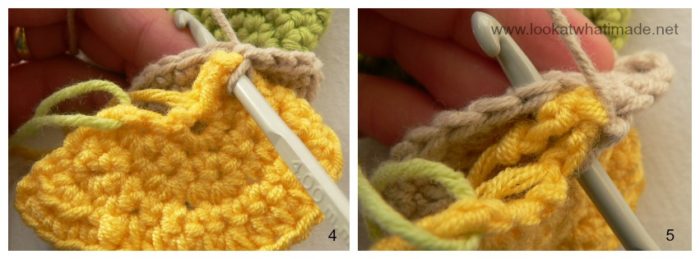
- Insert your hook from back to front into the end of Row 2 of the ear (that is the second hole to to the LEFT of the central hole {to the right if you are left-handed} – see Photo 2) and from front to back into the end of Row 3 (Photo 3). Now insert your hook into the next stitch of the head and make a sc through all 3 layers. This will fold the ear AND flip it (Photo 4). (1 sc through all 3 layers)
- Insert your hook into the end of Row 1 (the hole next to the central hole) AND through the first st of Row 4 of the ear (which will be sandwiched between the ear and the head at this point). Insert your hook into the next st of the head and sc through all 3 layers (Photo 5). (1 sc through all 3 layers)
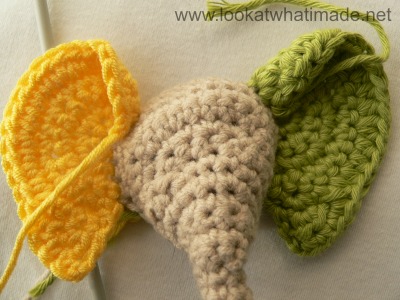
- Sc through the big central hole and the next st of the head. Sc through the next 3 rows of the ear AND the next 3 st’s on the head. The last stitch should fall in the row JUST after the stitch marker. (4 sc’s through both the ear and the head)
If you have never made one of my elephants, you are probably sitting there going “What???!” It really does make a lot more sense once you are doing it.
If you try, and fail, please contact me so that I can walk you through it. I am passionate about making things easier and although this method (join-as-you-go-crochet) seems more tricky at first glance, it is SO EASY once you get the hang of it.
I hope you have fun with these Dumbo-style ears!
Remember to subscribe to my newsletter if you would like to be kept in the loop. You can also like my Facebook page or follow me on Bloglovin or Google+.
Happy Hooking!



Sokhna says
Love the shape of the ears. I have been looking for it for sometime. Thanks for your generosity.
Elsie says
Making an elephant hat for a child and didn’t like the ears shown in the original pattern. Decided to google “crochet elephant ears” and lo and behold, your design appeared in my search. Totally love your elephants ears so went with your design. Wish I could send you a photo because I think you would love the end result. Thank you for sharing your talents it is very much appreciated.
Jenny says
You can post pictures on the blog’s Facebook community page, Elsie! We would love to see them!
BW Jenny :)
Laura O. says
Dedri,
Thank you for the answers. Your patterns and tutorials are amazing. I have crocheted on and off for many years, but never really understood the anatomy of a stitch and why certain parts of patterns seem to always be familiar. I have learned so much from your site! Every time I have a question I find you’ve already addressed it and created a great tutorial with lots of pictures! Thank you so much! :)
Dedri Uys says
Hi Laura. Thank you for your lovely comment :)
Laura O. says
Fabulous design, love, love, love being able to crochet the ears to the head instead of having to stitch them later! A couple questions a I finish up the head.
1. Why the chain 1 at the end of the ear, and what do I do with that tail? Thread it through the center hole of the ear and weave the ends to the back side of the head or ear?
2. Do you stuff the trunk?
3. Why the chain 1 at the end of the head and why not continue to decrease and stitch the head closed before attaching to the blanket?
Thank you again for such a wonderful pattern!
Dedri Uys says
Hi Laura.
1. The ch-1 creates a little knot when you pull it tight. It is just the way I like to fasten off to make sure things don’t wiggle loose. I mad sure the tails were inside the head when I crocheted them on (I just stuffed them into the head), but you can easily work them away into the head later.
2. I don’t stuff the trunk, I just push the tails into the top of it.
3. You are welcome to close the head before attaching, but if you stop where I suggest, you know exactly where to sew it onto the blanket. If you close it first, it becomes hard to know on which round of the head to attach it so that it a) doesn’t bulge and b) is secure enough. Again, the ch-1 is just a tastening-off knot.