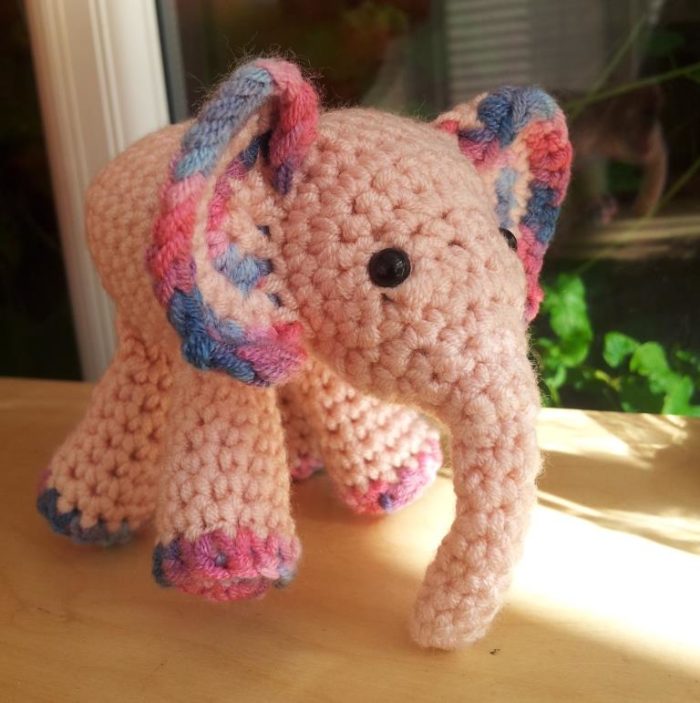
Meimei the Baby Elephant Crochet Pattern
© Dedri Uys 2013. All Rights Reserved
You may make as many of these little crochet elephants as you like, both for personal use and for small-scale sale. All I ask is that you credit me as the designer as and when you make anything using this pattern (even if you alter it).
You may in no way reproduce or copy the actual pattern!
♥
I would like to thank the following ladies for testing the pattern for me:
Dawn Turner ♥ Birna Þórðardóttir ♥ Lori Corby-Brown ♥ Amy Williams ♥ Caroline Tart
Lisa Robson ♥ Megan Munday ♥ Venetia Smith ♥ Beth Spaulding ♥ Pam Perkins

Size
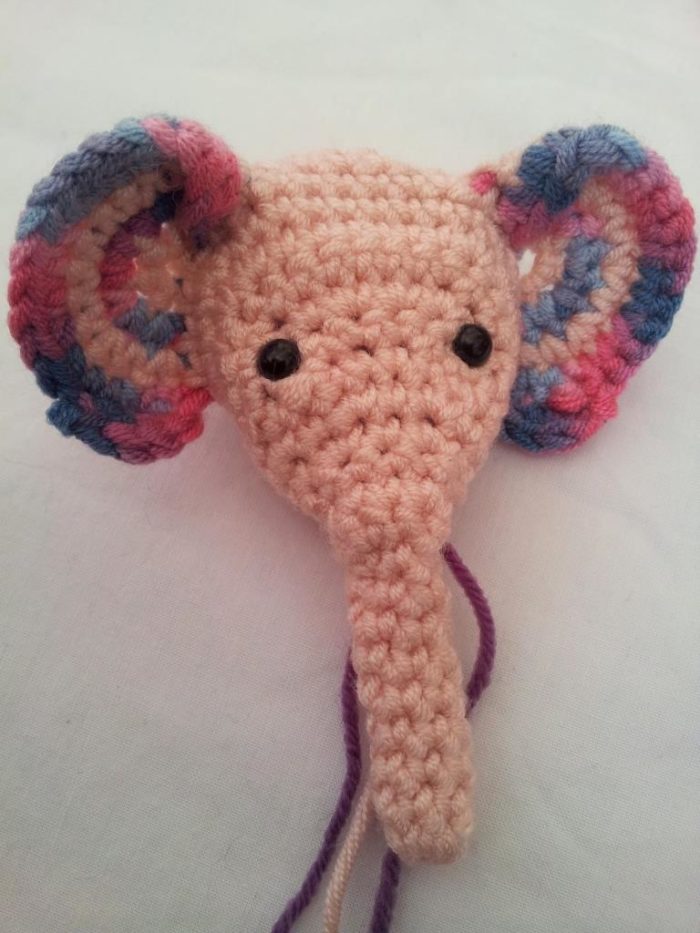
She is 11 cm front to back (not including her trunk) and 9 cm high (4.3″ x 3.5″).
Meimei has movable limbs, so she can stand and sit with ease.
Difficulty
This pattern is suitable for Advanced Beginners.
Short rows are used for shaping, however, don’t be daunted, the pattern contains tons of photos and you can also have a look at this tutorial I did about short rows.
The pattern includes an optional rug that you can sew onto her back. The rug is tiny, but uses more complex stitches. I thought it would be the perfect chance for you to get rid of those crochet cobwebs.
Materials
- 4 mm Crochet Hook (US 6/G UK 8) – you can use a smaller hook if you prefer. It’s not going to make her all wonky, just smaller.
- Double knit yarn in any colour of your choosing (approximately 43 m/ 48 yards)
- A few meters of contrasting colour for the ears, feet and rug (approximately 11 m/13 yards)
- Yarn needle
- Stuffing
- 2 buttons/safety eyes
Abbreviations
US Terminology used (US/UK Comparison Chart)
| CC | Contrasting Colour |
| Ch | Chain |
| Dc | Double crochet |
| Dc inc | Double crochet increase—work 2 dc’s in the same stitch |
| Hdc | Half-double crochet |
| MC | Main Colour |
| Sc | Single crochet |
| Sc inc | Single crochet increase – work 2 sc’s in the same stitch |
| St/St’s | Stitch/Stitches |
| Sl st | Slip stitch |
| Sc2tog | Single crochet 2 together (sc decrease) |
| Cs | Crab stitch (reverse single crochet) – video tutorial |
| Wst | Waistcoat stitch – video tutorial |
| * | Repeat all instructions between asterisks the amount of times specified.For example: *Sc inc, 3 x sc* x 2 will mean sc inc, sc in the next 3 st’s, sc inc, sc in the next 3 st’s. |
Please note: you will only use the crab stitch and the waistcoat stitch for the optional rug, so don’t be too stressed about them right now.
Meimei
Ears
(Make 2)
 1. MC: Ch 2. 5 x sc into the 2nd ch from the hook. Ch 1 and turn. (5)
2. CC: Sc inc in each st. Ch 1 and turn. (10)
3. MC: *Sc inc, sc* x 5. Ch 1 and turn. (15)
4. CC: *Sc inc, 2 x sc* x 5. Turn. (20)
5. Skip 2 st’s. 4 x sc in the third st. Skip 1 st and sl st into the next st. Bind off and work away your tails of yarn.
Changing Colours
There are plenty of ways to change colours. My favourite method is to change colours on the last yarn over of the last st on the row before the colour change.
So, for instance, for the last sc of Row 1: still using main colour (MC), insert hook into stitch and pull up a loop. Change to Contrasting Colour (CC). Yarn over and pull through both loops on hook. Ch 1 and turn as normal. Work the next row in CC and repeat the procedure for the last st of the round.
I tend to carry the colour I am not using instead of joining it for every second row. All this means is that you crochet over the yarn until you get to the end of the row. The yarn will then run “underneath” the stitches and be hidden from view. Dropsdesign has one of many YouTube tutorials that shows you how to carry the yarn.

Attaching the Ears
This photo shows you the end of each row. You will be working into these rows to attach the ear to the head. If you get stuck during the attachment of the ear, please refer back to this diagram.
Please bear in mind that this diagram shows the right side of the ear.
If you are right-handed, you will need to make sure that your end tail of yarn is to the right when you start attaching the ears, not to the left as in this photo.
If you are left-handed, your end tail of yarn should be to the left, as in the adjacent photo. This is the only thing you need to change if you are left-handed. Follow the rest of the instructions as written. It will work out. Trust me.
Legs
(Make 4)
Please note: the legs are worked in a spiral, so make the first stitch of each round in the first stitch of the previous round.
1. With MC: Ch 8.
2. Sc in the first st of the foundation chain (so the stitch farthest away from your hook). You should now have a ring. Make 7 more sc’s, working into the remaining foundation chain stitches. Don’t turn. Just continue around, making the first stitch of each round in the first stitch of the previous round. (8)
3. 8 x sc. (8)
4. *sc inc, 3 x sc* x 2. (10)
5-6. 10 x sc. (10)
7. *sc inc, 4 x sc* x 2. (12)
8-9. 12 x sc. (12)
Sl st in the next st. Ch 1 and bind off.
Feet
(Make 4)
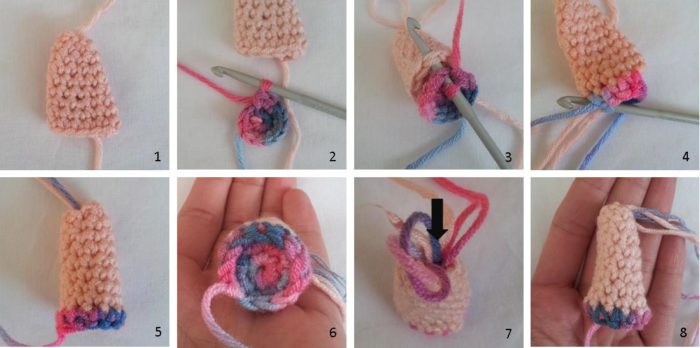
1. With CC: Into a magic ring: Ch 1. 6 x sc. Don’t turn. Just continue around, making the first stitch of the next round in the first stitch of this round. (6)
2. Sc inc in each of the 6 st’s of Round 1. (12)
Place the foot over the opening at the bottom of the leg with the right side facing you. Insert your hook into the next st of the foot AND from the inside to the outside into any stitch in the last round of the leg (Photo 3). Make a sc through both layers. Continue making 11 more sc’s through both layers (Photo 4). Sl st to the top of the first st. Ch 1 and bind off.
Work away your end tail of yarn. Here’s the lazy-girl guide to doing it: using a yarn needle, sew around the last stitch 2 times and then pull the yarn into the leg.
Use all your tails of yarn to stuff your legs with (Photo 7) and then add enough stuffing to fill the leg 3/4 of the way. I just jab the stuffing in there with the back of a bigger crochet hook. Don’t fill the leg all the way as you will need to be able to flatten the top of the leg during attachment.
Elephant Head
(Make 1)
Note: When working the short rows you will notice a “step” where the previous short row ended. I refer to these as a visual reminder that you are still on the right track. I also advise you to use a piece of scrap yarn as a running st marker to mark the beginning of each round.
Please see this tutorial if you are at all confused about short rows or running stitch markers. For a more specific look at running stitch markers and working in a spiral, see this tutorial.
The sl st’s at the end of the short rows are not included in the st counts in parentheses.
1. Into a magic ring: ch 1, 6 x sc. Continue around, making the first st of each round in the first stitch of the previous round. Use a piece of scrap yarn as a running stitch marker to mark the beginning of each round. (6)
2-8. 6 x sc. (6)
9. 5 x sc. Sl st in the next st and TURN. (5)
10. Short Row: Skip the sl st. Sc inc in the next 2 st’s. Sl st in the next st and TURN. (4)
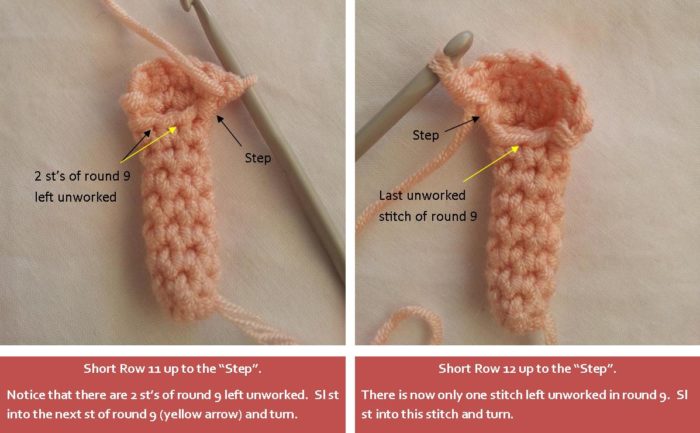
11. Short Row: Skip the sl st. Sc inc in the next st. 2 x sc, sc inc. This will bring you to the “step” at the beginning of Short Row 10 (see photo below). Sl st in the next st of Round 9 and TURN. (6)
12. Short Row: Skip the sl st. Sc inc in the next st. 4 x sc, sc inc. This will bring you to the “step” at the beginning of Short Row 11 (see photo below). Sl st in the next st of Round 9 (so the last remaining st of Round 9) and TURN. (8)
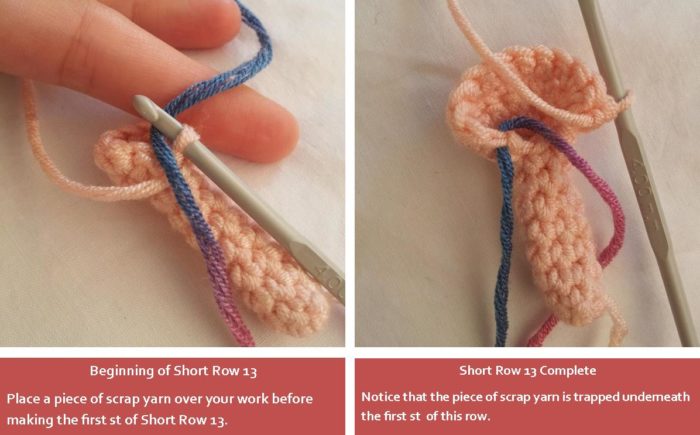
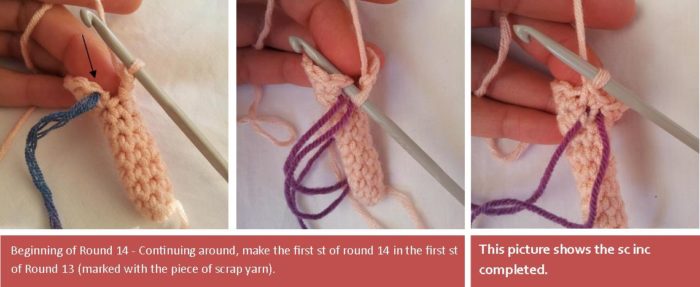
13. Place a piece of scrap yarn over your work to mark the beginning of this round (see photo below). Skip the sl st. *Sc inc, sc* x 4. DO NOT TURN. (12)
14. Make the first st of Round 14 in the first st of Round 13, which you marked with a st marker. *Sc inc, sc* x 6. See photos below. DO NOT TURN. (18)
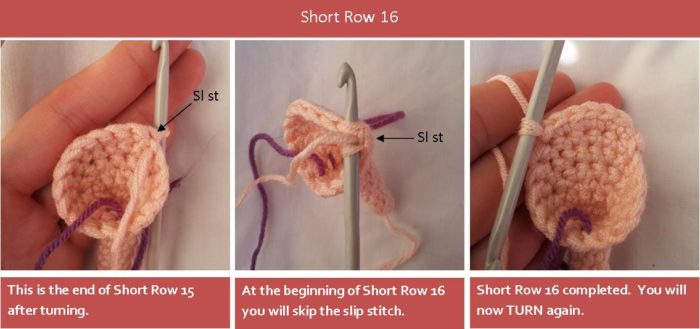
15. Short Row: 11 x sc, sl st in the next st and TURN (see photo below). (11)
16. Short Row: skip the sl st. Sc in the next st, 2 x sc inc, sc in the next st, sl st in the next st. TURN (6)
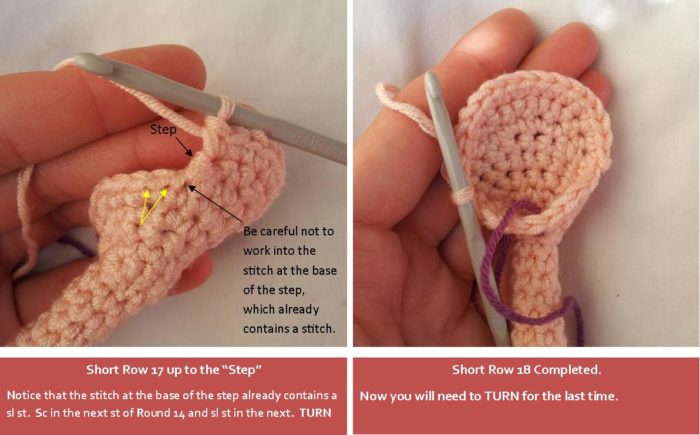
17. Short Row: Skip the sl st. Sc, 4 x sc inc, sc. This brings you to the “step” at the beginning of Short Row 16. Sc in the next st of Round 14. Remember to skip the stitch at the base of the “step”, which already contains a stitch (see photo). Sl st in the next st and TURN. (11)
18. Short Row: Skip the sl st. Sc, 2 x sc inc, 5 x sc, 2 x sc inc, sc. This brings you to the “step” at the beginning of Short Row 17. Sc in the next st of Short Row 15 and sl st in the next. TURN. (16)
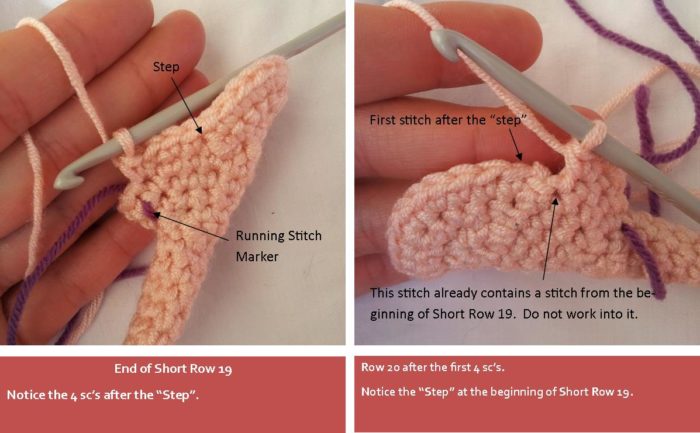
19. Short Row: Skip the sl st. 3 x sc, 2 x sc inc, 6 x sc, 2 x sc inc, 3 x sc. This will bring you to the “step” at the beginning of Short Row 18. 4 x sc in Round 14. Do not turn. (24)
20. Sc x 4. This should bring you to the “step” at the beginning of Round 19. 20 x sc. Skip 1. Sc, sc2tog. (26)
 21. Sc, sc 2tog, 2 x sc. Sc through the first ear x 6 (see Note 1 below). Sc in the next 6 st’s of the head only. Sc through the second ear x 6 (see Note 2 below). Sc, sc2tog. (24)
22. 9 x sc, sc2tog, 4 x sc, sc2tog, 7 x sc. (22)
23. 22 x sc. (22)
24. 22 x sc. (22)
If you are going to use safety eyes, you should place them now, before working the last round of the head. Remember to place your eyes far apart, so that they fall on the sides of her head when it’s stuffed. If you’re not sure, stuff the head a bit before attaching the eyes and see if you like the look.
25. 11 x sc2tog. (11)
Don’t bind off. Stuff the head and continue making the body.
Please Note: If you are at all concerned about using safety eyes, try embroidering some eyes with black yarn instead. I always apply some superglue to the back of my safety eyes for extra reassurance. And if these eyes are going anywhere, it’s into the head, not out of it!
Note 1 – To Attach the First Ear:
Please Note: I have used contrasting yarn to better illustrate the attachment. I have supplied stitch counts in parentheses after each step to help you keep track of the stitches.
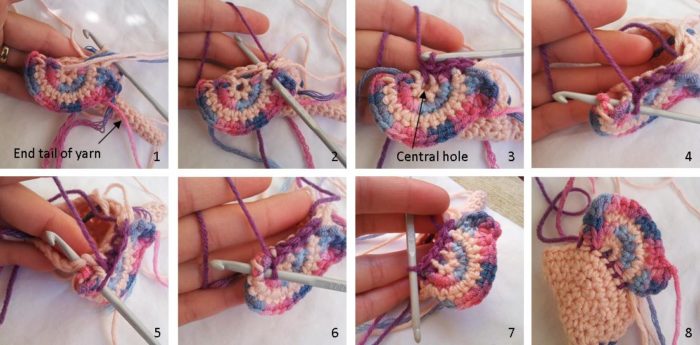
- Hold the ear in front of the head and upside down, with the end tail of yarn to the right as in Photo 1 below. (If you are left-handed, remember to flip the ear so that the end tail of yarn is to your left.) You will work the 6 sc’s attaching the ear through both the head and the ear.
- Insert your hook into the beginning of Row 3 of the ear AND the next st of the head (Photo 2). Make a sc. Sc through Rows 2 and 1 in the same fashion, remembering to insert your hook through both the ear AND the next st of the head. Sc through the central hole of the ear AND the next st of the head (Photo 3). (4 sc’s through both the ear and the head)
- Now insert your hook from front to back into the the next row (this will be the other end of Row 1) and then from back to front into the first st of Row 4 of the ear. This will pull the ear flat (Photo 4). Now Insert your hook into the next st of the head and work one sc through all 3 layers (Photo 5). (1 sc through all 3 layers)
- Insert your hook through Rows 2 and 3 (see Photo 6) AND the next st of the head. Sc through all 3 layers (Photo 7). (1 sc through all 3 layers)
Please note that your ear should have a little fold at the top where it is attached to the head (Photo 8).
Photo 8 illustrates what the ear will look like from the front, obviously NOT with ugly purple stitches showing. The purple stitches are PURELY for illustration. You should end up with a neat little fold at the top of the ear.
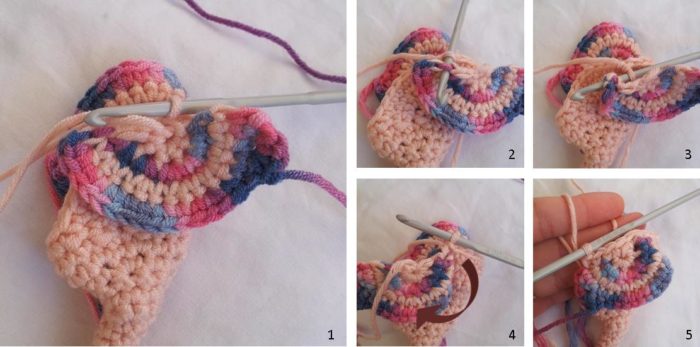
Note 2 – To Attach the Second Ear:
- Hold the ear in front of the head and upside down, with the end tail of yarn to the right as in Photo 1 below. (If you are left-handed, remember to flip the ear so that your end tail of yarn is pointing to the left.) You will work the 6 sc’s attaching the ear through both the head and the ear.
- Insert your hook from back to front into the end of Row 2 of the ear (to the LEFT of the central hole {to the right if you are left-handed} – see Photo 2) and from front to back into the end of Row 3 (Photo 3). Now insert your hook into the next stitch of the head and make a sc through all 3 layers. This will fold the ear AND flip it (Photo 4). (1 sc through all 3 layers)
- Insert your hook into the end of Row 1 AND through the first st of Row 4 of the ear (which will be sandwiched between the ear and the head at this point). Insert your hook into the next st of the head and sc through all 3 layers. (1 sc through all 3 layers)
- Sc through the big central hole and the next st of the head. Sc through the next 3 rows of the ear AND the next 3 st’s on the head (Photo 5). (4 sc’s through both the ear and the head)
Body
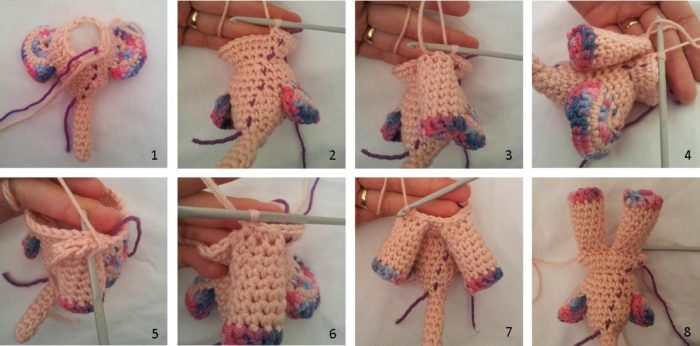
Continue where you left off with the head and remember to use that running stitch marker! It should creep slightly to the right as in Photo 1 below. If it doesn’t, you’ve done something hinky.
26. 11 x sc inc. (22)
27. *sc, sc inc* x 5. 8 x sc. *sc inc, sc* x 2. (29)
28. Sc inc, 28 x sc. (30)
29. You will attach the front legs in this round. Sc in the next 2 st’s of the body. Place one of the legs in front of the body with the foot pointing down. Flatten the first round of the leg (Photos 3 and 4). Insert your hook through the first stitch of the leg (through both layers) AND the next stitch of the body (Photo 5). Make a sc through all 3 layers. Make 2 more sc’s, working through both layers of the leg AND the next 2 st’s of the body (Photo 6). Sc in the next 2 st’s of the body only. Place the other leg in front of the body exactly as before and make 3 sc’s through all 3 layers (Photo 7). Sc in the next 20 st’s of the body. (30)
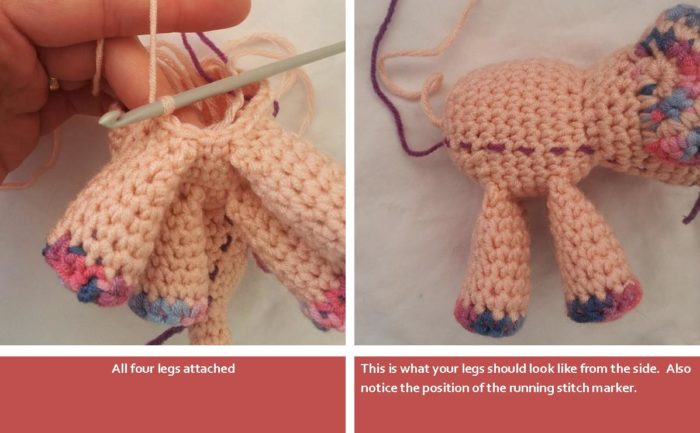
Photo 8 illustrates that the legs should fall on either side of Meimei’s trunk.
30-32. Sc x 30. (30)
33. You will be attaching the back legs in this round. Sc in the next 3 st’s of the body, now attach the first back leg as before. Sc in the next 2 st’s of the body only, now attach the last leg as before. Sc in the next 19 st’s. (30)
34. *sc2tog, 3 x sc* x 6. (24)
35. *sc2tog, 2 x sc* x 6. Now is a good time to stuff your little elephant. (18)
36. *sc2tog, sc* x 6. (12)
37. 6 x sc2tog. (6)
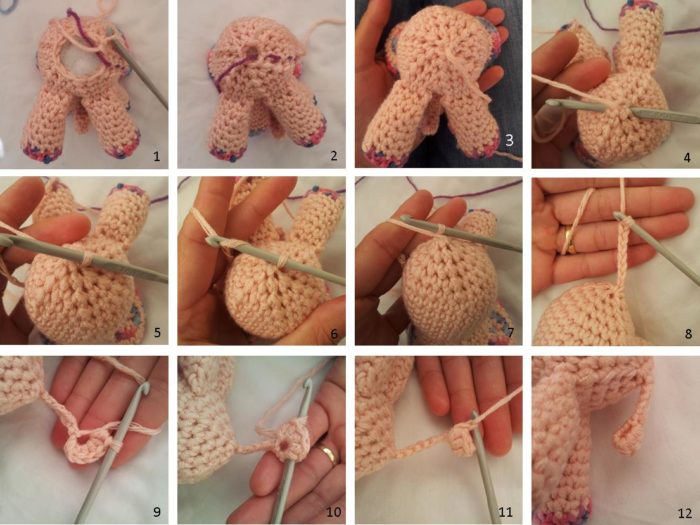
Bind off, leaving a 1m/1 yard tail of yarn. Weave the tail of yarn through the last 6 stitches and pull them tight to close the hole (Photos 2 and 3).
Tail
Now insert your hook around the “hole” by poking it into the elephant on one side of the closed hole and out the other side (Photo 4). Yarn over with the long tail of yarn and pull up a loop (Photo 5). Yarn over and pull through to get your starting chain stitch (Photos 6 and 7).
Ch 8 (Photo 8). 5 x hdc in the third chain from the hook (Photo 9). Drop the loop and insert your hook into the first of the 5 hdc’s. Grab the dropped loop and pull it through (Photos 10 and 11). This will give you a little popcorn stitch at the end of your tail. Ch 1 to secure the popcorn stitch. Sl st in each of the 6 ch’s back up the tail. Bind off and work away your tail of yarn.
Rug
This little rug is an optional extra. To make it a bit more funky, I have decided to use 2 stitches you might not normally encounter: the waistcoat stitch and the crab stitch. I think that this tiny little rug is the perfect opportunity to practice these stitches. Think of it as a little sampler.
The Stitches
The waistcoat stitch has a true stockinette finish and I absolutely love the look of it. It is always worked from right to left (left to right if you are left-handed), so is perfectly suited to working in the round. When making rows, though, you have to bind off at the end of every row, which is perfect for this little rug.
My friend Rhondda did a lovely tutorial for the waistcoat stitch, which you can find here. It includes written instructions and a photo tutorial, and also a link to her video tutorial.
The crab stitch, also called the reverse single crochet, is a lovely, sturdy stitch that looks gorgeous for the finishing round of rugs, shoes, blankets…anything that requires a pretty one-row border. It is always worked from left to right (right to left if you are left-handed) and can prove quite a challenge at first. Essentially, you are crocheting backwards. Here is an idiot’s guide to reverse single crochet. And if you need a video tutorial, the link is supplied in the abbreviations at the beginning of this post.
Crochet Rug Pattern
Please note: don’t work over your tails of yarn…you are going to use them to make tassels with later on.
1. Ch 18 and bind off.
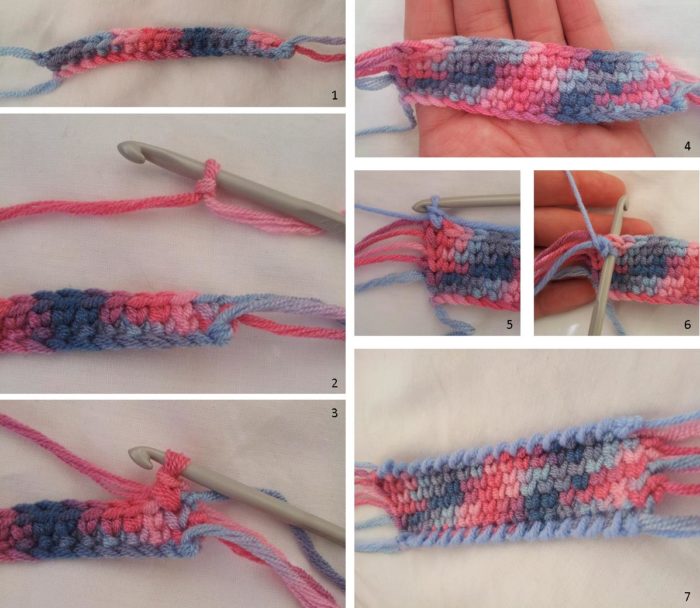
2. With a slip knot already on your hook, sc in one loop only of each of the 17 ch’s across. (The 18th ch doesn’t count, it forms a little knot when you bind off). See Photo 1. (17)
3-6. With a slip knot already on your hook, 17 x wst. Ch 1 and bind off. See Photos 2 and 3. (17)
7. With contrasting yarn and a slip knot already on your hook: starting from the last stitch of the last row, crabstitch in each stitch across. Ch 1 and bind off.
8. With contrasting yarn and a slip knot already on your hook: crabstitch in the remaining 2 loops of each of the foundation ch’s as above. Ch 1 and bind off.
Of course you can take the easy route and just make 6 rows of sc, finished off with a row of contrasting sc on either side…
Finishing the Rug
Tie overhand knots in the fringe, knotting 1 and 2, 3 and 4, 5 and 6, 7 and 8 together (Photo 1). Then tie knots between the knots you have just made. To do that, tie 2 and 3, 4 and 5, 6 and 7 together (Photo 2).
For the last row of knots, repeat the first row of knots, again tying 1 and 2 together (3 and 4, 5 and 6, 7 and 8) – see Photos 3 and 4. I use a big needle to push the knot down so that it abuts the other knots.
Finally cut the fringe (Photo 6) and separate the yarn so that it looks more fringe-y (Photo 7). 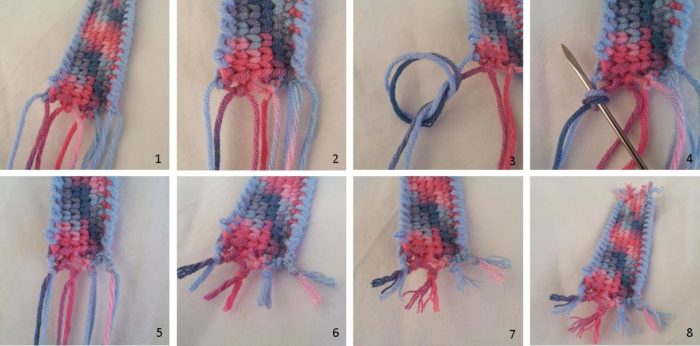
Sew the little rug to Meimei’s back and you are all done.
I hope you enjoy your little crochet elephant!
Remember to subscribe to my newsletter if you would like to be kept in the loop. You can also like my Facebook page or follow me on Bloglovin or Google+.
Happy Hooking!


Margaret Regan says
Thank you so much for a wonderful pattern This will be my template in future for an elephant amigurumi. No more worrying if the ears are correctly placed and match up on either side of the head. Also it was great to see the crab stitch being used. I learnt this stitch over 60 years ago but you very rarely see it in modern patterns. It is my favourite finish for a clean and tidy edging. All eager to try your other patterns.
Jenny Lowman says
Thank you Margaret! Which of Dedri’s patterns are you trying next?
Margaret Regan says
I have definitely got to do the amamani crochet balls. I have never heard of them. They look really interesting. Will also be buying the book. Once again cheers.
Mand says
Loving this pattern! I have a question arising out of my beginner status – well, advanced beginner is probably accurate. I made six or seven attempts at the trunk and they all looked inside-out no matter which way I crocheted around. Finally I was sure I’d got it right – but now that I’ve reached the top of the trunk, it’s definitely inside-out. Sigh.
Rather than frog yet again, I’m going to leave it this way and think of it as a “feature”. ;) Well, some elephants do have a noticeably different skin texture/colour on their trunks making the rounded area where trunk meets face very obvious…
My question is where to switch direction, as obviously I do want the main part of the head to be right side out. I’m thinking Row 14 or 15. I’m on hold till I hear your thoughts! :)
PS. Tried to find the CAL on Ravelry, to ask this, but I’ll have to have another look later when I’m on the laptop and can see what I’m reading! Can’t find the link this morning.
Dedri Uys says
Hi Mand. When you make amigurumi and start with a small tube, it automatically curls inside-out so that you are working around the inside of your work rather than the outside (so anti-clockwise rather than clockwise). You will need to push your first round the right way out so that you are working around the outside of the tube. Maybe this post will be helpful? As you are working with short rows for shaping, I think you either need to make everything inside-out or everything right-side out. Trying to turn crochet direction half-way might interfere with the actual construction of the head.
I hope you find that link useful.
Dedri
Barb Frye says
First let me thank you for this pattern, your creative ability and your generosity in making it free. I made this, my first crocheted animal! I had a little trouble with the head but for the most part, it was easy to follow. It turned out so cute. Will definitely look at your other patterns. Thanks so much.
Dedri Uys says
Thank you for your comment, Barb. You are most welcome.
Randie says
I love your pattern. I used it to make a present for my teacher and added a cup of coffee.
Now I wish to use it to make tons of elephants for an adoption organization that I work with. Thank you for making this pattern so easy to follow and all the pictures.
Dedri Uys says
That sounds like a wonderful idea :)
Sarah says
I love your elephant pattern. If I wanted to make the elephant ears larger what would you suggest
Dedri Uys says
Hi. You can find some larger ears HERE.
Ejm Van Oijen De Bruin says
Hartelijke dank voor het leuke patroontje van de baby olifantje. Ik ga kijken of het mij gaat lukken.
Dedri Uys says
You’re welcome.
Andrea says
Made this for my friends newborn baby! In light gray and mint. I have to say your pattern was by far one of the easiest to follow.. and I learned some new techniques (short rows). I don’t leave comments often on patterns, but I had to say something. Great instructions and pictures! I’m almost done with the body. I might add a couple more rows between ththe legs to make the body a little bigger; but so happy with how the rest turned out. Thank you!
Dedri Uys says
Hi Andrea. Thank you for taking the time to comment. I am so pleased that you like little Meimei.
Dedri
Ginny F. says
This is just the cutest pattern! I didn’t really have problems. Easy to follow and to keep track of stitches and rows; keeping a log of rows and stitches helped. The pictures are very helpful. Thank you!
Jamie Smyth says
I’m having problems with the body. I’ve completed the head and my little elephant is looking adorable so far, but following the the pattern for the body, I’m ending up with a floppy hat effect rather than the cone shape in your photo.
Dedri Uys says
Hi Jamie, I am not sure what you mean. Are you making the hat for the circus elephant, or are you making the body for Meimei?
Anne says
I so enjoyed making this, not perfect but nearly. I didn’t get the second ear quite right but it looks ok any way. You are so clever making up this pattern
Dedri Uys says
Hi Anne. I’m curious to know why the second ear was giving you trouble. Both are made in the same way… I’m glad you managed to follow the instructions for the head :)
Ashley says
He is adorable. I would LOVE to make him as a Christmas gift for my nephew but I am having an incredibly hard time with this pattern (specifically the head). is there any way you could share a video walk through as well? Please and thank you.
Jenny says
Hi Ashley. There are no plans for a video tutorial at present. Sorry!
Jenny :)
Dedri Uys says
Hi Ashley. If you tell me what you are having trouble with, I might be able to assist you?
Domi says
Thanks for this cute elephant pattern
Merci beaucoup ;)
Joke Adema Siri says
Thank you for the cutest elephant pattern
Dedri Uys says
You’re welcome :)
Samm says
Row 17 is a sc, 4 increases and another sc (10 stitches), but the pattern says it should be 11. Help please? Thanks!
Samm says
I see my error, so sorry, thank you! I didn’t realize the next stitch was a sc instead of a slip!
Stephanie O. says
Hello, I love your pattern. Such a cute little elephant! I am having problems after step 25 though. At step 26 you said to use the running stitch marker, and yours appears to begin below the trunk. My row 26 begins on top of the elephant’s head. Where did I go wrong? It looks just like yours otherwise.
Dedri Uys says
Hi Stephanie.
Have you got a photo? I think that you might have worked into the stitch that contains the sl st at the base of every ‘step’, but it is hard to tell if I cannot see.
Dedri
Sylvia says
My elephant head was also lopsided, but I am trying this again because it is too cute! Ever since I restarted the head, I have been noticing that there is a giant hole when I start row 14 by connecting to the first stitch in row 13, is this supposed to happen?
Dedri Uys says
Hi Sylvia.
There should be a small hole there, not a giant one. This hole is not visible once the elephant is completed and does not cause any issues (like stuffing poking out) later on. If you would like to try a more traditional approach to making the head, you can find some brilliant elephant patterns here on Ravelry. I have made this one and it is very cute.
Nahomi Acosta says
I’m sorry, I’m have a small problem with one part of this pattern, but I’m pretty sure it’s just my own confusion. After row 20 of the head, do I turn the work or do I not for row 21? I can’t seen to get it right, and I was wondering if you could clear this up for me. I adore how it looks so far, and I don’t want to have to scrap it if I can’t figure it out. Thank you!
Dedri Uys says
Nahomi, you do not need to turn at the end of Round 20. When you have made all the stitches of Round 20, do you end up back at the running stitch marker (under the elephant’s trunk)?