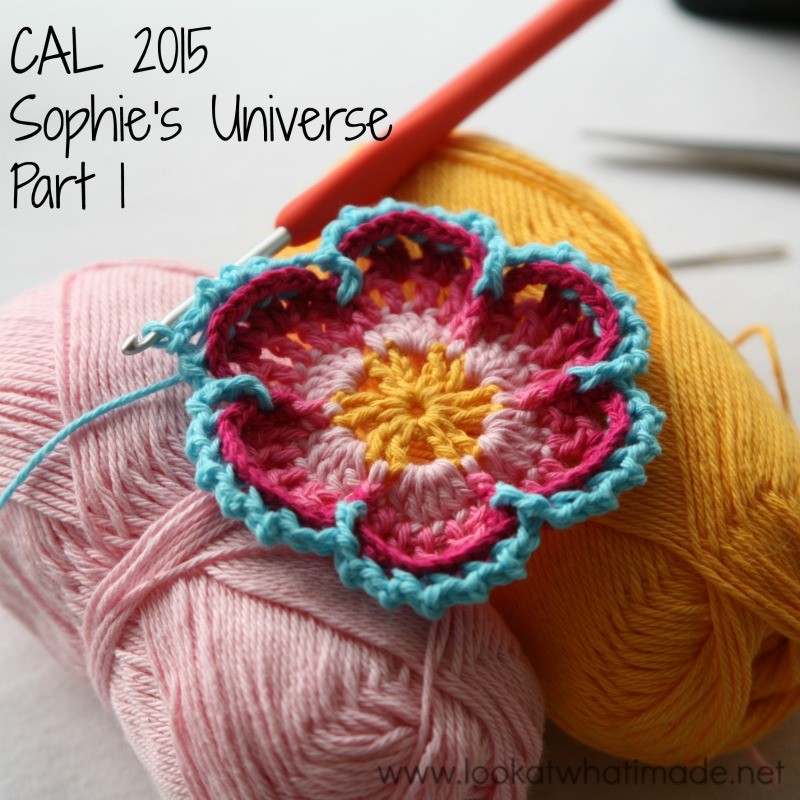
Welcome to Sophie’s Universe Part 1. I hope you are all super excited and eager to get started! If you haven’t already read the Information Post, please take a minute to do so now. It contains important details like yarn weight, hook size, and completed size, as well as a quick outline of what to expect and which resources are available.
It is worth bookmarking that post because it also contains a list of all 20 tutorials, which I will update with links as soon as each tutorial is available.
Once you have read all of that, make a cup of coffee (or tea if you must), find a cosy corner, and come join me for Part 1 of Sophie’s Universe. And then join me for Part 2. Part 2? Yes!! To reward you all for your not-so-patient waiting we are kicking this crochet-along off with 2 Parts!
Sophie’s Universe Part 1 {Photo Tutorial}
©Chris Simon and Dedri Uys 2014. All Rights Reserved.
The first 6 rounds of this Mandala were heavily inspired by Chris Simon’s Lace Petals Square (Block 16 of the Block a Week CAL 2014). In fact, if you take away the front post stitches and back loop stitches, it is an unashamed copy of Chris’ gorgeous design. So before I could even think about publishing this pattern, I had to get Chris’ permission to use her centre. Luckily she agreed. Thank you very much, Chris!
Resources
- Add this CAL to your Ravelry Queue
- Sophie’s Universe CAL 2015 Information
- Use the Print-friendly button at the bottom (right) of this post to print/save this tutorial. Don’t know how? Find out HERE.
- **Part 1 VIDEO TUTORIAL** by Esther Dijkstra from It’s All in a Nutshell
Translations
- Dutch Translation by Dianne Baan
- German Translation by Gabriele Rogers
- Spanish Translation by Lynda Hernandez
- Danish Translation by Tina Poulsen
- Finnish Translation by Sari Åström
- French Translation by Sandra Larvin (with Video Tutorials by Géraldine Cymer)
- Russian Translation (with Videos) by Natalie V. Alimpieva
- Swedish CAL Information by Emma Vingqvist, Agnetha Magnusson, Åza Karlsson, and Ulrika Larsson
- Arabic Video Tutorial by Banan Felimban
Materials and Colours
For the purposes of this tutorial, I am using Scheepjeswol Cotton 8 (available from Deramores) and a 3.25 mm Clover Amour Crochet Hook (US D/3 UK 10).
Remember to check the Helpful Tips before starting. There is some important information about adjusting your hook size to prevent bulging.
Colour Packs for Sophie’s Universe
If you are interested in the colour packs for Sophie, you can find them below.
Wool Warehouse
- Cotton 8 (Small)
- Softfun (Medium)
- Stonewashed XL (Large)
- **NEW** Colour Crafter Pack (Medium) – You can find the details HERE.
Deramores
- Cotton 8 (Small)
- Softfun (Medium)
- Stonewashed XL (Large)
Colours Per Round for Part 1
| Cotton 8 | Softfun | Stonewashed XL | |
 |
 |
 |
|
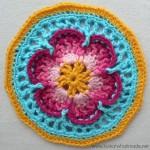
| Round 1 | Canary | Canary | Moonstone |
| Round 2 | Light Pink | Light Rose | Amazonite |
| Round 3 | Pink | Rose | Green Agate |
| Round 4 | Fuchsia | Bordeaux | Blue Apatite |
| Round 5 | Light Turquoise | Light Blue | Moonstone |
| Round 6 | Light Turquoise | Light Blue | Moonstone |
| Round 7 | Light Turquoise | Light Blue | Moonstone |
| Round 8 | Canary | Light Blue | Moonstone |
Abbreviations
US Terminology used (US/UK comparison chart HERE)
- BLO – Back loop only
- Bpsc – Back post single crochet
- Ch – Chain
- Dc – Double crochet
- Fpdc – Front post double crochet
- Fpsc – Front post single crochet
- Hdc – Half-double crochet
- Sc – Single crochet
- Sl st – Slip stitch
- St/st’s – Stitch/stitches
- * – Repeat instructions between asterisks the amount of times specified. This is a hardcore repeat and will consist of multiple instructions.
- () – Repeat instructions between parentheses the amount of times specified. This is a lower level repeat.
Special Stitches
- Standing Stitches: Standing sc’s, hdc’s, and dc’s are stitches used to start the round without the need for the traditional beginning chain. Links to tutorials are supplied in each relevant round.
Invisible Join
If you would like to use the invisible join instead of the sl st join at the end of each round, you can find a step-by-step photo tutorial HERE. If you DO decide to use it, make very sure that you understand which stitch to join to and which stitch to start your new round in, otherwise your blanket is going to come out all wonky!
Instructions
Round 1
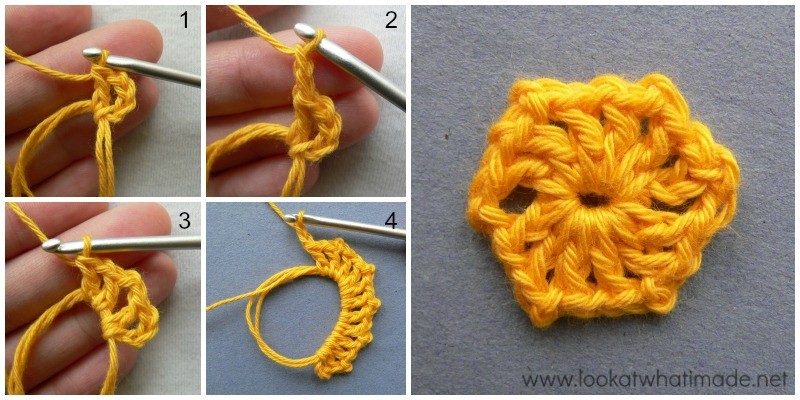
Into a magic ring: ch 4 (this counts as your first dc and ch 1) and then make a dc {Photo 1}. (Ch 2, dc, ch 1, dc ) five times {Photos 2 – 4}. Ch 2 and join to the third st of the beginning ch-4 with a sl st.
If you are not familiar with working into a magic ring, this video tutorial by Tamara from Moogly is very good. Please remember, when working into a magic ring you HAVE to work away your initial tail very well. If you just cut it, your whole project might unravel!
Stitch Count: 12 dc’s, 6 ch-2 spaces and 6 ch-1 spaces
Round 2
- If you are going to use the same colour for Round 2, sl st into the next ch-1 space, ch 1 and sc in the same space.
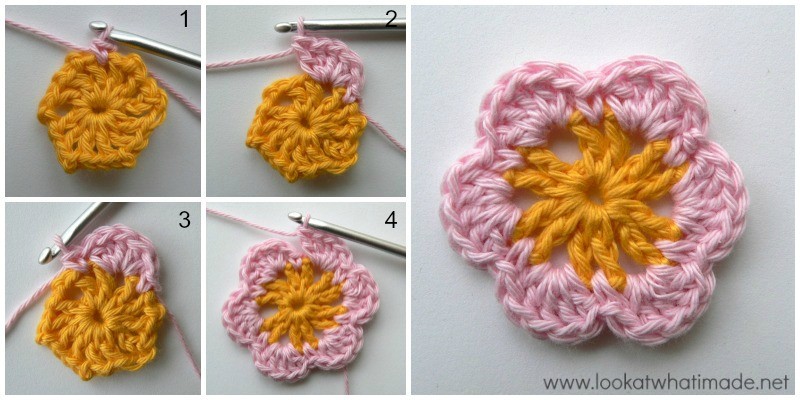
- If you are going to use a new colour for Round 2, join your new yarn by making a standing single crochet in any ch-1 space around {Photo 1}.
(Make 5 dc’s in the next ch-2 space {Photo 2}, sc in the next ch-1 space {Photo 3}) five times. Make 5 dc’s in the last ch-2 space {Photo 4}. Join to the first sc with a sl st.
Stitch Count: 30 dc’s and 6 sc’s {6 Petals}
Round 3
- If you are using the same colour, ch 1 and make a fpsc around the post of the same sc.
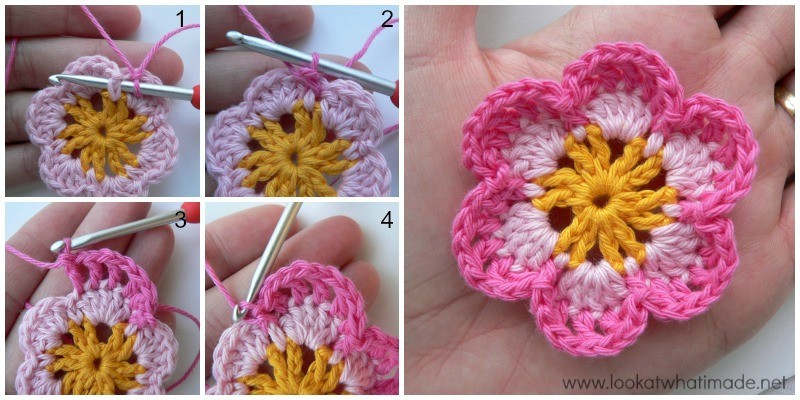
- If you are using a new colour, join your new colour with a fpsc around the post of any sc from the previous round. You will make the fpsc exactly the same as the standing single crochet, but working around the post of the stitch instead of into the top 2 loops {Photos 1 and 2}.
*(Dc, ch 1) in the next 4 dc’s. Dc in the last dc {Photo 3}. Fpsc in the next sc {Photo 4}.* Repeat from * to * 5 more times, omitting the last fpsc on the last repeat. Join to the top of the first sc with a sl st.
If you started with a standing fpsc, you might find it tricky to join to it with a sl st. Pull the beginning tail of yarn so that you can see the top loops of the stitch. If you cannot manage to poke your hook through both loops, you are more than welcome to join to the FLO of the standing fpsc.
You should now have 6 Petals. Each Petal should contain 5 dc’s and 4 ch-1 spaces. There should be one FPsc between Petals.
Stitch Count: 30 dc’s, 6 fpsc’s, and 24 ch-1 spaces {6 Petals}
Round 4
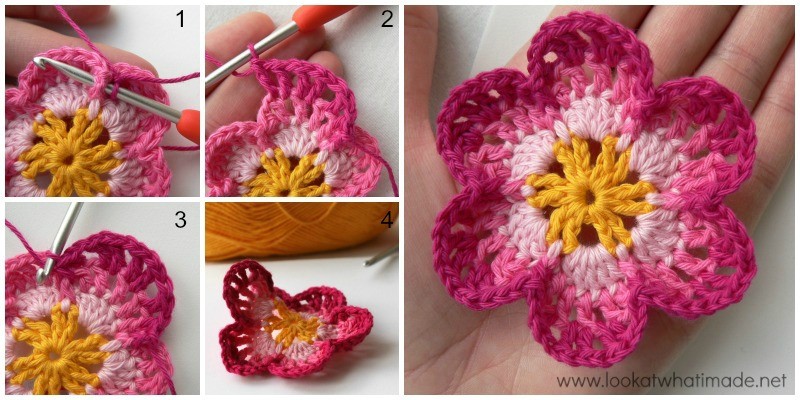
Round 4 is simple, but you have to concentrate! I had to frog this round a few times because I either forgot the ch-1′s or I made the stitches in the wrong spots. At the end of this round your flower will probably buckle. Don’t worry about it! See Photo 4 below.
- If you are using the same colour, ch 1 and fpsc around the post of the same fpsc as the sl st join.
- If you are using a new colour, start with a fpsc around the post of any fpsc around {Photo 1}.
*Hdc in the first dc. This first dc might be slightly tricky to get into because it is right next to the fpsc. (Ch 1, dc in the next dc, ch 1, dc in the next ch-1 space) twice. Ch 1 and dc in the next dc {Photo 2}. Ch 1 and hdc in the last dc. Fpsc in the next fpsc {Photo 3}.* Repeat from * to * 5 more times, omitting the last fpsc on the last repeat. Join to the first fpsc with a sl st. Fasten off and change colours.
Stitch Counts:
- Total: 48 st’s and 36 ch-1 spaces {6 fpsc’s, 12 hdc’s, 30 dc’s, and 36 ch-1 spaces}
- Per Petal: 2 hdc’s, 5 dc’s, and 6 ch-1 spaces per petal {1 fpsc between petals}
Round 5
You will not be working into the hdc’s in this round. In other words, you will skip the first and last st of every petal, which will be the hdc’s.
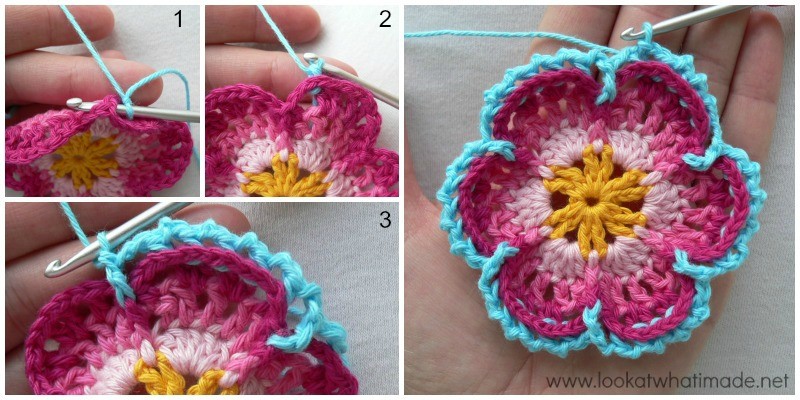
Join your new yarn by making a standing single crochet around the back of the post of the last dc of any petal around {Photos 1 and 2}. Phew…I say “of” a lot in that sentence! Hehe. You are basically starting with a standing back post sc.
*Ch 2 and fpdc around the post of the fpsc between the petals. (Ch 2, bpsc around the post of the next dc) 5 times.* Repeat from * to * 5 more times. Omit the last bpsc of the last repeat. Join to the first bpsc with a sl st.
Stitch Counts:
- Total: 30 bpsc’s, 6 fpdc’s, and 36 ch-2 spaces
- Per Petal: 5 bpsc’s and 6 ch-2 spaces per petal, and 1 fpdc between petals
Round 6
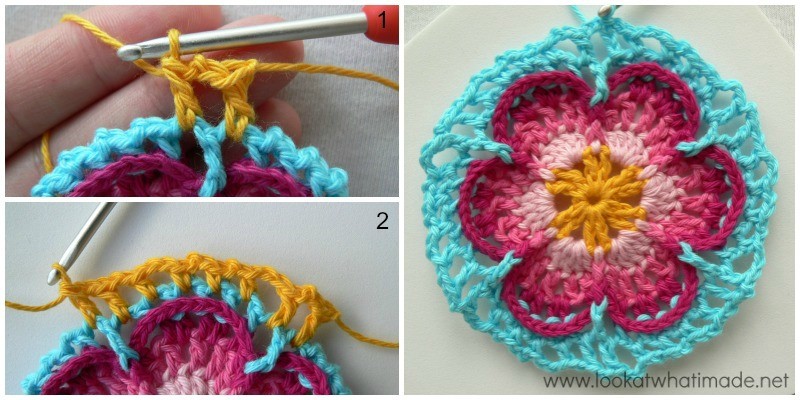
- If you are going to use the same colour, sl st into the next ch-2 space. Ch 5 (this counts as the first dc plus ch-2) and dc in the next ch-2 space. These 2 dc’s should fall on either side of the fpdc from the previous round {Photo 1}.
- If you are going to use a different colour, start with a standing double crochet in the next ch-2 space. Ch 2 and dc in the next ch-2 space. These 2 dc’s should fall on either side of the fpdc from the previous round {Photo 1}.
*Ch 2 and hdc in the next ch-2 space. (Ch 2, sc in the next ch-2 space) twice. Ch 2, hdc in the next ch-2 space. (Ch 2, dc in the next ch-2 space) twice {Photo 2}.* Repeat from * to * 4 more times.
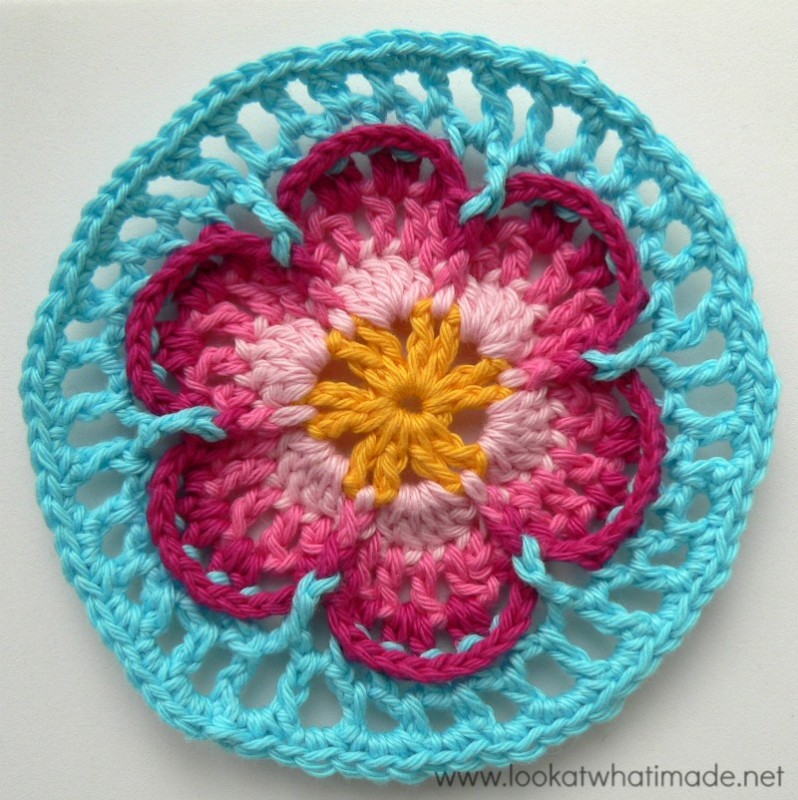
Ch 2 and hdc in the next ch-2 space. (Ch 2, sc in the next ch-2 space) twice. Ch 2 and hdc in the next ch-2 space. Ch 2 and join to the third ch of the beginning ch-5 (or the standing double crochet) with a sl st.
Notice that the dc’s fall on either side of the fpdc’s from the previous round {Photo 2}. Notice also that I am using yellow in Photos 1 and 2 so that you can see the stitch placement better.
Stitch Count: 36 st’s and 36 ch-2 spaces {12 sc’s, 12 hdc’s, 12 dc’s and 36 ch-2 spaces}
Round 7
- If you are going to use the same colour, sl st into the next ch-2 space. Ch 1 and make 2 sc’s in the same ch-2 space.
- If you are going to use a different colour, start with a standing single crochet in the next ch-2 space and then make another sc in the same ch-2 space.
Make 2 sc’s in the next ch-2 space. Make 3 sc’s in the next ch-2 space. *Make 2 sc’s in each of the next 2 ch-2 spaces, make 3 sc’s in the next ch-2 space.* Repeat from * to * 10 more times. Join to the BLO of the first sc with a sl st.
Stitch Count: 84 sc’s
Count your stitches!
Round 8
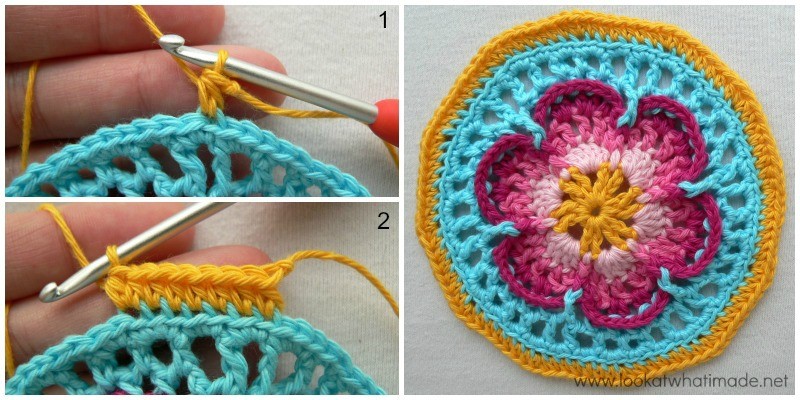
You will be working in the back loops only (BLO) for this round.
- If you are going to use the same colour, ch 2 (this counts as your first hdc).
- If you are going to use a different colour, start with a standing hdc in the BLO of the same st as the sl st join. {Photo 1}
Hdc in the BLO of the next 5 st’s and make 2 hdc’s in the BLO of the next st {Photo 2}. *Hdc in the BLO of the next 6 st’s, make 2 hdc’s in the BLO of the next st.* Repeat from * to * 10 more times. Join to the top of the beginning ch-2 (or the standing hdc) with a sl st.
Stitch Count: 96 hdc’s (worked into the BLO)
There! Now that wasn’t so hard, was it?
If you want to check your gauge, this is an excellent time to do it. Refer to the Gauge listed HERE to check if you are on the right track.

This blog post contains affiliate links. I only link to products I personally use or would use. All opinions are my own.


Anitra says
I’m having dfficulty finding the individual parts of SOFIE’S UNIVERSE to download. Is there some way to make it easier such as the ability to load ALL or SOME of the parts? I am in love with your work ank thank you for making iut available. Now if only I can!
Anitra
Jenny says
All of the individual rounds are available here on the blog, Anitra. Every single part is listed in the very first blog post.
https://lookatwhatimade.net/crafts/yarn/crochet/sophies-universe-cal-2015/sophies-universe-cal-2015-information/
Hope that helps :)
Elizabeth says
Hi I love this blanket caught my eye.I have a question.Can you use regular worsted weight yarn on this like red heart.I seen where it said no.8.Is that yarn like thread?TIA.
Jenny says
Cotton 8 is 4ply and thinner than dk yarn, but nowhere near thread. You can use whatever yarn you wish, Elizabeth, and the worsted weight yarn will be fine to use.
Doris walton says
These patterns are exquisite due to the color combination. I’m so ready to get started! Thank u so much for sharing.
Dedri Uys says
Thank you, Doris :)
Doris walton says
I would like to buy the mandala patterns. How do I get in touch with u?
Dedri Uys says
Hi Doris. The pattern for Sophie’s Universe is free. This is the first part of that pattern.
Roberta says
Beautiful!
Luisa says
Me puedes decir donde están los vídeos en español para hacer la manta del jardín de socia, y cómo descargarlos.
Kai says
I’ve made two of these lovely blankets now and my mother wants one. She has specific colors that she wants and I’m trying to plan it out right now, but I have a question. I know how much total yarn I need but is there a break down of how much yarn is used for each row (aprox)?
Dedri Uys says
Hi Kai. In the information post, under helpful hints, there’s a template showing you how many colours are needed per round for each yarn weight. There’s also a blank one that you can fill in with your own colours/numbers.
dana says
wowwwwwwwwwwwwwwwwwwwwwwwww
Ranji says
Namaste Dedri. I know it’s been a while since you have received mail about your beautiful Sophie’s Universe pattern. I have a niece getting married in November and will be making this as a wedding gift for her. I plan to use the mandala as the center piece and use other squares as a border, with plain stripes in between. I hope to send you pics of it completed. I cannot tell you how excited I am to start this. Ever since I saw the pattern in February, I just KNEW
I would be making this! Bless you for sharing your pattern so freely. You are a true inspiration to all of us crocheters. Thank you. Love and Light coming to you all the way from India. Ranji
Jenny says
We will look forward to seeing pictures of your blanket, Ranji! Wishing your niece a wonderful wedding day too :)
nadetronica says
i wish i found this earlier D: i want it! i need it!!! *rushes into her yarn stack *
Dedri Uys says
haha. It’s not going anywhere :)
Lilliam says
Thank you for your it help me after finished the chemo I began today the CAL 15
hope will help me about the recovery
Dawn Conant says
Your patterns are gorgeous and I really want to try making them but I am confused about something. There is a lot of changing of yarn to get the beautiful look that your pictures show. I don’t understand how to keep up with hiding all the ends.
Dedri Uys says
Hi Dawn.
The instructions are written in such a way that you can use one colour throughout, or change colours on every single round if you want to. I work my tails away as I go, because I use the invisible join when I am changing colours and it requires the use of a needle. I reckon that I might as well work the tails away since I already have a needle in my hand at that point.
Dedri
Julia says
Hi
Is there a way to save these with the photos still in the page? When I use the Printfriendly button all the images disappear.
Many thanks
Julia
Jessica says
You can hit Ctrl and P and it will give you the option to save the page just as is. Be careful to make sure you only choose to print as many pages as the pattern takes up, otherwise, it will also print all of the comments.
zenda says
Finally! I can get to start my Sophie. Cancer really gets the best of you… I’m still standing, Thank you God.
Thank you so much for the pattern.
Dedri Uys says
Hi Zenda. I hope you are feeling much better and that you will continue to feel better with each passing day! Have fun with Sophie :)
Kezune says
I’ve been destashing and finishing projects before my family moves (again). Just two more large projects and one small before I can finally start this! Thanks for the pattern!
Nina says
Hey Dedri. I just bought yarn for my first Sophie and I’m so exited. I’ve desided to put aside any other projects I’m working on right now and just wait for the yarn delivery to come. I won’t have any of the yarn untill next week, but then it will be even better to get started, and my “poor” hands can catch a little break inbetween the rounds.. I’m swedish but live in Norway and I know their are plenty more who have made their own Sophies here.. It’s a bit exiting I think, how far you can reach people with patterns :) Anyway, hope you have a nice day and thanx for sharing your lovely pattern with all of us :)
Dedri Uys says
Hi Nina. Thank you for your lovely message. I am humbled and amazed at the reach this CAL has had. You are right. It is SO exciting!
Patricia says
Hi! I just started this, and it’s so pretty! I’m having trouble finding the gauge information, though. When I clicked on the link at the end of Part 1, it took me to the list of all the instruction links, but I couldn’t see where to check my gauge. I’m making the large version. Thanks!
Dedri Uys says
Patricia, in the information post you will find all the info. There is a heading labeled gauge. Below that you will find what your circle needs to measure at the end of Part 1. This is the best way to determine gauge.
Mac says
Thank for a work of art (if I ever get started, lol)
Jenny says
Hope you get started soon! Sophie is waiting for you, Mac :)
Crys Price says
I am just now getting in on this amazing group and project and wonder how long the instructions will remain up or do I need to print off, PDF, and save so I can go at my own pace. Looks like it is almost finished and I do not want to start if it will disappear later. It looks like an amazing piece of art and I have done one other CAL and absolutely loved the experience.
Jenny says
Crys, the patterns will live here in Dedri’s Blog ‘forever’ :)
Patti says
Dear Dedri… I can not tell you how much I appreciate you sharing Sophie… there is no word to express my gratitude!! I LOve it so much!! I stare at all the lovlies that the amazing crocheters post… and I am awed by the beauty!! I have been a crocheter for 40 yrs… but was afraid to start one… today I decided I just have to have a “Sophie”… and I owe it all to you!! Not only are they Gorgeous but you wrote the instuctions so Professionally!! and easy to understand… I am so thankful for this Beautiful masterpiece work of art… that I too will be doing…
2 questions please… will you keep this site up for us to easy access? ( I have you on my task bar! ;))
second question…. I do not like things that are blocked ( I like the way things drape naturally) Can I not block Sophie as well?
Thank You ever so much…
Hugs from the US xxx
Dedri Uys says
Hi Patti.
Thank you for your lovely comment. The tutorials will remain on my website, yes. Sophie does, unfortunately, need to be blocked, but this does not change the “natural drape” in any way, it just makes her edges nice and crisp and makes sure that she is square when you are done. If you are set against blocking, you might find that your final blanket is warped.