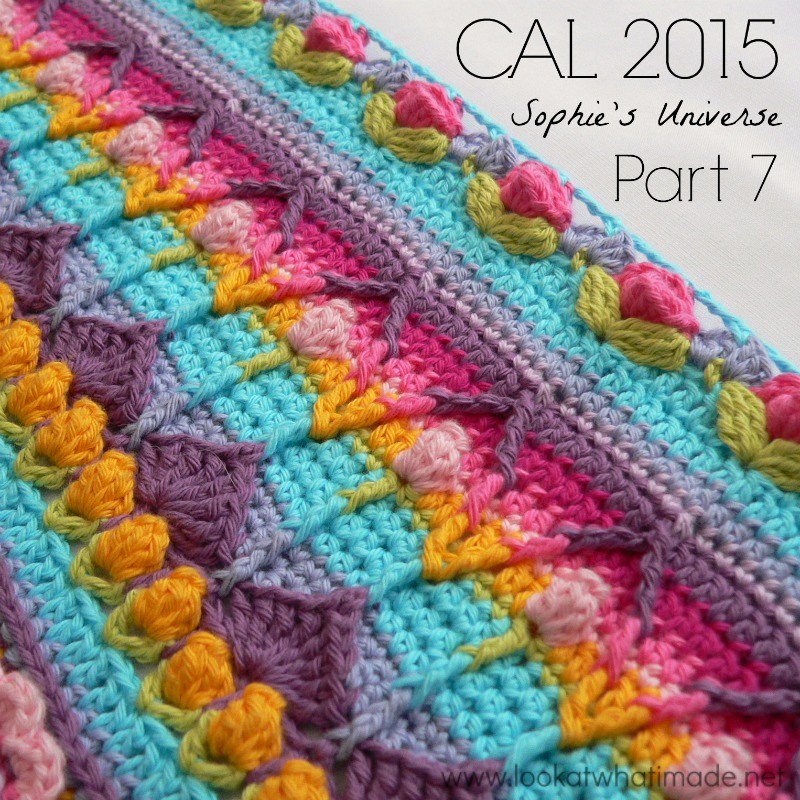
I think every woman loves receiving a bouquet of roses. Sophie is no exception. So this week, in belated honour of Valentine’s day, we are going to give Sophie some roses! The roses are my favourite part of the whole pattern and I have been waiting for 6 months (!!!) to share them with someone. I hope you enjoy them!
Someone sent me flowers yesterday and it made me feel ridiculously special! So this week I have another assignment for you. I would like you to present someone with a flower/flowers. You don’t have to buy them. A single picked flower will do. For those of you who are living in snow at the moment, you’re excused. Although…you can always present someone with a crochet flower (or a drawing of a flower). Go and spread the joy!
Update 23/02/15: Error at the end of Round 58 corrected (I have made it red to make it easy to spot). Thank you Susan Wilkes-Baker.
Sophie’s Universe Part 7
©Dedri Uys 2014. All Rights Reserved.
Resources
- Add this CAL to your Ravelry Queue
- Sophie’s Universe CAL 2015 Information
- Use the Print-friendly button at the bottom (right) of this post to print/save this tutorial. Don’t know how? Find out HERE.
- **Part 7 VIDEO TUTORIAL** by Esther Dijkstra from It’s All in a Nutshell. There’s a 2-minute sound malfunction around the 13-minute mark, but Esther has provided subtitles for that teensy bit.
Translations
- Dutch Photo Tutorial by Dianne Baan
- German Translation by Maja Heidingsfelder
- Spanish Translation by Lynda Hernandez
- Danish Translation by Tina Poulsen
- French Translation by Sandra Larvin
- Russian Translation (with Video) by Natalie V. Alimpieva
- Swedish CAL Information by Emma Vingqvist, Agnetha Magnusson, Åza Karlsson, and Ulrika Larsson
- Arabic Video Tutorial by Banan Felimban
Materials
See the Information Post.
Abbreviations
US Terminology Used (Basic US/UK comparison chart here)
- BLO – Back loop only
- Bpsc – Back post single crochet
- Ch – Chain
- Dc – Double crochet
- FLO – Front loop only
- Fpdc – Front post double crochet
- Fpdtr – Front post double treble crochet
- Fphdc – Front post half-double crochet
- Fptr – Front post treble crochet
- Hdc – Half-double crochet
- Sc – Single crochet
- Sc2tog – Single crochet 2 together (single crochet decrease). See this tutorial.
- Sl st – Slip stitch
- St/st’s – Stitch/stitches
- Tr – Treble crochet
- * – Repeat instructions between asterisks the number of times specified. This is a hardcore repeat and will consist of multiple instructions.
- () – Repeat instructions between parentheses the number of times specified. This is a lower level repeat.
Special Stitches
- Cluster : Dc3tog – see this tutorial.
- Standing Stitches: Standing sc’s, hdc’s, and dc’s are stitches used to start the round without the need for the traditional beginning chain. Links to tutorials are supplied in each relevant round.
- Tr Bobble:
- Beginning Tr Bobble: Ch 4. Yarn over twice and insert your hook into the stitch at the base of the ch-4. Yarn over and pull up a loop. (Yarn over and pull through 2 loops) twice – 2 loops on your hook. Yarn over twice and insert your hook into the same stitch. Yarn over and pull up a loop – 5 loops on your hook. (Yarn over and pull through 2 loops) twice – 3 loops on your hook. Yarn over and pull through all 3 loops. See the photo tutorial at the beginning of Part 6 if you need visual help.
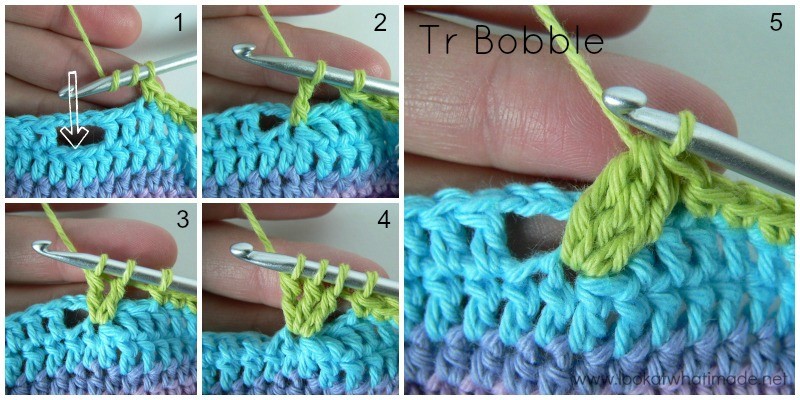
- Tr Bobble: Yarn over twice and insert your hook into the indicated stitch (Photo 1). Yarn over and pull up a loop. (Yarn over and pull through 2 loops) twice – 2 loops on your hook (Photo 2). Yarn over twice and insert your hook into the same stitch. Yarn over and pull up a loop – 5 loops on your hook. (Yarn over and pull through 2 loops) twice – 3 loops on your hook (Photo 3). Yarn over twice and insert your hook into the same stitch. Yarn over and pull up a loop – 6 loops on your hook. (Yarn over and pull through 2 loops) twice – 4 loops on your hook (Photo 4). Yarn over and pull through all 4 loops (Photo 5).
Instructions
Rounds 1 – 53
You can find the links for Rounds 1 – 53 HERE.
Note About Counting
Remember that you will be counting from ch-1 corner space to ch-1 corner space. The only exception will be Round 56, which will be counted as specified. If you are going to have trouble identifying the ch-1 spaces, please use stitch markers or scrap yarn to mark them.
Round 54
- If you are using the same colour, (ch 1, sc, ch 1, sc) in the same stitch as the sl st join. This is your first corner made.
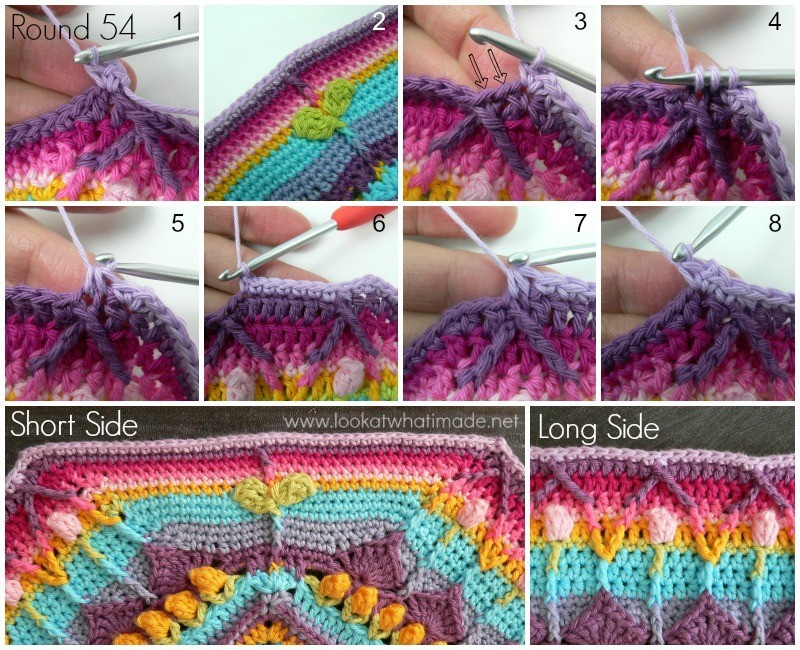
- If you are using a new colour, join your yarn by making a standing single crochet in the first hdc of the (hdc, ch 1, hdc) corner at the start of any short side. (Ch 1, sc) in the same stitch. This is your first corner made (Photo 1).
*Short Side: Sc in the next ch-1 space. Sc in the next 41 st’s. Don’t accidentally skip that first (hidden) stitch. The 21st sc will fall in the fpdc from Round 53. Sc in the next ch-1 space.
Long Side: Skip the first (hidden) stitch. (Sc, ch 1, sc) in the next stitch (Photo 3). Sc2tog, working into the 2 fpdtr’s (indicated with arrows in Photo 3 and illustrated in Photos 4 and 5). (Sc in each of the next 7 dc’s – see Photo 6. Sc2tog, working into the next 2 fpdtr’s) 8 times (Photo 7). Sc in the next dc. (Sc, ch 1, sc) in the next stitch, which should be the first hdc of the (hdc, ch 1, hdc) corner from the previous round (Photo 8).*
Repeat from * to * 3 more times, omitting the last (sc, ch 1, sc) corner on the last repeat. Join to the top of the first sc with a sl st.
Stitch Counts:
- Total: 452 sc’s and 8 ch-1 corner spaces
- Per Short Side: 45 sc’s
- Per Long Side: 68 sc’s
Round 55
- If you are using the same colour, sl st into the next ch-1 space. (Ch 1, sc, ch 1, sc) in the same ch-1 space. This is your first corner made.
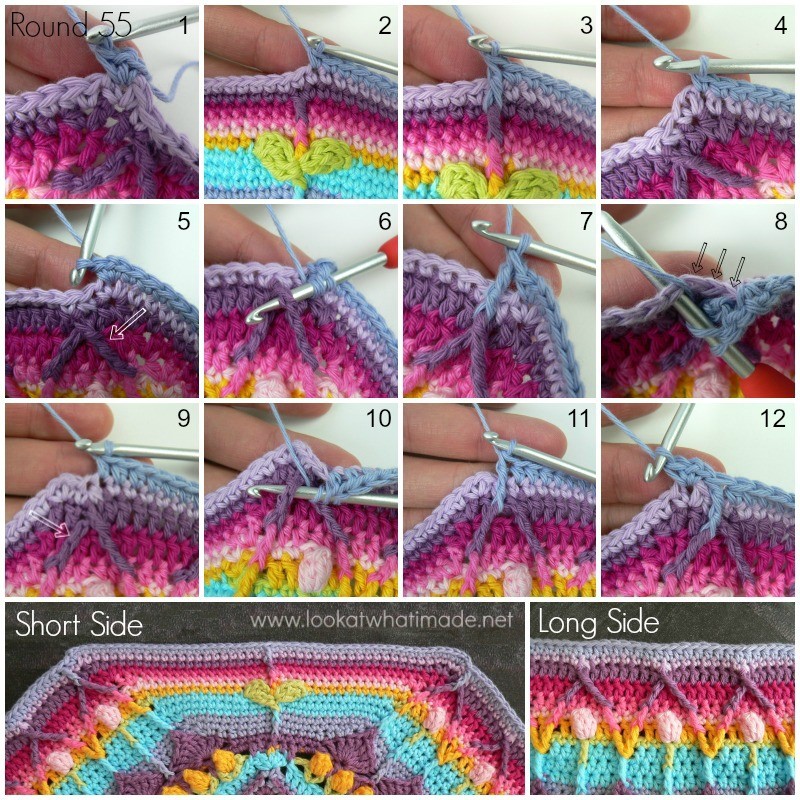
- If you are using a new colour, join your yarn by making a standing single crochet in the ch-1 space at the start of any short side. (Ch 1, sc) in the same ch-1 space. This is your first corner made (Photo 1).
*Short Side: Sc in the next 22 st’s, remembering to work into that first (hidden) stitch (Photo 2). Make a fpdc around the fpdc from Round 53 (Photo 3) and skip the next st of Round 54. Sc in the next 22 st’s (Photo 4). The fpdc in the middle of the short side will be slightly skew. Don’t worry about it.
Long Side: (Sc, ch 1, sc) in the next ch-1 space (Photo 5). Make a fptr around the first fpdtr from Round 53 (Photos 6 and 7). Skip the first (hidden) stitch AND the next 2 st’s of Round 54 (Photo 8). Hdc in the next 63 st’s. The seventh hdc should fall in the next sc2tog, and the last hdc should fall in the top of the last sc2tog from the previous round (Photo 9). Make a fptr around the last fpdtr from Round 53 (indicated with an arrow in Photo 9 and illustrated in Photos 10 and 11). Skip the last 2 st’s of Round 54. (Sc, ch 1, sc) in the next ch-1 space (Photo 12).*
Repeat from * to * 3 more times, omitting the last (sc, ch 1, sc) corner on the last repeat. Join to the first sc with a sl st.
Stitch Counts:
- Total: 456 st’s and 8 ch-1 corner spaces {192 sc’s, 252 hdc’s, 4 fpdc’s, and 8 fptr’s}
- Per Short Side: 47 st’s {46 sc’s and 1 fpdc}
- Per Long Side: 67 st’s {2 sc’s, 63 hdc’s and 2 fptr’s}
Round 56
- If you are using the same colour, sl st into the next ch-1 space. Ch 2 (counts as hdc). Hdc in the same ch-1 space. This is your first 2-hdc corner made.
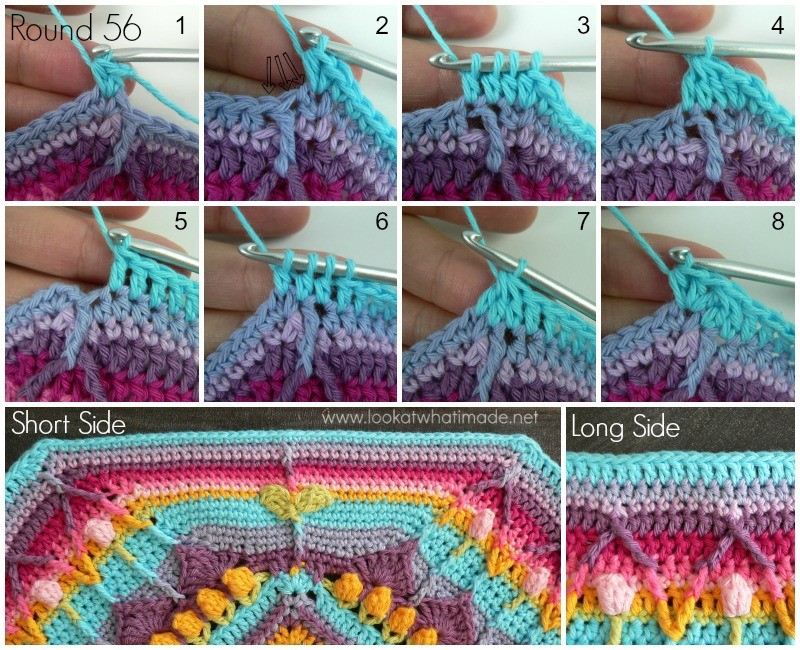
- If you are using a new colour, join your yarn by making a standing half-double crochet in the ch-1 space at the start of any short side. Hdc in the same ch-1 space. This is your first 2-hdc corner made (Photo 1).
Skip the first (hidden) stitch. Sc in the next 46 st’s. The 23rd sc will fall in the fpdc from the previous round. Make 2 hdc’s in the next ch-1 space (Photo 2).
*Long Side: Make a cluster, working into the first (hidden) sc, the fptr, and the next hdc (indicated with arrows in Photo 2 and illustrated in Photos 3 and 4). Dc in the next 62 st’s. I strongly suggest that you mark the second dc after the cluster with a st marker or a piece of scrap yarn. In fact…I insist on it. The last dc should fall in the hdc before the fptr (Photo 5). Make a cluster, working into the fptr, the next sc, and the ch-1 space (Photos 6 and 7).
Short Side: Make 2 hdc’s in the ch-1 space that already contains the last “leg” of the 3-dc cluster (Photo 8). Skip the first (hidden) stitch. Sc in the next 46 st’s. The 23rd sc will fall in the fpdc from the previous round. Make 2 hdc’s in the next ch-1 space.*
Repeat from * to * 3 more times, omitting the last short side on the last repeat. Join to the top of the beginning ch-2 (or the standing half-double crochet) with a sl st. Fasten off and work away your tails of yarn.
Stitch Counts:
- Total: 456 st’s {184 sc’s, 16 hdc’s, 248 dc’s, and 8 clusters}
- Per Short Side: 50 st’s {46 sc’s and 4 hdc’s} – The short side includes both hdc’s of the 2-hdc corners.
- Per Long Side: 64 st’s {62 dc’s and 2 clusters}
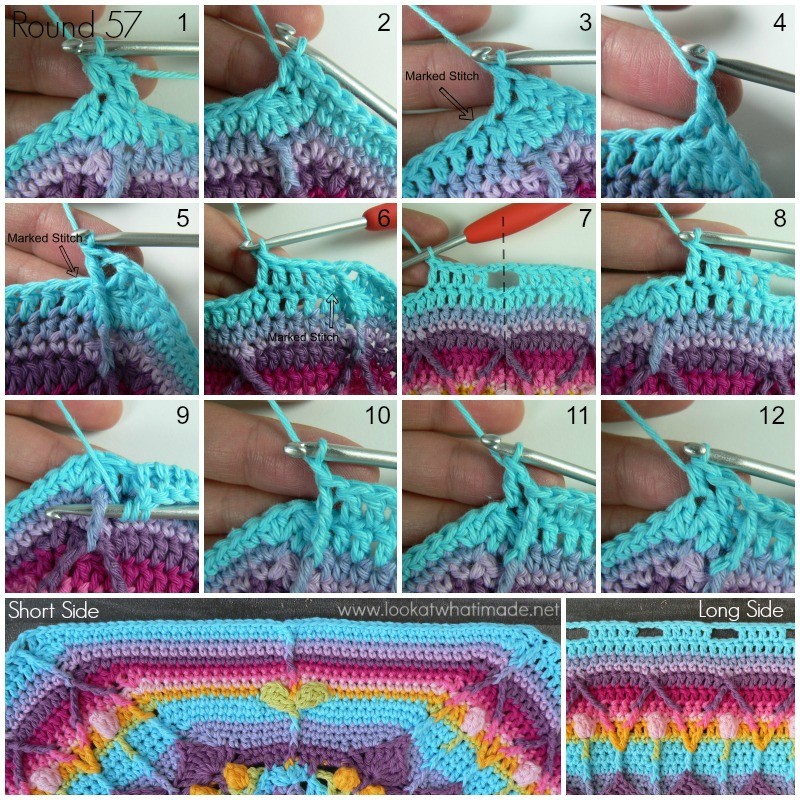
Round 57
If you want to use the same colour for this round (as I have done) you will still need to bind off at the end of the previous round, because this round starts in the stitch before the sl st join.
There are no clear-cut landmarks on the Long Side, so if didn’t mark the stitches I told you to mark in the previous round, please take a moment and do so now. Do not forget to make the ch-1 spaces at the start and end of each long side, which will count as your ch-1 corner spaces. Mark these ch-1 spaces if you are going to have trouble identifying them later.
Join your yarn by making a standing double crochet in the cluster at the end of any long side.
Hdc in the next st (Photo 1). Sc in the next 24 st’s. The last sc will fall in the sc you made into the fpdc from Round 55. Make a fpdc around the fpdc from Round 55 and skip the next st of Round 56. Sc in the next 24 st’s. The last sc should fall in the second hdc of the 2-hdc corner from the previous round. Hdc in the next stitch, which will be the cluster (Photo 2). Dc in the next st (Photo 3).
*Long Side: Ch 1 and make a fpdtr around the fptr from Round 55 (Photos 4 and 5). Dc in the next st, which should be the marked dc from the previous round. Dc in the next 4 st’s (Photo 6). Ch 3 and skip the next 3 st’s. (Dc in the next 5 st’s. Ch 3 and skip the next 3 st’s) 6 times. Each ch-3 space should fall directly above the tip of one of the petals from Rounds 49-53 (Photo 7). Dc in the last 5 dc’s before the cluster (Photo 8). Make a fpdtr around the fptr from Round 55 (Photos 9 – and 10). Ch 1.
Short Side: Make a dc in the next st, which will be the cluster (Photo 11). Hdc in the next st (Photo 12). Sc in the next 24 st’s. The last sc will fall in the sc you made into the fpdc from Round 55. Make a fpdc around the fpdc from Round 55 and skip the next st of Round 56. Sc in the next 24 st’s. The last sc should fall in the second hdc of the 2-hdc corner from the previous round. Hdc in the next stitch, which will be the cluster. Dc in the next st. *
Repeat from * to * 3 more times, omitting the last short side on the last repeat. Join to the top of the standing double crochet with a sl st.
Fasten off and work away your tails of yarn.
Stitch Counts:
- Total: 380 st’s, 28 ch-3 spaces, and 8 ch-1 corner spaces {192 sc’s, 8 hdc’s, 168 dc’s, 4 fpdc’s, and 8 fpdtr’s}
- Per Short Side: 53 st’s {48 sc’s, 2 hdc’s, 2 dc’s, and 1 fpdc}
- Per Long Side: 42 st’s and 7 ch-3 spaces {40 dc’s and 2 fpdtr’s}
Round 58 {Leaves}
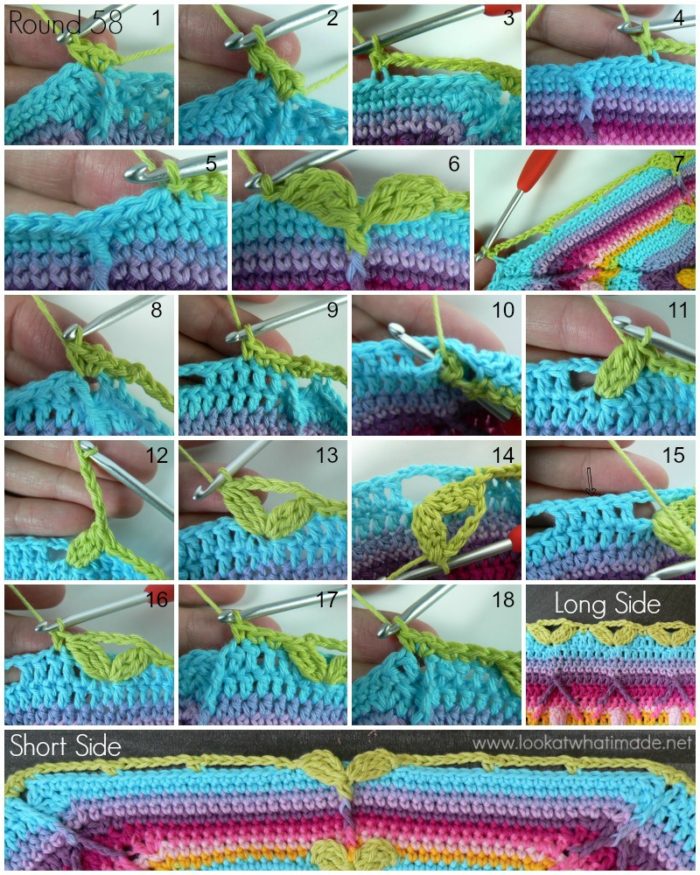
We will be making some more leaves in this round. If you need a reminder of how to make the Beginning Tr Bobbles on the short side, see the Special Stitches at the start of Part 6. On the long sides, you will be making regular Tr Bobbles – see Special Stitches above.
Join your new yarn by making a standing single crochet in the ch-1 space at the start of any short side. (Ch 1, sc) in the same ch-1 space (Photo 1).
*Short Side: Sc in the blo of the next (hidden) st (Photo 2). (Ch 6 and skip the next 6 st’s. Sc in the blo of the next st) 3 times (Photos 3 and 4). Sl st in the next st (Photo 5). There should be 3 st’s left before the fpdc. Now you are going to make your first leaf by making a Beginning Tr Bobble in the same st as the sl st. Anchor the leaf to the “stem” in the middle of the short side by making a sc around the fpdc from Round 55 (in other words, the second fpdc down). To make the second leaf, make a Beginning Tr Bobble in the sc that you made around the base of the “stem”. Skip the next 7 st’s of Round 57 (in other words, the 3 sc’s before the fpdc, the fpdc, and the 3 sc’s after the fpdc). Sl st in the next st (Photo 6). (Sc in the blo of the next st. Ch 6 and skip the next 6 st’s) 3 times. Sc in the blo of the next st, which should be the last dc before the ch-1 space (Photo 7).
Long Side: (Sc, ch 1, sc) in the next ch-1 space (Photo 8). Skip the fpdtr, which will be hidden anyway. Sc in the next 3 st’s (Photo 9).
(Skip the next 2 dc’s. Working in front of the ch-3 space from Round 57, make a Tr Bobble in the central skipped stitch from Round 56 – see Photos 10 and 11. Ch 5 – see Photo 12, and make a Tr Bobble in the same stitch – see Photos 13 and 14. Skip the next 2 dc’s of Round 57 and sc in the next dc – indicated with an arrow in Photo 15 and illustrated in Photo 16) 7 times.
Sc in the next 2 st’s and skip the next fpdtr (Photo 17). (Sc, ch 1, sc) in the next ch-1 space (Photo 18).*
Repeat from * to * 3 more times, omitting the last (sc, ch 1, sc) corner on the last repeat. Join to the top of the standing single crochet with a sl st.
Stitch Counts:
- Total: 168 st’s, 28 ch-5 spaces, 24 ch-6 spaces, and 8 ch-1 corner spaces {96 sc’s, 64 leaves, 56 tr bobbles, and 8 sl st’s}
- Per Short Side: 15 st’s and 6 ch-6 spaces {11 sc’s, of which 8 will be blo and 1 is used to anchor the leaves, 2 sl st’s, and 2 leaves}
- Per Long Side: 28 st’s and 7 ch-5 spaces {14 sc’s and 14 leaves}
Round 59 {Roses and the Start of the Central Flower on the Short Side}
Apart from when you make the corners, you will be working only into the ch-3 and ch-5 spaces along the long sides. You will be working into the stitches from Round 57 on the short sides.
Before we get started with this Round I am going to show you how to make the roses when the pattern calls for them.
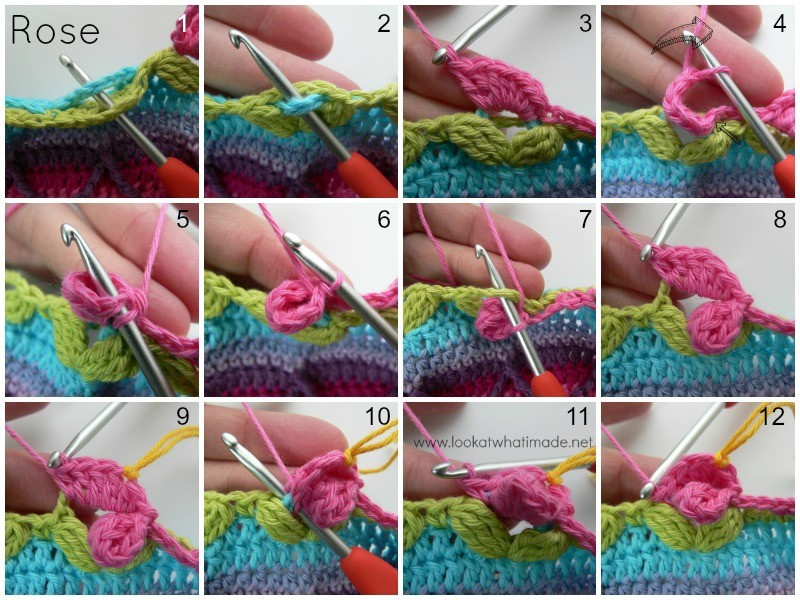
Rose
Pull the ch-3 space from Round 57 through the ch-5 space from Round 58 (Photos 1 and 2). Working only into the ch-3 space, make (2 sc’s, 3 hdc’s, 3 dc’s) – Photo 3. Bring the last stitch around the back of your work (Photo 4) and join to the first sc with a sl st, forming a ring (Photos 5 and 6). Let’s call this a modified popcorn.
(Sc, hdc, 3 dc, hdc) into the ch-5 space from Round 58, which should be behind the modified popcorn (Photos 7 and 8). Mark the first of the 3 dc’s with a piece of scrap yarn if you are going to have trouble identifying it later on (Photo 9). To finish the rose, make a sc into the ch-3 space from Round 57, again making sure to work in front of the ch-5 space (Photos 11 and 12).
Right. Let’s get started with my favourite round of the whole pattern. I hope you are excited!
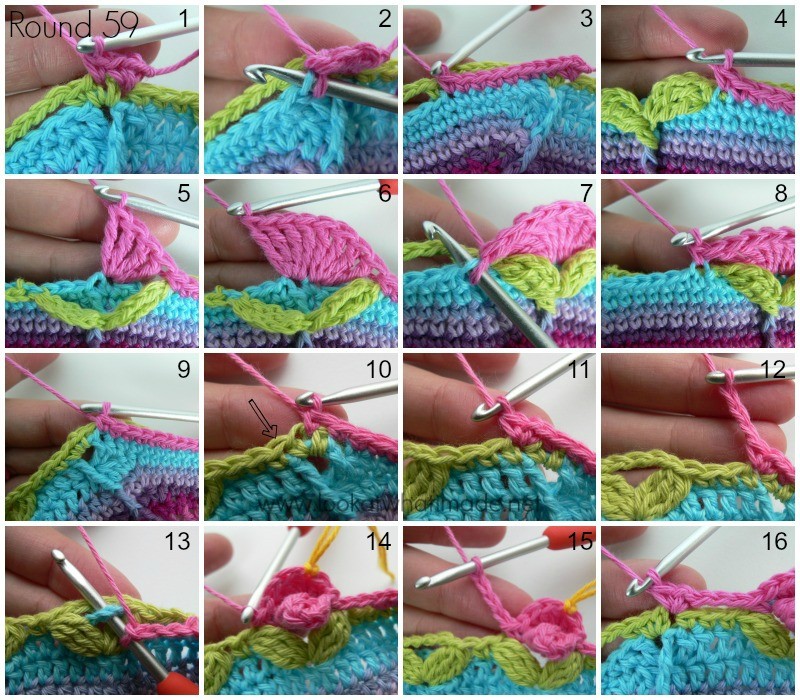
- If you are using the same colour, (ch 1, sc, ch 1, sc) in the same stitch as the sl st join. This is your first corner made.
- If you are using a new colour, join your yarn by making a standing single crochet in the same stitch as the sl st join, which should be the first sc of the (sc, ch 1, sc) corner from the previous round. (Ch 1, sc) in the same stitch. This is your first corner made.
*Short Side: Sc in the ch-1 corner space (Photo 1). Skip the next (hidden) st of Round 58. (Sc in the flo of the next st from Round 57, which already contains the blo sc from Round 58 – Photo 2. Working in front of the next ch-6 space, sc in the next 6 st’s of Round 57 – Photo 3) 3 times.
Sc in the flo of the next st from Round 57, which should be the last st before the leaf (Photo 4). Working behind the leaves, skip the next 2 available st’s from Round 57. Make 4 tr’s in the next st, which will be the sc before the fpdc (Photo 5). Make 4 tr’s in the next st, which should be the fpdc (Photo 6). Skip the next 3 st’s of Round 57 (behind the second leaf).
Sc in the flo of the next available st from Round 57, which already contains the blo sc from Round 58 (Photos 7 and 8). (Working in front of the next ch-6 space, sc in the next 6 st’s of Round 57. Sc in the flo of the next st from Round 57) 3 times (Photo 9). Skip the next st of Round 58 and sc in the ch-1 space (Photo 10).
Long Side: Skip the first (hidden) stitch. (Sc, ch 1, sc) in the next st (indicated with an arrow in Photo 10 and illustrated in Photo 11). Ch 3 and skip the next 3 st’s, which will be the 2 sc’s and the first leaf (Photo 12). Make a rose in the next ch-3/ch-5 space (see Rose at the start of this round) – Photos 13 and 14.
(Ch 4 – Photo 15, and make a rose into the next ch-3/ch-5 space) 6 times. Ch 3 and skip the next 4 st’s, which will be the last leaf and the next 3 sc’s. (Sc, ch 1, sc) in the next st, which will be the first sc of the (sc, ch 1, sc) corner from the previous round (Photo 16).*
Repeat from * to * 3 more times, omitting the last (sc, ch 1, sc) corner on the last repeat. Join to the top of the first sc with a sl st.
Fasten off and work away your tails of yarn.
Stitch Counts:
- Total: 260 st’s, 8 ch-3 spaces, 24 ch-4 spaces, and 8 ch-1 corner spaces {200 sc’s, 32 tr’s, and 28 roses}
- Per Short Side: 56 st’s {48 sc’s, of which 8 are flo, and 8 tr’s}
- Per Long Side: 9 st’s, 2 ch-3 spaces, and 6 ch-4 spaces {2 sc’s and 7 roses}
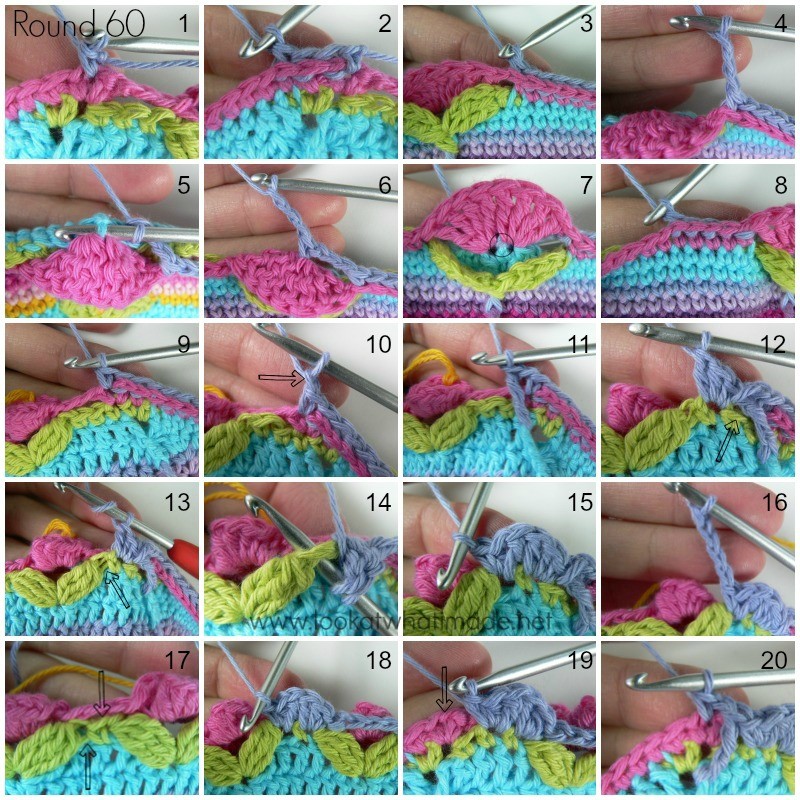
Round 60
Do not forget to make the ch-1 spaces at the start and end of each long side, which will count as your ch-1 corner spaces. Mark these ch-1 spaces if you are going to have trouble identifying them later.
When making the long sides, you can work in front of the ch spaces from Round 59, or over them. It is up to you. I will say that your roses will be slightly neater if you work in front of the ch spaces from Round 59.
- If you are using the same colour, sl st into the next ch-1 space. (Ch 1, sc) in the same ch-1 space.
- If you are using a new colour, join your yarn by making a standing single crochet in the ch-1 space at the start of any short side (Photo 1).
*Short Side: Make a bpsc in each of the next 24 sc’s, including the first (hidden) sc (Photos 2 and 3). Ch 3 (Photo 4). Make a bpsc in the sc from Round 57 that contains the first 4 tr’s of the 8-tr “flower” from Round 59 (Photo 5). Ch 3 (Photo 6). Photo 7 shows the little line formed by the bpsc. Skip the 8 tr’s from Round 59 and make a bpsc in each of the next 24 sc’s (Photo 8).
Long Side: Sc in the next ch-1 space (Photo 9). Ch 1 and make a fptr around the fpdtr from Round 57 (Photos 10 and 11). Skip the first (hidden) stitch of Round 59 and the next available stitch of Round 58, which you will find below the first ch-3 space from Round 59. Photo 12 shows the skipped stitch indicated with an arrow. The ch-3 from Round 59 is not visible, because it is behind my work.
{Sc, hdc, dc} in the next sc from Round 58 (Photo 12). {Dc, hdc, sc} between the same sc and the next Tr Bobble leaf. To work between these 2 st’s, insert your hook under all the loops of the Tr Bobble (indicated with an arrow in Photo 13 and illustrated in Photos 14 and 15). This is one scallop made. Ch 4 (Photo 16), and skip the next rose and both its leaves.
({Sc, hdc, dc} in the next sc from Round 58. {Dc, hdc, sc} between the same sc and the next Tr Bobble leaf – Photos 17 and 18. Ch 4 and skip the next rose and both its leaves) 6 times. At this point you should have 7 scallops.
(Sc, hdc, dc) in the next sc. (Dc, hdc, sc) in the next sc (Photo 19). Make a fptr around the fpdtr from Round 57. Ch 1. Skip the next st of Round 58 and the next st of Round 59. Sc in the next ch-1 space (Photo 20).*
Repeat from * to * 3 more times, omitting the last sc on the last repeat. Join to the top of the first sc with a sl st.
Fasten off and work away your tails of yarn.
Flick all the ch-4’s to the back of your work so that they do not lie in front of your roses.
Stitch Counts:
- Total: 404 st’s, 8 ch-3 spaces, 28 ch-4 spaces, and 8 ch-1 corner spaces {196 bpsc’s, 72 sc’s, 64 hdc’s, 64 dc’s, and 8 fptr’s}
- Per Short Side: 51 st’s and 2 ch-3 spaces {49 bpsc’s and 2 sc’s}
- Per Long Side: 50 st’s and 7 ch-4 spaces {16 sc’s, 16 hdc’s, 16 dc’s, and 2 fptr’s}
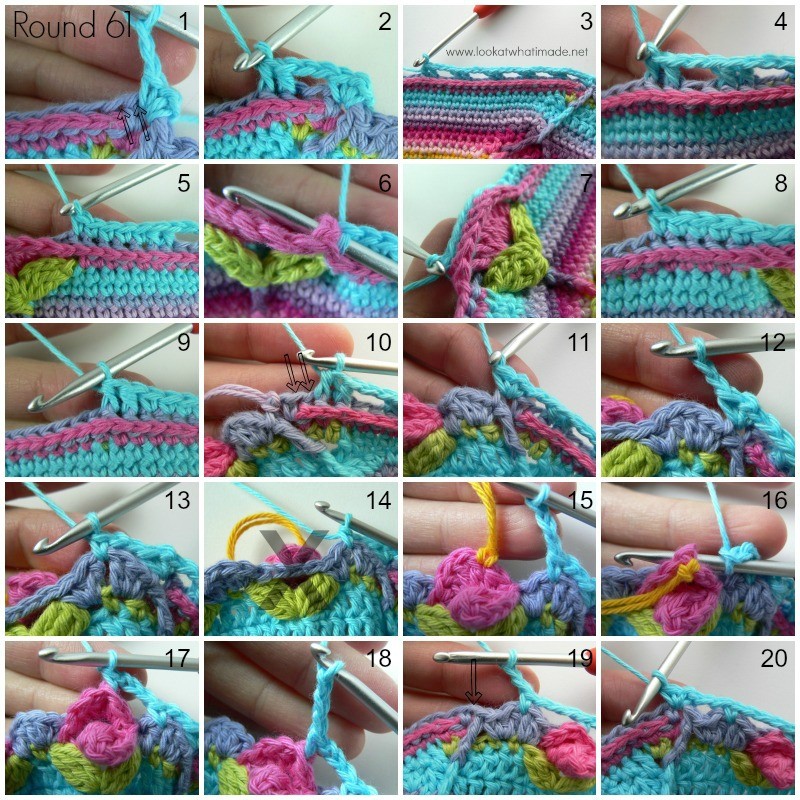
Round 61
In this round, you will be working into the tops of the roses from Round 59 and between the central 2 dc’s of each scallop on the long side. It will be helpful if you familiarise yourself with the “anatomy” of the roses first. Have a look at one of the roses. The “top” of the rose is formed by the (sc, hdc, 3 x dc, hdc) made into the ch-5 space from Round 58. When making your bpsc’s, you will make them into the first of the 3 dc’s.
Make sure that your ch-4 spaces from Round 60 are behind your roses! You will be super annoyed if they aren’t. If you have trouble identifying the stitches when you make the front post stitches on the short sides, have a look at this tutorial to remind yourself which loops (and posts) belong to which stitch. And take it slow.
Join your yarn by making a standing single crochet in the ch-1 space at the start of any short side. (Ch 1, sc) in the same ch-1 space.
*Short Side: (Ch 2 and skip the next 2 st’s. Fphdc around the next 2 st’s) 5 times (Photos 1 – 4). Sc in the last 5 st’s before the first ch-3 space (Photo 5). Make a bpsc around each of the 8 tr’s from Round 59 and skip the (ch-3, bpsc, ch-3) space behind them (Photos 6 and 7). Sc in the next 5 st’s of Round 60, taking care not to accidentally skip the first st (Photo 8). (Fphdc around the next 2 st’s. Ch 2 and skip the next 2 st’s) 5 times (Photos 9 and 10).
Long Side: (Sc, ch 1, sc) in the next ch-1 space (Photo 11). Ch 2 (Photo 12). Skip the fptr and the next 3 st’s.
(Sc between the 2 dc’s at the center of the next scallop – Photo 13. Ch 3 and make sure that your ch-4 space is behind your next rose – Photos 14 and 15. Make a bpsc around the post of the first dc of the 3 dc’s at the top of the rose from Round 59 – Photos 16 and 17. Ch 3 – Photo 18) 7 times. Sc between the 2 dc’s of the last scallop. Ch 2 (Photo 19). Skip the next 3 st’s and the fptr. (Sc, ch 1, sc) in the next ch-1 space (Photo 20).*
Repeat from * to * 3 more times, omitting the last (sc, ch 1, sc) corner on the last repeat. Join to the top of the first sc with a sl st.
Stitch Counts:
- Total: 228 st’s, 48 ch-2 spaces, 56 ch-3 spaces, and 8 ch-1 corner spaces {88 sc’s, 60 bpsc’s, and 80 fphdc’s}
- Per Short Side: 40 st’s and 10 ch-2 spaces {12 sc’s, 8 bpsc’s, and 20 fphdc’s }
- Per Long Side: 17 st’s, 2 ch-2 spaces, and 14 ch-3 spaces {10 sc’s, 7 bpsc’s}
Note About Curling
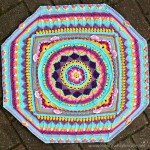
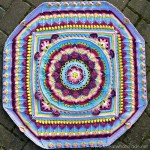
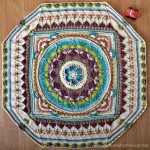
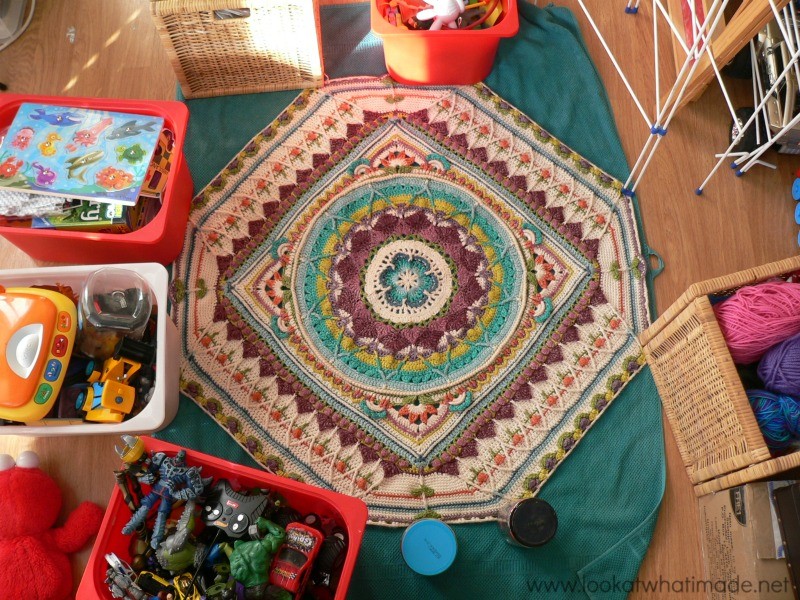
At this point, your edges will curl over quite a bit. Do not worry about this. I do suggest that you block Sophie at the end of Round 61, though. Both so that you can take pretty pictures and so that you can wait for the next part with complete peace of mind. Annie’s has some good advice for Blocking Afghans and Other Large Pieces.
I threw out my blocking squares because our charming cat scratched them to bits, but I have just ordered some more and I hope they arrive soon! If you are going to use foam squares to block on, consider buying these Interlocking Foam Exercise Mats. They are similar to these Knitter’s Pride Lace Blocking Mats, but cheaper. You will also need some of these Clover Fork Blocking Pins
.
In the meantime, I am improvising.
Remember to check the Helpful Tips before starting Part 8.
This part of the pattern was tested by Kimberly Slifer, Claire Martin, Maja Heidingsfelder, Lynda Hernandez, Venetia Smith, and Dianne Baan.

This blog post contains affiliate links. I only link to products I personally use or would use. All opinions are my own.





Donna Nix says
Hi Dedri
Just want you to know that I absolutely LOVE Sophie!! I’ve completed three and now working on two more. I’m giving them to my granddaughters. After I’ve completed the two I’m working on now, I still have one more (at least) to make. I gave 6 granddaughters and they all live Sophie too!! Each one is different so I never get tired or bored while working on it! All I can say is thank you very much for Sophie!
Donna
Dedri Uys says
Donna, what an awesome granny to make such intensive patterns for each of your granddaughters. My granny made each of us a granny square blanket when we turned 21, and I cherish mine!
Lorna Clark says
Thank you so much for your wonderful pattern. I am slowly but surely working my way through and have decided to blog about it as I go. Hope you like what I have done so far. Lorna :)
https://clarkfamilyhandbook.wordpress.com/2016/03/21/sophies-universe-parts-four-and-five/
Dedri Uys says
Hi Lorna. Your site is lovely and so is your Sophie. I hope you enjoy the journey!
Kim mitchell says
Hi, I’m Kim from Wisconsin, just started your beautiful sophies garden, a little over a week ago, today I finished video6 done by allinanutshell, well I think I have a big problem? All along since the extra corners were added when doing the short side, we have added an extra stitch in the old ch1, then started out count for our now41 stitches, well now I think sh3is means to start our count with that stitch??? So confused !!
If that’s the case I have actually have ch1 corner to to ch1. 43 stitches between my corners. How can I fix this,? No way am I ripping out16 rounds??? Help please!!!
Btw the most beautiful design I have ever worked on. And so far not counting them stitches has not caused me a problem, looks perfect all but now my count is way off…
Dedri Uys says
Hi Kim. The stitch counts become confusing when there are 8 sides, just because it is not what we are used to. If you think about making a simple square, you always count your stitches from ch corner space to ch corner space (if the square has ch corner spaces). This is no different. You will be counting from corner space to corner space unless you are instructed to do something different.
Have a look at the ‘Corners and Counting‘ instructions at the start of the Part 6 Photo Tutorial. I hope you find them useful. It would be helpful if you could use the contact me tab at the top of the website to contact me. We can then open up a line of email communication should you wish to send me a photo. Without a photo I will not be able to tell you if a simple ‘fudge’ will be sufficient at this point.
Dedri
Shannon says
I understand the count. No problems at all….until row 56. The count from row 55 is correct. And the 23rd sc on the short side of Round 56 falls above the fpdc, as it should. BUT, when I sc across to the first hdc before the ch1 sp., I end up with only 45 sc. I have been looking at this since last night and can’t figure out my error. I know it’s hard to help without a visual, but maybe I’m not the only one. Anybody?
Dedri Uys says
Hi Shannon. I will try my best to help you without a visual. The stitch count supplied is def correct and I have just double-checked it again. Can I check which hdc you are talking about when you say ‘when I sc across to the first hdc before the ch-1 space’? Round 55 doesn’t have any hdc’s. Do you mean the first of the 2-hdc corner for Round 56? Your last sc should fall in the sc before the ch-1 space. The 2 hdc’s should fall in the ch-1 space. Have you had a look at the video to see if that is of any help?
Dedri
Shannon says
Thanks for the reply! Oops, I mean sc from previous round not hdc. Somehow everything got shifted by one stitch. I ended up with one too few on the short row and one too many on the long row. Probably means a corner from round 55 is off. I’m gonna see if I can get away with doing an extra sc on the short round of 56 and decrease one on the long row. If that looks weird, I’ll just frog away. Sigh…….. I figured the problem was with me and not your pattern bc I didn’t see anyone else asking any questions about 56. I do appreciate you taking the time to check! I LOVE your pattern and your clearly written instructions! I did watch one of the videos for a previous row and it, too, was very well done. THANK YOU!!
Dedri Uys says
You are most welcome, Shannon. I am glad you figured it out in the end.
Dedri
Jenny says
Just one Ch1 stitch n every corner barring ones where the new round starts in a corner ch1 stitch, Irene. Most corners are (sc, ch1, sc).
Jenny
Luigina says
Beautiful work, a lot fun, Dedry you are a genius!
Thanks for having shared this gorgeous project!
Sorry for my bad English
Dedri Uys says
Hi Luigina. Your english is very good. Don’t worry about it for a second :)
Dimity says
Just a little note to say I am so enjoying this pattern! I was feeling sad and blue because I could not get my Tr Bobbles for the leaves right – the first stitch just seemed to stre-e-e-e-e-tch no matter how hard I tried to keep everything still – but a few rounds later and I am doing scallops over them so all my stretchy stitches are tucked away – HAPPY DAYS!! Thank you again for sharing this wonderful and challenging pattern :)
Dedri Uys says
I am glad you are happy with your blanket again :) Thank you for taking the time to comment x
Brittany says
Hi Dedri! Thank you so much for sharing this beautiful pattern. My daughter is anxiously awaiting her finished Sophie! I was wondering if it’s absolutely necessary to block after round 61 or if I can wait until after I finish part 8. Thanks! :)
Dedri Uys says
Hi Brittany. You do not have to block unless you want to. It just makes the final blocking easier, and it also helps you diagnose if you need to go up a hook size before starting Part 8.
Dedri
Dorothea says
I just finished the leaves and I was so excited to start the roses…..until I read the next row…OF COURSE IT SAID WORK IN FRONT of the chain stiches aaaaaaaaaaaaaaaargh….so important and I just didn’t do it..Is there ANY WAY I can work around it to make the roses or do I really need to frog round 58??
Thanks in advance and also for this so well written pattern! Dorothea
Dedri Uys says
Oh no! I’m afraid there’s no easy fix for that one :( Maybe I should put the warning in flashing lights! Good luck x
Dorothea says
Thanks for your reply Dedri!
I frogged it and now starting part 8 phew those bpsc really annoy me lol!!
Thanks for an amazing pattern AND explaining!
Greets from Ohio, USA
Dedri Uys says
Dorothea, they used to annoy me, but after the million back post stitches we did on Sophie, I have grown quite fond of them.
Mardi757 says
I’m about to block Sophie after Row 61 and have watched tutorials and think I’m sorted on procedure but how big should the 10ply Sophie be? I cannot find any measurements for this.
Dedri Uys says
Mardi, when you say 10 ply, are you referring to Aran/Worsted weight yarn? In other words, the large Sophie? In the information post you can find a table for each yarn thickness used. These tables include the sizes after most parts. I hope that helps.
LEANNE Gunston says
Sometimes being left handed is a pain. I am self taught, for the life of me i can’t seem to work out if i am swinging the hook forward or backwards for the roses Both ways seem to work so i hope i have do it right. I am loving the pattern. The pictures are amazing. Thank you
Jenny says
So glad you are enjoying Sophie. I love her too :)
jeanne smith says
i am left handed…after the 1st row is complete…i drop the entire rose and pick up the first stitch i am going in…this keeps my yarn to the back of the rose easily…i complete the slst and then start the back sc…
Dedri Uys says
Jeanne, you can do it that way. I prefer the look of the rose the way it is written, but the difference is small, so if it’s easier for you, by all means.
kathleen mcgraw says
Wow just finished the rose buds and must say I love them! You’ve made them beautiful and easy to do with such great instructions. Thank You!
Dedri Uys says
Thank you, Kathleen :)
Kathy Fuller says
Hey Dedri…I am IN LOVE with Sophie!!! Anyway, I’m having a problem. I’m on Round 58 (leaves). On the short side, it says the total number of stitches is 14. If I count the SC’s, the sl st’s, and the leaves, I come out with 16 stitches total. That is counting from chain space to chain space. Is this correct? Or, should I NOT be counting the two sc’s next to the chain 1’s on each end. If you could let me know, I’d REALLY appreciate it. I’ve done two short sides so far and will rip it out, if necessary. Thanks SO much. :)
Dedri Uys says
Hi Kathy, you are so right. the 14 is wrong. It should be 15, counting from ch-1 corner space to ch-1 corner space. 2 sc’s (one one each side as part of the corner), 8 blo sc’s (4 on each side of the central flower), 2 sl st’s, 2 leaves, and 1 sc around the stem of the flower, which anchors the leaves).
Kem says
One row 57 now..YAY. Each row I read, I go “uh-o, this is the one that might trip me up” and then I get into it and the instructions are so well written and the pics so clear, have not failed to get thru a row yet. I am continually amazed when I get to the end of a side and my stitch to turn the corner is EXACTLY where it should be and looks just like the pictures in the pattern. I has not happened every single time, but an adjustment to a stitch here and there is not noticeable. I even missed a couple of fptr at the corners and was able to stitch them in the missing spot rather than frog a whole row..yay. Thanks Dedri for this amazing pattern. I am enjoying making this more than anything I’ve ever made!!! Now to get back to hooking so I can get caught up!!
Dedri Uys says
Thank you so much, Kem. It is a joy to hear that you are enjoying it so much. I do try to make it as transparent as possible, given the complexity of the stitches. Have a great day.
Angela says
How do you do a fpdtc from round 57? I can’t find a tutorial. Thank you!
Jenny says
FPDT is just 3 times yarn over – once more than a treble :)
Jenny Lowman says
Yaya, I will get a photo arranged of my Sophie asap! I am totally in love with her and her monotone antique look, but I do get envious of all the lovely colourful Sophies that are appearing from all over the world! I think I will definitely be doing a third one some time this year in glorious technicolour :)
I start with a standing stitch of whatever type Dedri suggests we do via the patterns, or I slip stitch where she tells us to.
Nadine Drake says
My apologies! A closer look by me, and I found the link. Thank you for sharing your beautiful work with all of us!
Nadine Drake says
I would like to obtain the first 3 tutorials please, where can I locate them? Thanks!
yaya says
Hi Jenny
Can we see you one single color Sophie’s please and what method you use to starting each new round?
Many thanks
lily says
My father looked at me a little sideways when i told him i was making three blankets atm. I then explained what a wonderful pattern this is and what a CAL is, and i think he understood. I look forward to this pattern every week! I’m making one heirloom white thread baby blanket for our next kid, one colorful thread weight as a centerpiece for a bedspread for my husband and me, and one in worsted weight for our little one to grow along with. Obviously i have the luxury of a lot of time (and stashed yarn) but i have been enthralled with sophie since i first laid eyes on her and i cannot wait to see what she has coming up!
Jenny says
We are very happy that you are making three Sophies, Lily! Do share pics with us if you get the time :)