Good morning!
This week we are going to do 8 relatively simple rounds, so don’t gulp when you see all the words and photos. Explaining 2 different kinds of sides for each round takes a lot of photos and words, but the rounds are fairly straightforward and should go quickly.
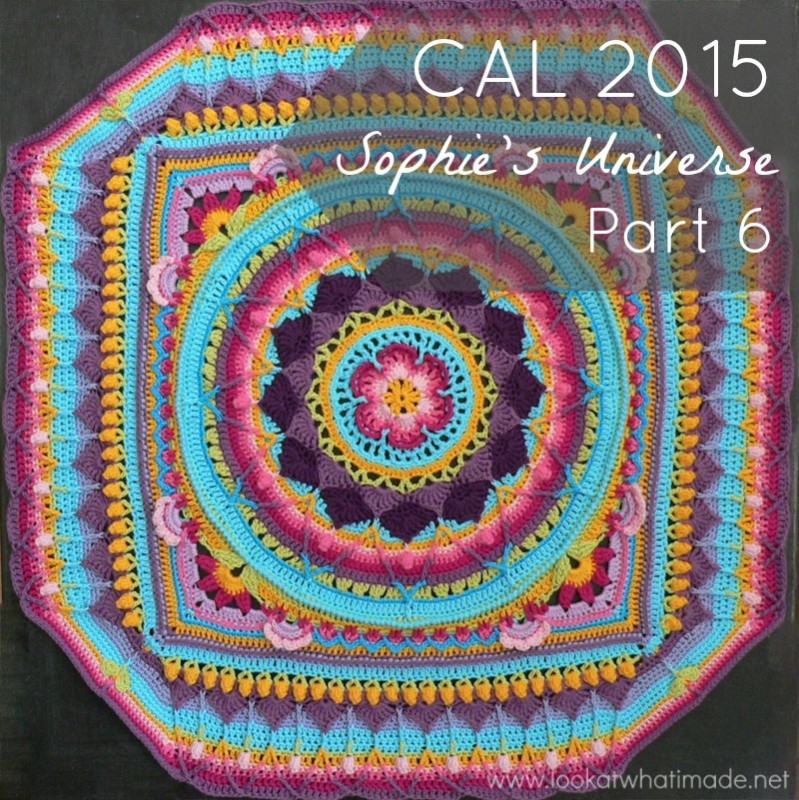
I keep being amazed at all the stunning colour combinations you guys are coming up with, and I have a little favour to ask. Before you get to the end of Part 6, could you take your Sophie on a little photo shoot outing? I love seeing pictures of Sophie draped over landmarks or in pretty landscapes. There is something extra special about seeing the habitat/loves/interests/landmarks that reveal a little bit about the hooker behind the project.
I know I loved seeing Sophie in different South-African settings: draped over a stack of tyres, with Table Mountain in the background; being held by 2 boys at a Sports day; in front of the Union Building in Pretoria.
I got to thinking. If these photos make me feel nostalgic and less homesick (at the same time), wouldn’t they do the same for other ex-pats doing the CAL, wherever they are from or wherever they find themselves now?
Share your Scenic Sophies using #scenicsophie.
And now you may continue…
Sophie’s Universe Part 6
©Dedri Uys 2014. All Rights Reserved.
Resources
- Add this CAL to your Ravelry Queue
- Sophie’s Universe CAL 2015 Information
- Use the Print-friendly button at the bottom (right) of this post to print/save this tutorial. Don’t know how? Find out HERE.
- **Part 6 VIDEO TUTORIAL** by Esther Dijkstra from It’s All in a Nutshell
Translations
- Dutch Photo Tutorial by Dianne Baan
- German Translation by Maja Heidingsfelder
- Spanish Translation by Lynda Hernandez
- Finnish Translation by Sari Åström
- French Translation by Sandra Larvin
- Danish Translation by Tina Poulsen
- Russian Translation (with Video) by Natalie V. Alimpieva
- Swedish CAL Information by Emma Vingqvist, Agnetha Magnusson, Åza Karlsson, and Ulrika Larsson
- Arabic Video Tutorial by Banan Felimban
Materials
See the Information Post.
In some of the photos, I have used a different colour than the specified colour to make it easier for you to see where the stitches go.
Abbreviations
US Terminology Used (Basic US/UK comparison chart here)
- BLO – Back loop only
- Ch – Chain
- Dc – Double crochet
- Fpdc – Front post double crochet
- FLO – Front loop only
- Fpdtr – Front post double treble
- Fptr – Front post treble crochet
- Hdc – Half-double crochet
- Sc – Single crochet
- Sl st – Slip Stitch
- St/st’s – Stitch/stitches
- * – Repeat instructions between asterisks the number of times specified. This is a hardcore repeat and will consist of multiple instructions.
- () – Repeat instructions between parentheses the number of times specified. This is a lower level repeat.
Special Stitches
- Popcorn stitch: Make 5 dc’s in the same stitch. Remove your hook from the last stitch. Insert your hook into the first dc of the 5 dc’s. Grab the last stitch with your hook and pull it through the first stitch. Ch 1. See this tutorial.
- Standing Stitches: Standing sc’s, hdc’s, and dc’s are stitches used to start the round without the need for the traditional beginning chain. Links to tutorials are supplied in each relevant round.
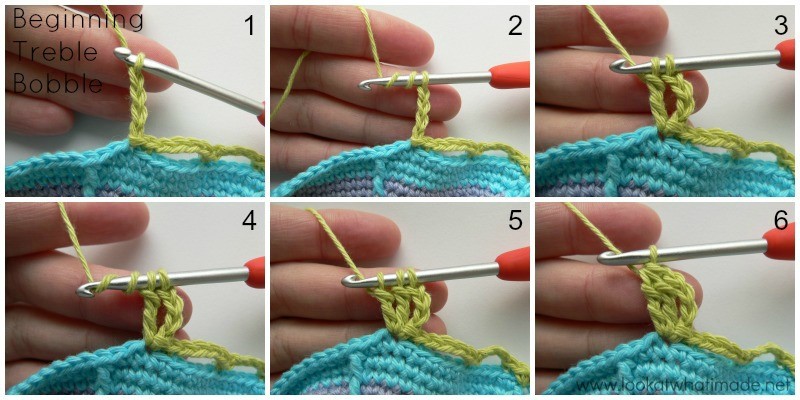
- Beginning Tr Bobble: Ch 4 (Photo 1). Yarn over twice (Photo 2) and insert your hook into the stitch at the base of the ch-4. Yarn over and pull up a loop. (Yarn over and pull through 2 loops) twice – 2 loops on your hook (Photo 3). Yarn over twice (Photo 4) and insert your hook into the same stitch. Yarn over and pull up a loop – 5 loops on your hook. (Yarn over and pull through 2 loops) twice – 3 loops on your hook (Photo 5). Yarn over and pull through all 3 loops (Photo 6).
Instructions
Rounds 1 – 45
You can find the links for Rounds 1 – 45 HERE.
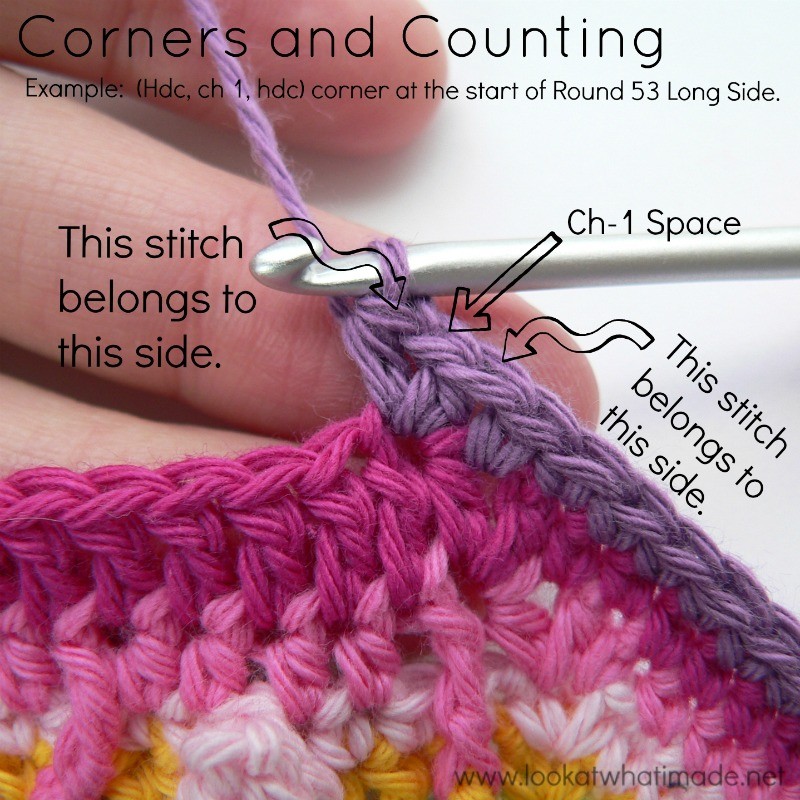
Corners and Counting
When counting the stitches for each side, you will be counting from ch-1 corner space to ch-1 corner space. In other words, wherever the corners are formed by making a stitch on either side of a ch-1 space, the stitch on one side of the ch-1 space will belong to one side and the stitch on the other side of the ch-1 space will belong to the other side. Just like when you are making squares. Any exceptions will be highlighted.
Mark the corner spaces with stitch markers if you think you might have trouble identifying them.
Round 46
- If you are using the same colour, (ch 1, sc, ch 1, sc) in the same stitch. This is your first corner made.
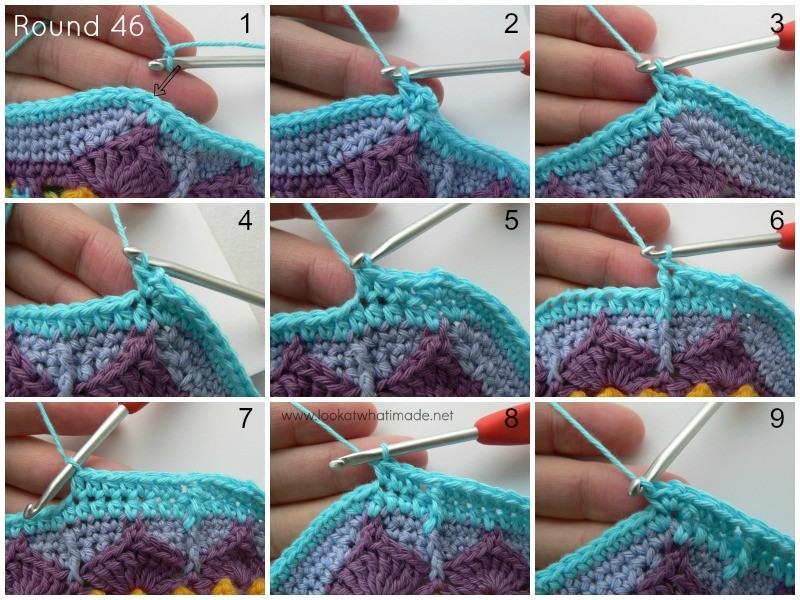
- If you are using a new colour, join your yarn by making a standing single crochet in the same stitch as the sl st join, which should be the first sc of the 2-sc corner at the start of any short side. (Ch 1, sc) in the same stitch. This is your first corner made (Photos 1 and 2).
Sc in the next 26 st’s. The last sc should fall in the second sc of the 2-sc corner – see Photo 3. (Sc, ch 1, sc) in the next stitch (Photo 4).
*Long Side: Skip the next hdc. Hdc in the next 3 st’s. The last hdc should fall in the hdc made into the fpdc from Round 44 – see Photo 5. (Fptr around the fpdc from Round 44 – see Photo 6, skip the next st of Round 45 and hdc in the next 7 st’s. The last hdc should fall in the hdc you made into the fpdc from Round 44- see Photo 7) 8 times. Fptr around the fpdc from Round 44. Skip the next st of Round 45 and hdc in the next 3 st’s. The last hdc should fall in the hdc you made into the picot (Photo 8).
Short Side: (Sc, ch 1, sc) in the next stitch (Photo 9). Sc in the next 26 st’s. The last sc should fall in the second sc of the 2-sc corner. (Sc, ch 1, sc) in the next stitch.*
Repeat from * to * 3 more times, omitting the last short side on the last repeat. Join to the first sc with a sl st.
Stitch Counts:
- Total: 404 st’s and 8 ch-1 corner spaces {120 sc’s, 248 hdc’s, and 36 fptr’s}
- Per Short Side: 28 sc’s
- Per Long Side: 73 st’s {2 sc’s, 62 hdc’s, and 9 fptr’s}
Round 47
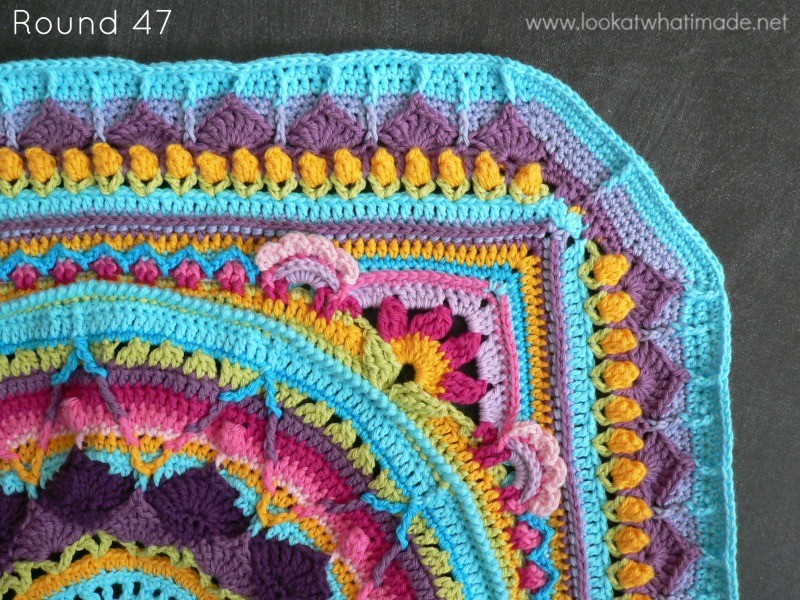
The front-post trebles will be slightly skew in this round – see the photo of Round 47 completed below. This will correct itself in the next couple of rounds. Do not forget to make the ch-1 spaces at the start and end of each long side, which will count as your ch-1 corner spaces. Mark these ch-1 spaces if you are going to have trouble identifying them later.
- If you are using the same colour, sl st into the ch-1 space. (Ch 1, sc) in the same ch-1 space.
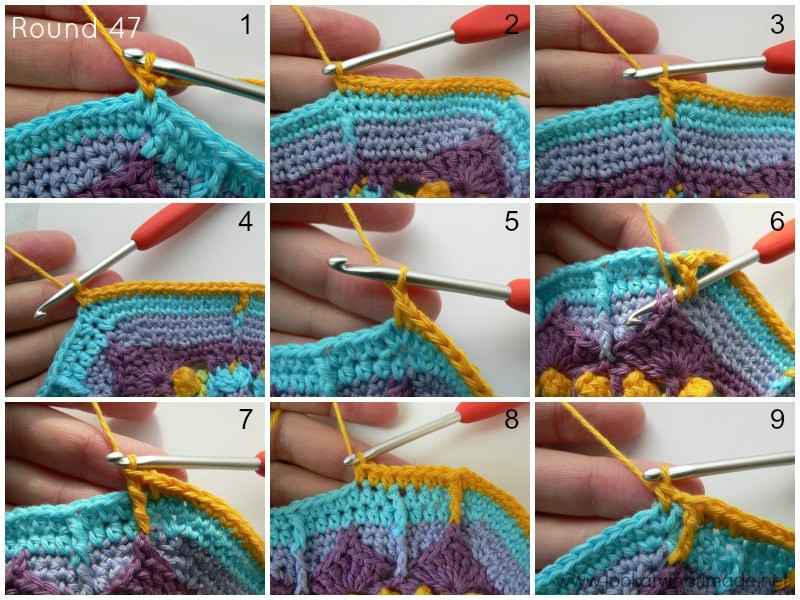
- If you are using a new colour, join your yarn by making a standing single crochet in the ch-1 space at the start of any short side (Photo 1).
Sc in the next 14 st’s. Don’t accidentally skip the first (hidden) stitch. The last sc should fall in the sc made into the fpdc from Round 45 (Photo 2). Fpdc around the fpdc from Round 45 (Photo 3). Sc in the next 14 st’s (Photo 4). Sc in the next ch-1 space.
*Long Side: Ch 1 (Photo 5). (Fptr around the picot from Round 41 – see Photos 6 and 7. Skip the next st of Round 46 and hdc in the next 7 st’s. The fourth hdc should fall in the fptr from Round 46 – see Photo 8) 9 times. Fptr around the picot from Round 41. Ch 1 and skip the next st of Round 46.
Short Side: Sc in the next ch-1 space (Photo 9). Sc in the next 14 st’s. Don’t accidentally skip the first (hidden) stitch. Fpdc around the fpdc from Round 45. Sc in the next 14 st’s. Sc in the next ch-1 space.*
Repeat from * to * 3 more times, omitting the last short side on the last repeat. Join to the top of the first sc with a sl st. Fasten off and work away your tails of yarn.
Don’t worry if your short sides curl up a bit at the end of this round.
Stitch Counts:
- Total: 416 st’s and 8 ch-1 corner spaces {120 sc’s, 252 hdc’s, 4 fpdc’s, and 40 fptr’s}
- Per Short Side: 31 st’s {30 sc’s and 1 fpdc}
- Per Long Side: 73 st’s {63 hdc’s and 10 fptr’s}
Round 48 {Leaves}
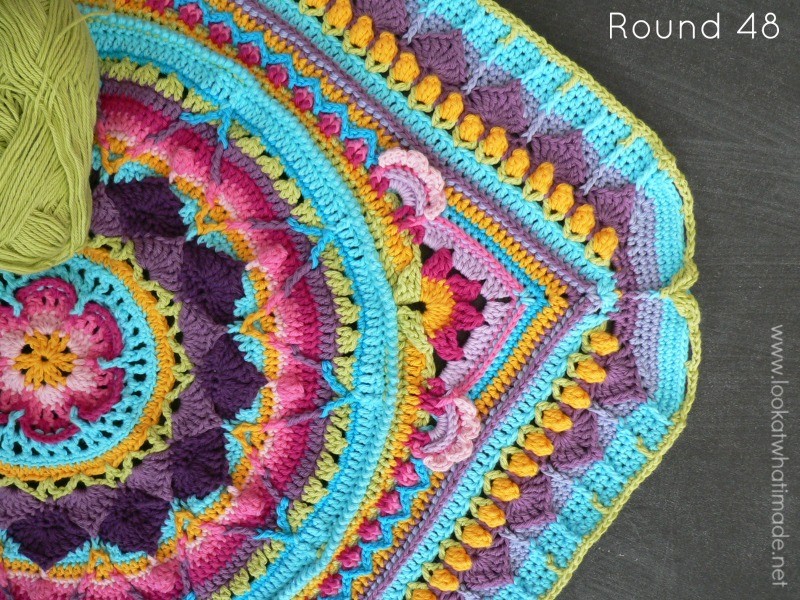
You will be making leaves in this round, but only on the short sides.
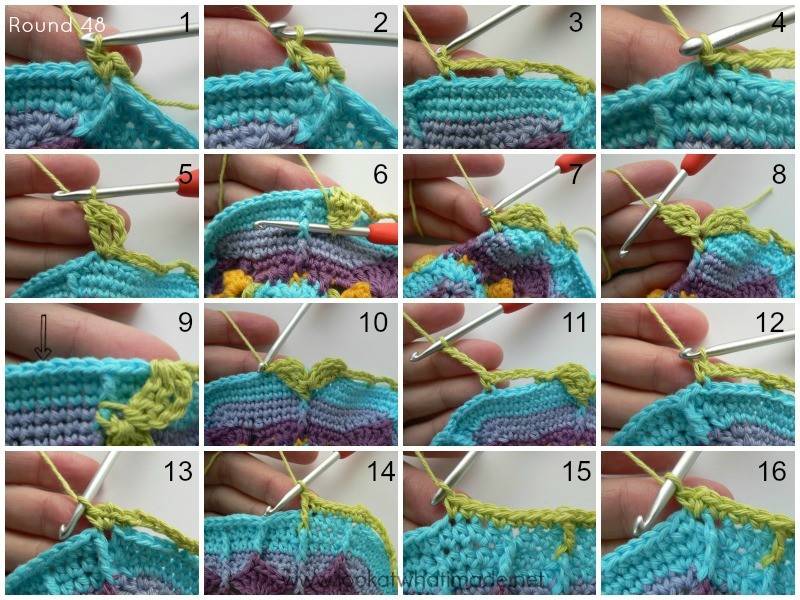
Join your yarn by making a standing single crochet in the ch-1 space at the start of any short side. (Ch 1, sc) in the same ch-1 space. This is your first corner made (Photo 1).
*Short Side: Skip the first (hidden) stitch and sc in the blo of the next st (Photo 2). (Ch 4, skip the next 4 st’s and sc in the blo of the next st) twice (Photo 3). Sl st in the next st (Photo 4). There should now be 2 sc’s left unworked before the fpdc.
Now you are going to make your first leaf by making a Beginning Tr Bobble in the same st as the sl st (Photo 5). See Special Stitches above if you need some help. Anchor the leaf to the “stem” in the middle of the short side by making a sc around the fpdc from Round 45 (in other words, the second fpdc down) – see Photos 6 and 7.
To make the second leaf, make a Beginning Tr Bobble in the sc that you made around the base of the “stem” (Photo 8). Skip the next 6 st’s of Round 47 (in other words, the 2 sc’s before the fpdc, the fpdc, and the 3 sc’s after the fpdc). Sl st in the next st (indicated with an arrow in Photo 9 and illustrated in Photo 10).
(Sc in the blo of the next st. Ch 4 and skip the next 4 st’s) twice (Photo 11). Sc in the blo of the next st (Photo 12).
Long Side: (Sc, ch 1, sc) in the next ch-1 space (Photo 13). Skip the fptr. Sc in the next 4 st’s. (Fptr around the fptr from Round 46 – see Photo 14. Skip the next st of Round 47 and sc in the next 7 st’s. The third sc should fall in the fptr from Round 47 – see Photo 15) 8 times. Fptr around the fptr from Round 46. Skip the next st of Round 47 and sc in the last 3 st’s. (Sc, ch 1, sc) in the next ch-1 space (Photo 16).*
Repeat from * to * 3 more times, omitting the last (sc, ch 1, sc) corner on the last repeat. Join to the top of the first sc with a sl st.
Stitch Counts:
- Total: 360 st’s, 8 leaves, 16 ch-4 spaces, and 8 ch-1 corner spaces {296 sc’s, 8 sl st’s, and 36 fptr’s}
- Per Short Side: 9 sc’s (including the sc that anchors the first leaf), 2 sl st’s, 4 ch-4 spaces, and 2 leaves
- Per Long Side: 74 st’s {65 sc’s and 9 fptr’s}
Round 49
- If you are using the same colour, sl st into the ch-1 space. (Ch 1, sc, ch 1, sc) into the same ch-1 space. This is your first corner made.
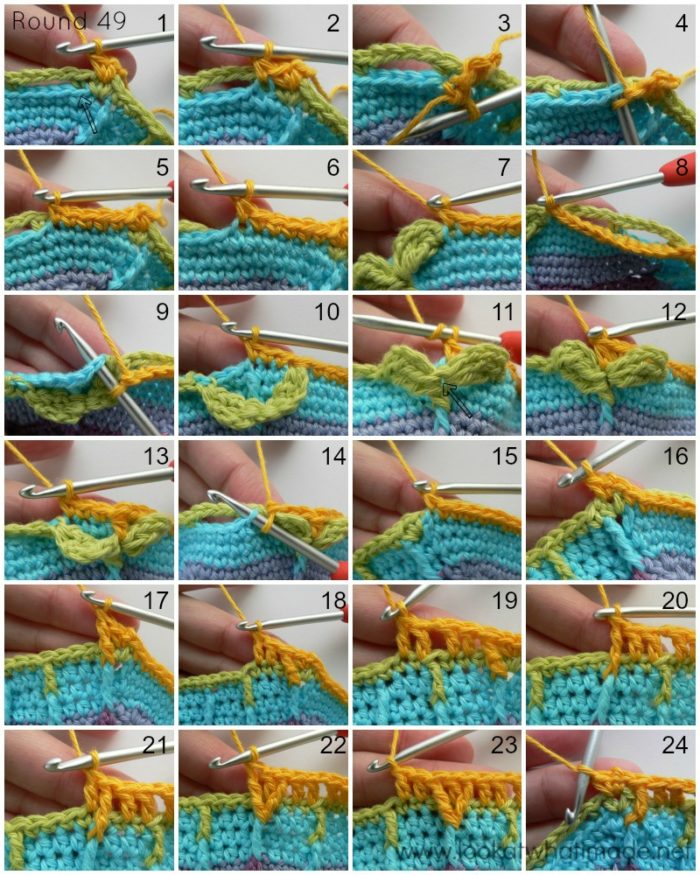
- If you are using a new colour, join your yarn by making a standing single crochet in the ch-1 space at the start of any short side. (Ch 1, sc) in the same ch-1 space. This is your first corner made (Photo 1).
*Short Side: Skip the first (hidden) stitch. Sc in the flo of the next st from Round 47 (that already contains a sc in the blo) – indicated with an arrow in Photo 1 and illustrated in Photos 2 and 3.
(Working in front of the ch-4 space from Round 48, sc in the 4 skipped st’s from Round 47 –Photos 4 and 5. Sc in the flo of the next st of Round 47 – see Photo 6) twice (Photos 7 and 8). Skip the sl st from Round 48.
Working behind the first leaf, sc in the first 3 skipped stitches from Round 47 (Photo 9). The last sc should fall in the top of the fpdc from Round 47 (Photo 10). Make an hdc into the sc between the two leaves. This is the sc that contains the Beginning Tr Bobble of the second leaf (indicated with an arrow in Photo 11 and illustrated in Photo 12). Sc in the next 3 st’s from Round 47, behind the second leaf (Photo 13).
Skip the next sl st. (Sc in the flo of the next st from Round 47 – see Photo 14. Working in front of the ch-4 space, sc in the 4 skipped st’s from Round 47) twice. Sc in the flo of the next st from Round 47 (Photo 15). Skip the next st of Round 48.
Long Side: (Sc, ch 1, sc) in the next ch-1 space (Photo 16). Make a fptr around the fptr from Round 47 (Photo 17). Skip the first (hidden) stitch AND the next 2 st’s from Round 48. Dc in the next 2 st’s. The last dc should fall in the sc before the fptr (Photo 18).
(Ch 1 and skip the next st, which will be the fptr from Round 48. Dc in the next 2 st’s – see Photo 19. Fptr around the next fptr from Round 47 – see Photo 20. Skip the next st of Round 48 and dc in the next st – see Photo 21. Fptr around the same fptr from Round 47- see Photo 22. Skip the next st from Round 48. Dc in the next 2 st’s – see Photo 23) 8 times.
Ch 1 and skip the next st, which will be the fptr from Round 48. Dc in the next 2 st’s. Fptr around the next fptr from Round 47. Skip the last 2 st’s of Round 48. (Sc, ch 1, sc) in the next ch-1 space- (Photo 24).*
Repeat from * to * 3 more times, omitting the last (sc, ch 1, sc) corner on the last repeat. Join to the top of the first sc with a sl st.
Stitch Counts:
- Total: 380 st’s and 44 ch 1 spaces – including the 8 corner ch-1 spaces (128 sc’s, 4 hdc’s, 176 dc’s, and 72 fptr’s)
- Per Short Side: 31 st’s {30 sc’s and 1 hdc’s}
- Per Long Side: 64 st’s and 9 ch-1 spaces {2 sc’s, 44 dc’s and 18 fptr’s}
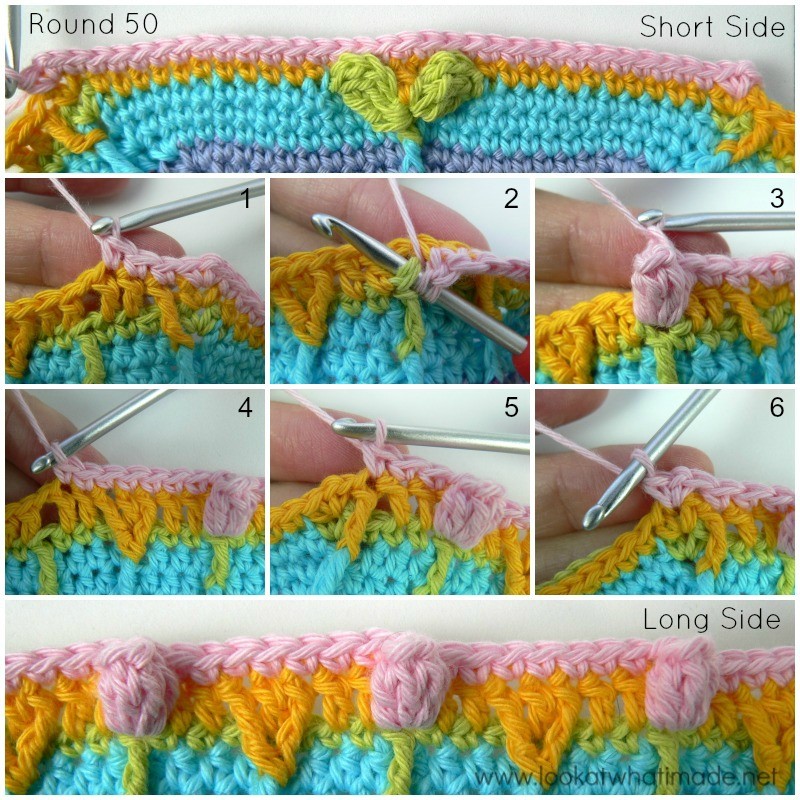
Round 50 {Tulips}
- If you are using the same colour, sl st into the next ch-1 space. (Ch 1, sc, ch 1, sc) in the same ch-1 space. This is your first corner made.
- If you are using a new colour, join your yarn by making a standing single crochet in the ch-1 space at the beginning of any short side. (Ch 1, sc) in the same ch-1 space. This is your first corner made.
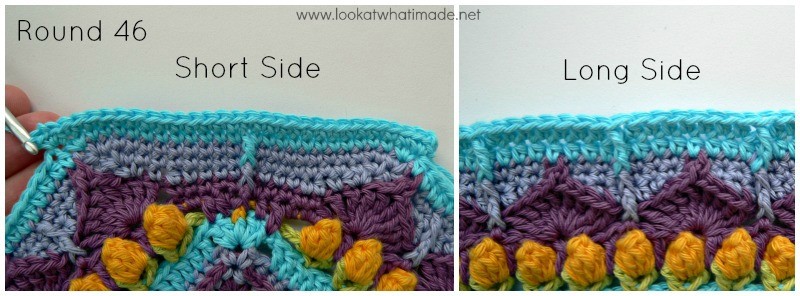
Skip the first (hidden) stitch and sc in the next 30 st’s. The 15th sc should fall in the hdc between the leaves. (Sc, ch 1, sc) in the next ch-1 space. This is your first short side made – see the “Short Side” photo below.
*Long Side: Skip the first (hidden) st. Sc in the next 3 st’s (Photo 1). (Working in front of the next ch-1 space, make a popcorn stitch in the skipped fptr from Round 48 – see Photos 2 and 3. Sc in the next 7 st’s of Round 49 – see Photo 4) 8 times. Working in front of the next ch-1 space, make a popcorn stitch in the skipped fptr from Round 48. Sc in the next 3 st’s. The last sc should fall in the top of the fptr from Round 49 (Photo 5). Skip the next st.
Short Side: (Sc, ch 1, sc) in the next ch-1 space. Skip the first (hidden) stitch and sc in the next 30 st’s. The 15th sc should fall in the hdc between the leaves. (Sc, ch 1, sc) in the next ch-1 space (Photo 6). *
Repeat from * to * 3 more times, omitting the last short side on the last repeat. Join to the top of the first sc with a sl st.
Stitch Counts:
- Total: 420 st’s and 8 ch-1 corner spaces {384 sc’s and 36 popcorns}
- Per Short Side: 32 sc’s
- Per Long Side: 73 st’s {64 sc’s and 9 popcorns}
Round 51
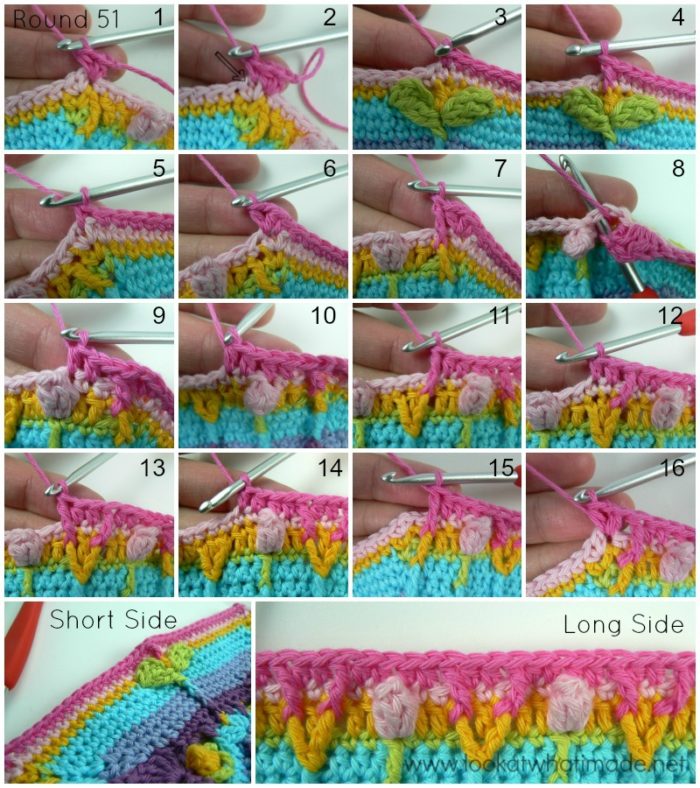
When working into the top of the popcorn stitches you will be working into the first dc of the popcorn, through which you pulled the last dc of the popcorn. You will find this stitch immediately to the right of the popcorn (left if you are left-handed).
- If you are using the same colour, ch 3 (counts as hdc + ch-1). Hdc in the same stitch. This is your first corner made.
- If you are using a new colour, join your yarn by making a standing half-double crochet in the same st as the sl st join. (Ch 1, hdc) in the same stitch. This is your first corner made (Photo 1).
*Short Side: Sc in the next ch-1 space (Photo 2). Skip the first (hidden) stitch – indicated with an arrow in Photo 2. Sc in the next 15 st’s. The last sc should fall in the sc made into the hdc from Round 49 (Photo 3). Fpdc around the hdc between the leaves from Round 49 (Photo 4). Sc in the next 15 st’s. Skip the last st and sc in the next ch-1 space (Photo 5).
Long Side: (Hdc, ch 1, hdc) in the next (hidden) stitch (Photo 6). Make a fptr around the fptr from Round 49 (Photo 7). Skip the next 2 st’s (Photo 8). Hdc in the next 4 st’s (Photos 9 and 10). The second hdc should fall in the top of the popcorn stitch – see the note at the start of the round and Photo 9 below.
(Fptr around the next fptr from Round 49 – see Photo 11. Skip the next st of Round 50 and hdc in the next 2 st’s – see Photo 12. Fptr around the next fptr from Round 49 and skip the next st of Round 50 – see Phto 13. Hdc in the next 4 st’s. The second hdc should fall in the top of the popcorn stitch – see Photo 14) 8 times.
Fptr around the next fptr from Round 49 and skip the next st of Round 50 (Photo 15). (Hdc, ch 1, hdc) in the next st, which will be the first sc of the previous (sc, ch-1, sc) corner (Photo 16).*
Repeat from * to * 3 more times, omitting the last (hdc, ch 1, hdc) corner on the last repeat. Join to the second ch of the beginning ch-3 (or the top of the standing hdc) with a sl st.
Stitch Counts:
- Total: 428 st’s and 8 ch-1 corner spaces {128 sc’s, 224 hdc’s, 4 fpdc’s, and 72 fptr’s}
- Per Short Side: 35 st’s {32 sc’s, 2 hdc’s, and 1 fpdc}
- Per Long Side: 72 st’s {54 hdc’s and 18 fptr’s}
Round 52
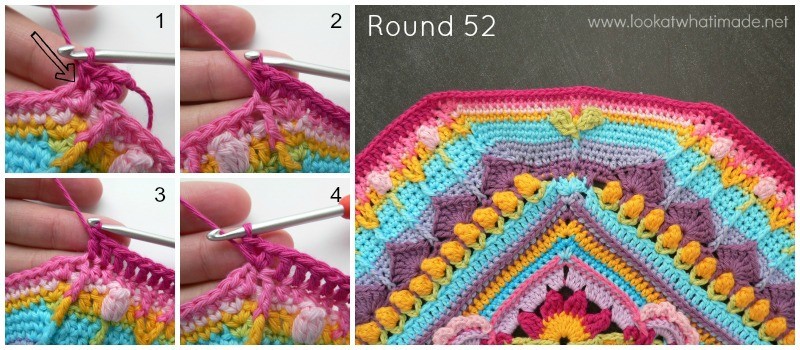
- If you are using the same yarn, ch 3 (counts as your first hdc + ch-1). Hdc in the same st. This is your first corner made.
- If you are using a new colour, join your yarn by making a standing half-double crochet in the same st as the sl st join. (Ch 1, hdc) in the same st. This is your first corner made.
*Short Side: Sc in the next ch-1 space (Photo 1). Skip the first (hidden) st and sc in the next 34 st’s. The 17th sc should fall in the top of the fpdc from the previous round. Sc in the next ch-1 space.
Long Side: Skip the first (hidden) stitch and (hdc, ch 1, hdc) in the next stitch, which will be the fptr from the previous round (Photo 2). Dc in the next 69 st’s (Photo 3). (Hdc, ch 1, hdc) in the next st, which should be the first hdc of the (hdc, ch 1, hdc) corner from the previous round (Photo 4).*
Repeat from * to * 3 more times, omitting the last (hdc, ch 1, hdc) corner on the last repeat. Join to the second ch of the beginning ch-3 (or the top of the standing half-double crochet) with a sl st.
Stitch Counts:
- Total: 436 st’s and 8 ch-1 corner spaces {144 sc’s, 16 hdc’s, and 276 dc’s}
- Per Short Side: 38 st’s {36 sc’s and 2 hdc’s}
- Per Long Side: 71 st’s {2 hdc’s and 69 dc’s}
Round 53
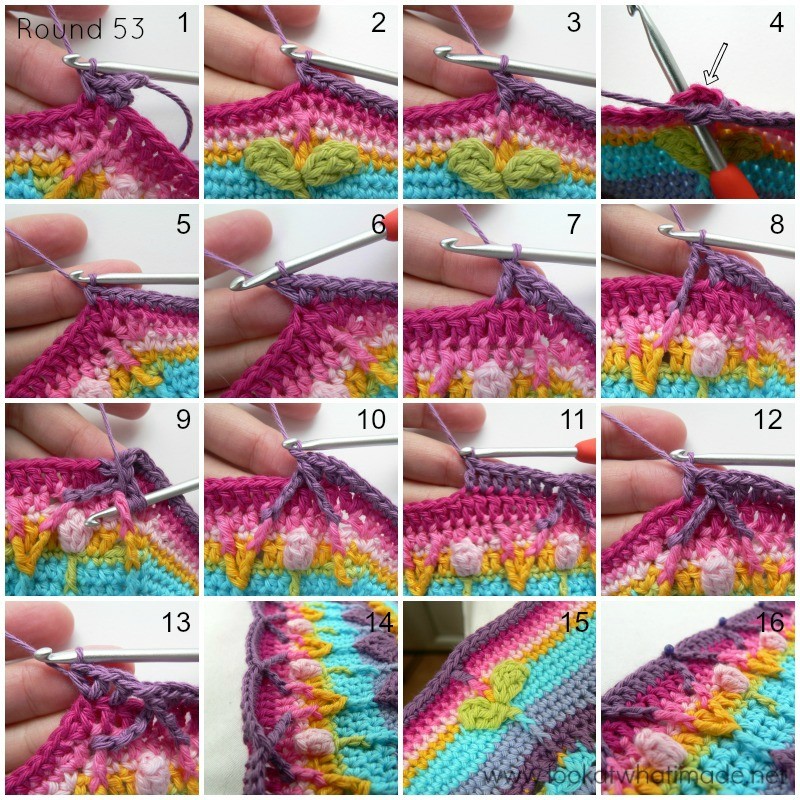
When you make the fpdtr’s you will be adding a stitch to each repeat by making 2 and only skipping 1. Do not worry about this. We will decrease again in the next round. You will notice that this round has a tendency to curl right over. Do not worry about this (Photo 14 below)!
- If you are going to use the same colour, ch 3 (counts as hdc + ch-1). Hdc in the same stitch. This is your first corner made.
- If you are using a new colour, join your yarn by making a standing half-double crochet in the same st as the sl st join. (Ch 1, hdc) in the same stitch. This is your first corner made.
*Short Side: Sc in the next ch-1 space (Photo 1). Skip the first (hidden) st. Sc in the next 18 st’s. The last sc should fall in the sc made into the fpdc from Round 51 (Photo 2). Make a fpdc around the fpdc from Round 51 (Photo 3) and skip the next st of Round 52 (Photo 4). Sc in the next 18 st’s. Sc in the next ch-1 space (Photo 5).
Long Side: Skip the first (hidden) stitch and (hdc, ch 1, hdc) in the next stitch (Photo 6). Skip the next st. Dc in the next st, which should be the dc right above the popcorn stitch from Round 49 (Photo 7).
(Make a fpdtr around the fptr from Round 51 to the left of the popcorn stitch (right if you are left-handed) – see Photo 8. Make a fpdtr around the fptr from Round 51 to the right of the same popcorn stitch (left if you are left-handed) – see Photos 9 and 10. Skip the next st of Round 52 and dc in the next 7 st’s. The last dc should fall in the dc right above the next popcorn stitch from Round 49 – see Photo 11) 8 times.
Make a fpdtr around the fptr from Round 51 to the left of the last popcorn stitch (right if you are left-handed). Make a fpdtr around the fptr from Round 51 to the right of the same popcorn stitch (left if you are left-handed). Skip the next st of Round 52 and dc in the next st (Photo 12). (Hdc, ch 1, hdc) in the next st, which will be the first hdc of the (hdc, ch 1, hdc) corner from the previous round (Photo 13).*
Repeat from * to * 3 more times, omitting the last (hdc, ch 1, hdc) corner on the last repeat. Join to the second ch of the beginning ch-3 (or the top of the standing hdc) with a sl st.
Stitch Counts:
- Total: 476 st’s and 8 ch-1 corner spaces {152 sc’s, 16 hdc’s, 232 dc’s, 4 fpdc’s, and 72 fpdtr’s}
- Per Short Side: 41 st’s {38 sc’s, 2 hdc’s, and 1 fpdc}
- Per Long Side: 78 st’s {2 hdc’s, 58 dc’s, and 18 fpdtr’s}
This part of the pattern was tested by Kimberly Slifer and Claire Martin, and proofread by Claire Martin and Venetia Smith.

This blog post contains affiliate links. I only link to products I personally use or would use. All opinions are my own.



Trish says
Never dreamed i make it to row 46. love this afghan. eager to complete each row
Dedri Uys says
Trish, your comment has warmed my heart :)
Lorna Clark says
Thank you so much for your wonderful pattern. I am slowly but surely working my way through and have decided to blog about it as I go. Hope you like what I have done so far. Lorna :)
https://clarkfamilyhandbook.wordpress.com/2016/03/21/sophies-universe-parts-four-and-five/
Liesel Kruger says
Hi Dedri, I’m from SA, what an awesome project and pattern, just battling with the leaves in round 48, not 100% sure on where the single crochet goes for the first leaf and exactly where the second leaf starts (pulled it out three times this weekend).
Regards
Liesel
Dedri Uys says
Hi Liesel. Het jy al na die videos gekyk? Esther wys presies hoe en waar om daai steke te maak. As jy steeds sukkel, stuur vir my ‘n boodskap met die Contact Me form (bo aan my blad) en dan sal ek jou van daar af email.
Nellery says
LOVE THIS PATTERN!!!! any word on whether an official PDF is being released? I want to print and bind it!!!!
Dedri Uys says
Hi Nellery. We are working on a Sophie Book.
carol bryson says
Thank you for the lovely pattern – I love it!!! I have just completed Round 7 and hopefully I will be able to finish this project before it is taken off the internet. You are a very talented woman and thanks for the hours of relaxation, creating this pattern with crochet!!!
Dedri Uys says
The pattern will remain on my website, so you dont have to worry about it disappearing. Enjoy!
jennifer Graves says
Thank you so much for this pattern! I have thoroughly enjoying this. I tend to be the type of crocheter that loses interest halfway through projects…I am about to start part 7 and can’t wait to see what is next. I have been crocheting for most of my life – probably about 25 years. I showed this to my mother, who taught me when once I was old enough to do a chain with my fingers, and she is super excited to start too! :)
Jenny says
Sophie’s Universe certainly keeps us interested and ‘hooked’ :)
Dedri Uys says
Jennifer, I’m curious to know if your mother has started yet :)
Sundus says
Hey its the first tym that I’m posting but I’d just like to take the time out and simply appreciate wat you’re doing, I’m a crazy crochet lover and currently I’m working as a crochet teacher. I mostly never use patterns or have ever done a CAL but with your piece I just couldn’t resist myself, making a first baby blanket for my baby that’s due :) I read that you wanted pics at the end of part 6 so I wanted to know how I could show it to u, haven’t been able to do a shoot out but I tries getting the view from the window. Thankyou so much for the amazing work totally appreciated.
Dedri Uys says
Hi, thank you for your lovely comment and congratulations on your expected baby. You can use the contact me tab at the top of this page to send me an email. when I respond you can send me a photo. Yippee!
Sarah Grimes says
First of all, this has been such a joyous experience and I thank you so much for all of your hard work. I seem to be stumped by the directions for round 47. You mention the ch 1 at the start end end of each long side, but I do not see the ch 1 described otherwise. The short side instructions end with “Sc in the next ch-1 space.”, and the instructions for the long side begin with “(Fptr around the picot from Round 41 – see Photos 6 and 7.”. I would like to clarify before moving forward. I look forward to your response and thank you again for such a lovely pattern.
Dedri Uys says
Hi Sarah. The short sides begin and end with a (sc, ch1, sc). If you read the little blurb at the start of the tutorial (Corners and Counting), you will see that one of these single crochets belongs to the short side, and one of them to the long side. The ch-1 space between them is the corner ch-1 space I am referring to.
After a couple of rounds you will understand exactly what I mean. And if you have any issues, have a look at the videos.
I hope that helps.
Sarah Grimes says
Thank you for the response. I think I understand. And again, just thank you.
Dedri Uys says
You are most helpful. If it is still unclear, please let me know.
Lyn says
Hi Dedri, I thought I knew how to crochet. Ha ha ha . I have learned more from this project than I thought possible. I get stumped but forge ahead with help of the videos. Older brains need extra help sometimes. I just wanted say thank you so much for this project. It is rare to find a free project of this caliber. Thanks so much. Lyn
Jenny says
It makes us happy to know you are enjoying your Sophie journey :)
Bozwell Moses says
Personally, I like when you post a picture of the area we are working on…..your big picture of row 47 & 48…..because then I get an idea of what color to change to or keep the color I am already using. Otherwise, I have to dig around for a picture and then try to enlarge it. Thank you for doing this, it really helped me out!!
Maddy says
Hi Dedri! This is my first time posting I thought I was doing well till now!
I am loving Sophie and cant put “her” down! Only started last week…
BUt now on Round 47 I am running into a bit of trouble: all my posts have a slant, skew as you said. To the left. I have frogged several times and believe my counts are OK. Maybe it is because I am left handed and trying to “wing” it, as I also crochet with the rear side facing me (what happens when one us self-taught and the self doesnt know much!)
My questions: is this slant in the posts something that will fix itself, or can be straightened when blocking?
Many thanks!
Dedri Uys says
Maddy, if you are working left-handed with the back of the work facing you, I am at a bit of a loss, I’m afraid. I can flick my mind between left and right hand instructions (which are basically the same but from a different direction), but if you throw working with the back facing you into the mix my brain might leak out of my ears. Nevertheless, I am happy to try and help you. You can use the “Contact Me” tab at the top of this site to email me. When I respond, you can send me a photo and we will take it from there.
Have you tried having a look at the video for this part?
Maddy says
Thanks so much for your reply. I have persevered for a while. Tomorrow I am going away for a couple of days (camping, so I dont want to take Sophie…. sorry!) so I will take this opportunity to block . Fingers crossed!
Lee Ann says
I am so loving your Sophie’s Universe CAL! This is a wonderful project and challenging in its own right. Thank you very much for sharing your amazing pattern and talent with us! :). :). A lot of us are making this CAL over at the facebook group, Official CCC Social Group.
Also, I snapped a photo of my Sophie along with a painting my mother painted which is “region-specific” and based on where I live. You had requested photos at the beginning on Part 6. Where do I send the photo? :)
Barbara says
I have just finished part 6 and laid it out to check. I cant believe that on round 4 I made a mistake and never noticed it till now. It hasn’t had any detrimental effect on the whole project thank goodness!
I thought I was being ever so careful. I have checked every round from part 3 onwards. I am leaving it as is but I think I might add some flowers to cover up this small error.
Jenny says
I can’t see any harm in that as longt as your stitch count is spot on :)
Shelley says
I was a bit caught off guard here in row 53.
The line states fpdtr …
Not a stitch I do every day so I went to the top of the pattern for review…
It’s not listed as a stitch or a special stitch.
Did I miss it?
Was it an error?
Or am I seeing fpdtr… And it should be fptr?
Shelley says
I found it back several parts ago.. After I looked at pictures to see how stitches came together, I re breed doing them in the mandala part!
Dedri Uys says
Thank you for highlighting that. I have now added it to the abbreviations.
Katrina Seavers says
Hi Dedri
I’m on row 50 but I’m worried that I’ve mad a mistake as my tulips and the ATMs seem very slanted but I can’t see where I’ve gone wrong.
Dedri Uys says
Hi Katrina. You can send me a photo using the “contact me” tab at the top of the page and then I can have a look for you.
Leen says
You are the most sharing crochet blogger in the universe! These photo tutorials must take up oodles of time and effort and you do it all for free and out of a genuine joy in sharing the crochety goodness. Thank you!
I started late with this CAL but I am all caught up now and awaiting today’s installment with eager anticipation.
Small question: what size is the large version of your blankie at the end of Part 6? Mine is turning out ginormous at almost 95 cm. I am using a yarn similar to Scheepjeswol Stonewashed XL and a 5 mm hook.
Dedri Uys says
Hi Leen,
Thank you for your lovely comment.
Mine is 96 cm at the end of Part 7, so you are pretty close.
Lydia says
Finally caught up and completed Part 6 today! Rainbow colour scheme, it looks amazing. Really enjoying this pattern! :3 <3
Dedri Uys says
I am so glad that you are enjoying it ;)
Carol D says
Can’t wait til tomorrow and Part 7 magically appears…
I can’t imagine how much work this is for you, Dedri. Not only to design and write the pattern, but to do your awesome photo tutorials! Absolutely amazing to me how you do this – especially since we know you work, have a beautiful family to take care of – you are an amazing woman and I hope you know how much your work – and your selfless sharing means to so many of us!
My original Sophie’s Garden is ‘growing up’ – I’m about to start Round 6! (Obviously all caught up with the original Sophie’s Universe….so when I’m done bringing ‘little sister’ up to speed, I will have TWO! I feel so proud of myself for having accomplished this! But never could have done anything like this without your tutelage!
I’ve placed both on our Cal-King bed and am amazed how much is already covered. Don’t know if I’m going to go ‘all the way’ with this CAL, since my plan was to use Sophie’s as the center of my afghan – and utilize the many smaller squares joined around to complete. It appears – so far – that this will work out well. Because the smaller squares will form the ‘drop’ on the afghan – and I’ll need plenty of those. Have already found the pattern for joining – that will take care of the octagonal shape of Sophie’s – so it will all work out so nicely.
Thank you again, Dedri. I so wish I could meet you in person to thank you…you are awesome!
Carol D says
Actually not about to start Round 6 – about to start PART 6 so am nearly finished with that one! SO EXCITING!
Dedri Uys says
Thank you so much, Carol. I will admit that I am tearing my hair out most nights because I just want to sit down and relax, but every week when the pattern goes up, and when I get comments like yours, it makes every hour worth while. I am looking forward to seeing your blanket!
Shami Immanuel says
Thanks for such a wonderful pattern. Each and every round is interesting. Finished all the rounds and you can see it here.
http://www.shamiatcraft.blogspot.in/2015/02/zentngle-pattern-4-cal-progress.html
louise wagner says
oh, im sorry, thats with sophies universal CAL