Good morning!
This week we are going to do 8 relatively simple rounds, so don’t gulp when you see all the words and photos. Explaining 2 different kinds of sides for each round takes a lot of photos and words, but the rounds are fairly straightforward and should go quickly.
I keep being amazed at all the stunning colour combinations you guys are coming up with, and I have a little favour to ask. Before you get to the end of Part 6, could you take your Sophie on a little photo shoot outing? I love seeing pictures of Sophie draped over landmarks or in pretty landscapes. There is something extra special about seeing the habitat/loves/interests/landmarks that reveal a little bit about the hooker behind the project.
I know I loved seeing Sophie in different South-African settings: draped over a stack of tyres, with Table Mountain in the background; being held by 2 boys at a Sports day; in front of the Union Building in Pretoria.
I got to thinking. If these photos make me feel nostalgic and less homesick (at the same time), wouldn’t they do the same for other ex-pats doing the CAL, wherever they are from or wherever they find themselves now?
Share your Scenic Sophies using #scenicsophie.
And now you may continue…
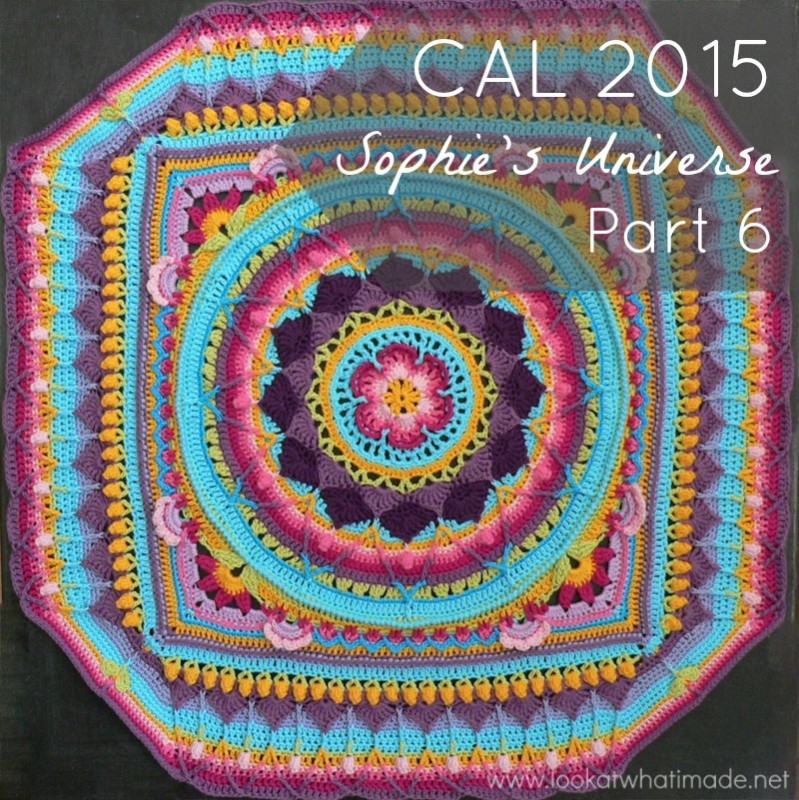
Sophie’s Universe Part 6
©Dedri Uys 2014. All Rights Reserved.
Resources
- Add this CAL to your Ravelry Queue
- Sophie’s Universe CAL 2015 Information
- Use the Print-friendly button at the bottom (right) of this post to print/save this tutorial. Don’t know how? Find out HERE.
- **Part 6 VIDEO TUTORIAL** by Esther Dijkstra from It’s All in a Nutshell
Translations
- Dutch Photo Tutorial by Dianne Baan
- German Translation by Maja Heidingsfelder
- Spanish Translation by Lynda Hernandez
- Finnish Translation by Sari Åström
- French Translation by Sandra Larvin
- Danish Translation by Tina Poulsen
- Russian Translation (with Video) by Natalie V. Alimpieva
- Swedish CAL Information by Emma Vingqvist, Agnetha Magnusson, Åza Karlsson, and Ulrika Larsson
- Arabic Video Tutorial by Banan Felimban
Materials
See the Information Post.
In some of the photos, I have used a different colour than the specified colour to make it easier for you to see where the stitches go.
Abbreviations
US Terminology Used (Basic US/UK comparison chart here)
- BLO – Back loop only
- Ch – Chain
- Dc – Double crochet
- Fpdc – Front post double crochet
- FLO – Front loop only
- Fpdtr – Front post double treble
- Fptr – Front post treble crochet
- Hdc – Half-double crochet
- Sc – Single crochet
- Sl st – Slip Stitch
- St/st’s – Stitch/stitches
- * – Repeat instructions between asterisks the number of times specified. This is a hardcore repeat and will consist of multiple instructions.
- () – Repeat instructions between parentheses the number of times specified. This is a lower level repeat.
Special Stitches
- Popcorn stitch: Make 5 dc’s in the same stitch. Remove your hook from the last stitch. Insert your hook into the first dc of the 5 dc’s. Grab the last stitch with your hook and pull it through the first stitch. Ch 1. See this tutorial.
- Standing Stitches: Standing sc’s, hdc’s, and dc’s are stitches used to start the round without the need for the traditional beginning chain. Links to tutorials are supplied in each relevant round.
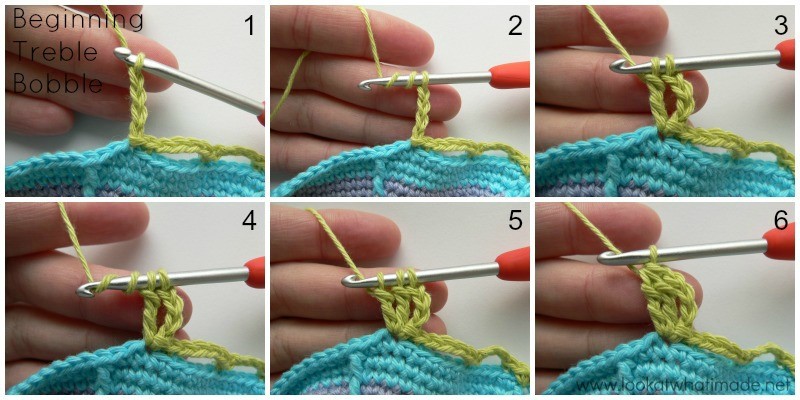
- Beginning Tr Bobble: Ch 4 (Photo 1). Yarn over twice (Photo 2) and insert your hook into the stitch at the base of the ch-4. Yarn over and pull up a loop. (Yarn over and pull through 2 loops) twice – 2 loops on your hook (Photo 3). Yarn over twice (Photo 4) and insert your hook into the same stitch. Yarn over and pull up a loop – 5 loops on your hook. (Yarn over and pull through 2 loops) twice – 3 loops on your hook (Photo 5). Yarn over and pull through all 3 loops (Photo 6).
Instructions
Rounds 1 – 45
You can find the links for Rounds 1 – 45 HERE.
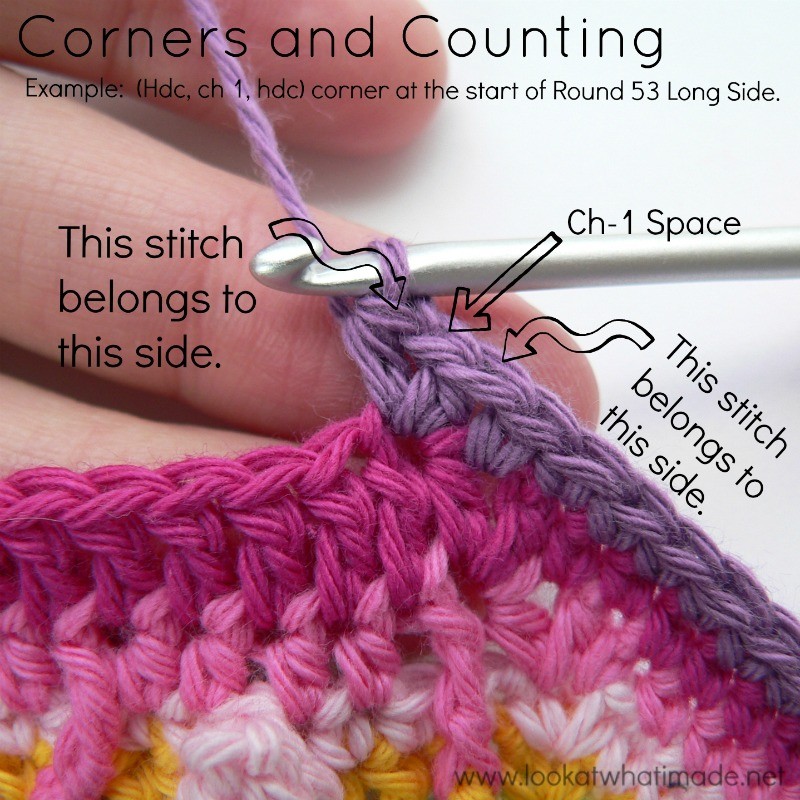
Corners and Counting
When counting the stitches for each side, you will be counting from ch-1 corner space to ch-1 corner space. In other words, wherever the corners are formed by making a stitch on either side of a ch-1 space, the stitch on one side of the ch-1 space will belong to one side and the stitch on the other side of the ch-1 space will belong to the other side. Just like when you are making squares. Any exceptions will be highlighted.
Mark the corner spaces with stitch markers if you think you might have trouble identifying them.
Round 46
- If you are using the same colour, (ch 1, sc, ch 1, sc) in the same stitch. This is your first corner made.
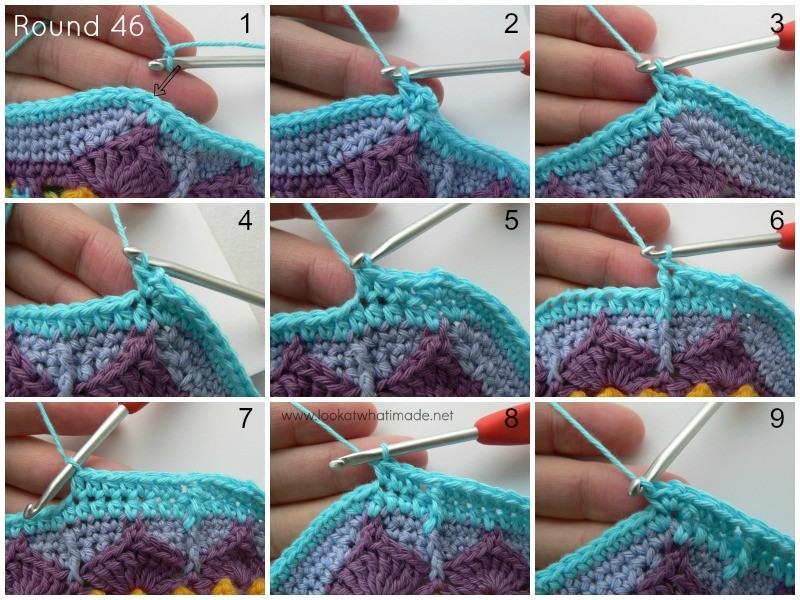
- If you are using a new colour, join your yarn by making a standing single crochet in the same stitch as the sl st join, which should be the first sc of the 2-sc corner at the start of any short side. (Ch 1, sc) in the same stitch. This is your first corner made (Photos 1 and 2).
Sc in the next 26 st’s. The last sc should fall in the second sc of the 2-sc corner – see Photo 3. (Sc, ch 1, sc) in the next stitch (Photo 4).
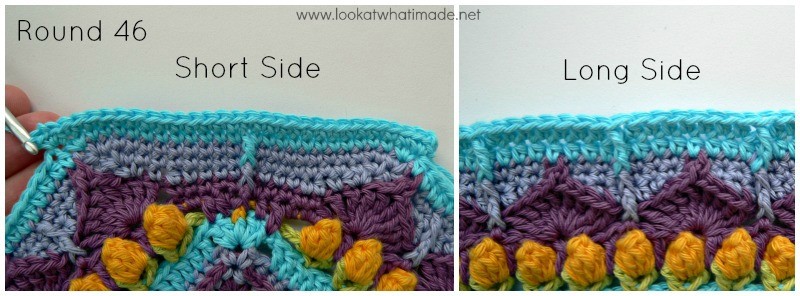
*Long Side: Skip the next hdc. Hdc in the next 3 st’s. The last hdc should fall in the hdc made into the fpdc from Round 44 – see Photo 5. (Fptr around the fpdc from Round 44 – see Photo 6, skip the next st of Round 45 and hdc in the next 7 st’s. The last hdc should fall in the hdc you made into the fpdc from Round 44- see Photo 7) 8 times. Fptr around the fpdc from Round 44. Skip the next st of Round 45 and hdc in the next 3 st’s. The last hdc should fall in the hdc you made into the picot (Photo 8).
Short Side: (Sc, ch 1, sc) in the next stitch (Photo 9). Sc in the next 26 st’s. The last sc should fall in the second sc of the 2-sc corner. (Sc, ch 1, sc) in the next stitch.*
Repeat from * to * 3 more times, omitting the last short side on the last repeat. Join to the first sc with a sl st.
Stitch Counts:
- Total: 404 st’s and 8 ch-1 corner spaces {120 sc’s, 248 hdc’s, and 36 fptr’s}
- Per Short Side: 28 sc’s
- Per Long Side: 73 st’s {2 sc’s, 62 hdc’s, and 9 fptr’s}
Round 47
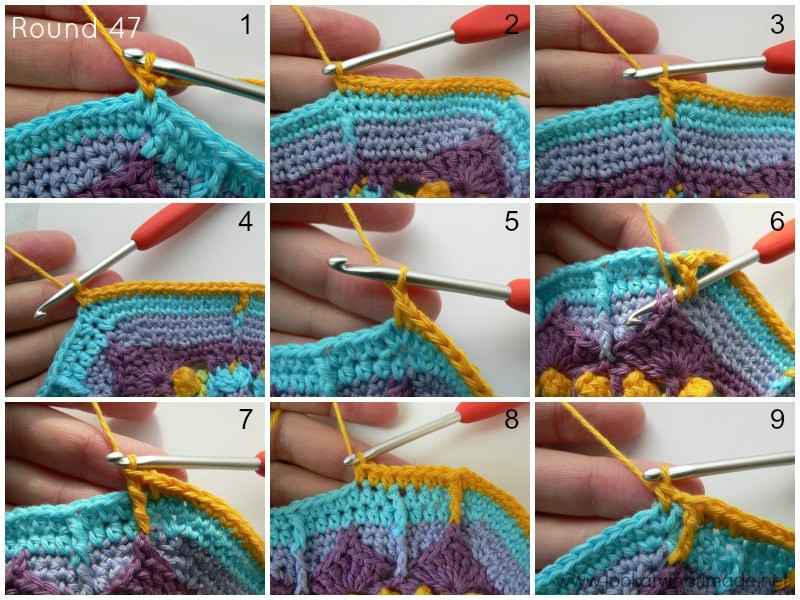
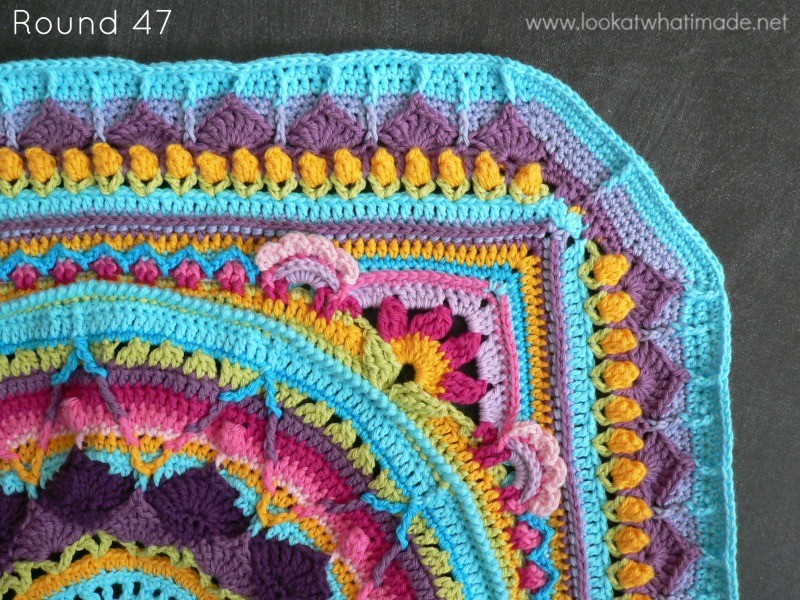
The front-post trebles will be slightly skew in this round – see the photo of Round 47 completed below. This will correct itself in the next couple of rounds. Do not forget to make the ch-1 spaces at the start and end of each long side, which will count as your ch-1 corner spaces. Mark these ch-1 spaces if you are going to have trouble identifying them later.
- If you are using the same colour, sl st into the ch-1 space. (Ch 1, sc) in the same ch-1 space.
- If you are using a new colour, join your yarn by making a standing single crochet in the ch-1 space at the start of any short side (Photo 1).
Sc in the next 14 st’s. Don’t accidentally skip the first (hidden) stitch. The last sc should fall in the sc made into the fpdc from Round 45 (Photo 2). Fpdc around the fpdc from Round 45 (Photo 3). Sc in the next 14 st’s (Photo 4). Sc in the next ch-1 space.
*Long Side: Ch 1 (Photo 5). (Fptr around the picot from Round 41 – see Photos 6 and 7. Skip the next st of Round 46 and hdc in the next 7 st’s. The fourth hdc should fall in the fptr from Round 46 – see Photo 8) 9 times. Fptr around the picot from Round 41. Ch 1 and skip the next st of Round 46.
Short Side: Sc in the next ch-1 space (Photo 9). Sc in the next 14 st’s. Don’t accidentally skip the first (hidden) stitch. Fpdc around the fpdc from Round 45. Sc in the next 14 st’s. Sc in the next ch-1 space.*
Repeat from * to * 3 more times, omitting the last short side on the last repeat. Join to the top of the first sc with a sl st. Fasten off and work away your tails of yarn.
Don’t worry if your short sides curl up a bit at the end of this round.
Stitch Counts:
- Total: 416 st’s and 8 ch-1 corner spaces {120 sc’s, 252 hdc’s, 4 fpdc’s, and 40 fptr’s}
- Per Short Side: 31 st’s {30 sc’s and 1 fpdc}
- Per Long Side: 73 st’s {63 hdc’s and 10 fptr’s}
Round 48 {Leaves}
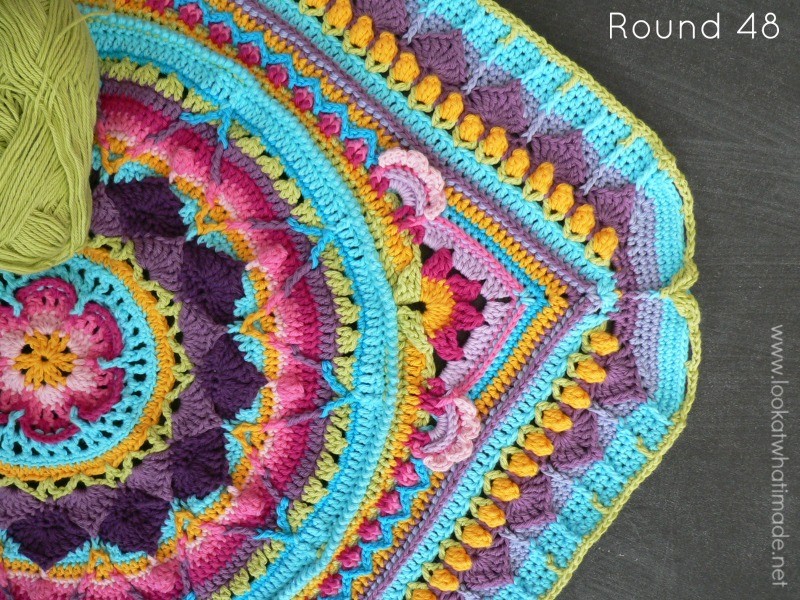
You will be making leaves in this round, but only on the short sides.
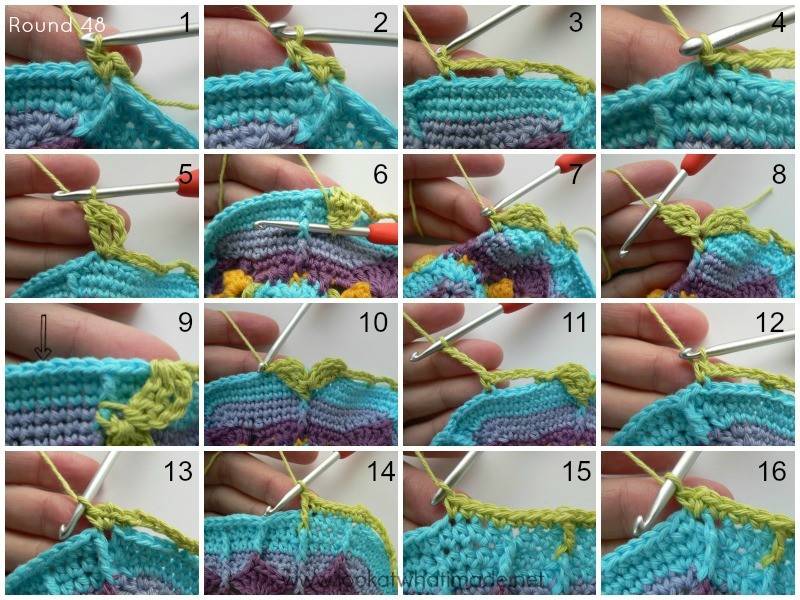
Join your yarn by making a standing single crochet in the ch-1 space at the start of any short side. (Ch 1, sc) in the same ch-1 space. This is your first corner made (Photo 1).
*Short Side: Skip the first (hidden) stitch and sc in the blo of the next st (Photo 2). (Ch 4, skip the next 4 st’s and sc in the blo of the next st) twice (Photo 3). Sl st in the next st (Photo 4). There should now be 2 sc’s left unworked before the fpdc.
Now you are going to make your first leaf by making a Beginning Tr Bobble in the same st as the sl st (Photo 5). See Special Stitches above if you need some help. Anchor the leaf to the “stem” in the middle of the short side by making a sc around the fpdc from Round 45 (in other words, the second fpdc down) – see Photos 6 and 7.
To make the second leaf, make a Beginning Tr Bobble in the sc that you made around the base of the “stem” (Photo 8). Skip the next 6 st’s of Round 47 (in other words, the 2 sc’s before the fpdc, the fpdc, and the 3 sc’s after the fpdc). Sl st in the next st (indicated with an arrow in Photo 9 and illustrated in Photo 10).
(Sc in the blo of the next st. Ch 4 and skip the next 4 st’s) twice (Photo 11). Sc in the blo of the next st (Photo 12).
Long Side: (Sc, ch 1, sc) in the next ch-1 space (Photo 13). Skip the fptr. Sc in the next 4 st’s. (Fptr around the fptr from Round 46 – see Photo 14. Skip the next st of Round 47 and sc in the next 7 st’s. The third sc should fall in the fptr from Round 47 – see Photo 15) 8 times. Fptr around the fptr from Round 46. Skip the next st of Round 47 and sc in the last 3 st’s. (Sc, ch 1, sc) in the next ch-1 space (Photo 16).*
Repeat from * to * 3 more times, omitting the last (sc, ch 1, sc) corner on the last repeat. Join to the top of the first sc with a sl st.
Stitch Counts:
- Total: 360 st’s, 8 leaves, 16 ch-4 spaces, and 8 ch-1 corner spaces {296 sc’s, 8 sl st’s, and 36 fptr’s}
- Per Short Side: 9 sc’s (including the sc that anchors the first leaf), 2 sl st’s, 4 ch-4 spaces, and 2 leaves
- Per Long Side: 74 st’s {65 sc’s and 9 fptr’s}
Round 49
- If you are using the same colour, sl st into the ch-1 space. (Ch 1, sc, ch 1, sc) into the same ch-1 space. This is your first corner made.
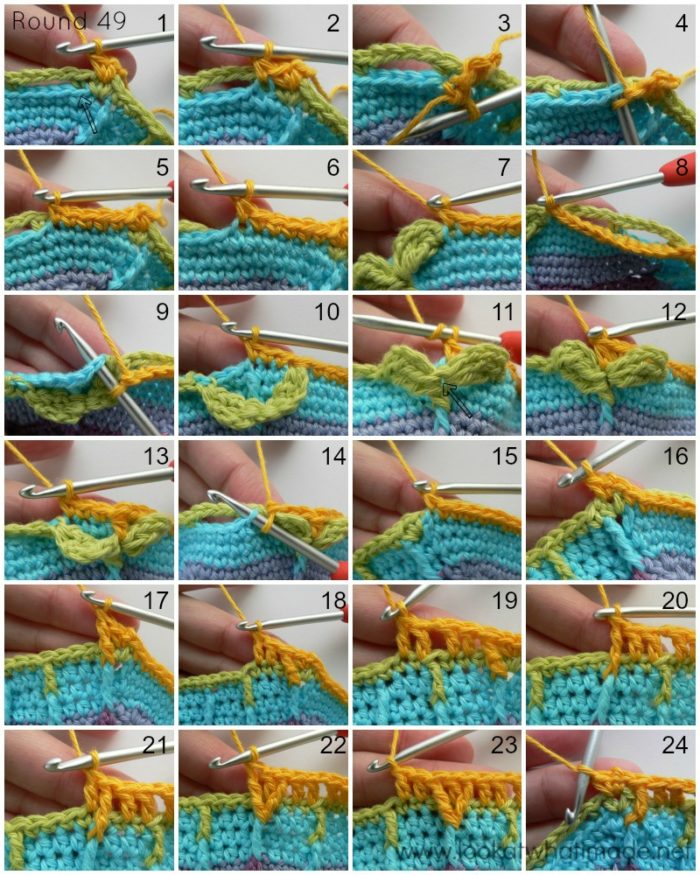
- If you are using a new colour, join your yarn by making a standing single crochet in the ch-1 space at the start of any short side. (Ch 1, sc) in the same ch-1 space. This is your first corner made (Photo 1).
*Short Side: Skip the first (hidden) stitch. Sc in the flo of the next st from Round 47 (that already contains a sc in the blo) – indicated with an arrow in Photo 1 and illustrated in Photos 2 and 3.
(Working in front of the ch-4 space from Round 48, sc in the 4 skipped st’s from Round 47 –Photos 4 and 5. Sc in the flo of the next st of Round 47 – see Photo 6) twice (Photos 7 and 8). Skip the sl st from Round 48.
Working behind the first leaf, sc in the first 3 skipped stitches from Round 47 (Photo 9). The last sc should fall in the top of the fpdc from Round 47 (Photo 10). Make an hdc into the sc between the two leaves. This is the sc that contains the Beginning Tr Bobble of the second leaf (indicated with an arrow in Photo 11 and illustrated in Photo 12). Sc in the next 3 st’s from Round 47, behind the second leaf (Photo 13).
Skip the next sl st. (Sc in the flo of the next st from Round 47 – see Photo 14. Working in front of the ch-4 space, sc in the 4 skipped st’s from Round 47) twice. Sc in the flo of the next st from Round 47 (Photo 15). Skip the next st of Round 48.
Long Side: (Sc, ch 1, sc) in the next ch-1 space (Photo 16). Make a fptr around the fptr from Round 47 (Photo 17). Skip the first (hidden) stitch AND the next 2 st’s from Round 48. Dc in the next 2 st’s. The last dc should fall in the sc before the fptr (Photo 18).
(Ch 1 and skip the next st, which will be the fptr from Round 48. Dc in the next 2 st’s – see Photo 19. Fptr around the next fptr from Round 47 – see Photo 20. Skip the next st of Round 48 and dc in the next st – see Photo 21. Fptr around the same fptr from Round 47- see Photo 22. Skip the next st from Round 48. Dc in the next 2 st’s – see Photo 23) 8 times.
Ch 1 and skip the next st, which will be the fptr from Round 48. Dc in the next 2 st’s. Fptr around the next fptr from Round 47. Skip the last 2 st’s of Round 48. (Sc, ch 1, sc) in the next ch-1 space- (Photo 24).*
Repeat from * to * 3 more times, omitting the last (sc, ch 1, sc) corner on the last repeat. Join to the top of the first sc with a sl st.
Stitch Counts:
- Total: 380 st’s and 44 ch 1 spaces – including the 8 corner ch-1 spaces (128 sc’s, 4 hdc’s, 176 dc’s, and 72 fptr’s)
- Per Short Side: 31 st’s {30 sc’s and 1 hdc’s}
- Per Long Side: 64 st’s and 9 ch-1 spaces {2 sc’s, 44 dc’s and 18 fptr’s}
Round 50 {Tulips}
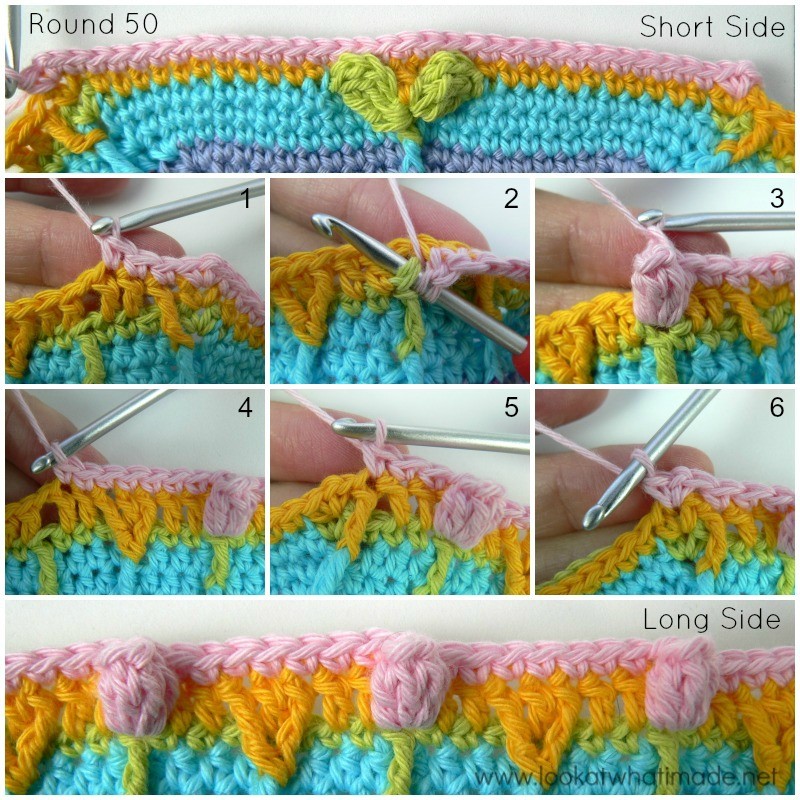
- If you are using the same colour, sl st into the next ch-1 space. (Ch 1, sc, ch 1, sc) in the same ch-1 space. This is your first corner made.
- If you are using a new colour, join your yarn by making a standing single crochet in the ch-1 space at the beginning of any short side. (Ch 1, sc) in the same ch-1 space. This is your first corner made.
Skip the first (hidden) stitch and sc in the next 30 st’s. The 15th sc should fall in the hdc between the leaves. (Sc, ch 1, sc) in the next ch-1 space. This is your first short side made – see the “Short Side” photo below.
*Long Side: Skip the first (hidden) st. Sc in the next 3 st’s (Photo 1). (Working in front of the next ch-1 space, make a popcorn stitch in the skipped fptr from Round 48 – see Photos 2 and 3. Sc in the next 7 st’s of Round 49 – see Photo 4) 8 times. Working in front of the next ch-1 space, make a popcorn stitch in the skipped fptr from Round 48. Sc in the next 3 st’s. The last sc should fall in the top of the fptr from Round 49 (Photo 5). Skip the next st.
Short Side: (Sc, ch 1, sc) in the next ch-1 space. Skip the first (hidden) stitch and sc in the next 30 st’s. The 15th sc should fall in the hdc between the leaves. (Sc, ch 1, sc) in the next ch-1 space (Photo 6). *
Repeat from * to * 3 more times, omitting the last short side on the last repeat. Join to the top of the first sc with a sl st.
Stitch Counts:
- Total: 420 st’s and 8 ch-1 corner spaces {384 sc’s and 36 popcorns}
- Per Short Side: 32 sc’s
- Per Long Side: 73 st’s {64 sc’s and 9 popcorns}
Round 51
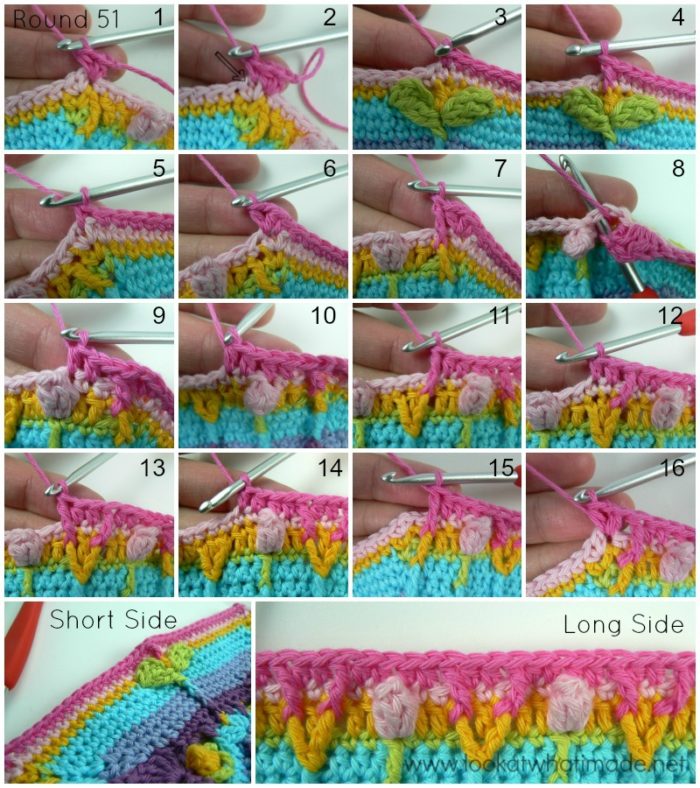
When working into the top of the popcorn stitches you will be working into the first dc of the popcorn, through which you pulled the last dc of the popcorn. You will find this stitch immediately to the right of the popcorn (left if you are left-handed).
- If you are using the same colour, ch 3 (counts as hdc + ch-1). Hdc in the same stitch. This is your first corner made.
- If you are using a new colour, join your yarn by making a standing half-double crochet in the same st as the sl st join. (Ch 1, hdc) in the same stitch. This is your first corner made (Photo 1).
*Short Side: Sc in the next ch-1 space (Photo 2). Skip the first (hidden) stitch – indicated with an arrow in Photo 2. Sc in the next 15 st’s. The last sc should fall in the sc made into the hdc from Round 49 (Photo 3). Fpdc around the hdc between the leaves from Round 49 (Photo 4). Sc in the next 15 st’s. Skip the last st and sc in the next ch-1 space (Photo 5).
Long Side: (Hdc, ch 1, hdc) in the next (hidden) stitch (Photo 6). Make a fptr around the fptr from Round 49 (Photo 7). Skip the next 2 st’s (Photo 8). Hdc in the next 4 st’s (Photos 9 and 10). The second hdc should fall in the top of the popcorn stitch – see the note at the start of the round and Photo 9 below.
(Fptr around the next fptr from Round 49 – see Photo 11. Skip the next st of Round 50 and hdc in the next 2 st’s – see Photo 12. Fptr around the next fptr from Round 49 and skip the next st of Round 50 – see Phto 13. Hdc in the next 4 st’s. The second hdc should fall in the top of the popcorn stitch – see Photo 14) 8 times.
Fptr around the next fptr from Round 49 and skip the next st of Round 50 (Photo 15). (Hdc, ch 1, hdc) in the next st, which will be the first sc of the previous (sc, ch-1, sc) corner (Photo 16).*
Repeat from * to * 3 more times, omitting the last (hdc, ch 1, hdc) corner on the last repeat. Join to the second ch of the beginning ch-3 (or the top of the standing hdc) with a sl st.
Stitch Counts:
- Total: 428 st’s and 8 ch-1 corner spaces {128 sc’s, 224 hdc’s, 4 fpdc’s, and 72 fptr’s}
- Per Short Side: 35 st’s {32 sc’s, 2 hdc’s, and 1 fpdc}
- Per Long Side: 72 st’s {54 hdc’s and 18 fptr’s}
Round 52
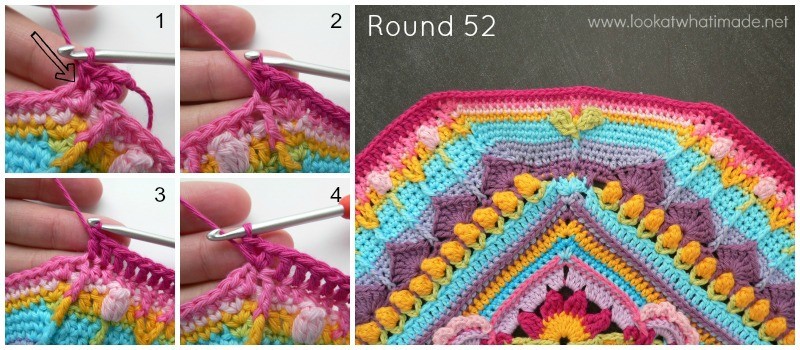
- If you are using the same yarn, ch 3 (counts as your first hdc + ch-1). Hdc in the same st. This is your first corner made.
- If you are using a new colour, join your yarn by making a standing half-double crochet in the same st as the sl st join. (Ch 1, hdc) in the same st. This is your first corner made.
*Short Side: Sc in the next ch-1 space (Photo 1). Skip the first (hidden) st and sc in the next 34 st’s. The 17th sc should fall in the top of the fpdc from the previous round. Sc in the next ch-1 space.
Long Side: Skip the first (hidden) stitch and (hdc, ch 1, hdc) in the next stitch, which will be the fptr from the previous round (Photo 2). Dc in the next 69 st’s (Photo 3). (Hdc, ch 1, hdc) in the next st, which should be the first hdc of the (hdc, ch 1, hdc) corner from the previous round (Photo 4).*
Repeat from * to * 3 more times, omitting the last (hdc, ch 1, hdc) corner on the last repeat. Join to the second ch of the beginning ch-3 (or the top of the standing half-double crochet) with a sl st.
Stitch Counts:
- Total: 436 st’s and 8 ch-1 corner spaces {144 sc’s, 16 hdc’s, and 276 dc’s}
- Per Short Side: 38 st’s {36 sc’s and 2 hdc’s}
- Per Long Side: 71 st’s {2 hdc’s and 69 dc’s}
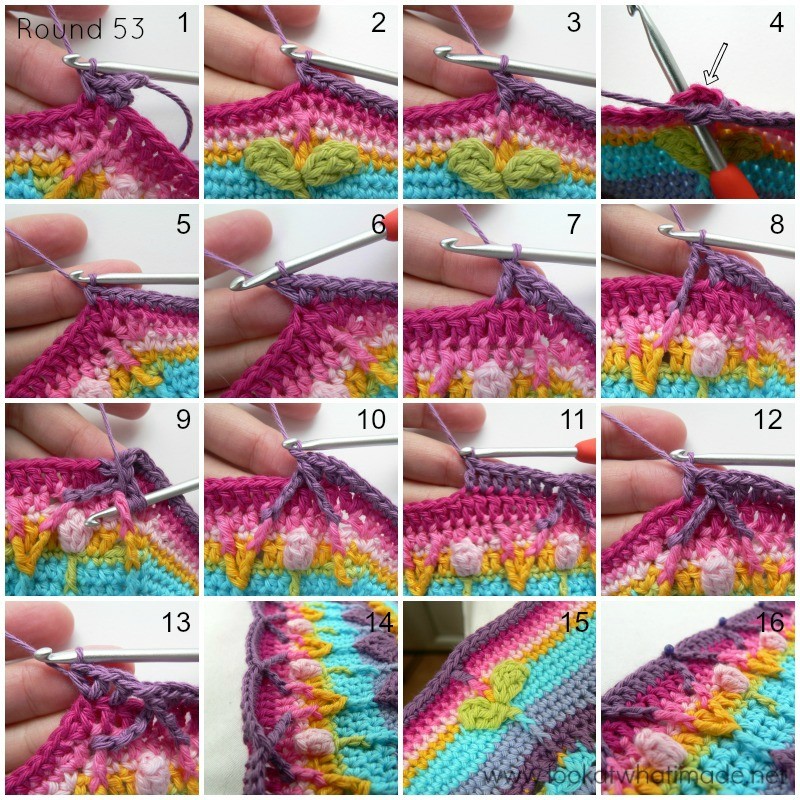
Round 53
When you make the fpdtr’s you will be adding a stitch to each repeat by making 2 and only skipping 1. Do not worry about this. We will decrease again in the next round. You will notice that this round has a tendency to curl right over. Do not worry about this (Photo 14 below)!
- If you are going to use the same colour, ch 3 (counts as hdc + ch-1). Hdc in the same stitch. This is your first corner made.
- If you are using a new colour, join your yarn by making a standing half-double crochet in the same st as the sl st join. (Ch 1, hdc) in the same stitch. This is your first corner made.
*Short Side: Sc in the next ch-1 space (Photo 1). Skip the first (hidden) st. Sc in the next 18 st’s. The last sc should fall in the sc made into the fpdc from Round 51 (Photo 2). Make a fpdc around the fpdc from Round 51 (Photo 3) and skip the next st of Round 52 (Photo 4). Sc in the next 18 st’s. Sc in the next ch-1 space (Photo 5).
Long Side: Skip the first (hidden) stitch and (hdc, ch 1, hdc) in the next stitch (Photo 6). Skip the next st. Dc in the next st, which should be the dc right above the popcorn stitch from Round 49 (Photo 7).
(Make a fpdtr around the fptr from Round 51 to the left of the popcorn stitch (right if you are left-handed) – see Photo 8. Make a fpdtr around the fptr from Round 51 to the right of the same popcorn stitch (left if you are left-handed) – see Photos 9 and 10. Skip the next st of Round 52 and dc in the next 7 st’s. The last dc should fall in the dc right above the next popcorn stitch from Round 49 – see Photo 11) 8 times.
Make a fpdtr around the fptr from Round 51 to the left of the last popcorn stitch (right if you are left-handed). Make a fpdtr around the fptr from Round 51 to the right of the same popcorn stitch (left if you are left-handed). Skip the next st of Round 52 and dc in the next st (Photo 12). (Hdc, ch 1, hdc) in the next st, which will be the first hdc of the (hdc, ch 1, hdc) corner from the previous round (Photo 13).*
Repeat from * to * 3 more times, omitting the last (hdc, ch 1, hdc) corner on the last repeat. Join to the second ch of the beginning ch-3 (or the top of the standing hdc) with a sl st.
Stitch Counts:
- Total: 476 st’s and 8 ch-1 corner spaces {152 sc’s, 16 hdc’s, 232 dc’s, 4 fpdc’s, and 72 fpdtr’s}
- Per Short Side: 41 st’s {38 sc’s, 2 hdc’s, and 1 fpdc}
- Per Long Side: 78 st’s {2 hdc’s, 58 dc’s, and 18 fpdtr’s}
This part of the pattern was tested by Kimberly Slifer and Claire Martin, and proofread by Claire Martin and Venetia Smith.

This blog post contains affiliate links. I only link to products I personally use or would use. All opinions are my own.


louise wagner says
i found you on youtube w/ parts 1-5,,,,,im on part 6 now and have totally lost my way..when will you be putting part 6 in a video and posting it to youtube? im a happy hooker waitting on you ,lol
Dedri Uys says
Hi Louise,
Esther, who is doing the videos, is working as fast as she can. What are you lost with? Maybe I can help you.
Heleen Richards says
Dear Dedri, thank you so much for the inspiring pattern and your instructions are very good. For you girls in South Africa- what kind of wool did you use? I love Elle Pullskein and a nr.3 hook. Do you think it can work?
Thanks.
Heleen.
Dedri Uys says
Heleen, hi.
I don’t know about Elle Pullskein, but Elle Pure Gold is a great choice, and Vinnis Nikim is also great.
Lena says
Just love this! x
Carrie says
BEAUTIFUL work Dedri! You continually amaze me each time I look at your new 2015 CAL posts!! ♡♡♡
Dedri Uys says
Thank you lovely Carrie
Mariana says
Thank you so much for this wonderful project. I have really been enjoying it and the instructions you give are just first class! I am however starting to fall behind a bit and worried if you keep up the tempo then I will have a WIP for the next couple of years! The unfortunate situation of working full time, having a family and only getting to crochet a couple of minutes each day if I am lucky :) Nevertheless, just wanted to say I am looking forward to see what comes next….even if I will only get to crocheting it much further down the line :)
Jenny says
I think we all wish (especially Dedri) that we had more time to crochet every day! :)
Dedri Uys says
Mariana, the rounds will get less as the weeks go by. I appreciate that people only have limited time and this is not a race. The patterns will remain on my website and you can finish at your leisure. I have broken it up into parts that I can photograph, edit, and make (3 of) each week, on top of a full-time job and 3 kids. I cannot imagine how frustrated I would be if I could only crochet for a couple of minutes a day! Good luck and I hope you manage to sneak a bit of extra crochet time in.
Nana Wilson says
VERY minor correction on your “note” about row 47. The use of the word “skew” is incorrect. Either used “askew” or skewed. :)
Dedri Uys says
Hi Nana, thank you for highlighting that. I do believe “skew” is an accepted word in the Oxford Dictionary, but I always welcome grammatical help.
Sylvia Lau-McDonald says
My yarn finally arrived on Friday, and I haven’t been able to put Sophie down since (well, between packing boxes, I’m moving). Now that I’m doing it I have to say that I cannot even imagine the time – and the math! – that had to go into designing this. I am totally amazed. Your instructions are so easy to follow, all I can say is — thank you thank you thank you! :)
Sylvia, starting round 29.
Dedri Uys says
Sylvia, you are most welcome! Lots and lots and lots…and lots of math. My brain hurts. Now go pack a box and then reward yourself with some more rounds :)
Pien says
hello Dedri, i like to do the sophie universe.
i Always use the print friendly version. but this time this one is not working.is there something wrong on youre (or mine)site?
greetings from Pien, the netherlands
Mari says
Hi Dedri, I’m following your Universe with great interest. Started and got up to round 15 doing FOUR blocks! Using double stranded worsted yarn – want to use the end result as a carpet. However, with the financial year-end coming up, I just haven’t got the time to “Sophie”. So for the time being this is a serious WIP (lol).
I must congratulate you on EXCELLENT tutorials! I have been hooking for over 50 years and must have done a zillion patterns, some well written, some not. Your tutorials are the BEST I’ve ever come across! Must be the “Boere-Bloed”! Wel gedaan my meisie!!!!
Groetnis,
Mari
Minette says
Hi Mari
Ek neem aan jy is ook volbloed Suid-Afrikaner? Dankie vir jou kompliment en bemoediging vir Dedri.
Minette
Fiddly Fingers says
I am really enjoying crocheting Sophie’s Universe. I have already made Sophie’s Garden and loved it. Your photos and instructions are so clear, this must have taken ages to put together. I think you deserve a really big ‘thank you’. BUT H..E..L..P! I’m getting left behind. I’m only just starting Part 5!! Can someone find me a few more hours in each day please. Lol :)
Jenny says
I need to grow more arms lol
Ruth says
What a beautiful morning to crochet!!
Dedri Uys says
Indeed! Although I didn’t get much crocheting done. We went to church and then to a kids party. A great day had by all, despite a hideous head cold.
Kris says
Hi Dedri,
sorry, but I have another question about the colour. As I said, I´m using Softfun colours. Maybe it´s my screen or the photo, but it seems to me that round 53 is Heath and not Cyclamen?
Have a nice week.
Dedri Uys says
You are correct! It was a last-minute adjustment and I totally forgot I’d done it. My bad. It’s fixed now, thank you.
Debbie. says
hi I haven’t yet started my kit hasn’t arrived any way I ordered the medium kit will the stich counts be different?
Dedri Uys says
Debbie, all 3 sizes use exactly the same pattern and stitch counts. The only thing that affects size is the thickness of the yarn and the hook size. I hope your yarn arrives soon!
zana says
I started the Cal last week and about to start on week four, I just want to say that your instructions are the best ever that I have ever seen as well as one of the most inspiring designs. I get so impatient on Sunday as our time zone(NZ) is 12 hours ahead of UK, meaning I have to wait till Monday. Also I want to say that for any Kiwis wishing to do the Cal, that I found that Countrywide Windsor have a good colour match up. It matches with the middle size on a 4mm hook.
Dedri Uys says
Thank you, Zana. And thank you for the handy tip about the Countrywide Windsor. Happy hooking over there. Ps. My sis lives in Hamilton.
Ronnie says
Thanks so much for your never ending devotion to Sophie’s Universe and all of us who are following your lead!
Its so exciting to wake up on Sunday and dash to the computer to see your latest creation!! You are both angels!!
Know that you are so appreciated! Off to hooking!
Dedri Uys says
Thank you, Ronnie. It keeps me out of mischief :)
Birgit says
Hi there!
Here is another late-starter. I bought yarn last week and will start in this CAL today.
Thank you for all those tutorials!
BIrgit
Dedri Uys says
Welcome to the CAL Birgit. I hope you enjoy it heaps!
rachel says
LOVE IT!!! for some reason I can’t see all the photos. (this time it’s rnds 46-47 just the first ones) am I the only one to experience this problem? When I download by printfreindly it comes out perfect.
Again, love it!!! thank you!!!
Charlene Boardman says
Thank you, thank you thank you! It’s gorgeous. Of course!!!
Dedri Uys says
Thank you, Charlene :)
Dolores says
Good morning Dedri and Jenny. Hope you gals have a lovely day I am ready to start hooking here. Thanks again x
Dedri Uys says
You are most welcome, Dolores. Have fun!
Georgina Martin says
Is there an album that we can upload our photos to so that they are all in the same place?
Thanks
Georgina
Dedri Uys says
Georgina, we are encouraging people to add their photos to a Ravelry project so that they can be seen by everyone who visits the pattern page on Ravelry.