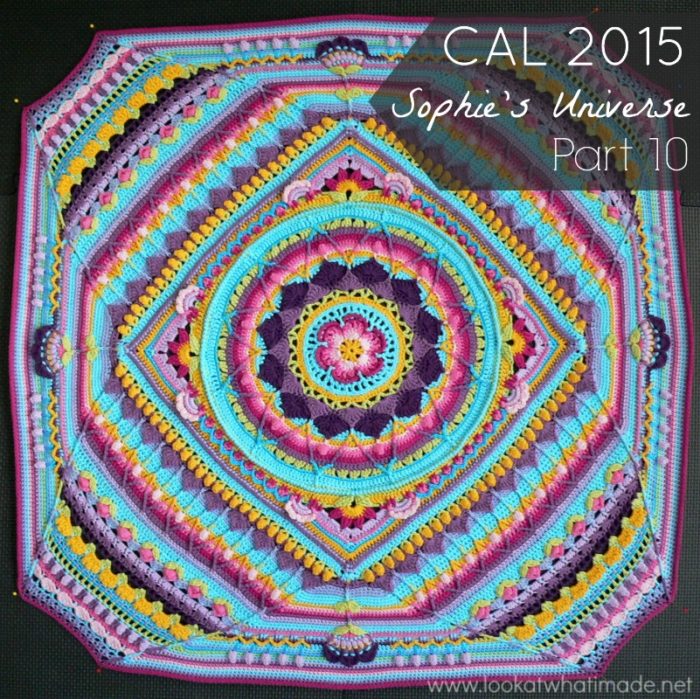
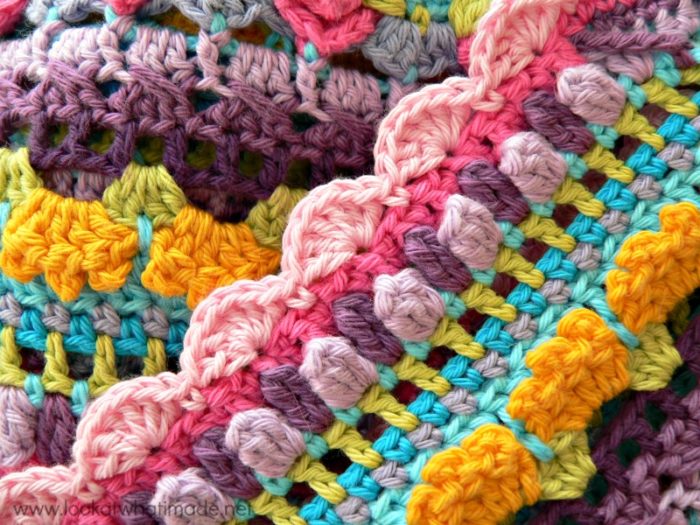
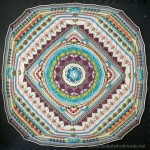
Part 10 of Sophie’s Universe is upon us and this week it is the scallops on the (very short) long sides that had me waxing lyrical. These simple little scallops just made me so happy. I think I took a million photos of them!
To those of you celebrating Mother’s Day today, I would like to say “Happy Mother’s Day!”
To everyone else, I would like to say: “Happy halfway-through-Sophie Day!”
I think this will be a fitting week to take Sophie to have her photo taken with the significant women in our lives (sisters, daughters, friends, nieces, cousins, grannies… you get the picture).
Sophie’s Universe Part 10
©Dedri Uys 2014. All Rights Reserved.
Resources
- Add this CAL to your Ravelry Queue
- Sophie’s Universe CAL 2015 Information
- Use the Print-friendly button at the bottom (right) of this post to print/save this tutorial. Don’t know how? Find out HERE.
- **Part 10 VIDEO TUTORIAL** by Esther Dijkstra from It’s All in a Nutshell
Translations
- Dutch Translation by Dianne Baan
- German Translation by Maja Heidingsfelder
- Spanish Translation by Lynda Hernandez
- French Translation by Sandra Larvin (with Video Tutorials by Géraldine Cymer)
- Danish Translation by Tina Poulsen
- Russian Translation (with Video) by Natalie V. Alimpieva
- Swedish CAL Information by by Emma Vingqvist, Agnetha Magnusson, Åza Karlsson, and Ulrika Larsson
Materials
See the Information Post.
Important Note
If you are following my colourway for the Large version (in Stonewashed XL), you can see a table with all the yardages per round for the first 10 parts HERE. It will give you a good idea of how much yarn I have used up to this point, and whether or not you need to buy more to compensate for differences in personal tension.
This does not apply to the medium and small versions, for which the estimates are well and truly enough.
*If you are following my colour placement, you should have about 23 grams of Amazonite left at the start of Part 10, which will be about 35 meters. You will need 20 g (30 meters) for Round 77. If you have less than this left, use Moonstone instead.
**If you are following my colour placement, you should have 19 g (65 meters) of Light Purple left at the start of this part. You will be using 7g (24 meters) for Round 78. This is the last time that you will be using Light Purple.
Abbreviations
US Terminology Used (Basic US/UK comparison chart HERE)
- Bpdc – Back post double crochet
- Ch – Chain
- Dc – Double crochet
- Fpdc – Front post double crochet
- Fpdtr – Front post double treble crochet (yarn over 3 times)
- Fpsc – Front post single crochet
- Fpttr – Front post triple treble (yarn over 4 times)
- Hdc – Half-double crochet
- Sc – Single crochet
- Sl st – Slip stitch
- St/st’s – Stitch/stitches
- * – Repeat instructions between asterisks the amount of times specified. This is a hardcore repeat and will consist of multiple instructions.
- () – Repeat instructions between parentheses the number of times specified. This is a lower level repeat.
Special Stitches
- Standing Stitches: Standing sc’s, hdc’s, and dc’s are stitches used to start the round without the need for the traditional beginning chain. Links to tutorials are supplied in each relevant round.
- Crossed Double: Skip the next st and make a dc in the next st (Photo 1). Working over the last dc made, make a dc in the skipped stitch (indicated with an arrow in Photo 1 and illustrated in Photo 2). The crossed double is similar to the Cable Stitch (above).
Instructions
Rounds 1 – 74
You can find the links for Rounds 1 – 74 HERE.
Note About Counting and Sides
Remember that you will be counting from ch-1 corner space to ch-1 corner space. Exceptions will be highlighted. If you are going to have trouble identifying the ch-1 spaces, please use stitch markers or scrap yarn to mark them.
Also, remember that your short sides will now be longer than your long sides. It will help to remember that the short sides are the ones with the single central flower.
Hint:
In this part, you are going to be making lots of sc’s. Lots and lots and LOTS of sc’s. I am going to tell you how I keep my count without losing my mind.
I count in sets of 20, in subsets of 4, like a little rhyme: 1 2 3 4…5 6 7 8…9 10 11 12…13 14 15 16…17 18 19 20. And then I start again. If I need to stop, I stop at the end of a 20-stitch repeat so that when I pick my work up again, I can just continue counting my sets of 20.
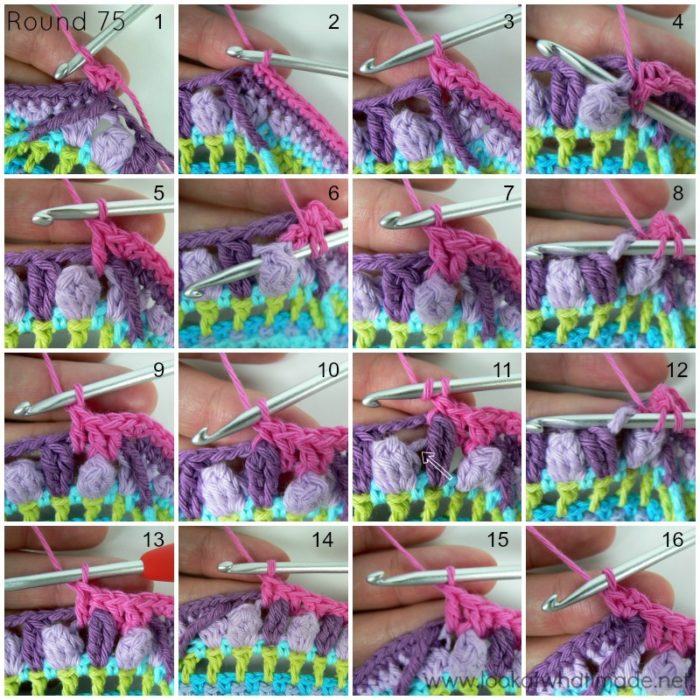
Round 75
- If you are using the same colour, (ch 1, sc, ch 1, sc) in the same stitch. This is your first corner made.
- If you are using a new colour, join your yarn by making a standing single crochet in the first sc of any short (Ch 1, sc) in the same stitch. This is your first corner made (Photo 1).
Sc in the next 99 st’s. The last sc should fall in the last sc of the short side (Photo 2). (Sc, ch 1, sc) between the same sc and the next fpttr. To do this, insert your hook between the posts of the two stitches, instead of into the top 2 loops of the fpttr (Photo 3). Skip the fpttr, which will now be hidden anyway.
*Long Side: Please note that you will be working in front of the ch-3 spaces from Round 74 for the whole long side. Dc in the ch-1 space from Round 73 before the first popcorn (Photos 4 and 5).
(Make a fpdc around the next Popcorn Stitch – see Photos 6 and 7. Working into the ch-3 space from Round 73, make a dc between the Popcorn Stitch and the next Tr2tog Bobble – see Photos 8 and 9. Make a fpsc around the Tr2tog Bobble – see Photo 10. Working into the ch-3 space from Round 73, make a dc between the Tr2tog Bobble and the next Popcorn Stitch – indicated with an arrow in Photo 11 and illustrated in Photos 12 and 13) 9 times (Photo 14).
Make a fpdc around the last Popcorn Stitch. Make a dc into the next ch-1 space from Round 73 (Photo 15).
Short Side: Skip the fpttr. (Sc, ch 1, sc) in the next st, which might be slightly hidden by the fpttr (Photo 16). Sc in the next 99 st’s. The last sc should fall in the last sc of the short side. (Sc, ch 1, sc) between the same sc and the next fpttr.*
Repeat from * to * 3 more times, omitting the last short side on the last repeat. Join to the top of the first sc with a sl st.
Stitch Counts:
- Total: 568 st’s and 8 ch-1 corner spaces {412 sc’s, 36 fpsc’s, 80 dc’s, and 40 fpdc’s}
- Per Short Side: 101 sc’s
- Per Long Side: 41 st’s {2 sc’s, 9 fpsc’s, 20 dc’s, and 10 fpdc’s}
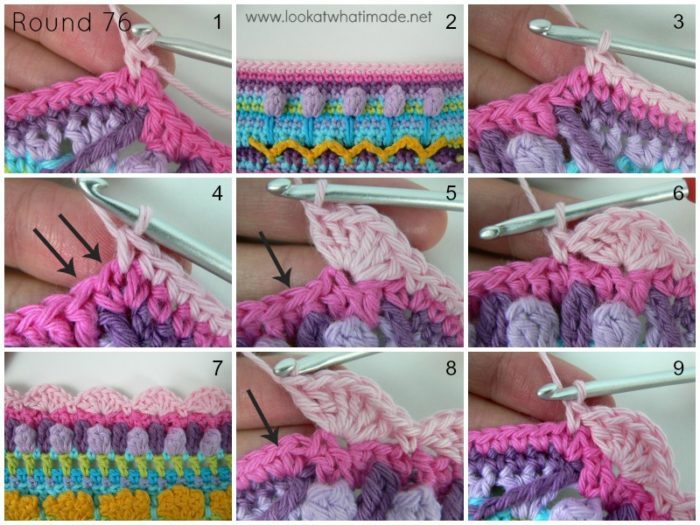
Round 76 {Scallops}
The 7 scallops on the long side will each fall in a front post stitch. The sc’s between scallops will each fall in a dc after a front post stitch. The suggested marked stitches below are only to help you count. If you feel that you can identify your stitches, feel free to disregard the suggestion.
- If you are using the same colour, sl st into the next ch-1 space. (Ch 1, sc) in the same ch-1 space. Mark this sc to help you count later on.
- If you are using a new colour, join your yarn by making a standing single crochet in the ch-1 space at the start of any short side (Photo 1). Mark this sc to help you count later on.
Skip the first (hidden) stitch. Sc in the next 100 st’s (Photos 2 and 3). Sc in the next ch-1 space (Photo 4). Mark this sc to help you count later on.
*Long Side: Skip the next 2 st’s, the first of which will be hidden (indicated with arrows in Photo 4). Make 6 dc’s in the next st, which will be the fpdc made into the Popcorn Stitch (Photo 5). (Skip the next 2 st’s. Make a sc in the next st – indicated with an arrow in Photo 5 and illustrated in Photo 6. Skip the next 2 st’s. Make 6 dc’s in the next st) 6 times (Photos 7 and 8). Skip the last 2 st’s before the ch-1 space.
Short Side: Sc in the next ch-1 space (Photos 8 and 9). Mark this sc to help you count later on. Skip the first (hidden) stitch. Sc in the next 100 st’s. Sc in the next ch-1 space. Mark this sc to help you count later on.*
Repeat from * to * 3 more times, omitting the last short side on the last repeat. Join to the top of the first sc with a sl st. Fasten off and work away your tails of yarn.
Stitch Counts:
- Total: 600 st’s {432 sc’s and 168 dc’s – the 168 dc’s form 28 scallops}
- Per Short Side: 102 sc’s – counting from marked sc to marked sc
- Per Long Side: 6 sc’s and 7 scallops {6 sc’s and 42 dc’s}
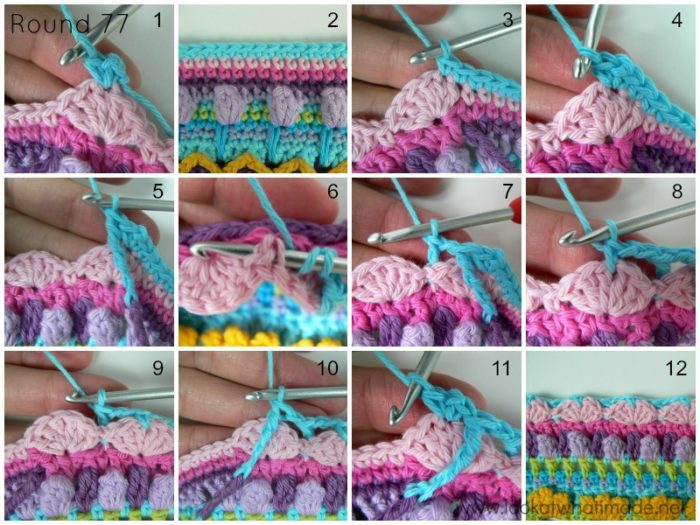
Round 77
Join your yarn by making a standing single crochet in the fourth dc of the 6-dc scallop at the end of any long side. (Ch 1, sc) in the same stitch. This is your first corner made (Photo 1).
Sc in the next 106 st’s (Photo 2). The last sc should fall in the second dc of the 6-dc scallop at the start of the next long side (Photo 3). (Sc, ch 1, sc) in the next st (Photo 4).
*Long Side: Make a fpttr around the fpttr from Round 74 (Photo 5). Ch 1. Make a bpdc around the next sc (Photos 6 and 7). (Ch 2. Make a sc between the third and fourth dc’s of the next scallop – see Photo 8. Ch 2. Make a bpdc around the next sc) 5 times (Photo 9). Ch 1. Make a fpttr around the fpttr from Round 74 (Photo 10).
Short Side: (Sc, ch 1, sc) in the fourth dc of the 6-dc scallop at the end of the long side (Photo 11). Sc in the next 106 st’s. The last sc should fall in the second dc of the 6-dc scallop at the start of the next long side. (Sc, ch 1, sc) in the next st.*
Repeat from * to * 3 more times, omitting the last short side on the last repeat. Join to the top of the first sc with a sl st.
Stitch Counts:
- Total: 492 st’s, 40 ch-2 spaces, and 16 ch-1 spaces – including the 8 ch-1 corner spaces {460 sc’s, 24 bpdc’s, and 8 fpttr’s}
- Per Short Side: 108 sc’s
- Per Long Side: 15 st’s, 2 ch-1 space, and 10 ch-2 spaces {7 sc’s, 6 bpdc’s, 2 fpttr’s}
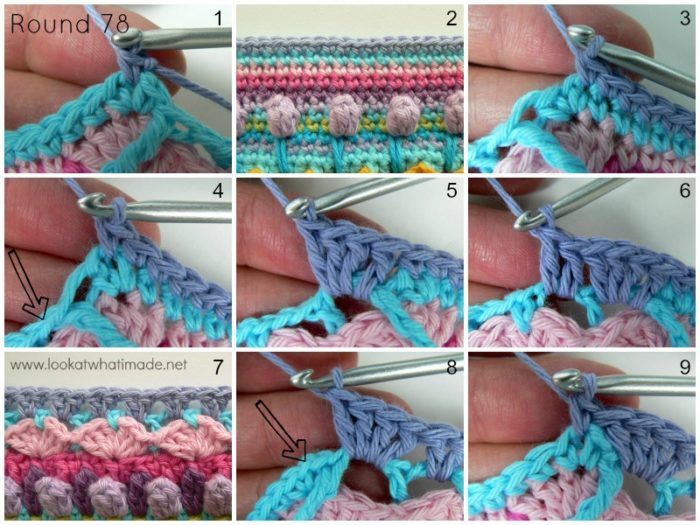
Round 78
- If you are using the same colour, sl st into the next ch-1 space. (Ch 1, sc) in the same ch-1 space.
- If you are using a new colour, join your yarn by making a standing single crochet in the ch-1 space at the start of any short side (Photo 1).
Sc in the next 108 st’s. Don’t accidentally skip that first (hidden) stitch (Photos 2 and 3). Sc in the next ch-1 space (Photo 4).
*Long Side: Skip the next 2 st’s. Make 4 dc’s in the next ch-1 space (indicated with an arrow in Photo 4 and illustrated in Photo 5). (Make 2 dc’s in the next ch-2 space) 10 times (Photos 6 and 7). Make 4 dc’s into the next ch-1 space (Photo 8). Skip the last 2 st’s.
Short Side: Sc in the next ch-1 space (indicated with an arrow in Photo 8 and illustrated in Photo 9). Sc in the next 108 st’s. Don’t accidentally skip that first (hidden) stitch. Sc in the next ch-1 space. *
Repeat from * to * 3 more times, omitting the last short side on the last repeat. Join to the top of the first sc with a sl st. Fasten off and work away your tails of yarn.
Stitch Counts:
- Total: 552 st’s {440 sc’s and 112 dc’s }
- Per Short Side: 110 sc’s
- Per Long Side: 28 dc’s
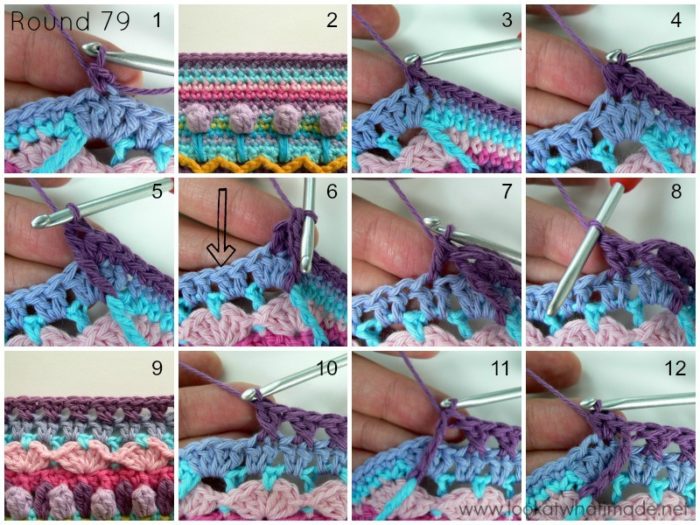
Round 79
Helpful Hint: Each Crossed Double should fall in the 2 st’s made into a ch-2 space from Round 77.
Join your yarn by making a standing single crochet in the third dc of the 4-dc group at the end of any long side (Photo 1). Mark this stitch to help you count later on. Sc in the next 113 st’s (Photo 2). The last sc should fall in the second dc of the 4-dc group at the start of the next long side (Photo 3). Mark this stitch to help you count later on.
*Long Side: Make 2 hdc’s in the next st (Photo 4). Make a fpdtr around the fpttr from Round 77 and skip the next 2 st’s of Round 78 (Photo 5). Dc in the next st, which should be the second dc of the next 2-dc group (indicated with an arrow in Photo 6 and illustrated in Photo 7). Working over the dc you just made, make a dc into the skipped stitch (just like when you were making the Cable Stitch in Round 63) – see Photo 8. This is your first Crossed Double made. (Skip the next st and make a dc in the next st. Working over the last dc made, make a dc in the skipped stitch) 9 more times (Photos 9 and 10). See Special Stitches above if you need help with these Crossed Doubles. Make a fpdtr around the fpttr from Round 77 and skip the next st of Round 78 (Photo 11). Make 2 hdc’s in the next st, which should be the second dc of the 4-dc group at the end of the long side (Photo 12).
Short Side: Sc in the next 114 st’s, marking the first and last sc’s to help you count later on. The last sc should fall in the second dc of the 4-dc group at the start of the next long side.*
Repeat from * to * 3 more times, omitting the last short side on the last repeat. Join to the top of the first sc with a sl st. Fasten off and work away your tails of yarn.
Stitch Counts:
- Total: 520 st’s {456 sc’s, 16 hdc’s, 8 fpdtr’s, and 40 crossed doubles, each containing 2 dc’s }
- Per Short Side: 114 sc’s – counting from marked sc to marked sc.
- Per Long Side: 16 st’s {10 crossed doubles, 4 hdc’s,and 2 fpdtr’s}
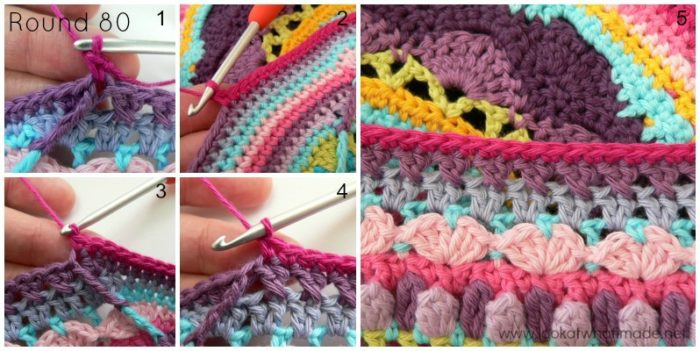
Round 80
This one is going to be boring and there is nothing I can do to make it less boring. Sorry!
If you are confident that you can accurately identify your stitches, you don’t have to mark the indicated stitches below, but you might find marking them VERY helpful for checking your stitch counts (and for knowing where to start the next round). You do NOT want to count 560 stitches every time you want to check that you haven’t gone wrong.
Join your yarn by making a standing single crochet in the fpdtr at the end of any long side (Photo 1). Mark this stitch to help you count later on. Sc in the next 119 st’s (Photo 2). The last sc should fall in the fpdtr at the start of the next long side (Photo 3). Mark this stitch to help you count later on.
*Long Side: Sc in the next 20 st’s (Photo 5). The last sc should fall in the stitch before the fpdtr at the end of the long side (Photo 4).
Short Side: Sc in the next 120 st’s, marking the first and last sc’s to help you count later on. The last sc should fall in the fpdtr at the start of the next long side.*
Repeat from * to * 3 more times, omitting the last short side on the last repeat. Join to the top of the first sc with a sl st. Fasten off and work away your tails of yarn. Don’t remove the markers. You will need them for the next part.
Stitch Counts:
- Total: 560 sc’s
- Per Short Side: 120 sc’s
- Per Long Side: 20 sc’s
This part of the pattern was tested by Kimberly Slifer, Claire Martin, Maja Heidingsfelder, Lynda Hernandez, Susan Wilkes-Baker, Venetia Smith, and Dianne Baan.

This blog post contains affiliate links. I only link to products I personally use or would use. All opinions are my own.





Brenda Routzon says
To everyone that is behind and think they will never get caught up. A friend actually bought me the yarn to make her one. I thought I would never get caught up and they were one week 7. I am now finishing up on week 10. I have looked a head a bit and the amount of rows do seem to get shorter the further we go. You can do it. This is the most beautiful work of art I have ever seen. Thank you for all your hard work Dedri. This is beautiful. Will be posting a photo soon I can’t wait until I can afford all the yarn to make me one. :)
Dedri Uys says
Thank you for your lovely comment, Brenda. I hope your friend will reward you with some yarn for all the work you are doing for her!!
Kem says
Oh wow, I cannot believe I’m finishing up part 10 today!! Only 3 more rows to go. When I started this a few weeks late, I never thought I’d get caught up! Now, I’ll have the fun of waiting for the next part. When you are on part 1, but part 7 or 8 is already out, you aren’t so sure you’ll ever catch up to the latest release. My FAV row, the roses, of course. But don’t be hatin on the sc rows…lol. Those are my “check to make sure my count is correct” rows. I tend to not verify counts at the end of each row, but those sc rows are a charm and if I need to add or delete a stitch to match, that’s the perfect time to do it!! Shhhhhhh!! Already have my yarn to start a second one.
I am curious about one thing Dedri, if you wouldn’t mind sharing….do you already have the pattern all designed all the way to the end, or are you still designing ahead of us? Also, how long did it take you to design this project? It just boggles my mind figuring all of this out. I created one original 12 “square this week as an alternate for another CAL I’m doing and it gave me a whole new appreciation for all you creative designers out there. And I didn’t even write mine down or count stitches. I posted it on a FB page and now ppl want the pattern, ooops, don’t have one..lol Thanks again Dedri and all your helpers for this amazing project. I can’t wait to finish and, at the same time, I NEVER want to finish!!
Jessica says
I so agree with your take on the sc rows. :) I use them the same way lol
Joyce says
I have finished Sophie’s Garden through row 36. I want to frame it, so should I block it first. I have never done something I like so much that I want to frame it. Thank you for sharing such a beautiful pattern.
Joyce
Dedri Uys says
Joyce, I am so pleased that you like it that much. I would block it, just to make it look nice and square. If you don’t block it, it will be fine, but your sides might bulge a bit. All the surface work tends to pull the work slightly. I hope you share a photo on my Facebook Page when you are done, or on the Sophie’s Garden Facebook Page. I would love to see it!
Ann says
Hi, I came across this lovely project a couple of weeks ago, I’ve managed to do rounds 1-8 so far. From next week I shall have more time so hopefully it will not take me too long to catch up.
Thank you very much for the detailed instructions and lovely photographs. Ann.
Maggie Lewin says
Hi Dedri – I am just getting to the end of part 4 so Im a bit behind but I found this wonderful project late. I am using some Acryllic yarn in lots of colours I had bought for another project. Mostly pinks, purples, white and the odd blue, yellow and green. I plan to eventually do another in that lovely new chunky yarn you posted about. Like another lady I often find it difficult to finish projects as they become samey but this is so so exciting I am enthralled. Its pretty no gorgeous, a challenge and so interesting. Really needs concentration sometimes – I am not an experienced crocheter but your instructions are so clear its not a problem. (Does anyone have anyone have any tips for stopping ones husband talking to you in the middle of a more challenging bit?) I cant do much at a time (back problems) but I always have to at least finish the round I am working on. Thank you a million times for sharing this with us all and for free.
Jenny says
Maggi, I find it helpful to count really loud if someone starts talking to me while concentrating. If nothing else it makes them laugh out loud ;)
Susan Nieuwoudt says
Hi Deri, thanks for sharing Sophie with me. I am left handed and have to do things a bit different but must say l have now completed part 1.
Dedri Uys says
Hi Susan.
Could you clarify what you are having to differently? The pattern should work for left-handers as well as right-handers, only going in the opposite direction. If I am missing something important, please let me know so that I can fix/mention it.
Dedri
Susan Nieuwoudt says
Hi Dedri
Sorry for replying so late.
I have figured out what is the difference. hehehehe Like to find solutions to a problem.
I work on the back side in other words its not just a case of direction it also involves turning my work around front to back. Right handed have the front facing them and I have the back facing me. So its a total turnover and not just direction but having said that each of us have our own way of crochet and what we feel comfortable with. I have now sorted it out. but please don’t change your pattern instructions as I tend to follow the pitures more than the writing so both is just fine.
Thank you for your interest, and my comment was just to show that even lefties like me can do your wonderful pattern.
Thank you for sharing this wonderful world of Sophie with us.
Susan Nieuwoudt
Ann says
Hi, I only found this wonderful project last week, I’ve managed to complete rounds 1-8 so far. Next week I should be able to spend more time on it and hope to catch up as quickly as I can.
I’m finding it interesting and enjoyable so far. Thank you so much.
Jenny says
We are delighted that you are enjoying your travels into Siphie’s universe :)
Bernadette says
I have so many incomplete projects that I have become bored with. I found this and knew I had to try it. I am just finishing part 3 and find it hard to stop crocheting at the end of the day. I can’t stop in the middle of a row because I need to see the end result before quitting for the day. I am using orange, yellow, and green shades as these are the colors in my living room. It has been difficult finding yarn in enough different hues and choosing which ones to use for each row. I chose 4 ply cotton with an I hook and it’s coming along nicely. I have been crocheting for about 50 years and have never been so excited about finishing a project as I am now. This is so much fun. Thank you so very much for sharing this beautiful pattern and so much joy to everyone. It’s priceless and for you to share this no charge is angelic. thank you thank you thank you ps I will share a photo of mine when I get further along
Jenny says
Your Sophie sounds lovely! Please share aome photos with us :)
Dedri Uys says
You are so welcome, Bernadette. I hope you have a lot of fun with it!
Sandy says
Dedri, I think the print version on your page has been hijacked. It takes me elsewhere. Love Sophie and am so enjoying the COL. I will try the print thing in a day or two, may just be something on my end of things, I’m not really savvy on how these thing work. Thank You for all your work it is much enjoyed.
Jenny says
Are you still having issues with the print friendly section? I have tried it and it seems fine to me.
Julie T says
Hi, when converting to print friendly and PDF week 10 changes to a document on something like “The Changing Face of Governence”, hoping this can be remedied soon? Thanks, just started on the project, loving it!
Rory says
A belated Mothering Sunday to you Dedri and to all moms in the UK! In the US and parts of Asia it is celebrated on the 2nd Sunday of May. May we always find joy in our precious children :)
Dedri Uys says
Thank you, Rory :)
Carol Holihan says
I never thought I’d love single crochet nearly as much as I do. Thank you!
Jenny says
Happy to hear you are enjoying all the single crochet stitches! I was dreaming about them the other night lol
Bonnie says
Trying again to comment.
Bonnie says
Strange, couldn’t comment with the e-mail address I use to get your newsletter, but when I changed the e-mail address to another one of mine, it worked.
Pauline says
Every night i rush myself in front of the computer and start working on this CAL and each part is more interesting then the one before i feel so proud of myself thank you so much for this amazing work :)
Sharyn P says
Once again, Dedri, a beautiful creative addition to this blanket. I am loving every stitch and change and turn.
I appreciate your eye, design, creativity, and am so grateful this is in my life right now.
Sharyn
Yvonne Ellen says
There is no way to thank you enough for the blessing of Sophie. It is a gift to each of us that is further enhanced by joining so many crochet lovers worldwide! You are an amazing woman.
Erna Tan says
Thank you very much for this Sophie garden design that you made . My sister and I enjoy it to making Sophie garden . God bless you a lot.
Big hug from us,
Erna
Alkmaar, Netherlands
Mary says
I am really enjoying making this afghan and hope you realise how we appreciate the effort you have put into it.
Dedri Uys says
Thank you, Mary :)
Charlene Boardman says
Dedri, after this CAL would it be possible to make an afghan just as amazing for boys, please!!! My Grandsons are soo jealous of their baby sister, who has had so much made for her, and Sophie’s Universe tops it off!
Charlene Boardman says
Thank you so much Dedri! How you designed this, I just can’t fathom! It is gorgeous!!! Thank you soooo much!