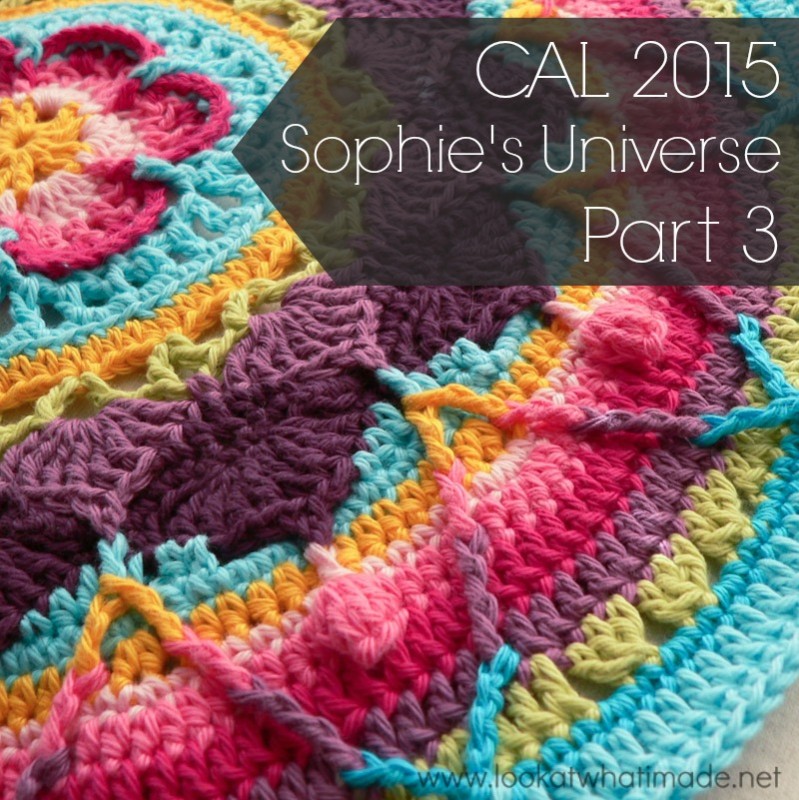
I hope you are all excited and ready for Part 3 of Sophie’s Universe. At the end of part 3, you will have a beautifully bright Mandala. This Mandala has its own Ravelry Page, so feel free to add your projects there as well.
Sophie’s Universe Part 3 {Photo Tutorial}
©Dedri Uys 2014. All Rights Reserved.
Special design credit to Chris Simon for allowing me to use a modified version of her Lace Petals flower.
Resources
- Add this CAL to your Ravelry Queue
- Sophie’s Universe CAL 2015 Information
- Use the Print-friendly button at the bottom (right) of this post to print/save this tutorial. Don’t know how? Find out HERE.
- **Part 3 VIDEO TUTORIAL** by Esther Dijkstra from It’s All in a Nutshell
Translations
- Dutch Photo Tutorial by Dianne Baan
- German Translation by Gabriele Rogers
- Spanish Translation by Lynda Hernandez
- Danish Translation by Tina Poulsen
- Finnish Translation by Sari Åström
- French Translation by Sandra Larvin (with Video Tutorials by Géraldine Cymer)
- Russian Translation (with Video) by Natalie V. Alimpieva
- Swedish CAL Information by Emma Vingqvist, Agnetha Magnusson, Åza Karlsson, and Ulrika Larsson
- Arabic Video Tutorial by Banan Felimban
Materials
See the Information Post.
Size
| Large | Medium | Small | |
| Sophie’s Universe (End of Part 3) | 50 cm (just under 20 “) | 40 cm (just under 16″) | 30 cm (just under 12″) |
Abbreviations
US Terminology used (US/UK comparison chart here)
- Ch – Chain
- Dc – Double crochet
- Fpdc – Front post double crochet
- Fpdtr – Front post double treble
- Fptr – Front post treble crochet
- Hdc – Half-double crochet
- Sc – Single crochet
- Sl st – Slip stitch
- St/st’s – Stitch/stitches
- * – Repeat instructions between asterisks the number of times specified. This is a hardcore repeat and will consist of multiple instructions.
- () – Repeat instructions between parentheses the number of times specified. This is a lower level repeat.
Special Stitches
- Cluster : Dc3tog – see this tutorial.
- Crab stitch: This stitch is also known as the reverse single crochet. See this tutorial.
- Popcorn stitch: Make 5 dc’s in the same stitch. Remove your hook from the last stitch. Insert your hook into the first dc of the 5 dc’s. Grab the last stitch with your hook and pull it through the first stitch. Ch 1. See this tutorial.
- Standing Stitches: Standing sc’s, hdc’s, and dc’s are stitches used to start the round without the need for the traditional beginning chain. Links to tutorials are supplied in each relevant round.
Invisible Join
If you would like to use the invisible join instead of the sl st join at the end of each round, you can find a step-by-step photo tutorial here. If you DO decide to use it, make very sure that you understand which stitch to join to and which stitch to start your new round in, otherwise, your mandala is going to come out all wonky!
Instructions
Rounds 1 – 15
You can find the links for Rounds 1 – 15 HERE.
Round 16
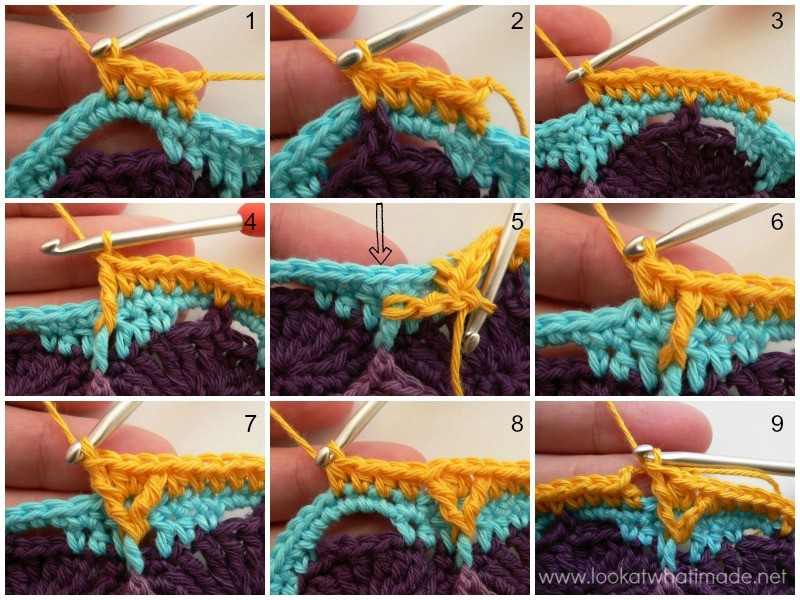
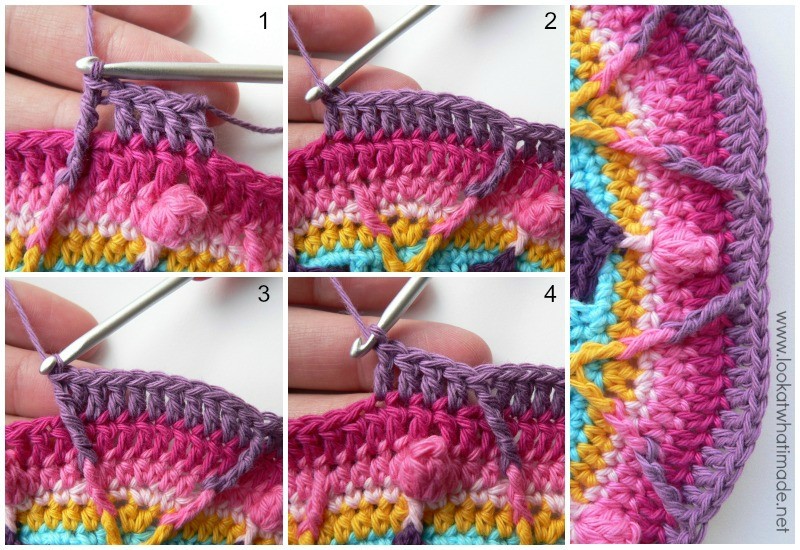
Hint: The hdc’s worked into the picots should fall in the 4th sc made into the ch-6 space.
- If you are going to use the same colour, sl st into the next st and then ch 2 (this counts as your first hdc). Hdc in the next 3 st’s.
- If you are going to use a different colour, start with a standing half-double crochet in the st after the sl st join. Hdc in the next 3 st’s {Photo 1}.
*Catch the picot by making a hdc through the picot from Round 13 and into the next st of Round 15 (so through both layers as before) – see Photo 2. Hdc in the next 5 st’s {Photo 3} and make a fptr around the post of the fpdc from Round 14 {Photo 4}. Skip the next st of Round 15 and Make 2 hdc’s in the next st {indicated with an arrow in Photo 5 and illustrated in Photo 6}. Fptr around the same fpdc from Round 14 {Photo 7}. Skip the next st of Round 15 and hdc in the next 4 st’s {Photo 8}.* Repeat from * to * 11 more times, omitting the last 4 hdc’s on the last repeat {Photo 9}. Join to the top of the beginning ch-2 (or standing hdc) with a sl st.
Stitch Count: 168 st’s {144 hdc’s and 24 fptr’s}
Round 17
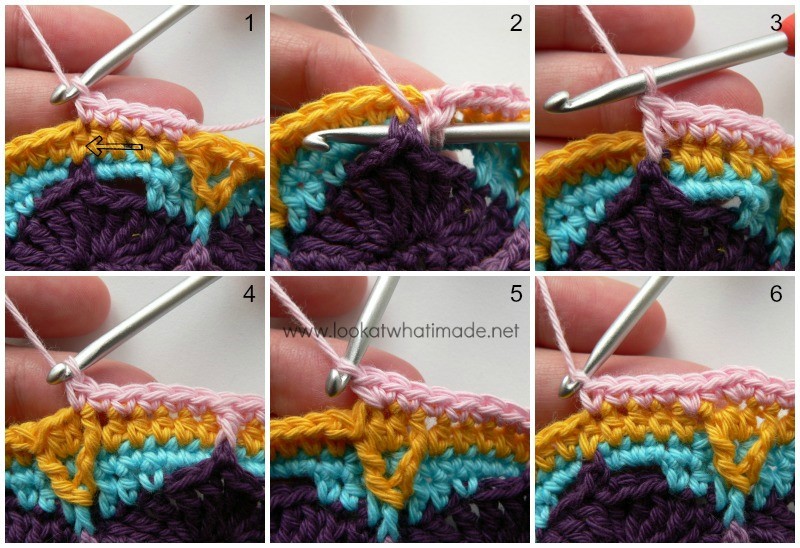
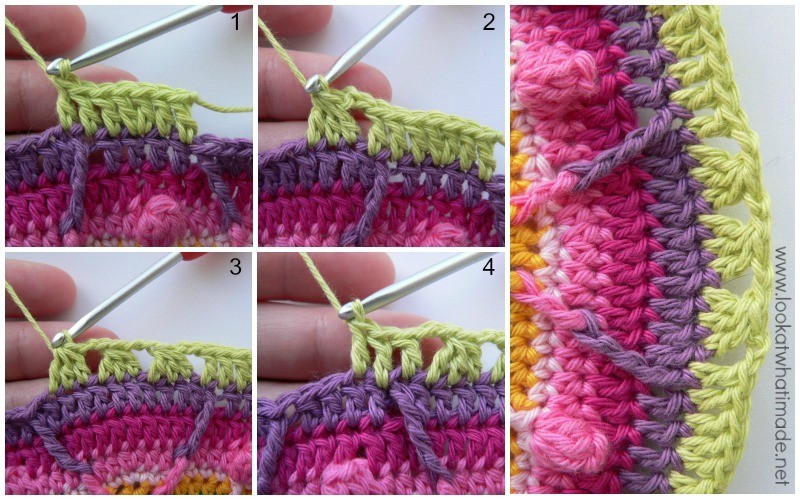
- If you are going to use the same colour, ch 1 and sc in the same st. Sc in the next 4 st’s {Photo 1}.
- If you are going to use a different colour, start with a standing single crochet in the same st as the sl st join. Sc in the next 4 st’s.
*Fpdc around the picot from Round 13 {indicated with an arrow in Photo 1 and illustrated in Photos 2 and 3}. Skip the next st from Round 16 and sc in the next 6 st’s {Photo 4}. Make 2 sc’s in the next st {Photo 5}. Sc in the next 6 st’s {Photo 6}.* Repeat from * to * 11 more times, omitting the last 5 sc’s on the last repeat. Join to the top of the first sc with a sl st.
Stitch Count: 180 st’s {168 sc’s and 12 fpdc’s}
Note
In the next 3 rounds, Sophie has a tendency to buckle. This will correct itself in Rounds 21 and 22, so don’t worry about it. If your stitch count is spot on, you’ll be fine.
Round 18
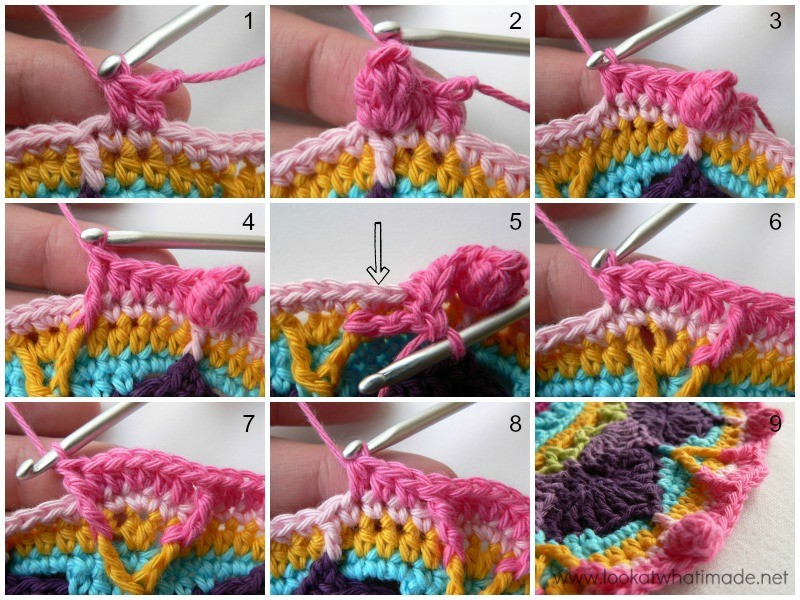
Update: A few of you seem to be struggling with this round. I have now linked to a better tutorial (by Tamara from Moogly) to make it easier for you to understand how the popcorn should be made. Remember that the 5-dc popcorn stitch is closed with a ch st.
- If you are going to use the same colour, sl st into the next 3 st’s so that you end up in the second sc before the fpdc. Ch 2 (this counts as your first hdc). Hdc in the next st.
- If you are going to use a different colour, start with a standing half-double crochet in the second sc before any fpdc from the previous round. Hdc in the next st {Photo 1}.
*Make a popcorn stitch in the next st, which will be the fpdc {Photo 2}. Hdc in the next 4 st’s {Photo 3}. Fptr around the fptr from Round 16 {Photo 5}. Skip the next st of Round 17 {indicated with an arrow in Photo 5}. Hdc in the next 2 st’s. Make 2 hdc’s in the next st. Hdc in the next 2 st’s {Photo 6}. Fptr around the fptr from Round 16 {Photo 7}. Skip the next st of Round 17. Hdc in the next 3 st’s {Photo 8}.* Repeat from * to * 11 more times, omitting the last 2 hdc’s on the last repeat. Join to the top of the beginning ch-2 (or the standing hdc) with a sl st.
Stitch Count: 192 st’s {156 hdc’s, 12 popcorns and 24 fptr’s}
Round 19
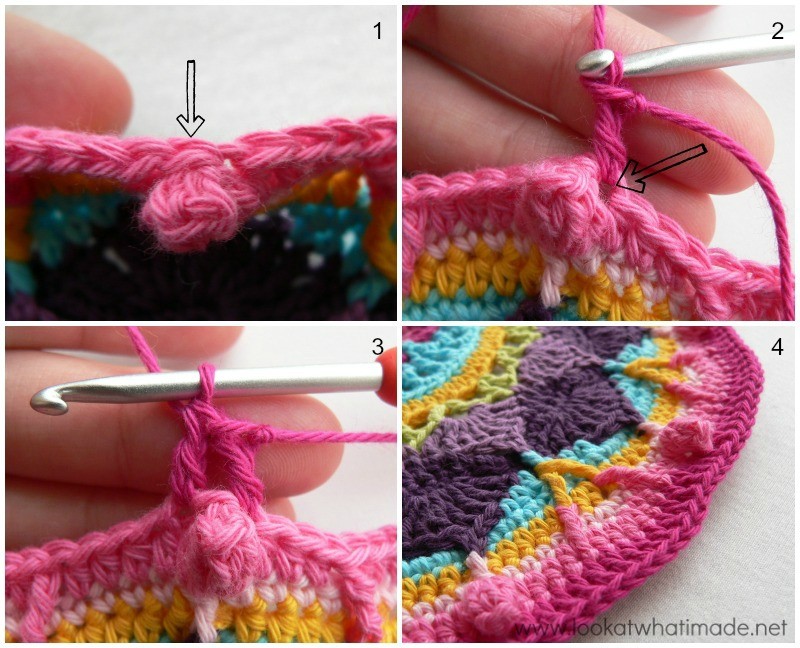
Identifying which “loops” to work into for the popcorn stitch: for the purposes of this pattern, the “top” of the popcorn stitch will be the first dc of the 5-dc’s used to create the popcorn. You will find the loops for this stitch immediately to the right and slightly behind the popcorn (to the left if you are left-handed) – see the arrow in Photo 2. When you work into the first dc of the 5-dc popcorn like this (Photo 2), you will skip the ch st on top of each popcorn (indicated with an arrow in Photo 1).
- If you are going to use the same colour, sl st to the popcorn stitch. Ch 3 (this counts as your first dc).
- If you are going to use a different colour, start with a standing double crochet in any popcorn stitch around {Photo 2}.
Dc in the next 15 st’s. *Dc in the next stitch, which should be the Popcorn Stitch. Dc in the next 15 st’s.* Repeat from * to * 10 more times. Join to the top of the beginning ch-3 (or the standing dc) with a sl st.
Photo 3 below shows the first dc after the Popcorn completed. Note the skipped ch st at the top of the Popcorn.
Stitch Count: 192 dc’s
Round 20
- If you are going to use the same colour, ch 3 (this counts as your first dc). Dc in the next 3 st’s.
- If you are going to use a different colour, start with a standing double crochet in the same st as the sl st join. Dc in the next 3 st’s.
*Fpdtr around the fptr from Round 18 {Photo 1}. Skip the next st of Round 19 and dc in the next 10 st’s {Photo 2}. Fpdtr around the fptr from Round 18 {Photo 3}. Skip the next st of Round 19 and dc in the next 4 st’s {Photo 4}. The first dc should fall in the dc in the top of the popcorn stitch.* Repeat from * to * 11 more times, omitting the last 4 dc’s on the last repeat. Join to the top of the beginning ch-3 (or the standing double crochet) with a sl st.
Stitch Count: 192 st’s {168 dc’s and 24 fpdtr’s}
Round 21
- If you are going to use the same colour, ch 3 (this counts as your first dc). Dc in the next st.
- If you are going to use a different colour, start with a standing double crochet in the same st as the sl st join. Dc in the next st.
*Make 2 dc’s in the next st. Dc in the next 3 st’s. The last dc should fall in the dc after the fpdtr from the previous round {Photo 1}. (Ch 2 and make a cluster) three times {Photos 2 and 3}. Ch 2 and dc in the next 3 st’s {Photo 4}.* Repeat from * to * 11 more times, omitting the last 2 dc’s on the last repeat. Join to the top of the beginning ch-3 (or the standing double crochet) with a sl st.
Stitch Count: 132 st’s and 48 ch-2 spaces {96 dc’s and 36 clusters }
Round 22
At this point, the “petals” formed by your front post stitches are almost complete. In this round, you will be forming the points of the petals.
Do not worry if your mandala starts to curl in this round, it will straighten out in the next round.
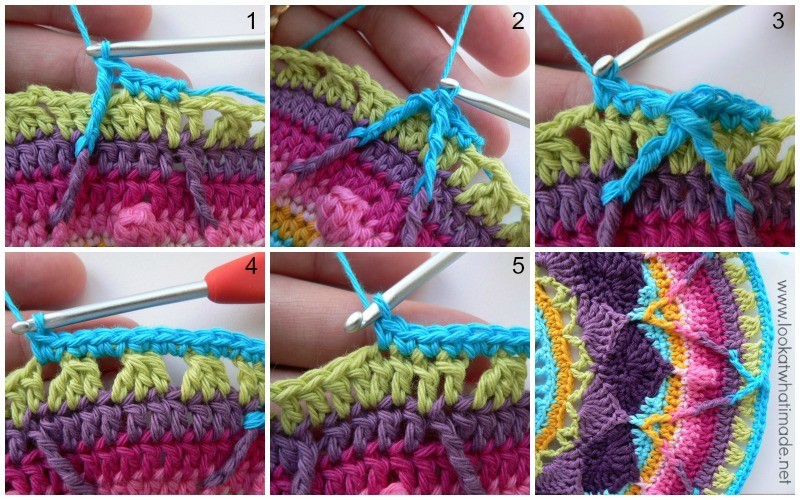
- If you are going to use the same colour, ch 1 and sc in the same st. Sc in the next 2 st’s.
- If you are going to use a different colour, start with a standing single crochet in the same st as the sl st join. Sc in the next 2 st’s.
*Fpdtr around the fpdtr from Round 20 to the left of the popcorn stitch (right, if you are left-handed) – see Photo 1. Fpdtr around the fpdtr from Round 20 to the right of the popcorn stitch (left, if you are left-handed) – see Photo 2. Skip the next st of Round 21. Sc in the next 3 st’s {Photo 3}. (Make 2 sc’s in the next ch-2 space, sc in the top of the next cluster) three times. Make 2 sc’s in the last ch-2 space {Photo 4}. Sc in the next 4 st’s {Photo 5}.* Repeat from * to * 11 more times, omitting the last 3 sc’s on the last repeat. Join to the first sc with a sl st.
Stitch Count: 240 st’s {216 sc’s and 24 fpdtr’s}
Round 23
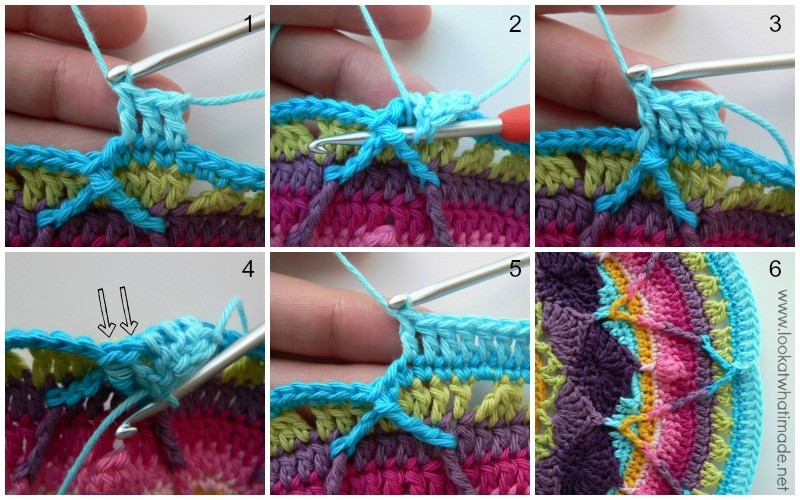
Note: When working around the fpdtr’s from the previous round, you will make one fpdc around both posts (together) and skip the tops of these 2 st’s. The arrows in Photo 4 indicate the tops of the fpdtr’s that will be skipped.
- If you are going to use the same colour, ch 3 (this counts as your first dc). Dc in the next 2 st’s.
- If you are going to use a different colour, start with a standing double crochet in the same st as the sl st join. Dc in the next 2 st’s {Photo 1}.
*Make a fpdc around the posts of both fpdtr’s from Round 22 {Photos 2 and 3}. See Note above if you need help with this. Dc in the next 18 sc’s {Photo 5}. Don’t accidentally skip the first sc after the fptr’s.* Repeat from * to * 11 more times, omitting the last 3 dc’s on the last repeat. Join to the top of the beginning ch-3 (or the standing double crochet) with a sl st.
Stitch Count: 228 st’s {216 dc’s and 12 fpdc’s}
Round 24
In this round, you will be making increases by working into the loops (tops) of the fpdc’s AND around the posts.
- If you are going to use the same colour, ch 1 and sc in the same st. Sc in the next st.
- If you are going to use a different colour, start with a standing single crochet in the same st as the sl st join. Sc in the next st.
*Hdc in the next 2 st’s. The last hdc should fall in the top of the fpdc from the previous round {Photo 1}. Fpdc around the post of the fpdc from the previous round {Photo 2}. Hdc in the next 2 st’s {Photo 3}. Sc in the next 15 st’s.* Repeat from * to * 11 more times, omitting the last 2 sc’s on the last repeat. Join to the first sc with a sl st. Fasten off and work away your tails of yarn.
Stitch Count: 240 st’s {180 sc’s, 48 hdc’s, and 12 fpdc’s}
Please Note: I have used Canary in the photos below to better illustrate the stitches, but I have used light turquoise in my final blanket.
Round 25 (Optional)
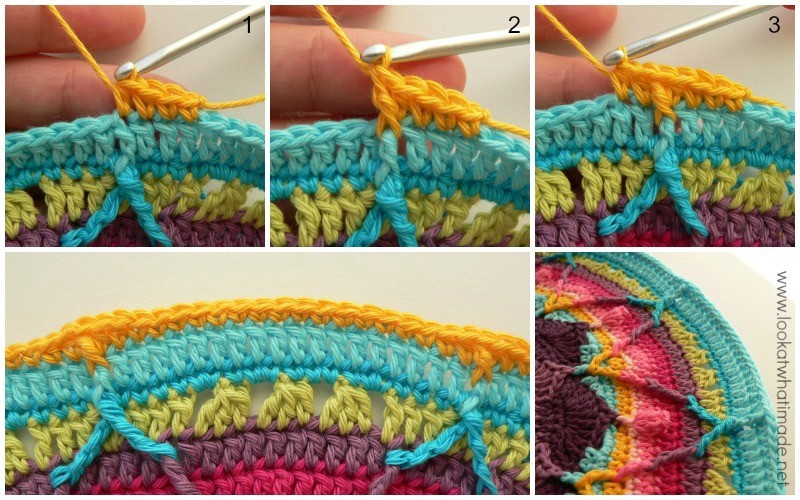
This round is optional. The crab stitch tends to make a lot of people “crabby”, but I quite like making it. Don’t worry if your mandala starts wobbling slightly when you make the crab stitch round. Once you’ve blocked it, it will be right as rain.
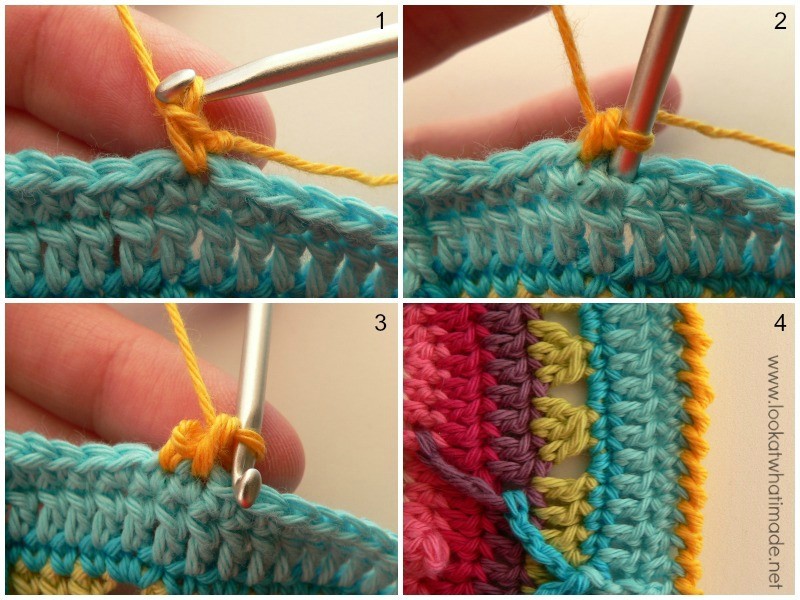
Start in any stitch around with a standing single crochet (Photo 1). Make a crab stitch in each st around (Photos 2 and 3).
If you are not familiar with the crab stitch, see this video tutorial. When you get to the end of the round, make a crab stitch in the same stitch as the standing single crochet. No need to join with a sl st. In fact, I’ll give you an apple if you manage to do it! Just fasten off and work away your tails of yarn.
Stitch Count: 240 crab stitches
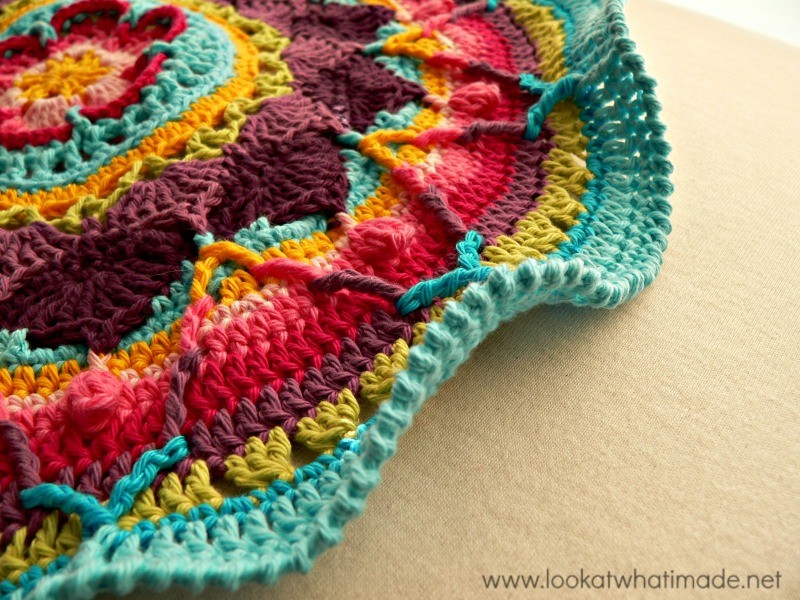
See the “wobble” I was talking about? It looks a little bit worse in the photo than it actually was.
This is nothing to be alarmed about. It is caused by the fact that the crab stitch takes up more space and is denser than normal single crochet. Because of this, it stretches the last round slightly. Once your mandala is blocked it should be perfect!
If you are going to continue with the CAL there is no need to block at this point. We will square this mandala up next week and that will get rid of the “wobble”.
And now that we’ve gotten all the formalities out of the way I have a little mister who would like to say hello. Of the 3 blankets I am making, the Softfun seems to be his favourite.

This blog post contains affiliate links. I only link to products I personally use or would use. All opinions are my own.


Toni says
I’m so confused with round 20…. You ask for 20stitches between the repeats where there is only 16 available…. Could you please explain how you can get 4dc then the fpdtr, skip one stitch, 10dc,fpdtr skip one st then four more…. I’m so upset that I don’t get it as I’m lagging behind and want to catch up so badly!
Dedri Uys says
Toni, I am sorry that you are finding this frustrating.
This is the repeat: *Fpdtr around the fptr from Round 18 (Photo 1). Skip the next st of Round 19 and dc in the next 10 st’s (Photo 2). Fpdtr around the fptr from Round 18 (Photo 3). Skip the next st of Round 19 and dc in the next 4 st’s (Photo 4). The first dc should fall in the dc in the top of the popcorn stitch.*
There aren’t 2 lots of 4 dc’s, only 1 lot of 4 dc’s. You only repeat the instructions between asterisks the amount of times specified. Fpdtr and skip the stitch behind the fpdtr (1), dc in the next 10, (10) Fpdtr and skip the stitch behind the fpdtr (1). Dc in the next 4 (4). 1 + 10 + 1 + 4 = 16.
On the last repeat you leave out the last 4 dc’s, because you have already made them when you started the round (before the repeats started). I hope that helps.
Dedri
Toni says
Yes that makes perfect sense…. I think I needed to stop for a bit and come back to it… Thank you so much for your prompt reply and simplification of your beautiful work :)
Amalie Eltzholtz says
Hey…
Thanks for a great CAL…
Is the number of stitches in round 19 correct? It is written as the same as in round 18, but I have to skip a stitch by each of the popcorns..!? How can it be the same?
Dedri Uys says
Hi,
You are not skipping a stitch. If you take the top of the popcorn to be the first dc of the 5-dc popcorn, which is what I suggest for the symmetry of this pattern, the slip stitch does not count as a stitch. It is just there to close the popcorn. I hope that helps.
Amalie Eltzholtz says
Hey…
Thanks for a great CAL (:
I am having some troubles with round 19 – it says there’s supposed to be 192 st’s, but that is the same number as last round, and I have skipped all the st’s of the popcorn st… How does that make sense?
In round 18 all the st’s were counted – also the ones from the popcorn…
Dedri Uys says
Amalie, you shouldn’t skip all the stitches of the popcorn. When you work into the popcorn, you should work into the first dc of the 5-dc popcorn (which has the last dc of the popcorn pulled through it), and ignore the ch st. Have another look at the tutorial. Can you see where I have inserted my hook into the first of the 5 dc’s that form the popcorn?
Anthea says
I relented and started this CAL yesterday…the blanket I promised my brother will have to wait. After all it is hellish hot in South Africa at the moment!! I just wanted to tell you how I appreciate your very hard work! The design is beautiful and that is hard enough but the photos and videos ans tutorials, the links…I am not sure if everyone actually understand the huge amount of work that has gone into this!! Thank you Thank you Thank you!! Warm regards from Pretoria
Jenny says
Thank you for the kind comments Anthea! Dedri works incredibly hard to bring these beautiful patterns out to us every week and even I am humbled by her dedication to both Sophie and all of us! :)
Dedri Uys says
Thank you, Anthea. I love the idea that so many South Africans are working on Sophie. It makes me feel much less homesick. Enjoy and feel free to ask if you have any questions x
Maya Harrison says
This crochet along is awesome. I saw a lot of participants on Instagram with amazing projects. I just discovered this now. Once I get some yarn, I will give it a try. wohooo!!! You are so talented to put this together Dedri.. Thank you!
Jenny says
We are glad you are enjoying it Maya! :)
Susie says
This is such a great project, the mystery being the best of it. It is also great to be doing it with others across the world with all levels of experience.
Thank you for the design and opportunity, it is helping with the therapy for my mental health and wrists from dog bites.
I have learnt so much. Thank you again.
Dedri Uys says
Susie, you are very welcome. I hope your wrist heals up soon and as for the mental health…I hope this really helps with that. I find crochet very helpful when I feel like I am spiralling. Best of luck x
Maxine Timms says
Hello Dedri
In round 20 I’m struggling to keep the tension on the fpdtr. The top of the stitch keeps going loose and horrid and baggy. I feel as though I need 3 hands to try and keep the stitch tight as I crochet. Is there a knack to this? LOVING the CAL. The pattern is gorgeous and your photo tutorial is a dream. Thank you.
Jenny says
Hi Maxine!
I have the same problem, along with most others. Keep on trying hard, but when you make the yarn overs on the hook, give the first yo a push so it looks like it is sitting on top of the hook as opposed to the back of it. You are effectively tightening that first loop so it isn’t quite as loose.
Hope you gather what I am saying and that it helps.
Jenny
maxine timms says
Dear Jenny
thank you for your advice. After much fiddling, grinding of teeth, undoing and redoing, the stitches are looking better. Not quite as tight and neat as I would like but I’m hoping the next round might hide that a bit???? Here’s hoping. fingers crossed.
Jenny says
The stitches mostly seem to blend in well I found, Maxine. I have similar issues and my Sophies don’t look out of place at all :)
tanns says
I have been patiently waiting to start this, I broke 2 fingers on my left hand and cut cast off to soon, and have to have more work done on fingers and also broke the baby finger by slamming in truck door unloading groceries. So I have been slowly getting my wool ready to start and will cut new cast to custom fit the crochet hook. LOL hope mine turns out as beautiful as some of the ones I have seen so far.
Dedri Uys says
ouch. I had a finger injury at the end of last year (not broken, just inflamed central slip) and it was horrible not being able to use the finger. Can’t imagine having to wear a cast on 2!
Rachel says
Roll on Sunday- I’ve been hanging in there since Tuesday….My crochet basket keeps looking at me….
Charlotte says
Dedri & Kim. From the bottom of my heart I want to thank you for this amazing CAL. Am loving it, and as a newbie it is taking me out of my comfort zone and I am learning heaps! Baie, Baie dankie!
Dedri Uys says
Jy is baie welkom, Charlotte.
Rory says
I am enjoying this CAL so much. My first ever! Thank you for putting time and effort into the photo tutorials that go along with the written instructions. The notes you add to each round are great and keep me on track all the time. The photos are beautifully done too :) Looking forward to part 4! Have a wonderful weekend!
Dedri Uys says
Thank you very much, Rory. Have a wonderful week :)
Gale Goldberg says
Wanted to let you know…. I must have been Overtired…. lol I figured out 17 … thank you so much
Dedri Uys says
No worries. Sometimes we just need to put things down for a bit and walk away.
Sue says
Hello to the little mister. I have two of those around myself, one wanting to chomp on Sophie’s Universe. He’s growing his first two teeth. :)
Dedri Uys says
Maybe you should crochet him a teething toy so that he doesn’t chew a hole in Sophie! Mine never chewed yarn, but they chewed just about everything else.
Sue says
None of them are getting anywhere near my Sophie. So he nibbles on my fingers instead lol.
Susan says
Row 19
the last st of each 16-stitch repeat should fall in the dc before the popcorn stitch. Should say fall in the last hdc before the popcorn stitch.
Dedri Uys says
Thank you Susan. I have fixed it now. Well spotted!
Rena. says
Ms. Dedri, I have had so much fun doing this and have learned a great deal. I never thought I could make something so beautiful. Even when I thought frogs were invading my home, you and all of the lady’s and gents…I know your out there… helped me get through the rough spots. I also enjoy the crab stitch. Can hardly wait to see what you have in store for us next Sunday. I can see us all now, hovering around our computers like junkies waiting for a fix. lol
Dedri Uys says
Rena, I am so pleased that you have had fun despite the frogs. This pattern is very much a learning journey. I quite like the crab stitch too, but to each his own, I guess.
Thank you for your lovely comment
Kathy says
Thanks so much for your hard work on this project. I am a novice but the tutorials sure have helped me get to this point. I’ve done the crab stitch but not sure if I like it. It looks like the next round will be difficult to work into it. I’m thinking of removing it and wondering how it will affect the outcome of the piece. Thanks again
Dedri Uys says
Kathy, you won’t be working into the crab stitch round, you will be working around the back posts of the previous round, so it is up to you whether you keep it or not. I personally prefer the final item with the crab stitch.
Kathy says
Thank you – I thought that may be the case. Think it’s growing on me. Looking forward to it
Ronnie says
I did it! Honestly I too happen to love the crab stitch. I use it in patterns that don’t call for it! Thanks for the beautiful challenge, I’m really enjoying it. Now on to my second Sophie’s Universe. In my first one I had to tear out row 19 3 times only to find that I had errors in row 18, thank God they were near the end. So, I found my errors and now all is fine! Btw, how do I get my apple? Lol
Lesley says
Hello to your little mister – love his Olaf pjs! My girls love their Anna and Elsa ones!
And no problem with popcorn here!
Betty says
Your tutorials save my sanity. Being a visual learner, they are soooooo helpful. I am keeping up with very little frustration and can’t believe all that I have picked up in 2 weeks. Thank you so so much for all of the effort you put into your designs and instructions. A tip I would pass onto others, take the time to check the stitch count at the end of every round. You won’t be frogging so much.
Jenny says
A very invaluable tip Betty! Counting your stitches is very important on the CAL to make sure you don’t slip up and find yourself going horribly wrong :)
Gina says
Thank you so much for all the time and effort you have put into this CAL! This is my first, and I am learning so much and am so proud of myself! My husband laughs at me because I cheer at the end of each round after counting and realizing I have the correct number of stitches. Thanks again!