This Mandala is a celebration of FUN and joy. It is also a celebration of everything I love about crochet – colour, prettiness, whimsy, nostalgia…
The pansies were adapted from a piece of crochet lace my great-grandma made in the ’50s, and when I initially published the pattern for the Pansies in 2014, the process brought back so many memories of her.
For a few short hours, it felt like we were communicating across the years. The most intimate moments, for lack of a better word, were when I noticed some little error in the work or a change in tension. In those moments she was not the graceful old lady from memory, coiffed to perfection and smelling like Yardley, but a young woman, very much like myself, raising her children and trying to keep her act together.
Back in 2014, I tried to create this Pansy Pizza for the first time. It was lovely, but so wonky that several fierce blockings and no amount of wishing could get it to lie flat. Now, only seven years later, I have finally allowed myself the time and space to figure out how to do this beauty justice.
And doesn’t it just make you smile?
If you want to see more photos of the process, you can find them HERE:
Pansy Pizza Pattern
© Dedri Uys 2021. All Rights Reserved.
Resources
- Add This Pattern to Your Ravelry Queue
- Hashtag: #pansypizza
- Videos:
Translations
- Dutch Translation by Michael Wassenaar (with links to his Dutch video tutorials)
If you prefer a formatted, ad-free English US PDF version of this pattern (both Photo Tutorial and Written-only), you can buy it HERE in my Ravelry Store. The Photo Tutorial PDF includes Charts by the very talented Masako Kawahara.
Materials
- Scheepjes Softfun Mini Pack in the Rainbow Colourway (Each ball = 20g/56m; 60% Cotton, 40% Acrylic)
- Yarn A – Bumblebee (2634) – Yellow
- Yarn B – Soft Coral (2636) – Coral
- Yarn C – Pumpkin (2651) – Orange
- Yarn D – Candy Apple (2410) – Red
- Yarn E – Pink (2480) – Dusky Pink
- Yarn F – Hot Pink (2495) – Dark Pink
- Yarn G – Violet (2519) – Light Purple
- Yarn H – Deep Violet (2515) – Dark Purple
- Yarn I – Apple (2516) – Light Green
- Yarn J – Emerald (2605) – Dark Green
- Yarn K – Cool Blue (2603) – Light Blue
- Yarn L – Dark Turquoise (2511) – Dark Blue
- 3.5 mm crochet hook
- Optional: 40cm florist hoop
Gauge
Pansy Triangles = 15.5cm (6.1”) per side (blocked)
Size
- Up to the end of Round 9 – 36cm /14.2”/65g
- UP to the end of Round 10 – 40cm /15.7” /75g
Abbreviations
US Terminology
- Beg – Beginning
- Ch – Chain
- Dc – Double crochet
- Dtr – Double treble crochet
- Hdc – Half-double crochet
- RS – Right side
- Sc – Single crochet
- Sl st – Slip stitch
- Sp/sps – Space/spaces
- St/sts – Stitch/stitches
- SM – Stitch marker
- Tr – Treble crochet
- WS – Wrong side
Punctuation
- [] – used to indicate stitches to be worked into the same st/sp
- () and * – repeat the instructions between parentheses and asterisks the number of times specified.
Special Stitches
Bobble Stitch: Yarn over and insert your hook into the indicated st/sp. Yarn over and pull up a loop. Yarn over and pull through 2 loops. (Yarn over and insert your hook into the same st/sp, yarn over and pull up a loop, yarn over and pull through 2 loops) twice. Yarn over and pull through all 4 loops on your hook.
Small Petal: [hdc, dc, 4 tr, dc, hdc] in the same ch-3 sp.
Large Petal: [hdc, dc, 2 tr, 3 dtr, 2 tr, dc, hdc] in the same ch-3 sp.
Standing Stitch: Standing stitches are used to start the round when using a new colour (or starting in a different place from where you finished the previous round). They are exactly the same as regular stitches, except that they are made ‘in air’, without being attached to a previous stitch. With a slip knot already on your hook and holding the knot in place with your index finger, make your stitch as normal.
Omitting: At the end of some rounds, you will see an instruction telling you to omit the last corner/stitch(es) of the last repeat. This means that your last repeat should stop before the indicated corner/stitch(es), because you will already have made that corner/stitch(es) before the repeat started.
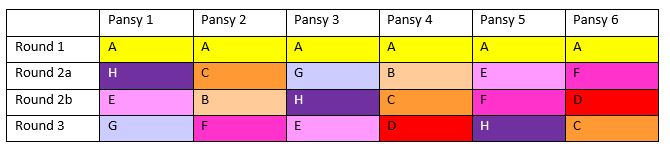
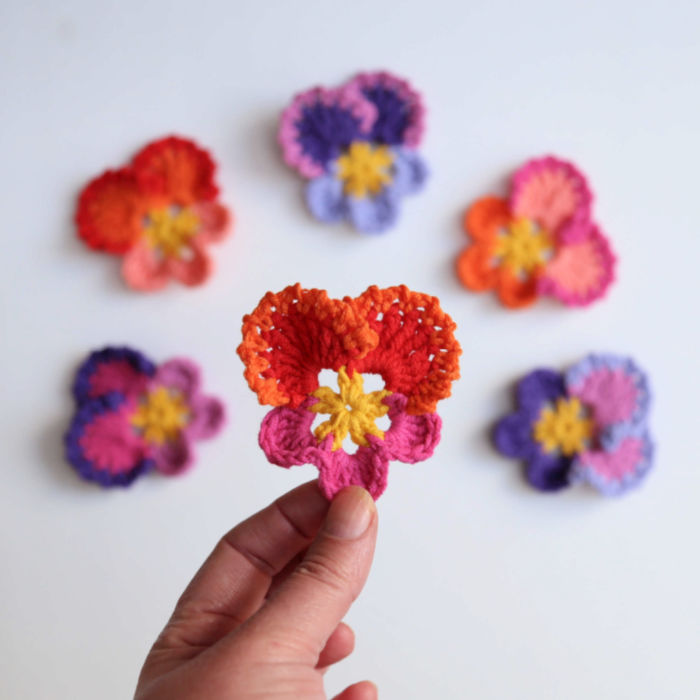
Pansies
If you need step-by-step photos for creating the Pansies, please see THIS TUTORIAL. Charts are available in the Paid PDF version of this pattern.
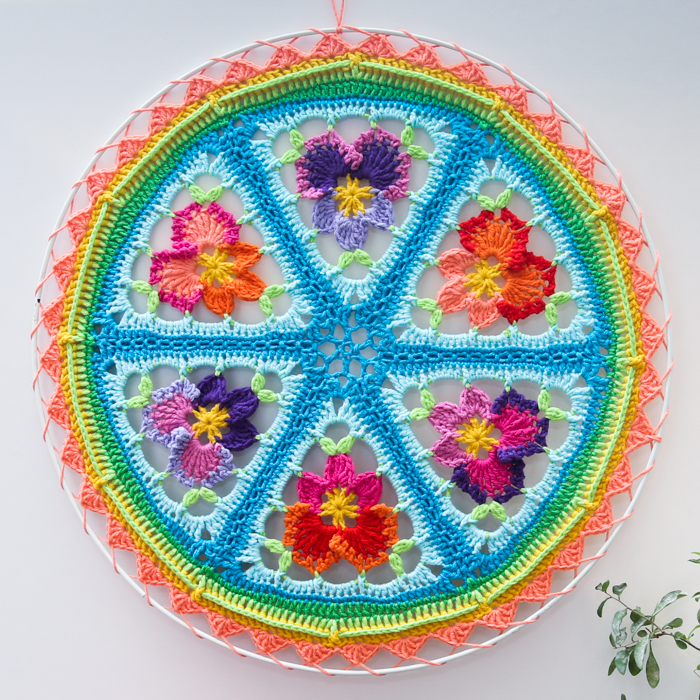
Make 6, following the Colour Chart below.
Round 1
With Yarn A and working into a magic ring: ch 3 (counts as your first dc), dc, ch 3. (2 dc, ch 3) 4 times. Tighten the magic ring and join to the top of the beg ch-3 with a sl st. Fasten off.
Stitch Count: 10 dc and 5 ch-3 sps
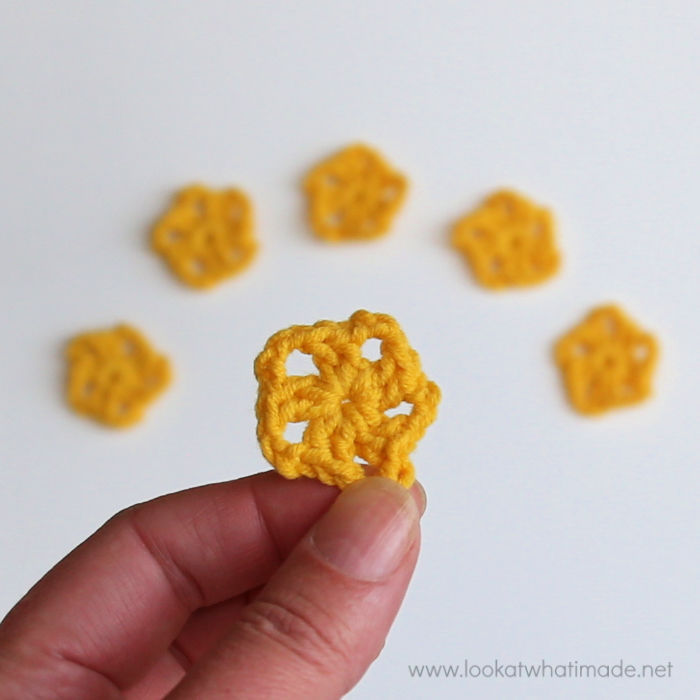
Round 2
Join Colour 2a yarn by making a standing sc between any 2-dc pair from the previous round. (Make a Small Petal in the next ch-3 sp. Sc between the next 2 dc) 3 times, changing to Colour 2b on the last yarn-over of the last sc.
Make a Large Petal in the next ch-3 sp, sc between the next 2 dc, make a Large Petal in the last ch-3 sp. Join to the first sc with a sl st. Ch 1, changing colours on the ch-1. Turn.
Stitch Count: 50 st/5 Petals
Round 3
This is not a complete round. In this round, you will only be working into the stitches of the 2 Large Petals. The wrong side of the flower should be facing you.
With WS facing, skip the sl st. (Sc, ch 2) in each of the next 22 sts. Sc in the last st, which should be the last st before the colour change, and then sl st in the same st. Fasten off and work away your ends.
Stitch Count: 23 sc, 22 ch-2 sps
Your top two petals (the Large Petals) will look a bit odd. That’s how they are meant to look. They should form a little lip between them. This “lip” should be quite flexible, allowing it to drape to one side. I like the movement this lends to the flower.
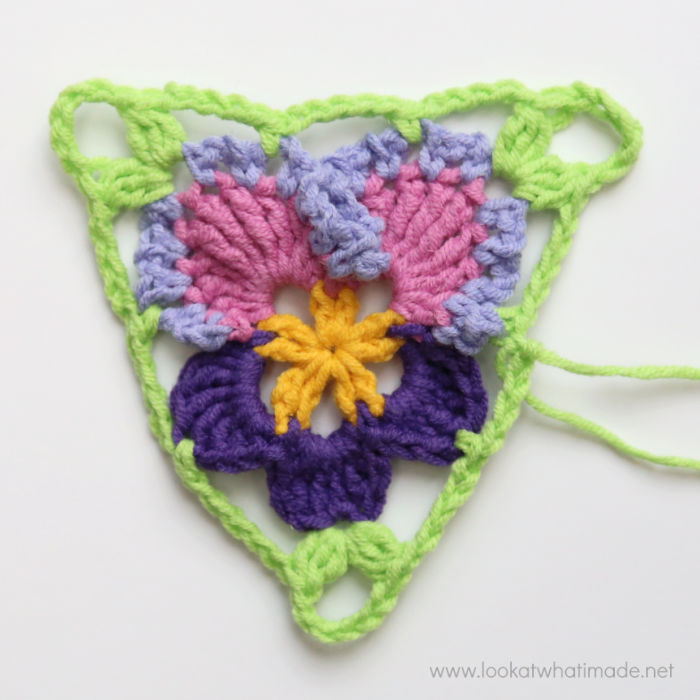
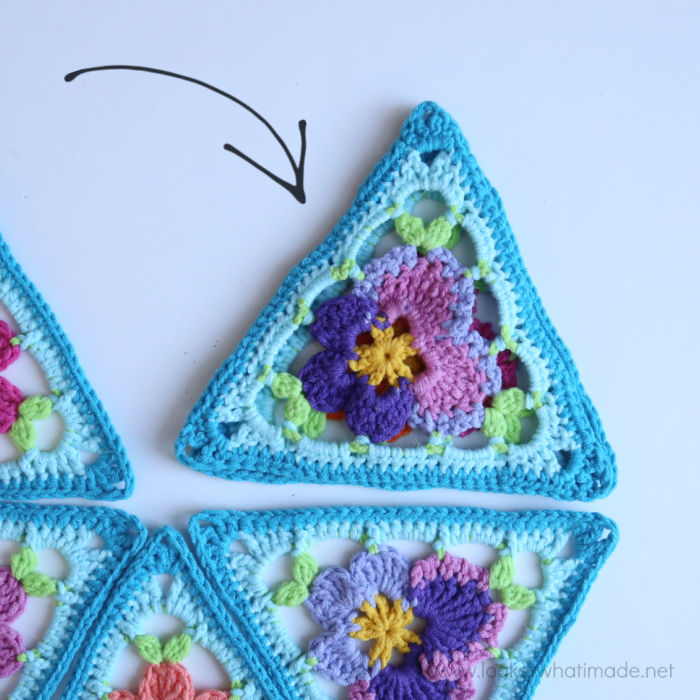
Triangles
Once you’ve made all the pansies, we are going to triangularify them.
Round 4
Join Yarn I by making a standing sc in the second ch-2 sp of the first Large Petal of any Pansy. Ch 5, skip the next 2 ch-2 sps, [Bobble, ch 6, Bobble] into the next ch-2 sp. This is your first corner made.
Ch 5, skip the next ch-2 sp, sc in the next ch-2 sp. Ch 5, skip the next 8 ch-2 sps, sc in the next ch-2 sp. Ch 5 and skip the next ch-2 sp. [Bobble, ch 6, Bobble] into the next ch-2 sp. This is your second corner made.
Ch 5, skip the next 2 ch-2 sps, sc in the next ch-2 sp. This sc should fall in the second-to-last ch-2 sp of the second large petal.
Ch 5, sc in the 5th st of the first small petal (in other words, the third tr). Ch 5, [Bobble, ch 6, Bobble] in the 5th st of the next small petal (in other words, the third tr). This is your third corner made.
Ch 5, sc in the 4th st of the last small petal (in other words, the second tr). Ch 5, join to the first sc with a sl st. Fasten off.
Stitch Count: 6 Bobbles, 6 sc, 9 ch-5 sps, and 3 ch-6 corner sps
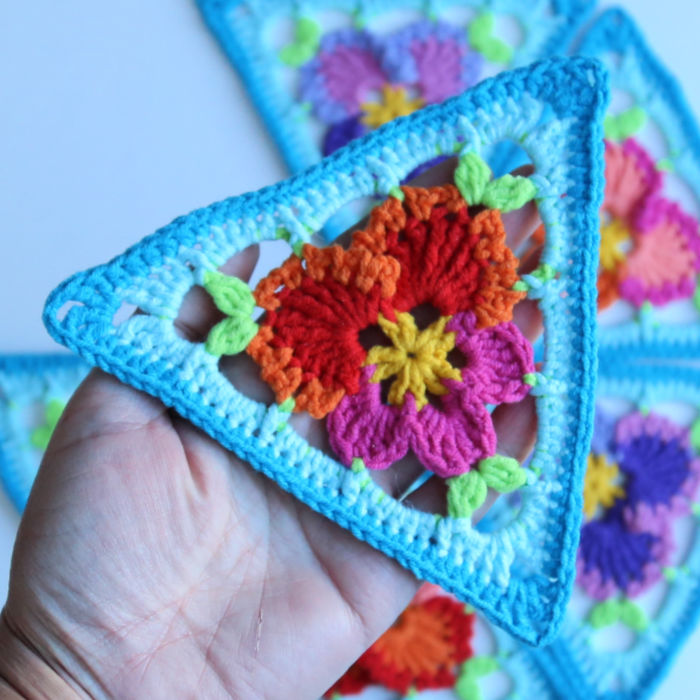
Round 5
Join Yarn K by making a standing hdc in any ch-6 corner sp around. [Hdc, dc, tr, ch 2, tr, dc, 2 hdc] in the same ch-6 corner sp. This is your first corner made. *(FPdc around the next st, 5 hdc in the next ch-5 sp) 3 times. FPdc around the next st. [2 hdc, dc, tr, ch 2, tr, dc, 2 hdc] in the next ch-6 corner sp.*
Repeat from * to * twice, omitting the last corner on the last repeat. Join to the first hdc with a sl st. Fasten off and work away your ends.
Stitch Count Per Side: 27 st – 19 hdc, 2 dc, 2 tr, and 4 FPdc, not including ch-2 corner sps.

Round 6
Join Yarn L by making a standing dc in any ch-2 corner sp around. [Tr, ch 2, tr, dc] in the same ch-2 corner sp. This is your first corner made. *Hdc in the first 5 sts. The last hdc should fall in the first FPdc. If it doesn’t, you’ve accidentally skipped the first (hidden) st. Sc in the next 17 sts. Hdc in the last 5 sts. [Dc, tr, ch 2, tr, dc] in the next ch-2 corner sp.*
Repeat from * to * twice, omitting the last corner on the last repeat. Join to the first dc with a sl st. Fasten off and work away your ends.
Stitch Count Per Side: 31 sts – 17 sc, 10 hdc, 2 dc, and 2 tr, not including ch-2 corner sps.

Blocking
You can either block the triangles now, before joining, or you can join them first and then block them. You don’t HAVE to block at all, but it makes it easier to spot tension issues or errors if you do. Plus, the triangles are so pretty when their corners are all neat!
Joining the Triangles
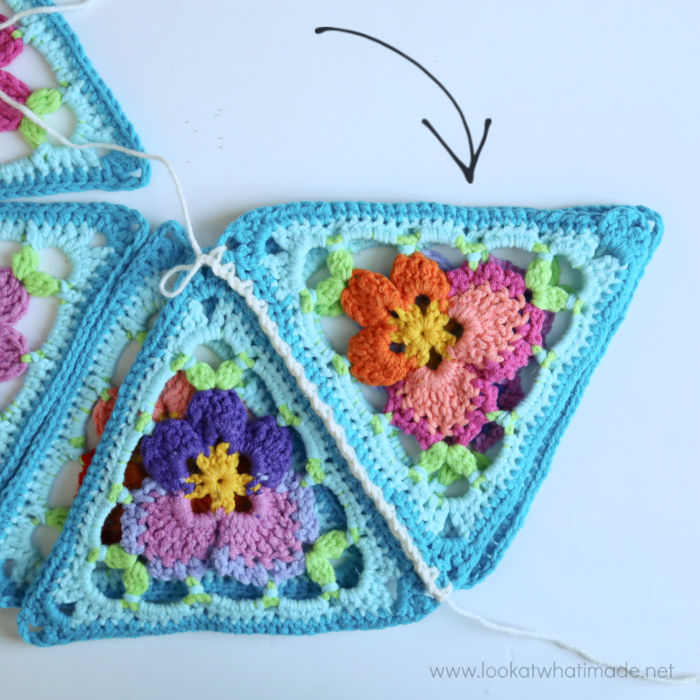
With RS facing, place the triangles in a hexagonal pattern, with the bottom of the pansies pointing inward (see Photo below).
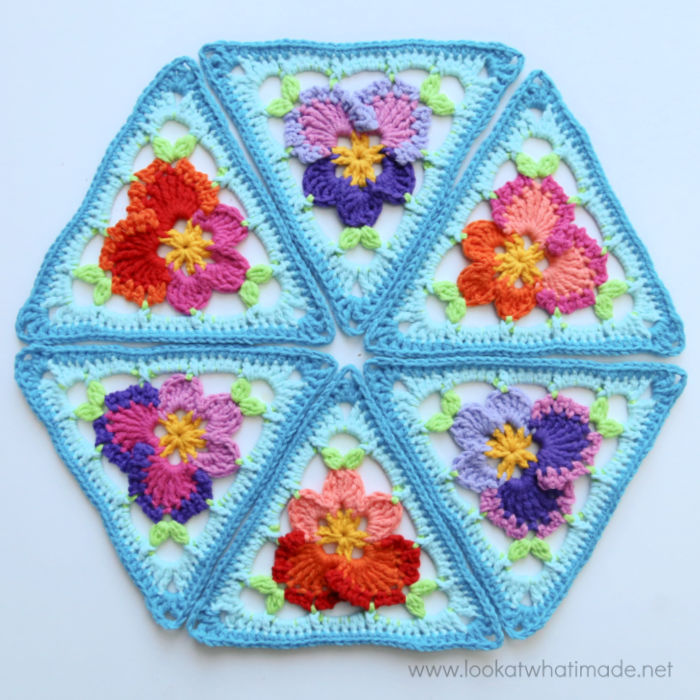
Flip Triangle 1 onto Triangle 2 so that their right sides are facing each other, and the bottom of the pansies are pointing left. If you are left-handed, flip Triangle 1 onto Triangle 6 so that the bottom of the pansies are pointing right.
*With Yarn L and a sl knot already on your hook, join your yarn by making a sc in the ch-2 sp farthest away from you working through both layers here and throughout. Ch 1. Sc in the next st, making sure that you are identifying your loops correctly. (Ch 1, skip the next st, sc in the next st) until you have worked into each st across. Ch 1. Sc in the next ch-2 corner sp. Fasten off.*
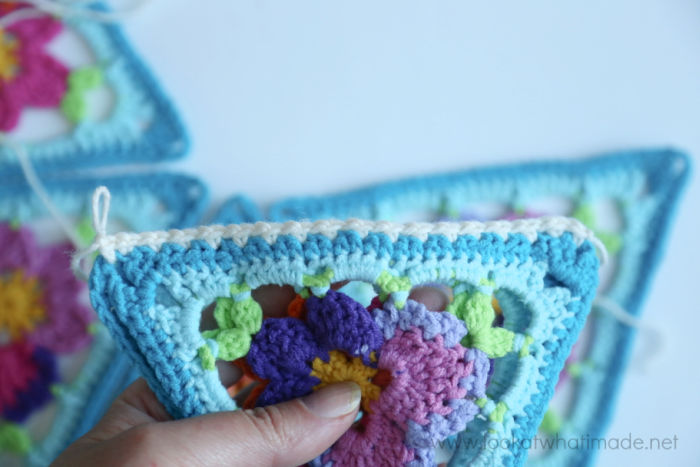
Flip Triangles 1 and 2 onto Triangle 3 (as above) and repeat from * to *. If you are left-handed, flip Triangles 1 and 6 onto Triangle 5.
Keep joining the other triangles in the same way, until you have joined all 6 triangles to each other. When you open your work back up, there will be a hole in the middle, which we will close now.
Please Note: In the photos below, the hole is a little bit bigger than yours will be because I neglected to make that final sc into the ch-2 sps. In other words, I didn’t read my own pattern!

With the RS facing you, join Yarn L by making a standing dc in the central ch-2 corner sp of any pansy triangle.

Dc in each of the 5 rem ch-2 corner sps, join to the first dc with a sl st. Fasten off and work away your ends.
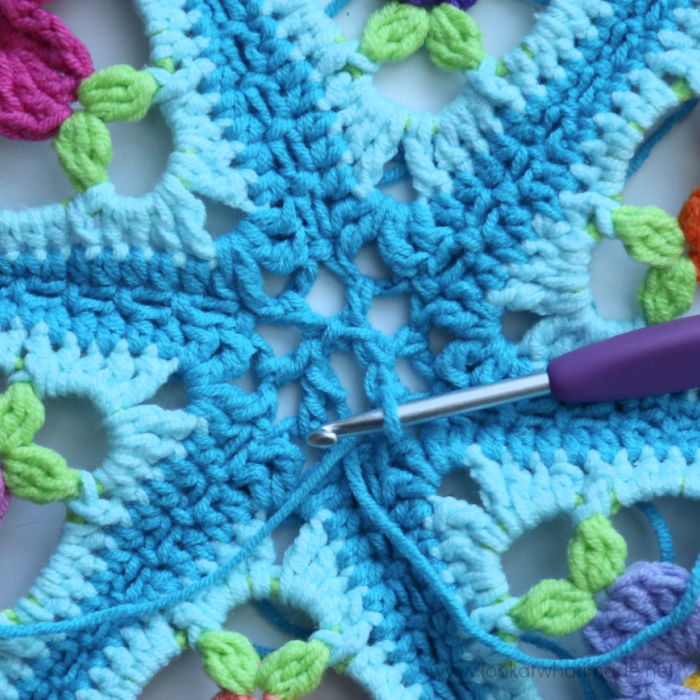
Round 7
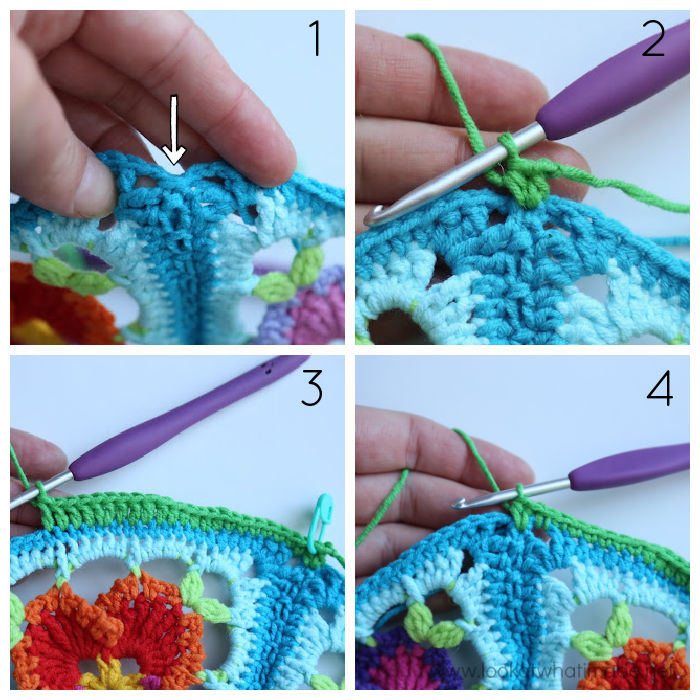
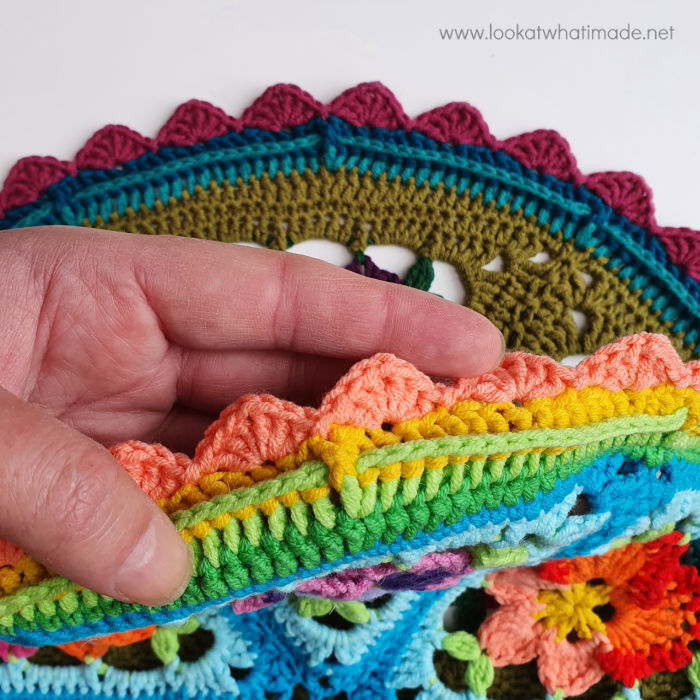
Locate the last ch-2 sp of any triangle and the first ch-2 sp of the next triangle. Between these two sps, you will see a horizontal bar (loop) created by the first st of the join {Photo 1}. This is where you will start your round.
Join Yarn J by making a standing hdc in the horizontal bar (see above). Hdc in the same bar {Photo 2}. Mark this hdc with a SM.
*Sc in the first ch-2 sp of the next triangle. Sc in the next 6 sts, hdc in the next 5 sts. Dc in the next 4 sts, make 2 dc in the next st, dc in the next 4 sts {Photo 3}. Hdc in the next 5 sts, sc in the next 6 sts. Sc in the next ch-2 sp, make 2 hdc in the next horizontal bar {Photo 4}.*
Repeat from * to * 5 more times, omitting the last 2 hdc on the last repeat. Join to the first hdc with a sl st. Fasten off.
Stitch Count: 216 sts – 84 sc, 72 hdc, 30 dc
Round 8
The increases in this round will fall in the second st of an increase from the previous round.
Join Yarn I by making a standing dc in the second (marked) hdc from the previous round. Dc in the same st. Mark this dc with a SM.
(Dc in the next 17 sts. Make 2 dc in the next st, which should be the second st of the increase from the previous round) 11 times. Dc in the last 17 sts. Join to the first dc with a sl st. Fasten off.
Stitch Count: 228 dc
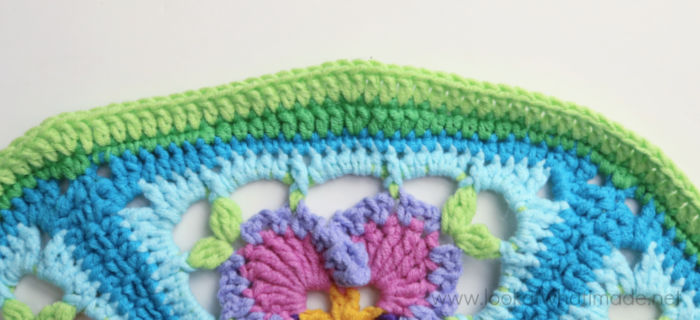
Round 9
Each [hdc, FPdc] increase will fall in the second dc of an increase from the previous round.
Join Yarn A by making a standing hdc in the second (marked) dc from the previous round. FPdc around the same st. Mark this FPdc with a SM.
(BPdc in the next 18 sts, [hdc, FPdc] in the next st) 11 times. BPdc in the last 18 sts. Join to the first dc with a sl st. Fasten off.
Stitch Count: 240 sts – 12 hdc, 12 FPdc, 216 BPdc
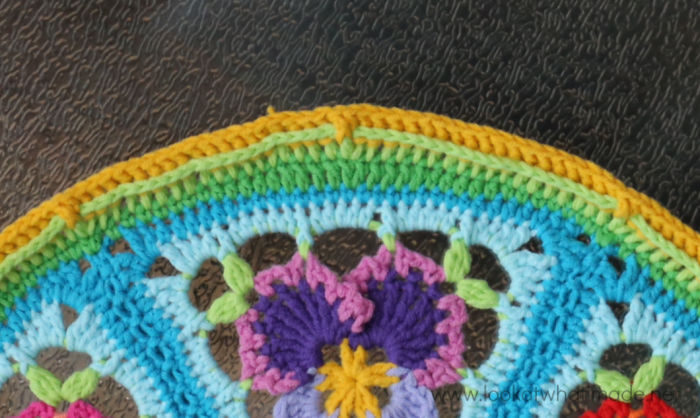
And here she is, busy blocking at the end of Round 9.
At this point, you have three options:
- Fasten off and use this mandala as a decorative ‘lappie’ (cloth) underneath vases or lamps… or whatever floats your boat
- Square the mandala up with Part 4 of Sophie’s Universe, starting in the marked st when following Round 26 of Sophie’s Universe.
- Continue on with Round 10 below to create a wall-hanging
Round 10
Join Yarn B by making a sl st in the marked FPdc from the previous round. (Skip the next 2 sts, [3 dc, ch 1, 3 dc] in the next st, skip the next 2 sts, sl st in the next st) until you have worked into every st around. The last sl st will fall in the FPdc that already contains the first sl st. Fasten off and work away your ends.
Stitch Count: 40 Shells
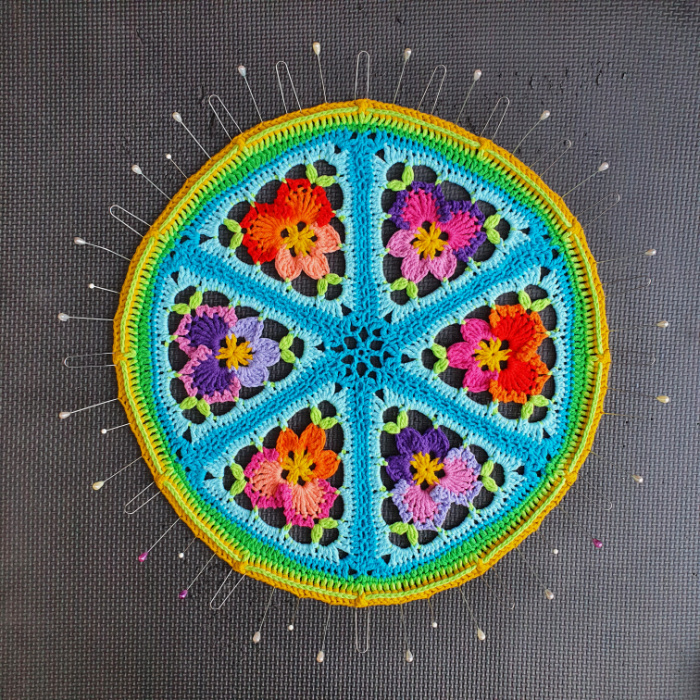
Attaching Your Pansy Pizza to a Hoop
Cut 8 lengths of scrap yarn (20cm/8”) and use these pieces to tie every fifth shell to the hoop. Make sure that you space them out evenly and that the mandala is nice and taut.
Take approx. 2m/80” of Yarn B and thread your yarn needle with it. Tie the yarn to any tied ch-1 sp around and sew the mandala to the hoop as follows:
*Wrap the needle around the hoop and insert it from back to front into the ch-1 sp at the top of the next Shell. Pull the yarn all the way through.*
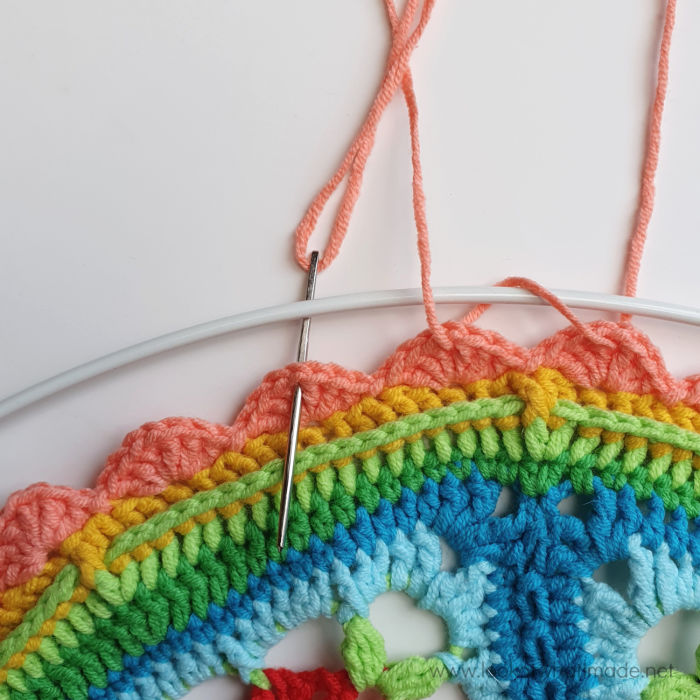
Repeat from * to * until you have sewn each Shell to the hoop. When you get back to the beginning, make sure that the Shells are neatly spaced out and gently tug on each looped stitch in turn to make sure that the mandala is secure and the stitches are uniform. When you have made sure that all the stitches are neat and as tight as you want them, tie the final yarn end to the first ch-1 sp and work away your ends.
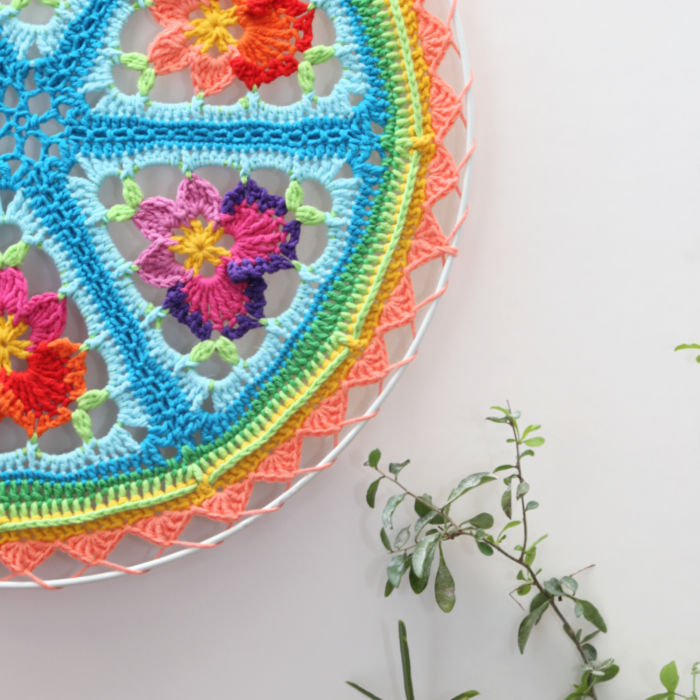
And there you have it. One Glorious Pansy Pizza, ready to be hung on your wall
Please remember to use #pansypizza when you share your photos. I would love to see them!
I am working on squaring (and growing) the Pansy Pizza, but it is proving a delicious (LEKKER in Afrikaans) challenge, so you may have to wait a few more weeks.
If I don’t see you before Christmas, have a wonderful festive season!

This blog post contains affiliate links. I only link to products I personally use or would use. All opinions are my own.


M G says
Your designs are so colorful, intricate and beautiful.
I love pansies and your pattern is so cheerful, spring is coming soon!
Thanks so much for sharing your gift of creativity with so many others!
Jenny Lowman says
Thank you! I love Dedri’s pansies too. So happy and cute!
Bethany A Tomlins says
Beautiful pattern. Pansy Pizza. I loved the last one too. Hope you had a Merry Christmas and a Safe New Year.
Jenny Lowman says
We are glad that you love Dedri’s Pansies!
Carol says
Thank you so much for this lovely pattern!
Wishing you a Very Merry Christmas and a Wonderful and Happy New Year!!
Stay safe and happy always,
Carol
Merle Bronson says
I would like to have a hard copy oF these instructions for the pansy Mandela. I can’t make a copy from my iPad. Is this possible? Thank you
Jenny Lowman says
Dedri doesn’t supply hard copies, but you can always use the PDF button from the print friendly facility at the bottom of the pattern and ask a friend to print it out for you.
Debra says
So pretty!!! My grandfather’s favorite flowers were pansies & I remember walking around the side of his house with him when I was a little girl & admiring his pansies together.Such sweet memories. I will have to try your great grandma’s pattern. Thank you sweetie. I wish you a Merry Christmas & a Healthy & Happy New Year.
Debra
Jenny Lowman says
Lovely memories, Debra! My dad planted pansies in the front garden for my mum to enjoy every year.
Britt-Helen Hjørnevik says
Finst dette mønsteret på svensk?? Nydelig!!♥️♥️♥️
Jenny Lowman says
Just English speaking in US terms Britt-Helen, sorry.
Daine says
Thank you for posting.
I wanted to make a crochet tire cover and the granny versions I’ve seen are not me.
I think this is going to look wonderful on my purple RAV4. I’ll be posting in Ravelry soon I hope.
Jenny Lowman says
That sounds wonderful, Daine! We look forward to seeing pictures.
Marianne says
Thank you. What a nice Christmas present.
Lee says
Very beautiful work.
Jenny Lowman says
Aren’t the colours so gorgeous?
Rachel says
A absolutely awesomely beautiful
Jenny Lowman says
Thank you!
Shanti says
Just too beautiful
Haju says
Lovely