This week I am honoured to bring you Part 14 of the Wonder CAL 2016, hosted by American Crochet and the Crochet With Us Facebook Group. If this is the first time you hear about the CAL, you can read all about it HERE. The short version is that it is a 21-part weekly crochet-along worked in rows, with each designer contributing 6-9 rows.
For my part I wanted to use a stitch repeat that could be used for an easy stand-alone blanket as well; something that would be visually striking in anywhere from 2 to a hundred colours. I am quite pleased with what I came up with! And the cherry on the cake is that I got to design this part while having coffee with my granny on the ‘stoep’ in South Africa!! (You can find out why I am currently in South Africa HERE.)
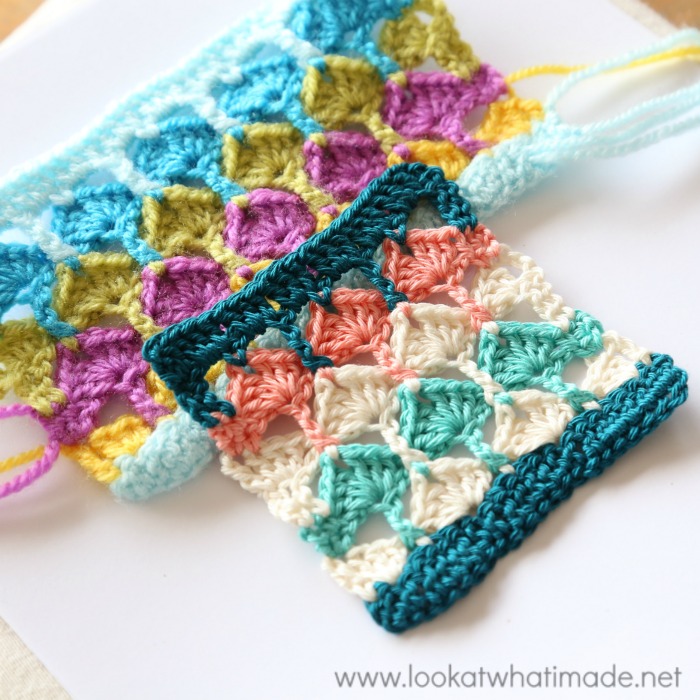
My mom and I can’t seem to agree on what this stitch looks like. I think it looks like Quiver trees and she thinks it looks like egyptian fans. It probably looks like both, but that means that I can’t decide on a name for this stitch. Feel free to suggest something!
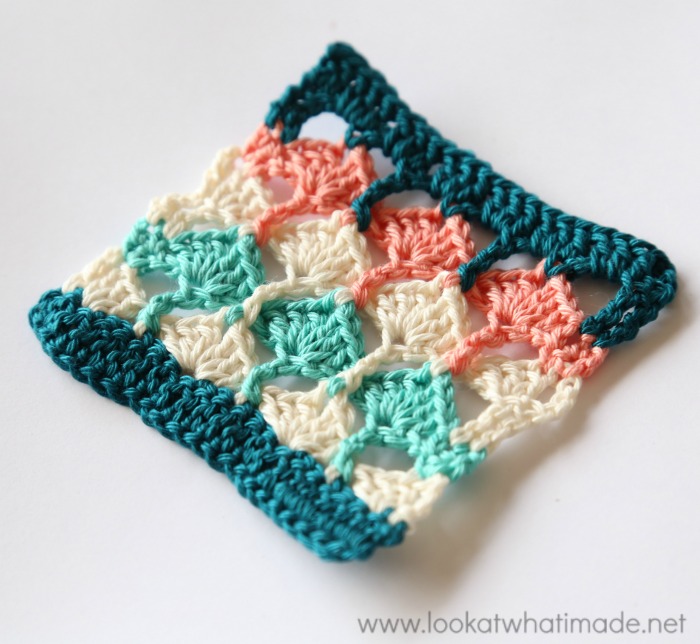
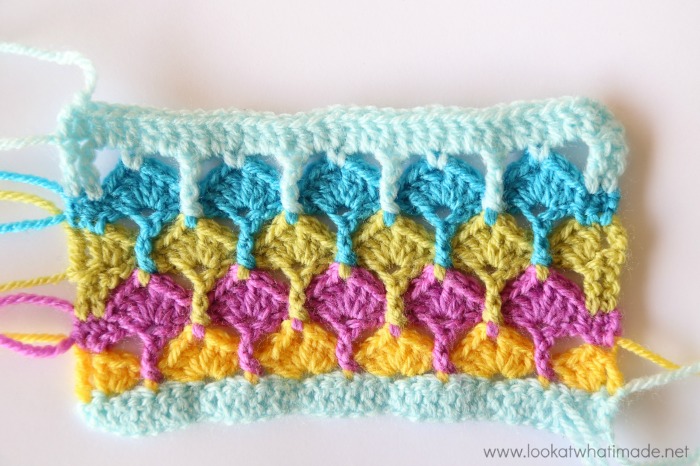
I have worked up two samples: one that uses 4 colours and one that uses a different colour for each tree/fan. Instructions are provided for when you need to change colour/fasten off, but the amount of colours you choose to use is entirely up to you.
Wonder CAL 2016: Part 14 – Trees/Fans
Materials
If you are making the Wonder CAL blanket, you will continue to use the same hook and yarn as for the rest of your project. If you want to make a blanket ONLY out of this part, please use whatever hook and yarn combination you feel comfortable with.
For this tutorial, I am using a 3.5 mm Clover Amour hook* and Scheepjes Catona in colours 401, 253, 130, and 264.
*If you haven’t seen my comprehensive post about crochet hooks yet, it is well worth reading if you want to find out more about some of the most popular brands.
Abbreviations
US Terminology
- Ch – Chain
- BP – Back post (insert your hook from back to front around the post of the indicated stitch and complete the stitch as normal)
- Dc – Double crochet
- RS – Right side
- Sc – Single crochet
- Sl st – Slip stitch
- St – Stitch/stitches
- Tr – Treble crochet
- WS – Wrong side
- * – Repeat instructions between parentheses and/or asterisks the amount of times specified
Special Stitches
- Standing Stitches – Standing stitches are exactly the same as regular stitches, except that they are made ‘in air’, without being attached to a previous stitch. Start with a slip knot already on your hook and complete the stitch as normal. Here are some tutorials for the standing double crochet and standing single crochet to get you started.
Notes
This stitch needs a multiple of 6 + 3 st to work. It will need a multiple of 6 + 5 chains if you are intending to use it for something other than adding it to the Wonder CAL blanket.
Wonder CAL (Working Into Existing Rows)
If your last row was made with the Wrong Side facing you, continue with the pattern below. If your last row was made with the Right Side facing you, make 1 row of double crochet as a base row. The Right Side of your work should be facing you when you start Row 1 below.
Starting A New Project (Working Into a Foundation Chain)
If you want to start another project using these instructions, you will need to chain a multiple of 6 + 5 st. Dc in the fourth chain from the hook (first 3 ch counts as first dc) and each chain across, turn. You should end up with a multiple of 6 + 3 st (including the initial ch-3). Continue with Row 1 below.
Instructions
Row 1
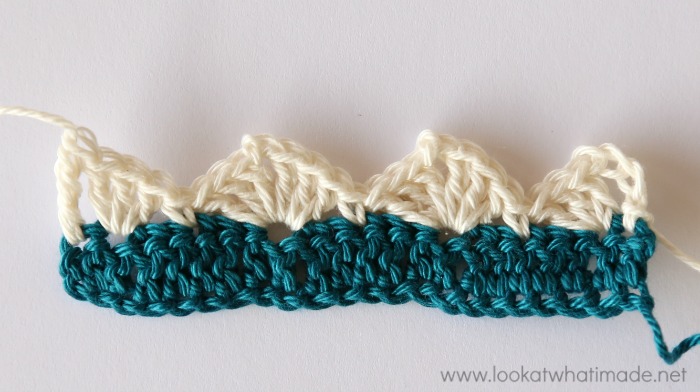
With RS facing and Colour A, join your yarn by making a sl st in the first st, ch 4 (counts as tr), make 3 dc in the next st, skip the next 2 st, sc in the next st, *skip the next 2 st, (3 dc, ch 2, 3 dc) in the next st, skip the next 2 st, sc in the next st; repeat from * until you have 4 st left, skip the next 2 st, make 3 dc in the next st, tr in the last st, fasten off and turn.
Row 2
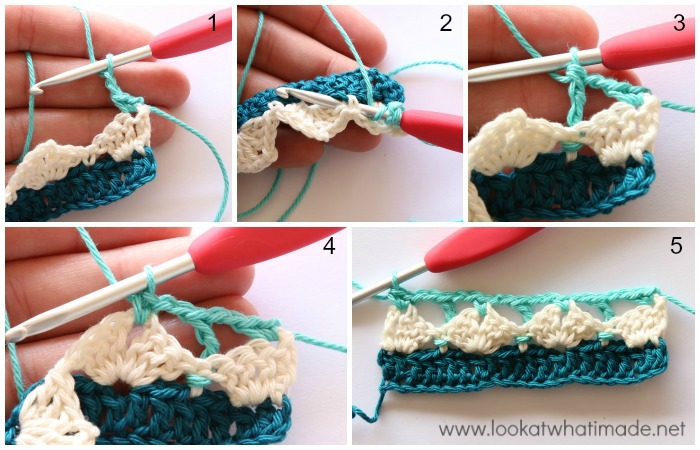
With WS Facing, join Colour B by making a standing sc in the first tr, sc in the same tr, *ch 2 {Photo 1}, BPtr around the next sc (which you will find between Shells – see Photos 2 and 3), ch 2, sc in the next ch-2 space {Photo 4}; repeat from * until you have worked into every ch-2 space, ch 2, BPtr around the next sc, ch 2, make 2 sc in the last tr {Photo 5}, turn.
Row 3
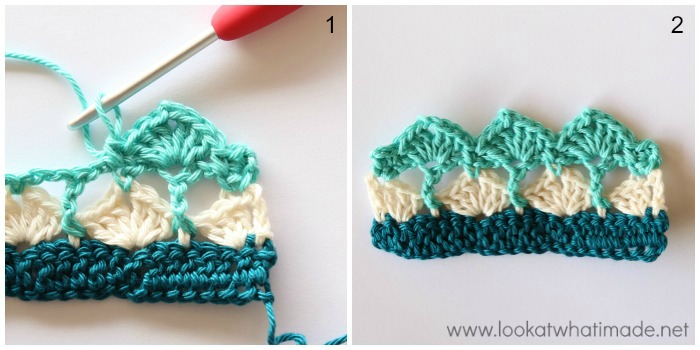
With RS Facing, ch 1 (doesn’t count as a st), sc in the first 2 st, *(3 dc, ch 2, 3 dc) in the next BPtr, sc in the next sc {Photo 1}; repeat from * until you have 1 st left, sc in the last st {Photo 2}, fasten off and turn.
Row 4
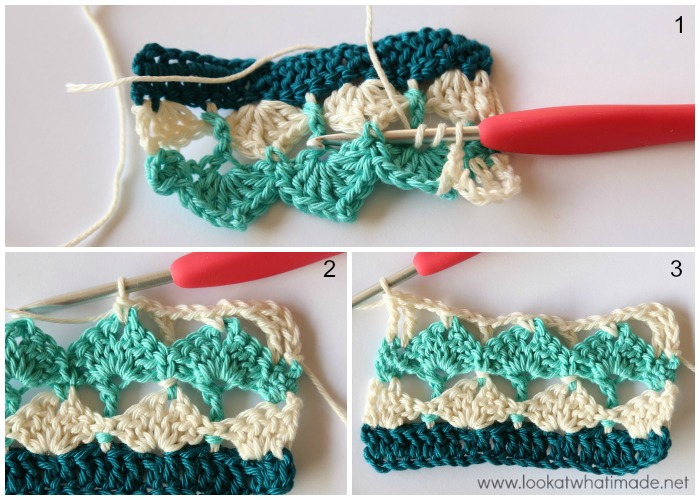
With WS Facing, join Colour A by making a sl st in the first st, ch 4 (counts as tr), tr in the next sc, ch 2, sc in the next ch-2 space, *ch 2, BPtr around the next sc from Row 2 {Photo 1 shows the back of the work with the hook inserted}, ch 2, sc in the next ch-2 space {Photo 2}; repeat from * until you have worked into every ch-2 space, ch 2, tr in the last 2 sc {Photo 3}, turn.
Row 5
With RS Facing, ch 4 (counts as tr), make 3 dc in the next tr, sc in the next sc, *(3 dc, ch 2, 3 dc) in the next BPtr, sc in the next sc; repeat from * until you have 1 ch-2 space and 2 tr left, make 3 dc in the next tr, tr in the last tr, fasten off and turn.
Row 6
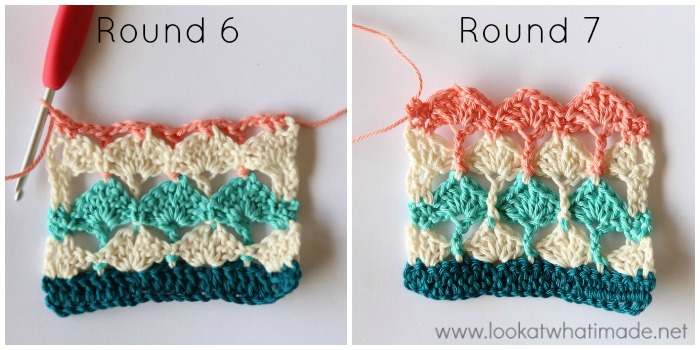
With WS Facing, join Colour C by making a standing sc in the first tr, sc in the next st, *ch 2, BPtr around the next sc from Row 4, ch 2, sc in the next ch-2 space; repeat from * until you have worked into every ch-2 space, ch 2, BPtr around the next sc from Row 4, ch 2, sc in the last 2 st, turn.
Row 7
With RS Facing, ch 1 (doesn’t count as a st), sc in the first 2 st, *(3 dc, ch 2, 3 dc) in the next BPtr, sc in the next sc; repeat from * until you have 1 st left, sc in the last st, fasten off and turn.
Note: If you want to continue using this stitch for more rows, simply repeat Rows 4 – 7 until your project is as long as you want it to be. Then continue with Rows 8 and 9 below to finish off.
Row 8
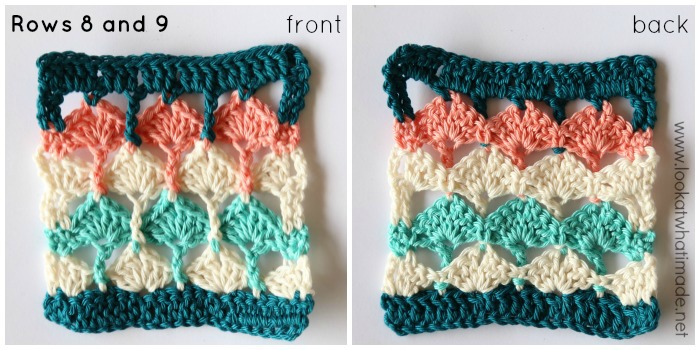
With WS Facing and Colour D, repeat Row 4. BPtr will be made into Row 6, not Row 2.
Row 9
With RS Facing, ch 3 (counts as dc), dc in the next st, *make 2 dc in the next ch-2 space, dc in the next st; repeat from * until you have 1 st left, dc in the last st, fasten off.
And there you have it. Part 14 of the Wonder CAL all done!
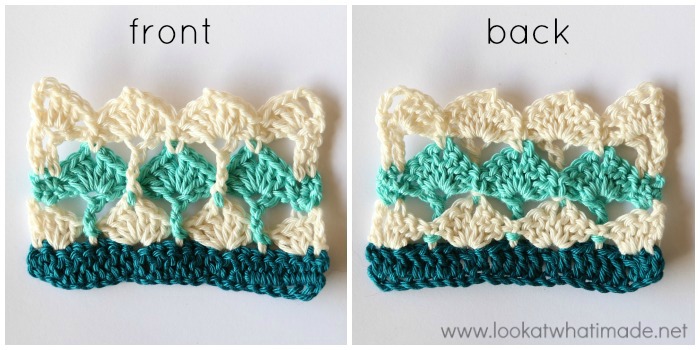
As you can see, the pattern has a very definite front and back, but I think that a blanket made solely of this stitch will be gorgeous on both sides.
Related Patterns
- Quiver Fans Dress by The Lavender Chair
- Quiver Fans Sun Hat by The Lavender Chair
If you have any feedback or questions, please leave a comment and Jenny or I will try to get back to you as soon as possible.
Feel free to share your progress on social media using #CWUACWONDERCAL2016 and #lookatwhatimadedotnet.

This blog post contains affiliate links. I only link to products I personally use or would use. All opinions are my own.


Suzandig says
Hey. I sent a screenshot. Did you get it?
Dedri Uys says
No, I didn’t. Could you email it again?
margit says
Dear Dedri,
agree with your mom, for me looks like egyptian palm tree fan
Aroha says
Love the stitch. Looks like arrow heads to me…lol
Joan Davis says
Whispering Leaves is what I see…and I just love the pattern!! Thank you so much for sharing it!!
Dedri Uys says
How poetic!
Pam says
What a striking stitch, so distinctive! You have been saying tree/fan, well how about Fan Tree?? or Palm Leaf? A rose is a rose is a rose, it will look amazing whatever you decide to name it. You are a lady with exceptional creative talent.
Dedri Uys says
Thank you, Pam :)
DIANA says
Can’t wait to try this pattern!! You always have such beautiful patterns. Thanks for sharing them.
Dedri Uys says
Thank you :)
Ellen says
Love this! reminds me of a ginkgo leaf which was my grandmothers favorite :)
Jana says
Can’t wait to see more about Charlotte!! I am nearing the end of my first square and it’s been a challenge and I’ve loved every minute of it- frogging included!!
This is such a lovely stitch. I will make a scarf or shawl with it in autumn colors and then one in blues and frosty whites for winter…I will call it the quiver leaf stitch.
thank you for all of your beautiful work Dedri! Enjoy your family- they are so precious and I have very few left.
Jana
Carol D says
Well, you’ve scored again, Dedri!
I’m loving this stitch. Really liked it when I first saw it. Then, as I was doing those boring household chores that we all hate to do, it occurred to me that this might be an beautiful addition to a little cardigan I’m planning to make for my little granddaughter….Maybe just two rows? – and then the border? Of course, I have to look carefully at stitch counts and what is needed for the stitch….but I think this would be beautiful on this particular pattern (one I found in a recent Crochet! magazine)
Now I have to take a closer look at the pattern – and at the stitch….but I think I can make it work.
THANK YOU again for once more increasing our “repertoire” of stitches! Loving it!
Hoping that you have a great tour. How awesome to sit in a room with so much family – all of whom share your love of yarny goodness! (I think I could tell which of those folded up blankets was yours, by the way!) That has to be a great “side-line” of your tour – to be able to spend time with family.
Prayers for your safety while you’re there….Enjoy! How I wish I could take part in at least one of these Workshops. I think now that I’ve done one of these, the next time I’d be able to ‘relax’ a bit and enjoy more actual crochet time….I was a bit nervous and felt ‘out of place’ among so many expert hookers in Lyme Regis.
Be Safe!
Paulette Schroeder says
Love the look of this stitch! Perhaps call it the “Quiver Fan” stitch…
Jenny says
Good suggestion, Paulette! I like the sound of quiver stitch myself :D
Jenny
Judy says
An blanket or a shawl! Thank you, once again, for an inspired, Dedri-unique design.
Jenny says
Ooh it would be lovely as either, Judy :)
Jenny
Cala says
Hmmmmm ……dink ook dit lyk soos klein koker-boompies ☺ Maar watookal die naam …. dis baie mooi! Dankie! ♥
Rebecca Barton says
This stitch looks like elegant trained trees in a formal garden. So you could call it the Espalier Stitch the Arbour Stitch.
Jenny says
Your suggestion made me think of topiary, Rebecca, but that’s not the best name for a stitch :)Jenny
Deanna Buterbaugh says
The new stitch looks like the leaf of the ginkgo tree, which is also the symbol of the city of Tokyo. The leaf looks like a fan with a long stem. You will be able to view it here:
https://upload.wikimedia.org/wikipedia/commons/thumb/c/cb/PrefSymbol-Tokyo.svg/500px-PrefSymbol-Tokyo.svg.png
Jenny says
So it does, Deanna! :)
Jenny