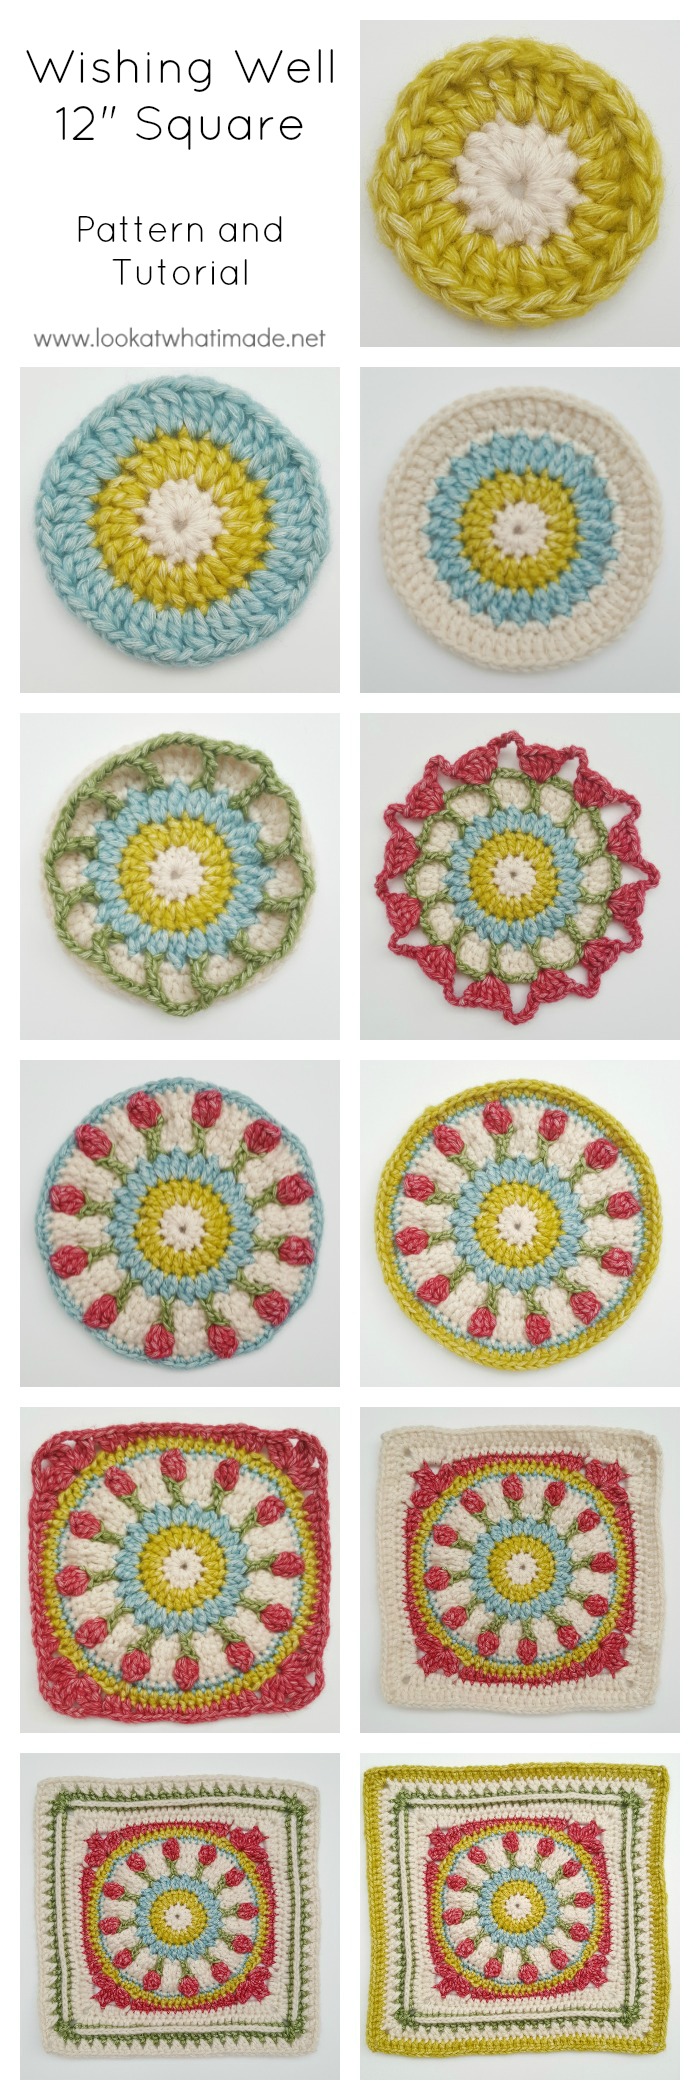
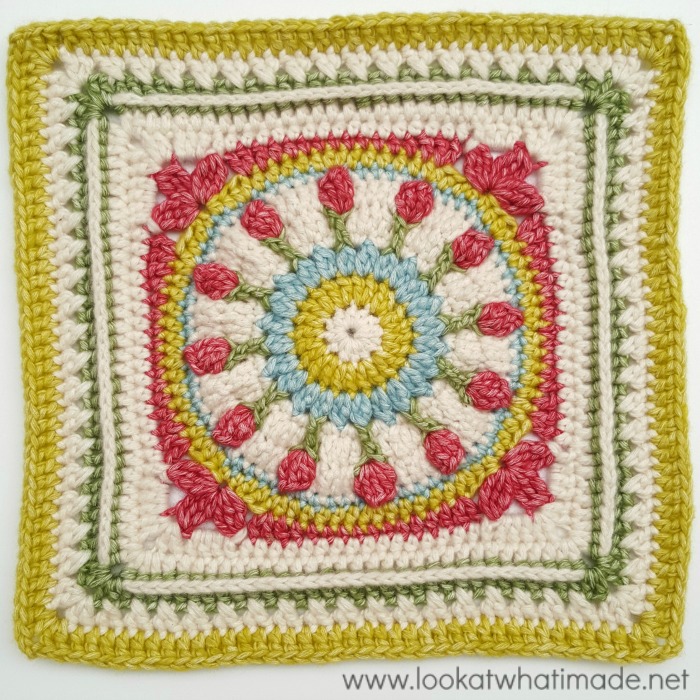
I am very excited to bring you my latest 12″ crochet square: Wishing Well. Designed for the Moogly CAL 2016, it was inspired by a flight of fancy.
My favourite book (and musical) is Les Miserables. I know the story and songs so well that I could probably perform it for you at the drop of a hat (you don’t want me to do that, though).
One of the parts that always made me sad as a child is when Mme. Thenadier tells Cosette to go and “fetch some water from the well in the wood,” to which Cosette responds: “Please do not send me out alone, not in the darkness on my own!”
I used to imagine Cosette, scared and alone, walking into the forest to find the well. My mind, rebelling against this sad vision, conjured up a magical wishing well surrounded by flowers and lit up as if a spotlight were shining on it (or a giant moonbeam if I am being totally honest).
This square is my interpretation of that imagined wishing well.
Wishing Well 12” Square
©Dedri Uys 2016. All Rights Reserved.
Tested by Jenny Lowman and Isabelle Claisse
- Ravelry: Add this pattern to your Ravelry Queue
- Hashtags: #mooglycal2016 #wishingwellcrochetsquare #lookatwhatimadedotnet
- French Translation by Véronique Malanda from Chez Horaive
Materials
- 5 mm crochet hook
- 125 meters of worsted weight yarn in 5 colours
Size
12” Square
Gauge
At the end of Round 3, your circle should measure 9 cm (3.5”)
Abbreviations
US Terminology Used
- BP – Back post (Insert hook from back to front around the post of the st)
- FP – Front post (Insert hook from front to back around the post of the st)
- Hdc – Half-double crochet
- Sc – Single crochet
- Sl st – Slip stitch
- Sp – Space
- St/st – Stitch/stitches
- Tr – Treble
- () – Repeat instructions between parentheses the amount of times specified.
- * – Repeat instructions between asterisks the amount of times specified.
Special Stitches
2-dc Cluster (Dc2tog in the Same Stitch) – Yarn over and insert your hook into the next stitch. Yarn over and draw up a loop. Yarn over and pull through 2 loops – 2 loops on hook. Yarn over and insert your hook into the same stitch. Yarn over and draw up a loop. Yarn over and pull through 2 loops – 3 loops on hook. Yarn over and pull through all 3 loops.
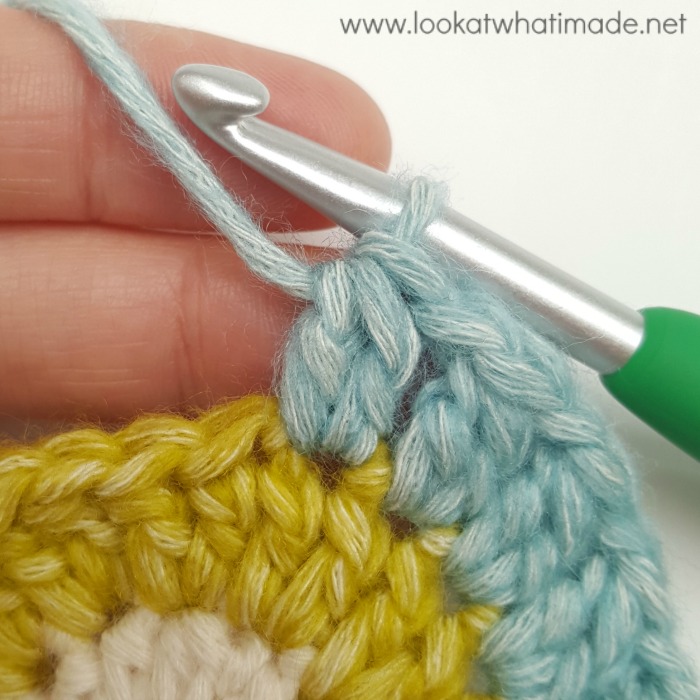
Standing Stitches – With a slip knot already on your hook, complete the stitch as normal. You can see a tutorial for the standing double crochet HERE.
Tr Bobble – Yarn over twice and insert your hook into the indicated stitch. Yarn over and pull up a loop. (Yarn over and pull through 2 loops) twice – 2 loops on hook. Yarn over twice and insert your hook into the same stitch. Yarn over and pull up a loop – 5 loops on hook. (Yarn over and pull through 2 loops) twice – 3 loops on hook. Yarn over twice and insert your hook into the same stitch. Yarn over and pull up a loop – 6 loops on hook. (Yarn over and pull through 2 loops) twice – 4 loops on hook. Yarn over and pull through all 4 loops.
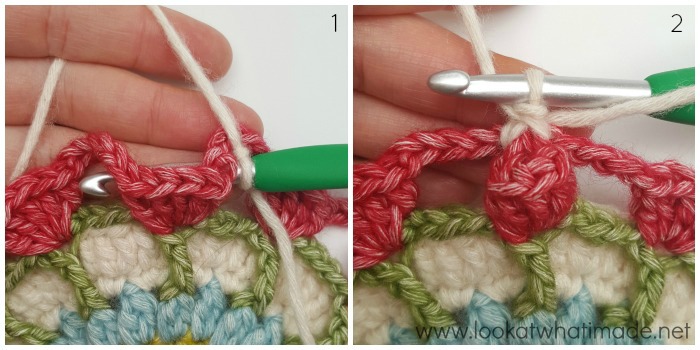
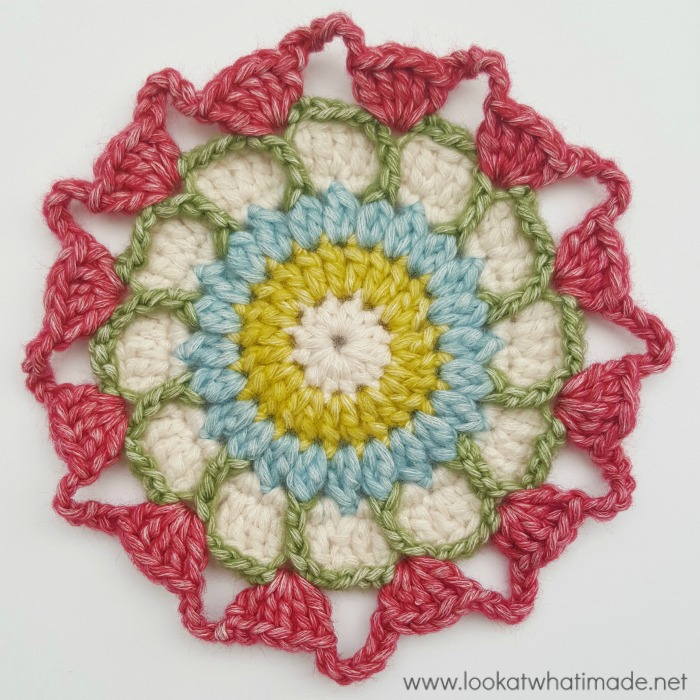
Turning 5-dc groups into Popcorns – Insert your hook from front to back into the ch-6 sp before the 5-dc group, and from back to front into the ch-6 sp after the 5-dc group {Photo 1}. Yarn over and pull up a loop. Yarn over and pull through both loops on your hook {Photo 2}. This is your FPsc made. Tug on the ch spaces so that you get a neat Popcorn.
Notes
Join to the first stitch of the round with a sl st, or use the Invisible Join. Exceptions will be highlighted.
Instructions
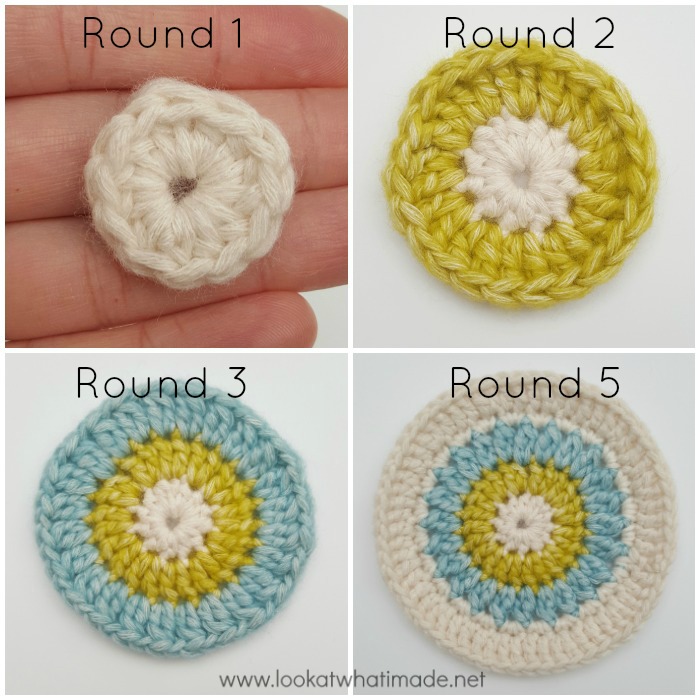
Round 1: With Colour A and working into a magic ring, ch 1 (doesn’t count as a st), 12 hdc. Join (see Notes) and fasten off. {12 hdc}
Round 2: With Colour B, join your yarn by making a standing dc in any st around. Dc in the same st. Make 2 dc in each remaining st. Join and fasten off. {24 dc}
Round 3: With Colour C, join your yarn by making a sl st in any st around. Ch 2 and make a dc in the same st. This counts as first 2-dc Cluster. (Ch 1, make a 2-dc Cluster in the next st) 23 times. Ch 1, join, and fasten off. {24 2-dc Clusters, 24 ch-1 spaces}
Round 4: With Colour A, join your yarn by making a standing sc in any ch-1 sp around. Sc in the same sp. Make 2 sc in each remaining sp. Join to the first sc with a sl st. {48 sc}
Round 5: Ch 3 (counts as first dc), dc in the same st. (Dc in the next 3 st, make 2 dc in the next st) 11 times. Dc in the last 3 st. Join and fasten off. If you are going to have trouble identifying the initial ch-3 later on, mark it with a st marker. {60 dc}
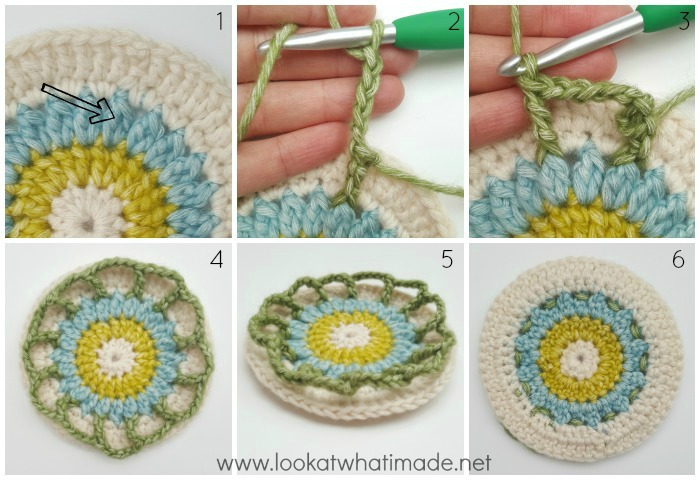
Round 6: This round will not be attached to Rounds 4 and 5. With Colour D, join your yarn by making a standing FPtr around the 2-dc Cluster from Round 3 directly below the beginning ch-3 of Round 5 {indicated with an arrow in Photo 1 and illustrated in Photo 2}. (Ch 5 and skip the next 2-dc Cluster. Make a FPtr around the next 2-dc Cluster {Photo 3}) 11 times. Ch 5 and skip the last 2-dc Cluster. Join and fasten off. {12 FPtr and 12 ch-5 sp}
Photos 4 – 6 show you what your work should look like from the front, side, and back.
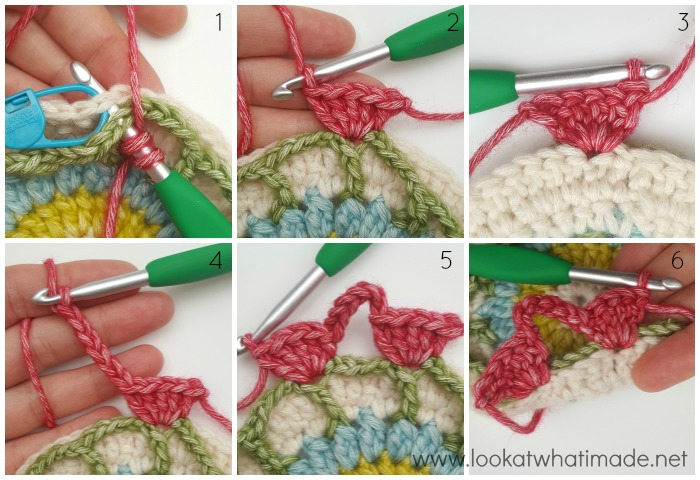
Round 7: Before you start, locate the first FPtr of Round 6, which should be directly in front of the beginning ch-3 from Round 5. This is where you will start. With Colour E, join your yarn by making a standing dc in the FPtr below the beginning ch-3 of Round 5 AND into the top of the beginning ch-3 from Round 5 (so through both layers). To do this, insert your hook into the FPtr, then insert your hook into the indicated st on Round 5 {Photo 1} and complete your dc as normal. Make 4 more dc working through both st {Photo 2 shows the front, Photo 3 shows the back}. (Ch 6 {Photo 4}. Skip the next 4 st from Round 5. The first skipped st will be slightly hidden by the 5 dc you just made. Make 5 dc in the next FPtr AND the next st of Round 5 as before {Photos 5 and 6}) 11 times. Ch 6 and skip the last 4 st of Round 5. Join and fasten off. {12 5-dc groups and 12 ch-6 sp}
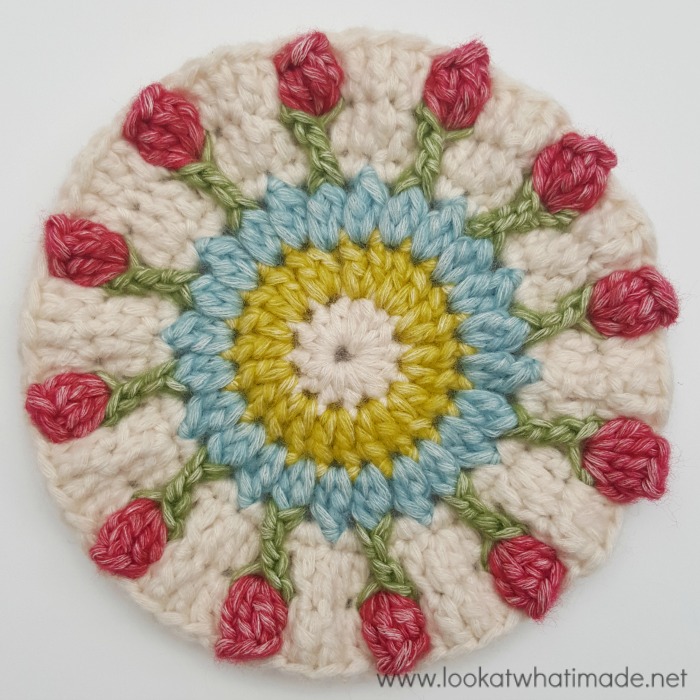
Round 8: In this round, you will be making Popcorns from the 5-dc groups (see Special Stitches above). You will also be working over the chain spaces from Rounds 6 and 7. With Colour A, join your yarn by making a standing FPsc around any 5-dc group. (Working over both chain spaces, dc in the next 3 skipped dc from Round 5, make 2 dc in the next skipped dc. FPsc around the next 5-dc group) 11 times. Dc in the next 3 skipped dc from Round 5, remembering to work over both chain spaces, and make 2 dc in the last skipped dc. Join and fasten off. {12 FPsc, 60 dc}
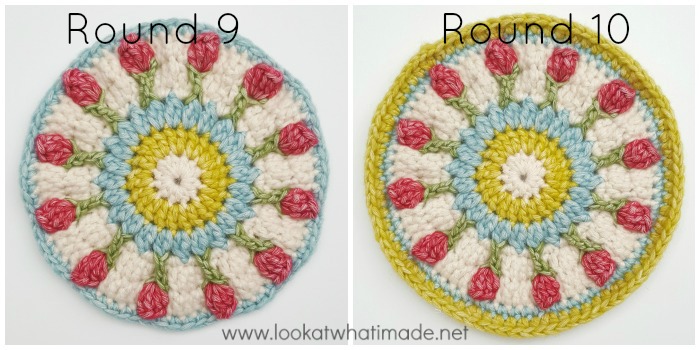
Round 9: With Colour C, join your yarn by making a standing sc in any FPsc. Sc in each of the remaining 71 st. Join and fasten off. {72 sc}
Round 10: With Colour B, join your yarn by making a standing hdc in the same st as the join. Hdc in the same st. (Hdc in the next 5 st, make 2 hdc in the next st) 11 times. Hdc in the last 5 st. Join and fasten off. {84 hdc}
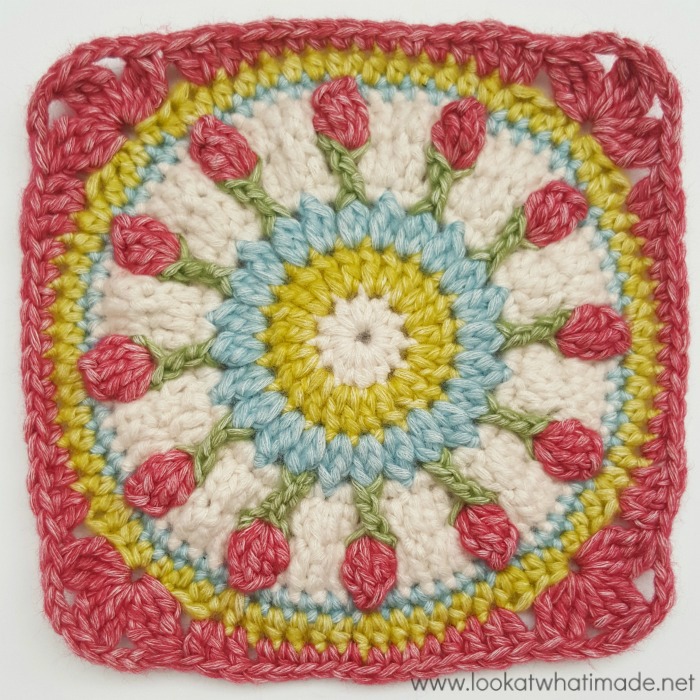
Round 11: With Colour E, join your yarn by making a standing sc in the second hdc of the previous round. Sc in the next 2 st. *Hdc in the next 2 st, dc in the next st, make 2 dc in the next st. Skip the next 3 st and make a Tr Bobble in the next st. (Ch 3, Tr Bobble in the same st) twice. Skip next 3 st, make 2 dc in next st, dc in next st, hdc in next 2 st, sc in the next 6 st.* Repeat from * to * 3 more times, omitting the last 3 sc on the last repeat. Join and fasten off. {18 st and 2 ch-3 sp per side, not including the central corner Tr Bobble – 6 sc, 4 hdc, 6 dc, and 2 Tr Bobbles}
Round 12: With Colour A, join your yarn by making a standing dc in any central corner Tr Bobble. (Dc, ch 2, 2 dc) in the same st. This is your first corner made. *Make 3 dc in the next ch-3 sp. FPdc around the Tr Bobble. Hdc in the next 16 st. Don’t accidentally skip the first st after the FPdc, which will be slightly hidden. FPdc around the next Tr Bobble. Make 3 dc in the next ch-3 sp. (2 dc, ch 2, 2 dc) in the next Tr Bobble.* Repeat from * to * 3 more times, omitting the last corner on the last repeat. Join to the first dc with a sl st. Sl st in the next st and in the ch-2 space. {28 st per side – 16 hdc, 2 FPdc, and 10 dc}
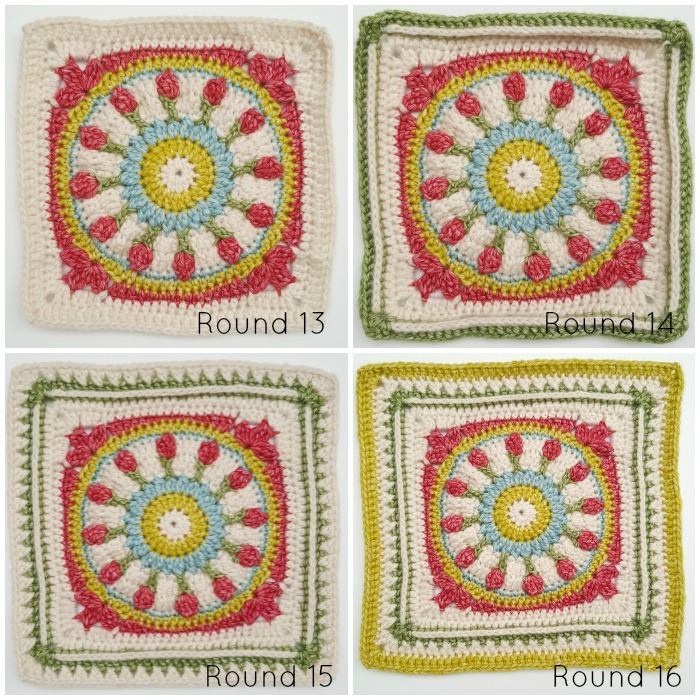
Round 13: Ch 3 (counts as dc). (Dc, ch 2, 2 dc) in the same sp. This is your first corner made. *Dc in each of the next 28 st. (2 dc, ch 2, 2 dc) in the next ch-2 corner space.* Repeat from * to * 3 more times, omitting the last corner on the last repeat. Join and fasten off. {32 dc per side}
Round 14: With Colour D, join your yarn by making a standing hdc in any ch-2 corner space. (Hdc, ch 2, 2 hdc) in the same sp. This is your first corner made. *BPdc around each of the 32 st across. (2 hdc, ch 2, 2 hdc) in the next ch-2 corner sp.* Repeat from * to * 3 more times, omitting the last corner on the last repeat. Join and fasten off. {36 st per side – 4 hdc and 32 BPdc}
Round 15: With Colour A, join your yarn by making a standing dc in any ch-2 corner space. (Dc, ch 2, 2 dc) in the same st. This is your first corner made. *Skip the first (hidden) stitch. (Skip the next st and dc in the next st. Working over the dc you just made, dc in the skipped st) 17 times. Skip the last st. (2 dc, ch 2, 2 dc) in the next ch-2 corner space.* Repeat from * to * 3 more times, omitting the last corner on the last repeat. Join and fasten off. {38 st per side – 4 dc and 34 dc}
Round 16: With Colour B, join your yarn by making a standing dc in any ch-2 corner space. (Dc, ch 2, 2 dc) in the same st. This is your first corner made. *Skip the first (hidden) stitch. Dc in the remaining 37 st. (2 dc, ch 2, 2 dc) in the next ch-2 corner space.* Repeat from * to * 3 more times, omitting the last corner on the last repeat. Join and fasten off. Work away all your ends! {41 dc per side}
I hope you enjoy making this square! If you have any questions or feedback, please leave a comment.

This blog post contains affiliate links. I only link to products I personally use or would use. All opinions are my own.


Gohar Izzat says
I absolutely love your crochet patterns and idea. I started to crochet this January. Your instructions are very clear to follow. I love your 12” square pattern. Would you please give an estimate for how much yarn do I need to make 12 square. I was thinking to make a blanket for my mom. I might use a different color for flowers in each square. Can I use Scheepjes softfun Denim yarn instead.
Thank you very much,
Gohar
Dedri Uys says
Hi :) Each square takes 125 meters of worsted weight yarn, using a 5mm hook. You can def use Scheepjes softfun denim, but it is a double knit yarn, so you would use less yarn and a 4mm hook. Your squares would be smaller (about 9″)
Lee Ann Steinmetz says
Hi Dedri,
I made this square last year, and sometime between then and now, I lost the information for it. Yesterday I logged on to Ravelry and looked at every square till I saw it! Do you know how excited I am??? Thank you for such a beautiful design. I would like to send you a photo of my square. Where should I send it?
Love,
Lee Ann
Dedri Uys says
Hi Lee Ann. I love your enthusiasm! You can send a photo to dedri (at) lookatwhatimade (dot) net.
Wajeeha says
Dear Dedri
This is Wajeeha from Pakistan, more than a year since I’ve been into crochet, done a lot of stuff but granny squares are something I don’t want to do – I don’t know why.
However, your Wishing Well has such beautiful texture, I’m going to try it.
BUT, with your permission, I want to convert this into a doily pattern. As far as I understand crochet patterns… from your pattern, if I do a few more simple Round 9 and 10, let’s say twice more, bringing us to Round 12, and skip the 3 chain stitches with the Bobble stitches, in your Round 11, I think I can wing it? Am I right?
I just love your colors, especially the white mixed red and green, will have to go search for those.
Thank you so much for this pattern, and more so for your reply in advance. :)
Dedri Uys says
Hi Wajeeha. You are welcome to play around with the pattern. Thank you for taking the time to ask me and to comment :)
Cindy says
New a crocheting and your patterns and pictures make it easy for me to develop new skills. Thanks!
Would you mind sharing the make and colors of the yarn in used in 12″ Wishing Well?
Dedri Uys says
Hi Cindy. I used Stonewashed XL in Moonstone, Amazonite,Canada Jade, Red Jasper, and Lemon Quartz.
Jill Jones says
I think I licked the yarn showing through problem: I used 2-dc clusters in the middle stitches.
Jill
Dedri Uys says
Hi Jill. I just crocheted in front of the chains. I don’t mind the chains showing at the back. Your solution is great, though, and one I have used before on other projects.
Jill Jones says
Oh dear!!
The chains show through my white yarn when I work over them. It looks great if I work in front of them but then they show in the back. I tried working two dc per stitch to cover them but it looks funny.
Any tips to correct this?
P.S. I love your blog and detailed instructions :)
SamJC says
Hi there, do you have a uk pattern for this? X
Jenny says
Hi SamJC. The pattern is only written in US terms I am afraid.
Jenny
Lisa says
I loved this square! Your directions are excellent, my only suggestion would be that you might give approximate size of it after more of the rounds. I ended up switching to a smaller hook and using hdc for rounds 13-16 after measuring at the end of end 14 and discovering I was already at 11.5″! The end result was still beautiful! Thank you for a beautiful design!
Sharone says
I love this pattern, but need some help… The circle is badly buckled and I need to know if this is usual before I carry on…mI’m only on round 4 with the sc stitches… Should I carry on… Only do 1 sc in each stitch. for this round…. Heeeeeelp
Jenny says
Hi Sharone. I don’t think mine was badly buckled at round 4.
Could you post a photo on our FaceBook page visitor post area Here so I can have a look and see if anything is awry?
Thanks.
Jenny :)
Susse says
This is so beautiful. I love it. Thanks for the great pattern and for making it so easy to follow.
Jenny says
So glad you are enjoying Dedri’s pattern Susse :)
Jenny
Jenny says
I am looking forward to trying this too, Susse :)
Ann Poprdan says
Thank you for the pattern. It is lovely.
Dedri Uys says
You’re most welcome :)
MEREDITH ROBINSON says
Thanks for this pattern. As all your patterns and tips, this was well written and the pictures were so helpful. I’m glad to have you as part of the CAL.
Julia Donnelly says
Loved making this square, such great instructions and the photos are a wonderful help! Lots of interesting stitches and nice texture.
It’s beautiful! Thanks so much.
Lesley says
I really enjoyed this pattern. Very happy with the outcome. Thanks very much!
Maaike says
Wow! I am stunned by looking at the photo’s, especially the part were the flowers (tulips?) are made. Gorgeous!! Thank you for this pattern :-)
Judy says
Like magic, ordinary dc stitches become lovely flowers a few rounds later. Amazing. I love the story behind this square–I enjoy working on pieces that have a story, even if the story isn’t mine directly. When you as a designer put your heart and soul and stories into a design, it makes me want to try that much harder to do your story proud when I recreate the piece. Thank you for sharing the story and the square pattern.
Gina says
AGH!! You know those moments when two of your worlds collide? I’m having one of those moments… I was doing the Sophie’s Universe CAL last year, but I had a really bad car accident in July and was not able to crochet for a year. I was finally able to pick Sophie back up two days ago. I’m working on the butterflies now, so my husband and I began talking LAST NIGHT about what squares I should do to make Sophie into a rectangle. So that’s world 1:
World 2: As I said, I haven’t been able to crochet, so I haven’t been able to participate in Moogly’s CAL, but I’ve been admiring the squares as they’ve been released each week. So today’s square is released, and no joke, I thought THAT’S THE SQUARE I NEED TO DO FOR SOPHIE!!! It works PERFECTLY! So I follow the link to the pattern, only to find that IT’S YOUR DESIGN!!!
I know, I’m probably the only person on this planet that thinks that’s awesome (and I apologize for all the shouting…). But finally being able to crochet again is a huge thing for me, and I’ve shed many a tear over Sophie wondering if I’d ever be able to finish her, so this world collision really feels like a God Thing. Anyways, I just wanted to share that with you. I promise, I’m not usually this melodramatic! Thank you for all the beauty you share with us!
Bettina says
Hi Gina,
love your story and am very happy to read that you are hooking again!! Very understandable that you are shouting :-)).
Are you posting your Sophie progress somewhere? I am rotgold on ravelry just in case you are a raveler yourself.
And I think its a beautiful idea to use this wishing well in Sophies Universe. I was looking at all the alternatives so far but wasnt sure what I wanted. Now I think I have found something I would like to make more than one repitition of :-). My Sophie is still a baby, she is in round 40, but very well and kicking :-).
Let worlds collide and keep on hooking :-)).
Melissa says
Your work leaves me with my mouth gapped open. You have taught this old crochet-dog some new tricks. Good work, love it!!!
Martina Kališek says
Thank you, this is an excellent example of good and adequate instructions – leaves the crocheter without any doubt that anything might have gone wrong. And the colors are beautiful, well chosen as well.
Martina Kališek says
Thank you, this is an excellent example of good and adequate instructions – leaves the crocheter without any doubt that anything might have gone wrong. And the colors are beautiful, well chosen as well.