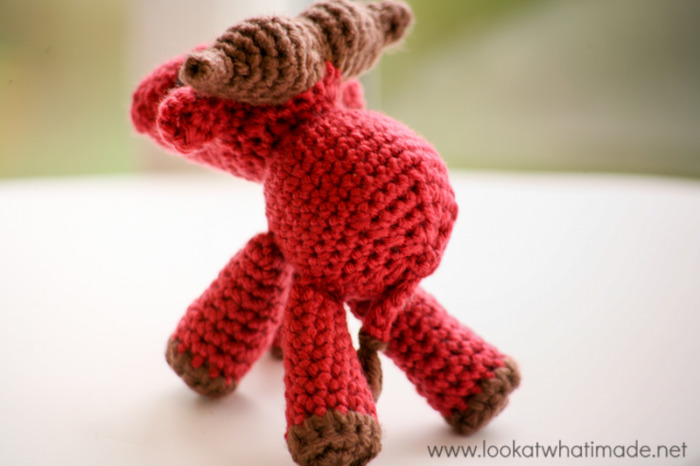
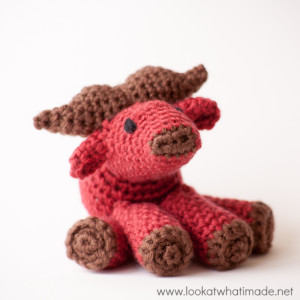
Anette has outdone herself yet again with this super cute Crochet Water Buffalo. Walter is the eighth animal in our Little Zoo Series. His horns, ears, and legs are joined as you go, making for very little sewing! The pattern contains plenty of photos and tips to make it as easy as possible for you to create your very own Water Buffalo.
Water Buffalo
©Anette Bak and Dedri Uys 2015. All Rights Reserved. Please see our Terms of Use.
This pattern has been tested by Venetia Smith, Beth Spaulding, Tess McDonald, Lesley Lord, Pam Perkins, Kay Crone, and San (from Loopsan).
Resources
- Add this pattern to your Ravelry Queue.
- To print/save this pattern, please use the Print Friendly button at the bottom of this post.*
- You can find the rest of the Little Zoo patterns HERE.
* If you are planning on printing/saving this pattern, you will need to print/save the instructions for the legs and body as well, because this pattern uses the generic Little Zoo legs and body.
Materials
- 4 mm Clover Amour Crochet Hook (US 6/G UK 8) – you can use a smaller hook if you prefer.
- 65 meters worsted weight yarn (#4) in any 2 colours (see Yarn below).
- Yarn Needle
- Stuffing
- Fabric Marker – a permanent marker will work, too, if you don’t have a fabric marker. Just make sure that it will be visible on the CC yarn you choose to use.
Yarn
I am using Deborah Norville Everyday Worsted Weight yarn.
- MC – Scarlet (50 meters)
- CC – Woodpile (15 meters)
Abbreviations
US Terminology Used. (US/UK Comparison Chart HERE)
- CC – Contrasting Colour
- Ch – Chain
- Dc – Double crochet
- Hdc – Half-double crochet
- MC – Main Colour
- Sc – Single crochet
- Sc2tog – Single crochet 2 together (single crochet decrease)
- Sc inc – Single crochet increase (make 2 sc’s in the same stitch)
- Sl st – Slip stitch
- St/st’s – Stitch/stitches
- () – This either denotes a group of stitches or the stitch counts for each round.
- * – Repeat all instructions between asterisks the amount of times specified.
Notes
RSM: Running Stitch Marker. Use a piece of scrap yarn to mark the first stitch of every round. To do that, place a piece of scrap yarn over your work before making the first stitch of the round. Flick this piece of yarn backwards/forwards over your work before making the first stitch of each subsequent round.
Instructions
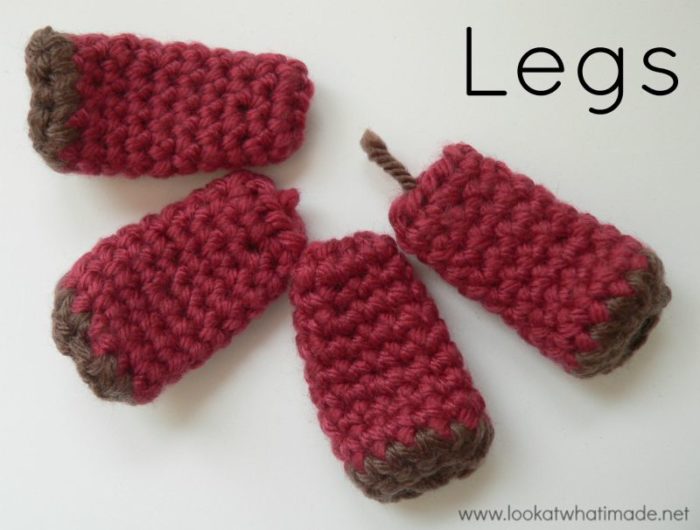
Legs and feet
Make 4 legs following THESE INSTRUCTIONS. Use MC for the legs and CC for the feet.
Ears
Make 2 with MC.
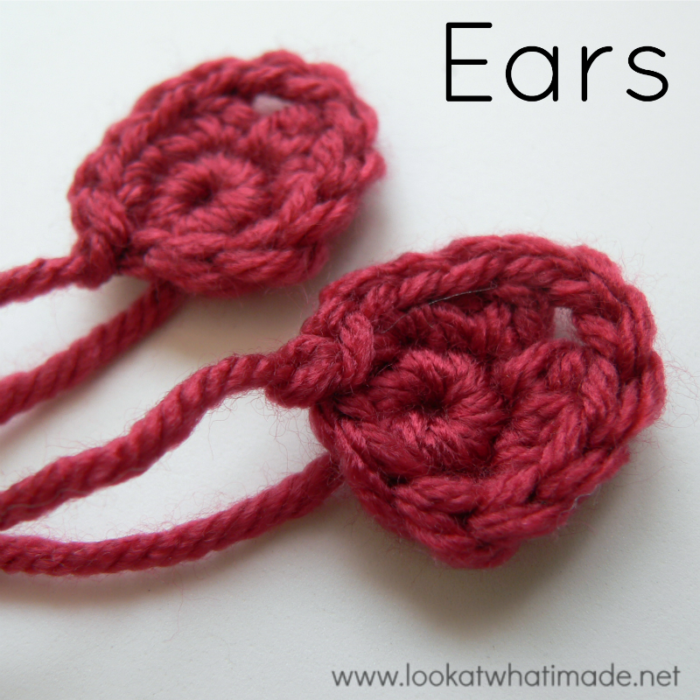
- With MC, and working into a magic ring, ch 1, 6 x sc. Join to the first sc with a sl st. (6)
- Sc inc in the next st, (hdc, dc) in next st, ch 2, (dc, hdc) in next st, sc inc, sl st in next st, ch 1 and bind off. (8)
Horns
Make 1 with CC.
- Ch 2, 4 x sc in the second ch from the hook. (4)
- 4 x sc. (4)
- 2 x *sc inc, sc*. RSM. (6)
- 6 x sc. (6)
- 2 x *sc inc, 2 x sc*. RSM. (8)
- 2 x sc inc, 6 x sc. (10)
- Sc, 2 x sc inc, 7 x sc. (12)
- 2 x *sc, sc inc*. 8 x sc. (14)
- 14 x sc. (14)
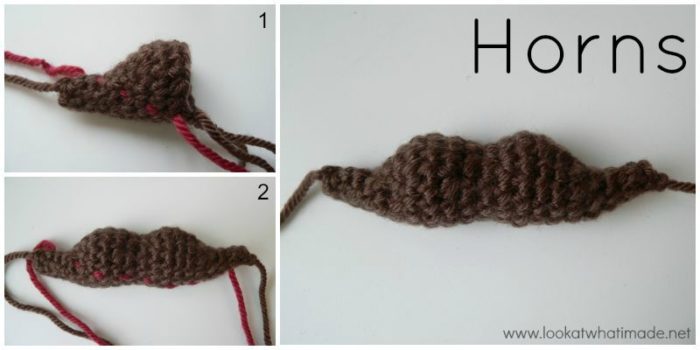
- Sc, sc2tog, 2 x sc, sc2tog, 7 x sc. (12) Stuff the horns! See Photo 1.
- 2 x sc, sc2tog, 2 x sc, sc2tog, 4 x sc. (10)
- 3 x sc, sc inc, 2 x sc, sc inc, 3 x sc. (12)
- 3 x sc, sc inc, 2 x sc, sc inc, 5 x sc. (14)
- 14 x sc. (14)
- 4 x sc, 2 x sc2tog, 6 x sc. (12) Stuff the horns some more.
- 4 x sc, 2 x sc2tog, 4 x sc. (10)
- 2 x sc, sc2tog, 2 x sc, sc2tog, 2 x sc. (8) Stuff it one more time.
- Sc, sc2tog, 2 sc, sc2tog, sc. (6)
- 6 x sc. (6)
- 2 x *Sc2tog, sc*. Sl st in the next st. Ch 1 and bind off (Photo 2). Remove your running stitch marker. (4)
Head
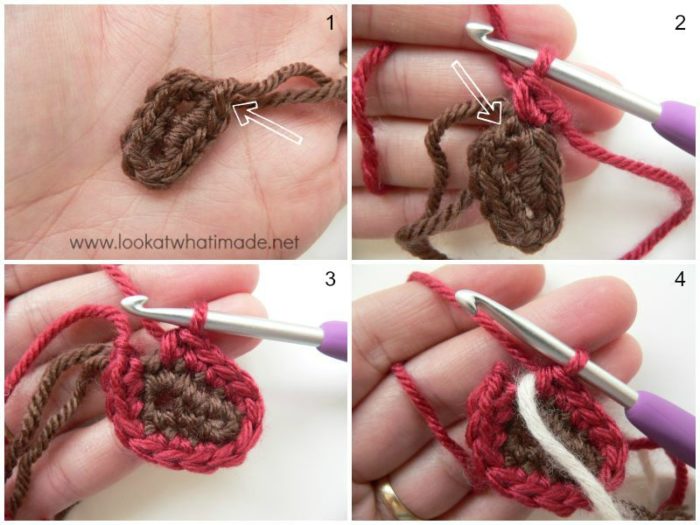
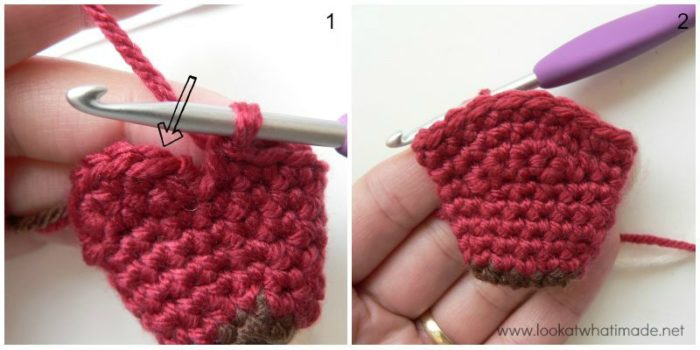
Round 1: With CC, ch 4. 3 x sc into the second chain from the hook. Sc in the third chain. 4 x sc in the fourth chain. Sc into the opposite side of the third chain. 2 x sc in the opposite side of the second chain. Join to the first sc with a sl st and bind off (Photo 1). (12 st’s – including sl st)
Round 2: Continue with MC. Sc inc in the sl st from the sl st join (indicated with an arrow in Photo 1 and illustrated in Photo 2). 7 x sc, starting in the stitch that contains the sl st join (indicated with an arrow in Photo 2). Sc inc, 3 x sc (Photo 3). RSM (Photo 4). (14)
Round 3: 14 x sc. RSM. (14)
Round 4: 3 x sc, sc inc, 4 x sc, sc inc, 5 x sc. RSM. (16)
Round 5: 16 x sc. RSM. (16)
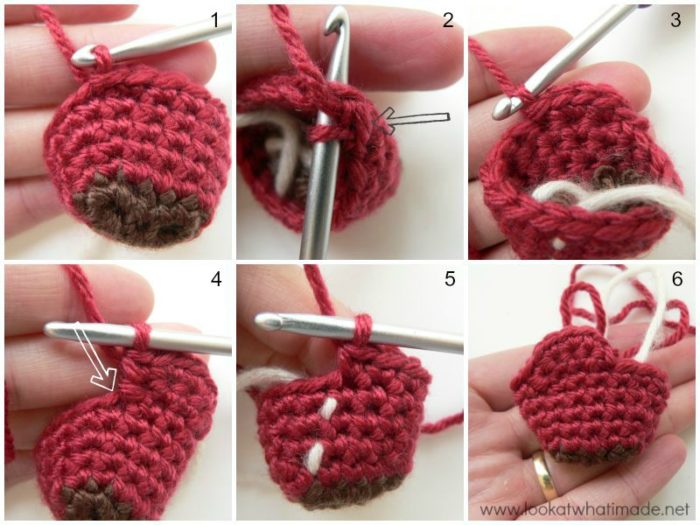
Short Row 6 (Outside Facing): 9 x sc. Sl st in the next st (Photo 1) and turn, leaving the remaining 6 st’s unworked. (9)
Short Row 7 (Inside Facing): Skip the sl st (indicated with an arrow in Photo 2). 2 x sc inc. Sl st in the next st (Photo 3) and turn, leaving the remaining 6 st’s unworked. (4)
Short Row 8 (Outside Facing): Skip the sl st. Sc, 2 x sc inc, sc (Photo 4). Skip the st with the sl st in it (indicated with an arrow in Photo 4). 6 x sc in the remaining stitches of Round 6 (Photo 5). RSM. Photo 6 shows what Short Row 8 looks like when completed. (12)
Round 9: Sc in the next 6 st’s of Short Row 7. This will bring you to the ‘step’. Sc in each of the 12 st’s from Short Row 8. This will bring you to the stitch marker. RSM. (18)
Round 10: 4 x sc, sc inc, 8 x sc, sc inc, 4 x sc. RSM. (20)
Round 11: 5 x sc, sc inc, 8 x sc, sc inc, 5 x sc. RSM. (22)
Round 12
You will be attaching the horns and the ears in this round.
Landmark: The ears will be attached by working into the 2 stitches of each sc inc from Round 11.
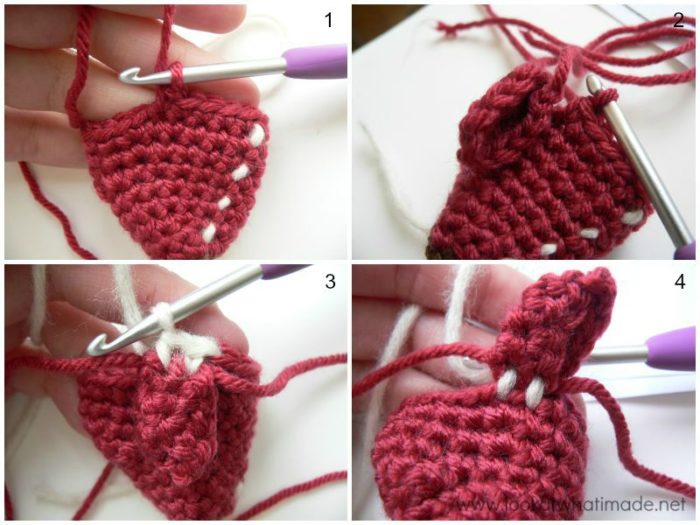
5 x sc (Photo 1).
Fold one of the ears in half, with open side pointing towards your right (left if you are left-handed), and place it in front of the head so that the flat edge of the ear lines up with your last round of stitches (Photo 2). Make 2 sc’s through all 3 layers (folded ear and head). See Photos 3 and 4 (white used for illustration only).
Attach the horns with the next 8 sc’s (see Attaching the Horns below).
Attaching the Horns
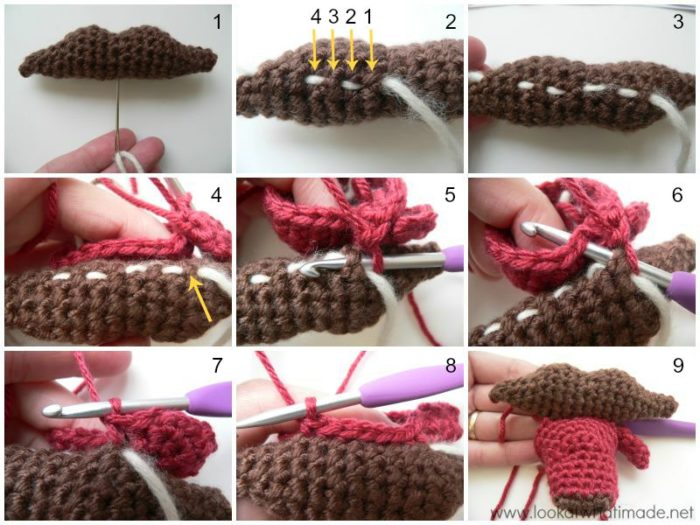
Thread a needle with about 10 cm (4”) of yarn. Locate the bottom middle of the horns (Photo 1) and make 4 running stitches to either side of the center, working into the holes formed by the rows (Photos 2 and 3). You want to mark the 8 rows you will be working around when attaching the horns. These holes should be centered.
Place the horns in front of the head, with the ‘dotted line’ lined up to the last round of the head (Photo 4). Insert your hook around the first marked row on the horns (Photo 5). Insert your hook into the next stitch of the head (Photo 6) and make a sc through both layers (Photo 7). Insert your hook around the next marked row of the horns and into the next stitch of the head. Make a sc through both layers. Repeat this until you have made 8 sc’s into the horns (Photo 8). Photo 9 shows what this attachment should look like from the front.
Once you have made all 8 sc’s into the horns (and the head), fold the second ear in half, with the open side pointing towards your left (right if you are left-handed), and place it in front of the head so that the flat edge of the ear lines up with your last round of stitches. Make 2 sc’s through all 3 layers (folded ear and head).
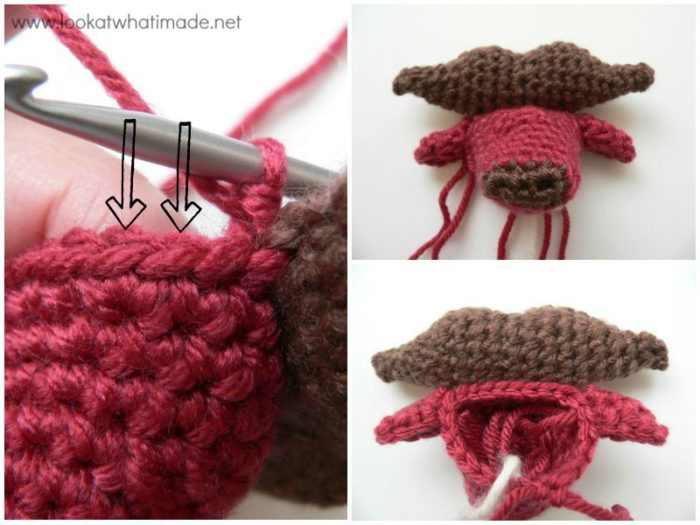
Remember that landmark I spoke about at the start of the round? Make sure that you are attaching your second ear by working into the 2 st’s of the sc inc from Round 11 (see arrows).
Sc in the remaining 5 st’s of the head. RSM. Pull up a long loop, because you are going to be doing some drawing next. (22)
Round 13
In this round, you will be crocheting into the horns again. You will be creating a semi-circle by making 8 sc’s into the back of the horns. Before you get started, you will need to mark the stitches/rows you want to work into, so turn the head so that it is looking away from you (Photo 1) and, using a fabric marker (or a marker pen), draw a semi-circle on the back of the horns so that you can see into which holes to insert your hook (Photo 2). Once you have done that, continue on with the instructions below.
Grab your working yarn again. 8 x sc. The last sc will fall in the first sc from Round 12 made into the horns (Photo 3).
The next 8 sc’s will be made only into the horns. Make 4 sc’s along the line of the semi-circle, aiming for the center top of the horns. Then make 4 more sc’s along the line of the semi-circle, aiming for the point where the horns joins the head again (Photos 4 and 5).
Sc in the next 8 st’s of the head only, making the first sc in the last sc from Round 12 made into the horns (indicated with an arrow in Photo 6 and illustrated in Photo 7). RSM. Photo 8 shows Round 13 completed (from the back). (24)
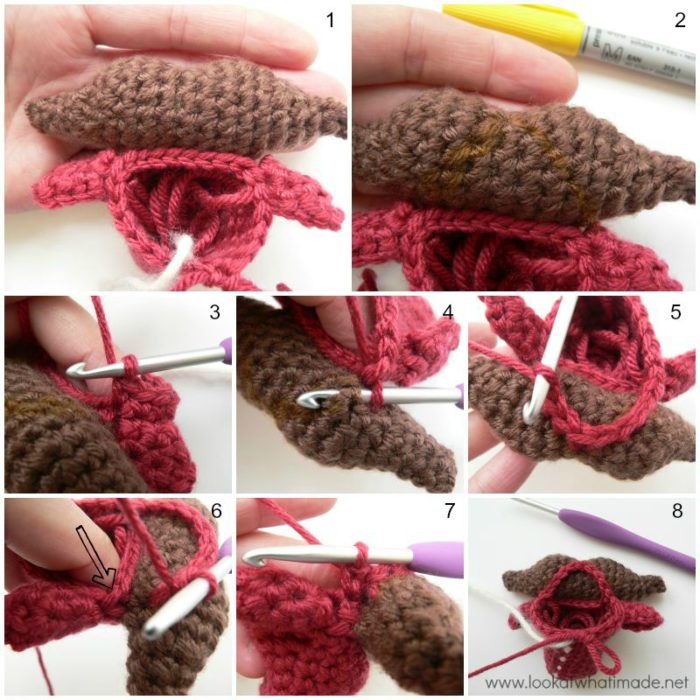
Round 14 (Bridge Row): 6 x sc, sc2tog, 8 x sc, sc2tog, 4 x sc. There should now be two stitches left before the stitch marker. This is the new start of your round, which will allow the pattern to be used with the standard Little Zoo body pattern. RSM. (20)
Round 15: 11 x sc2tog. RSM. (11)
This is a good time to stuff the head.
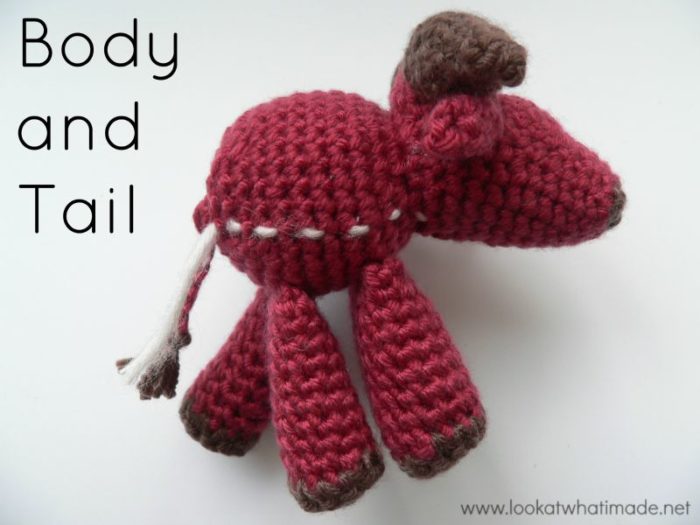
Body and Tail
Continue making the body and the tail by following THESE INSTRUCTIONS.
Adding the Eyes
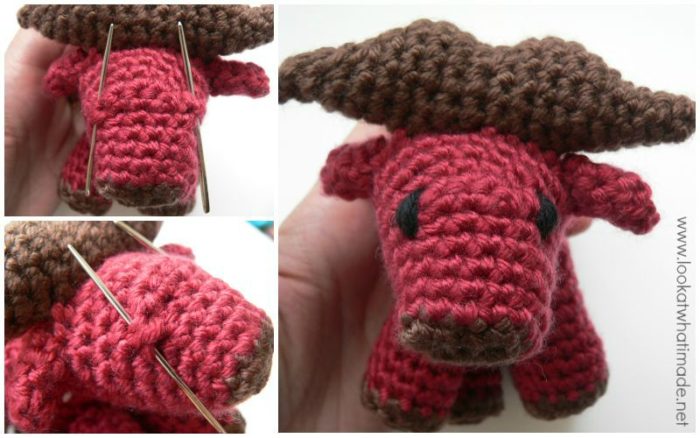
When you embroider the eyes, you will need to make them more vertical/diagonal than horizontal.
The easiest way to determine the placement for your eyes is to use two yarn needles to mark the spots where you want to add the eyes. Sometimes wordy explanations fall short, and this is one of those times. Please have a look at the photos below.
You will notice that I have marked 2 spots on a level with Short Row 7 and in line with the sides of the nose.
Add the eyes by using scrap black yarn and making a few back stitches in the two marked spots.
Embellishing the Horns
Or, as I like to call it, adding the horn thingy.
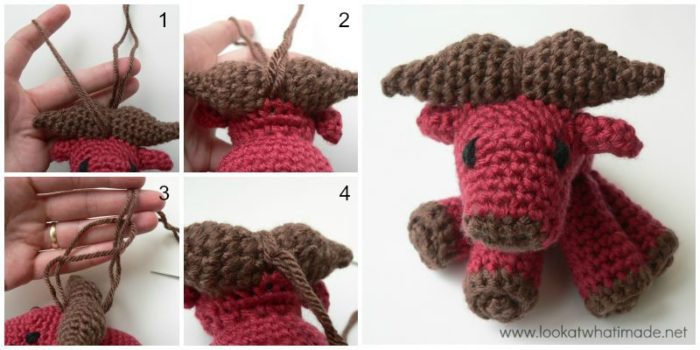
Take a 30 cm (12”) piece of CC yarn, fold it in half, and thread the two ends through a yarn needle so that you have a closed loop on the end farthest away from your needle.
Insert your needle from front to back in the center of the horns, right where the horns meet the head. Pull the yarn ¾ of the way through (Photos 1 and 2).
Insert your needle into the loop that hasn’t been pulled through (Photo 3) and pull tight, moving the resulting ‘knot’ to the back of the horns (Photo 4). The resulting loop will form a line in the center of the horns. Pull on your yarn so that this loop is nice and tight. Work your tails away right at the point where the horns meet the head (on the back).
We hope that you have enjoyed making your Little Zoo Water Buffalo. You can find the rest of the Little Zoo animals HERE.

This blog post contains affiliate links. I only link to products I personally use or would use. All opinions are my own.


gail scherer says
I am confused on row 2 of the body, I only get 23 st and 5 unused. I don’t get the 29 the directions say.This pattern is so cute. Thank you for all your work.
Dedri Uys says
Are you doing this in Round 2? *sc, sc inc* x 5 – in other words, (sc in the next st, make 2 sc in the next st) 5 times. 8 x sc – in other words, sc in the next 8 sts. *sc inc, sc* x 2– in other words, (make 2 sc in the next st, sc in the next st) twice. (29)
EQ50 says
I recently purchased your amamami puzzle ball book and am so looking forward to making the animals in it! This little guy will fit right in my zoo. Thanks for all the wonderful patterns!
Jenny says
Don’t forget to show us pictures when you complete your zoo :)
Dedri Uys says
I’m glad you like all the animals. Have fun with the amamani!