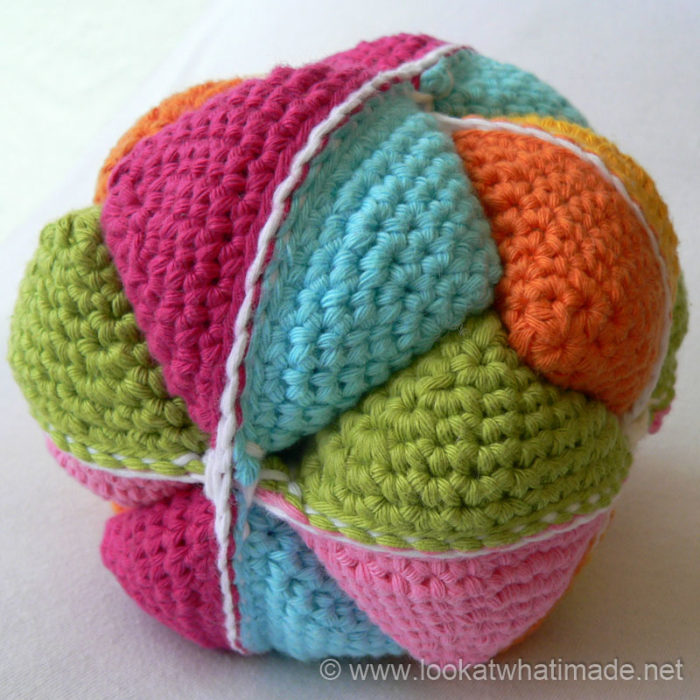
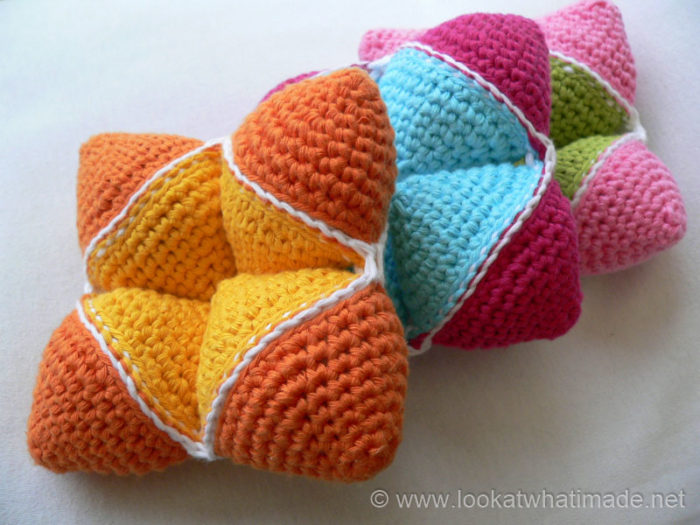
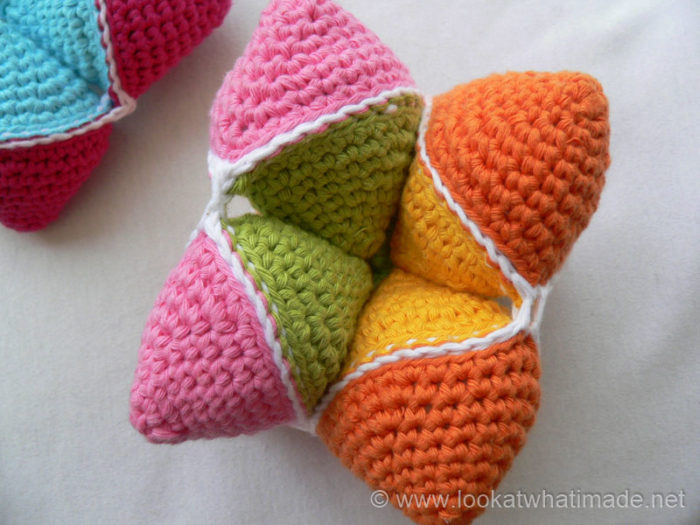
This crochet star ball is based on the traditional Amish puzzle ball and, as such, comes apart into 3 segments or “rings” that have to be assembled to form the ball. Despite how it looks, there are only 3 tiny bits of actual sewing involved in making this ball.
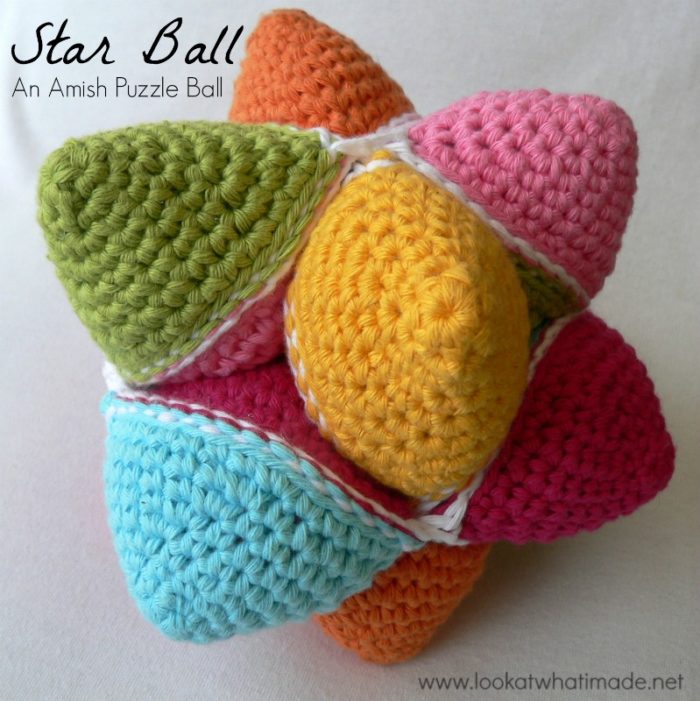
I was going to call it a Spiky Amish Puzzle Ball (erm, not very imaginative), but when little X saw the ball he went: “Wow…a (s)tar ball…can I have it?” You should have seen his little face. This was the fastest one of my completed projects has disappeared off my craft table yet.
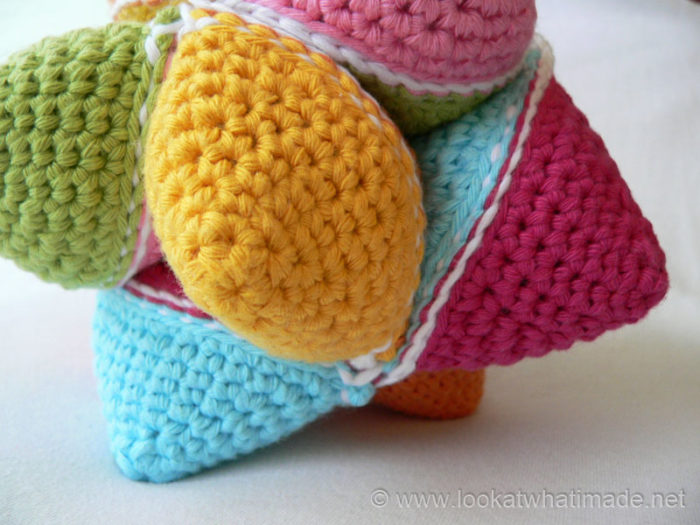
This ball is an excellent developmental ball. Not only can you change colours by turning the “spikes” around…
…but you can also fold the wedge pairs flat once the ball has been built.
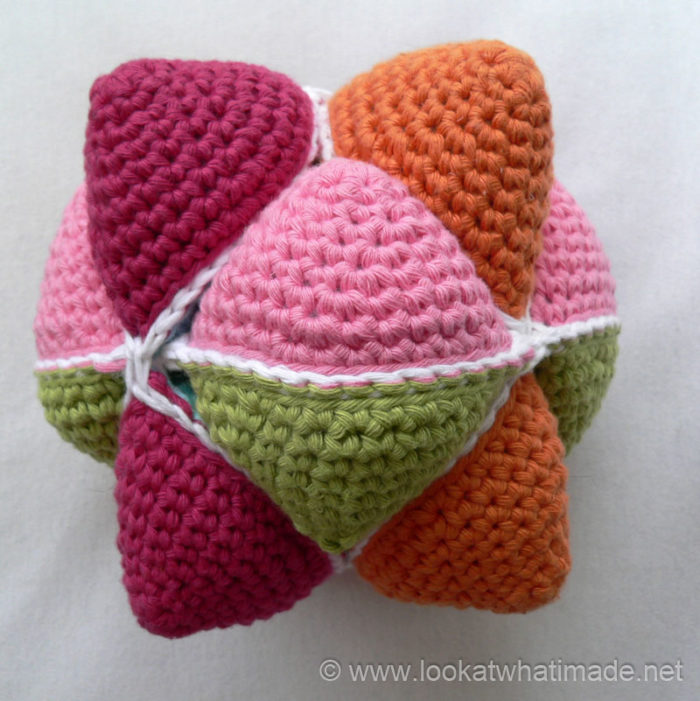
If you fold all the wedges flat, you will end up with a multi-faceted ball.
Star Ball Pattern
©Dedri Uys 2014. All Rights Reserved. (See Terms of Use)
If you would like to print this pattern, please use the print-friendly button provided at the end of the post. You can then choose to remove images from the print-out by clicking on them.
Add this pattern to your Ravelry Queue
Difficulty
Intermediate
Gauge
Gauge is not important, but it is important that you work as tightly as you comfortably can. The more tight your stitches are, the less likely you are to over-stuff the wedges (and the less likely you are to get stuffing poking out)!
Size
Using the hook and yarn specified: 7″ (17.5 cm) from point to point.
Materials
- Worsted Weight Yarn – approx 200 m/220 yards
- 7.5 m/8 yards per wedge
- 10 – 20 m/11 – 22 yards for joining the wedges (depending on which method you choose)
- 4 mm Clover Amour Crochet Hook
- Stuffing (see Stuffing Bombs)
- Yarn Needle
Suggested Yarn
- For a ball that is easy to build and wash, use acrylic yarn. I suggest Deborah Norville Everyday Soft Worsted Weight Yarn as it is soft and non-pilling. This yarn is suitable if you want a ball that little hands can build and take apart easily.
- For a very solid ball that will take some muscle to build, use cotton yarn. Why? Cotton has virtually no elasticity. “Slipping” the segments over each other becomes more of a “wrestle” the segments together. But the resulting ball has cleaner lines and is very solid and strong. So if you don’t intend for it to be used as a “puzzle” much, this is your best bet.
For this Specific Star Ball I used Drops Paris Cotton (available HERE from Wool Warehouse) in Heather (7), Light Turquoise (2), Medium Pink (33), Pistacho (39), Strong Yellow (14), Orange (13), and White (16).
Abbreviations
- Ch – Chain
- Hdc – Half-double Crochet
- RSM – Running Stitch Marker (see Running Stitch Marker below)
- Sc – Single Crochet
- Sl st – Slip Stitch
- St/s – Stitch/Stitches
- () – Repeat the instructions between parentheses the amount of times specified
- {} – Stitch Counts
Running Stitch Marker
The wedges are worked in a continuous spiral, so you will be making the first st of each round in the first st of the previous round. To help you keep track of your rounds I suggest using a Running Stitch Marker.
A Running Stitch Marker is a piece of yarn that is place over your work before making the first st of a round. It is then flicked backwards/forwards over your work before making the first st of every subsequent round. It will form a running stitch up your work, helping you to identify the first st of every round. In this pattern, your Running Stitch Marker should creep slightly to the right as you work (left if you are left-handed). The last st of a round should fall in the st before the RSM.
You can read more about Running Stitch Markers and working in a spiral in HERE.
Instructions
For the Star Ball you will need to make 24 wedges as stipulated below. So I suggest keeping this project for tv-time and waiting at the doctor’s office.
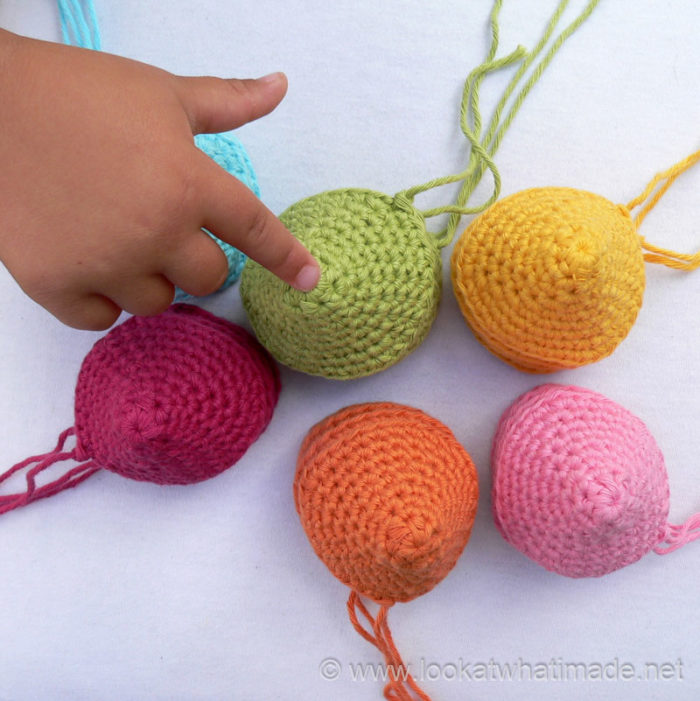
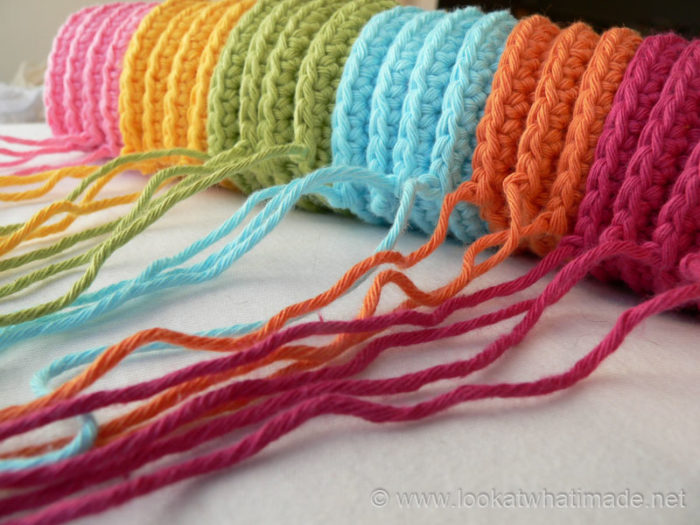
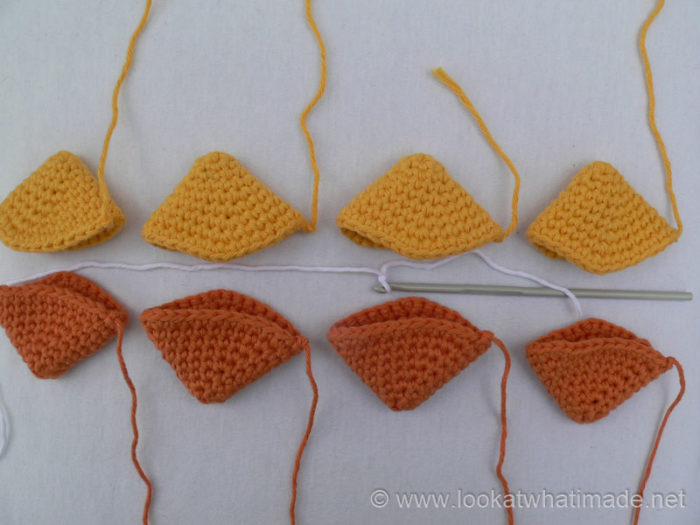
Seamless Wedges
Make 24 in any colour you fancy. I am using 6 colours and making 4 of each.
- Into a magic ring: ch 1 (this does not count as a stitch), 6 x hdc. Tighten the ring. Place a piece of scrap yarn over your work to mark the beginning of the next round. {6}
- Make 2 sc’s in the first hdc of the previous round. This is your first increase. Sc in the next st. (Make 2 sc’s in the next st, sc in the next st) twice. Flick the piece of scrap yarn back over your work before making the first st of the next round. From here on out you will do this every time you see RSM. {9}
- (Make 2 sc’s in the next st, sc in the next 2 st’s) 3 times. RSM. {12}
- (Make 2 sc’s in the next st, sc in the next 3 st’s) 3 times. RSM. {15}
- (Make 2 sc’s in the next st, sc in the next 4 st’s) 3 times. RSM. {18}
- (Make 2 sc’s in the next st, sc in the next 5 st’s) 3 times. RSM. {21}
- (Make 2 sc’s in the next st, sc in the next 6 st’s) 3 times. RSM. {24}
- (Make 2 sc’s in the next st, sc in the next 7 st’s) 3 times. RSM. {27}
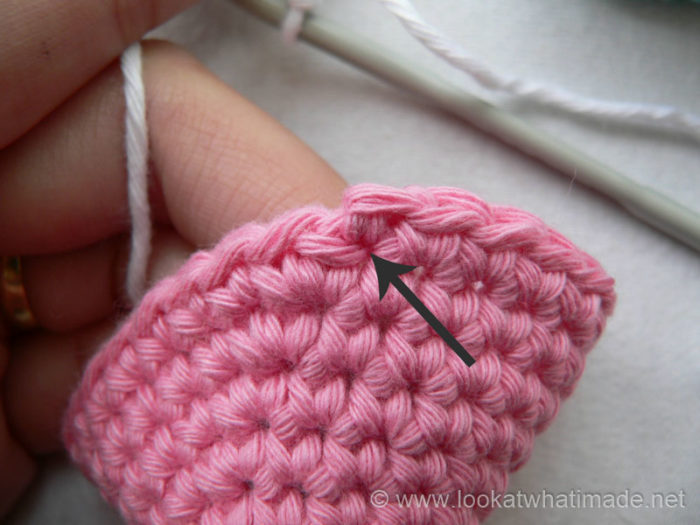
- (Make 2 sc’s in the next st, sc in the next 8 st’s) 3 times. {30}
Sl st in the next st. Ch 1 and bind off. Remember to remove the running stitch marker when you are done with your wedge.

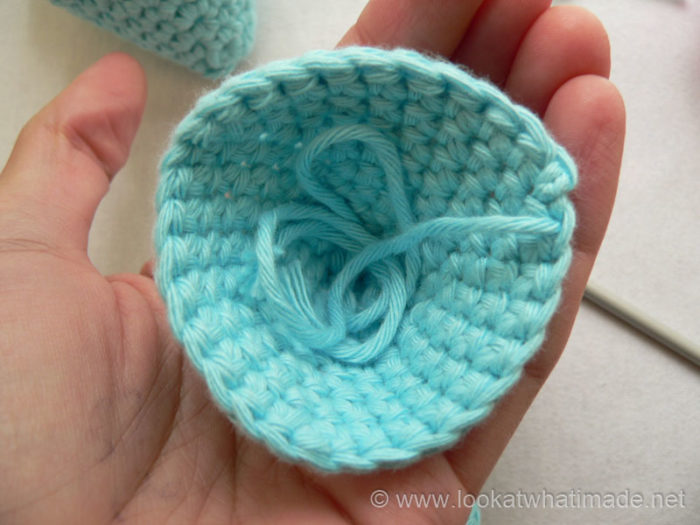
Preparing the Wedges for Attachment
Insert your hook into the stitch containing the sl st, from the outside of the wedge to the inside, and pull the end tail of yarn through to the outside of the wedge.
Insert your hook into the next st, from the inside of the wedge to the outside, and pull the tail of yarn through to the inside of the wedge. Pull it quite tight so that the knot formed by the ch-1 is no longer visible.
Pulling the tails into the wedge like this means that there is no need to work away the tails of yarn and it eliminates the bump formed by the ch-1 bind-off.
Joining the Wedges
Please note, in the photos below I have not pulled the end tail of yarn into the wedges yet, because I only realized that it would be easier to do so after I had attached the first segment.
You will be attaching the wedges to each other in groups of 8, or 4 pairs.
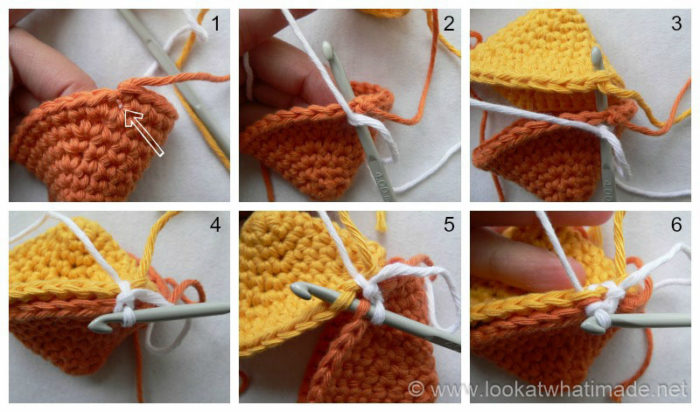
Attaching the First Pair of Wedges
Pick up the first wedge. Insert your hook from the outside of the wedge to the inside into the st containing the sl st (Photos 1 and 2). Place the next wedge behind the first wedge, with the right sides facing away from each other, and insert your hook from the inside of the wedge to the outside into the stitch containing the sl st (Photo 3). Now make a sl st through both layers (Photo 4).
The next 14 st’s will be made into the back loop only (blo) of the wedge closest to you and the front loop only (flo) of the wedge furthest away from you. So insert your hook into the blo of the next st on the wedge closest to you AND into the flo of the next st of the wedge furthest away from you and make a sl st (Photos 5 and 6).
Make 13 more sl st’s through both layers (Photo 10). You should now have made 15 sl st’s in total. Insert your hook into both loops of both layers of the next st (Photo 11) and make a sl st. You are working through both loops for this last st because it will make the join between wedges stronger.
Phot0 7 shows what the sl st’s should look like. Photo 8 shows the sl st’s from the top (closest to you). Photo 9 shows the sl st’s from the bottom (furthest away from you).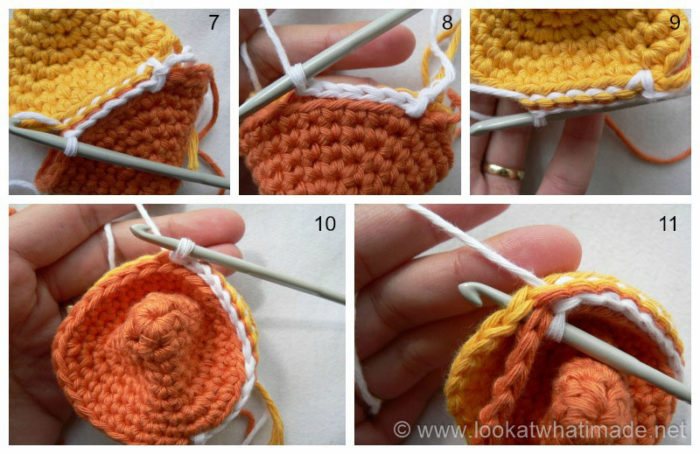
Attaching the Second and Third Pairs of Wedges
You will now join the next pair of wedges to each other, so pick up the next 2 wedges and hold them with right sides facing away from each other. Insert your hook into the st’s containing the sl st’s as before (Photo 12), and make a sl st through both layers.
(Sl st into the blo of the next st on the wedge closest to you AND into the flo of the next st on the wedge furthest away from you – so both layers) 14 times. Sl st through both loops of the next st of both wedges.
Join the next pair of wedges to each other in the same way.
Attaching the Fourth Pair of Wedges
Join the last pair of wedges by making a sl st through both layers of the stitch containing the sl st (as before). (Sl st into the blo of the next st on the wedge closest to you AND into the flo of the next st on the wedge furthest away from you – so both layers) 14 times. (Sc, ch 1, sc) through both loops of the next st of both wedges (Photos 14 – 16).
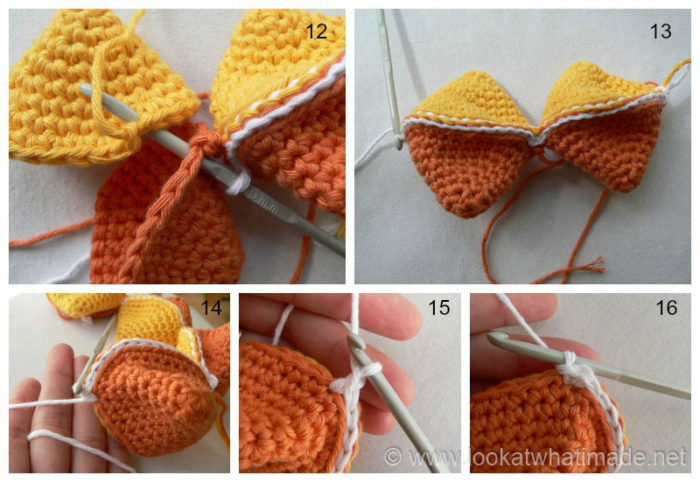
Well done! You have now attached one side of each of the 4 pairs of wedges. Now we will close and stuff the wedges.
A Word about Stuffing
You want to stuff the wedges quite tightly, but not so tightly that the stuffing starts poking through and/or distorting your ball. BUT, if you’re wedges aren’t nice and fat to begin with, your ball will very quickly become limp and lifeless. It’s a tiny bit of trial and error, I’m afraid…
I suggest using Stuffing Bombs so that your stuffing won’t poke out even if your tension is a bit relaxed.
Closing the Fourth Pair
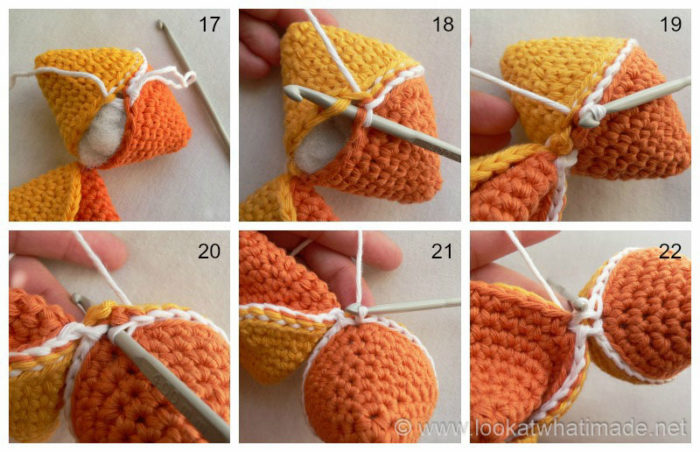
(Sl st into the blo of the next st on the wedge closest to you AND into the flo of the next st on the wedge furthest away from you – so both layers) 14 times, stuffing as you go (Photos 17 – 19). Sl st through both loops of the next st of both wedges. This stitch will already contain a sl st (Photos 20 and 21).
Closing the Rest of the Pairs
Sl st into the st on the next pair of wedges that already contains a sl st (Photo 22). (Sl st into the blo of the next st on the wedge closest to you AND into the flo of the next st on the wedge furthest away from you – so both layers) 14 times, stuffing as you go. Sl st through both loops of the next st of both wedges. This stitch will already contain a sl st.
I find it easier to close the wedges if I pinch or “sandwich” the 2 layers together (Photo 23). This becomes slightly tricky once the wedge contains stuffing, though.
When you have closed the last pair (Photo 24), ch 1 and fasten off, leaving a 8″ (20 cm) tail of yarn. Use this tail of yarn to sew the first wedge to the ch-1 space formed by the (sc, ch 1, sc) on the fourth pair (Photos 25 and 26).
Your segment will be a little bit snug at this point (Photo 27), but with a bit of tugging and squishing, it will flatten out (Photo 28). 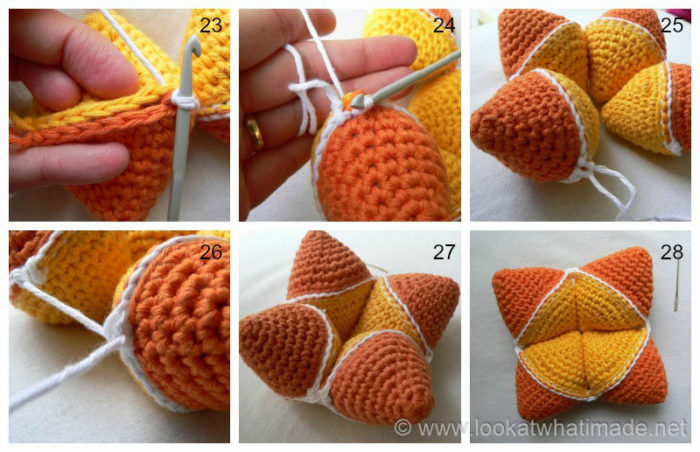
Building the Crochet Star Ball
Once you have completed all 3 segments (or rings), it is time to build your Star Ball.
Slip half of the first segment through the middle of the second segment and straighten them out so that they cross each other. See the big green and yellow gap below? That’s where the wedges of the third segment will go.
Slip the third segment over the first 2 so that each wedge of the third segment slots into one of the large gaps around the side of the first 2 segments.
Related Free Patterns
Remember to subscribe to my Weekly Newsletter if you would like to be kept in the loop. You can also like my Facebook page or follow me on Bloglovin, Google+, Pinterest, Twitter, or Instagram.
Happy Hooking!


A says
If I were to credit and link your pattern, would it be alright if I made and sold these in my online shop? Feel free to say no if you are not comfortable, but I think these are very cute and marketable and I figured it couldn’t hurt to ask.
Dedri Uys says
Hi, you are welcome to make and sell as many as you can :)
TANYA says
Hi Dedri
I am a super new hooker, 1 week to precise. My daughter is expecting and I want to attempt this project.
I have loads of DK wool and wondered if I can do this with a single Strand DK. I tried the double Strand with 4.5mm hook but found it difficult and confusing.
Thanks for your advice
Jenny Lowman says
Hi Tanya. You can certainly give it a go. It may just be a different size. It will help you grasp the pattern, certainly.
Good luck!
Kristina says
I wish there was guidance as to how to assemble the ball to take advantage of the colors one has chosen. I’m using just red, white, and black and have figured that I can do these pairings: RW, RB, WB, RR, WW, BB but there is no guidance as to how different combos will end up.
Jenny Lowman says
Maybe have a search on Ravelry, Kristina. Others may have used similar colours for theirs and posted pics up :)
BW
Jenny
JoAnn says
Is this age appropriate for a 2 1/2 year old?
Dedri Uys says
Definitely, although they might not be able to build it themselves just yet. But as a ball or cuddle toy, it’s very popular.
Bhani says
Ravelry que link doesn’t work unfortunately, I’m so going to attempt this puzzle, it’s gorgeous.
Dedri Uys says
Thank you for letting me know. I have fixed it now.
Anika says
Hi! I think there may be an error in the pattern. In the “attaching the first pair of wedges”, you wrote:” Make 13 more sl st’s through both layers (Photo 10). You should now have made 15 sl st’s in total…” Didn’t you meant to make 2 more? I have a hard time closing the 4 wedges together. By thee way, love ❤️ your blog, your pattern are always very clear and detailed!
Anika says
never mind! I was tired yesterday, I just found what I did wrong
Dedri Uys says
Hi Anika. I am not exactly sure what you mean. Each wedge pair is closed by making 16 sl st on one side, then 16 sl st in the next wedge pair, and so on until you have made 16 sl st into each of the 4 wedge pairs. Then you go back down the other side and close the open sides of the 4 wedge pairs to form a strip of 4 wedges.
The first 2 sl st (of 16) are explained ( through both loops and one through flo/blo). Then you are told to do 13 more sl st through flo/blo (into the first wedge pair), which gives you 15 sl st. Then you make the last sl st through both loops of both layers, giving you 16 sl st.
cindy says
do you have this star ball in a easy pattern. thank you
Jenny says
Cindy, this is he only version of this pattern available. We’re not quite sure what you are asking for, exactly? Do you mean you are finding this pattern too difficult?
Jenny
Katy says
So I would love to bust through some of my Drops Paris stash, but you mentioned that the ball will be very stiff. Will it still work as a puzzle for 18mos or younger? Does it not move at all if you use Paris? Thank you!
Dedri Uys says
Katy, that’s a bit tricky to answer. I have so many puzzle balls that it doesn’t matter that the flower one doesn’t come apart often. Personally I prefer the Drops to any other yarn, purely for the stability of the final product. If you are willing to build it yourself every time they take it apart, go for it. If you want them to be able to build it, Drops is not the best option.
Katy says
Thanks! That’s just the answer I needed. The recipient won’t be able to put it back together, but she has 2 older sisters who I think would be happy to help.
Lissa says
Thank you so much for this pattern, turned out great, my 6 month old daughter loves tossing this around ! And it will grow with her when she realizes comes apart! I’ve added little ribbons on mine like ‘taggies’ in the joins of the rings for an extra element of play!! (Happy to send a pic if you would like to see) Just started on a colourfull flower ball too !
Dedri Uys says
You are most welcome. I am so pleased that she likes it :)
Jessica says
I Would call myself an advanced beginner, but I am really struggling with attaching the pieces together. In the instructions it says to reference the pictures, but I don’t see any. I cannot find any videos online about this particular project to even get a clue. I’m so sad, I am so excited to finish this for my son. Could you maybe email me the pictures… Or talk me trough it in a more basic manne? I feel so dumb asking. But I am eager to finish this project. Thank you.
Dedri Uys says
Hi Jessica. Which browser are you using and do you have the latest version installed? I have tried the pattern on Chrome, Firefox, and Internet Explorer and the images show up for me. Are there spaces where the photos should go, or are there no no gaps, just words? I would appreciate your feedback so that I can investigate the issue.
Ali says
What yarn and colors did you use for the one on this page? Love the color scheme and would like to do it.
Dedri Uys says
Ali, I have now updated the post to include the colours and yarn I used. Thank you.
Tali says
Just finished making it. I have to admit I was a bit skeptical at first, but it came out perfect!
It was supposed to be a gift for my niece but my husband and I fell in love with it and decided to keep it :D
Thank you for this wonderful pattern!
Dedri Uys says
Hehe. I love that your husband liked it! Thank you :)
Lauren Eramo says
Great for small ones
natasja says
what a great pressent to give to a little boy
Jan says
Love’ love, love this.
Thank you
The print friendly does not do PDF any more.
Debbie says
Yes it does – try again Jan
Love your site Dedri – Keep it up!
Dedri Uys says
Thank you, Debbie :)