As with every project, this Simple Joy blanket and I have been on quite a journey together. It is true that I would have paid vast sums of money to avoid this particular journey. It is also true that there were moments of breathtaking joy and grace. Like I said in last week’s Reveal Post: “Every single stitch contains a prayer or an acknowledgement of gratitude. Every single stitch prompted me to remember and acknowledge all the simple joys.”
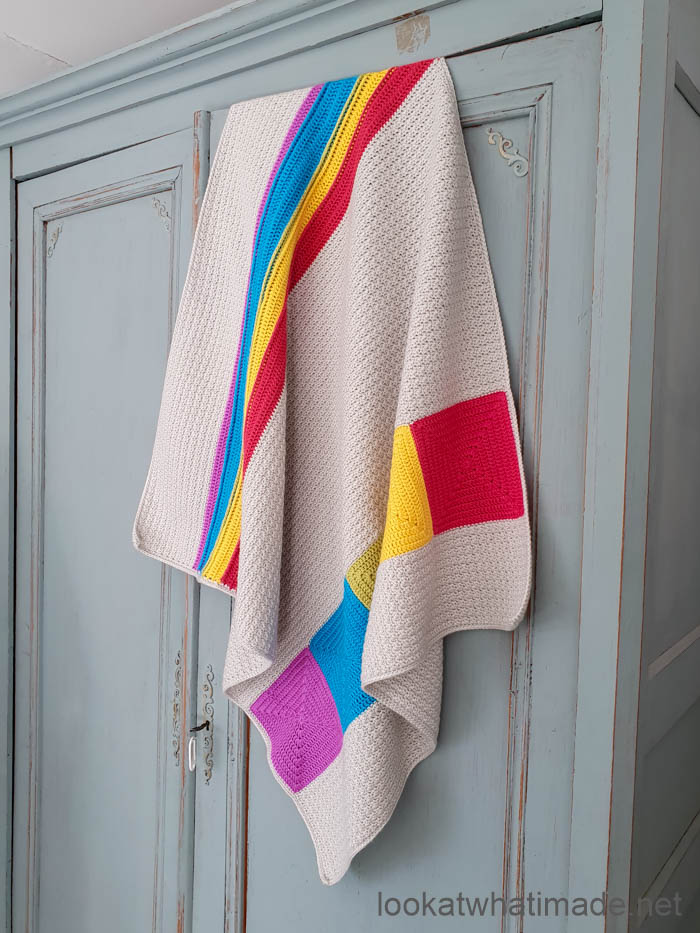
This blanket is both colourful and tranquil. The textured background and the coloured bands will stimulate without overwhelming. The Chunky Monkey version I am sharing below is child size, and quite heavy (1.6kg), which is perfect for my youngest, who needs a bit of weighing down at bed time.
After having made it for Boy 3, I realised that I wouldn’t mind having one of these myself. The pattern is super simple to customise size-wise, and I will share more details about that next week (at the bottom of this post) when I share the adaptations needed to create a Colour Crafter baby version.
I have to tell you that I thoroughly enjoyed working with this yarn. Everything about it is a YES in my books. The best bit is probably how quickly a project grows with such a chunky yarn :)
Simple Joy Crochet Blanket Pattern
© Dedri Uys and Scheepjes 2019. All Rights Reserved.
The pattern below is for the larger Chunky Monkey version. If you would like to make the smaller Colour Crafter version, please see Adaptations for Colour Crafter Baby Blanket Version at the bottom of this post.
Resources
- Add to Your Ravelry Queue
- Hashtag: If you share photos, please use #simplejoyblanket so that we can find your projects and have a gleeful look.
- Yarn Retailers:
- Wool Warehouse (International)
- Black Sheep Wools (International)
- Deramores (International)
- Caro’s Atelier (Netherlands)
- Knotty House (Canada)
- More Retailers
Materials
- Small hook: 5mm crochet hook {for textured parts}.
- Large hook: 5.5mm crochet hook {for Squares, Coloured Stripes, and Border}.
- Scheepjes Chunky Monkey (100% acrylic), 100g/116m/127yds
- Main Colour: 2017 Stone x 13 balls
- Contrasting Colours:
- CC1 – 1084 Wild Orchid x 1 ball {Purple}
- CC2 – 1068 Turquoise x 2 balls {Blue}
- CC3 – 1822 Chartreuse x 1 ball {Green}
- CC4 – 2004 Canary x 1 ball {Yellow}
- CC5 – 1083 Candy Apple x 2 balls {Pink}
Size
105cm (41.3”) x 130cm (51.2”).
Gauge
1 Square should measure 20cm x 20cm (7.9” x 7.9”).
Abbreviations
US Terminology
- CC – Contrasting colour
- Ch – Chain
- Dc – Double crochet
- Hdc – Half-double crochet
- MC – Main colour
- Rem – Remaining
- RS – Right side facing
- Sp/sps – Space/spaces
- Sl st – Slip stitch
- Sc – Single crochet
- St/sts – Stitch/stitches
- Tr – Treble
- WS – Wrong side facing
Charts and Legend
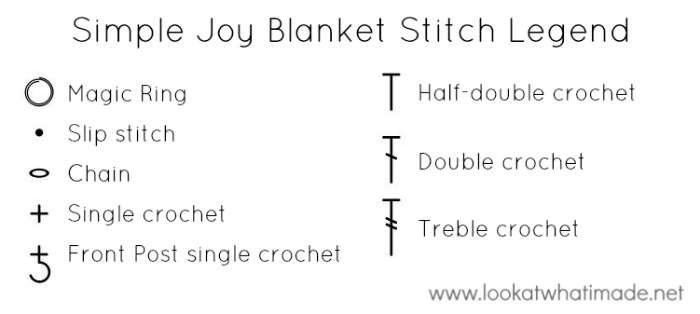
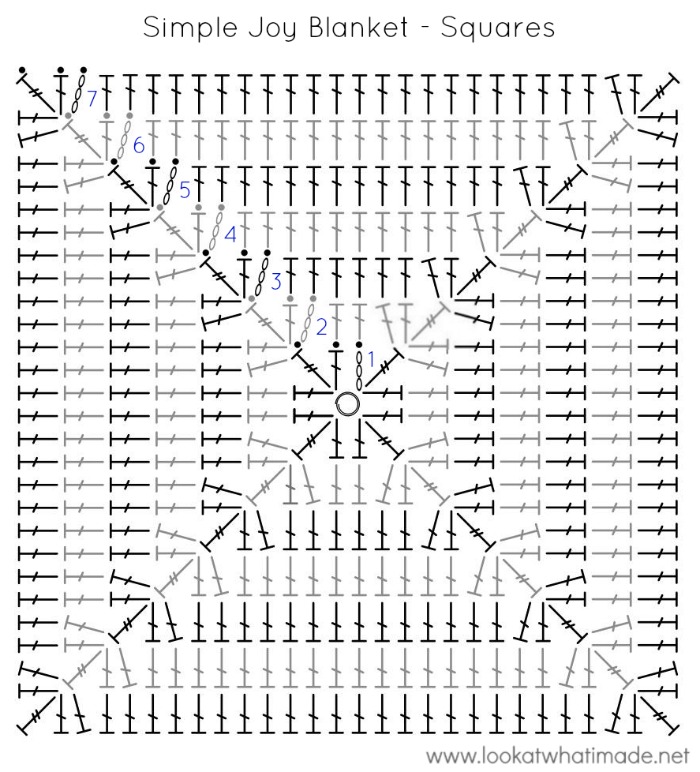
Charts have been provided for the different parts of the pattern. The only element that has not been charted is the border, which consists of two simple sc rounds.
Punctuation
* An asterisk indicates pattern repeats. You will need to repeat all the instructions between asterisks the number of times specified. This is a hard-core repeat and will consist of multiple instructions.
Square Brackets [] indicate repeats. You will need to repeat the instructions between square brackets the number of times specified. This is a lower level repeat.
Parentheses () are used to indicate a group of stitches to be worked into the same stitch/space. Parentheses are also used to indicate a repeat when using square brackets would be too confusing.
Special Stitches
(FP) Front Post – Identify the post of the stitch you want to work around. Insert your hook from the front to the back and then from the back to the front around the post of the stitch so that the post lies in front of your hook. Complete your stitch as normal.
Standing Single Crochet – With a sl knot already on your hook, insert your hook into the indicated st/sp. Yarn over and pull up a loop. Yarn over and pull through both loops.
Notes
- When making the squares, the corners will always be made as (2 dc, tr, 2 dc) in the central tr of the corner from the previous round.
- FPsc rows will pull in slightly. Remember to keep your tension relaxed when making them. If you find that they pull in too much, you might find it useful to use a larger hook than the one specified (for FPsc rows only).
- I managed to get the first 22 rows of (textured) MC done using 200g of MC. If you can only get 21 rows out of 200g of MC, you will need an extra ball or two…
Instructions
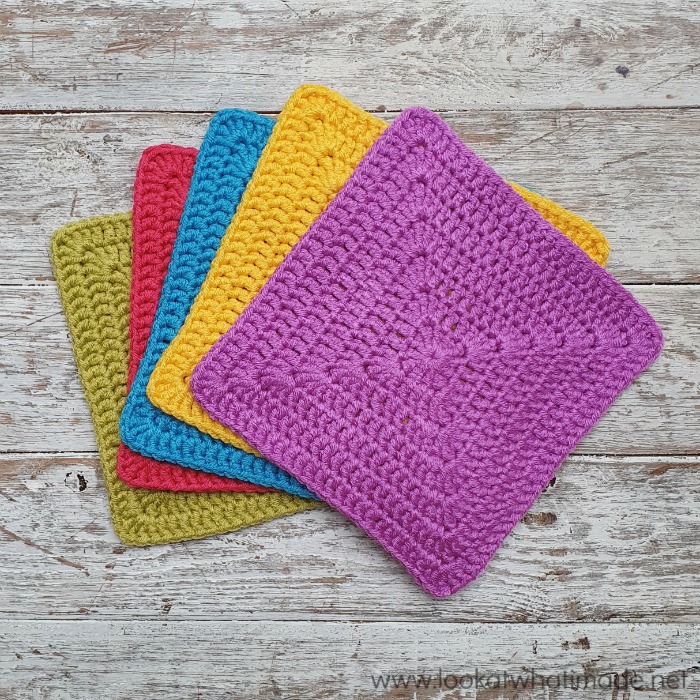
1. Solid Squares
(Make 1 in each of the 5 Contrasting Colours – I used roughly 38g for each square)
Make a magic ring, leaving a 10cm/4” yarn end.
Round 1: Using the large hook (see Materials) and working into the magic ring: ch 3 (counts as dc throughout), dc, tr. [2 dc, tr] three times. Join to the top of the beg ch-3 with a sl st. Sl st in the next dc and in the next tr. {8 dc and 4 (corner) tr}
Round 2: Ch 3. (Dc, tr, 2 dc) in the tr at the base of the ch-3. *Dc in the next 2 sts. (2 dc, tr, 2 dc) in the next tr.* Repeat from * to * two more times. Dc in the next 2 sts, each of which will already contain a sl st. Join to the top of the beg ch-3 with a sl st. Sl st in the next dc and in the next tr. {6 dc per side, not including 1 tr per corner}
Round 3: Ch 3. (Dc, tr, 2 dc) in the tr at the base of the ch-3. *Dc in the next 6 sts. (2 dc, tr, 2 dc) in the next tr.* Repeat from * to * two more times. Dc in the next 6 sts, the last 2 of which will already contain a sl st. Join to the top of the beg ch-3 with a sl st. Sl st in the next dc and in the next tr. {10 dc per side, not including 1 tr per corner}
Round 4: Ch 3. (Dc, tr, 2 dc) in the tr at the base of the ch-3. *Dc in the next 10 sts. (2 dc, tr, 2 dc) in the next tr.* Repeat from * to * two more times. Dc in the next 10 sts, the last 2 of which will already contain a sl st. Join to the top of the beg ch-3 with a sl st. Sl st in the next dc and in the next tr. {14 dc per side, not including 1 tr per corner}
Round 5: Ch 3. (Dc, tr, 2 dc) in the tr at the base of the ch-3. *Dc in the next 14 sts. (2 dc, tr, 2 dc) in the next tr.* Repeat from * to * two more times. Dc in the next 14 sts, the last 2 of which will already contain a sl st. Join to the top of the beg ch-3 with a sl st. Sl st in the next dc and in the next tr. {18 dc per side, not including 1 tr per corner}
Round 6: Ch 3. (Dc, tr, 2 dc) in the tr at the base of the ch-3. *Dc in the next 18 sts. (2 dc, tr, 2 dc) in the next tr.* Repeat from * to * two more times. Dc in the next 18 sts, the last 2 of which will already contain a sl st. Join to the top of the beg ch-3 with a sl st. Sl st in the next dc and in the next tr. {22 dc per side, not including 1 tr per corner}
Round 7: Ch 3. (Dc, tr, 2 dc) in the tr at the base of the ch-3. *Dc in the next 22 sts. (2 dc, tr, 2 dc) in the next tr.* Repeat from * to * two more times. Dc in the next 22 sts, the last 2 of which will already contain a sl st. Join to the top of the beg ch-3 with a sl st. Sl st in the next dc and in the next tr. Fasten off, leaving a 25cm/10” yarn end. {26 dc per side, not including 1 tr per corner}
2. Attaching the Squares to Each Other
You will be attaching the squares to each other in a strip, using whip stitch and the final yarn end from one of the two squares joined at a time. You will be arranging your squares as follows from left to right: CC1, CC2, CC3, CC4, CC5.
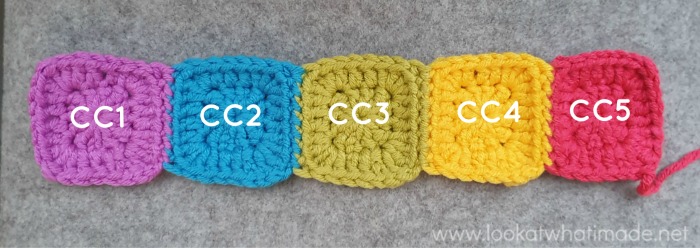
Place Square 1 on top of Square 2 with WS facing each other.
- *Photo 1 – Make sure that the final yarn end of the top square is top right (top left, if you are left-handed) and the final yarn end of the bottom square is bottom right (bottom left, if you are left-handed).
- Photo 2 – Thread your needle with the yarn end from the top square.
- Photo 3 – Insert your needle from front to back into the back loop of the corner tr of the top square and into the front loop (the one closest to you) of the corner tr of the bottom square (so the ‘inside loops’).
- Photo 4 – Pull through to tighten the stitch. Insert your needle from front to back into the inside loops of the next st and pull tight.
- Photos 5 and 6 – Continue working into the inside loops of each st until you have worked into the next corner tr. Make sure that you have pulled the end through properly, but not so tight that it shrinks or restricts the sides of the squares.*

Open up your work and place Square 2 on top of Square 3 with WS facing each other. Repeat from * to * above.
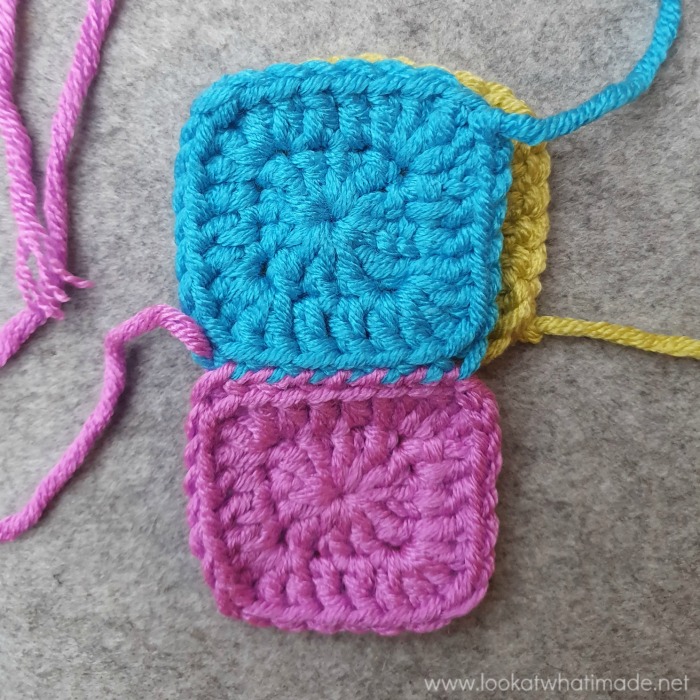
Continue sewing the squares together, placing Square 3 on top of Square 4 and Square 4 on top of Square 5, following the instructions between * and * above.
Work away all the ends.
If you need help with using the Whip Stitch for joining in the inside loops only, you can find a short video tutorial HERE.
3. Adding the Bottom Textured Part
When working into the squares, work into both loops of each corner tr, and both loops of each of the 26 dc along the side of each square.
Hold the strip of squares with the RS facing you and the CC1 square (Square 1) to your right. You will be working along one of the ‘long sides’ of the strip.
Row 1: Using the large hook, join your MC yarn by making a standing sc in the corner tr of the first square on the right (left, if you are left-handed). Remember to work through both loops. Sc in the next 27 st of the first square. [Sc in the 28 sts of the next square] 4 times. Change to the small hook. TURN. {140 sc}
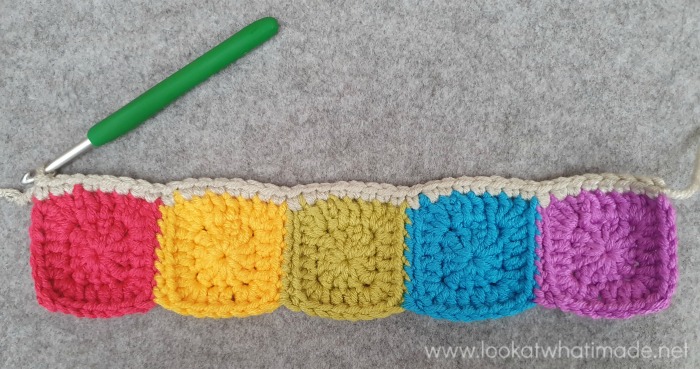
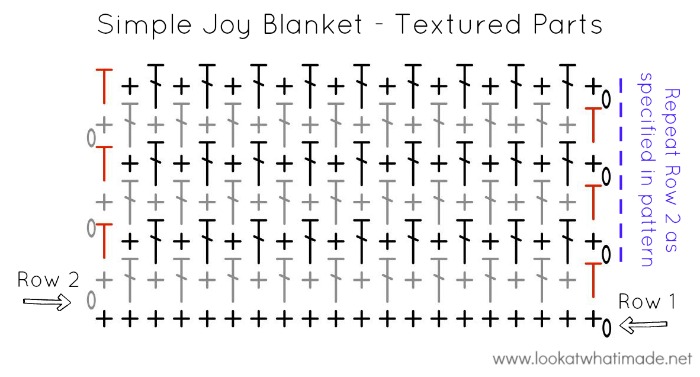
Row 2: Ch 1 (doesn’t count as a stitch throughout), sc in the st at the base of the ch-1, [dc in the next st, sc in the next st] until you have 1 st left. Hdc in the last st. TURN. {70 sc, 1 hdc, and 69 dc}
Rows 3 – 22: Repeat Row 2.
Fasten off and work away your ends.
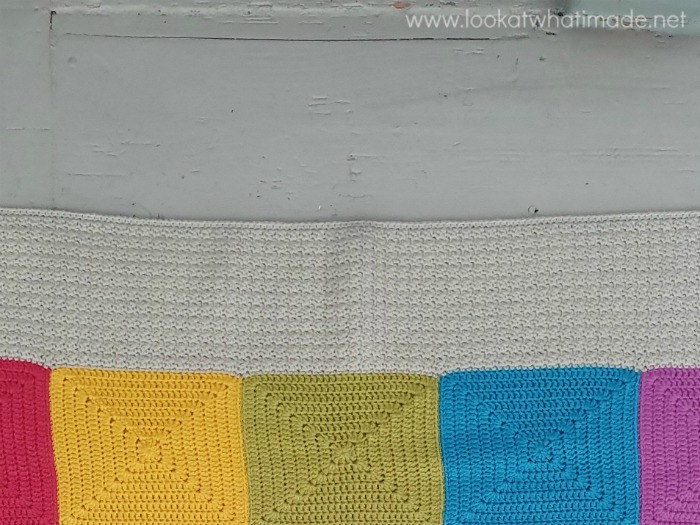
4. Adding the Middle Textured Part
You will now make the rest of the blanket, working into the opposite side of the strip of squares.
Hold the strip of squares with RS facing and the CC5 square to your right.
Row 1: Repeat Row 1 above. {140 sc}
Row 2: Repeat Row 2 above. {70 sc, 1 hdc, and 69 dc}
Rows 3 – 75: Repeat Row 2. Change to the large hook at the end of Row 75.
Row 76: With WS facing, ch 1, sc in the st at the base of the ch-1, sc in each rem st, change to CC5. TURN. {140 sc}
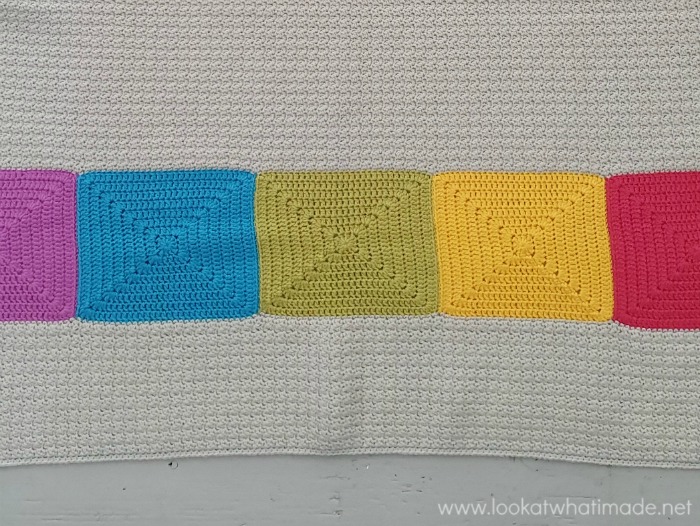
5. Adding the Coloured Stripes
Rows 77 and 82 (marked with **) are the repeat rows for this part.
Row 77**: With RS facing, ch 3 (counts as first dc throughout), dc in each rem st. TURN. {140 dc}
Rows 78 – 81: Repeat Row 77, changing to CC4 at the end of Row 81.
Row 82**: With WS facing, ch 1, FPsc in the st at the base of the ch-1, FPsc in each rem st. TURN. {140 FPsc}
Rows 83 – 85: Repeat Row 77, changing to CC3 at the end of Row 85.
Row 86: Repeat Row 82.
Row 87: Repeat Row 77, changing to CC2 at the end of the row.
Row 88: Repeat Row 82.
Rows 89 – 93: Repeat Row 77, changing to CC1 at the end of Row 93.
Row 94: Repeat Row 82.
Rows 95 – 96: Repeat Row 77, changing to MC at the end of Row 96.
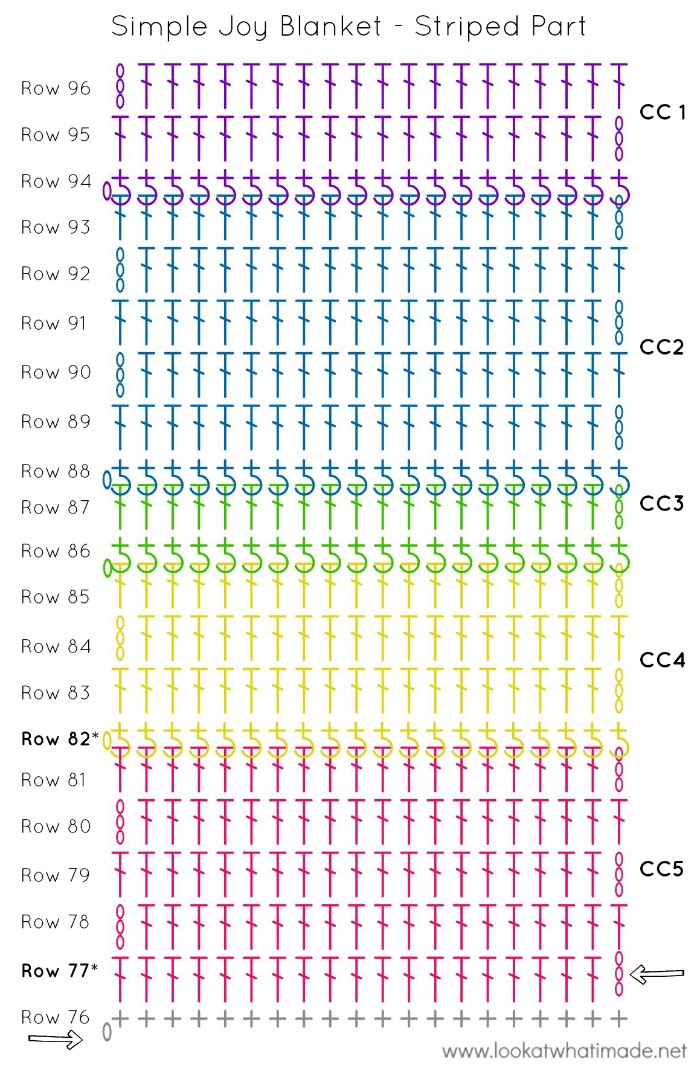
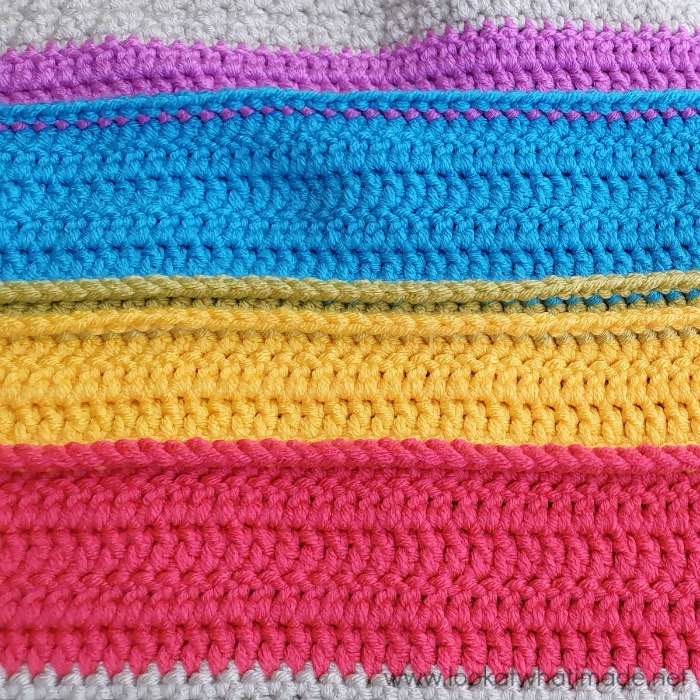
6. Adding the Top Textured Part
Row 97: With RS facing, ch 1, sc in the st at the base of the ch-1, sc in each rem st. Change to the small hook. TURN. {140 sc}
Rows 98 – 118: Repeat Row 2. Do not fasten off at end of Row 118.
7. Adding the Border
Round 1
I found this round easier to do if I broke it up into sides.
Change to the large hook.
First Short Side
With RS facing, ch 1. (Sc, ch 2, sc) in the st at the base of the ch-1. Sc in the next 138 st. (Sc, ch 2, sc) in the last st.
Stitch Count: 140 sc, not including ch-2 corner sps
First Long Side
Turn through 90 degrees.
- Sc in each of the next 21 MC rows. I find this easiest to do if I work into the top of the first/last st of each row. It’s a little bit fiddly identifying the rows. Sorry…
- Skipping all FPsc rows, make 2 sc in each of the 16 CC dc rows that form the stripes.
- Sc in each of the next 76 MC rows.
- Sc in each of the 28 st of the CC1 square.
- Sc in each of the next 21 MC rows.
Stitch Count: 180 sc, not including ch-2 corner sps
Second Short Side
Turn through 90 degrees.
(Sc, ch 2, sc) in the first st. Sc in the next 138 st. (Sc, ch 2, sc) in the last st.
Stitch Count: 140 sc, not including ch-2 corner sps
Second Long Side
Turn through 90 degrees.
- Sc in each of the next 21 MC rows.
- Sc in each of the 28 st of the CC5 square.
- Sc in each of the next 76 MC rows.
- Skipping all FPsc rows, make 2 sc in each of the 16 CC dc rows that form the stripes.
- Sc in each of the next 21 MC rows.
- Join to the first sc with a sl st.
Stitch Count: 180 sc, not including ch-2 corner sps
Round 2
Sl st into the ch-2 corner sp. (Ch 1, sc, ch 2, sc) in the same sp. Sc in each st across. *(sc, ch 2, sc) in the next ch-2 corner sp. Sc in each st across.*
Repeat from * to * two more times. Join to the first sc with a sl st. Fasten off and work away your ends.
Stitch Counts (not including ch-2 corner sps):
- Short Side – 142 sc
- Long Side – 182 sc
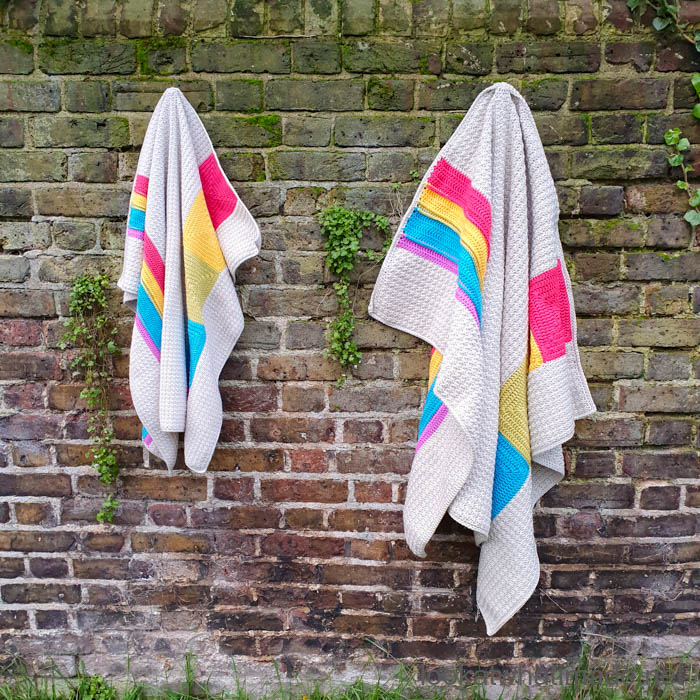
Baby Version in Colour Crafter (left) and Regular version in Chunky Monkey (right)
7. Blocking
Due to the difference in width created by the textured parts, the squares, and the stripes, I suggest that you block this blanket before using it.
*Adaptations for Colour Crafter Baby Blanket Version*
Materials
- Small hook: 4mm crochet hook {for textured parts}.
- Large hook: 4.5mm crochet hook {for Squares, Coloured Stripes, and Border}.
- Scheepjes Colour Crafter (100% acrylic), 100g/300m/328yds
- Main Colour: 2017 Verviers x 4 balls
- Contrasting Colours:
- CC1 – 1084 Hengelo x 1 ball {Purple}
- CC2 – 1068 Den Helder x 1 ball {Blue}
- CC3 – 1822 Delfzijl x 1 ball {Green}
- CC4 – 2004 Brussel x 1 ball {Yellow}
- CC5 – 1083 Tilburg x 1 ball {Pink}
Size
80cm (31.5”) x 88cm (34.6”).
Gauge
1 Square should measure just shy of 16cm x 16cm (6.3” x 6.3”).
Instructions
1. Solid Squares
Follow the instructions for making a solid square above, but do not fasten off at the end of Round 7. Instead, continue making the following Round 8:
Round 8: Ch 3. (Dc, tr, 2 dc) in the tr at the base of the ch-3. *Dc in the next 26 sts. (2 dc, tr, 2 dc) in the next tr.* Repeat from * to * two more times. Dc in the next 26 sts, the last 2 of which will already contain a sl st. Join to the top of the beg ch-3 with a sl st. Sl st in the next dc and in the next tr. Fasten off, leaving a 25cm/10” yarn end. {30 dc per side, not including 1 tr per corner}
I used roughly 14g per square.
2. Attaching the Squares to Each Other
Attach the squares as specified above.
3. Adding the Bottom Textured Part
When working into the squares, work into both loops of each corner tr, and both loops of each of the 26 dc along the side of each square.
Hold the strip of squares with the RS facing you and the CC1 square (Square 1) to your right. You will be working along one of the ‘long sides’ of the strip.
Row 1: Using the large hook, join your MC yarn by making a standing sc in the corner tr of the first square on the right (left, if you are left-handed). Remember to work through both loops. Sc in the next 31 st of the first square. [Sc in the 32 sts of the next square] 4 times. Change to the small hook. TURN. {160 sc}
Row 2: Ch 1 (doesn’t count as a stitch throughout), sc in the st at the base of the ch-1, [dc in the next st, sc in the next st] until you have 1 st left. Hdc in the last st. TURN. {80 sc, 1 hdc, and 79 dc}
Rows 3 – 22: Repeat Row 2.
Fasten off and work away your ends.
4. Adding the Middle Textured Part
You will now make the rest of the blanket, working into the opposite side of the strip of squares.
Hold the strip of squares with RS facing and the CC5 square to your right.
Row 1: Repeat Row 1 above. {160 sc}
Row 2: Repeat Row 2 above. {80 sc, 1 hdc, and 79 dc}
Rows 3 – 75: Repeat Row 2. Change to the large hook at the end of Row 75.
Row 76: With WS facing, ch 1, sc in the st at the base of the ch-1, sc in each rem st, change to CC5. TURN. {160 sc}
5. Adding the Coloured Stripes
Rows 77 – 96: As in Pattern, but with an altered stitch count of 160 sts per row.
6. Adding the Top Textured Part
Row 97: With RS facing, ch 1, sc in the st at the base of the ch-1, sc in each rem st. Change to the small hook. TURN. {160 sc}
Rows 98 – 118: Repeat Row 2. Do not fasten off at end of Row 118.
7. Adding the Border
Round 1
I found this round easier to do if I broke it up into sides.
Change to the large hook.
First Short Side
With RS facing, ch 1. (Sc, ch 2, sc) in the st at the base of the ch-1. Sc in the next 158 st. (Sc, ch 2, sc) in the last st.
Stitch Count: 160 sc, not including ch-2 corner sps
First Long Side
Turn through 90 degrees.
- Sc in each of the next 21 MC rows. I find this easiest to do if I work into the top of the first/last st of each row. It’s a little bit fiddly identifying the rows. Sorry…
- Skipping all FPsc rows, make 2 sc in each of the 16 CC dc rows that form the stripes.
- Sc in each of the next 76 MC rows.
- Sc in each of the 32 st of the CC1 square.
- Sc in each of the next 21 MC rows.
Stitch Count: 184 sc, not including ch-2 corner sps
Second Short Side
Turn through 90 degrees.
(Sc, ch 2, sc) in the first st. Sc in the next 158 st. (Sc, ch 2, sc) in the last st.
Stitch Count: 160 sc, not including ch-2 corner sps
Second Long Side
Turn through 90 degrees.
- Sc in each of the next 21 MC rows.
- Sc in each of the 32 st of the CC5 square.
- Sc in each of the next 76 MC rows.
- Skipping all FPsc rows, make 2 sc in each of the 16 CC dc rows that form the stripes.
- Sc in each of the next 21 MC rows.
- Join to the first sc with a sl st.
Stitch Count: 180 sc, not including ch-2 corner sps
Round 2
Sl st into the ch-2 corner sp. (Ch 1, sc, ch 2, sc) in the same sp. Sc in each st across. *(sc, ch 2, sc) in the next ch-2 corner sp. Sc in each st across.*
Repeat from * to * two more times. Join to the first sc with a sl st. Fasten off and work away your ends.
Stitch Counts (not including ch-2 corner sps):
- Short Side – 162 sc
- Long Side – 186 sc
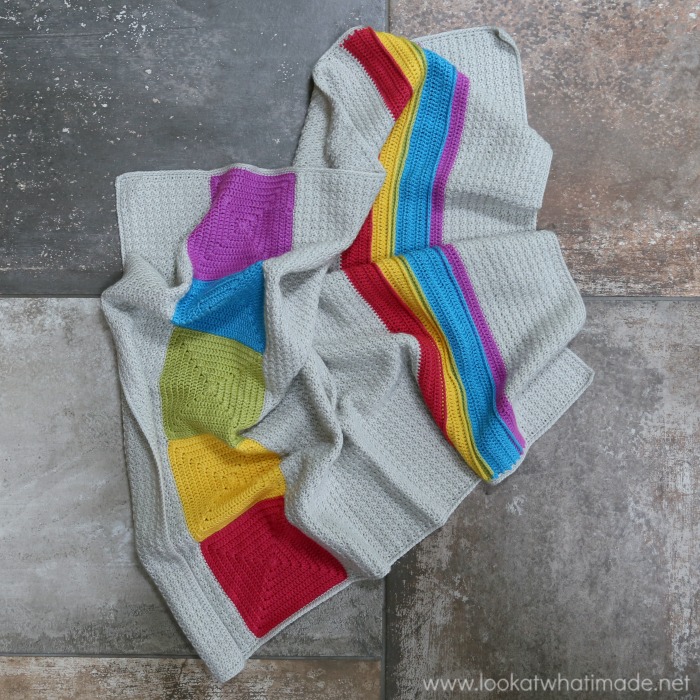
I hope you enjoy starting on this new, simple journey.
Want to see more of our Simple Joy Crochet Blanket journey?
- Simple Joy Blanket Yarn Arrival
- Simple Joy Blanket WIP
- Simple Joy Blanket Reveal
- Simple Joy Blanket Pattern (This Post)

This blog post contains affiliate links. I only link to products I personally use or would use. All opinions are my own.


Violeta says
What a beautiful and cozy blanket! Love the combo of the solid texture and those colorful squares and stripes. Today I’ve featured your pattern on Crafts on Display, I hope you enjoy it! https://craftsondisplay.com/crochet/cozy-and-colorful-free-simple-joy-crochet-blanket-pattern-196189/
Jenn says
Wondering if you still plan to post the baby version and how to customize?
Thank you for your time.
Jenn
Dedri Uys says
Hi Jenn
The baby version is at the bottom of the post :)
Graciela says
Hello, Dedri! Thank you so much for your works of beauty! I’ve started making this gorgeous blanket, but my squares are not square! The sides look ondulated. Will this change when I block them? Thanks again.
Dedri Uys says
Can you send me an email using the contact tab at the top of the website? We can then exchange photos so that I can better help you.
Dedri
Patrese says
Very smart young fellow. Simple is beautiful too, I was looking for a slow mind, too do.
Thanks
Pat
Dedri Uys says
He’s a bright young thing x
Anthony John says
Thank you so much Dedri! I’m so looking forward to spending time on this beautifully uncomplicated blanket! (I may even drive up to black sheep wools to pick out the yarn today!!)
Dedri Uys says
Aww I’m sorry I didn’t see this until now. I’d have asked you to give Sara (from Black Sheep Wools) a great big kiss and press from me. Merry Christmas xx