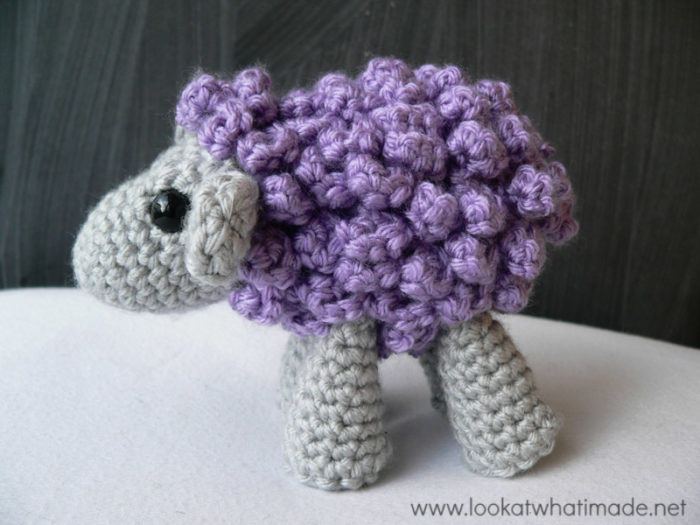
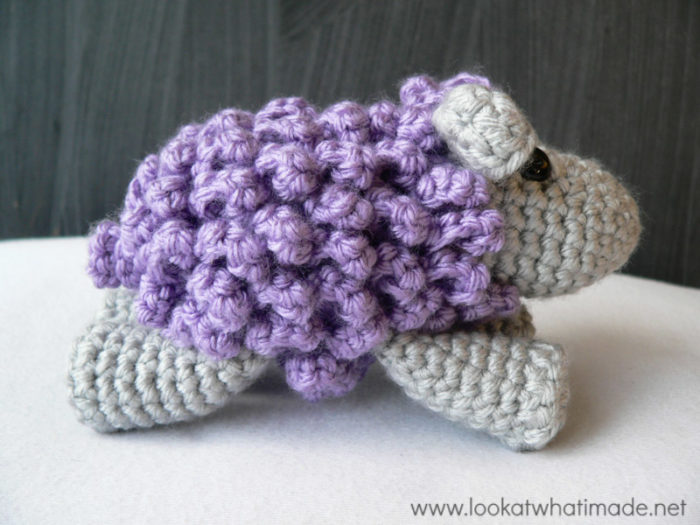
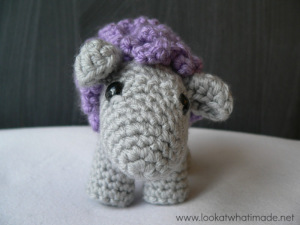
This little crochet sheep is another collaboration between the talented Anette Bak and myself. It is part of our Little Zoo Series and I think it might be my new favourite.
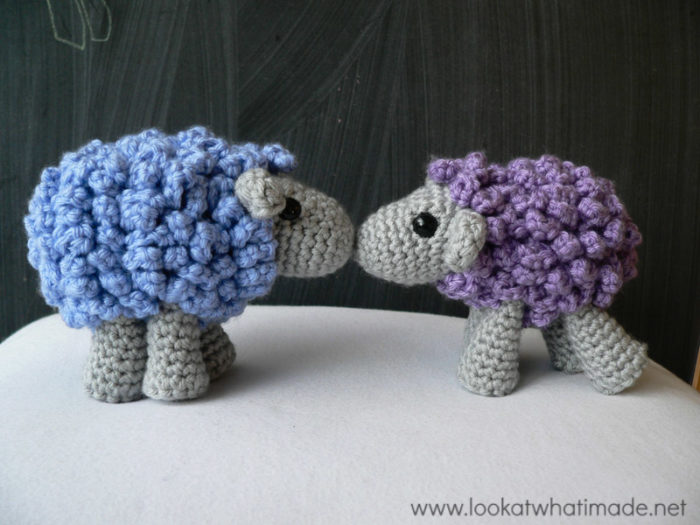
The ears and legs are joined as you go, meaning that there is very little sewing involved. There are, however, a LOT of curlicues to be made. Strictly speaking you could leave Shorn…erm…shorn (naked), but he does look super cute all fluffed up.
The light blue sheep above is quite puffy. This is because I misunderstood how Anette wanted the curlicues made and ended up making twice as many as I should have. I call him my popcorn explosion and he is partly to blame for my sore finger becoming even more sore!
I hope you have great fun making your very own Shorn (or Sharon, if you prefer).
Shorn the Crochet Sheep
(or Sharon the Sheep)
© Anette Bak and Dedri Uys 2014. All Rights Reserved.
Edited by Venetia Smith
Translations
- German Translation by Nina from Vervliest Und Zugenaeht
Print This Pattern
If you would like to print this pattern, please use the print-friendly button at the bottom of this post. You can then choose which photos to exclude from the print-out. Please note that the instructions for the legs are on a different page (link below) and you will need to print them out as well.
Add This Pattern to your Ravelry Queue>
Materials
- 4 mm Clover Amour
hook (US G/6, UK 8)
- Worsted weight yarn (#4) in 2 colours:
- Grey (Main Colour) – 40 meters (43 yards)
- White (Contrasting Colour) – 75 meters (82 yards)
- Stuffing
- Yarn Needle
- Optional: Two 12 mm Safety Eyes
Please Note: I have used Deborah Norville Everyday Mist as my Main Colour, and Orchid
and Baby Blue
as the respective Contrasting Colours.
Size
Using the hook and yarn specified, your sheep will be about 12 cm (just under 5″) long, and 9 cm (just under 4″) high.
Abbreviations
US Terminology used {US/UK Conversion HERE}
Special Abbreviations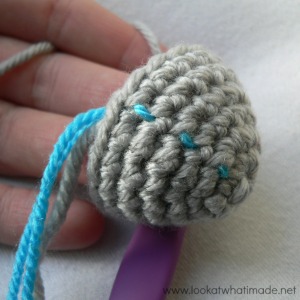
- CC – Contrasting Colour
- Flo – Front Loop Only
- MC – Main Colour
- RSM – Running Stitch Marker: Place a piece of scrap yarn over your work before making the first stitch of the next round. Flick this piece of yarn backwards/forwards over your work at the beginning of each new round. The yarn will form a running stitch up your work, which will help you keep track of the start of each round. When you are done, simply pull the yarn out. We will be referring to this RSM, so please use it.
Special Stitches
- Curlicue – Ch 3. Make 4 sc’s in the second chain from the hook. Make 4 sc’s in the last chain.
- Dc inc – Double crochet increase (make 2 dc’s in the same stitch)
- Hdc inc – Half-double crochet increase (make 2 hdc’s in the same stitch)
- Sc inc – Single crochet increase (make 2 sc’s in the same stitch)
Legs and Feet
Make 4 legs using THESE INSTRUCTIONS.
Use Main Colour for the legs and Contrasting Colour for the feet. Alternatively use your Main Colour for the legs AND the feet.
Ears
 (Make 2 Ears)
- Start with your Main Colour. Into a magic ring: ch 1, sc, hdc, 2 x dc, hdc, sc. (6)
- Make a sc inc in the first sc from Round 1 to join the ring. Hdc inc in the next hdc, dc inc in both of the next 2 dc’s, hdc inc in the next hdc, sc inc in the next sc. (12)
- Skip the first 2 sc’s of Round 2 and sl st in the next st. Ch 1 and bind off.
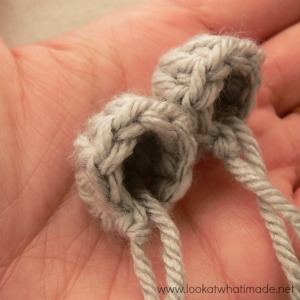
The ears are meant to be bowl shaped – they are to be folded a bit when they get crocheted on to the head. Make sure to work away the initial tail of yarn from the magic ring to be invisible and to end up very near the final tail of yarn. That way both ends can be tied together and placed inside the head when crocheted onto the head.
Head
- Start with your Main Colour. Into a magic ring: ch 1, 6 x sc. (6)
- Continuing on in a spiral, sc inc in each of the 6 sc’s. RSM (12)
- Sc in each st around. RSM (12)
- (Sc in the next st, sc inc in the next st) 6 times. RSM (18)
- Sc in each st around. RSM (18)
- Sc in each st around. RSM (18)
- Short Row (outside): Sc in the next 10 st’s. Sl st in the next st and turn, leaving the remaining 7 st’s of Round 6 unworked. (10)
- Short Row (inside): Skip the sl st. Sc in the next st. Sc inc in the next 2 st’s. Sc in the next st. Sl st in the next st and turn, leaving remaining 5 st’s of Short Row 7 unworked. (6)
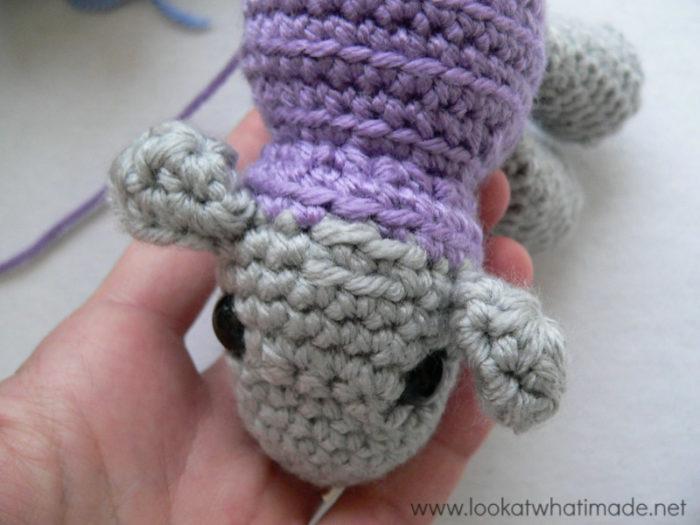
- Short Row (outside): Skip the sl st. Sc in the next st (mark this stitch for your first eye). Sc inc in the next 4 st’s. Sc in the next st (mark this stitch for your second eye) – see Photo 1 below. Skip the stitch that already contains a sl st. Sc into the remaining 7 st’s of Round 6. This should bring you to the running stitch marker. Do not turn. From this point onward, you will be working in a spiral again. RSM (17)
- Sc into the next 5 st’s. This will bring you to the “step” at the beginning of Short Row 9. Sc in each of the 17 st’s of Short Row 9. RSM (22)
- Sc in each of the 22 st’s around. RSM (22)
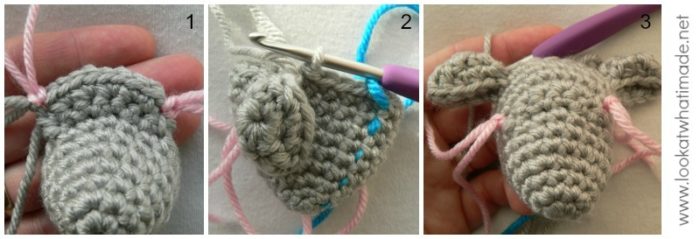
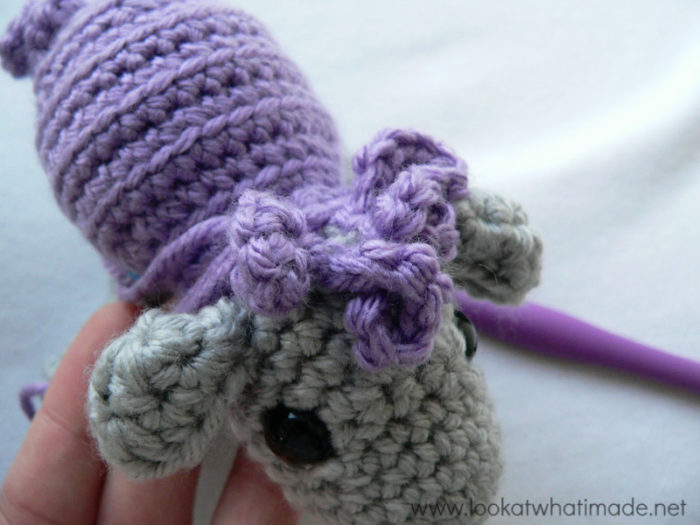
- You will be attaching the ears this round. The ears will look lopsided if you have marked the stitches for the eye placement in Short Row 9 (see Photo 3 below). This is because the stitches of Round 10 are distorting the stitches containing the markers. If you are adding safety eyes into the marked stitches they WILL line up. If you are embroidering your eyes, you can shift the placement of the eyes later if you prefer. DO NOT ADJUST your ear placement based on these markers! Sc in the next 5 st’s. Attach the first ear with the next 2 sc’s (see Note below). Sc in the next 2 st’s of the head only. Sc in the back loop only (blo) of the next 2 st’s. Sc in the next 2 st’s. Attach the second ear with the next 2 sc’s (see Note below). Sc in the next 6 st’s, changing to CC on the last yarn over of the last stitch. Make 1 sc in the new colour. RSM (22)
- Bridge Row: Sc in the next 9 st’s. Sc in the blo of the next 2 st’s. Sc in the next 9 st’s. Move RSM to this new starting point and leave the remaining 2 st’s of Round 12 unworked.
- Sc in the blo of each of the 22 st’s around. RSM. This is a good time to add the eyes (as marked in Short Row 9) and stuff the head. Pull up a long loop with your working yarn so that your work doesn’t unravel while you do this. Once you have finished, insert your hook into your work again and continue to make the last round of the head as instructed below. (22)
- Sc2tog 11 times. RSM (11)
Before you continue, have a look at your sheep’s head. There should be a tiny square of front loops right in the middle of it’s forehead formed by the 4 blo stitches in Rounds 12 and 13.
Note
Attaching the First Ear
Fold the ear. Place it in front of the head and upside down, with the opening pointing to your right (left if you are left-handed) – see Photo 2 above. Make your first sc through the stitch just before the sl st bind-off on the ear and the next st of the head (2 layers). Make the second sc through the stitch after the sl st bind-off, the second stitch after the bind-off, and the next stitch of the head (3 layers).
Attaching the Second Ear
Fold the ear. Place it in front of the head and upside down, with the opening pointing to your left (right if you are left-handed). Make your first sc through the stitch before the sl st bind-off, the stitch after the sl st bind off, and the next st of the head (3 layers). Make the second sc through the second stitch after the bind-off and the next stitch of the head (2 layers).
Body
When making the body you will need to work into the back loop only (blo) for some stitches, and into both loops (as standard) for others. To help make it easier for you to know when to work into the blo, we have made the blo instructions bold.
- Sc inc in each of the 11 st’s around. RSM (22)
- (Sc in the blo of the next st, sc inc in the blo of the next st) five times. Sc in the blo of the next 8 st’s. (Sc inc in the blo of the next st, sc in the blo of the next st) twice. RSM (29)
- Sc inc in the next st, sc in the blo of the next 8 st’s, sc in each of the remaining 20 st’s. RSM (30)
- You will attach the front legs in this round. See this tutorial if you need help visualising what to do. Sc in the blo of the next 2 st’s of the body. Place one of the legs in front of the body with the foot pointing towards the nose/mouth of your animal and flatten the first round of the leg. Insert your hook through the first stitch of the leg (through both layers of the flattened foundation chain) AND the next stitch of the body. Make a sc through all 3 layers. Make 2 more sc’s, working through both layers of the leg AND the next 2 st’s of the body. Sc in the next 2 st’s of the body only. Place the other leg in front of the body exactly as before and make 3 sc’s through all 3 layers. Sc in the blo of the next 20 st’s of the body. RSM (30)
- Sc in each st around. RSM (30)
- Sc in the blo of each st around. RSM (30)
- Sc in the first 3 st’s. Sc in the blo of the next 8 st’s. Sc in the remaining 19 st’s around. RSM (30)
- You will be attaching the back legs in this round. Sc in the blo of the next 3 st’s of the body. Attach the first back leg as before. Sc in the next 2 st’s of the body only. Attach the last leg as before. Sc in the blo of the next 19 st’s. RSM (30)
- (Sc2tog, sc in the next 3 st’s) 6 times. RSM (24)
- (Sc2tog, working into the blo. Sc in the blo of the next 2 st’s) 6 times. Now is a good time to stuff your little critter. RSM (18)
- (Sc2tog, sc in the next st) 6 times. RSM (12)
- Sc2tog 6 times, working into the blo. RSM (6)
Bind off, leaving a 100 cm/40″ tail of yarn. This is overly generous, just so you know that I know this. But I would rather you waste 10″ than be 1″ short.
Adding the Tail
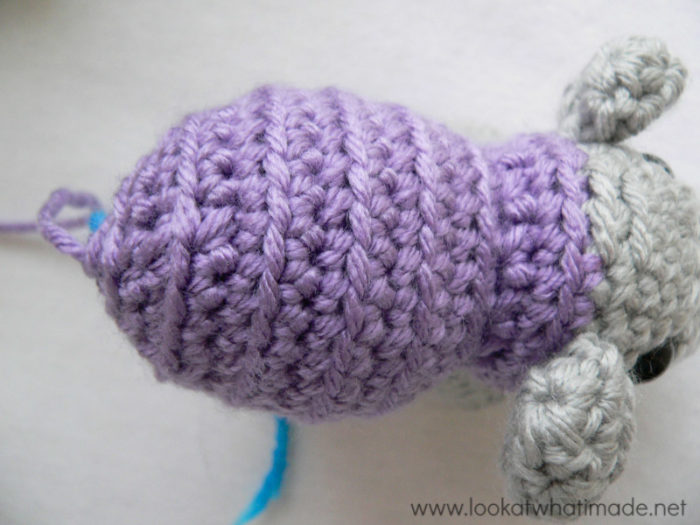
Take the long tail of yarn from the end of Round 12 of the body and weave it through the last 6 stitches. Pull them tight to close the hole.
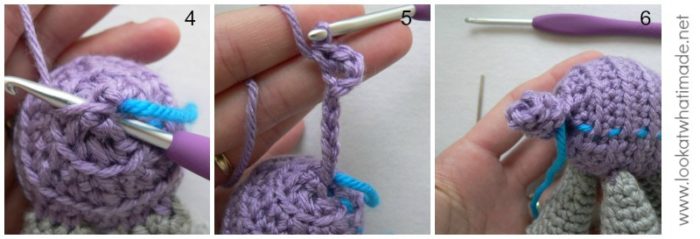
Insert your hook around the “hole” by poking it into the sheep on one side of the closed hole and out the other side (Photo 4). Yarn over with the long tail of yarn and pull up a loop.
Ch 8. Make 3 sc’s in the second chain from the hook (Photo 5) and each of the remaining 8 chains (including the loop you pulled up to start with). Fasten off and work away your tails of yarn (Photo 6).
Adding the Fleece
The fleece is added by making curlicues into the front loops only of the indicated stitches. These front loops (flo) will form little ridges around the sheep’s body, making them easy to identify and work into.
The notes below are based on the body having been made with the exact blo as described above. There are 88 curlicues to be made!
When making your curlicues, please note that the curlicues should fall in every second stitch (unless specified). When making the 2 sl st’s between curlicues, the second sl st will form the base of the next curlicue. Each “repeat” should therefore fall over 2 st’s, not 3.
Round 1
Turn your sheep onto his/her back with the head facing you. You will be starting your curlicues in the front loop of the second to last stitch of Round 12 of the head. This will be the only MC (Main Colour) front loop under the sheep’s neck/chin.
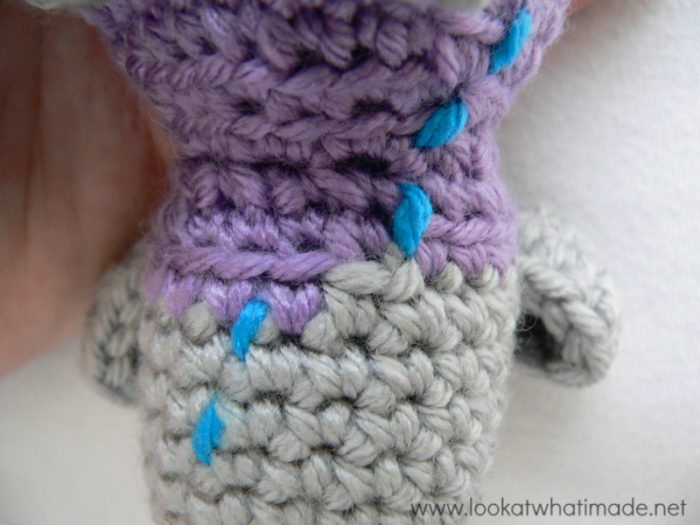
With a slip knot already on your hook, join your CC (Contrasting Colour) yarn by making a sl st in the MC front loop specified.
Ch 3. Make 4 sc’s in the second chain from the hook. Make 4 sc’s in the last chain. This is your first curlicue made. (Sl st in the next 2 st’s and make a curlicue) 4 times. Sl st in the next 2 st’s. The last sl st should fall in the CC front loop directly to the right of the 4 MC front loops (to the left if you are left-handed) – see the large arrow in the photo below.
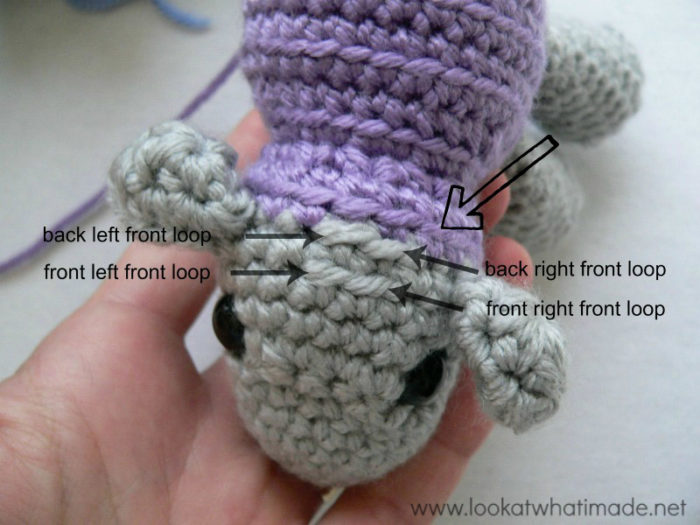
Make a curlicue. Sl st in the next CC front loop (which should be the CC front loop above the back right MC front loop). Sl st in the back right MC front loop on the forehead (back left if you are left-handed). Make a curlicue. Sl st in the front right MC front loop (front left if you are left-handed). Sl st in the front left MC front loop (front right if you are left-handed). Make a curlicue. Sl st in the same stitch. Sl st in the back left MC front loop (back right if you are left-handed). Make a curlicue. Sl st in the CC front loop directly above the last sl st. Sl st in the next CC flo.
This is the fiddliest part of making the curlicues and it is behind you now. Congratulations!
(Make a curlicue, sl st in the next 2 st’s) 4 times. The last sl st should fall in the stitch before the RSM. Make a curlicue. {14 curlicues}
Round 2
At the RSM, jump to the next round of flo’s. (Sl st in the next 2 st’s, make a curlicue) 11 times. {11 curlicues}
Round 3
At the RSM, jump to the next round of flo’s. Sl st in the first 2 flo’s, make a curlicue. Continue in the 8 flo’s in front of the front legs. (Sl st in the next 2 st’s, make a curlicue) 4 times. Continue in the flo’s on the other side of the legs. (Sl st in the next 2 st’s, make a curlicue) 10 times. {15 curlicues, 4 of which fall in front of the front legs}
Round 4
At the RSM, jump to the next round of flo’s. (Sl st in the next 2 st’s, make a curlicue) 15 times. {15 curlicues}
Round 5
At the RSM, jump to the next round of flo’s. Sl st in the first 2 st’s, make a curlicue. Sl st in the next st. Jump to the 8 flo’s in front of the back legs. Sl st in the first front loop. Make a curlicue. (Sl st in the next 2 st’s, make a curlicue) 3 times. Sl st in last front loop. Jump to the flo’s after the back legs. Sl st in the next front loop. Make a curlicue. (Sl st in the next 2 st’s, make a curlicue) 9 times. {15 curlicues, 4 of which fall in front of the back legs}
Round 6
At the RSM, jump to the next round of flo’s. (Sl st in the next 2 st’s, make a curlicue) 12 times. {12 curlicues}
Round 7
At the RSM, jump to the next round of flo’s. (Sl st in the next 2 st’s, make a curlicue) 6 times. Sl st in the same stitch (or any stitch close by). Ch 1 and bind off. Work away all your tails of yarn. {6 curlicues in Round 7}
We hope you enjoy making and playing with your little crochet sheep.
Dedri and Anette
 Our Brilliant Testers:
- Isabelle Beel
- Connie Gerbrandt
- Lesley Lord
- Beth Spaulding
- Tess McDonald
- Heather Knotek Smith
- Rosanne Van de Peppel
More Little Zoo Animals (Free Patterns)
- Meimei the Baby Elephant
- Rupert the Rhinoceros
- Napolion the Baby Lion
- Collin the Crocodile
- Zoe the Zebra

This blog post contains affiliate links. I only link to products I personally use or would use. All opinions are my own.


Dragana says
Dear Dedri, I can’t understand how in the row 2 of body you have 29 stitches and in the row 3 you have 30 stitches? Btw this sheep is so cute!! :)
Dedri Uys says
Hi. Round 3 starts with a sc inc (single crochet increase).
Christine says
Hello Dedri, I love this sheep. I have made two of them now, both times I have not ended up with the same amount of curlicues as you do, what could I be doing wrong?
Dedri Uys says
Hi Christine. Can you give me more information so that I can help you? The number of curlicues isn’t a deal-breaker, though, so if your sheep look fine, I wouldn’t worry about it. But I am happy to investigate.
Dedri
Tricia Bird says
Thanks so much for providing such a well written free pattern. I decided to try it using up some old baby yarn and a 2mm hook. Crazy as it seems and I have to make 2, one for each grandchild. I’m up to working on the curlicues. Anyone who thinks they are fiddly with worsted weight yarn, well let me tell you it’s extra fun with baby yarn! :) If you’d like to take a look at my work in progress I posted some pics through my instagram account and will certainly post the pair completed. Thanks again for all your beautiful patterns. https://www.instagram.com/p/Bgq4TXogmoa/?taken-by=ycswid https://www.instagram.com/p/BgrPYFCgVWV/?taken-by=ycswid
Dedri Uys says
Hi Tricia. Your little sheep is so cute :) I just went on your blog for a little spy and saw the photos of the lynx. Wow!
Susan says
Hi. What is meant by “short row (inside) and short row (outside) on head portion?
Thank you
Dedri Uys says
Short rows are rows that do not begin and end where rows traditionally begin and end. They help shape items three-dimensionally.
Heather says
There’s something wrong with the instructions for rows 9, 10, and 11 of the body as copied here. Following the word “six” in each line, something is missing, and I’m not sure what. The word “six” is also bolded so I’m not sure what, if anything, should be done in blo.
Thanks,
Heather
9. (Sc2tog, sc in the next 3 st’s) six RSM (24)
10. (Sc2tog, working into the blo. Sc in the blo of the next 2 st’s) six Now is a good time to stuff your little critter. RSM (18)
11. (Sc2tog, sc in the next st) six RSM (12)
Dedri Uys says
Hi Heather. Thank you for bringing that to my attention. The word ‘times’ was inadvertently removed from those sentences. They should all read ‘6 times’. This has been amended now. You might need to clear your browser cache in order to see the changes.
Have a good evening,
Dedri
Vlasta says
Hi! Thank you for all the lovely free patterns and tutorials! I recently discovered your blog and have already made Charlotte. The instructions were real clear and easy to follow.
Unfortunately I have a problem with row 13 of the head (the bridge row). I’m not sure what to do when you say to leave the remaining 2 st’s unworked. Do I skip the last 2 stitches and sc in to the first sc from the beginning? But then I have 20 stitches to work with for the row 14 and not 22. Or do I chain 2?
I’m more of a beginner and I’m trying to learn new things so any help would be greatly appreciated :)
Dedri Uys says
Hi and thank you for your question. The bridge round stops 2 stitches earlier than it should so that the remaining rounds could be more easily written. Otherwise the instructions for attaching the legs would have been split over 2 rounds each, instead of only 1 round. So as far as crocheting into each stitch, nothing changes. We are just moving the start of the rounds by 2 stitches.
After you have made all the stitches for Round 13, move your running stitch marker to this point (so 2 stitches in front of where it used to be) and start with Round 14 in the very next stitch. The first 2 st of round 14 will now fall in those 2 unworked stitches. I hope that makes sense.
Bianca says
I love this sheep! I made 2. One for my 5 year old son and one for my 4 year old daughter. I am pretty sure holding the sheep Mommy made, while counting sheep to fall asleep has helped them fall asleep faster and stay in their own beds longer at night :). Thank you for sharing this pattern!
Jenny says
Aw that is so lovely to hear! Sleepy sheep! :)
Dedri Uys says
That is so sweet, Bianca. I am pleased you love the sheep. Anette’s creative mind gets an A+ for this one :)
Sue Hillard says
Oh just love this sheep made in pink thank you now I want too make more animals. Have a Granddaughter who will love them as well…. X
Jenny says
We would love to see pics of your Shorn :)
Joan says
I made this pattern and just loved it. I too found the curls a little hard on the hands but just too cute to quit. I made this for my granddaughter who is 20 months old and she loves to cuddle it. My grandson who is almost 7 wants one too.
Dedri Uys says
The curls are murder! But so worth it :) Anette is a genius at designing. I love that your 7-year-old grandson wants one too :)
Karen says
Really cute! Thanks!
Molly says
Hi, I just finished making the head of my sheep and noticed that all of my back loop stitches are on the wrong side. I double checked my stitches but I’m not sure. Am I crocheting in the loop closest to me or farthest away? I chose the one farthest away, which puts the ridge on the inside.
Dedri Uys says
Molly, if you are crocheting into the loop farthest away from you, which is the back loop, your remaining loops (front loops)should be on the outside of the head. Tell me this: when you crochet, do you crochet around the outside of the head, or the inside. In other words, when you hold the head with the “hole” facing you…do the stitches around the hole go clockwise or anti-clockwise? If they go anti-clockwise it will indicate that you are working with the right side of your work facing inside, not outside like it should, and you will need to turn your work inside-out and continue.
Chyrl says
I can not get this pattern to print. Any ideas? The print friendly button doesn’t seem to be working.
Dedri Uys says
Hi Chyrl, I just tried it and it worked for me… Can you tell me more about the problem you are having and I can try and help you more effectively?
Miriam says
Just finished your dinosaur puzzle ball. Hard to make, but great result.
Can’t wait to start this cute little sheep, I love it!
Nancy says
So CUTE! Thank you :-)
Carrie says
Awww, WHAT a cute-y pie! :D Maybe I’ll try to whip him up before Christmas! Or maybe I’m just making more work for myself ;) Ah, Shorn is worth it, right? :D
Keren says
So So Cute. The minute I’m having some spare time I working on this adorable sheep. Hope it’s not too hard I am a bit out of practice. Thanks !
Dedri Uys says
Not hard…just fiddly :)